Make Your Own Bullion

With the growing list of food ingredients that people become sensitive to, it’s easy for families to kind of go numb reading ingredient lists. Not only is it difficult to read the chemical name of some of the ingredients (let alone answer the questions, “Why is this in here?”), but some families are now asking, “What isn’t listed?”

For example, natural flavoring is listed as a single ingredient but can actually incorporate up to 200 different ingredients. It’s a shady practice, because it could be something as simple as a proprietary blend of herbs. Although it’s more likely the summation of chemicals used for extractions of certain elements for flavoring. But how is a family to know what chemicals or processes were used and make the educated decision if this is something that is harming the health of a loved one?

So whether you’re looking to cut some corners in your grocery budget, trying to eliminate ingredients in your diet, or simply wanting to eat more simply (knowing exactly what you’re cooking with, able to say the ingredients, and other reasons) you can make basic kitchen ingredients from scratch. Bullion is one of those ingredients that you can make in advance and have it in your pantry waiting for you to use!

Advertisements

First Make Your Stock

I’m going to move forward here with making chicken stock and turning it into chicken bouillon. However you can do this by making your own beef stock or vegetable stock. (And I just want to say that when you make your own vegetable stock, it actually has more flavor and tastes a thousand times better than what you will buy in your local grocery store!)

There are also a few different ways that you can cook your stock. You can make stock on stovetop, in a slow cooker in your oven, in a crock pot, or a pressure cooker. The only difference is going to be the amount of time you commit to. With the exception of the pressure cooker, you will want to cook low and slow to release all the nutritional benefits of your ingredients. A lot of influencers, bloggers and You Tubers will encourage you to make a stock in a short amount of time. Of course it is possible, but I want to encourage you to take the time and cook your stock ingredients out.

If you’re making a bone broth, cook it so that you extract the marrow from the bones. If you’re cooking vegetables, don’t assume that because you’re not extracting marrow that you can get by with less time. Check out my post A Touch Bitter? where I specifically talk about vegetable stock.

You know that you have a good and flavorful stock when it has rich and dark colors. The color comes from all the nutrients that you cook out from your original ingredients.

Advertisements

My Chicken Stock

I’m going to be honest with you here, daddy taught me how to cook by following a recipe. But I inherited a wild cooking hair from mom, where we improvise. I cook by smell, then by flavor, all over what a recipe says. I’m working hard to make notes on my recipes to find a strong base that is pretty average for how my recipes go. Just know that when I have chicken bones to use, I literally use the ingredients that I have on hand. And just like your kitchen, there are ingredients that I run out of. I don’t go to the store for missing ingredients. I run with what I have.

Here’s what I have standard in my kitchen:

  • onion skins (kept in a vegetable food scrap bag in the freezer)
  • garlic skins (vegetable food scrap bag)
  • stems of herbs that dehydrate to make my own dried herbs (vegetable food scrap bag)
  • dehydrated herbs from my garden (oregano, basil, lemon balm, sage, parsley, chives and others)
  • dehydrated herbs that I have yet to successfully produce in my garden (ginger, tumeric and others)

General Recipe

In my 8 quart instant pot I add:

  • the bones of one whole chicken fryer
  • if the chicken came with gizzards, I cook the gizzards here in my stock.
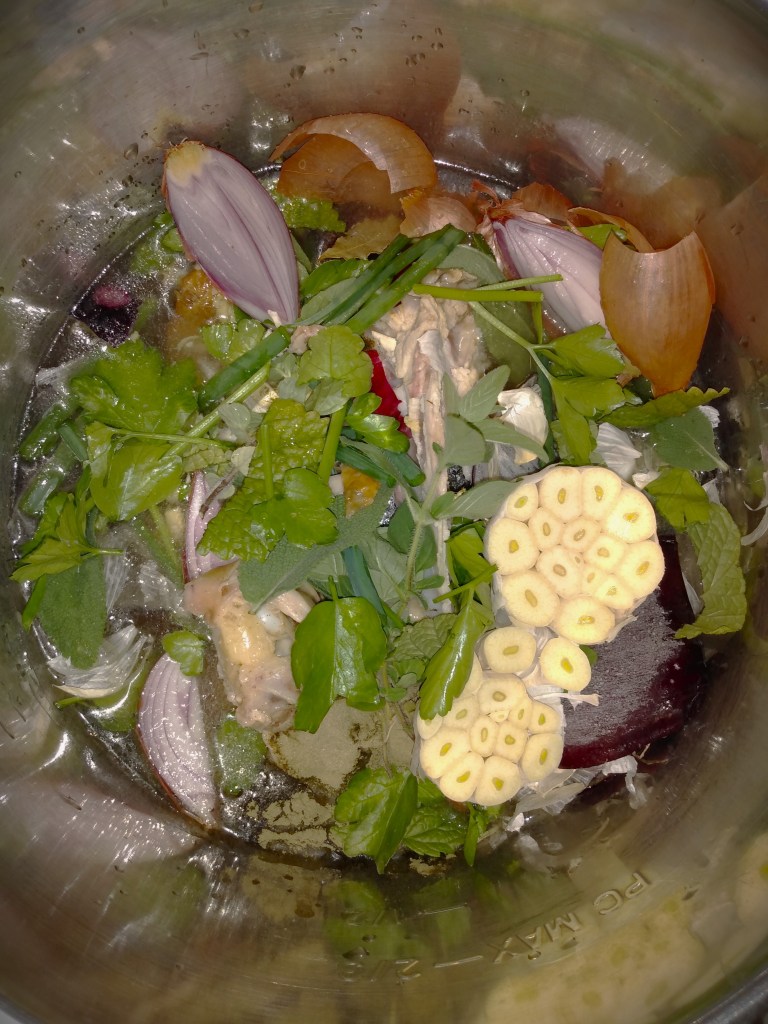
  • the vegetable food scraps from my freezer (ideally I aim for the skins of about 4 onions, the skins of 2-4 garlic heads, half a bunch of leafy herbs)
  • herbs from my seasoning shelves (including salt and pepper)
  • filtered water that fills my pot up to it’s Max line.

The herbs are generally where I run out of supply and have to improvise. If I have everything the herbs that I like to add are:

  • Ginger
  • Bay leaves
  • Lemon balm (fresh will give you more of a lemon flavor, dehydrated will have more of a green tea lemon flavor, use according to which type you’re using. I like going heavier on the fresh lemon balm)
  • Rosemary
  • Oregano

These herbs I go heavy on. If I’m out of any of these, I improvise using other herbs. Sage I use sparingly because it’s such a potent herb. Cilantro I use sparingly because I have family members who dislike the flavor of this herb. So I keep this one low in quantity to still get the nutritional value, but the flavor is not prominent at all. Fresh cracked pepper I use in varying levels depending on what my stock is currently at. Salt, I try to remember to add, but half the time I forget. Because the flavor of salt is not extracted, like herbs, I have no problem seasoning with salt once my pressure cooking is done.

I set my instant pot to pressure cooking, on high, for 3 hours. (No matter which stock type I’m making, I don’t ever go less than 3 hours.) This is what gives you full extraction.

Making Bullion

Once your broth has finished processing, you strain out all the ingredients. With a vegetable stock, I go ahead and compost the vegetable bits that I strain out. With bone stock I strain out all the bones and vegetables and they are thrown out.

If you’re making vegetable bullion, you can cool your stock down to room temperature and then move forward with the next step. If you make a bone broth (chick, beef, venison, goat, sheep, etc.) you will need to cool your broth off over night in your refrigerator. The exception is if you have a fat skimmer that can separate the fat out from hot broth. I do not. So I refrigerate my stock over night.

Once the fat layer has formed on your chilled broth, you skim the fat off of the broth.

You have to skim off of the fat, because when you make bullion you want to have a long shelf life. Fat is the limiting factor in shelf stable food. It will go rancid before anything else goes bad. So by removing the fat, you ensure that you have a long shelf life for your bullion.

When my chicken broth is been skimmed from fat, I grab my jelly roll trays for my dehydrator and set my dehydrator up where it’s going to process the broth. The reason why I set my dehydrator up in location and fill the jelly roll trays on the stacked racks is because the broth is going to run to lowest point. There is not going to be an even layer of broth. So I fill in place and pour the stock until I reach the lip at one point on my tray. This will maximize the amount of broth I can process at a single time.

Dehydrating liquid hack: before placing your liquid on the jelly roll trays put it in a sauce pan and reduce the stock. By evaporating the liquid down, you will cut down on your dehydrating time and save space in your dehydrator.

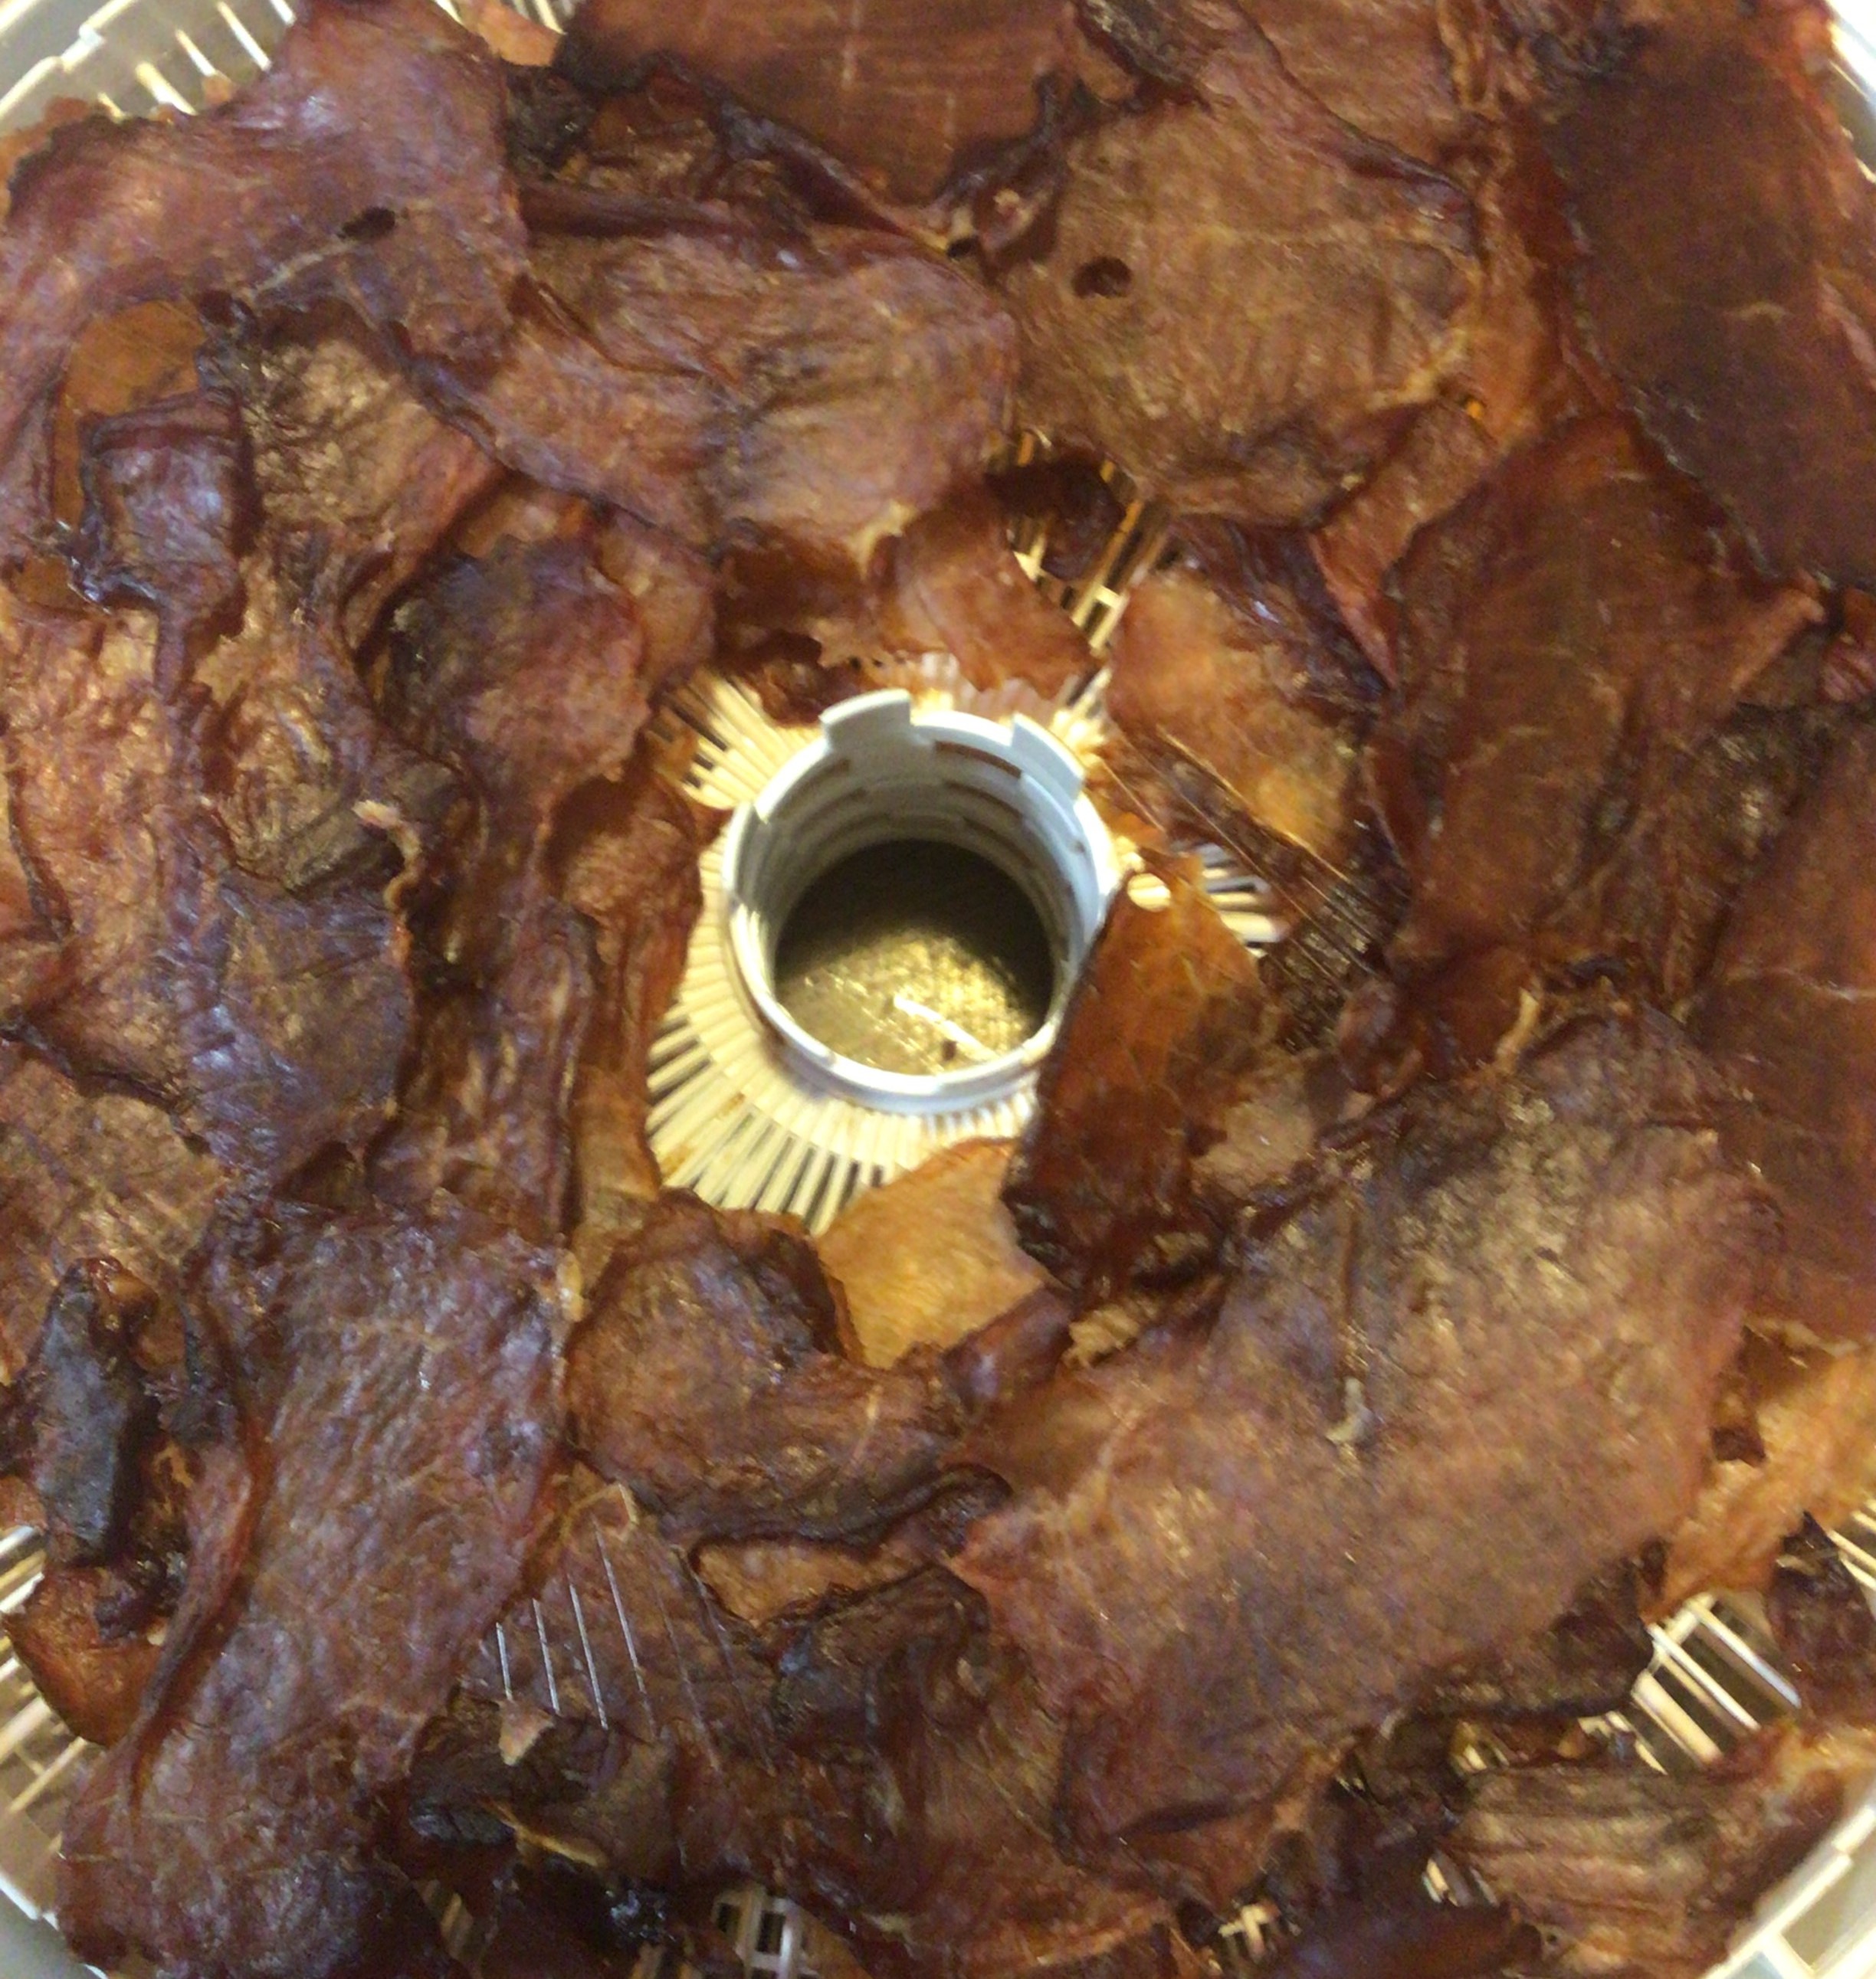
I run my dehydration temperature at 140-145°F until the broth is crispy like this. Dehydration time is going to vary depending on if you reduced your broth first, the temperature you dehydrate out, and most importantly the thickness of where your broth pools. The thicker sections will be gummy to touch until it’s properly dehydrated. The thinner bits you can leave as is. Or when you check on your progress, you can used a silicone spatula to push the thinner bits in closer to the thicker bits (this makes it easier to remove the thinner sections when you’re finished dehydrating).

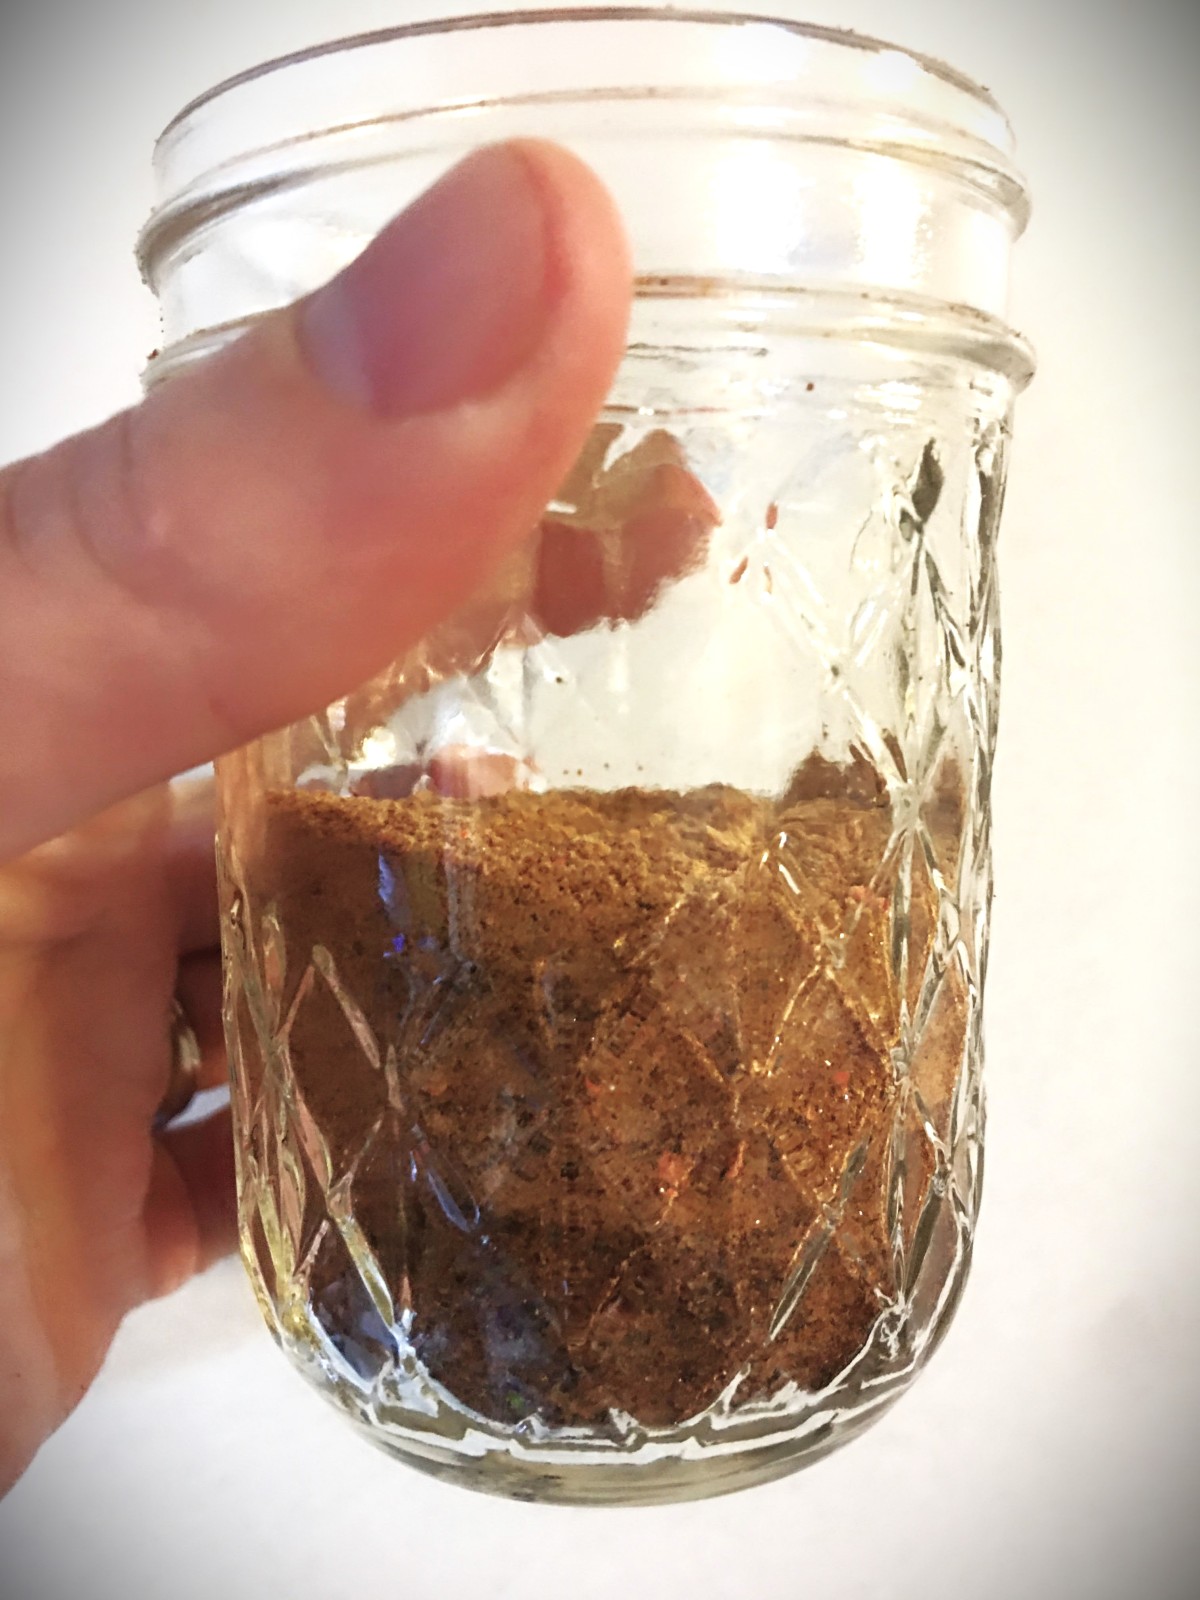
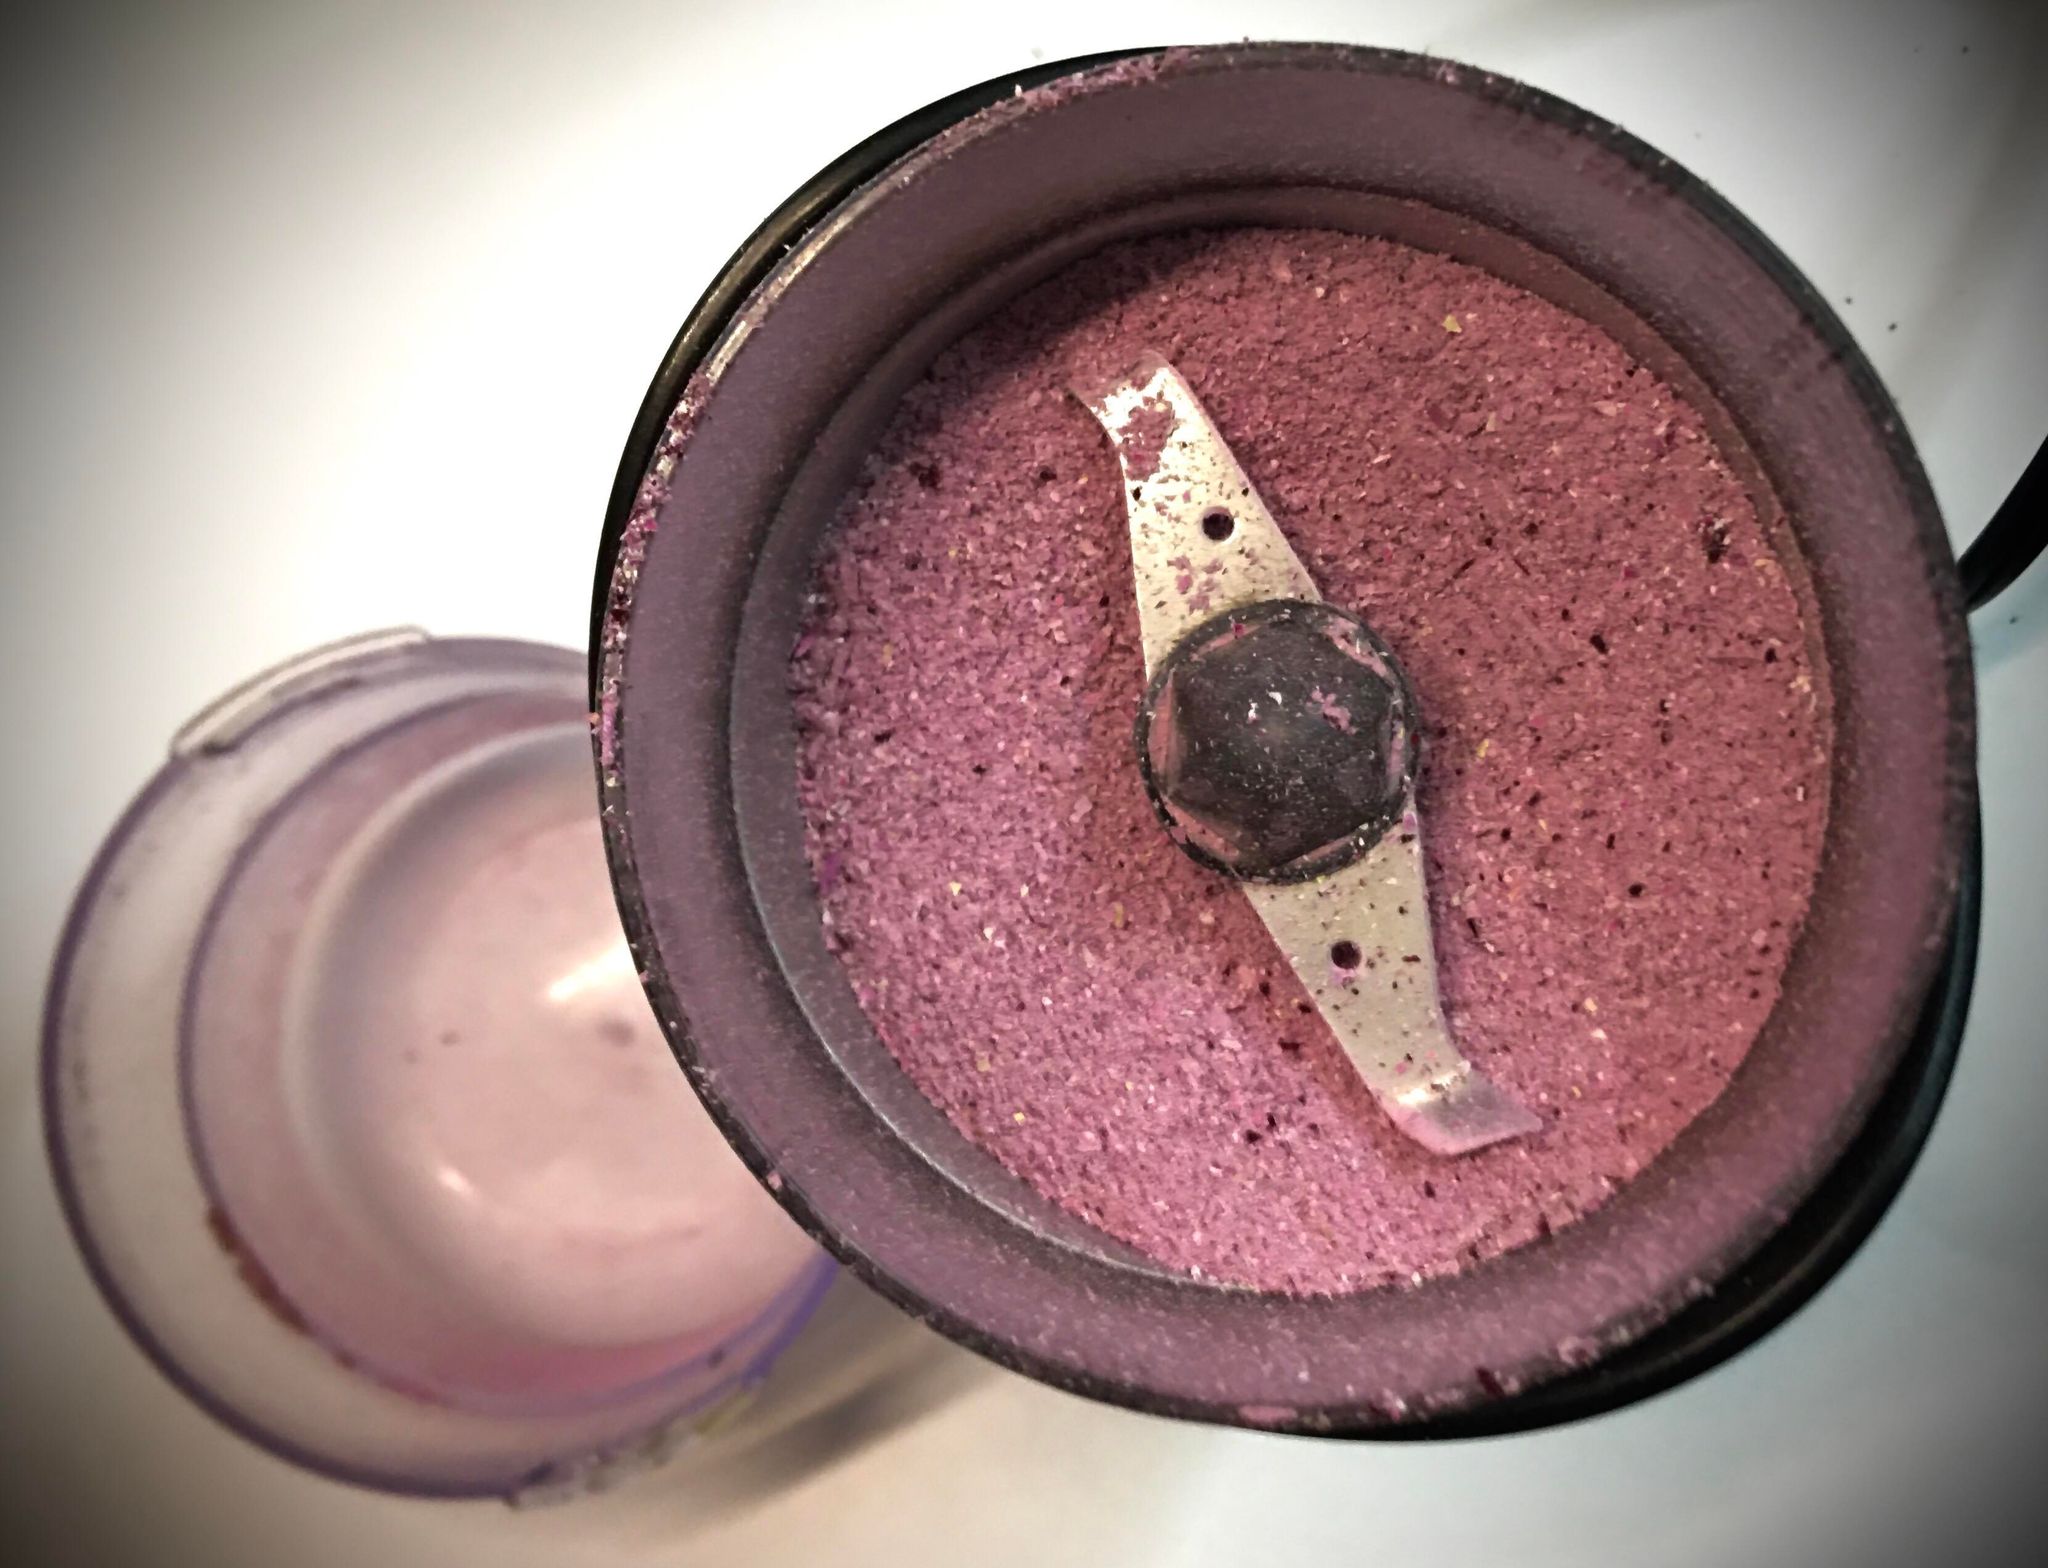
In the center of my jelly roll try, you’ll see that I put my coffee/herb grinder in the center. It makes it easy to brush the chunks and bullion dust into the grinder. When the container reaches its limit I remove the tray, cap the grinder and run it for about 10 seconds. Just long enough for the broth to turn into a powder. The bullion powder I put directly into my mason jar that I’m going to store it in.

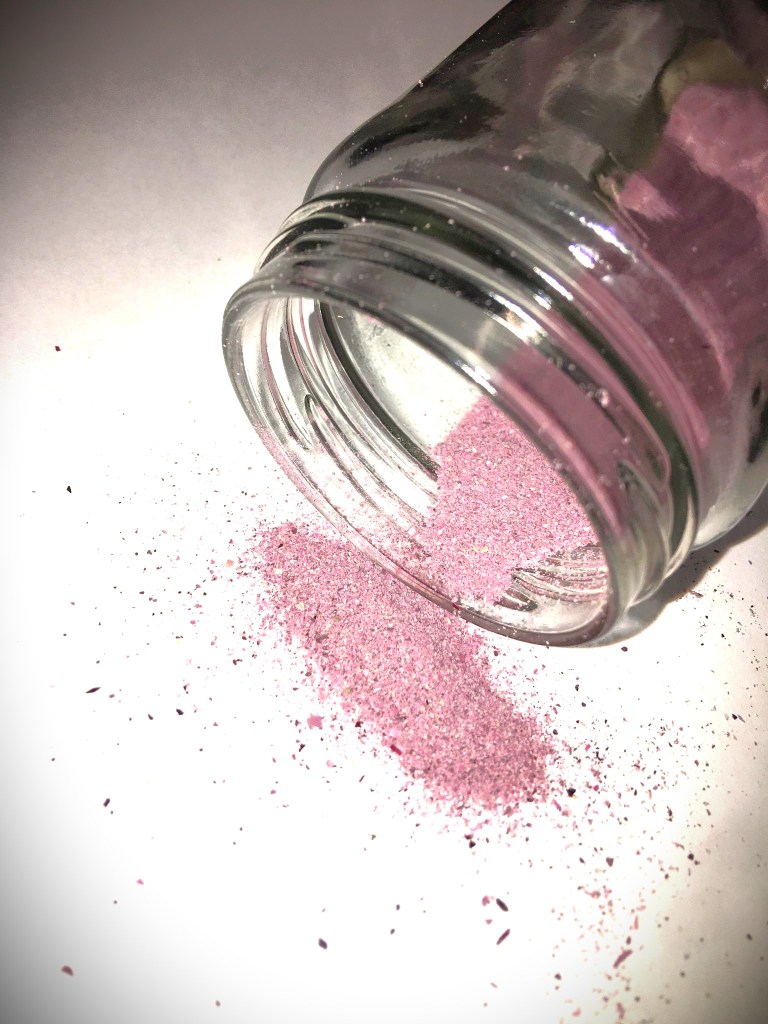
Just so you won’t be alarmed, what you see in this 1/2 pint size jar is what my 8 quart size instant pot produces. My first time making my own bullion, I was disappointed that it didn’t make more. But that disappointment disappeared when I tasted the bullion. You will not be disappointed with the intense flavor!

This is perfectly save to keep in your pantry or in your spice cupboard.

Personally I have a tiny kitchen, so I keep my bullion on the top shelf of my fridge. The bullion usually doesn’t last my family a year. Although there was a time where I needed to free up some jars and use my canned chicken stock, so I had one batch of bullion powder in my fridge for about 2 years. It was still fresh and flavorful when I went back to finish this bullion off.

Comment below and tell me how you like this space saving flavorful bullion.

How does it compare to what you’ve previous bought from the store?


This post contains affiliate links to products. We may receive a commissions on products purchased through these links, but at no extra cost to you. These items listed here are from Amazon but may be purchased at local markets.

If you don’t have a current dehydrator and are looking for one, I have been very pleased with this dehydrator. This was an upgrade from my very first dehydrator, but still on a budget. If you’re in a tight financial place, with today’s economy, this is the one that I highly recommend. Not only was it a great price, but it also included jelly roll trays for each rack (something that can’t be said with other budget units)

Herb Grinder Elictric has been great for keeping all the ground herbs/boullion contained in the grinding bowl.

Processing…
Success! You're on the list.

Leave a comment

Advertisements
Advertisements
Advertisements
Advertisements

Cake Dreams

One of the memories that we are so quick to build are children’s birthday parties. So how do we make memories that last?

Make a cake!

I can’t begin to tell you all the cakes that I remember through the years. There’s the Holly Hobby cake my mom made from me (a popular baby doll from the 70’s). There was the cake that got locked in the trunk on my sister’s birthday. The cakes my sister’s and I made for our parents because finances were tight but the box cake was a big way we could show they mattered. The cake my husband made for me with marshmallow frosting. The cakes I made for my kids.

The list goes on and on….

I could tell a life story just off of the cakes I’ve made through the years.

And I want you to know that you can make cakes that make memories without going to culinary school and gaining the education of a baker!

You can make cakes!

You can make memories!

Photo by cottonbro studio on Pexels.com

Even though I have cake recipe books which put a world of recipes from scratch, I’m going to show you how you can make a memorable cake using a box cake–which is in everyone’s price range. And in this age of inflation, when you can still find boxes of cake mix for a dollar, I want that to be available to you.

Box cake mixes are great. The directions are easy enough for my kids to follow and make on their own. (In fact I just made a cake for a local mom and my boys wanted to help because they love baking cakes with me. They had to skip out on this one, but I had to promise that they could make their dad’s cake all on their own without me!)

TIP: you can test the doneness of you cake sponge by poking the cake with a toothpick in the center. When you pull the tooth pick out, and it’s dry, your cake is done. You want no moisture or batter on the tooth pick. Although you might see cooked crumb–that is still done.

Or….

TIP 2: When your timer goes off take a temperature reading in the center of your cake. When you reach an internal temperature of 200°F, your cake is done.

This particular tip is invaluable. If you’ve watched baking competitions you see people testing cakes by poking it like a chef pokes a steak. The amount of resistance tells you the internal state of being done.

The average person doesn’t know what a done cake feels like. We can easily
learn the feel of an under done cake and an overly done (and dry) cake. I’m
going to save you the head ache and just tell you that you only need to reach
200°F and your cake will be perfectly done no matter what. This works for all
elevations. AND it gives you a more accurate unit of measurement to direct you
in how much longer to cook your cake when it’s under 200°F.

Now that you know you do not have an undercooked cake, you’re halfway done.

Some people find the cake (or sponge) cooking the most intimidating. Others find the frosting to be intimidating. But frosting a cake doesn’t have to be intimidating either, because I’m going to show you a trick that I used with the Pinterest inspiration picture that was given to me for the cake I made the other day.

My go to frosting is formulated by Wilton. I’ve successfully modified this recipe to make it flavored. But this recipe gives you three different consistencies. I used two of these for the following Unicorn Cake that I recreated, stiff and medium. I used the medium for the filling between two layers and doe the exterior frosting. The stiff consistency I used for the decorative elements.

When it comes to coloring your frosting, the stores give you the choice of the liquid food dye or gel. The gel will give you vibrant colors for less.

TIP: If you’re a family that is conscientious about food dyes, you can still color your frosting. What you’re going to do is plan in advance and dehydrate the fruit, vegetable, or edible flower for the colors you want. Don’t worry about the vegetables. The Wilton frosting is sweet and can overpower the vegetable flavor, if that is a concern for you.

As a point of reference, it took me about half a pound of strawberries (sliced, dehydrated, than powdered) to turn a single batch of Wilton frosting pink and mild strawberry flavor. I had the pink color to the frosting long before the strawberry flavoring that was requested by the birthday girl.

TIP: When you use a fruit with high water content, you definitely want to turn it into a powder in order to prevent your frosting from becoming watered down.

Frosting the cake is going to look a little differently depending on what kitchen tools you have available. If you can pipe the frosting onto the cake before you spread the frosting, you will be able to do a thin layer of frosting without getting crumbs of cake into your frosting.

Don’t have piping tools (pastry bag, coupler, and decorative tips), that’s okay. The trick is to take your butter knife (if that’s all you have), put dollops of frosting onto your cake, and then spread the frosting around using the flat of your knife.

The number one cause of crumbs in your frosting is your knife hitting the cake’s sponge. If you just move the frosting around, with your knife only touching your frosting, you should eliminate all crumbs.

If you still find you have crumbs, the other reason is that your frosting is too thick. This is particularly a problem with cakes that are light and fluffy. Not a problem!

If your frosting doesn’t spread easily, stop. Remove the frosting and put it back in the bowl. Add a teaspoon of water (or less) and mix it into your frosting to loosen it up. Test the consistency by trying to spread your frosting on your cake. It shouldn’t grip your cake like Velcro, but smoothly spread like mashed potatoes. Once you can easily spread your frosting, make that cake beautiful!

Want to make decorative elements, like an inspiration picture, but don’t feel confident in your piping skills? You will want this trick.

Don’t worry. You can use this trick even if you’re only comfortable using the tubes of colored frosting!

Print out your inspiration picture (with the elements blown up to the size you want them on the cake). If you have face details you want to recreate, make a copy for the body, and a second copy for the face. (The same is true for detailed that are stacked but not faces.)

For example, here’s the inspiration that I was working with.

The original creator had freehanded the design of this cake. I’m fortunate if I can draw a horse head on paper with a pencil, so I needed this trick.

I do have skills in Inkscape where I took the picture and traced the elements and made my own stencils. After I printed out the stencils I put them on top of a metal cooking sheet. To keep them in place, I used a loop of tape. Then on top of the stencils I taped down a sheet of waxed paper.

Once my different colors of frosting were put in piping bags, I started tracing the stencil lines with the planned out colors.

In the instance with the unicorn head, I made the outline, then filled (flooded) the inside with frosting, smoothing everything out with a knife to make it look like a solid piece.

When all my decorative elements were piped out, I put the cooking sheet in the freezer.

You’ll want to plan this one ahead of time. The frosting will take time to freeze. Even with the stiff frosting, you will want this to be in the freezer for at least over night.

When the frosting is frozen, you can transfer the elements from the waxed paper to the cake.

A memorable cake doesn’t have to cost a fortune. In fact, making a cake shows the person that you love them. And it doesn’t have to be perfect.

My favorite cake my husband made was the marshmallow frosting cake. And I guarantee that none of us will make that frosting again. It was not user friendly because it was a pouring frosting instead of a classic spreadable one.

This isn’t the marshmallow frosting cake. But it is the one my boys made on their own, for me.

The most memorable cake I made was my son’s bubble cake. He wanted a bubble cake so I made a tall multi layer cake in the shape of a bottle of bubbles. That sponge would not keep shape. It wanted to disintegrate on me and there was not enough support I could put in to make it stay. Let’s just say I’m glad I made it a fondant cake, because that fondant was the only thing keeping it together. I was in tears. But my son was dancing with happiness over having a bubble cake.

I tell you these stories so that you know that sometimes the best memories come from the imperfections in our cakes. After all, my favorite childhood cake, the Holly Hobby one I mentioned at the beginning, wasn’t all perfection. I look at the pictures from that birthday and only see love. My mom looks at those pictures and sees the cramping in her hands because of all the piping that cake took. She finished that cake with tears of pain. But it meant the world to me.

So don’t be afraid to make that cake for your loved one!

It may turn out to be an imperfect but testament of love that lasts through the ages. Or it may be the cake that blows your mind because you never thought you could do it, but you did! No matter the outcome, it is always worth it to make that cake!

Super hero birthday

Navy Retirement Cake. Inspiration cake and my cake with the medalion that was placed against the center wave in the flag.

Bridal shower cupcake cake.

More Than Arm Candy

I have to love my husband who loves to give practical gifts. Usually he stays away from gifting flowers because they last for a few days before they’re composted. However, there are so many uses for not just roses but other flowers as well. While I’m going to be talking about roses here, there are so many other flowers that can be used in the exact same way!

For those who are unaware, roses are edible. (Before you do eat rose petals, make sure that they haven’t been sprayed with chemicals, pesticides, insecticides, or anything else that is harmful to you.) Roses contain vitamins A & C, Niacin, Potassium, Iron, Calcium, and Phosphorus. Some places where you’ll find fresh petals are on a dessert/cake or in beverages such as teas.

Advertisements

It’s not just the petals that are usable to our bodies. Rose hips (the bulb at the bottom of bud, harvested at the end of the rose season from the rose bush) is used in the beauty industry and baby products for the benefits it has to the skin.

The benefits to the skin is the primary reason why I decided from this last bouquet of roses that was given to me that I was going to use the petals for my next batch of soap.

I started making soap because I’m not okay with all the chemicals that are being used in soaps in the commercial market. Other than using soap dyes (which I’ve had my tub and skin discolored from bath bombs and other products) the mission I’m on is finding natural dyes to color my soap. For pink soap, I’ve seen soap makers use dyes or French clay.

Now Calendula is a well known floral natural food grade colorant. For red/pink colorant, Beets can be used in food. But anyone who’s worked with beets knows that your skin and clothes can be discolored. So I wanted to find a different red/pink colorant for my soap that I can grow in my garden. So I came to roses.

Advertisements

How to Process Roses

There’s two easy ways of doing this.

The first is to hang the roses upside down to slowly dry them out. The benefit of this method is that all the vitamins and natural compounds that our bodies benefit from are at a higher concentration when they are dried at a low temperature and slowly.

Ideally, the most benefit would come from using the petals fresh. And while it is possible to use fresh ingredients in soap making (I make orange colored soap using pumpkin puree), there’s no way of breaking down the petals for a smooth and consistent colorant unless you want to use a blender and puree it with the water content of your soap. While it’s not a bad idea, unless you grow roses year round (which I don’t) you have a limited supply due to the window of fresh flowers available. (This is the reason why dried petals are best for me.)

This drying method is slow and takes time. Also any white component will yellow as it dries out. This can affect your over all final color depending on which rose you use. With the red rose, not so much. But the other two, the tinge will be noticible.

So there’s the second method, using a dehydrator.

The benefit from using a dehydrator is that petals are finished drying in about 24 hours (at 90°F, the lowest setting on my dehydrator) and their colors are only affected by growing darker.

As you can see here, the white component on the pink flowers have not discolored too much. This is great because when I turn these petals to powders, I’ll retain a pink like quality.

Before I move on to finishing these petals, I want to mention that if you want to make a natural confetti for cake decorations or throwing for a party/wedding celebration, all that you need to do is crush your dried petals by hand and store them in an air tight container (like a lidded glass jar) to prevent them from rehydrating due to humidity in the air.

As you can guess, with the fact that there were lavender inner petals on the second rose (the one with the variegated pink and white outer flowers), this is the reason why I blended in the red petals with the pink ones, to keep the pink and stop the transitiontoward purple (although I’m not opposed to purple soap.)

To make Rose Powder, all you need to do is put the crushed petals into a coffee or herb grinder and run it until you get the consistency that you are looking for. Because I’m looking to make a colorant for my soap and don’t want to have flower chunks in it, I took the powder down to a very fine grind.

The fun part about Rose Powder is that you’re not limited to use it as a natural dye or colorant. You could dust this on the icing of a confectionary dessert. If you want to make pink pasta, use this powder as part of your dry ingredients. Mix the powder with a sugar or salt and you have a pink sugar or salt rim to your favorite beverage.

No matter what celebration you have coming up, keep this idea in mind. If you want to dress put your Easter cup you can make a sugar rim using all sorts of different colored edible flowers. Calendula gives you yellow/orange, Violets blue/purple, Hibiscus yellow/orange/pink/blue/purple, there are so many other flowers. If you want to see a quick list of different edible flowers, here’s a jumping of point here.


What unique way do you use flowers?

Processing…
Success! You're on the list.

Leave a comment

Advertisements
Advertisements

Embracing Dry Meat

There are just certain cuts of meat that no matter how attentive you are, they just dry out. Instead of stressing out for a dry dinner, I’ve decided to embracethe dry and put it work for me. You’ve had the roast, chicken, and pork loin that just dry out no matter what. I know that I certainly have. And when we were able to get some pork loin for $0.99 a pound, we made the sale and I decided to make jerky!

I decided to try 2 different ways of seasoning, and 4 different flavorings. One was a wet rub (with minimal liquid) and the rest were marinades.

For the wet rub, this is the recipe that I used. It isn’t mine and even after searching through my devices and searching online, I can’t seem to find the post again. So if this is your recipe, please let me know so I can properly give you credit!

The benefit of a wet rub is that you have just enough liquid incorporate your seasoning into your meat without the need to drain off excess liquid. You can pull the meat straight from the bag and place on your dehydrating trays. But you will notice that the marinades absolutely need to properly drain or you will have to clean the bottom of your dehydrator. This wet rub didn’t need to be drained because the salt content didn’t have enough time to extract the water content from the jerky, like you see through the processing of bacon.

  • 1 Tbsp Worcestershire Sauce
  • 1 tsp. Salt
  • 1/2 tsp. Pepper
  • 1/2 tsp. Ginger
  • 1/2 tsp. Onion Powder
  • 1/4 tsp. Garlic
  • 2 tsp. Brown Sugar

This recipe calls for a rest period of 15 minutes before laying the meat out on the dehydrator racks. I processed at 160°F, even though some people say they process at 145°F. The thinness of the cut (I aimed for paper thin although there were a few pieces that were a bit thicker) I made allowed me to have crispy jerky strips at 5 hours. The thicker bits took another hour.

Advertisements

And let’s face it, I’m a busy mom and I usually don’t get around to process projects like this until the evening (usually while I’ve got the dinner cooking and I have a few minutes to do another task). The shorter processing time is most definitely my best choice.

For the marinades I chose from the Asian cuisine just because they are all great for an all round punch of flavor and generally well seasoned. From a local Vietnamese grocery store I had purchased a Honey Garlic Marinade and Korean BBQ sauce. From a local restaurant supply store I used Mr. Yoshida’s Original Gourmet sauce. (Mr. Yoshida’s is the sauce that I freezer marinade chicken and pork in for a quick pull out of the freezer “teriyaki” dinner where I don’t have to plan a marinating time.)

For marinating, I used the bowl and zipper bags. Obviously the bowl is the better option. However, in the middle of trying to get Christmas presents created and made, let’s just say I forgot two marinades for two days and am very glad that I used the zipper bags. My fridge space is at a premium right now and they were easier to store than a bulky bowl.

And as a side note, I highly recommend a longer marinade time than the recommended 15 minutes that I used for the wet rub and the Honey Garlic Marinade. Obviously the two day marinade imparted much more flavor into the jerky. 15 minutes on a marinade gives you only a hint of the flavor. However for a wet rub 15 minutes is most definitely all you need and you still get more flavor than the marinades.

Prepping the Jerky

You are going to run into a world of difference of opinion when it comes to jerky thickness. Some love the thin. Others prefer the thick cut. Then there are the people who love jerky that snaps and is crunchy. And others who want more of a soft chewy bite.

I really can’t tell you how you should cut your meat in prepping your jerky. Just know this. If you want the chewy bites of meat, you will want to cut the meat thick. If you want crunch and texture, you want to go with a paper thin cut (think Pho or Fondue, where slices of raw meat are added to the broth and cooked by the soup almost instantly).

Advertisements

The thickness of your meat is going to drastically determine your dehydrating time. So even if a recipe tells you that the time is x hours, in reality that is when you’re going to check the jerky. Chances are very good that you will need to add a few or several more hours depending on just how thickly you cut your meat.

The absolute cardinal rule of making jerky is that you have to remove as much fat as you can from your meat. Fat is the limiting factor for how long of a shelf life you can keep your meat before it turns rancid and is spoiled. Small thread like seams of fat is not going to be an issue because the heat of the dehydrator will usually render that fat out, especially on the super thin cuts of meat. If you prefer the thick cuts of jerky do not count on any rendering to take place at all. The fat that goes in will still be on the jerky when it comes out.

TIP: If you cut your meat against the grain you will have tender jerky that you don’t have to work and pull to take your bite. It’s the difference between have crispy jerky and looking like you’re a pup working on a raw hide.

Looking at the above pictures (of raw meat), you will notice that there was still fat on my slices. But here (below) you will notice that they rendered out.

In fact, what you see in these pictures is four trays worth of jerky that I piled up before packaging up. On the left is the Korean BBQ. And the right is the Mr. Yoshida’s marinade.

When dehydrating jerky make sure that the meat is laid out flat (not folded over into layers) and isn’t touching it’s neighboring piece of meat. If the meat over laps the jerky is going to stick together. It’s not too much of a problem with the very thin slices. But the thick slices, the meat will still be raw even after several hours of dehydrating.

Sealing it up for storage

The great thing about making jerky is that it does not require fridge or freezer space. If you have air tight containers, chances are that you will probably eat the jerky you made before it goes bad. (This is especially true if you were diligent in cutting off as much fat as possible.)

There are many great products out there. There are vacuum glass or plastic containers. You can vacuum seal in mason jars using a vacuum sealing lid attachment.

One word of caution on this one. There new canning lids have greatly reduced the amount of rubber used on their gaskets. Everything I vacuum sealed with these new seals has completely failed from about 1 month up to 4 months. So please be aware of the lids that you use for vacuum sealing. While these new lids have remained true for water bath and pressure canning, they have been a complete failure for vacuum sealing my dry goods. If you wish to vacuum seal in your mason jars, I highly recommend that you switch to a reusable gasket and lid set like the ones made by Tattler. The more cushion created by a thicker gasket you have, the greater the longevity of your vacuum seal is going to have in remaining in contact with your jar.

Advertisements

The method that I used for these roughly 15 pounds of pork loin (actual jerky weight is less because weight of water content was removed) was sealing in mylar bags.

Mylar bags can be used with a vacuum sealing system. However I don’t want to discourage you if you are on a budget. The truth is that I haven’t found a vacuum sealing system that I’m in love with. Even sous vide vacuum sealing systems have failed me and I’ve gotten rid of them. What I’m about to show you, I’m not happy with for long term storage. However I am very pleased with the results for at least a year’s shelf stable storage condition.

Below, I’ll leave a link to this model of a mylar sealer. It is not vacuum sealing, but it is economical for the families on a budget.

Once you place your jerky in the mylar bag, place an oxygen absorber. (Oxygen is the enemy of food preservation.) An oxygen absorber is all that you need in a bag like this. The bags, before sealing are open at the very top. Once I have the meat and oxygen absorber inside, I hand press the excess air out of the bag and use the zip lock to close it off.

By removing as much air as possible, it creates less work for your oxygen absorber. And in that process, there’s more absorbing properties available should you fail to seal the bag properly and a little air leaks in.

Advertisements

Oxygen absorbers are soft when they have the capacity to absorb more oxygen. When they are no longer functional, they become hard.

With the zip lock closed, I then place the bag in the sealing device. (Pay attention to the notched tabs that make opening the bag easier. You want to seal on the far side of that notch or else that feature will not open the bag for you when you’re ready to open your jerky.) This particular sealer works when you press the lever down on top of the mylar bag. There is a light that turns on when it is sealing and turns off when it’s finished. The maker recommends leaving the pressure on for an additional few seconds to make sure the seal occurs. And I highly recommend this step of patience. While this machine is economical, it’s not fool proof. I have better sealing than the sous vide machines I’ve previously used, but it still has its margin of errors.

One thing to look out for when sealing mylar bags are wrinkles in the seal.

As you can see here, the top part of the bag has a smooth seal. The bottom part, closest to the camera, has wrinkles. These wrinkles are where you seal can fail and put your oxygen absorber to work. If you see this, seal the bag again and manually check to see the condition of the seal. There have been a couple of times where I sealed the bag, but the seal absolutely failed and when I checked to see if the top was sealed, it popped right open as if I hadn’t sealed at all. No matter what, always check that seal!

Absorbers

There are two types of absorbers; oxygen and moisture. My jerky is so dry and snaps that I pass on the moisture absorber. If you are making a thicker jerky with more chew, you will most definitely want to add a moisture absorber into your bag with the oxygen absorber. After all moisture is that creates the environment for mold to set in on food. And we don’t want that.

And just because you’ve not had rain for a while does not mean that you are clear to skip the moisture absorber.

This past summer we were a couple months with zero rain and yet we had humidity levels in the 90% and higher range. This is completely unusual for the Pacific Northwest and frustrated me to no end. I was dehydrating my vegetables to turn them into powders for seasoning. I would shut my dehydrator off at night, when I went to bed, and in the morning my dried vegetables were moist and flaccid again. I was so frustrated!

The point of that story is that even though you don’t have rain falling doesn’t mean that you’re free of moisture.

Advertisements

With these rounds of making jerky I packaged them the same day, after they cooled down. I was not going to chance moisture being in my bags and ruining my jerky. (It also helps that my humidity levels were also in the 50% range, so I know the jerky was not being a moisture sponge while it cooled.)

Pay attention to your humidity levels. When in doubt add a moisture absorber with your oxygen absorber. And if your meat is thick cut, absolutely add that moisture absorber. It will keep your jerky’s texture and minimize the threat to your preservation.

TIP: If your absorbers come in a single large bag rather than smaller packages, you can still use the amount of absorbers that you need and seal the bag back up with your heat sealer. This will prevent oxygen from further exposing your extra absorbers. They will be preserved and ready for you to use when you’re ready to use them.

Which was my favorite Jerky?

I’m going to hands down say that my least favorite was the Honey Garlic Marinade. I had such high hopes for it because it smells so amazing! The problem was that the package directly said it was for 1 pound of meat and my jerky was 2.5 pounds. I will try this one again but make sure the meat to marinade ratio is true. The other problem was that the marinade turned out to be a low sodium finished product. My preference is toward a salty jerky. (Salt is a natural moisture absorber, it draws the water out of the meat. This is why jerky and preserved meat is always so salty.)

If you’re looking for a low sodium option for your jerky, than I think you’ll be pleased with the Honey Garlic Marinade. Both the honey and Garlic were mild in flavor, almost negligible in flavor–again, the problem of meat to marinade ratio.

In third place was the Mr. Yoshida’s jerky. While it was not my favorite and I may or may not make this jerky again, I do have to say that I loved this mild Teriyaki flavor. All the Teriyaki flavored jerky I have ever bought from a reputable jerky brand and always been too sweet and even off putting. I love Mr. Yoshida’s for having that palatable Teriyaki flavor.

I did learn from the Honey Garlic Marinade. So before I turned my dehydrator on, I sprinkled salt on top of this jerky. A light dusting of salt was just enough to season the meat without becoming a salt bomb. It enhanced the flavor of Mr. Yoshido’s. Even with two day’s marinating, had I not dusted with salt, the flavor would still have been bland.

Unless you’re going for a low sodium jerky, always salt it before you dehydrate it.

A very close second place goes to the Korean BBQ marinade. I will most definitely make this one again! There is a hint of sweetness, but you pick up bites of garlic. The reason for this is because the marinade had minced garlic in it. Even if you’re not familiar with Korean food, you will love this marinade just for the garlic. The best part is that you can eat and eat this jerky and you won’t need a breath mint.

This one was also dusted with salt before dehydrating. I played around with the salt levels on this one. A light dusting will keep you down in the lower sodium range. Although this marinade is still amazing with a heavier hand of salt, more to the traditional levels of saltiness. So you can go light or heavy on the salt with this one and still have an amazing jerky that beats out the ones that are bought in the stores.

My absolute favorite was the wet rub! I seriously had to bag that jerky up to keep from eating it all up. And even then it took self control not to open the bags that I just sealed. Flavor wise it’s true to the “original” that the professional brands sell. It’s not a fancy flavor, just good classic jerky. The salt level is probably on the moderate side. For my personal preferences, it’s on the upswing on the salty spectrum, but I also prefer my foods less salty than most people. If you like the salt, I would recommend, for the first time, sticking to the recipe above, and giving it a dusting before you put it in the dehydrator. If you’re a moderate salt person, the recipe is plenty good enough. And if you’re a low sodium person, go ahead and cut back on the salt.


Advertisements

Whether you’re limited on freezer space, want to take advantage of a great meat sale, looking for shelf stable foods, want a snack that won’t go bad on you, or just want to try something new, making jerky is definitely worth the time and effort!

You don’t even have to keep it in the snack food groups.

The great thing about jerky is that if you’re in a power outage setting you can use jerky as a meat in a soup. Thin slices of jerky will warm up and rehydrate rather quickly. The thicker jerky will give a soup texture. Or maybe you want to try something new with your chili or stew. You seriously don’t have to leave jerky in the category of a meat stick snack. There are so many uses that you can use it for when cooking for meals during an emergency or when you’re out enjoying nature.

What’s your favorite jerky flavor?


Products used in this post

This post contains affiliate links that give us commissions on products purchased at no additional cost to you. These items listed here are from Amazon but may be purchased at local markets.

ChoripDong Korean BBQ Sauce for Sliced Shortribs This product I could only find on the Canadian Amazon site. However it was at my local Vietnamese market.

Tattler Reusable Canning Lids

Regular Mouth

Wide Mouth

Processing…
Success! You're on the list.

Leave a comment

Advertisements

Lost on What to Bring?

It never fails that there is a family get together that you don’t know what to bring. Or maybe it’s an office or friends get together. And this is especially painful for those of us who cook well and bring an amazing dish but no one wants to touch it because it’s not one of those Pinterest fad dishes.

This is what you want to bring!

Back at Easter I found a Pillsbury cream cheese and crescent appetizer. I can’t find the exact one, but this link is their fall version in case you want to use an official recipe.

The problem I had was that after more than a decade of marriage, no one in my husband’s family told me that they preferred salty/savory dishes over sweet dishes. And I love cooking pastries and sweets. So once I got that bit of information I finally got the secret to making something that they always want to eat, I feel loved, and I’m not bringing tons of leftovers home of my dish (because they don’t want to take any home).

Again, the above link is for the thanksgiving version. But the Easter version focused on fresh parsley instead of the cranberries. I wanted to keep my Thanksgiving appetizer simple, so I just recreated the Easter version and put it in a cup instead of in a carrot shape, like I did this past spring.

You really don’t need the recipe. For the parsley version all you need on hand is:

  • Pillsbury crescent rolls (feel free to use the generic brand, it’s just the carrier for the cream cheese!)
  • Cream cheese
  • Parsley
  • Flavored Salt (I love garlic so I use garlic salt, but feel free to use any herb/flavored salt you have on hand)

Create Your Shell

For Easter I made a carrot shape by wrapping strips around a cone of foil. For Thanksgiving, I made a bowl by cutting squares and baking them over the bottom of my silicone cupcake molds.

Here’s the trick! If you want to create bite size pieces, use mini cupcake molds. The standard cupcake molds creates pieces that take about 4 bites. Know the people at your party. My family wants the bites that they can just pop in their mouths (or take two bites if they’re being dainty and polite). So the mini is perfect for your grazing appetizer get-togethers. If you’re doing something like a sit down side, the larger (regular size cupcake mold) is perfect for preparing pre-made plates for your get together.

TIP: Use the oven temperature on the package of your crescent rolls. But cut back on the cook time. The minimum cook time on the package I used was 9 minutes. The perfect golden brown I found came at 7 minutes.

Mix Your Filling

For the two packages of crescent rolls that I used, I mixed up about 32 oz of cream cheese. At Easter I found that 16 oz was barely enough to fill my carrots. In fact, I scraped from some carrots to fill others just to make sure that there was “enough” for all the carrots. And this filling is great to have leftovers with because you can spread it on bagels or toast and you will love it just the same!

Taking from my days at working in a University Dining Hall, if you want creamy cream cheese, you want to take the 10 minutes or so to aerate your cream cheese. All you do is take your cream cheese and put it in a bowl and use a hand mixer on high speed. (The Pillsbury recipes never tell you this trick, but believe me you want to do it!)

Advertisements

When you first start mixing, you will feel the chunk and clunk of the dense cheese. After 10 minutes you will notice that it feels like you’re mixing a thick butter cream frosting. At this point is when you want to season the cheese. Everyone’s salt preferences are going to be different, so I’m not going to tell you an exact measurement to put in. I prefer to barely taste the salt, in fact I would never salt cream cheese for feeding me or my boys. For my husband’s family, though, I salt it a touch beyond my comfort zone–this hits their food pleasure center. So if you are no or low salt making these for people who love salty food, season the cheese enough that it’s just outside your comfort zone but not a salt bomb. If you like salty food, season it to your exact preference. If people tell you that you like salt too much, season the cheese so that it tastes bland to you, but you can still barely taste the salt.

Once the cheese is seasoned, then you want to add your seasonal flavor embellishment. Parsley is good no matter what time of year. I like using just parsley because it’s not going to clash or taste bad eating before or after another appetizer. Plus, parsley is known as a palate cleanser. So if someone eats an appetizer that did not sit well on their tongue, they can come right back to yours and reset their mouth to go on with their party eating.

TIP: Right before Thanksgiving, Monday to be exact, all the parsley was severely picked over and the bunch I bought, when I got home and opened it had some slimy wilted parsley in the center. I couldn’t serve that to family, so I grabbed my dehydrated parsley off my herb shelf. While I love fresh herbs, I keep dried herbs for this precise reason. So don’t be afraid to use any dried herbs that you have on hand!

Advertisements

With the above recipe link, you will notice that Pillsbury used cranberries and jalapeño. Don’t be afraid to use other flavors during the rest of the year. For example, back for Easter I grated some carrots and put carrots in with the fresh parsley. For spring and summer you could definitely use dehydrated or freeze dried berries. (Just be careful of your water content from berries if you use fresh. They can loosen your cream cheese so it becomes too soft and sloppy.) For a fall and winter option, don’t be afraid to add some Pecans, Walnuts, or other winter nut. Even a candied nut can be your friend for a little bit of sweet and savory combo!

Putting it Together

It is possible to pipe the cream cheese mixture into your crescent shell. You will want to do this when you’re finished mixing your filling. And if you don’t have a piping back and tips in your kitchen, all you have to do is put your cheese into a zip lock bag, snip and bottom corner (after you zipped it up with all the air pressed out). The only drawback to this method is that if your cheese was put back into the fridge or not aerated, then the bag is going to burst.

What do you do if the bag bursts?

Take two small spoons from your drawer. I teaspoon full of cream cheese is more than enough to fill the shells made from the bottom of the mini cupcake molds.

Once your shells are filled, you can finish them off with a dusting of parsley or other flavoring that you put into the cheese (crushed nuts, berries, fruit, etc.).


There you have it!

This is how you can make an impressive appetizer without spending a fortune and doesn’t require a degree from a chef school. But even if you have even less time or say that you burn boiling water, if you can bake crescent rolls then you can spend a little more and get the fancy flavored cream cheese that is pre-made for you.

Even if you seriously can’t cook the crescent rolls, skip the chip and dip route. Pick up the pre-made flavored cream cheese and swing by the bakery department in your local grocery store. You can find pre-sliced bread or even baguettes. Slice up the bread, spread some cheese on top, and sprinkle some parsley (or other ingredients mentioned above).

What’s your favorite appetizer to take to a party?


Items that might interest you for making this appetizer

These links are affiliate links. We may receive a commission for purchases made through these links, but at no extra cost to you.

Standard Sized Silicone Cupcake Molds

The silver platter I used was a wedding present. Here is a Silver Tray available in a similar style.

Or perhaps you’re looking for a Ceramic Tray.

Various Freeze Dried Fruits to choose from. These Cranberries are a seasonal favorite that’s unique from the fresh berries in the store where they are good for a year after opening.

Processing…
Success! You're on the list.

Leave a comment