After spending almost a decade in the event decorating industry I have repetatively heard "I can do that". Instead of being dismissed by creative minded people, I want to show you how I do "that" so you can be sucessful in recreating that inspiration image. I just might have a few tricks that you haven't seen yet!
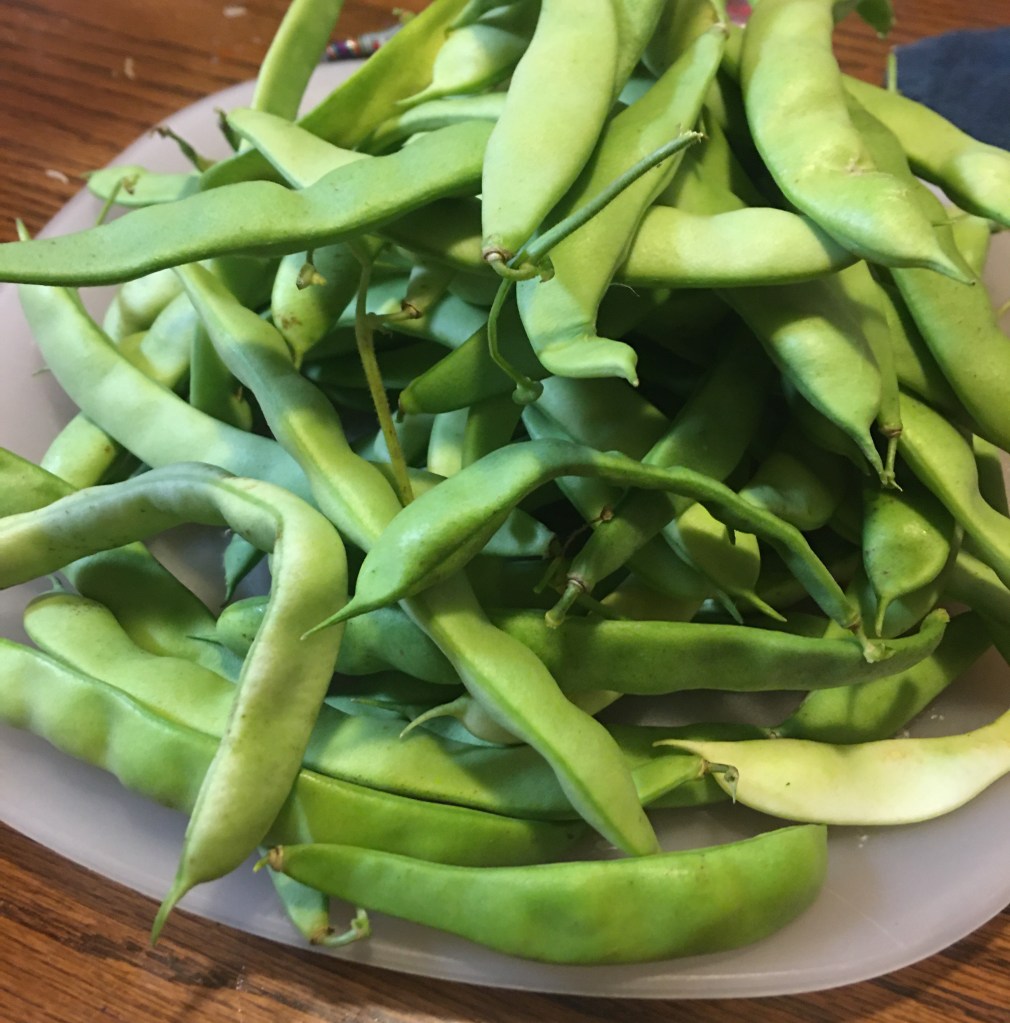
This was the first year that I grew a shell bean. I grew up with my grandparents and mom growing snap beans. In fact, snap beans were pretty much the only vegetable that I ate without issues. So I have a special place in my heart for beans.
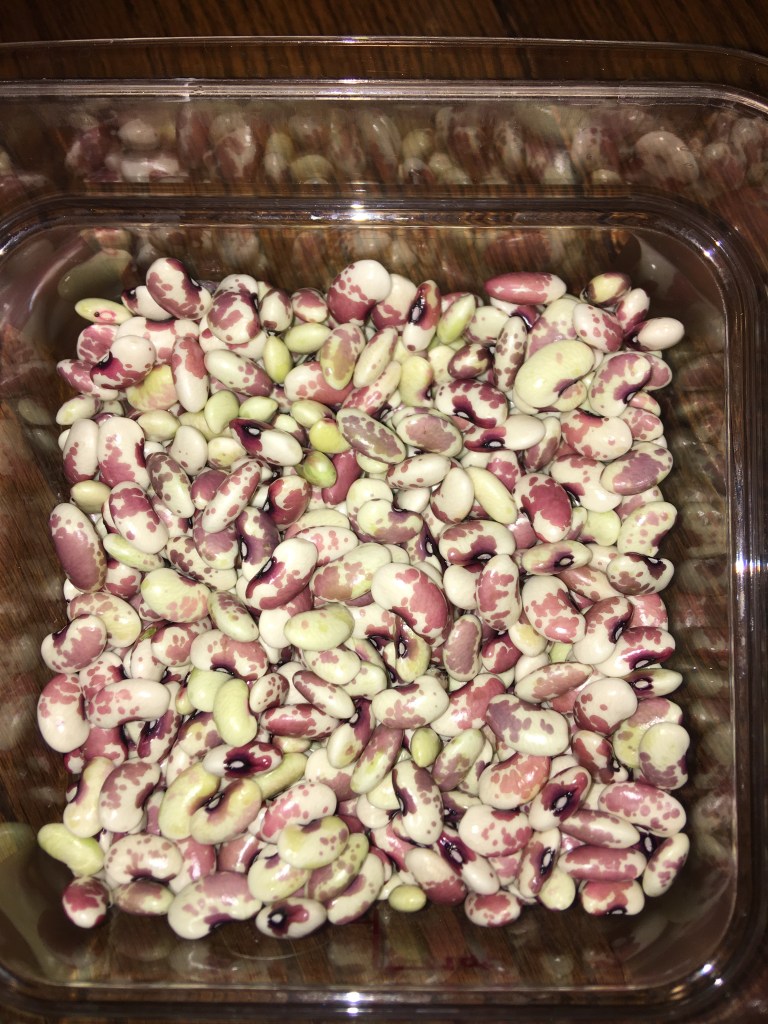
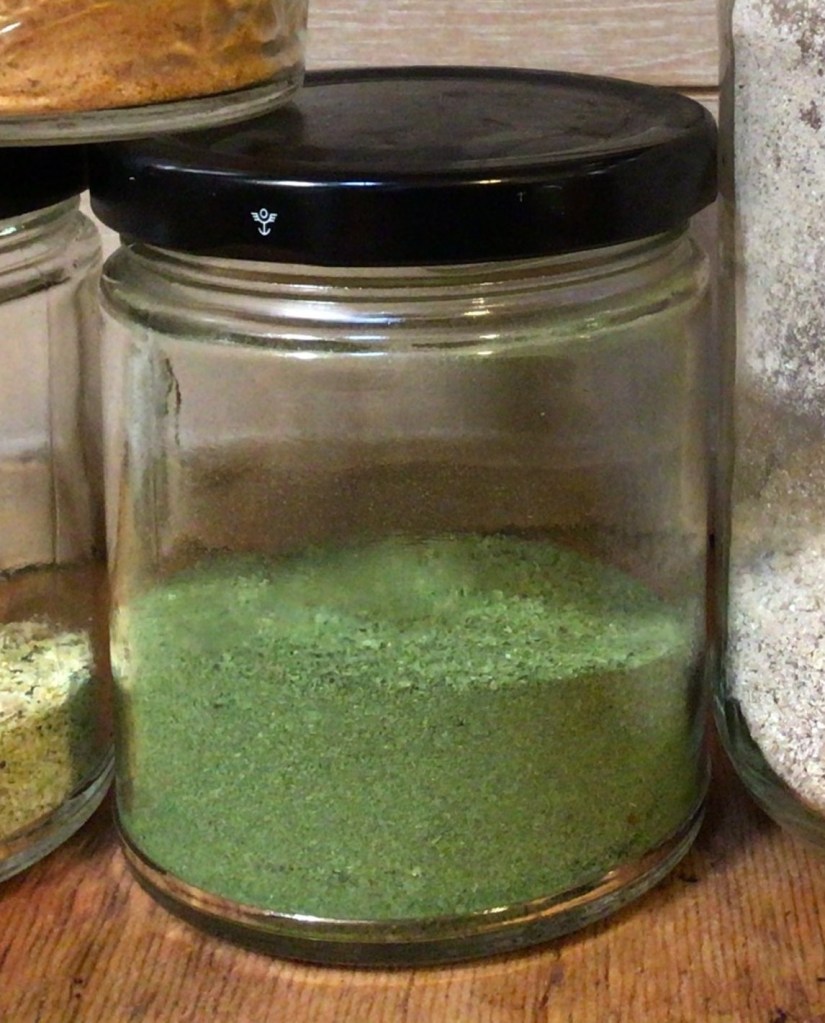
This is the shell beans that I grew this year, 1000 Year Cave Beans.
I think my beans loved being talked to when I watered them. I was surprised to see just how large these beans grew to become.
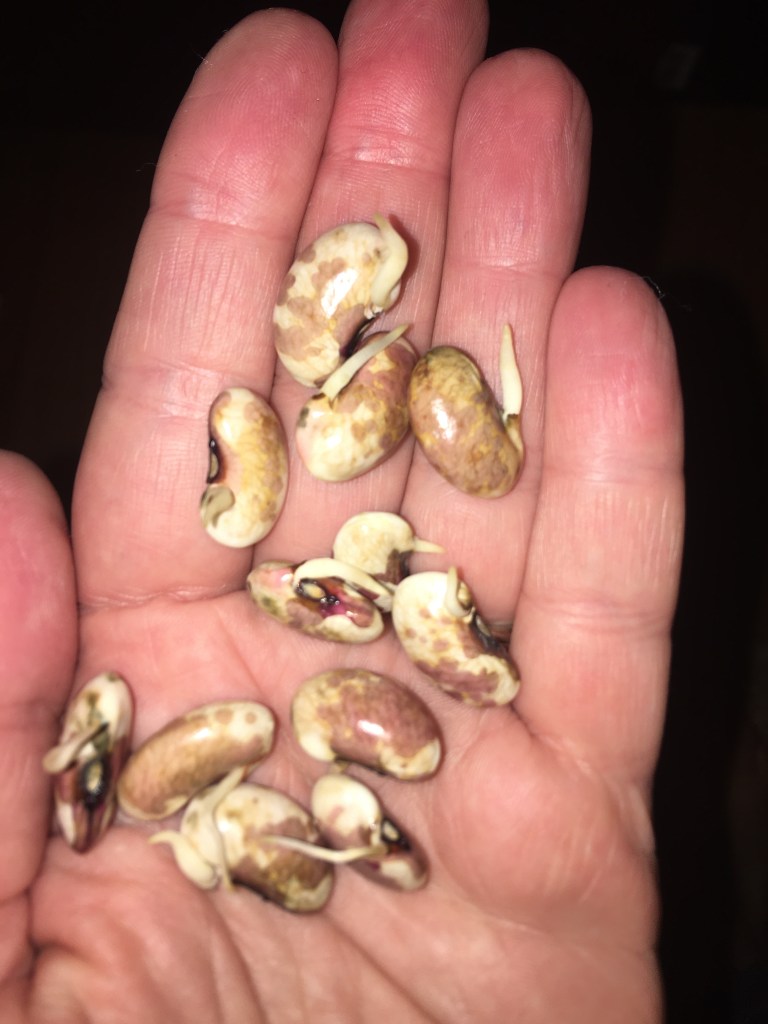
And just to show you how fresh these beans were, I didn’t anticipate them sprouting with in 3 days of me shelling them and waiting for more to mature so I could can a couple jars at once.
Advertisements
The one bit of information that I thought was prevalent was preserving beans of all kind. But with every safe recipe that I looked up every recipe was either for snap beans or dried beans.
When I teach people how to can, I always hand them safe recipes to select from, depending on what they want to can. And so these are the first sources that I turn to when I look to can a new food item that I’ve never canned before. And so I trust that what these experts say are what you are going to get. This is the one time that the extension office failed me. Here is the recipe that I used for my fresh shell beans. In full disclosure, if I were canning dried shell beans (such as the bagged beans from the dried foods aisle from the grocery store) this is absolutely the recipe that I would use.
But for fresh beans… I didn’t have canned beans. Instead I had half beans, half refried beans.
What happens when you can fresh shell beans the same as dried shell beans?
The gray in the water is the starch from the starch from this particular bean, 1000 Year Cave Bean. In fact, the starch left over in the bottom of the pan that I cooked these beans for the 30 minute stove top cook for a hot pack, was a richer version of this gray. In fact, it matched the gray on a pair of my camo pants. Next time I harvest these beans and prep them, I’ll take a picture of the bottom of my pan for you!
As you can see here, my beans started to break down due to the 75 minute processing time on top of the 30 minute hot pack cook time.
On the positive side, if you want to have canned beans that you can eat straight out of the can without needing to warm it up, the extension office recipe is perfect for it. All I added was the hot beans, hot fresh water, and 1/2 tsp salt for my pint sized jars. The beans were perfectly seasoned, soft, and very tasty. I am absolutely canning these beans again from here on out for the unforeseeable future.
The Extension Office recipe was also very pleasant for adding to my enchiladas recipe. In this instance, I really do appreciate a soft, smashable bean.
Unfortunately I need canned beans that I can toss into a soup, stew or chili where some firmness is needed.
Advertisements
Is there another safe recipe available?
I’m going to connect you to one of my favorite safe canners Melissa Norris, Pioneering Today. Please click the link to go straight to her directions. A video is also available.
If you’re on a time constraint, here’s the quick read of her directions:
Wash your jars.
Fill the clean jars with shelled beans until 1 1/2″ head space remains.
Add salt (1/2 tsp for pint, 1 tsp for quart).
Boil water and pour over the beans until you have 1″ head space.
(Remove air)
Clean the jar rims with a damp cloth, place lids, and screw down bands.
Place jars in your pressure canner.
Vent your pressure canner for 10 minutes.
(Once at pressure) process the beans at 10 lbs. of pressure for 50 minutes.
Once time is up, remove from heat and let your canner cool on its own.
When the lid unlocks, remove the lid but leave jars in the canner for about 10 minutes.
Remove the jars from the canner and set on the counter to cool for at least 12 hours and seal.
Store in your pantry.
If you are growing beans to supplement some of your grocery purchases, love gardening, or various other reasons… know that you can absolutely can your own beans. You can control what is used on your plants and what ingredients you add with your beans when you can them. The beans that I canned have 3 ingredients: beans, water, and salt. In comparison, the sale beans that I have in my pantry have an additional ingredient Calcium Chloride (an additive to absorb moisture which causes bacteria to thrive, “used pre- and post harvest to maintain firmness, reduce decay and prevent certain diseases… [and] as a drying agent.” (ingredi.com)
Advertisements
Store canned beans do have their benefit. I’m not going to pretend that I avoid them like a plague. For my family, we’re choosing to make a switch to lessen the additives in our diet. And with my young children, I want them to know where food actually comes from. I don’t want them to assume that food just mysteriously shows up on the store shelves. I want them to know where their vegetables come from. And where their meat comes from as well. (We love our local farmers!)
Plus I have the added bonus of not just hearing my oldest say, “Mom, can we can ____? I’m interested in that.” But it also helps establishes what we learn with our homeschooling. Math and science do matter on a daily basis. We can understand our world by working with it.
But most important of all, pressure canning beans (and other vegetables) make growing or store sale purchases a massive benefit to the family budget because we can preserve it and eliminate some of our food waste. And that is a win win for everyone!
Processing…
Success! You're on the list.
Whoops! There was an error and we couldn't process your subscription. Please reload the page and try again.
It all started when I had a West Coast Clam Chowder that was too thin….
I learned how to make clam chowder from my mom. And she started her chowder with a roux. Nothing says “please give me a headache” more than trying to fix a roux based sauce or soup than your sauce being too thin. It’s not like you can add more flour because it’s not cooked out. And you can’t make corn starch slurry to thicken it up. I mean technically you can, but it’s not the same. The flavor gets thrown off and the texture is also not the same.
That’s when I had the brilliant idea of adding instant potato flakes. I put diced potatoes in my chowder and so the potato flakes made sense because it’s dehydrated powder that absorbs your excess liquid AND you get to keep the potato flavor.
Over the years, from this dehydrated potato beginnings, I have started dehydrating more and more of my vegetables.
It just made more and more sense, because if you really look at all the seasonings in the seasoning aisle in the grocery store, just about all of it comes from plants, herbs, and their seeds. We already season our food with produce. It’s not a far leap to move to use vegetables as seasoning.
Advertisements
From my chowder I moved to thickening my brown sauce made in my caste iron pan when I once again added too much water. This sauce the water evaporates relatively quickly. But this time I added dehydrated mushroom powder. It added an earthy note to my brown sauce and thickened up in just a few minutes instead of the several minutes that cooking off the water takes. Once again, the flavor improved.
And to be honest, I’ve hated working out the lumps of flour when I tried to re-thicken with flour like my mom use to. Depending on the day, I’m convinced that the flour was giving me attitude, “I’m just going to stay lumpy because there’s nothing you can do about it!”
So my comeback to my lippy flour has become, “Oh yeah? Well I’m going to use vegetables then. They don’t lump up like you do.”
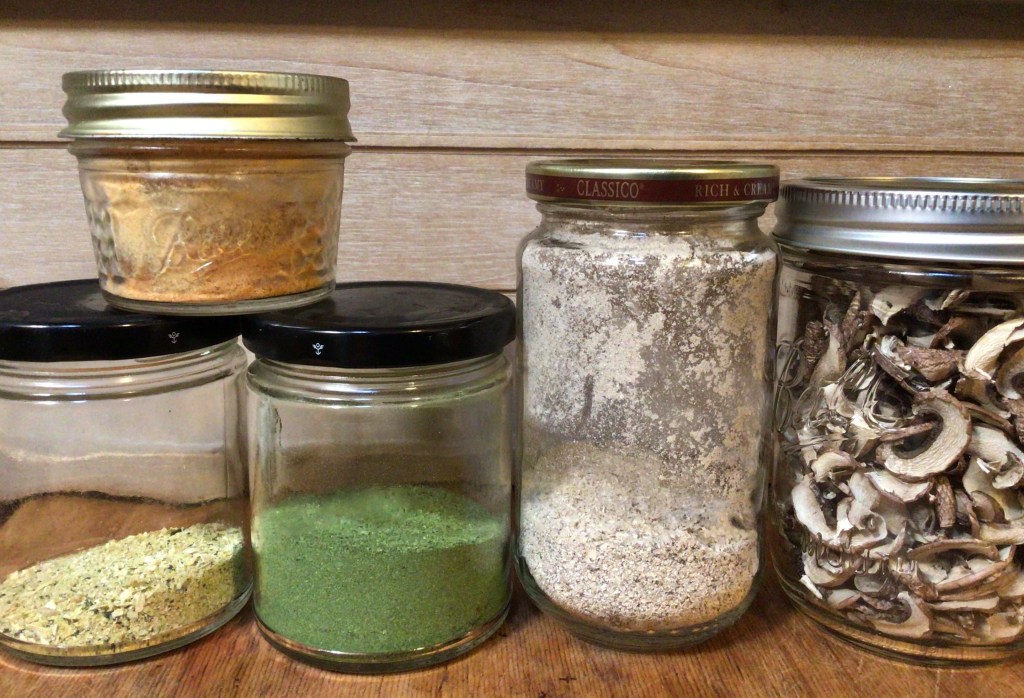
I’m still waiting on some of my produce to finish growing in my garden to replenish some of my vegetable powders, but I’d like to introduce you to some of my favorite powdered veg.
From left to right you Zucchini, Spinach, Mushrooms, and sliced Mushrooms. The orange powder on top is the combination of yellow, orange, and red sweet peppers. You know that bag of small peppers in the produce department? Those are the ones that I dehydrated and turned to a powder.
I’m all out of my powdered Butternut Squash. This one is actually my work horse. It has a nice sweet flavor that my boys don’t know that I’m adding vegetables into a meal.
Not only does my powdered veg work as a thickener, it doubles as my mom hack of hiding vegetables from my children who don’t want to see certain vegetables on their plates. Peas and Carrots are still acceptable on the plate, but all the others, I have to get pretty creative. And instead of renaming vegetables to some weird name, like my mom did, I just prefer seasoning everything with it.
Do you have a recipe that your family is always asking for?
Do you always tell them “Absolutely not!” because it’s your recipe and you don’t want anyone else to have it?
If you want to be generous this Christmas, you can dehydrate and turn your secret ingredients into a powder and make a seasoning pack or bag of instant soup.
This is particularly a great idea for loved ones who live across the country from you and shipping out a sauce or soup just isn’t practical! You don’t have to ship glass containers, liquid, or even have the weight of the ingredients that still contain their water content.
Maybe the person you’re gifting is a hiker or camper. But gifting them dehydrated food, in the form of seasoning, you’re able to give them the nutrition they need and taking up a fraction of their pack space.
Not sure about that statement?
Take another look at the pictures of my powdered vegetables. The Spinach is contained in a 9 oz jar and is currently holding two bunches of spinach. Yes, that is two grocery store bunches of spinach.
Looking for a funny gift for your cook or baker this Christmas?
Here’s a design that can take on many different meanings. It’s perfect for your secret recipe cook, a white elephant present, or for that home cook whose mystery meals are not exactly the best surprises to hit the dinner table.
Here’s a sneak peak for Abstract Cooking, which is officially released on Monday.
Processing…
Success! You're on the list.
Whoops! There was an error and we couldn't process your subscription. Please reload the page and try again.
I won’t even say what else comes with this season. Let’s just say that as a mom of three young children, I’m fully aware of what the change of season means. And this past week, that came and knocked the energy out of me. Shoot I didn’t know I had any more energy to be knocked out! I thought my kiddos drained it from me to fuel their never ending supply of energy.
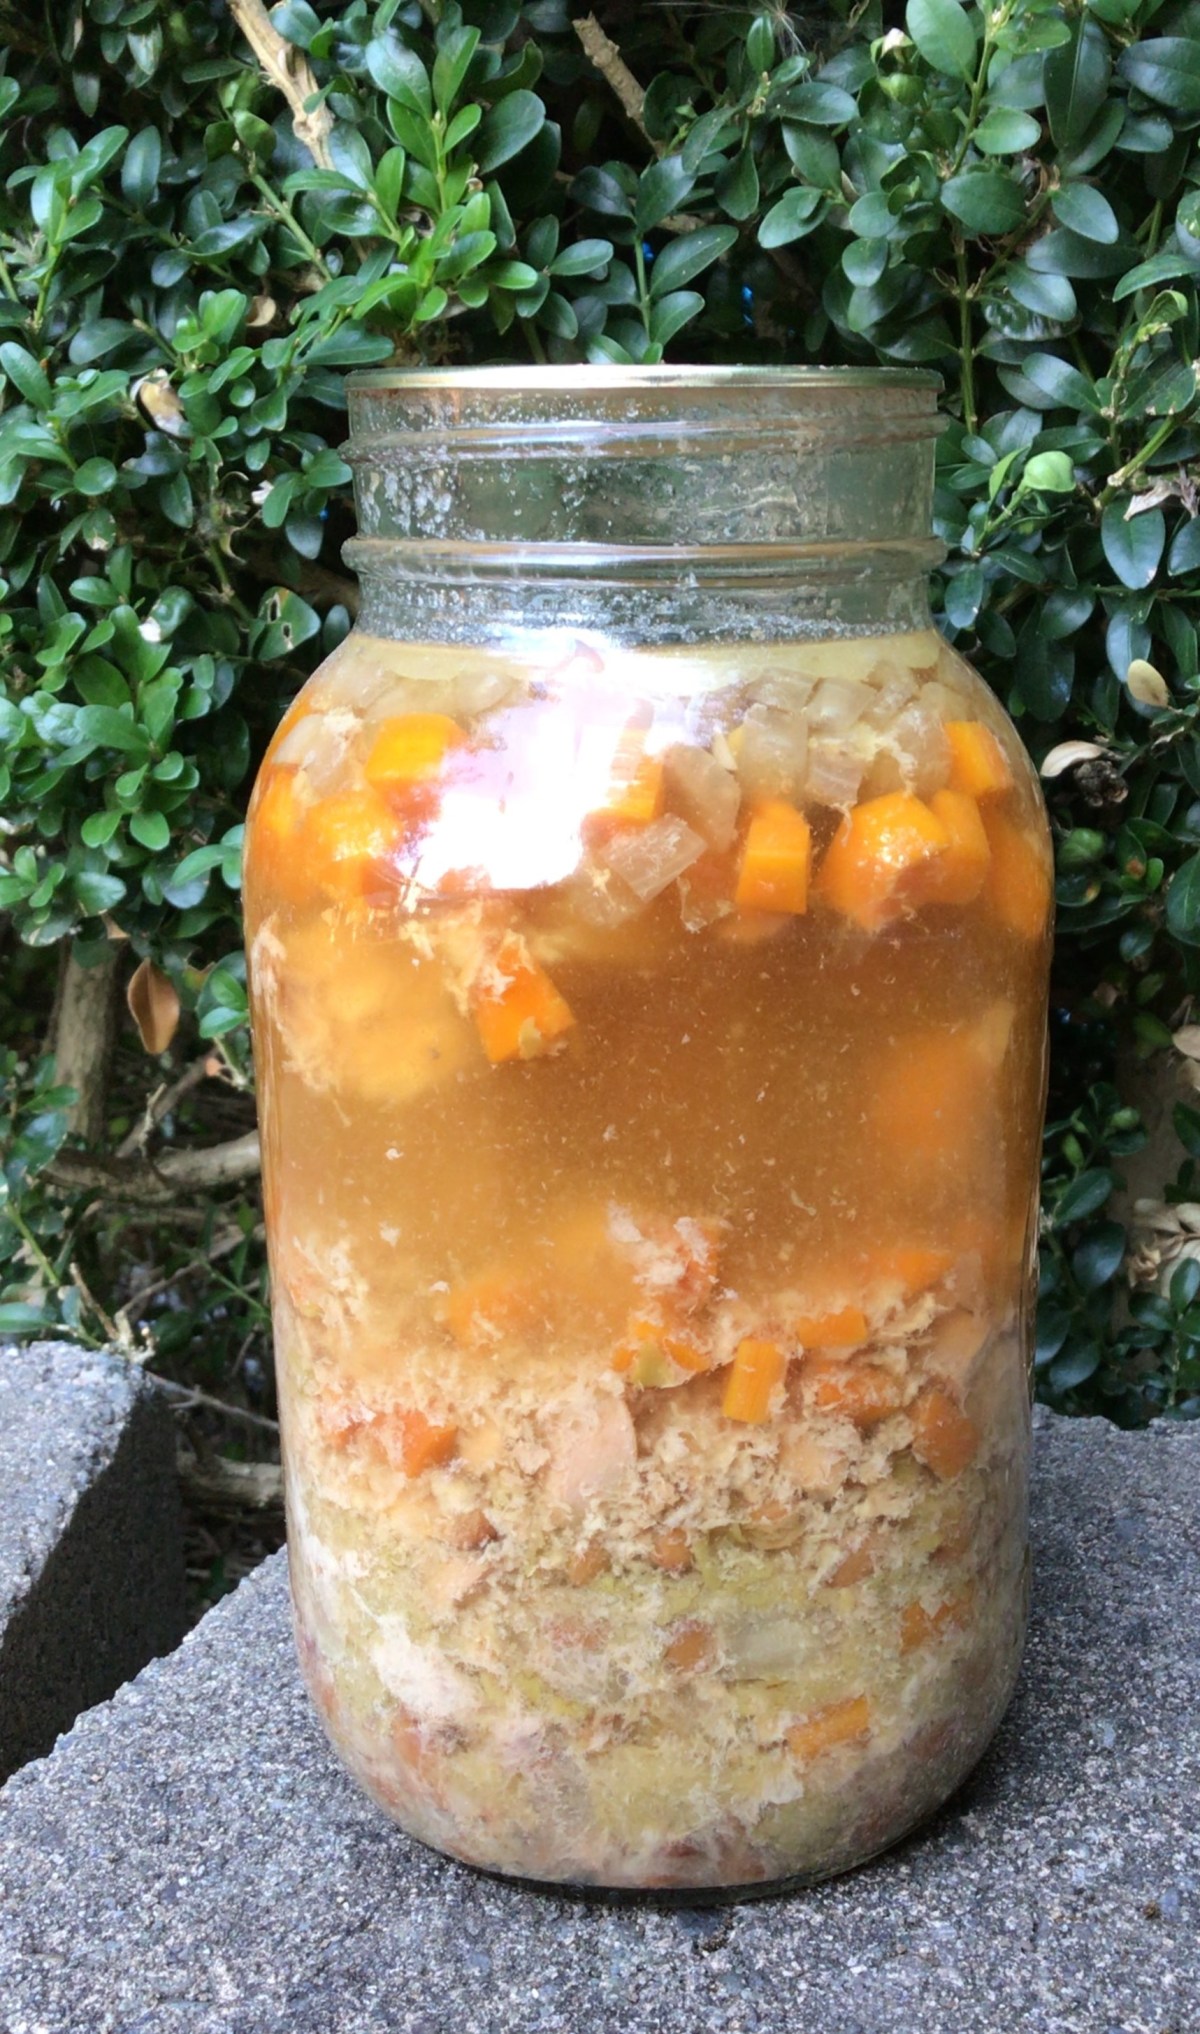
And yet, I was so grateful to have this soup already canned up and ready to go in my pantry. The chicken stock I make, I add antiviral herbs to it. Let me just say that Lemon Balm is my new favorite antiviral herb to cook with! (In a few weeks I’ll share more with you everything I put into my Chicken Stock. You’re going to love it!)
I want to share with you this recipe for Chicken Soup that is perfect for those days where you need healing chicken soup but don’t have the time or energy to make it from scratch. You will absolutely love this because it takes only 5 minutes to warm up–the same amount of time it takes to make condensed soup from the grocery store. BUT it has less ingredients and more immune boosting goodness. And even if your sick days are few and far between, this soup is quicker to heat up than going through a fast food drive through. Plus as the added bonus of being that IT item to use up some leftovers you have sitting in your fridge on the day you crack open this jar of soup.
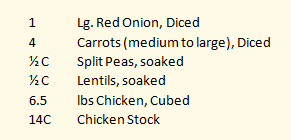
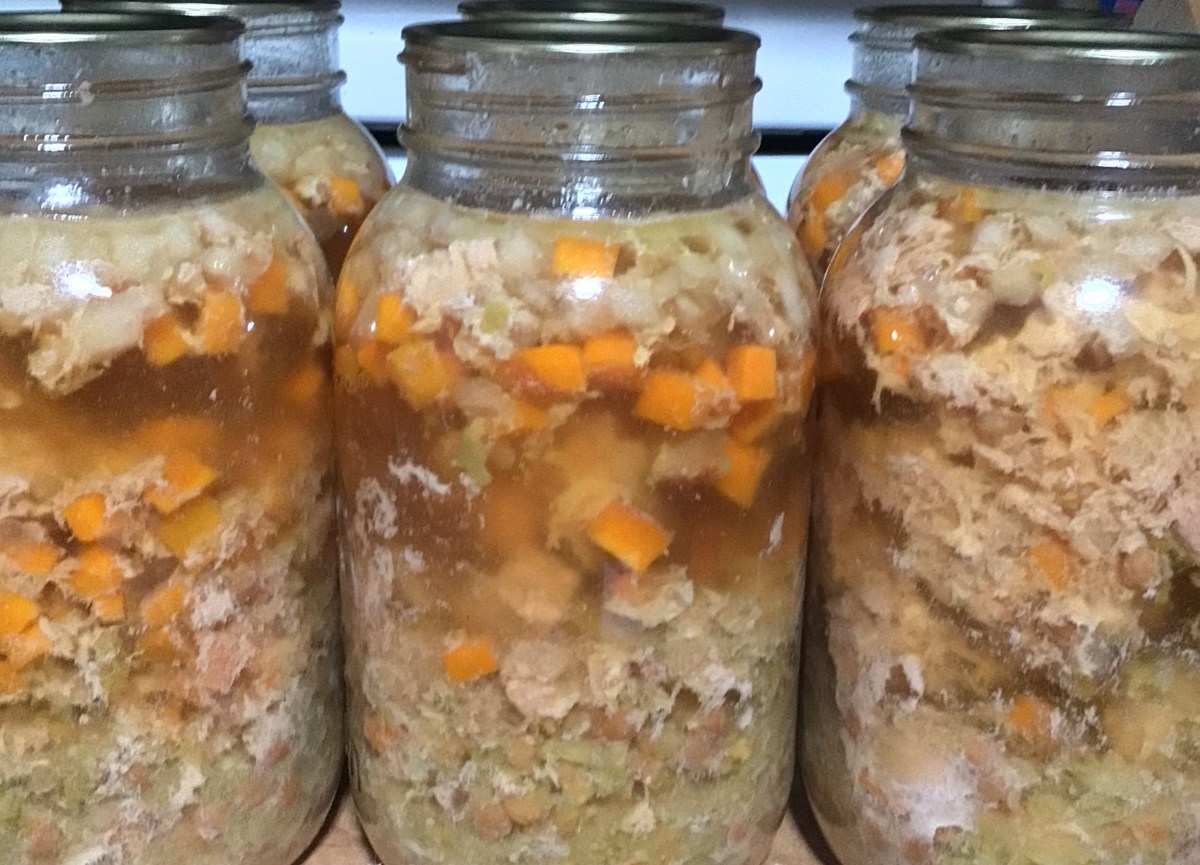
Yields: 7 Quarts of canned soup
Clean your jars and lids.
Prep your ingredients.
Cold pack your chicken, split evenly between all 7 jars.
For each of your ingredients, split evenly between all 7 jars. Start with the larger cut ingredients and end with the smaller peas and lentils.
(It’s easier to shake the smaller ingredients down into the cracks of larger ingredients than to shove the larger ones in on the smaller.)
Fill each of the Quart size jars with about 2 cups of chicken stock.
If you have Kosher or Sea Salt, you can season your soup now. Otherwise, do not put in your table salt or iodized salt. You will season your soup when you open you jar before serving.
Clean the rims of your jars with vinegar and then place lids and rings, finger tight.
Prepare your pressure canner.
Follow your canner’s directions for the correct process of canning with your canner.
For example, I am Sea Level – 1,000 foot elevation so I can the Chicken Soup with 10 lbs of pressure for 90 minutes in my weighted canner.
Once time is complete, turn off the heat and let your canner naturally release pressure.
When you can remove your lid, let the cans sit for an additional 10 minutes before removing them from the canner.
Allow your jars to sit 12-24 hours to seal. Then remove the rings and clean your jars before storing.
With new lids preserving your canned goods for up to 18 months, you have plenty of shelf life for this soup.
There are many options you have for this Chicken Soup.
You can season it and eat as is.
If you have left over rice or noodles in your fridge you can add those ingredients and still have rice and chicken or chicken noodle soup that is ready to eat with a 5 minute warm up on your stove.
With adding a thickening agent (slurry or corn starch) you can turn this into chicken and dumplings or a pot pie filling.
Maybe you have other small amounts of leftover meat, like Italian Sausage. You can use this meat to bulk up the soup, add some kale and parmesan and have a Tuscan style soup.
Or maybe you’re looking for something Latin in flavor. Grab some tortilla strips, grated jack cheese and add in Latin American seasonings and you can have Tortilla soup.
These ideas are a far cry from being authentic cultural cuisines. However I want to give you a few ideas on how you can turn one of your canned soups into a blank slate for some variety.
Advertisements
I know a lot of us really do not have time to prep meals for our families. In fact “meal prep” might have a double four letter word effect in your ears. And that’s okay. For roughly the same time it would take me to cook a soup from scratch for my family, I can make 7 meals that I can crack open and serve dinner in less time than it is for me to go through a drive through. And it’s healthier for us.
To heat up this dinner in 5 minutes, this is all I do:
Grab my jar from the pantry.
Grab my soup pot. And turn my burner on high.
Open the jar and pour the soup into the pot.
Fill the jar with Water and pour into the pot.
Put the jar in the dishwasher and set the table.
Taste the soup to make sure it’s seasoned the way I want it. (Add salt, because I usually only have table salt readily available, so it got canned without salt.)
And it’s dinner time.
If you have a college student who’s coming up on Mid Terms or Finals, this is perfect for them! Often times they’re up late and find themselves hungry after the cafeteria is already closed. This is something they can cook from their dorm room with a microwave or hot plate and have the brain food that they need. Or maybe they’ve caught a cold and need a little mama’s love in the form of soup. This is super convenient and perfect for a care package.
Advertisements
Looking for a gift idea for this Holiday Season?
This is soup is perfect for the new mother getting use to having baby at home, an elderly family member who retired their pots and pans, someone who is an avid camper or loves cooking by camp fire, or anyone else who can benefit from a quick home cooked meal without all the fuss.
Maybe you’re the type of person who loves gifting food to a neighbor, friend, or family when they become ill. Here is a quick way of gifting all that healthy goodness without your schedule batting an eye.
I highly recommend this recipe for everyone!
Do you need another gift idea?
This one is personal and doesn’t require you to have a master’s degree in art to make!
Here are some supplies that you will need:
Canvas
Paint
Paintbrush
Clear Acrylic Spray
Chalk pen/crayon, Paint pen, Pastel, or like craft item you can write with
(Optional) Sponge, Paper towel, Napkin, or Tissue
(Optional) Embellishments such as pre-cut vinyl design
Paint a design on your canvas. You can do whatever design you would like. Here are some examples of canvases that I already have on hand. There are the canvases that my boys made 3 years ago.
And these are the ones that I have in the prepped stage for various projects that I have in the works. You can use coordinating colors, monochromatic colors, are shades for an abstract scene.
Let your canvas dry.
Spray your canvas with Clear Acrylic Spray and let dry. This step is important, because accidents happen and sometimes you want to “erase” a mistake. I’m a phonetic speller and sometimes I just get a word wrong. No worries. By having the acrylic spray dried before you start writing with your crafting pen of choice, you have the option of wiping away the mistake with a wet cloth. The only writing medium that gets to be a bit tricky is acrylic pens. That one you may not find having an “erasing” quality. Chalk pens and most pastels will generally work for excessive editing.
With your writing medium of choice write your message, series of quotes, words of encouragement, or whatever you’re inspired to say. When I made these gifts for nieces and nephews, it took about 7 quotes that I pulled from online to fill the 8×10 canvas with medium small print from top to bottom. You can write as large or small as you would like. Just be aware that the writing medium you choose to use will help you decide how small you are able to write. I used a chalk crayon that had a relatively large nib, so I wrote as small as I could and the words were as tall as the width of my pinky.
Advertisements
Decide if you would like to leave your writing clear and readable or if you would like to smudge the words to make an added texture on top of the painted design that you made. This choice is perfect for the people who believe that their handwriting isn’t pretty. By smudging your writing, you remove the uneven, shaky, or other characteristics of your handwriting that you may be self conscious of. If you choose to smudge, I recommend printing out a copy of your message that you can give with your gift, so the recipient has the opportunity to read the love that you wrote for them. For direction of smudging, that is completely up to your eye. I personally like smudging my work from left to right because I love using horizontal strokes when I paint. I do have some pieces that the strokes are vertical and so my esthetic is to smudge vertical with those, so the “text” doesn’t compete with the flow. But you could choose to smudge diagonally, circular, zigzag… each direction you go will give a different feel to your piece.
Once you are done writing and/or smudging spray your canvas with the Clear Acrylic Spray again. This is going to be a critical step for you. If you chose to smudge your “text”, the spray will prevent further smudging. If you want to add vinyl or HTV on top of your art, this spray is going to anchor your vinyl down. I’ve tried applying vinyl and HTV straight on a painted canvas and both have peeled off, taking paint with it. But every time that I’ve used the Acrylic Spray, vinyl and HTV both stay on the canvas perfectly.
Embellish your gift. Your options are endless at this point. You can choose to make something and personal with just adding your recipient’s name. You can add scrapbooking embellishments with hot glue to add some glam or character. You could pray a frame with a metallic paint and make a modern framed art. Or perhaps you want to do four panels and keep them frameless. And then there’s always the option making a 3D piece using other crafting techniques, such as this.
If you find that you are on a budget this Holiday season, this is a perfect gift option for you. We are in a time in history where people need to hear how much they are loved and valued. So when you can poor into another person and share with them a hope of a future with them, it can hold profound meaning in their life right now. I have never before seen so many people facing suicide and thoughts of hopelessness like I’ve seen in the last few years. Sharing with someone how much they mean to you is something that you will never regret. And you never know that it might be the one thing that offers them hope in a time where it seems like everything is so wrong.
What is inspiring you right now? Do you have ideas sparking in your mind?
Right now I’m inspired with many of the changes that come with fall. This is the season that always has inspired me. In fact, my boys found a whole acorn that I so want to use as a piece of 3D art. I’m hoping I can find some more and have more than a single nut to work with!
Please comment below with what you want to make and even send me some pictures. I would love to see what creativity jumps to life in you!
Files used today
Spring Triple Panel comes with all you see here. Or you can select individual elements.
Now that Fall weather has set in, there’s one concern that comes up every year. What do we do when the power goes out this year?
You would think that with the frequency that my surrounding area loses power due to snow fall, that there would be changes in the electrical system. Or even something as simple as taking preventative measures to eliminate more outages. But instead the average number of outages remains the same. And the outage time remains the same, 24-72 hours. Some areas have outages for longer.
But none of them have hit the fame as the President Day’s Storm of ’92. Roads were thick sheets of ice. Trees were breaking from an obscene amount of cumulative ice. And the power lines were down just from the weight of the ice on the lines. That’s not even taking into consideration the transformers that were blown.
I remember that my family had no power, with snow and ice, for longer than a week. I wish I could remember how much snow we had that year. And I wish I could remember how long we were really without power. My family did quite well in that storm because we had a wood fireplace, where we could keep one room sufficiently warm, with a flat top that we could cook on.
Even with all the power outage skills that my husband and I have, it only mildly prepared us for the day that an Otter Pop propped our freezer open this past summer.
Fortunately for us, the freezer had only been ajar for a couple hours and we caught it before we had a complete loss of our frozen foods.
And for as much as working in campus dining wasn’t exactly my job of choice, I do value the information that I learned getting my food handler’s permit. In this particular instance, I had the information to easily recall safe temperatures to prevent food borne illnesses.
A couple of my meats were between 38-39°F. Most were further away from the danger zone. And the majority was still frozen solid. My defrosted meat was still safe so I cooked that all up and prepped my pressure cooker for canning hot packed meat. The rest of the compromised meat, that could safely sit in my fridge and defrost the rest of the way, was saved to process the next day.
So with storm season quickly approaching, what plans does your family have for saving food for when the power goes out? Or even your freezer gets accidently propped open? Or your fridge fails you for one of a handful of reasons?
If your fridge or freezer contents can be handled in a timely and food safe manner, there is absolutely no reason why you can have zero food waste when the unforeseen happens.
Pressure Canning
Just about everyone I talk with, who are familiar with food preservation have the skills of water bath canning (the process of canning in glass jars acidic foods). I’m sure you’ve seen people’s canned jams, jellies, tomato sauces, and fruits. Foods that are under the pH value of 4.6 can all be water bath canned, be shelf stable for 18 months, using current lids (when stored properly in a cool dark place, like your pantry or storage closet).
What about the rest of your food that is not acidic; vegetables, milk,
butter, and meat?
That’s where a pressure canner comes in.
Before moving on, I want to acknowledge those who say that they mama, grandma, or auntie still water bath can everything (even the food above a pH 4.6). I’m not going to argue with your mama, grandma, or auntie. Food is one area where I prefer to not take my chances. The risks I make in life, I prefer to make elsewhere. Pressure canners can be purchased for less than an Instant Pot. So I choose to use the pressure canner and encourage everyone else to use a pressure canner as well. It also has the least processing time. Those who claim to water bath meat do so with a processing time of over 3 hours. With the pressure canner, processing time runs from 75-90 minutes (for elevation 1,000 feet above sea level and lower) depending on the size of your jar and type of meat you’re canning. So from the money and time perspectives, the pressure canner is still the best way of processing (all other food risk issues put aside).
Another bonus to investing in a pressure canner is that it’s two canners in one. You can pressure can with it as well as water bath.
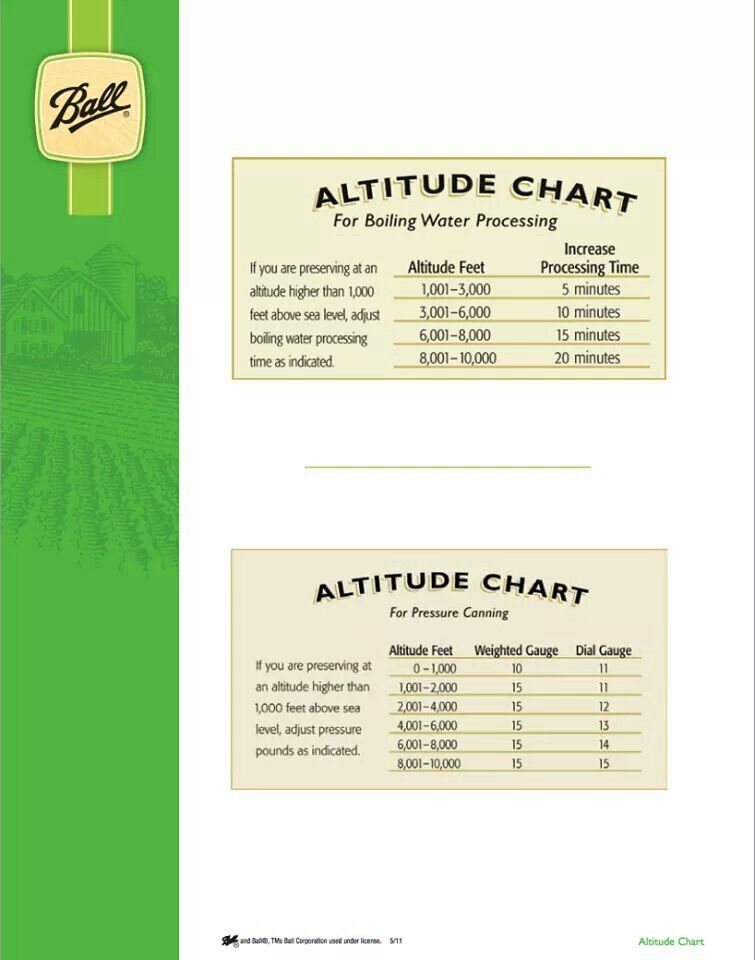
Pressure canning weights and processing times vary dependent on the elevation at which you are cooking.
Another subject that can bring some heated conversations is cold pack vs. hot pack pressure canning meats. What you need to know is that cold pack means that you put raw meat into your jar and the processing time cooks your meat. Hot packing means that you cook your meat until a little pink is left and then you pack it in your jar with a stock or water. There are safe ways of processing both ways, when you look at the cuts of meat, how it’s packed, and what proven canning recipes state.
A bit of it comes down to common sense decision making as well. For example, the meat that I took out of our compromised freezer (38-39°F) was safer to hot pack. The reason is that once you come to 40°F bacteria start to grow and cause problems. So I immediately cooked the ground beef, even a little longer than until only slight pink remains, because I didn’t want to start the canning processes with a possibility of the meat being compromised. When canning, the meat nearest the center of the jar doesn’t reach the high temperature to kill off bacteria as quickly as the meat nearest the edge of the jar. So by making sure the meat would all be thoroughly cooked (between pan and canning), I make the chance of food borne illness less. Of course, this meat I’m going to use before the other meat I have canned, but this is all about making the choices that make sense with the science behind food preserving.
Something worth noting, that in the ideal situation where there is no compromise to your meat, how you can it is going to determine how it turns out. In the instance of ground beef, if you hot pack it, you will end up with canned beef that is small crumble in shape and texture. If you cold pack ground beef you will end up with a product that is solid–comparable to a meatloaf or a pressed meat like SPAM. So if you’re canning meat in a non-emergency setting, think about how you would like to use your canned meat. Because that is going to help you decide how you preserve your meat.
Things to Watch Out For
Obviously, the first signs of failed seal are if your lid buckles or the lid never seals to begin with.
When you remove your jars from the canner you can immediately spot the first failure type, a buckled lid. It’s any type of warping that you see on the lid. Even if the seal feels sound, it could be a false seal that will break on your shelf after you let it sit for a week or two.
Think of this issue as soundness of a structure. When you build a house, you don’t use warped wood or a broken foundation because it can cause problems to the soundness of the house in the future. Everything could be fine for a few years, but the time comes where the house gives way to other problems because of unsound structural sources of the house. A buckled lid may have a sound seal, but it’s only a matter of time before it fails.
In this instance, it’s just best to remove the lid and reprocess the jar. Your food is not going be harmed by processing it a second time. But, giving it a new lid with a proper seal is going to give it the sound structure your food needs to be safely preserved on your shelf.
Now the failed lid seal, that problem is the one that sneaks up on you. And it’s the number one reason why for good practices you never store your jars with the rings on.
Once your jars have cooled over night it’s time to remove the rings and test the seal. Pick the jar up by the edge of the lid alone. If sealed properly the jar will suspend off the lid. (I still brace myself for my jar to crash to my counter or floor, even though I haven’t ever had one do that.) If a jar is not properly sealed, you’ll hear the lid pop and it comes right off. No big deal, clean the rim of the jar off with vinegar and apply a brand new lid before processing it again.
Now the reason why we don’t store jars with rings on them is because when you go to check your jars (ideally every week), you can immediately see if a lid’s seal is broken. The couple of times it’s happened to me, I opened my pantry door, barely touch the jar and the lid clatters to the floor. Usually this happens before anything starts growing or smelling off. So, early detection of a failed seals is great.
I’ve seen many pictures and heard stories of people who left their rings on their jars. More times than not, they smell something off in their panty and have to figure out where the smell is coming from. They never say it, but I can guess the process of elimination they have to go through in removing rings. Sometimes they don’t have to touch the rings because they see a science experiment going on in a jar. A regular inspection of lids, with rings off, prevents spoiled jars from going this far.
Siphoning
There are a few reasons why your jar siphons (loses liquid). This is a great article in covering all the possible reasons. I want to point out what it looks like.
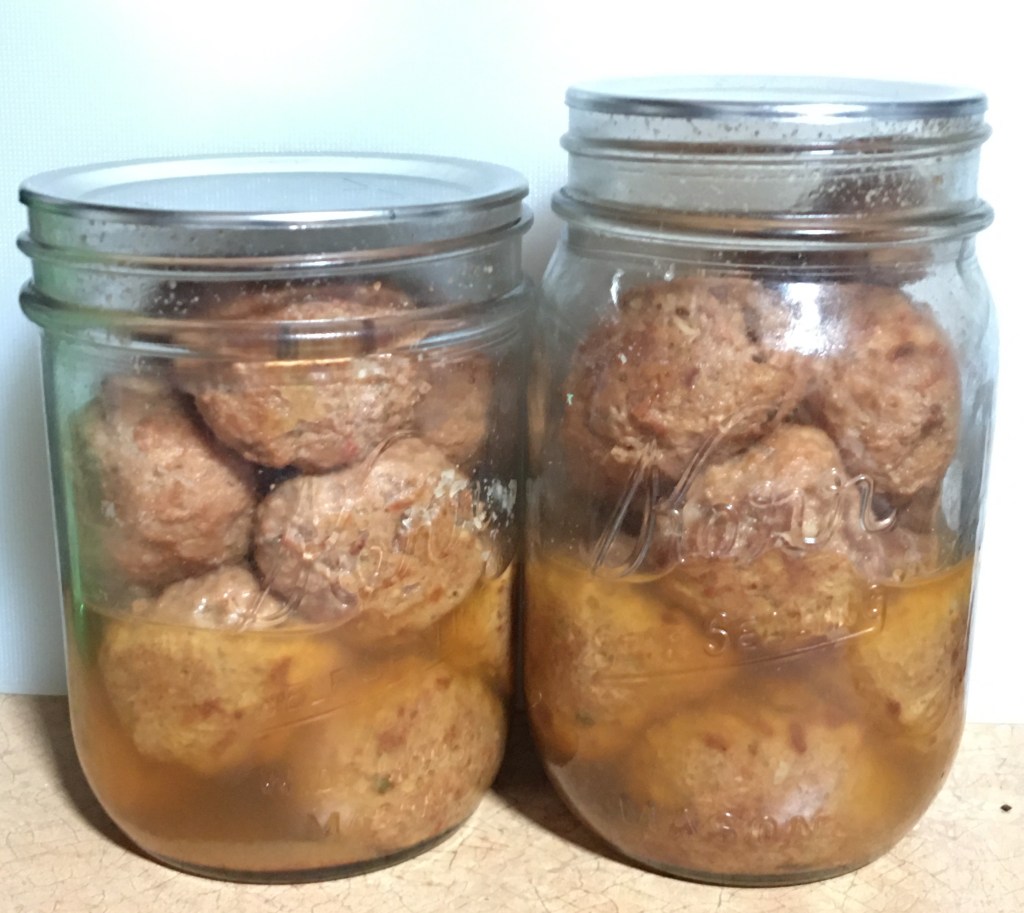
This is one of my canning sessions. These two were the only two jars that siphoned, out of the 7 in my canner. Both lost over half their liquid before sealing. Truth be told, I have no idea why these two failed (losing half a can of liquid or more is a failed seal). But with this much liquid missing, there was no way I could put these on my shelves. I could have put these in my fridge to eat the next day. Instead I chose to put in more beef stock and re-can them with a fresh lid. (They didn’t lose any liquid the second time.)
Siphoning is only a problem when you lose a drastic amount of liquid like this. Otherwise, siphoning is a common occurrence in canning and generally not a problem. Any meat (or other canned product) above liquid line will be discolored over time. It’s still good, just not visually appealing.
An interesting story is that I never learned how to pressure can from my mom or grandma, because my grandma tried pressure canning and could not figure out why she kept siphoning like this. After a few fails she just called it quits. Mom was pretty impressed when I had this conversation with her. The bottom line is that technology is pretty amazing in this day and age, where we can teach ourselves new skills and problem solve with a little research.
So please know that if siphoning was a problem with your previous attempts at pressure canning, know that making one or a couple adjustments can solve this problem for you and you can prevent it in the future.
Back to the Meat Save
As I mentioned earlier, I was so glad to have the skills to can the meat from my freezer. At first my husband was freaking out because he thought it was all lost. (And the freak out would have been rightful had I not been able to save our meat.) But his reaction is what most people have. Especially with food prices so high.
I cannot tell you the value of the calm of pulling out the pressure canner and setting up for an unplanned canning session. The best feeling of all was knowing that the whole incident was not a lost moment. My husband learned how to can meat. Up until this moment, it was something that I did and he just popped into the kitchen to find out how I was doing. But now, if we have a moment where we have to marathon can again, we can take shifts and not lose out on sleep or meat.
What are your plans for the coming storm season?
Are you prepared for a moment where your fridge is not working for you?
What cooking sources do you have for a no power situation?
Some ideas I would like open for consideration is pressure canning soups, meats, and vegetables. In a worst case situation, these are safe for you to crack the lid and eat straight out of the mason jar. Or you can warm them in the matter of minutes over your grill.
Another option is freeze dried foods. All you need alternate fuel for is to boil water. The water can then rehydrate full meals for you that are warm.
I know power outages are hard on the whole family. But by thinking in advance, it is possible to turn it into more of an adventure instead of worrying about food loss (by opening and closing the fridge) or getting burnt out by cold food.
If you’re interested in new recipes that require nothing more than a camp stove, this is the first site that I go to search, Trail Cooking. Under her tab, Trail Cooking, Sarah has an amazing list of recipes. Usually I find a handful of interesting recipes on most sites. Here, I have a list that rivals the lists I have for my cookbooks on my shelf at home. So please be sure to check out her menu offerings!
If you’re not yet into canning but still would like to prepare for no power meal options, check out The Good Steward.
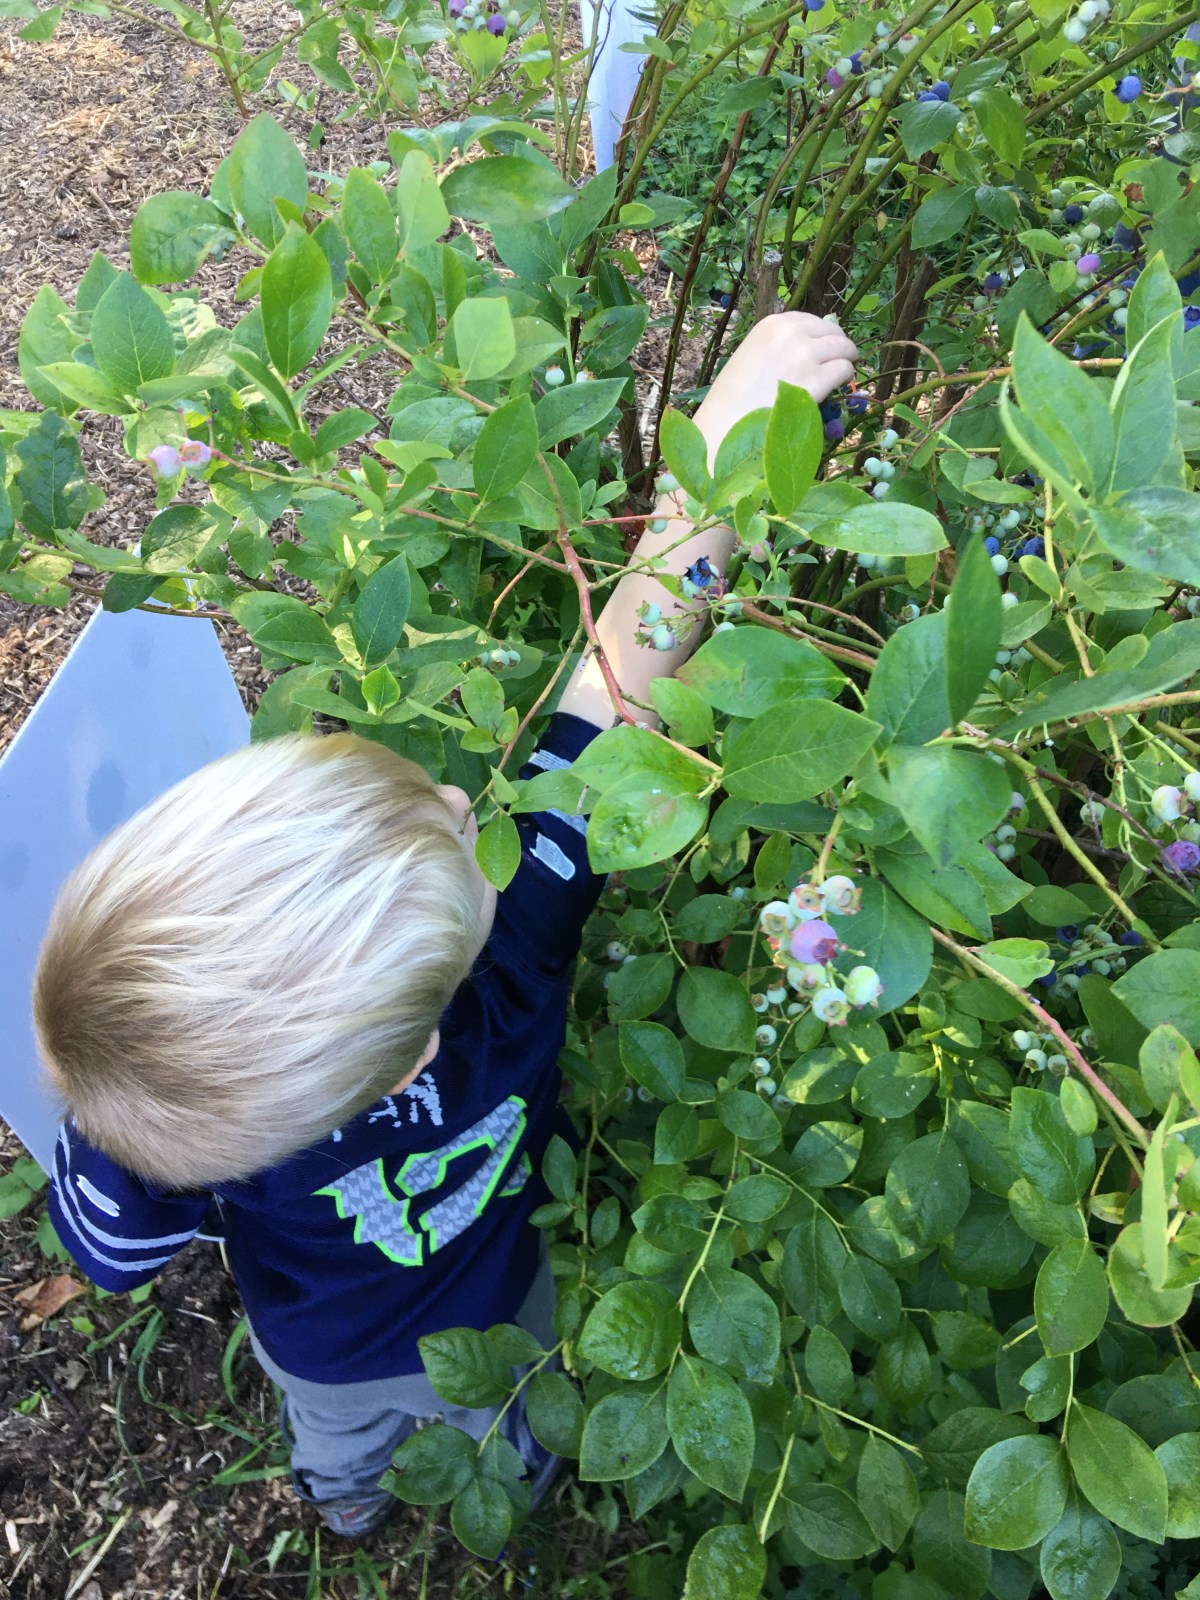
This picture was our family’s first time going out to pick blueberries. I have a second berry picking appointment coming up this weekend and I wanted to share with you our experiences and what you can do with any blue-berries that you picked this year. Or if you’ve yet to visit a blueberry farm, than the berries that you can find in your local produce stand or appointment.
This year blueberries were slow to come into season because of our long cold and wet spring in the Pacific Northwest. (In fact, our whole growing season was completely thrown off, not just the blueberries.
Why did I choose to pick our own berries this year?
My youngest two kiddos LOVE blueberries. If my mother in law or we buy a pint of blueberries from the store, these two will gobble them all up while your back is turned making lunch. LOL I wish that were an exaggeration!
My problems with store berries are that produce prices have jumped through the roof so much where I can only afford to buy one fruit, in moderate weight, each time I go to the store. Yes, we’re a family with a tight food budget. And truth be told, blueberry prices make it so that this fruit really isn’t in our range. I can choose a pint of berries or a few bunches of bananas, or a bag of clementines. So If I want to have fruit to last past one meal, you can guess which direction I usually go. And then there’s the problem that when the blueberries are on sale, sometimes I find berries that already turn, or they’re molding in a day or two at home. Again, not cost effective.
So when I saw a social media add for a local blue berry farm, I jumped on the opportunity!
If you know grocery store storage, you know that the fruit you purchase today is already about 3 weeks off of the plant that it grows on. So picking berries ourselves means that they’re the freshest that you can possible get. And you have the bonus of the fruit being picked while ripe, instead of green. (If you know how quickly the vitamins leave your produce once it’s picked, you understand the value of eating your produce as soon from picking as you can get.
Then there is the educational bonus. By taking the boys out to pick, they see where the blueberries come from (not the store refrigeration case), what the blue berry bush looks like, what a ripe berry looks in comparison to a green berry, and what kind of environment it takes to grow blueberries. (Yes, we picked with boots on our feet!)
Advertisements
This was definitely a learning experience for the boys because we had been picking an insane number of blackberries this summer. And the one thing that they immediately noticed is that they love picking blueberries over black berries because they don’t have thorns!
The remaining bonus to picking blueberries our selves is that we can speak with the farmer and learn about their farming practice. If it matters to your family if a farmer uses pesticides, natural organic sprays, or no sprays at all, this is how you get that information. There are many local farmers out there who do not have the time or money to purchase the “organic” sticker from the FDA. And often times, these farmers use a lot less product on their crops than the companies who can afford that sticker.
Pearson’s Bees and Berries is one of these farms. I would never have known that they skip even the organic sprays had I not met them and talked with them. But the first thing that I loved about this farm is that their bushes are heirloom. This is where I draw the most value from farmers. With as much as society pushes for scientific advancements, I really do not want those advancements in my food. I’m not the mom who buys everything organic. But I am the mom that buys produce (and grow my own) from heirloom and heritage plants whenever I can.
And I’m also the mom that buys directly from local farmers over grocery stores. People are under the assumption that farmers make a lot of money from their crops. Unfortunately, especially for the small farms, they don’t make very much from their crops unless they sell directly themselves. And I would rather my money go directly to a family to invest in their business than a chain. Plus it frees up the grocery resources for the families who are unaware of their local farmers or (for any numerous reasons) can’t make it out to the farms themselves. And if you’ve ever lived in a community where the power goes out or a snow storm comes in and the onion bins are empty, you know what it means to free up resources when you can. (The onion bin is a true story. Every year!)
This first visit to the blueberry farm, we picked 9 pounds of berries. This weekend we’ll pick another 9 pounds.
What do you do with all those berries???
I’m so glad you asked that question!
With my family, the way that we maximize our small grocery budget is by preserving everything that we can for the year. When berries are in season, we store them in a way befitting to how we will use them throughout the year. Apples we make apple sauce. And last year I learned how to can apple pie filling. So in the fall, I can buy the apples at the cheapest price of the year and take care of our apple needs for the year. Black berries, we pick them (for the price of gas to get to our picking location) and have our jam for a year or two for the insane amount of PBJ that we go through in our house.
This is my first year with blueberries to preserve for the year. So I photo documented everything to share with you here. If you decide to hit the berry farms this year before the season ends, you can have an idea on what you want to do with your berries!
Frozen
The first thing my mother in law recommended to use, when she heard of our first trip of picking blueberries, was that they freeze beautifully. And indeed they do!
I took this cookie sheet, and made a single layer of berries. I put them in the freezer to get them frozen and then put them into zip lock bags. I chose the quart sized bags and measured out the berries into 2 cup increments. Most blue berry recipes that I have (and looking at new ones), this is perfect for making a double batch of just about everything. And yes, I always make double batches of everything. With a family of five, with three of them growing, I just overcook to be on the safe side and err on the side of leftovers. And with blue berry muffins, it’s nice to have one baking session with treats for the week.
If I only need 1 cup, then at least I only have a cup of thawed berries in the fridge for the berry thieves to nab!
Dehydrate
The baker in me made me dehydrate. I’ve had many recipes where the juice of the berries was just too much for the sponge and it made a soggy mess! So by taking the liquid out of the berries, you not only save freezer space with this shelf stable preservation but you also keep the right consistency to cakes and muffins.
The problem was what is the right way to dehydrate blueberries?
Before I set up my dehydrator my mother in law had already found a news article that stated the way that you HAVE to do it–but the berries in half.
Now I froze 3 pounds of my berries. And that left me 6 pounds of berries to dehydrate. There was absolutely no way I was going to cut all those berries in half. I’m a mother of 3 after all!
So I performed an experiment.
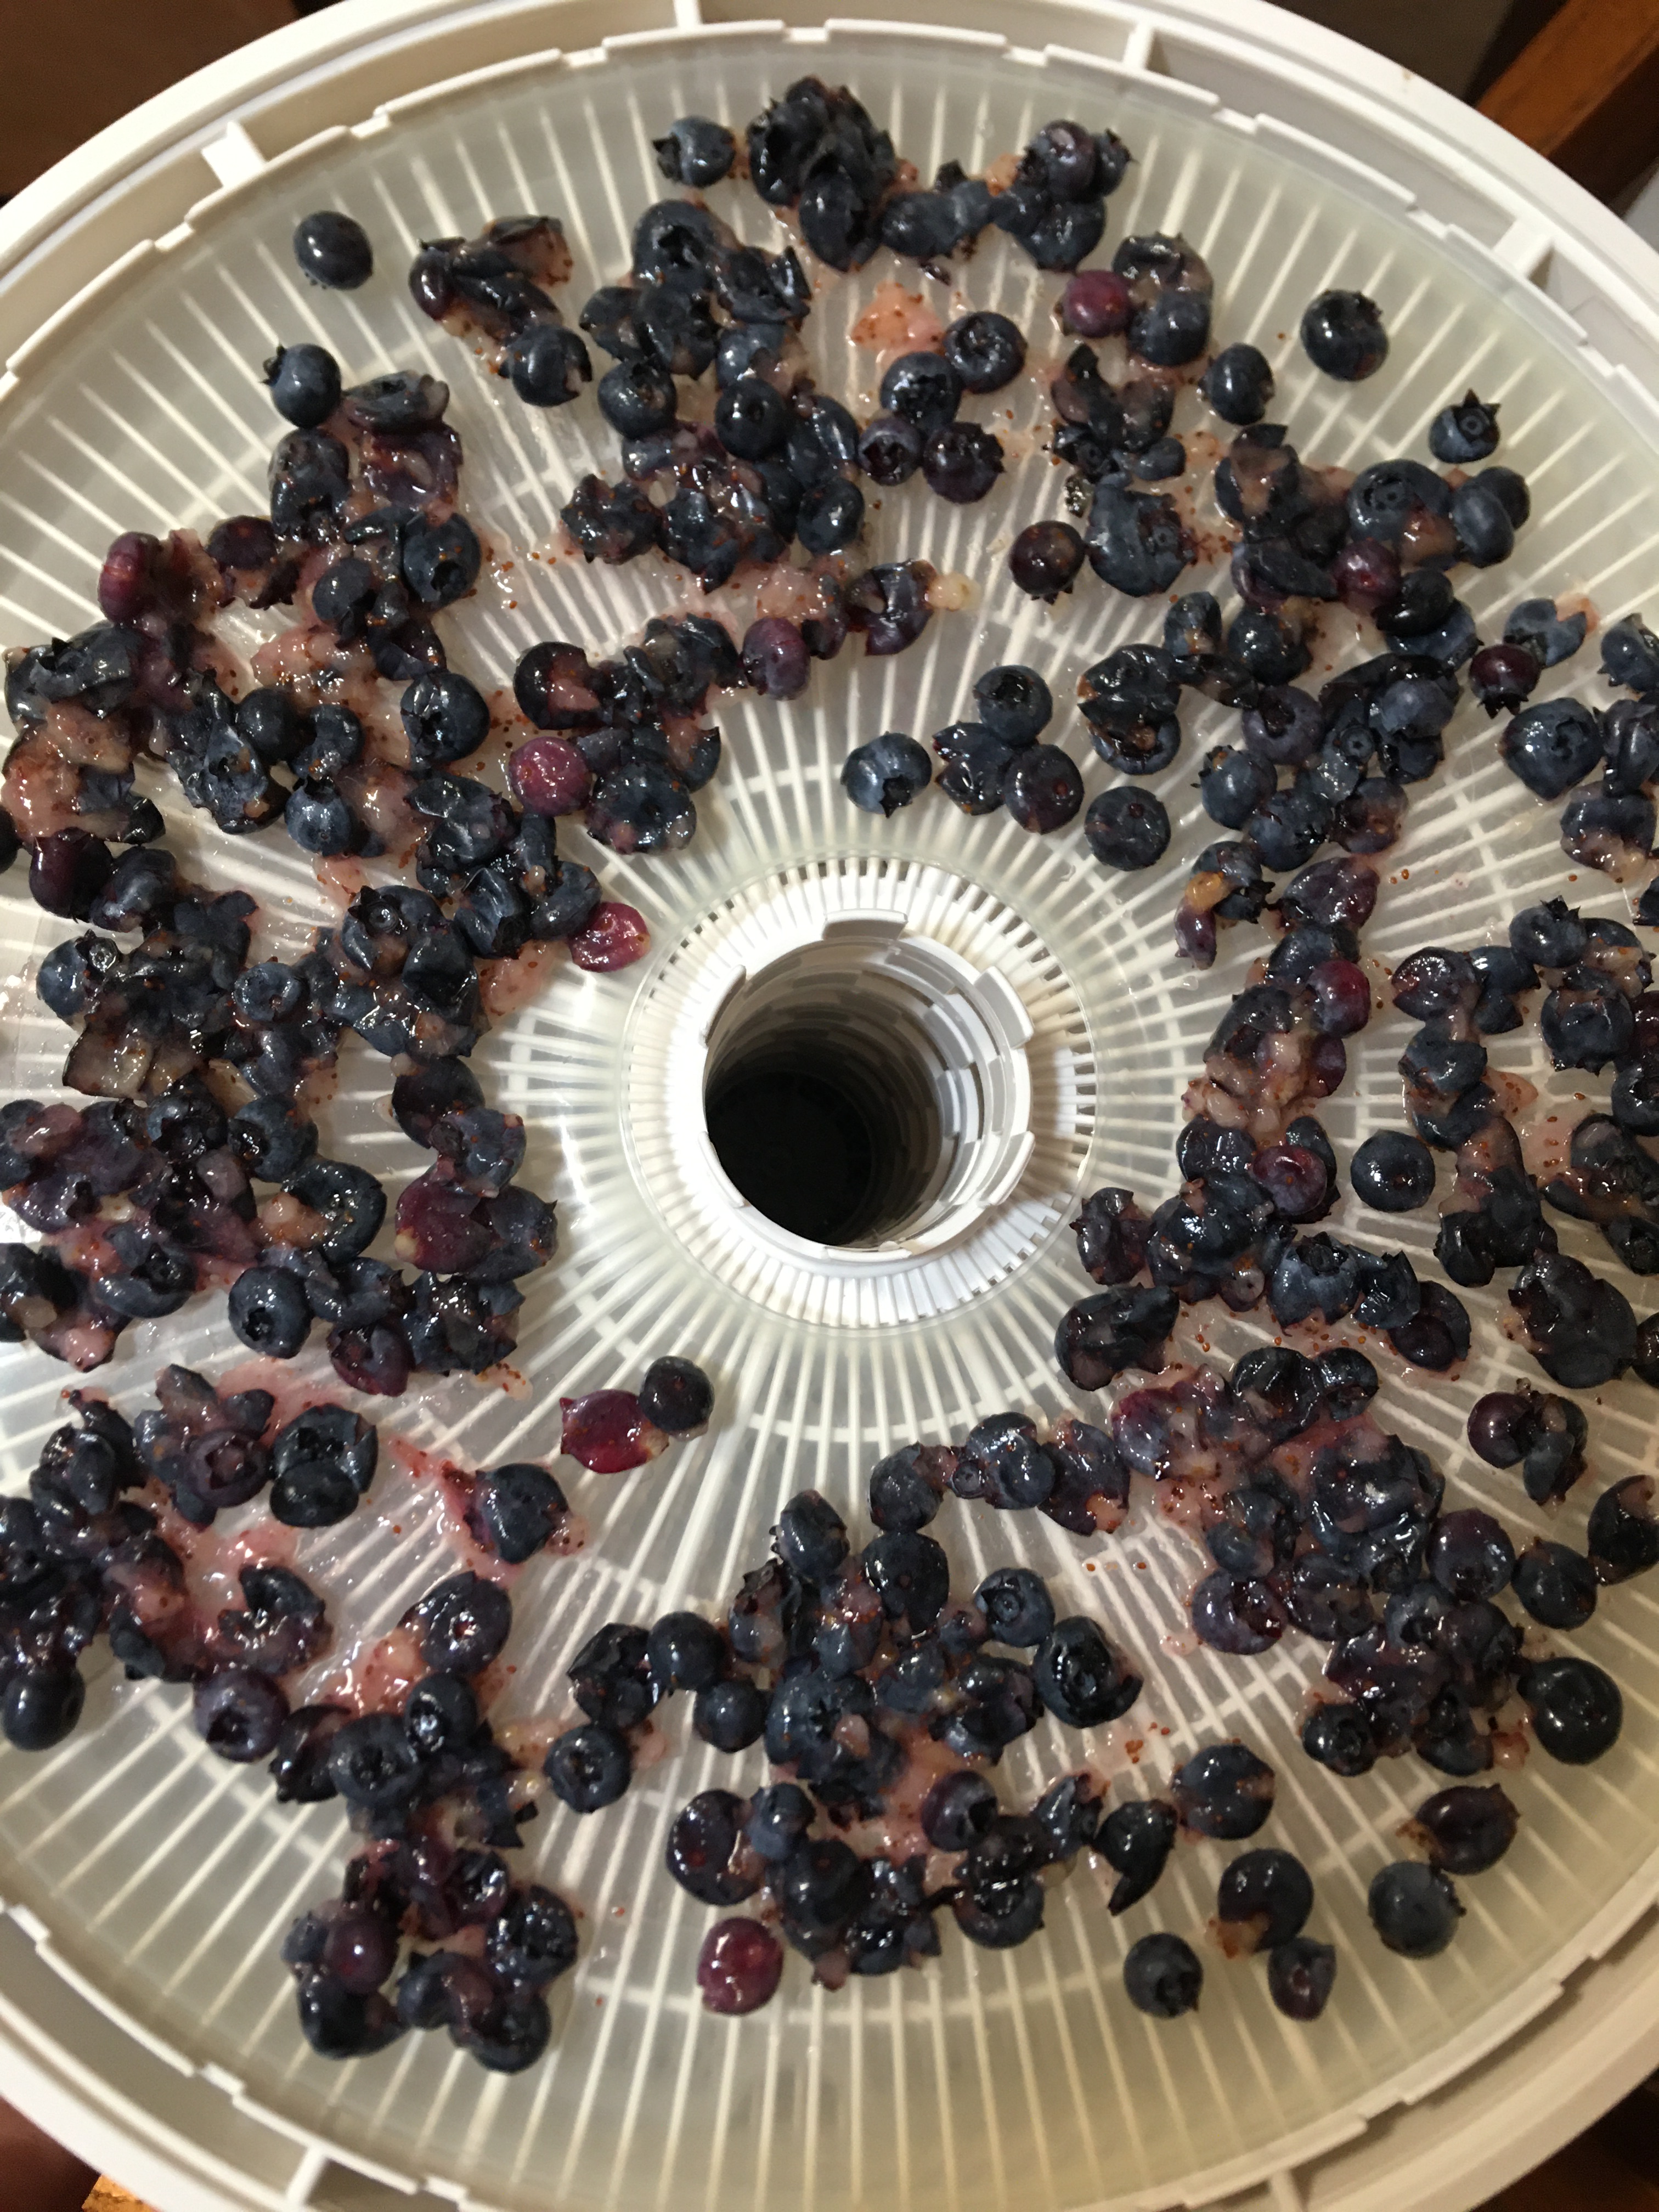
I left berries whole, with an assumption going into this that they would take forever because of the sturdy berry skins, for one tray. The second tray I filled with berries that were cut in half.
As seen above: whole berries and smashed berries.
For three trays I lightly smashed the berries onto a plate, using a glass cup that I could look through. By using the glass cup you can make sure that you see which berries you are smashing, which ones you already smashed, and just how much pressure you are adding in connection to breaking the skins open. For the smashing, I applied just enough pressure that the skins split open, allowing the air in to dehydrate, and yet keep the majority of the fruit structure intact.
When you look at the pictures above, the whole berries and the cut berries looked the same. So I just put the whole berry picture up. Both of those sets were placed on the mesh insert. I’m done with the days of putting fruit directly on the trays. By using just the mesh I don’t ever have to scrub my trays. Plus the mesh you can fold and break up any of the thin bits that cling to the surface. So even the mesh don’t have to be scrubbed either! The Right picture is the smashed berries. You can see what I mean when I say just enough to break the skin. Some got a bit more flat than the other (which looks a lot like the whole berries on the left). But these berries are a bit messier. I wanted to save the mess and not lose out on any of the blueberry goodness. So I dehydrated these on the jelly roll sheets.
The final two trays of blueberries were my fully mashed berries. I’m teaching myself how to seed save from different plants. My tomatoes are not yet ripe, so I can’t practice on those yet. So I chose to use the blueberries as my maiden voyage. And I’ll talk more about that below!
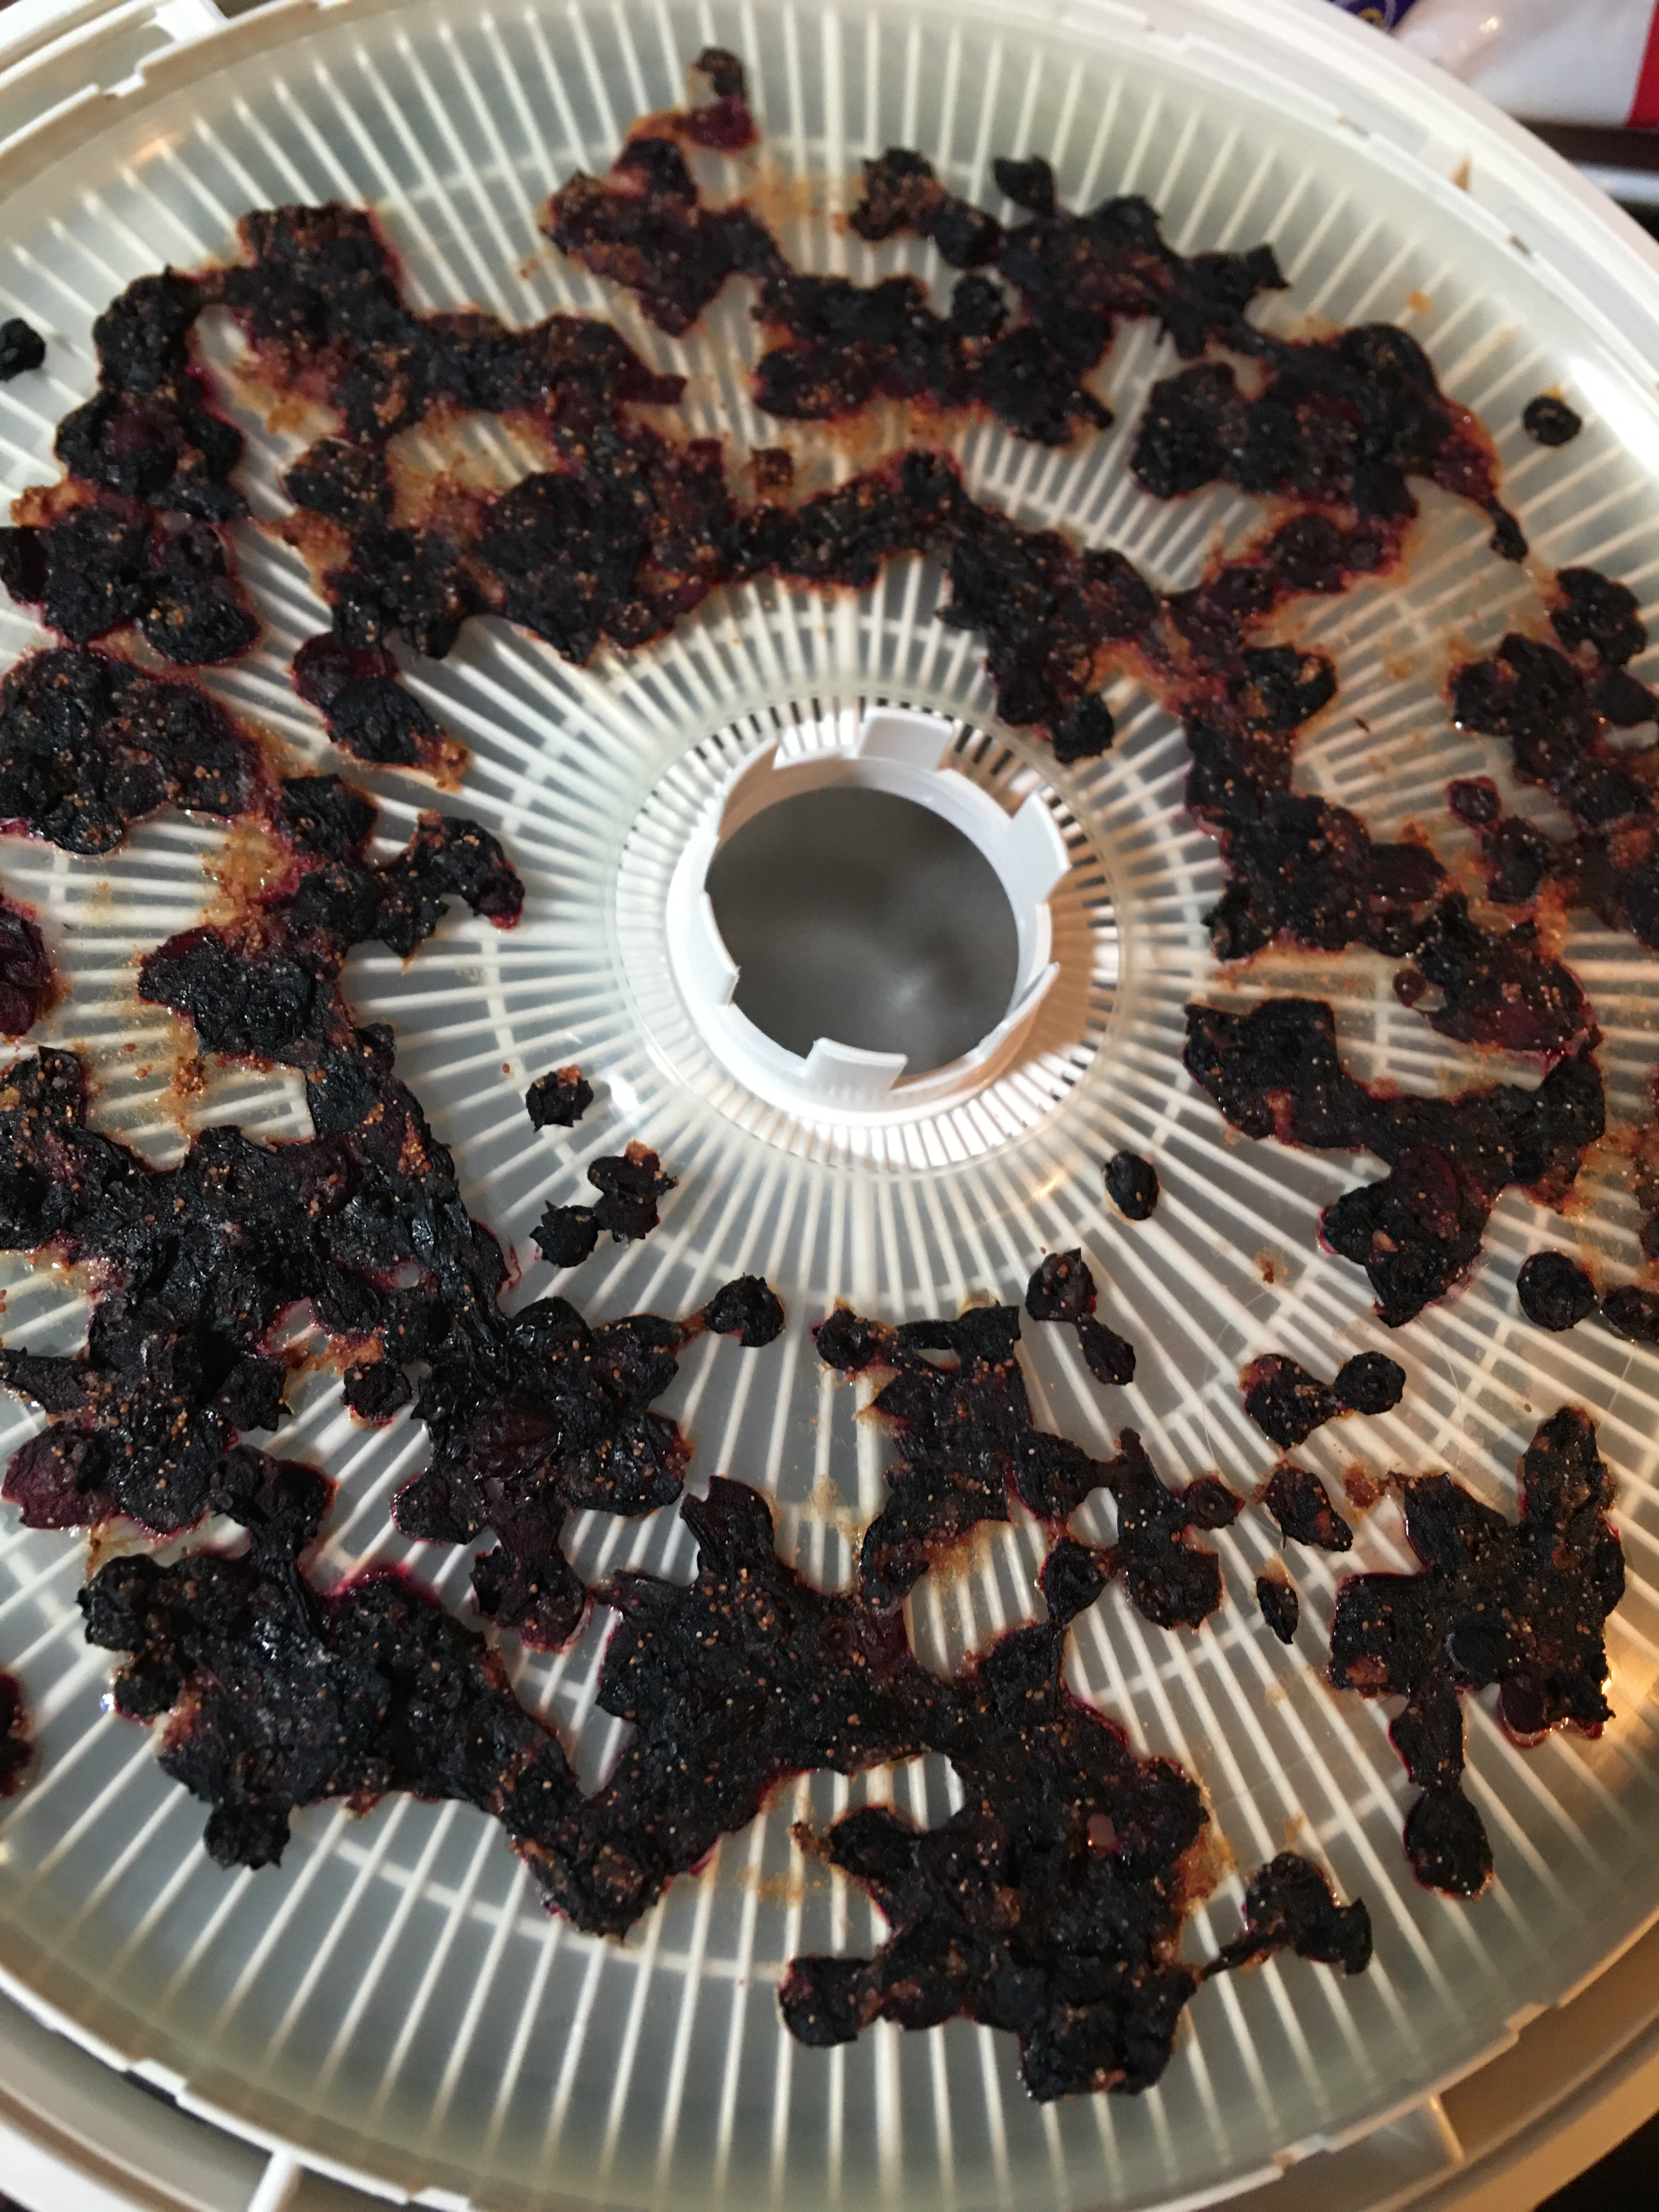
As you can see below, with the final dehydrated product, the fully mashed berries were a mess, a beautiful, lovely mess! So those of course were on a jelly roll insert.
As seen above: smashed and fully mashed.
The drying time and final products actually surprised me! The smashed and mashed took the least time to dehydrate, as anyone would expect. They took about the same amount of time, 13 hours. (Of course we had very high humidity days, which didn’t help here.) The mashed berries pulled off the jelly roll just like any fruit leather would. So if you want fruit leather you can use a blender or you can skip that extra clean up and just use a plate and glass. Of course the blender will give you the means of smoothing out everything across the jelly roll and produce a nice solid leather you can cut into perfect strips. Or you can go the quick and dirty route and skip the whole cutting process. Either way works and is a complete judgment call.
The smashed berries surprised me. I didn’t think they would turn out as perfect as they did. There was very little flesh spread and it looks nearly identical to how the whole and cut berries turned out, when they finished. These look exactly the same as the dehydrated blueberries in the packets of oatmeal or premade blue berry muffin packages. My walking away point is that for the least dehydrating time and same end product, a light smash is the way to go for dehydrating berries!
What surprised me the most was that the cut berries and the whole berries took the same 23 hours to dehydrate. Cutting the berries didn’t speed along the process for me. Even when I ate a whole berry and a cut berry, their textures were identical. I’m not sure why the article my mother in law read said that you had to cut the berries for the best result. There wasn’t a difference.
However there was a difference between the whole/cut berries vs. the smashed berries. When dehydrated the smashed berries had a little bit of pop corn roughness to it, but it had a bit more “airiness” to them. You could say they had a snap and not as dense feel to the teeth. It wasn’t a completely night and day difference between the three methods. But it was noticeable.
My Vote: a quick smash of the blueberries and dehydrating them is the way to go!
One side product you might not have thought of
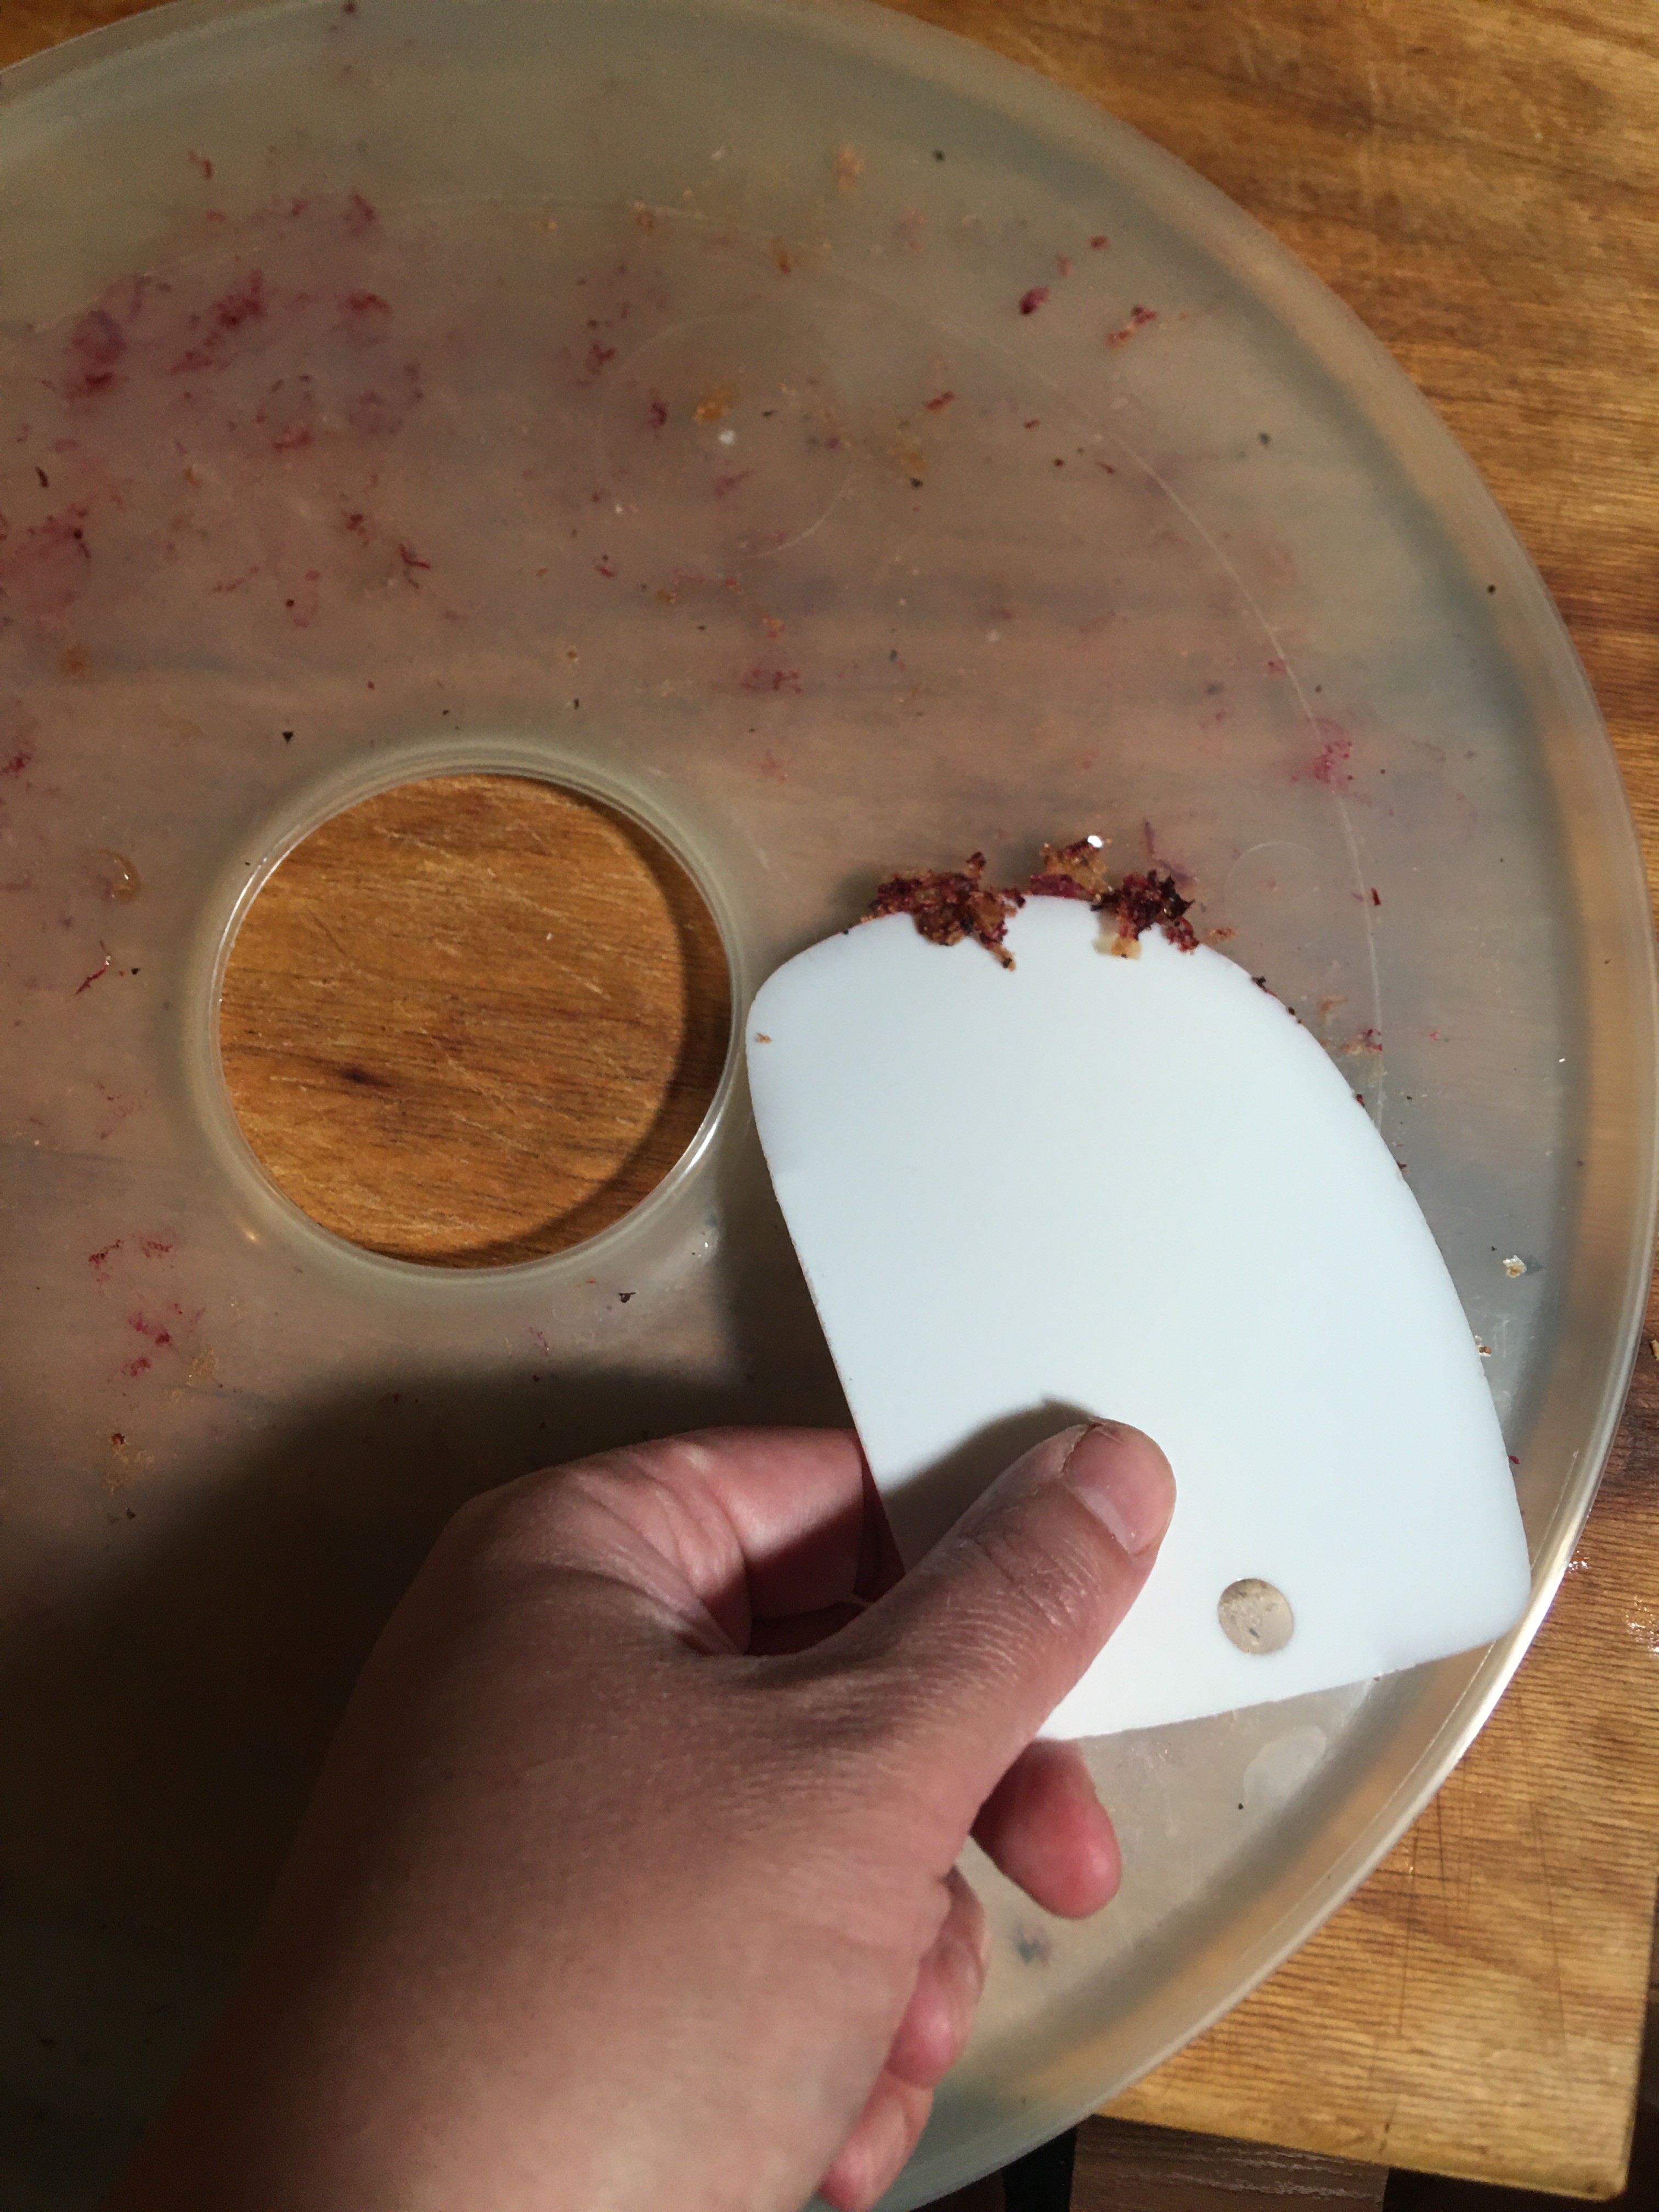
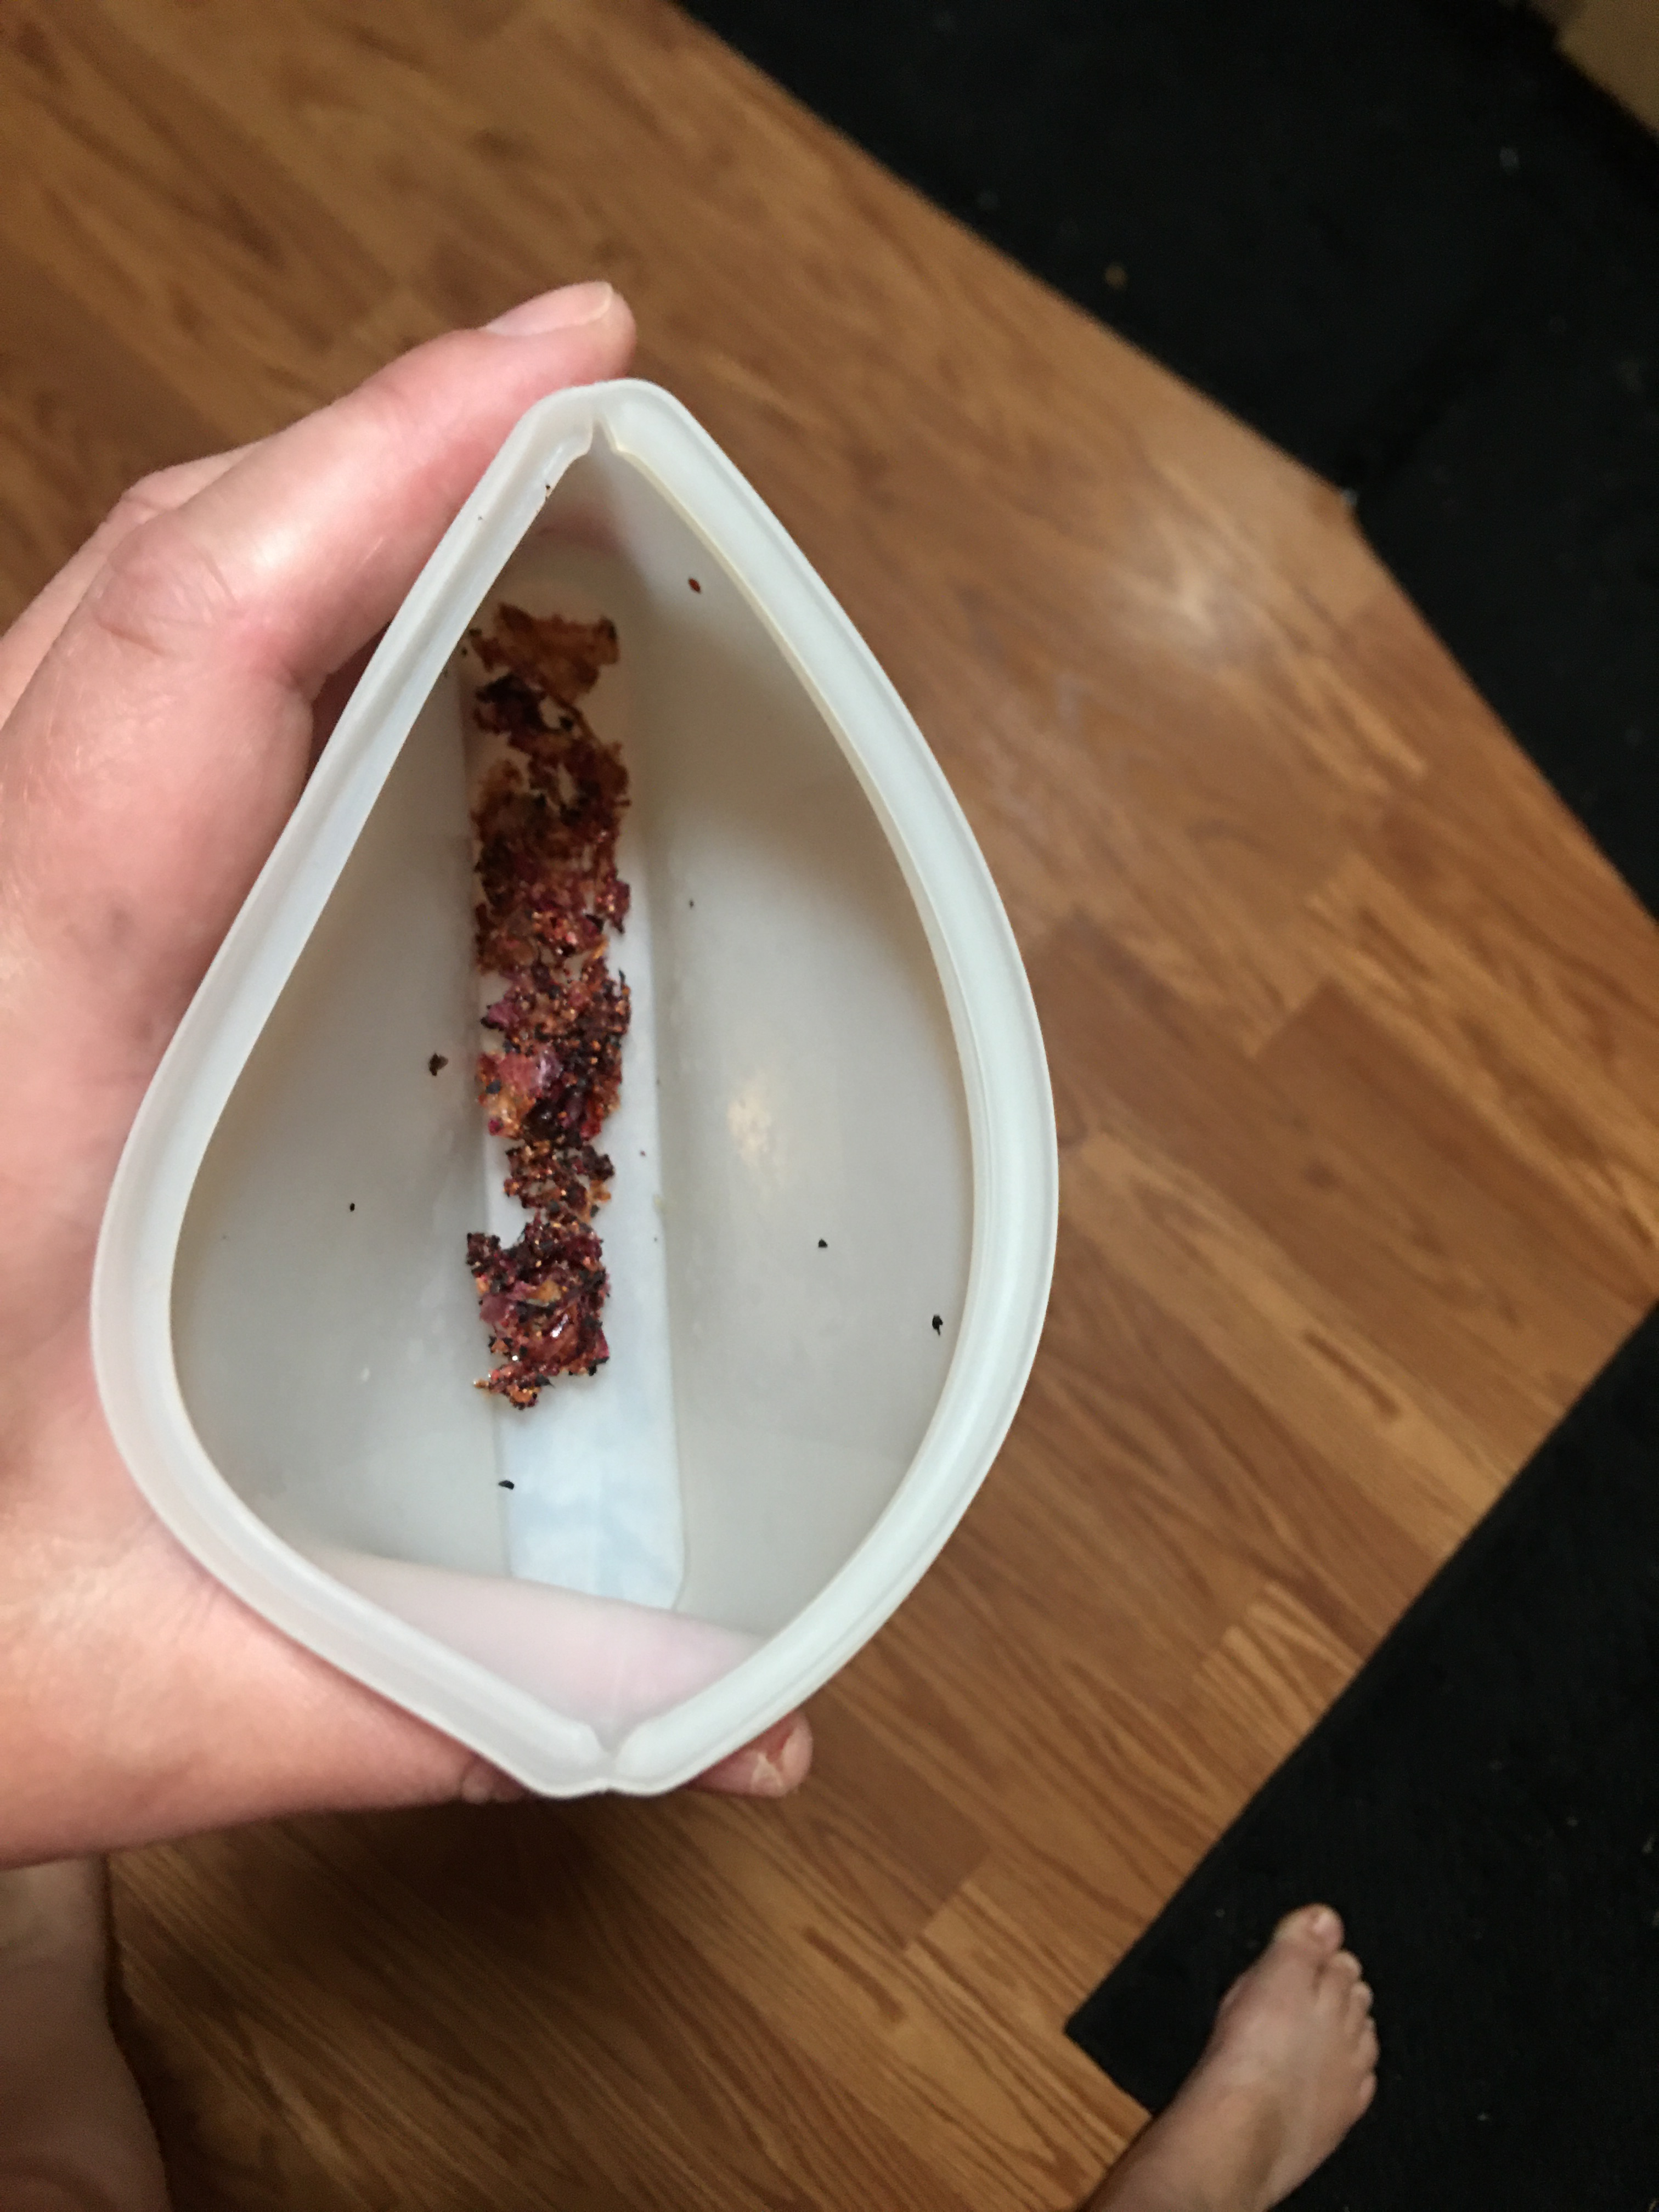
Before I end this portion of dehydration, I wanted to talk about this one last observation. I like finding ways of using as much as I can of the things I preserve. And if you’ve dehydrated long enough, especially with the jelly rolls, you know there is always that bit from the juice and fragments of flesh stuck to your tray. This time, I decided on another experiment. I scraped off this little remnant. As you can see in the right picture below, I didn’t gain a whole lot of extra bits off of 5 jelly rolls, but I want you to stay tuned because I use this bit in a recipe below and I want you to know that this is completely usable!
What caused me to go to this effort?
I had to scrape my jelly rolls anyway, to make it quicker for washing when I was all done–no scrubbing. I took a taste of these scrapings. And let me tell you what! These scrapings have just as much flavor as the blueberries themselves. So yes, all that flavor, I was definitely going to cook with that.
Saving Seeds
I have no idea how successful this attempt of seed saving will be. I’m very new to this skill set. Including this batch of blue berry seed, I have three other plant varieties that are in the process of cold stratification.
If you are also new to seed saving, perennial plants do require cold stratification in order to tell the seed that it’s ready to sprout. I only have a small garden so it’s not space effective for me to plant seeds in the fall and let them over winter (cold stratify naturally) and hope they take off in the spring. So the best option for me is to go through the stratification method using my freezer and start the seeds indoors and plant any successful starts.
With blueberries, the methods I’ve seen people use for capturing seeds all involved using a blender and wasting the flesh. As you can imagine, I have no intention of losing berries to waste, so I tried something different.
If you remember above, when I talked about mashing the blueberries I mentioned seed saving. Here is what I did. The mashing broke apart the berries that you would see happen in a blender. The difference is that the flesh, I was able to put in my dehydrator and use it as a food source.
On the plate that I mashed the berries on, I removed the thick flesh and left the juice on the plate. With a silicone spatula, I scraped the juice from the plate into the bows that you see here.
As you can see, there seeds were quite numerous from the several handfuls of berries that I mashed. Definitely the seeds are numerous enough to get me a few starts to plant this spring. And I might have enough to share with others.
The method that I used to separate out the seeds from the juice and bits of flesh was the sluicing method. If you’ve seen a video on how you sluice a pan of gold, you understand the steps that I took here. I didn’t pour in very much water, maybe 1/4 cup of water at a time. I swirled the water in the bowl and let the water separate the juice and flesh from the seeds.
It is true what you hear; the seeds to stick to the bottom of your blender, or in this case your bowl. There will be a few floating seeds, but those are the ones that you don’t want anyway.
I sluiced, in my soup bowl, four or five times until you I got to this last picture of the seeds in the bowl.
From this point I continued in the stratification method that others already show how to do; place a damp paper towel in a zip lock bag, place the seeds on the paper towel, and place in the freezer to start the stratification process. (These are placed in the freezer for a minimum of 90 days for blueberries.)
I know that I’m not going to have any blueberries for five years, but I want to start this process now. And I might have to plan ahead and grown several bushes because I definitely have blueberry lovers on my hands!
Freeze Dried
While I do not have a freeze drier, I so wanted to mention this method of food preservation. This method maximizes on the flavor and texture of the blueberry while maintaining the maximum level of vitamin retention. No other food preservation method tops this method at this moment in food history.
That alone is reason enough, but there is also the added bonus of berries being shelf stable and fresh for up to 25 years, 1 year after opening. If you’ve water bath or pressure canned any preserves, you can recognize the benefit of not having a jar or seal failing you.
Maybe you’re like me and don’t have a freeze drier. I want you to know that you still have that option available to you.
I’m going to talk more about freeze dried berries next week, because I’m going to use these in recipes. And believe me, if you are a professional cake or cupcake baker, you’re going to want to see what freeze dried berries can do for you and your clients. You’re going to have all the berry flavor without throwing your water ratio off. Plus the added bonus of being able to decorate with the berries that you can’t do with fresh and less of your precious time than dehydrating.
Blue Berry Recipe
I wanted to share the blue berry recipes that I have and how each of these ways of preserving blueberries act in a given recipe, but I’ve given you ALOT of information already. So be sure to tune in next week for the recipes and how the berries work.
BUT in the meantime I don’t want to leave you hanging with the jelly roll scraping. So here we go on this quick analysis.
As seen above: the berry scrapings and blueberry pancakes (above: whole dehydrated berries, bottom: berry scrapings)
I didn’t have very much of the scraping, just enough for two pancakes for the boys. I made two other pancakes with the dehydrated berries. (And of course some plain flapjacks for the kiddo who dares to turn his nose up on blueberries.)
The dehydrated berries had a bit of crunch to them, but did not disappoint in the flavor department. The blueberry scrapings I absolutely loved! There was the full blueberry flavor without the bite of a dry blueberry, or even the wet squish of pancakes with fresh berries in them.
I’m so tempted to make more mashed berries and spread it very very thin to maximize the blueberry scrapings, because it’s the absolute perfect world for blueberry pancakes–full flavor without messing up the texture of a classic pancake!
Products seen today
These products are affiliate links. We can receive a commission from purchases made through these links, but at no extra cost to you. These products I have purchased for myself. Where I have talked about them, my statements are based on my experience on these products.
This was a replacement dehydrator for my other Nesco that served me well for over a decade. I wanted to make this recommendation because this dehydrator came with a mesh and jelly roll for each tray. I was prepared to purchase these accessories, but was so pleased to find out that I didn’t have to.


Leave a comment