Relish for the Non Pickle People!

This was one wild ride for the growing season for my little garden this year. Here in the Pacific Northwest we had absolutely no spring, just an extended winter until June.

Normally we can start planting things as early as April. Most home gardeners wait until Mother’s Day to plant starts out into the garden. May is when all surprise freezes are no longer a possibility. So you can imagine the thoughts running through my head when halfway through June we still hadn’t broke past the 60’s. I even planted double my usual tomatoes because it looked like the grow season was going to be that far off of the norm and we were not going to get as many tomatoes.

Hope returned when August showed summer in all its gardening glory and continued through September. Usually September is our Indian summer. But the beautiful weather continued all the way through October. Actually traditionally cool and rainy October kicked in that last week.

All this time I left my tomatoes going. There were so many green tomatoes and I hoped beyond hoped that they would turn red on the vine before we lost our extended summer.

This first week of November was when I had to pull the plug. And that meant I had somewhere around 6-7 quarts of green tomatoes–hands down the most green tomatoes that I’ve ever had to figure out what I was going to do with them. Mind you, I didn’t grow up where fried green tomatoes or green tomato sandwiches were common place. I know of these things, but they were never part of my childhood diet.

Looking up green tomato recipes, there was one that stood out–Green Tomato Relish.

I am not a pickle person. That’s story for another time. But I married a pickle person (who by chance isn’t a tomato person…and I am!) who loves pickles and especially relish. I figured that I would can some green tomato relish for him so that he had some homemade condiments that were right up his alley.

From what I found time and again with green tomato relish recipes is that it’s comparable to pickle relish and several people commented about how they preferred it over pickle relish. That caught my curiosity!

As I began to read through several different recipes I saw most of them were very similar in ingredients to fresh salsa. I love salsa!

Then the thought hit me that maybe, just maybe there is a relish in the world that a non-pickle person would like. (And when I say I don’t like pickles, I mean that I can pick pickles off a restaurant burger and taste exactly where they were place on the patty just by the residual brine that was left behind.)

I used this video from OurHalfAcreHomestead, Green Tomato Relish 2018. Besides the fact that I had nearly all the ingredients in my kitchen already, the huge selling point for me is that Miss Volfie is my kind of woman! The way that she cooks is how I cook (you make things so frequently that you go off of the recipe in your head). It was how I was taught to cook and how my dad was taught to cook. So this cooking technique automatically flips a switch in my head that starts the fanfare that this woman knows what she’s talking about. She’s not after the fame and money but honestly passing on what she knows best.

I highly recommend that you watch the video. But in the case that you just want the recipe and steps without the talk, here it is.

Green Tomato Relish

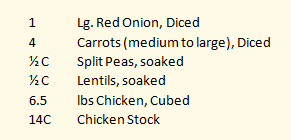
Miss Volfie’s batch is broken down to this ratio:

  • 2 Cups Green Tomatoes
  • 2 Cups Onions
  • 1 Cup other Vegetable (Sweet Bell Pepper in this instance)

I love this ratio because it’s easy to make you “batch” based off of the amount of green tomatoes that you have. No need to be short or waste what you have on hand. Your green tomatoes are literally your limiting factor.

(This is the measurements that were used for a triple batch)

  1. Mince your Tomatoes, Onions, and Bell Peppers
  2. Sprinkles about 2 Tbsp of salt over your vegetables and let the salt extract the water from the vegetables over night.
  3. (Next Day) Prep your jars for water bath canning your relish.
  4. Add your vegetables to a colander.
  5. Rinse the excess salt off your vegetables and drain them off.
  6. In your stock pot add the following seasonings: *2 cups sugar, *2 cups cider vinegar, 2 tsp salt, 1 tsp mustard powder, 1 tsp celery seed, fresh cracked pepper.
  7. Bring to a boil.
  8. Bottle and put in water bath canner.
  9. Process for 10 minutes.
  10. Cool

Modifications and Verification of Safe Canning

I’ve been teaching some safe canning classes for people who want to learn this skill for the first time. I’m also part of a few communities where I see the debate of safe and not safe recipes more often than I care to admit. Most arguments seem to be around processing times. So if you are a higher elevation, 10 minute processing time is not going to be enough. If you are a low elevation, I only need to process the tomatoes for 5 minutes.

When in doubt, always be mindful of your elevation and go to a trusted source for processing times.

For example, I wanted to verify if this recipe was a safe recipe or just a family recipe that hasn’t changed with updated food safety research. Other than processing time, the other important bit of information to verify is the acidity (the ratio of tomatoes to other ingredients and the added vinegar).

I found a very similar recipe at the National Center for Home Food Preservation (NCHFP), Pickled Green Tomato Relish. The most notable difference between these two recipes is that the NCHFP actually lists cornstarch as an ingredient. Flour and cornstarch are on the list for things not to add to recipes for home canning (with the exception of Clear Gel, which is a modified cornstarch that was created for canning–but this isn’t what’s listed in this recipe).

Cornstarch is a thickening agent. And from my experience in the kitchen I can only assume that the cornstarch was listed in this recipe to thicken the relish juice. Even though the NCHFP is a trusted source for safe canning practices, this is one instance where I am NOT comfortable in following their recipe.

Nobody likes a soupy relish, so here’s how I made my modification. Safe canning means that a certain amount of 5% acid (vinegar) needs to be added to counter the water content of the recipe. Miss Volfie did strain her vegetables, but there was obviously going to be a bit of water content still left–her vegetables were sitting in their juices over night and I think there was a shake in her straining before she potted her vegetables.

With my colander, I added a muslin cloth inside before adding my vegetables. I rinse and strained them. Then I picked up the muslin and compress strained the excess water out of the vegetables. There were several cups of water that I extracted out of my vegetables that would have been otherwise added, thus diluting the 5% Apple Cider Vinegar to a lower acid percentage.

Because I did extract the extra water from my vegetables, an additional step not taken by Miss Volfie or the NCHFP, I had no problem in following Miss Volfie’s lead in slightly reducing the vinegar and sugar volume. (My tomatoes were enough for a 7 batch and I added 4 cups of vinegar–slightly more vegetable weight than the NCHFP recipe, the same vinegar measurement, plus less water content from the straining step, and minus the cornstarch for thickening.)

Now I do agree with the NCHFP for simmering for 5 minutes once the relish comes to a boil. Some people will say 10-20 minutes, but the goal is to get the relish up to a hot temperature so that the center of your jar reaches proper temperature while processing. So I did modify Miss Volfie’s recipe by simmering those extra few minutes.

Advertisements

Here’s the walking away point.

Understand what the science is saying about processing your food for preservation. Food preservation is not just packaging to put food on your shelf. There is microscopic life that we share our world and food with. Safe canning isn’t about being a kill joy. It’s about understanding the world we live in and the food we share with other life forms. It’s about understanding how to create an environment, inside our food, that prevents these bacteria from taking over and leaving us with their food waste that makes us sick.

So look for those recipes that interest you. Check and verify those recipes with the people who spend their occupational lives studying in this area. Are they going to be right? Yes. And sometimes they do something that’s questionable. Go by what you know and at the same time get up to date on new information that’s found. Make your judgments based off of what risks you are comfortable with. And be prepared to answer and describe your thought process.

Advertisements

Now the Fun Part… how did it turn out???

My pickle loving husband couldn’t wait to try what I made, thinking of him. In fact, while I was cooking the relish to jar up, he has already planned out that we were going to have burgers. Let’s face it, my man adds so much relish that you think a burger bleeds relish!

Off he went to the store to pick up ground beef. But he returned with fish sticks because our 6 year old went to the store with him and they decided that the best price by weight was fish over beef. (The things and decisions that come from my family LOL.)

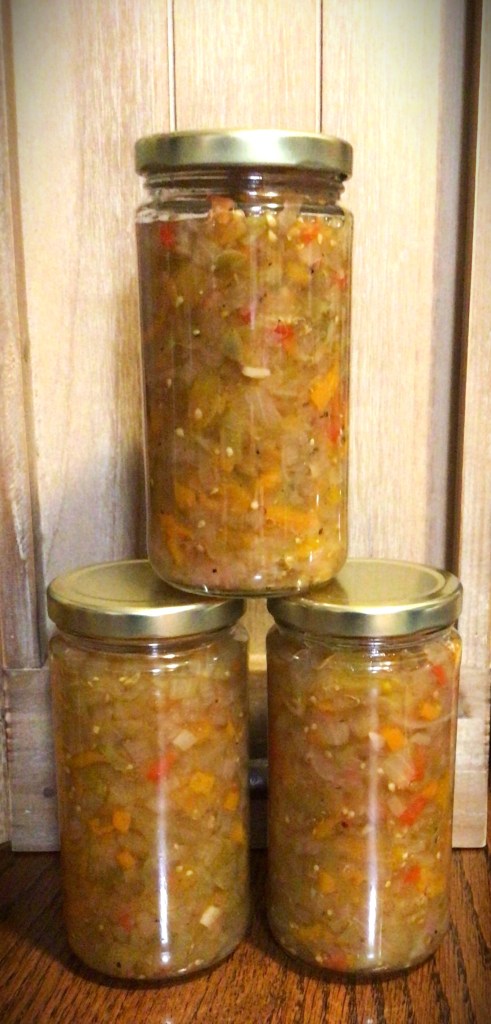
Once the relish was finished processing (one jar was not up to proper head space, but I still processed it so I would know how the vegetable texture would come out and the blend of flavors) I popped open the not-safe jar and taste tested the Green Tomato Relish.

First Impression–It’s not pickle tasting. That’s a win.

Second Impression–It doesn’t fresh or cooked salsa. The Apple Cider Vinegar adds a tartness that just isn’t present in a salsa. That’s a pass.

Can I eat this? Yes.

Will I go out of my way to eat this? Probably not.

What about my pickle loving husband? Will he be okay if we move forward in our married life with this relish and not buy store bought pickle relish again in the future? Maybe. I didn’t ask him that specific question.

However, I did ask him what he thought. He said it tasted good and he ruminated on the flavors going on in his mouth. He said next time he would probably add more vinegar.

So the next time that I make this recipe I won’t go light on the sugar and vinegar ratio to keep the relish less soupy. I’m not in love with this recipe enough to put my foot down and claim it as a favorite and it has to be this way because I’m making it for me. I’m still making this for my husband. So I’ll add the vinegar next time to see if it has a better flavor to him.

That being said… THIS IS WHAT I ABSOLUTELY LOVE ABOUT THIS RECIPE!

You remember that I said that my husband came home with fish?

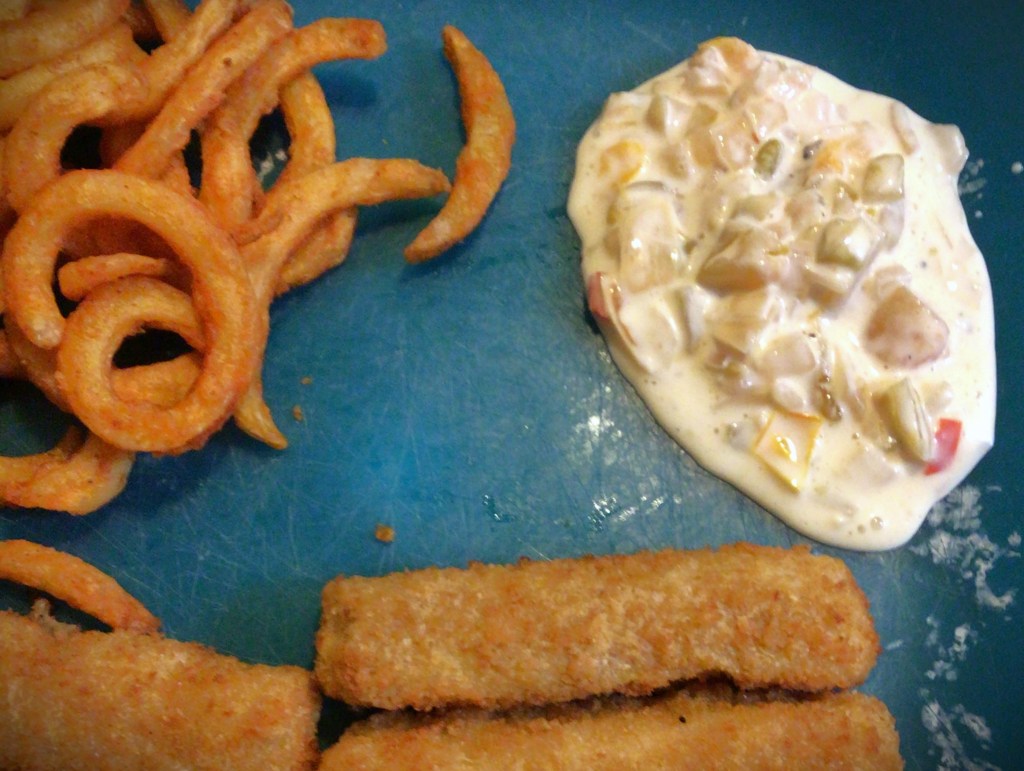
I took this tomato relish and mixed it with mayonnaise to make a homemade tartar sauce. (Yes, this pickle hater is a tartar sauce snob. Yes, I’m aware it has pickles in it. And this is the exception to the rule of my hate for pickles.) This was by far the BEST tartar sauce that I have ever had. It was just the right combination of sour to creamy to crunchy ratio!

My husband and I do agree on one thing pickle related…the best tartar sauce. We both grew up eating fish from the Skipper’s chain of seafood restaurants. They had the world’s best tartar sauce. And when the chain shut down and we were no longer able to buy fish from them, we had a massive hole in our hearts for what tartar sauce to buy for when we cook fish at home. NONE of the brands in the grocery store came close to our favorite.

THIS homemade tartar sauce is NOW MY NEW FAVORITE! This Green Tomato Relish with just some mayonnaise is all we need to have the happy happy love love all over again for tartar sauce. And let’s just say that I laughed when my husband gave me the face for taking the last of the homemade sauce. He took the jar of whatever was in the fridge and made a gagging sound when he tasted it. Funnier still he searched the jar for the pull date to see if it had gone bad. Nope… it was still “good”. But it’s no longer consumable now that we have our replacement tartar sauce.

Advertisements

For My Fellow Pickle Haters…

Should you make Green Tomato Relish?

If you have a pickle lover that you life with, then yes! Kissing them after they eat Green Tomato Relish, you’re not going to gag over that pickle aftertaste.

If you happen to want a fish or seafood condiment that you will actually eat, definitely!

This recipe is far enough removed from the dreaded pickle that you can appreciate this recipe.

Even if you are not a relish condiment consumer, this recipe is worth having on your shelf or in your fridge. You can make your own tartar sauce. Of I recently fell in love with German Pickle Soup. I had no intention of ever making it, but was willing to order it at my local Bavarian restaurant. NOW, I will most definitely search out a pickle soup recipe that I can substitute out the pickles for this green tomato recipe.


I hope you make this recipe. When you do, please comment below and let me know what you think.

If you’re a pickle hater and have concerns about a specific flavor profile, ask all your questions below in the be comments and I’ll let you know my opinion.

Processing…
Success! You're on the list.

Leave a comment

What about the Shell?

This was the first year that I grew a shell bean. I grew up with my grandparents and mom growing snap beans. In fact, snap beans were pretty much the only vegetable that I ate without issues. So I have a special place in my heart for beans.

This is the shell beans that I grew this year, 1000 Year Cave Beans.
And just to show you how fresh these beans were, I didn’t anticipate them sprouting with in 3 days of me shelling them and waiting for more to mature so I could can a couple jars at once.
Advertisements

The one bit of information that I thought was prevalent was preserving beans of all kind. But with every safe recipe that I looked up every recipe was either for snap beans or dried beans.

When I teach people how to can, I always hand them safe recipes to select from, depending on what they want to can. And so these are the first sources that I turn to when I look to can a new food item that I’ve never canned before. And so I trust that what these experts say are what you are going to get. This is the one time that the extension office failed me. Here is the recipe that I used for my fresh shell beans. In full disclosure, if I were canning dried shell beans (such as the bagged beans from the dried foods aisle from the grocery store) this is absolutely the recipe that I would use.

But for fresh beans… I didn’t have canned beans. Instead I had half beans, half refried beans.

What happens when you can fresh shell beans the same as dried shell beans?

The gray in the water is the starch from the starch from this particular bean, 1000 Year Cave Bean. In fact, the starch left over in the bottom of the pan that I cooked these beans for the 30 minute stove top cook for a hot pack, was a richer version of this gray. In fact, it matched the gray on a pair of my camo pants. Next time I harvest these beans and prep them, I’ll take a picture of the bottom of my pan for you!

As you can see here, my beans started to break down due to the 75 minute processing time on top of the 30 minute hot pack cook time.

On the positive side, if you want to have canned beans that you can eat straight out of the can without needing to warm it up, the extension office recipe is perfect for it. All I added was the hot beans, hot fresh water, and 1/2 tsp salt for my pint sized jars. The beans were perfectly seasoned, soft, and very tasty. I am absolutely canning these beans again from here on out for the unforeseeable future.

The Extension Office recipe was also very pleasant for adding to my enchiladas recipe. In this instance, I really do appreciate a soft, smashable bean.

Unfortunately I need canned beans that I can toss into a soup, stew or chili where some firmness is needed.

Advertisements

Is there another safe recipe available?

I’m going to connect you to one of my favorite safe canners Melissa Norris, Pioneering Today. Please click the link to go straight to her directions. A video is also available.

If you’re on a time constraint, here’s the quick read of her directions:

  • Wash your jars.
  • Fill the clean jars with shelled beans until 1 1/2″ head space remains.
  • Add salt (1/2 tsp for pint, 1 tsp for quart).
  • Boil water and pour over the beans until you have 1″ head space.
  • (Remove air)
  • Clean the jar rims with a damp cloth, place lids, and screw down bands.
  • Place jars in your pressure canner.
  • Vent your pressure canner for 10 minutes.
  • (Once at pressure) process the beans at 10 lbs. of pressure for 50 minutes.
  • Once time is up, remove from heat and let your canner cool on its own.
  • When the lid unlocks, remove the lid but leave jars in the canner for about 10 minutes.
  • Remove the jars from the canner and set on the counter to cool for at least 12 hours and seal.
  • Store in your pantry.

If you are growing beans to supplement some of your grocery purchases, love gardening, or various other reasons… know that you can absolutely can your own beans. You can control what is used on your plants and what ingredients you add with your beans when you can them. The beans that I canned have 3 ingredients: beans, water, and salt. In comparison, the sale beans that I have in my pantry have an additional ingredient Calcium Chloride (an additive to absorb moisture which causes bacteria to thrive, “used pre- and post harvest to maintain firmness, reduce decay and prevent certain diseases… [and] as a drying agent.” (ingredi.com)

Advertisements

Store canned beans do have their benefit. I’m not going to pretend that I avoid them like a plague. For my family, we’re choosing to make a switch to lessen the additives in our diet. And with my young children, I want them to know where food actually comes from. I don’t want them to assume that food just mysteriously shows up on the store shelves. I want them to know where their vegetables come from. And where their meat comes from as well. (We love our local farmers!)

Plus I have the added bonus of not just hearing my oldest say, “Mom, can we can ____? I’m interested in that.” But it also helps establishes what we learn with our homeschooling. Math and science do matter on a daily basis. We can understand our world by working with it.

But most important of all, pressure canning beans (and other vegetables) make growing or store sale purchases a massive benefit to the family budget because we can preserve it and eliminate some of our food waste. And that is a win win for everyone!

Processing…
Success! You're on the list.

Leave a comment

Advertisements

Saucy Saves

It all started when I had a West Coast Clam Chowder that was too thin….

I learned how to make clam chowder from my mom. And she started her chowder with a roux. Nothing says “please give me a headache” more than trying to fix a roux based sauce or soup than your sauce being too thin. It’s not like you can add more flour because it’s not cooked out. And you can’t make corn starch slurry to thicken it up. I mean technically you can, but it’s not the same. The flavor gets thrown off and the texture is also not the same.

That’s when I had the brilliant idea of adding instant potato flakes. I put diced potatoes in my chowder and so the potato flakes made sense because it’s dehydrated powder that absorbs your excess liquid AND you get to keep the potato flavor.

Over the years, from this dehydrated potato beginnings, I have started dehydrating more and more of my vegetables.

It just made more and more sense, because if you really look at all the seasonings in the seasoning aisle in the grocery store, just about all of it comes from plants, herbs, and their seeds. We already season our food with produce. It’s not a far leap to move to use vegetables as seasoning.

Advertisements

From my chowder I moved to thickening my brown sauce made in my caste iron pan when I once again added too much water. This sauce the water evaporates relatively quickly. But this time I added dehydrated mushroom powder. It added an earthy note to my brown sauce and thickened up in just a few minutes instead of the several minutes that cooking off the water takes. Once again, the flavor improved.

And to be honest, I’ve hated working out the lumps of flour when I tried to re-thicken with flour like my mom use to. Depending on the day, I’m convinced that the flour was giving me attitude, “I’m just going to stay lumpy because there’s nothing you can do about it!”

So my comeback to my lippy flour has become, “Oh yeah? Well I’m going to use vegetables then. They don’t lump up like you do.”

I’m still waiting on some of my produce to finish growing in my garden to replenish some of my vegetable powders, but I’d like to introduce you to some of my favorite powdered veg.

From left to right you Zucchini, Spinach, Mushrooms, and sliced Mushrooms. The orange powder on top is the combination of yellow, orange, and red sweet peppers. You know that bag of small peppers in the produce department? Those are the ones that I dehydrated and turned to a powder.

I’m all out of my powdered Butternut Squash. This one is actually my work horse. It has a nice sweet flavor that my boys don’t know that I’m adding vegetables into a meal.

Not only does my powdered veg work as a thickener, it doubles as my mom hack of hiding vegetables from my children who don’t want to see certain vegetables on their plates. Peas and Carrots are still acceptable on the plate, but all the others, I have to get pretty creative. And instead of renaming vegetables to some weird name, like my mom did, I just prefer seasoning everything with it.

Do you have a recipe that your family is always asking for?

Do you always tell them “Absolutely not!” because it’s your recipe and you don’t want anyone else to have it?

If you want to be generous this Christmas, you can dehydrate and turn your secret ingredients into a powder and make a seasoning pack or bag of instant soup.

This is particularly a great idea for loved ones who live across the country from you and shipping out a sauce or soup just isn’t practical! You don’t have to ship glass containers, liquid, or even have the weight of the ingredients that still contain their water content.

Maybe the person you’re gifting is a hiker or camper. But gifting them dehydrated food, in the form of seasoning, you’re able to give them the nutrition they need and taking up a fraction of their pack space.

Not sure about that statement?

Take another look at the pictures of my powdered vegetables. The Spinach is contained in a 9 oz jar and is currently holding two bunches of spinach. Yes, that is two grocery store bunches of spinach.

Looking for a funny gift for your cook or baker this Christmas?

Here’s a design that can take on many different meanings. It’s perfect for your secret recipe cook, a white elephant present, or for that home cook whose mystery meals are not exactly the best surprises to hit the dinner table.

Here’s a sneak peak for Abstract Cooking, which is officially released on Monday.

Processing…
Success! You're on the list.

2 responses to “Saucy Saves”

  1. Lyle Avatar

    This article extremely informative, I have learnt so much from it.

    Like

    1. Pacific Northwest Event Design Avatar

      Thank you for reading! I am so glad that you were able to learn from me.

      Like

Leave a comment

Advertisements

Comfort In a Jar

Hello Fall. Hello Soup Season.

I won’t even say what else comes with this season. Let’s just say that as a mom of three young children, I’m fully aware of what the change of season means. And this past week, that came and knocked the energy out of me. Shoot I didn’t know I had any more energy to be knocked out! I thought my kiddos drained it from me to fuel their never ending supply of energy.

And yet, I was so grateful to have this soup already canned up and ready to go in my pantry. The chicken stock I make, I add antiviral herbs to it. Let me just say that Lemon Balm is my new favorite antiviral herb to cook with! (In a few weeks I’ll share more with you everything I put into my Chicken Stock. You’re going to love it!)

I want to share with you this recipe for Chicken Soup that is perfect for those days where you need healing chicken soup but don’t have the time or energy to make it from scratch. You will absolutely love this because it takes only 5 minutes to warm up–the same amount of time it takes to make condensed soup from the grocery store. BUT it has less ingredients and more immune boosting goodness. And even if your sick days are few and far between, this soup is quicker to heat up than going through a fast food drive through. Plus as the added bonus of being that IT item to use up some leftovers you have sitting in your fridge on the day you crack open this jar of soup.

Yields: 7 Quarts of canned soup

  1. Clean your jars and lids.
  2. Prep your ingredients.
  3. Cold pack your chicken, split evenly between all 7 jars.
  4. For each of your ingredients, split evenly between all 7 jars. Start with the larger cut ingredients and end with the smaller peas and lentils.

(It’s easier to shake the smaller ingredients down into the cracks of larger ingredients than to shove the larger ones in on the smaller.)

  • Fill each of the Quart size jars with about 2 cups of chicken stock.
  • If you have Kosher or Sea Salt, you can season your soup now. Otherwise, do not put in your table salt or iodized salt. You will season your soup when you open you jar before serving.
  • Clean the rims of your jars with vinegar and then place lids and rings, finger tight.
  • Prepare your pressure canner.

Follow your canner’s directions for the correct process of canning with your canner.

For example, I am Sea Level – 1,000 foot elevation so I can the Chicken Soup with 10 lbs of pressure for 90 minutes in my weighted canner.

  • Once time is complete, turn off the heat and let your canner naturally release pressure.
  • When you can remove your lid, let the cans sit for an additional 10 minutes before removing them from the canner.
  • Allow your jars to sit 12-24 hours to seal. Then remove the rings and clean your jars before storing.

With new lids preserving your canned goods for up to 18 months, you have plenty of shelf life for this soup.

There are many options you have for this Chicken Soup.

  • You can season it and eat as is.
  • If you have left over rice or noodles in your fridge you can add those ingredients and still have rice and chicken or chicken noodle soup that is ready to eat with a 5 minute warm up on your stove.
  • With adding a thickening agent (slurry or corn starch) you can turn this into chicken and dumplings or a pot pie filling.
  • Maybe you have other small amounts of leftover meat, like Italian Sausage. You can use this meat to bulk up the soup, add some kale and parmesan and have a Tuscan style soup.
  • Or maybe you’re looking for something Latin in flavor. Grab some tortilla strips, grated jack cheese and add in Latin American seasonings and you can have Tortilla soup.

These ideas are a far cry from being authentic cultural cuisines. However I want to give you a few ideas on how you can turn one of your canned soups into a blank slate for some variety.

Advertisements

I know a lot of us really do not have time to prep meals for our families. In fact “meal prep” might have a double four letter word effect in your ears. And that’s okay. For roughly the same time it would take me to cook a soup from scratch for my family, I can make 7 meals that I can crack open and serve dinner in less time than it is for me to go through a drive through. And it’s healthier for us.

To heat up this dinner in 5 minutes, this is all I do:

  1. Grab my jar from the pantry.
  2. Grab my soup pot. And turn my burner on high.
  3. Open the jar and pour the soup into the pot.
  4. Fill the jar with Water and pour into the pot.
  5. Put the jar in the dishwasher and set the table.
  6. Taste the soup to make sure it’s seasoned the way I want it. (Add salt, because I usually only have table salt readily available, so it got canned without salt.)
  7. And it’s dinner time.

If you have a college student who’s coming up on Mid Terms or Finals, this is perfect for them! Often times they’re up late and find themselves hungry after the cafeteria is already closed. This is something they can cook from their dorm room with a microwave or hot plate and have the brain food that they need. Or maybe they’ve caught a cold and need a little mama’s love in the form of soup. This is super convenient and perfect for a care package.

Advertisements

Looking for a gift idea for this Holiday Season?

This is soup is perfect for the new mother getting use to having baby at home, an elderly family member who retired their pots and pans, someone who is an avid camper or loves cooking by camp fire, or anyone else who can benefit from a quick home cooked meal without all the fuss.

Maybe you’re the type of person who loves gifting food to a neighbor, friend, or family when they become ill. Here is a quick way of gifting all that healthy goodness without your schedule batting an eye.

I highly recommend this recipe for everyone!

Do you need another gift idea?

This one is personal and doesn’t require you to have a master’s degree in art to make!

Here are some supplies that you will need:

  • Canvas
  • Paint
  • Paintbrush
  • Clear Acrylic Spray
  • Chalk pen/crayon, Paint pen, Pastel, or like craft item you can write with
  • (Optional) Sponge, Paper towel, Napkin, or Tissue
  • (Optional) Embellishments such as pre-cut vinyl design

Paint a design on your canvas. You can do whatever design you would like. Here are some examples of canvases that I already have on hand. There are the canvases that my boys made 3 years ago.

And these are the ones that I have in the prepped stage for various projects that I have in the works. You can use coordinating colors, monochromatic colors, are shades for an abstract scene.

Let your canvas dry.

Spray your canvas with Clear Acrylic Spray and let dry. This step is important, because accidents happen and sometimes you want to “erase” a mistake. I’m a phonetic speller and sometimes I just get a word wrong. No worries. By having the acrylic spray dried before you start writing with your crafting pen of choice, you have the option of wiping away the mistake with a wet cloth. The only writing medium that gets to be a bit tricky is acrylic pens. That one you may not find having an “erasing” quality. Chalk pens and most pastels will generally work for excessive editing.

With your writing medium of choice write your message, series of quotes, words of encouragement, or whatever you’re inspired to say. When I made these gifts for nieces and nephews, it took about 7 quotes that I pulled from online to fill the 8×10 canvas with medium small print from top to bottom. You can write as large or small as you would like. Just be aware that the writing medium you choose to use will help you decide how small you are able to write. I used a chalk crayon that had a relatively large nib, so I wrote as small as I could and the words were as tall as the width of my pinky.

Advertisements

Decide if you would like to leave your writing clear and readable or if you would like to smudge the words to make an added texture on top of the painted design that you made. This choice is perfect for the people who believe that their handwriting isn’t pretty. By smudging your writing, you remove the uneven, shaky, or other characteristics of your handwriting that you may be self conscious of. If you choose to smudge, I recommend printing out a copy of your message that you can give with your gift, so the recipient has the opportunity to read the love that you wrote for them. For direction of smudging, that is completely up to your eye. I personally like smudging my work from left to right because I love using horizontal strokes when I paint. I do have some pieces that the strokes are vertical and so my esthetic is to smudge vertical with those, so the “text” doesn’t compete with the flow. But you could choose to smudge diagonally, circular, zigzag… each direction you go will give a different feel to your piece.

Once you are done writing and/or smudging spray your canvas with the Clear Acrylic Spray again. This is going to be a critical step for you. If you chose to smudge your “text”, the spray will prevent further smudging. If you want to add vinyl or HTV on top of your art, this spray is going to anchor your vinyl down. I’ve tried applying vinyl and HTV straight on a painted canvas and both have peeled off, taking paint with it. But every time that I’ve used the Acrylic Spray, vinyl and HTV both stay on the canvas perfectly.

Embellish your gift. Your options are endless at this point. You can choose to make something and personal with just adding your recipient’s name. You can add scrapbooking embellishments with hot glue to add some glam or character. You could pray a frame with a metallic paint and make a modern framed art. Or perhaps you want to do four panels and keep them frameless. And then there’s always the option making a 3D piece using other crafting techniques, such as this.

If you find that you are on a budget this Holiday season, this is a perfect gift option for you. We are in a time in history where people need to hear how much they are loved and valued. So when you can poor into another person and share with them a hope of a future with them, it can hold profound meaning in their life right now. I have never before seen so many people facing suicide and thoughts of hopelessness like I’ve seen in the last few years. Sharing with someone how much they mean to you is something that you will never regret. And you never know that it might be the one thing that offers them hope in a time where it seems like everything is so wrong.

What is inspiring you right now? Do you have ideas sparking in your mind?

Right now I’m inspired with many of the changes that come with fall. This is the season that always has inspired me. In fact, my boys found a whole acorn that I so want to use as a piece of 3D art. I’m hoping I can find some more and have more than a single nut to work with!

Please comment below with what you want to make and even send me some pictures. I would love to see what creativity jumps to life in you!


Files used today

Spring Triple Panel comes with all you see here. Or you can select individual elements.

Jelly Fish element from my Jelly Fish Collection

Processing…
Success! You're on the list.

Leave a comment

Holy Jam Batman!

This post contains affiliate links to products. We may receive a commission for purchases made through these links, but at no extra cost to you.

One of the first things you’ll hear when you start in the world of making your own jams and jellies is that you MUST stick strictly to the recipe or your jam won’t set.

And the first thing anyone will set out and do is try to take a single batch recipe and double it or triple it, like you’re making chocolate chip cookies. After all, if your family goes through PB&J like nobody’s business you really don’t want to make 6 pints of jam at a time. That would take forever!

Plus, if you have kids underfoot there is absolutely no chance you’ll get four pots of jam on your stove top. Because the odds are that you’ll have a four ring circus around your ankles and all your pots start a rolling boil at the same time. At least that’s how things would play out in my house IF I had to make jam one batch at a time.

Fortunately for us, my husband and house a lady who was selling off her jam inventory and gave us her large batch recipe. Unfortunately I can’t share that recipe with you because of a verbal agreement that we made with her. And that’s one thing about my husband and I, we keep our word.

BUT, it got us on the path to know that you don’t have to make single batch jams and jellies if what you are really looking for is to make one large batch and set your family up for a year’s worth of jam in one day!

Advertisements

I’m sure that there are other large batch recipes out there if you took the time to search, but there’s not going to be many. One, too many people have a small business making jam for bazaars and other venues. And if you’re in the business, you’re not going to put your recipe online because that’s just not a good business model. Ball has an extensive jams and jelly section, but all of them are single batch. I haven’t had time to scour the pages of extension offices to see if they have large batch recipes. But I did find one rather quickly with the company that I buy my pectin in bulk.

Yes! You can buy pectin in bulk and at a far greater savings than buying the box of 2 packets of gel pectin at your local grocery store.

For the last several years I have been buying Hoosier Hill Farm Powder Pectin. They have an amazing product and I’ve preferred this over the gel/liquid pectin that I grew up using. It’s less mess. And like I mentioned above, it’s at a far better price than buying the same quantity in the gel/liquid form.

If you don’t have the time to search out your own large batch of Jam and Jelly recipe, you can use this one from Hoosier Hill Farm. You can go directly to the site through the link, but for your convenience I have it here:


Cooked Jam Directions and Recipes

  1. Locate and mark off fruit recipe on chart below. Check 8 OZ jars for defects. Because containers are not filled to the rim, one more container than the specified cup yield may be needed.

If jams will not be placed in boiling water bath, wash, scald and drain jars, or use automatic dishwasher with very hot rinse water. Keep hot.
If jams will not be placed in boiling water bath, wash jars and sterilize in boiling water for 10 minutes. Keep hot.
Wash lids and place in a small container. Cover with cooling water shortly before placing on filler jars. Always use new lids.

  1. Prepare fruit as directed in recipe.
  2. Measure amount of prepared fruit specified in recipe ingredients listing, pack solidly in cup. If measure is slightly short, add water.
    Place measured fruit in 6 or 8 quart sauce pot. Add lemon juice if listed.
  3. Measure sugar and set aside. DO NOT REDUCE SUGAR.
  4. Stir fruit pectin into prepared fruit. (Sauce pot must be no more than 1/2 full to allow for full rolling boil.)
  5. Bring to a full boil over high heat stirring constantly. At once stir in sugar. Stir and bring to a full rolling boil. (a boil cannot be stirred down). Then boil hard one minute stirring constantly. Remove from heat.
  6. Skim off foam with large metal spoon. Immediately ladle into jars leaving 1/4 inch space on top. With a damp cloth, wipe jars and threads clean.
  7. Immediately cover jars with hot lids. Screw bands on firmly.
  8. Place in boiling water bath carefully setting jars on rack in canner or large sauce pot of boiling water. Water should cover jars by 1 to 2 inches. Cover canner, and return the water to a boil, then boil 5 minutes. (At high altitudes, increas boiling time by 1 minute for each 1000 feet above sea level). Remove jars from canner.
  9. Let jam stand to cool. Check seals. Jar lids should be slightly concave or remain so when pressed. Remove bands from jars. Store jam in a cool dry place. (small amounts of unsealed jam may be covered and stored in the refrigerator).

I added the pint yield for anyone who might not yet have the conversion memorized.

Tip: The above jam recipe is a little on the loose side for my taste. So by cooking it a couple minutes longer on the rolling boil will firm it right up. The next time I run this recipe I’ll rolling boil for 3 minutes instead of 1.

What I want to point out is that this recipe does set jam every time. AND if you take a look at all the measurements you will see that they are exactly doubled or tripled the original measurements.

Can I use grandma’s recipe in a large batch?

I have yet to find any real information that says you cannot.

The rumor is that you can’t double a recipe because it won’t set. But here’s the deal, jams and jellies set because the sugar to pectin ratio is kept!

If companies dealing in high volume jams and jellies sales can make recipes in high quantity, you can too. You just have to understand the science and process behind making jams and jellies.

Pectin has to have a high sugar concentration to set. Low or No Sugar Pectin doesn’t have to have that sugar content because it has dextrose (a simple sugar extracted from corn and other vegetables). Because a sugar was already added into the Low or No Sugar Pectin, less is required when you you make your jam or jelly.

So if you are meticulous in your math for creating a larger batch of grandma’s jam then there is no reason why you can’t have success in doubling, tripling, or quadrupling grandma’s recipe!

Tip: Switch from measuring out your ingredients from cups to a unit of measurement, lbs. or grams. By switching to weight measurement you eliminate the dead space of your berries and the precise measurement of your dry ingredients. The reason why the set can be different in using the same recipe over and over again is because the weight of the measurements is different even if the look of your cup measurement seems to be consistent.

If you’re nervous about increasing your batch amount, you can take a trick from candy making to test your jam. Keep a bowl or glass of ice cold water handy. When your cook time is done, drop some of the jam into the water. If it’s not going to set, but remain a syrup, the jam/jelly will dissipate in water. If it is going to set, then it will gel up in the water.

I’ve known too many canners who process their jam and then wait until they crack open a jar to find that their jam/jelly didn’t set. The simple water test, or even setting a small quantity of jam in a bowl and putting it a freezer to cool down, will give you a rather quick indication if your jam/jelly will set or not.

If the jam/jelly doesn’t set or is too loose, then there was something wrong with the ratio of sugar to pectin. (This is all the more reason to find a successful recipe and translate it into weight measurements. Then you can recreate the recipe and have perfection each and every time.) Unfortunately I can’t advise you in adding more sugar or adding more pectin to your recipe because I can’t tell you where your recipe went wrong.

Advertisements

So in this moment of uncertainty, what I would do is head this off in a scientific approach– set aside two samples. In one sample sprinkle in a little more sugar. In the other sprinkle in a little more pectin. What happens? Which one thickens the jam/jelly? Which one makes it looser or no change at all? Also remember that if you’re using powder pectin, it will take a little bit for the pectin to do its thing. It has to hydrate and react with your jam/jelly.

The same goes with if your jam/jelly is too thick. The reason for it being too thick is either because there’s too much pectin or the jam/jelly got reduced too much (you cooked off the water content). There are some fruits that have more natural pectin in it. That’s the reason why apples don’t need pectin to make an apple jelly. So if you’re working with a jam that has a mixture of apple in it, then this is one thing to keep in the back of your mind, the effect that pectin has on your recipe.

But as I mentioned above in the recipe Tip, sometimes the only change you need to make is how long you run your rolling boil for. The longer your rolling boil goes, the more your water content will burn off. Just be careful not to burn your jam on the bottom of your pan. That flavor will permeate through your entire batch.

Making a Memorable Gift

We’re living in a moment of time where family budgets are taking an extreme hit. And with the holidays quickly approaching us I want to share with you one quick idea on how to make a budget friendly gift that will leave a lasting memory. So whether you’re looking to give a hostess, thank you, teacher appreciation, Christmas, or white elephant gift you can take this skill of jam/jelly making and make a gift that will be appreciated!

Once you’ve processed your jam and the jar has cooled, take a selection of material that fits the person or gifting moment. You can choose to cut the fabric in a square or a circle. Depending on if you’re using a wide mouth or standard jar lid will determine what size of square or circle you will make. Another determining factor will be if you want the overlying fabric to hang low or high.

Tip: Set your jar upside down on the back side of our fabric. With a marker or chalk, mark out 2″ from either side of the lid of your jar. Draw out your circle or square. (The Christmas Truck print was a 2″ square. The Red Plaid was a square cut 3″ off both sides of the lid.)

Once your fabric is cut place it on top of your lid and secure it with the jar ring, string, ribbon, or even elastic. Decorate as elaborate of simple as your taste leans.

And now you’re ready for the holidays with simple gifts that don’t suck the joy right out of your festivities!


These cute Jar Labels can be found here in a bundle.

Processing…
Success! You're on the list.

Leave a comment