Taming Fly Aways!

I know these are common problems for family get-togethers. Either, your family is so large, that when you have a pot luck style meal there is always the problem of not having enough table space. Or your family is enjoying the sun with a BBQ and you spend more time than you can admit chasing down paper plates, napkins, and even silverware.

My family suffers from both of these problems. Every year.

Inspiration hit when I watched this video, tutorial using dollar store Jenga Blocks, from She So CraftDee. This video was so well put together with directions, that I don’t want to recreate what this talented woman did. So I will just direct you to her video if you want to learn how to create structures using Jenga Blocks. Instead, I will proceed with the road blocks I faced while working with this tecnique and how I made this Paper Goods Caddy.

Materials

  • (54) Jenga Blocks (I used 48 of one style of blocks and 6 blocks of another style)
  • Hot Glue Gun and Glue
  • Multi-Purpose Cement 0.5 fl oz (E6200 would be the best choice)
  • Ruler (Optional)
  • Paint
  • 1.25″ Nails
  • Hammer
  • (14) 0.5″ Wood Cubes
  • (3) Square Pen Holders
  • Glitter Paper
  • Metal Gift Tag
  • Vinyl
  • Transfer Tape
  • Elmer’s Glue
  • Glitter
  • Acrylic Paint Pen (optional)
  • Flat Face Rhinestones (optional)
  • Jewelry & Metal Glue (optional)

Project Dimensions

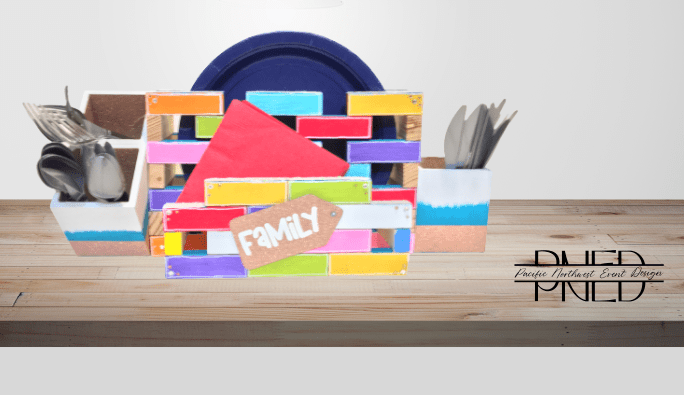
The overall dimensions are 17″ wide by 6.5″ high by 7.5″ deep. The interior of the silverware holder squares are 2.5″. The plate holder is 9.5″ wide by 1.75″ deep. The napkin holder is 7.5″ wide by 1.75″ deep.

This accommodates 9″ paper plates and standard sized napkins. In the picture are 9″ plates and cocktail napkins (6.5″). The dimensions can be adjusted according to your family needs.

Before I jump into how to assemble this caddy, I want to start with the pitfall of gluing options.

She So CraftDee only uses hot glue. I do want to draw attention to the fact that it’s not just any hot glue stick, but wood glue. Full disclosure, I have not yet worked with hot wood glue so I cannot attest to the strength or durability. But for the crafter who does not use hot wood glue or have never heard about it, it is not going to function the same way as the standard glue stick that you have in your craft stash. So please do not expect standard hot glue to work like hot wood glue.

I have decorated in enough wedding and other events that, professionally, I would not put trust in wood glue alone to hold a vase that holds water and everything else that adds weight. An LED pillar light is only going to weigh ounces. However, the weight of a glass vase filled with water, stones, flowers, and anything else of weight is going to add up quickly. There is no telling if and when glue will fail. So I would highly recommend that you reinforce your build in the legs and the base frame so that you can rest assured that you won’t have a catastrophe on your table tops. Wood glue and standard hot glue would all be adequate for any non-weight baring sides.

Advertisements

Because this Paper Goods Caddy is a functional piece, you will definitely need to use something much more substantial, for reinforcement. I used Multi-Purpose Cement (from the dollar store) as my primary gluing option, with the use of standard hot glue to hold the blocks in place while the Cement cured. For a home craft, the Multi-Purpose Cement is a good choice if you just need a little bit of glue. You will use the full 0.5 fl oz tube for this project. However if you are a professional, I would recommend E6200 over all other glue.

TIP #1: Examine your Jenga Blocks. You want to make sure they are solid wood with no cracks, grooves, or holes. The cheaper Jenga Blocks do not give you the easiest surfaces to work with. I had a couple of blocks that had a gaping hole where the wood was laminated together. The glue went straight down to my work surface. If sanding doesn’t give you a smooth working surface, paint your blocks. The glue actually held much better to the painted surface than the laminated wood surface. Plus, the paint fills the gapes and grooves for you. Just be sure to let your paint dry overnight.

TIP #2: If you are using colored blocks, like I did, set up the pattern that you want your bricks to be in before you start gluing. This will keep your pattern uniform in the front and the back.

Prep the Silverware Holder

Please feel free to decorate the silverware holders in your personal style. However if you want to recreate what you see in the pictures, these are the steps that I took.

  1. Paint the top 2/3 of the pen holder with white acrylic paint. (Allow to dry.)
  2. Paint the bottom 1/2 with teal acrylic paint. (Allow to dry.)
  3. Cut Glitter Paper (or vinyl of choice) into 2.5″ strips (the number will vary depending on the length of your Glitter Paper or vinyl choice). Also cut 3 additional strips at 1″.
  4. Slide a 2.5″ strip into a box and crease the edge. (This will give you the cleanest edge and prevent you from mismeasuring the inside of the box.) Trim on the crease.
  5. Remove the backing and place on the inside face of the box.
  6. Repeat 4-5 for the remaining 11 inside faces of the three boxes.
  7. Take a 1″ strip of Glitter Paper and apply it to the bottom outside edge of the pen holder box.
  8. Tack the edge of the Glitter Paper closed with a dot of glue.
  9. Repeat steps 7-8 for the other two pen holder boxes.
  10. Glue two of your boxes together, Glitter Paper seam sides together. Use a very liberal amount of Multi-Purpose Cement in the center, with a rectangular frame of Hot Glue. NOTE: Hot Glue does leave a gap between items glued together. So if you want zero gap please use Cement only. You will need to clamp together the boxes until the glue dries (an estimate of 1-2 hours).
  11. Set Aside for Assembly.
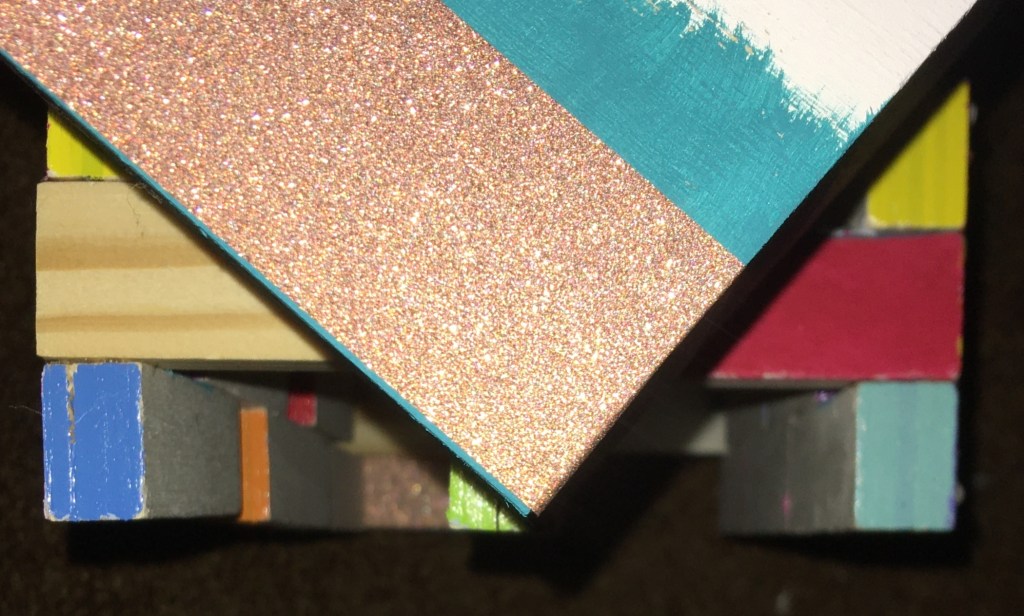
Advertisements

Prep Gift Tag

  1. Take a left over piece of 2.5″ strip of Glitter Paper. If it is large enough, wrap it around from top front, down, over the bottom edge, and up the back side. If it is not large enough, take two pieces that fully cover the front and back and cover each side.
  2. Trim the edges of the Glitter Paper that run over the edge of the metal gift tag.
  3. Create the hole, matching the metal gift tag, by piercing the Glitter Paper covering the hold.
  4. Using your cutting machine, cut “Family” (or any other phrase of choice). The Font I used was Chunky Confetti.
  5. After you weed your vinyl, apply “Family” with transfer tape onto your gift tag.

Prep the Paper Goods’ Feet (Optional)

My oldest son informed me that we needed to add a bottom so that the napkins and the plates could stay in the holder. He was concerned about his grandma having to put in and take out her paper goods. So I designed this so that the Caddy is not just a holder, but it’s a moveable container that can keep the goods in and be easy storage.

  1. Take 7 of the 1″ cubes and glue them end to end. This is one foot.
  2. Repeat with the other 7 cubes to make a second foot.

NOTE: you can use Hot Glue for this prep because the feet will not hold a lot of weight. I chose to the Multi-Purpose Cement because I have clamps, and I want to ensure that in the heat of the summer sun, the hot glue will not soften and become weak.

Advertisements

Paper Goods Caddy Assembly

From my stash of Jenga Blocks, I wanted to use ones with colored ends, but didn’t have enough. So this is the reason why I used 48 blocks of one style and 6 blocks of another style (which were used on the sides of the plate holder). The two different styles of blocks had different heights, which lends to the floating brick illusion. The floating bricks could be more prominent by using an even smaller set of Jenga Blocks, still using the 2 row build.

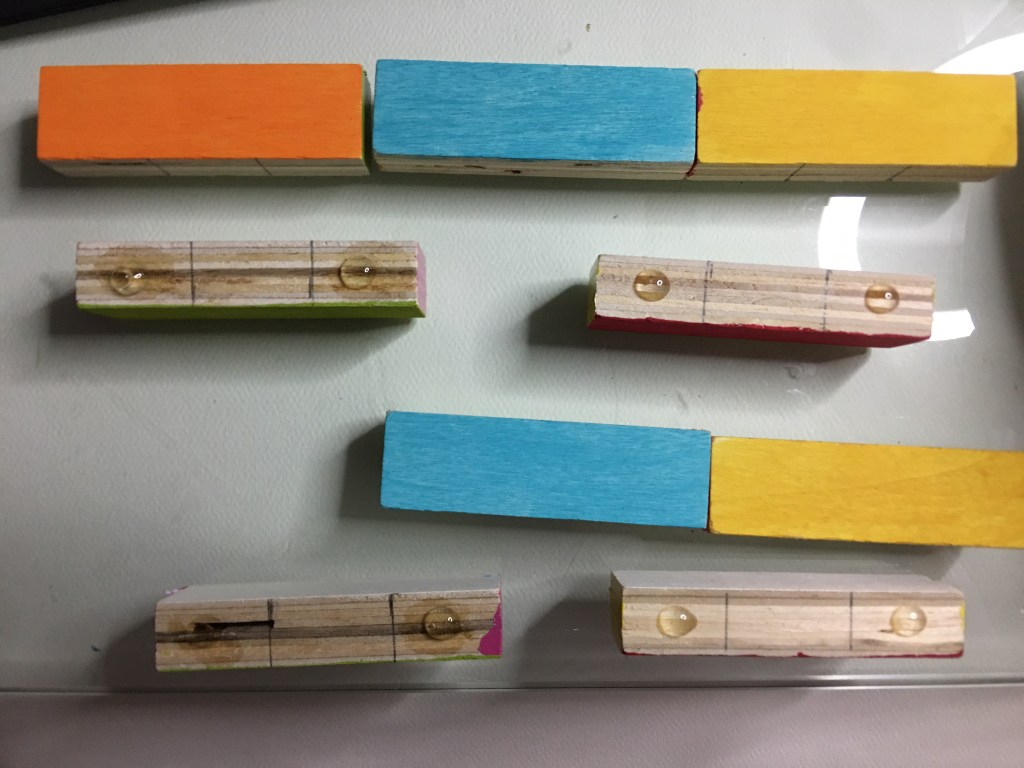
  1. Mark off your Jenga Blocks. My blocks were about 3″ wide so I drew two lines at inch increments so that I could work fast and glue all the bricks together uniformly.
  2. Glue together your two row sections, 3 bricks on top of two. In the inch section I put a large circle of Cement with two dabs of Hot Glue on either side. Once Hot Glue dries, you are free to move on to the next piece to glue.
  3. You will have 6 sets of two rows.
  4. Glue together your napkin face plate, starting with the rows. Make 2 sets of 3 blocks, glued together end to end. And make 2 sets of 2 blocks, glued end to end.
  5. Start with the base and work your way up. One top of one of the 3 blocks, center a 2 block set and also glue on the arms that will attach to the plate holder. On top of the two arms and the set of two, glue on the other set of 3. On top of that glue on the last section of 2.
  6. Set the base for your plate section, by making 2 corners. If you are using two different sized blocks for a floating brick look, your larger blocks will be used here on the sides (they are the unpainted bricks in my photos). Glue your side piece on top of your front and back corner piece. Do this for the other side. NOTE: your center bottom piece is not going to be attached to anything for a few steps, so set those off to the side for the moment.
  7. Space out your corners by setting a two row section on top, do not glue.
  8. With your corners set, remove the two row section without moving the base corners, place your napkin face plate. Once you have the napkin face plate center, you know where to add the Cement and a single dab of Hot Glue.
  9. This amount of glue is not enough to keep the napkin face plate in place, so you will need to hammer one nail into each arm of the face place, into the base corner, so that it will offer the stability to the napkin face plate.
  10. Glue the two row section, which you used to space the corner sections, onto the middle arms on the side of the plate section. Use a dab of Cement and Hot Glue.
  11. Repeat this last step with a two row section for the back of the plate section.
  12. Glue a side arm, on top of the two row sections, on each side.
  13. Repeat steps 10-12 to form the middle of the plate section.
  14. Repeat steps 10-11 to form the top of the plate section.
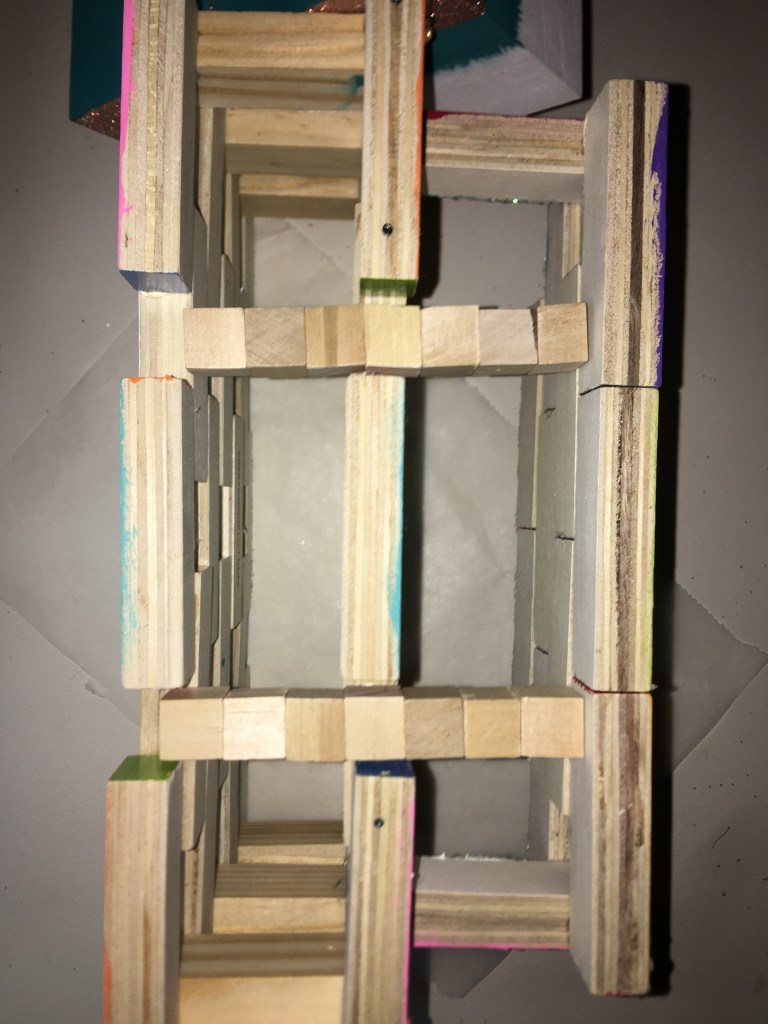
  15. Turn the Caddy upside down and glue in the middle sections that were set off to the side, back in step 6.
  16. To reinforce the face plate a second time, you will use 4 nails to nail both sides of the left and right Jenga Blocks above it.
  17. Where you would like to add glitter, paint on your glue and apply glitter.
  18. (Optional) Use your acrylic pen and draw on a frame around the front edge of each of your blocks, front and back.
  19. (Optional) To add gems, place a dot of Jewelry & Metal Glue where you would like to add your Rhinestones. You can glam this up as much as you want, including using only Rhinestones instead of glitter (step 17).
  20. Hot Glue your “Family” Gift Tag to the Napkin Faceplate.
  21. Glue the single silverware box, upright on the right hand side. Apply the Multi-Purpose Cement Glue and Hot Glue onto the Jenga Blocks (to the height of the silverware box). Attach the silverware box.
  22. Tip the Cady on its side so you can position the Double Silverware Box. As you look at the side of the Cady, note that the middle row is the front of the Plate Holder. Use the Jenga block to create a 45° angle. The front bottom of the Silverware Box is lined up with the bottom edge of that middle Jenga Block. The top back edge of the box will be in alignment with the front of that back row of the Plate holder.
  23. Remove the double box and apply the Multi-Purpose Glue and Hot Glue to the side of the Cady where the Double Box will sit.
  24. Attach the Double Box to the Caddy.
  25. Turn the bottom of the Caddy upside down and apply Multi-Purpose Glue and small dabs of Hot Glue to the two recessed sections of the middle row.
  26. Attached the two feet, centered on that middle 4th square, into those recessed sections.

Congratulations! You have completed a space saving Paper Goods’ Caddy.

Please leave a comment how this caddy turned out for you.

If you’ve seen a project that you want more information on how to make, please let me know so I can set you up for success!

Empty Tomb is now live. 100% of preceeds will go to the support of orphans in Rwanda.

Processing…
Success! You're on the list.
Advertisements

New Twist on Carrots

Making a new style out of throw away materials

The one bit of insight you have, when working for someone else, is just how much a business throws out. And the quality of their garbage. And you also gain insight as to what kinds of businesses subsidize other businesses for you marking your product down for their employees.

I personally know of a few companies who have switched to the Lean Operational method of running a business. And even then it still, somehow, manages to amaze me how much gets thrown out.

Maybe it’s the fact that I grew up where we didn’t have as much as other people around us. Maybe it’s the fact that my mom created magic when she made the gifts we were given on less than a shoe string budget. Maybe it’s the fact that I carry on that frugality because our family budget can go farther and do more things when I reallocate and make do with the little I have, so the hard work of my husband can go elsewhere for family provisions.

This craft here is me on a plate, for you. This is me thinking outside of the box. This is me using materials where half of what you see is stuff that most people throw away.

If you are looking for a new infusion to your farm house style or Easter decor, this project is for you!

Advertisements

Materials

  • 8×10 Canvas Frame
  • Teal and Metallic Gold Acrylic Paint, with paint brush
  • 2 Complimentary Ribbons
  • HTV Vinyl (Permanent Vinyl is another option)
  • Garden Now Open SVG
  • Leaves from Silk Flowers
  • Hot Glue Gun with Glue Sticks
  • Pliers
  • Crafting Knife or Scissors
  • Staples (optional)
  • Sandpaper (optional)

Prepping the Frame

First you want to remove the canvas from our frame so you can paint the frame for your reverse canvas. (If you’re new to Reverse Canvas, hold on for a moment and I will circle back to help you through this process.) Paint the front and sides of your frame with Teal paint. If you keep the paint very thin, you will notice that the paint is dry to the touch in about three minutes. For this example, I went in a circle around the frame twice with the minimum amount of paint (dry brush method, where it look likes and almost feels like you’re brushing on already dry paint) and ended with full coverage of color with no waiting time to apply the Gold paint. It’s really not in my budget to play with Gold Leaf. I would use it for a client. But for the rustic feel I went for, metallic gold paint was enough to add a smidge of class to an otherwise rustic feeling project. And the gold, I used somewhere around a nickel size drop of paint and hit the corners and some edges. Then I set the frame to the side to dry while I added the HTV to the canvas.

First Time Creating a Reverse Canvas: From the back side of the Canvas remove the staples with a pair of pliers. (There are two different methods of putting the canvas back on the frame, which I’ll cover in steps ahead. I just want to let you know from the beginning, if you remove the staples right from the beginning, it can save you from potential problems in future steps. It’s not mandatory, but definitely one of my highly recommended steps.) If small holes next to the staples happen, don’t be afraid, you will not see them later on. If the staples are stubborn, feel free to cut the canvas next to the staple, with a crafting knife, and release the canvas. Set the canvas to the side and move forward with painting your frame, mentioned above.

TIPS: If you’re keeping with the rustic look, there’s no need to sand your frame. If you want a smooth looking frame, you will definitely want to sand your frame before you paint it. If the frame staples are visually unappealing to you, I highly recommend dry wall spackle. You can find some that is purple when you apply it and turns white when it’s dry. It’s very easy and convenient to use, with next to no guess work. A palate knife or even your finger is all you need to apply the spackle. Once it dries, you’ll quickly run over it with sandpaper a couple times. This will smooth out your edges. And when you paint your frame, no one will know that you used putty to fill in the frame cracks. (This is the same method I use when I want to use a frame that for one reason or another was gouged or dropped.

Applying Vinyl to the Canvas

When you go to cut your HTV (High Temperature Vinyl) from your cutting machine, remember to mirror your image. Once you’ve weeded your vinyl, you will place your frame on top of your canvas, so that you can see exactly where you want to press your carrier sheet down on the canvas. (This step is mostly important if you have a few small holes in the canvas that you’re working around. If you’re canvas came off the frame undamaged, than feel free to skip using the fram as a point of reference.) Follow our vinyl’s directions for heat and pressing time. These settings vary. Once you’re vinyl is attached, proceed to reattaching your canvas to your frame.

What if I choose to use Permanent Vinyl? I have successfully used permanent vinyl on canvas. I prefer HTV over 651 (or permanent) because once I have it adhered I do not have to worry for one moment about humidity causing the vinyl to lift. But please do not be shy with using permanent vinyl. You will still want to use an iron to press your Canvas. If there’s any moisture in the fabric, the iron will get that dried out and prepped for your permanent vinyl. Once you place your vinyl, you will want to make sure to have your project on a hard surface that you can press down with a scraper or squeegee. The more attention that you use with burnishing that vinyl down will pay off in the end with a longer life to your craft. Remove your transfer tape and then move forward with attaching the canvas back onto the frame.

Advertisements

Reapply Canvas to the Frame

There are two ways of doing this; hot glue gun or staples.

Method Hot Glue Gun: Apply a liberal amount of hot glue to the back of your frame. Flip it over and position it over your canvas before pressing down and attaching the two together.

The benefit of this method is that it is so quick! Any skill level of crafter can do this application. The important thing to remember is that you have to move quickly so your glue doesn’t cool down on you. AND you will want to try and manage how much glue you use. Too little and the canvas won’t want to stick to your frame. Too much and you will have guaranteed seepage of glue that you will have to clean up. My recommendation is err on the side of a little too much and keep the glue a little off center. It’s better if it seeps out of the outside edge instead of the inside edge. With an inside edge seep, you will need to try and scrape the glue off the canvas or risk having what looks like slug trail on your canvas.

Method Staples: Flip your frame upside down. Position your canvas on top of the frame. Take your staple gun and staple at the top center of your frame. Gently pull your canvas down and place a staple in the center bottom of the frame. Gently pull the canvas to one side and staple in the center of that side. Gently pull on the other side of the canvas and staple in the center of that side. This is called Stretching Canvas. You will then go through the whole rotation again, moving out from center. On a frame this size, you should have about 5 staples across the top and bottom. And about 7 down the sides.

In my opinion I recommend stretching your canvas with the Staple Method. Anytime you add anything to canvas, if it’s not taunt, the weight of your project will warp the appearance of your canvas.

I’m in a crafting group where many of the crafters there swear by the hot glue gun method. In that group I withhold this information because in that setting it’s more important to have these ladies soak up the success of accomplishing a craft that they might not otherwise have attempted.

Here, I want to give you further information because I want you to make an education decision based off of the goal you are after. If you are making this to sell at a craft fair, or you’re decorating for an event that you want professionalism for, I want to set you up for success in these moments. And I know we are not face to face so I can’t use my tone or non-verbal cues to fill you in on this. I am by no means dogging on the hot glue method. In fact, in this example I’m showing you I couldn’t find my staple gun and so I in fact used a hot glue gun. I know the value of stretching canvas and so even with a hot glue gun, I still stretched my canvas. It took much longer than with a staple gun. And if I were using something of more weight than paper carrots, I can assure you that I would not trust hot glue to keep my standard of professionalism to clients. (I know my limitations with hot glue guns, and I’m woman enough to admit that there are many other crafters out there who are geniuses with hot glue. I have skills, but I am not a hot glue gun goddess.)

I want you to feel comfortable with your skill level and what goals are for this project. If what you have available is a hot glue gun, you’re not at all comfortable with stretching canvas, and you’re new to reverse canvas making–PERFECT! Know that you can make a beautiful and professional looking canvas using this method. If you want the challenge and extra security that staples offer, than stretching your canvas is exactly what you’re looking for.

Once your canvas is attached, you will want to trim off the extra canvas. You can either use a crafting knife and cut away on the outer edge of the frame. Or you can use a pair of scissors, angle you blade into the back of the frame, and trim the canvas back.

With clean edges, it’s now time to add those carrots!

Carrots

This is the part that I’m most excited about. These carrots are made completely from scraps that most of the times end up in the trash or recycling bins.

Most of these segments are made from triangles and parallelogram scraps about 3″ wide. Some wider, some less. All of these were from scraps from an explosion box I made a few months back. The card stock was 5 different textures and shades of orange. In fact, one of the orange papers was actually faded from being left out in front of a window. The segments you see above were not triangles and so I pre-folded them in triangular forms to make it quicker to shape and hold with a small drop of glue.

These single cones I then stacked with each other. On a few of the carrots I placed the glue on the back of the cone. Most looked better with the attachment point being at the front of the cone.

I made a few extra carrots than I had space for on the canvas, because I wanted to have some choices of which ones looked better than others. In fact, one carrot had a herringbone look to it. And since it didn’t have the same feel as the others, that one got set aside for a future project.

Once I got the length of carrots that I was happy with (a few were 4″ long and others were as much as 8″), I went into my bin of silk flowers that have seen better days. In fact, they were part of the flowers that I bought from a wedding planner who was selling all of her inventory. I was after her roses, but she gave me her entire flower collection. These leaves were actually from some geraniums and daffodils. The daffodils were actually really beat up and were just collecting dust, because I couldn’t use them for events. And this was the moment that I could actually give these greens a purpose. Other than purchasing silk ferns, these greens were actually quite perfect.

What makes these carrots so special in the crafting world is that it embraces the cubism element from the art world. I’ve seen a lot of carrots made from yarn and cloth, styrofoam and foam. These paper carrots give talking points and structure. And this structure is what was great for placing in the frame, with the ability to break free from the frame (giving a nod to surrealism).

Finishing Touches

Once I found the placement that I liked for these carrot shapes, I glued them down with hot glue gun.

Due to the light weight nature of this project, attaching the ribbon with hot glue is enough. However, if you’re creating for a professional item, you will want to use a stapler to attach you bottom layer of ribbon to the frame. For the top ribbon attachment, E6000 glue would be better than hot glue. But hot glue does do the job for a non-sellable project.

Please comment below and tell me how this spring time project turned out for you. Pictures are even better. I love seeing what other people make!

The SVG used in this post can be found here

Processing…
Success! You're on the list.
Advertisements

International Women’s Day & Crafting Month

Created to Make

It really is amazing to think about how much of our world and lives are all about creating something. Sometimes the first thing we think about when we hear “National Crafting Month” are the classic artistic skills of painting, quilting, sewing, crochet/knitting, needle point…everything that you would step into a crafting store to build your supply lists. Maybe you say you’re NOT a crafter because these classic forms of crafting feel as foreign and difficult as learning a language from a country on the other side of the world from you. But there is so much more to crafting.

Crafting is what we learn from others.

In my case I learned how to craft from my mom. She learned from her mom. She learned from her mom. And I’m not sure how far back that goes. So when people ask me, I’m at least a third generation crafter. I learned the old crafts. It’s what my matriarchs knew and passes on.

And while I move forward with new crafting technology and techniques, I’m also mindful of how things use to be done.

For example, the inspiration for what I’m writing today is birthed from current events, what every day women have done for centuries, and how to be creative in unifying these ideas.

For many years, my family has been taking care to learn how to grow a garden. One I have fond memories of my grandparent’s garden. My mom even off and on grew a garden.

I mention gardening because of the events unfolding in Ukraine, worldwide fertilizer production has been drastically cut back. In fact, many farmers around the world who depended on fertilizers to produce food for their local and global markets are not going to have the supply they will need. In fact, it is still uncertain if Ukrainian farmers will receive their wheat seeds in enough time for a spring planting. If they do not, many countries around the world will not have wheat to import, because Ukraine has been their wheat supplier.

Now I’m not a farmer. I don’t supply food for other families. However, I’m mindful of what is going on around the world market because I want to be aware. Knowing what I know, now, it’s becoming important to me to grow more for my family right not. Yes, inflation and the cost of groceries plays into that. It play into any first world country family who is living on a budget. And it’s ignorant of me to ignore the fact that so many other families, in areas not as prosperous as the place I call home. So to honor those families, where I may not have as much influence to change what they are facing, I’m making conscious decisions to change how I’m doing things right now. If I grow more, and use more of the resources that my two hands can produce for my family, than that frees up resources for others to provide for their families. I learned how to grow a garden as a child. Not all families around me learned that skill set. So I use my skills to provide for my family, so there’s less strain on my local market, which has a trickledown effect. If enough local families relieve the food chain, it relieves on a regional level. This in turns frees up resources on a national level. And in an ideal world, governments would not be wasteful and they would take these excess resources to relieve the food vulnerability in other countries.

And that would take me in a new conversation away from what I want to focus on today.

International Women’s Day

The one thing I love about being in the Pacific Northwest is that I grew up in an area where I learned about and ate cuisine from different places around the world. And from these different cultures I’ve learned food preparation that I would not have learned in a less culturally diverse community.

And while the most popular women to honor on International Women’s Day are politicians and celebrities, I want to draw attention and bring honor to the more humble group of women–village mamas. It doesn’t matter if a culture’s history was spent mostly in a tribal setting, rural village, or small townships, Mamas were the ones who made the world turn and kept families alive. They passed down cooking techniques and recipes that kept their people alive through countless seasons and years of famine, blight, war… they put the food on the table. And boy do mamas know how to make food resources stretch.

This week I’m particularly been in awe of all the women who fed their families in a variety of ways with one crop, corn.

Photo by Tran Le Tuan on Pexels.com

I’m not going to lie, I grew up where family recipes consist of cooking corn on the cob. And then you either eat it on the cob or cut it off the cob. Other than cornbread, that is what I inherited in my ancestral cook book. I will also be truthful and admit that corn is my least favorite. So yes, ladies around the world, please feel free to send me your favorite corn recipes. I will gladly embrace them, because I’m educating myself on the uses of corn to become less dependent on wheat for providing for my family. This fall, it is already on my books that I’m going to teach myself to make masa and tortilla from the corn I harvest this year. I have a general working knowledge and it will officially be put to the test.

And step one in my education, today, was shucking corn. Last fall I planted Strawberry Corn because it is a corn that can be popped and pop corn is one of my family’s favorite snacks. So I took my meager harvest that had been drying and doubling as fall and winter decorations, and I shucked.

As a historian, I’ve seen how village Latinas shucked corn by rubbing the ears together. Here is what I learned today….

There is a reason why these mamas use a basket or other larger vessel to shuck into. A soup bowl is not big enough. The kernels on the floor will be processed to germinate and put back into my garden this year. And I will have effectively doubled what I have previously planted in years past.

The easiest kernels to release are the ones at the ear tip. And those first ones take the most effort. Once I got seeds to release, I had a whole side of ear cleared in a couple of swipes. An up and down movement is what I found necessary to start the process. Once I was started a side to side movement seems to make the seeds drop much faster. Then on the last corn (with no other cob to rub against), I found that using my thumb in a downward movement (from the top of the cob), there was not much pressure that was needed to drop those last seeds.

Pacific Northwest Event Design

Another thing that any mama in a resource scarce place will tell you is that you waste nothing.

We as human beings were created to be creative people.

I harvested my corn, but here is where National Crafting Month comes in. What am I going to do with the cob and husks that are left over?

I’m not sure if there was another generation that followed my grandparents in making husk art. I honestly haven’t seen any creations at farmer’s markets for the fairgrounds since my grandparents passed away. I’m going to have to make a husk doll in the upcoming days and show you because they’re not popular hits in Google image search. I have 4 cobs left to craft with. So I’ll try my hand at that and make at least a brief posting on how that turns out. And if you’ve never heard or seen of a husk doll, then I’ll have the pleasure of passing on a little history.

But for today, I took three of my cobs and turned them into fun Easter decorations.

This is one craft that I will definitely do again in the future. In fact, I will have my boys do it. This is a messy craft, so be forewarned.

There are some bits of information that you need to know, if you’ve never had experience with corn cobs before. The husks take paint nicely with no real preparation. However, the paint feels like it takes forever to dry. I tried to keep my paint thin and it still took upward of two hours before the husks were completely dry.

Now you will absolutely love working with the cob portion!

The cob will absorb paint like a sponge. Drying will not be instantaneous but it surprised me at how quickly it was dry to the touch. I had planned on putting my glitter on wet paint, but I had to go with option 2, glue. The dry time is completely dependent on the type of glue you use and it’s dry time. The glitter does not shed easy, but some will come off on your finger if you swipe it (when dry).

Bringing it back around to celebrating women, what is something that you appreciate or want to know from women different from you?

How can you turn that into a craft to celebrate what it means to be a woman?

In fact, please comment below something that you admire about women in a culture different from your own. I’m always looking for new knowledge and skills. If you inspire a creation, I want to give you recognition as well.

Happy Belated International Women’s Day!

Processing…
Success! You're on the list.

Living Life In Color

Options For Creating Faux Stain Glass Windows

Color planning in my cutting software

With the increase of daylight, the approach of spring, and the first thoughts of Easter sprout ideas of how to bring new life and color into our lives.

This week end I’m participating in a crafting challenge. And one of the group crafts was a faux stain glass window.

When I go into these challengers, I focus on using the supplies in my office and only make a new supply purchase if I don’t have an item, or cannot think of an alternate item. Can I use a flat canvas instead of a framed canvas? Have my boys recently broken a toy that I can give a second life to? Have I recently purchased something that came in beautiful packaging that I can use to add dimension or further details?

I LOVE creating multi-medium products!

For this faux stain glass project, I didn’t have a framed piece of glass. (There are products on the market for making faux stain glass.) And I didn’t make that purchase because I have glass items I could pull from. What I chose to use was a half completed family schedule project.

I finally completed our family schedule for my early readers.

For over a year this picture frame hung, waiting for the inspiration for how to complete it. Do you have a project, or dozen, like that?

Well, this was the perfect glass for me to work with. All the vinyl already on the glass was placed on the front of the pane. And for faux stain glass, all the work is done on the back.

If you want to make a faux stain glass for your holiday switch out, an upcoming event, or as a fun project with your children, this is perfect for you. I’m working on my own designs to add to my shop. You might find another cut file artist who have some stain glass patterns. Or you can use a blank coloring book picture (children’s cartoon coloring book, adult coloring book, a blank mandala, or any other image). For these pages, all you have to do is upload them into your cutting machine program. When cutting out your glass outline, use a permanent vinyl that is the same color on the front and back. If you choose a vinyl that is printed or colored on one side and white on the back, you will have a white outline from your viewing side of your glass.

One common problem you may not avoid is your faux stain glass lines not releasing from your transfer tape. I have never had difficulty transferring to glass before. But even with all the tricks I know, I scrapped my first cut of vinyl and had to go with a Take Two.

I’m not sure if the problem was this pane of picture frame glass, the size of the project (10″ x 13″), or that my transfer tape was too sticky. But I did have to use my nails to scrape off the bottom quarter of my vinyl. So I adhered the transfer tape to both legs of my pants. I got the tack down to a barely sticky level. The vinyl still lifted in a couple of places, but at lease it released. The next time I do this technique with vinyl I am going to use transfer paper and see if the less tack released better.

An example of some extensive lifting of vinyl

To minimize the amount of lifting I recommend starting in a corner and slowly folding the transfer tape back on itself. As you start to see the lift, immediately start to press it back down with your finger. If you go too quickly, you will more thank likely have large sections pull back up from the glass. With the aid of your weeding tool, you can reposition and press down. However, it becomes more difficult to prevent creases in the vinyl when the uplifting sections get longer. So the sooner you can press these pieces down the better.

Another common problem is trapped air bubbles. You may not see it on this back side. But it is obvious from the front of the glass.

Advertisements

To overcome air bubbles, you will want to pierce the vinyl with the sharp point of our weeding tool or other needle. With a way for the air to escape, you can now use your finger nail to press the air out. This will also press the vinyl down. When you flip the glass back over you should notice that the bubble is gone.

If the air did not escape the bubble, then go back in with your weeding tool and make the hole a little bigger.

There have been several times I’ve done this on other projects. Most of the time the hole seals itself up. In a worst case scenario there will be a small wrinkle. But it will only be visible from the back side.

Once your vinyl is laid, you are ready for the fun part. Painting!

This time around, I tested a few different application methods to help you decide how you want to make your faux stain glass. In the picture below you will notice that the paint looks different between the greenery, tulips, and sky/clouds. I used three different preparations of acrylic paint. But in the past I have also used washable children’s finger paint and tempera paint. So don’t think you are limited to paint choices.

This is the paint side of the glass pain. You can see the difference of the three different acrylic techniques described below.

Glue Mixed With Acrylic Paint

What you see on the greenery is a mixture of Mod Podge with a couple drops of acrylic paint.

Depending on the directions you read, you might be told to use Mod Podge, white glue, or clear glue. The bottom line is, they’re all glue and they’re going to act the same. The problem I had with this method is actually a couple fold. First, glue clumps and thickens horribly the longer you work with this mixture. And even with a fine painting brush, your painting surface is going to increase the longer you work with the glue. With just the greenery portion, the tip of my brush doubled in size by the time I finished. So to combat the thickening glue paint mixture, start with your smaller/finer detailed areas first and end with your larger surface areas.

Another problem that I had with this method was the inconsistency of pigment placement. It didn’t matter what brush strokes I used, the color inconsistency was worse than a dog’s fur that is suffering from hot spots.

I kept flipping my glass over to check the visibility and progress. A second coat did not smooth things out. In the end I had to apply a third coat (by which the glue was already thick) where I was blobbing on dots right next to each other. Fortunately, at this point I was working with two shades of green. I took a toothpick and “drew in” leaf veins, blending in the shades. It brought a cohesion that was greatly missing.

My recommendation with this method: apply your glue/paint liberally. If you are using more than one color or shade in a single section, apply first at your lines and then work your way in to where you want the colors/shades to meet.

Acrylic Paint

My favorite paint to work with is acrylic paint. If it were possible to be in tune with an art medium, this is tied for first place with me. (It’s partner in crime is fabric.)

I was quickly frustrated with the glue mixture, that I decided to go straight to acrylic paint by itself. You will see this demonstrated in the blue sky and white clouds. (The clouds are not visible in the final product, because I painted the back of the picture frame holder white for cohesion.)

If you want paint brush stokes to add character to your glass, this is probably the medium of choice for you. The sky I applied with side to side brush strokes. The clouds I applied with circular strokes. So this is very easy to add textures and definition to your glass.

Here is the problem with this method. The front and back of your glass are going to look different. The front of the glass automatically gives the appearance of gloss. When acrylic dries, the finish is matte. Not to mention, if you’re choosing acrylic you’re choosing your stroke pattern. Your pattern is going to take precedence over painting over the finite edge of your vinyl (or permanent marker if that was the tutorial/directions your chose to follow).

That being said, with all the care and precautions I took, I was able to stay in the lines better with plain acrylic than I was with the glue and acrylic mixture. There was absolutely noway I could prevent going over the lines with the glue.

With these first two options, there was absolutely no way that I could keep the lines clean so that both sides were presentable. And I tried.

So that leads me to the third option I tested.

My recommendation: if you want visible brush strokes or create an umbre effect, this method is for you.

Advertisements

Acrylic Paint Pens

I chose this paint method for the tulip section, because I love visiting the Tulip fields each year. I love the bearded tulips and the multi colored ones alike. And if you couldn’t guess, I have an affinity for the red tulips with yellow tips.

And the acrylic pens were perfect for this kind of detail!

Again, I used the materials that i already had in my crafting stash. My acrylic pens are generic, but they did the job. And I can’t wait to purchase a better quality product to use.

For as much as I loved this method the best, over all the numerous products and techniques I’ve ever used on glass, they still had their own drawbacks. My number one problem is that the tips were so small in comparison to the size of my project. It’s a good thing that I find coloring calming and an avenue to my happy place. This was probably the most time consuming paint application.

Trial and error with this product is that the paint pen wants to apply a layer of paint too thin. I regularly had to shake the paint down to the tip. And about halfway through the tulips, I had to compress the tip to purposely create a small pool of paint to spread out.

Another draw back for this application method is that you cannot blend your colors. I, for one, have a pet peeve about muddying my pens. They can be ink, watercolor, or paint. I cannot muddy my tips. I need true colors. And because of this preference I worked with the yellow first, then went back through with the red. Even with my toothpick trick, the yellow was too dry to blend with using that method.

My recommendation: if you want to blend with the pens,work sections at a time. And if you like keeping your tips clean, leave a hair line separation between colors.

Another bonus for this method is that you have complete control over every application line of the paint. You have full control over not painting on or over the lines for each section. So if you want to have a flawless back and front, for duo viewing, this method is a must!

Drying Times

Maybe your method of choice is less about application and more about drying time. Believe me, I’ve conscientious about this because I have young children. Anything that takes long drying times I have to safe guard unless I want smears, prints, or transfers to my furniture and walls.

Acrylic Paint was the quickest. Especially since I only needed one coat of paint. The sections were dry pretty much when I finished the tulips. I give it an estimate of 20 minutes. As I mentioned before, acrylic paint dries with a matte finish. So the bonus here is that you don’t have to test touch to see if it is done drying. You see the difference.

The Acrylic Pen comes in second place for drying time. I have no estimate for you because on glass there was no noticeable change that I could see. The finish is just as glossy as when you first apply it. I had to test touch for dryness. I didn’t have a clock in front of me, so it could have been a ten minute dry time or twenty (from first painted section in relation to when I finished painting the entire project.) I would have zero qualms about putting the picture frame back on after an hour of drying time.

Glue with Acrylic Paint is like watching paint drying. It’s a slow process. But if you have worked with Mod Podge you know. Whatever wet glue you choose, you already know that takes several hours to properly dry. Mod Podge takes 24 hours to cure. And all of the drying time is very much determined by how thick you choose to paint. My glue had about an hour to dry.It was still mildly tacky, but I had to put the cover back on so little fingers didn’t damage the work I did.

Final Thoughts

With larger sections, this is a project that I believe even self proclaimed non-crafters can do. The important thing is selecting the paint method that you are most comfortable using. If the word paint intimidates you, but you still enjoy coloring a color page or two, then you will feel right at home with using an Acrylic paint pen set. It literally feels like coloring with markers. If you prefer a quick and done method, grab a brush and your choice of acrylic paint. If you love glue and/or medium manipulation than the mixture of glue and acrylic paint is definitely for you.

Everyone is going to have a different preference or comfort level. You craft with what is comfortable with you and your expectations. This is what truly sets you up for success. Whether you are making a faux stain glass window, the background for another project, or even transforming a vase into something more note worthy for your centerpieces.

If you want to clean up the back side of your glass pane, so that it’s more presentable, here are two options. If you have a steady hand and are good at lining pieces of vinyl up, you can cut out a second set of lines and apply it on the backside. The second option is picking your paint of choice and paint over the colors on the original set of lines. For example, on my project I could use a black sharpie, black acrylic paint with a fine tip brush, or my black acrylic pen to re-establish my black lines.

It’s my hope that you now feel enabled and courageous to try something new.

Paint Is Your Friend

And right now we can all use a little more color in our lives!

Processing…
Success! You're on the list.
Advertisements