After spending almost a decade in the event decorating industry I have repetatively heard "I can do that". Instead of being dismissed by creative minded people, I want to show you how I do "that" so you can be sucessful in recreating that inspiration image. I just might have a few tricks that you haven't seen yet!
The one thing about approaching holidays is that you really get smacked in the face with everything that needs to be done.
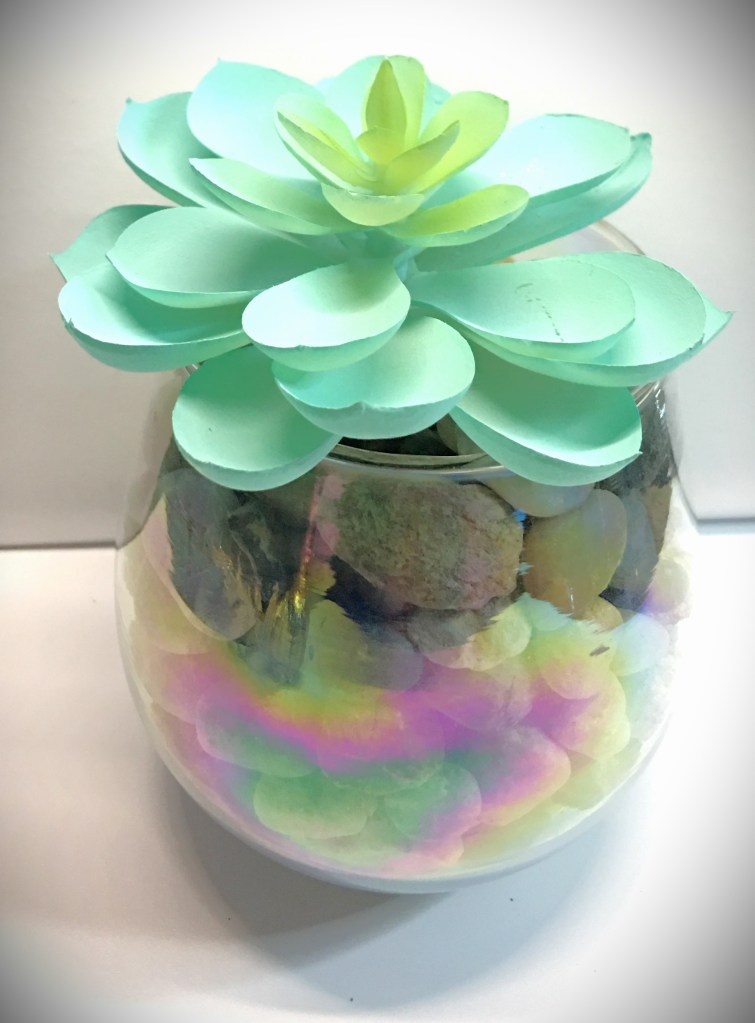
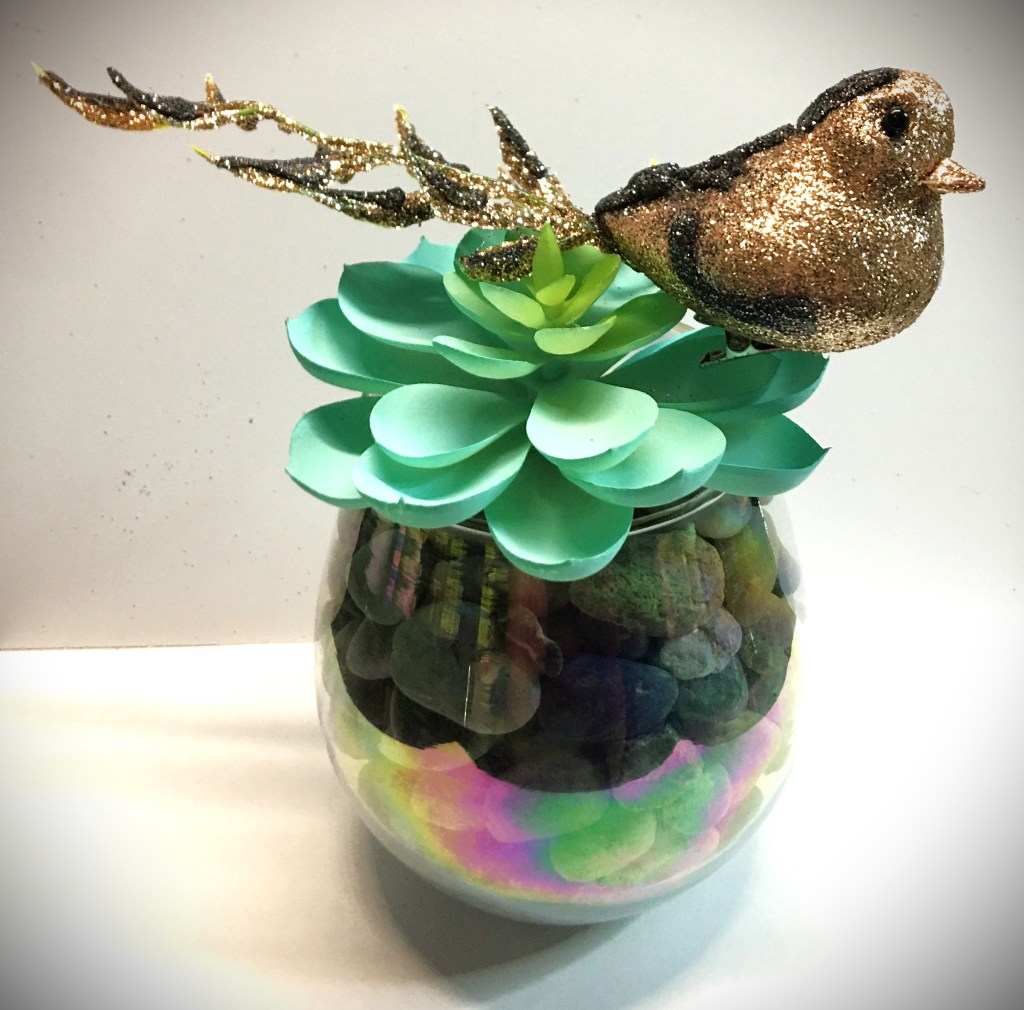
Whether you’re decorating sideboards for an Easter get together or just looking for something quick that fits in a space as small as a window sill to add a little color before spring finally unfurls. This quick craft is for you.
What you need:
1 Stemless Wine Glass
1 Bag of stones 18 oz/794 g
1 Faux Succulent
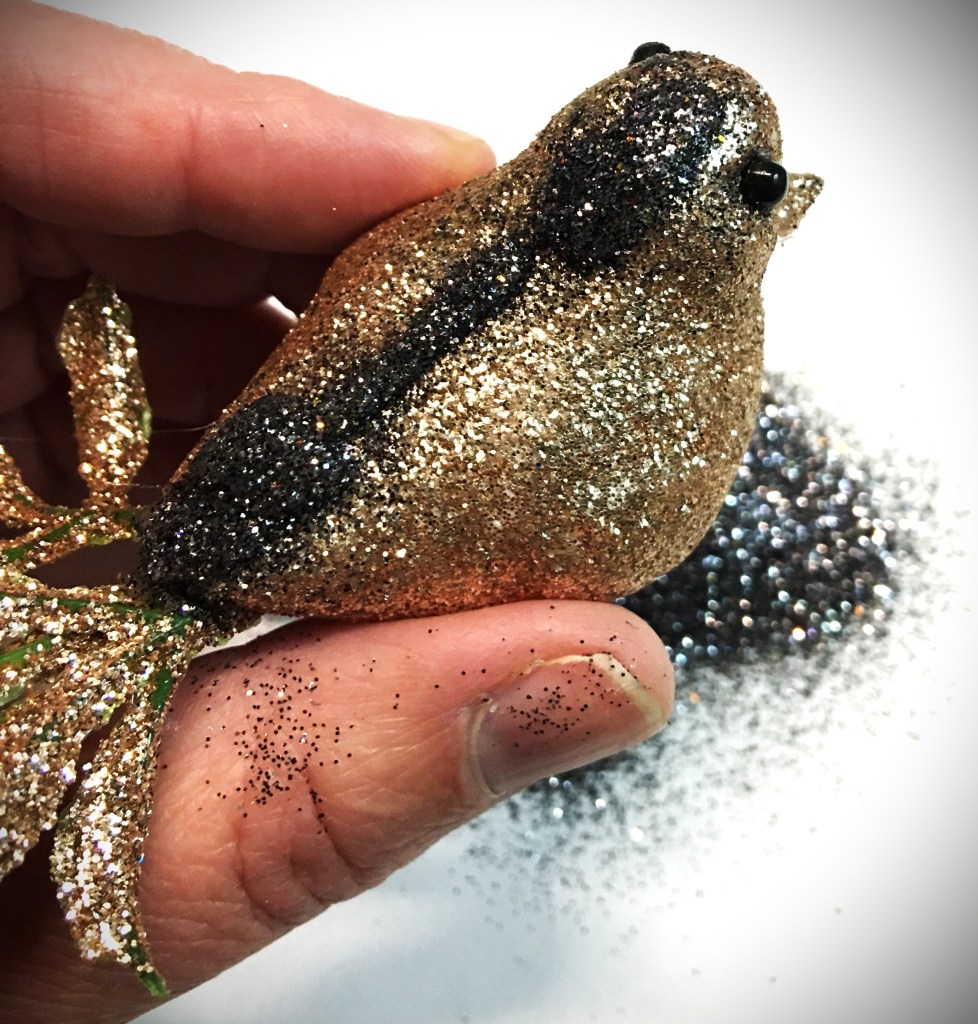
Any other accent piece that you would like to add (I chose a glittery bird)
Glue Gun
Accent Glitter
5 Minute Version
If you just want to toss something together, all you need is the glass, rocks, and succulent.
The succulent that I chose had a very thick stem. Because it was sturdy, I could pour the rocks in the glass and push the succulent stem into the rocks and moved on. (If the rocks have resistance, give the succulent stem a little swirl and it will sink right in.)
For whatever reason if the succulent just does not want to go into the rocks, never fear. Pour out the rocks with the exception of some in the bottom (or the level that you can easily push in the succulent). Then lift up the leaves on one side (and then the other) to add the stones in, around the stem.
Want to use real succulents?
You can do this using a real succulent of your choice. Make sure you verify if the succulent you want to use can life in rocks or if it needs cactus potting soil.
If your succulent needs soil, but you prefer the look of the rocks showing through the glass, you will need to take a little extra time layering the rocks outside and putting the soil in the center
Advertisements
Ten Minute Version
Follow the directions for the 5 minute version to get the glass filled and succulent set. The remaining time is dressing up accent piece that you are adding.
For example, the glitter bird that I’m using came from the dollar store and I wasn’t 100% satisfied with it. If I had feathers in my crafting room, I would have added feathers for the wings as well as the way it was set up with feathers on the tail. Unfortunately, I don’t keep feathers. So I needed to pull off the pink ones that came with the bird. The black eyes also seemed to stick out awkwardly. To remedy this, I grabbed my glue gun and black glitter and added glitter detail work to add dimension and character to the bird.
Thanks for spending a few minutes with me today. If you’re anything like me, you have a list as long as your arm to get done in less than 48 hours. My kiddos always look forward to a newly designed shirt. I haven’t got a fully developed idea for that yet. But I do have a spring edition ready to go dressing up some sock bottoms. They enjoyed the ones that I made for them for christmas. So I thought I would make a few more for them. You can check out sock designs here:
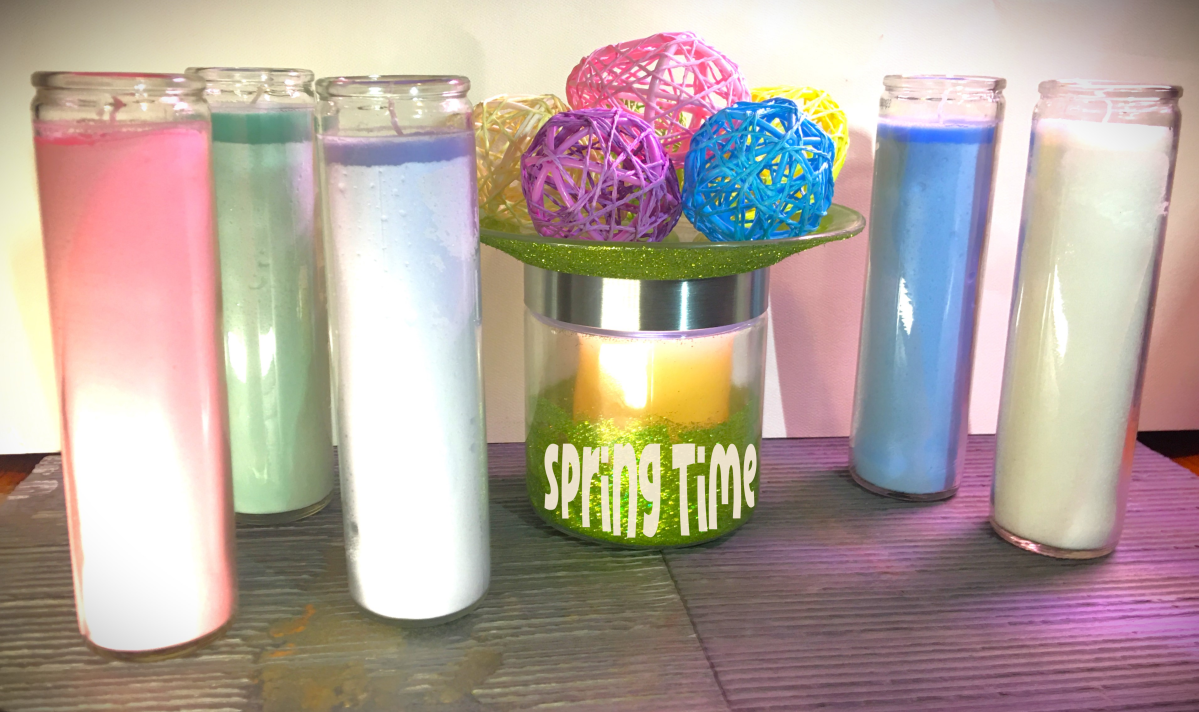
Depending on the space you’re looking to decorate for spring and Easter, you might find that you want a little sparkle in a small place. Maybe it’s a window ledge, a office desk corner, a mantel piece, or just a side table. This is something quick that you can put together and adds as much or little color as you like. The best part is that with the exception of glue drying time, you can have this project done in under an hour!
Materials Needed:
Clear Glass Salad Plate
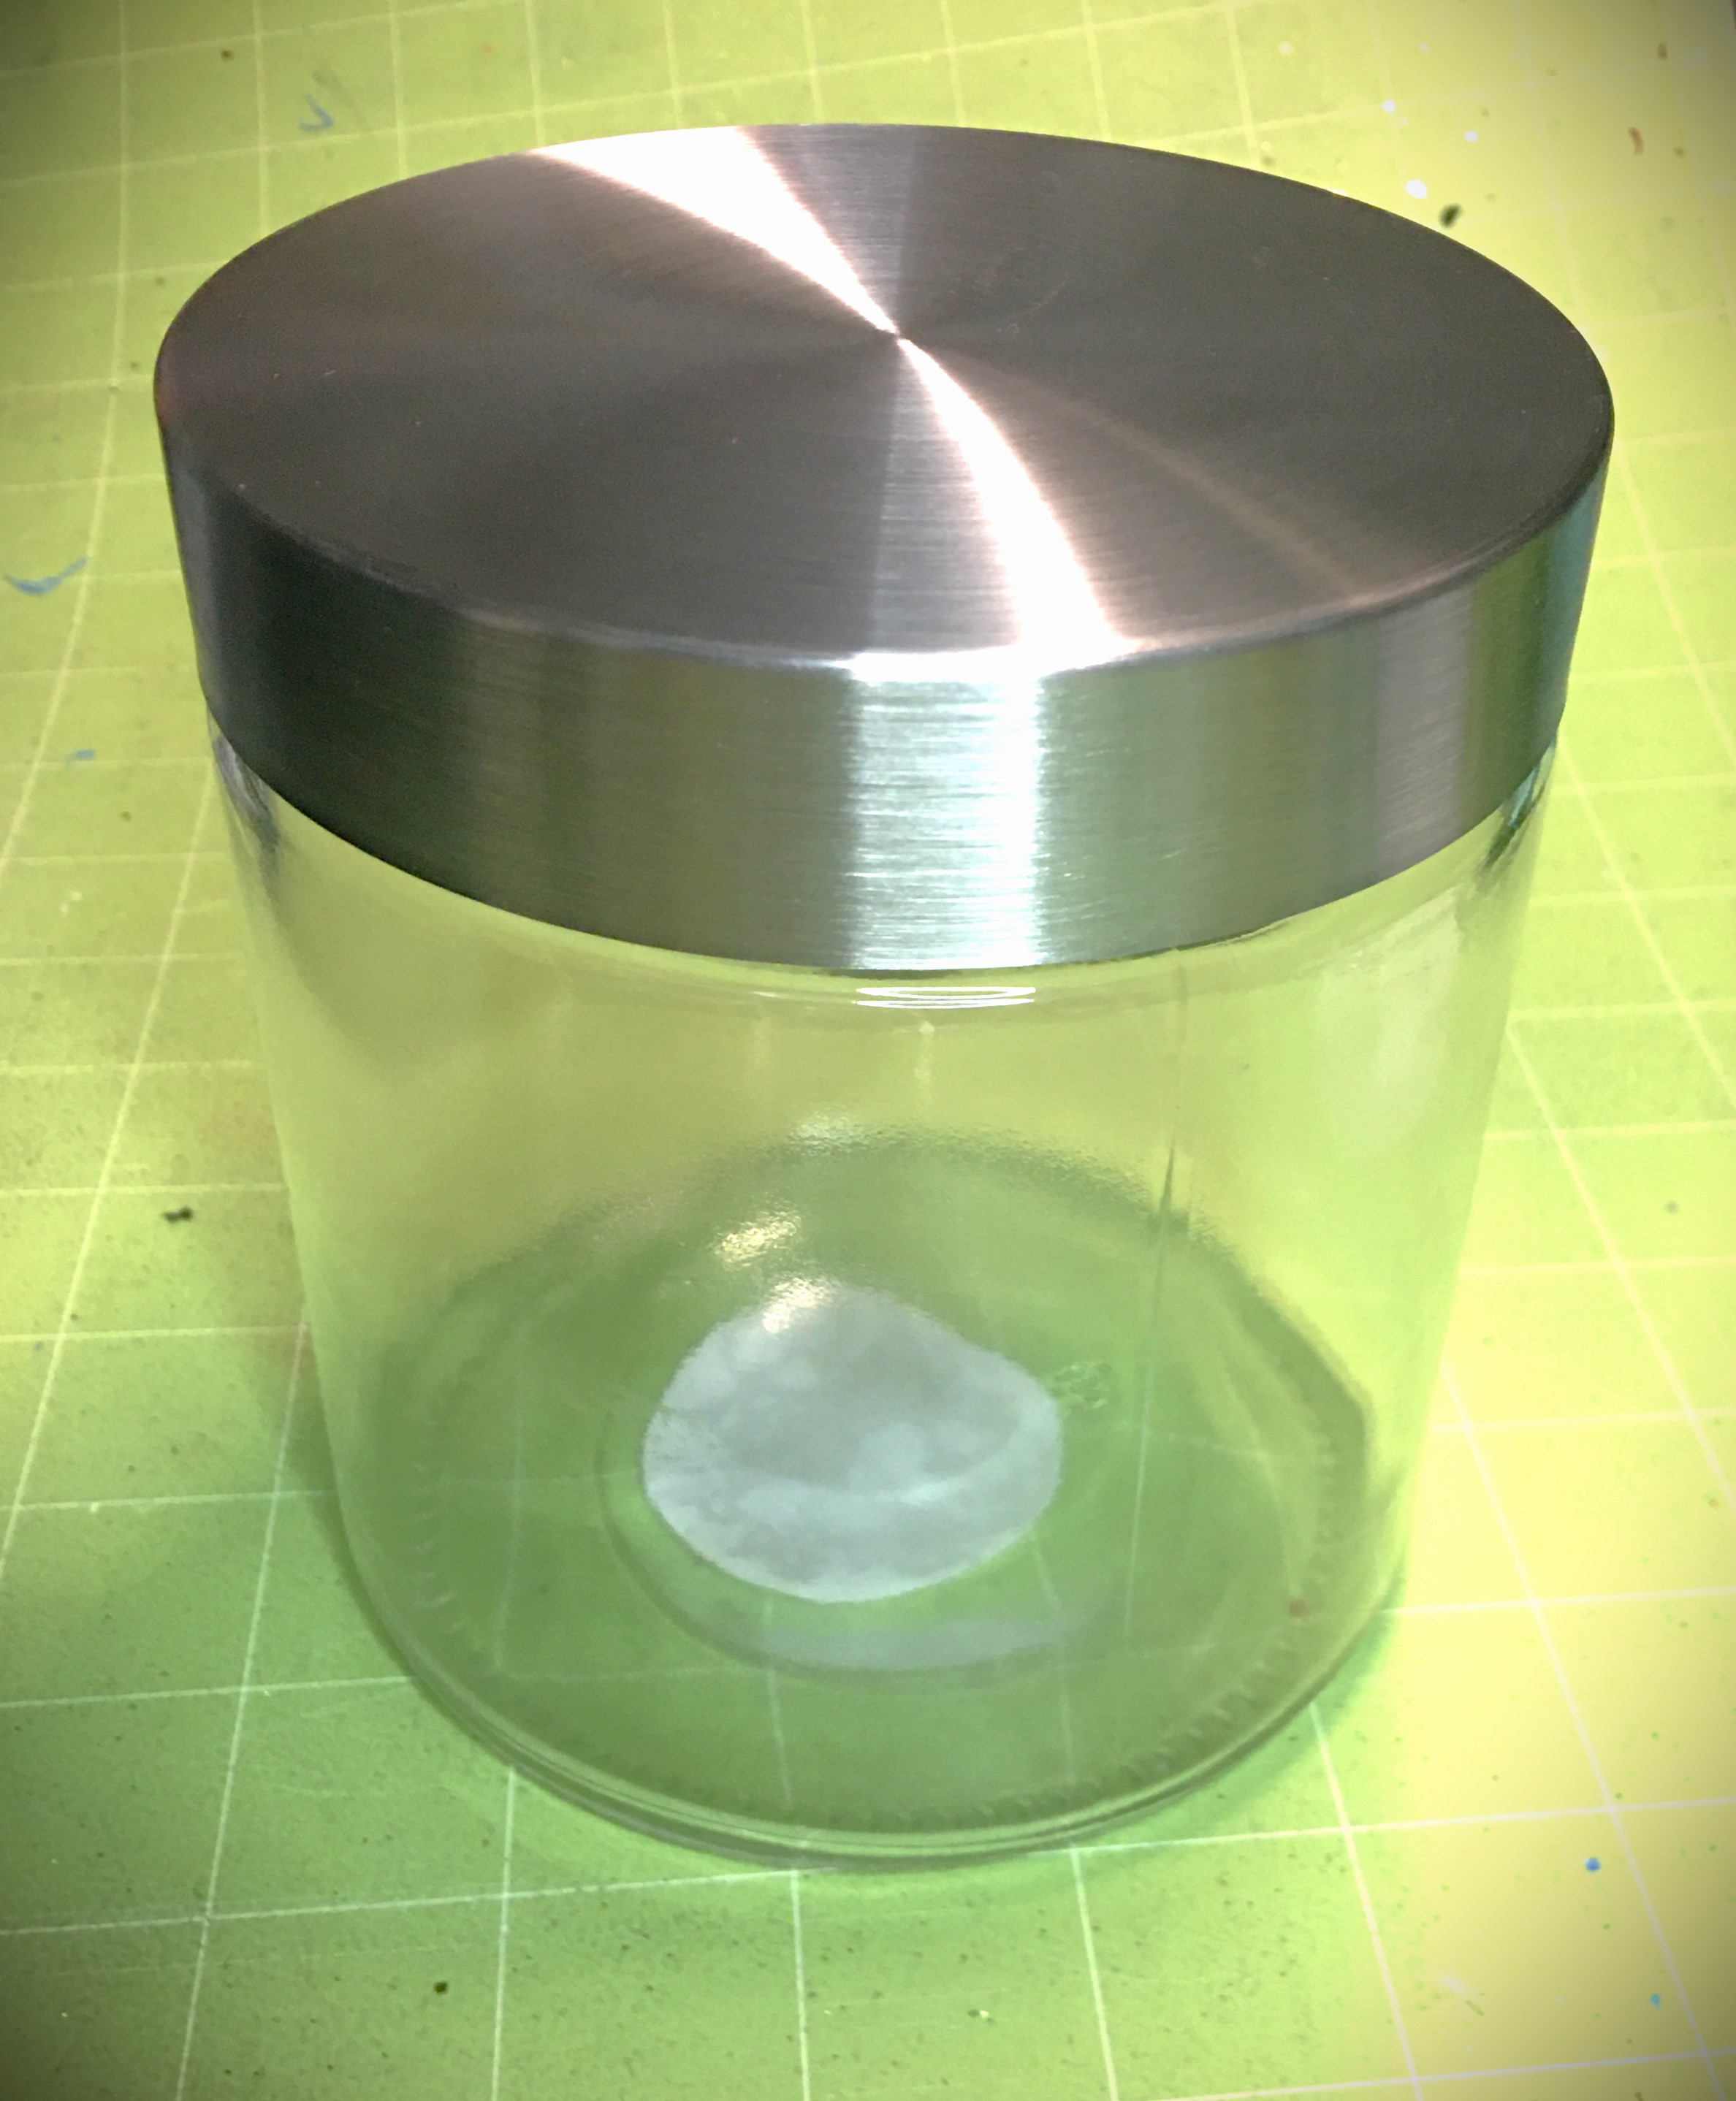
Clear Glass Cylinder Container (with lid)
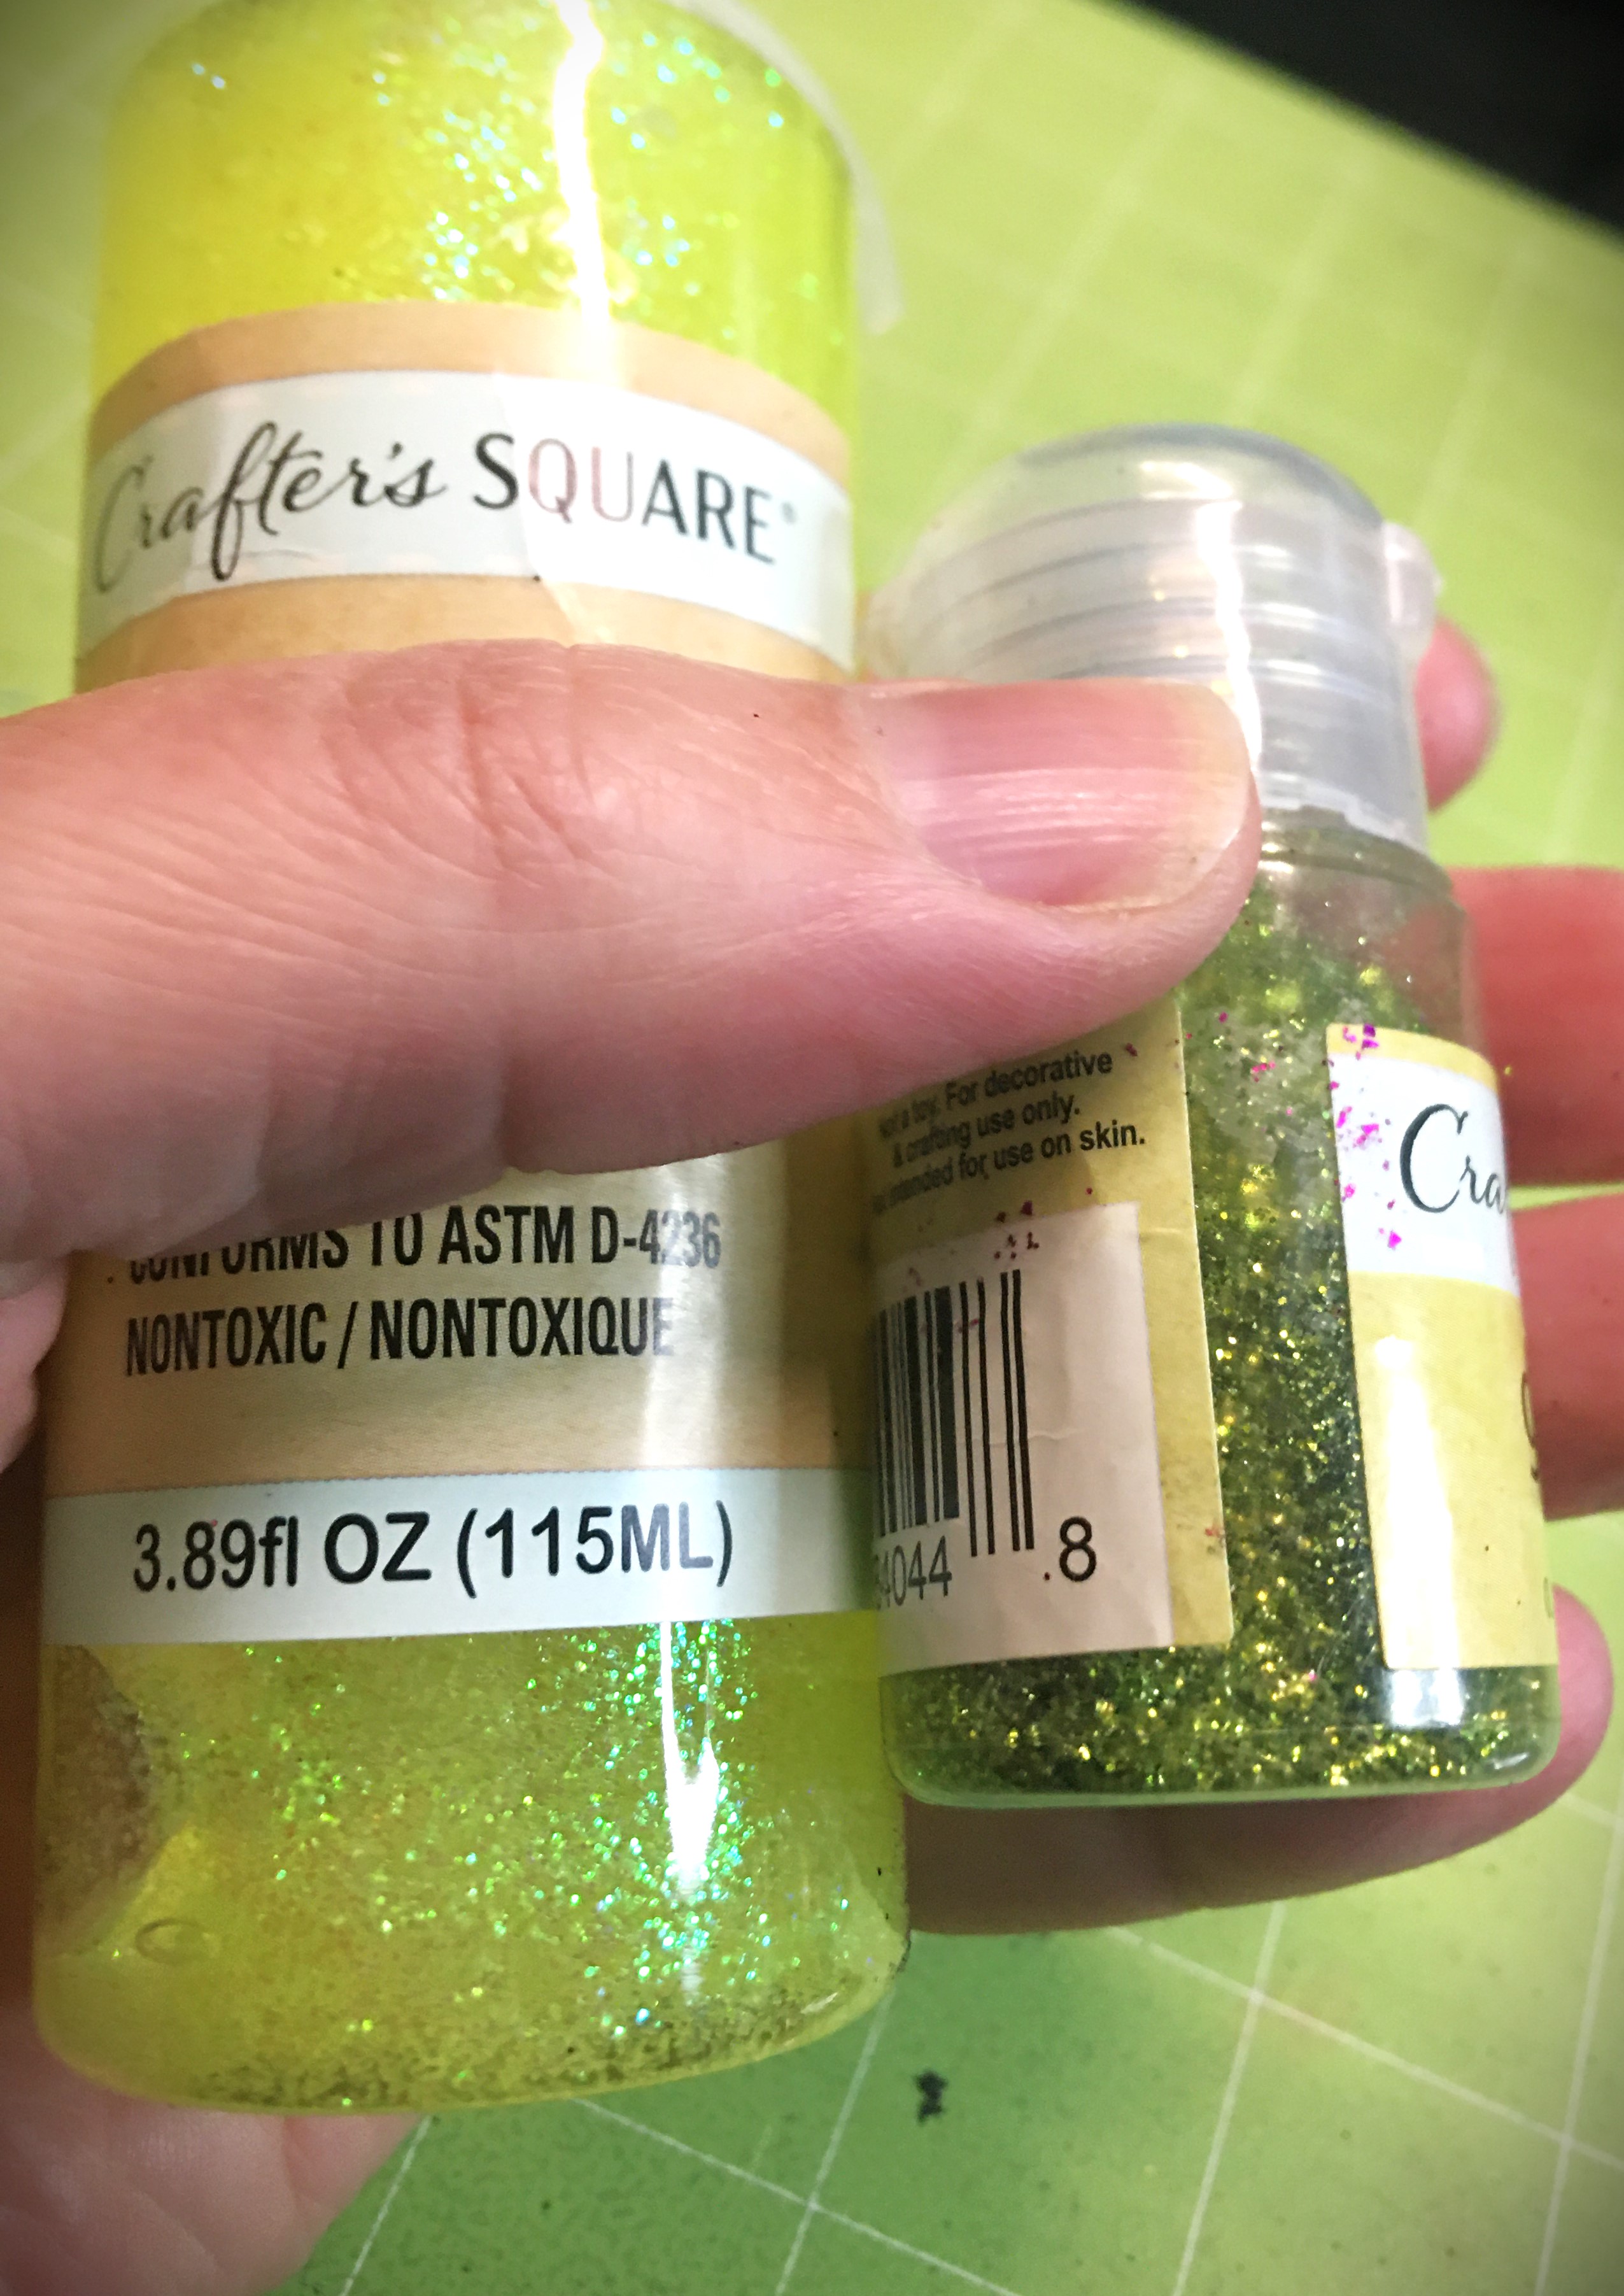
Glitter (color of choice)
Glitter Glue (complementary color)
Elmer’s Glue
Paint Brush
Paper and Wire Decor Eggs
Tall Candles (colors of choice)
Fairy Lights (optional)
Polycyclic or Clear Acrylic Spray Paint (optional)
Vinyl Decals/Stickers (optional)
Silk Flowers (optional)
Everything you see here I sourced at my local dollar store, with the exception of my Elmer’s glue and polycyclic. Hello mom of young children here! I found that I’m least likely to cry with accidents when I buy things from the dollar store. And accidents happen.
Advertisements
Let’s Make It
Jar Stand
This one is a multifunctional component. I’m showing you how this holds a decor item, the paper and wire eggs. Instead of the eggs, you can use the plate for treats. Or you can set the plate aside and use the jar as a plate holder for part of your Easter Brunch.
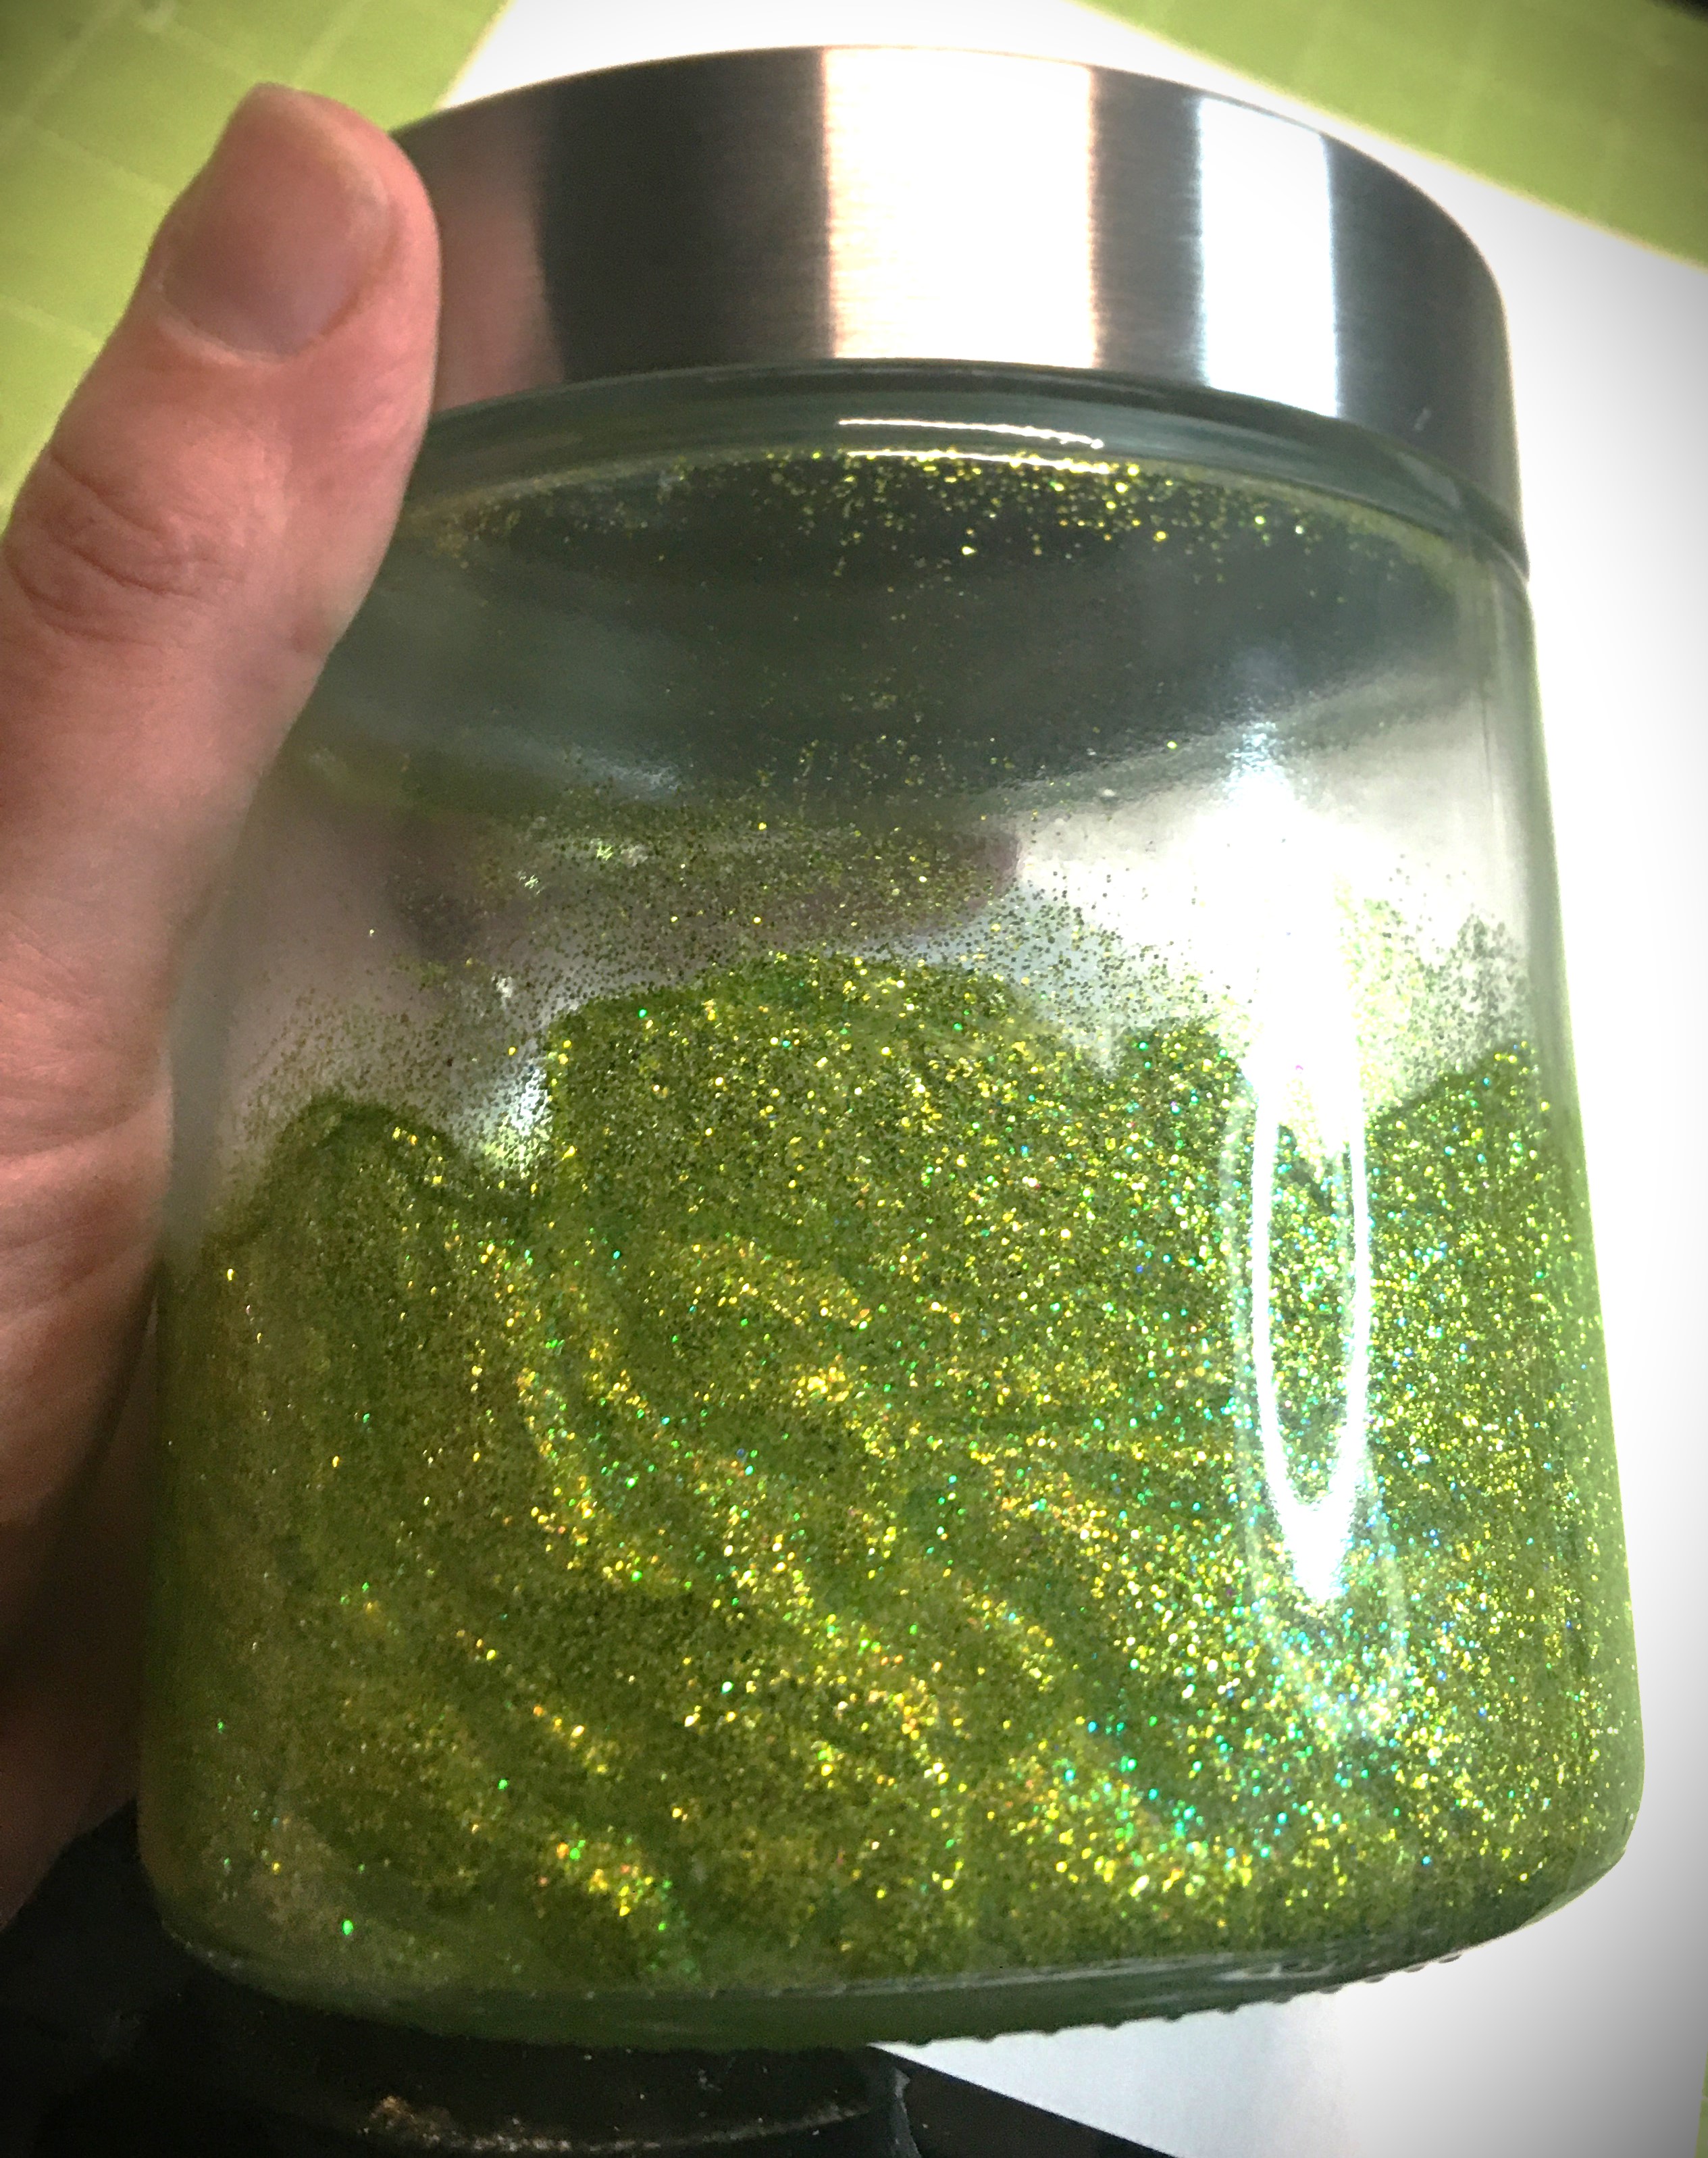
Inside the glass jar paint in your glue in the bottom portion of the jar. I used a yellow glitter glue to complement the green glitter. When using glitter glue, it’s important to pat the glue on your project and not paint it on. This type of glue does not have the holding power that Elmer’s glue has. I chose to stop the glue a little over halfway up the jar and stroke upwards to create a grass like effect. If you want to use Elmer’s glue you’ll have a little better control over the glue and a quicker dry time. Just make sure to add a little secondary color of glitter into your original glitter choice. This will give dimension to your color and keep it from becoming flat looking.
Dump a good portion of glitter into the bottom of your jar and swirl it around on top of the glue. For the sides of the jar, I turned and tilted the glitter from the bottom of the jar down toward the mouth. I also hit the sides as I turned the jar, so that with it came to knock out all the excess glitter, there was very little that came out.
Allow to thoroughly dry.
You may find that you need a dry loose bristle brush to brush out some stray glitterthat likes to stick to the clear glass.
Advertisements
Egg/Treat Plate
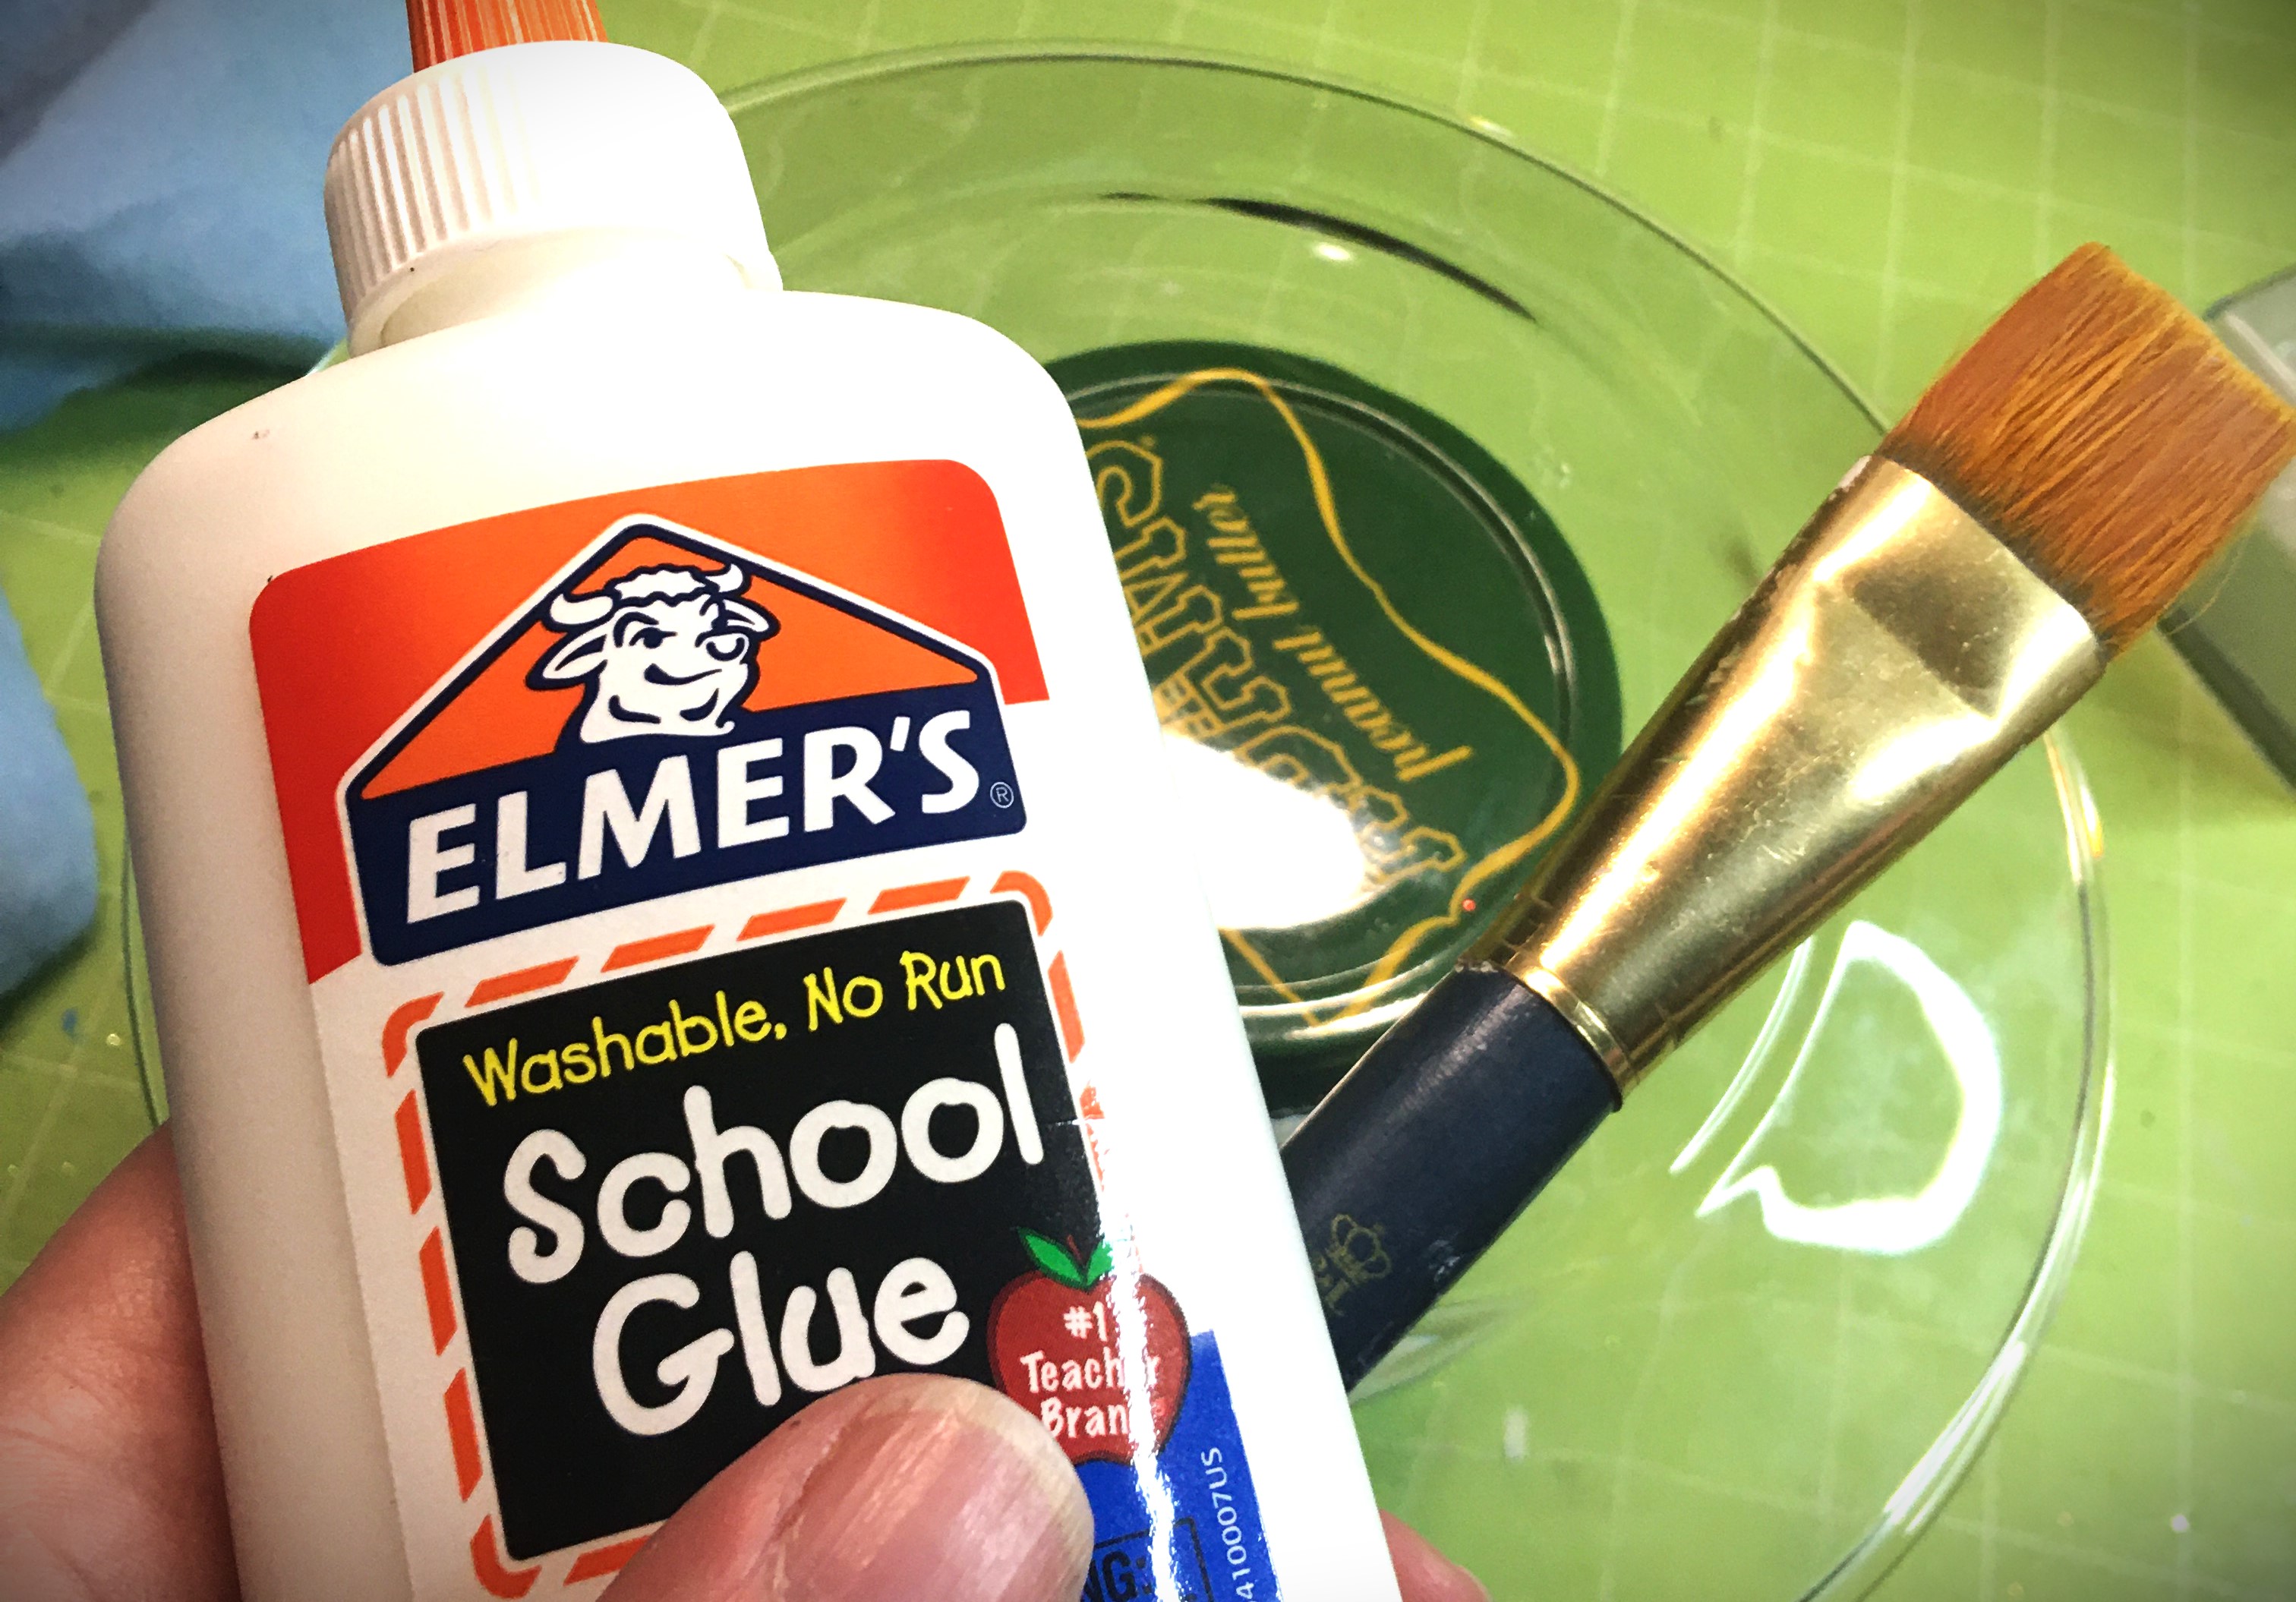
In order to keep this plate safe for treats, make sure to apply the glitter to the underside of the plate. This makes the face hand washable.
Apply a thin layer of Elmer’s glue to the area of the plate that you want to add the glitter. For me, I love the silver coloring of my jar’s lid and want that to shine up through the bottom of the plate. So I only applied glue to the lip of the plate.
Sprinkle glitter over the wet glue. The more thorough you are on the shaking off of excess glitter makes the final step easier to apply without lifting the glitter.
Once the Elmer’s glue is dry, seal in the glitter with polyclinicsealant or clear acrylic spray. This is an important step if you want to make sure that you won’t leave glitter trails when handling the plate. If you choose to use polycyclic, you want to tap the sealant on instead of brushing. Brushing actually ends up stripping glitter off of the glass. If you tap it on, the only glitter that comes off is whatever is loose to start with. If you’re like me and want to minimize the amount of glitter loss, clear acrylic spray is perfect. There is no loss. Plus the acrylic spray has the additional bonus of retaining the sparkle of the glitter more.
Allow to thoroughly dry.
Advertisements
Assemble the Accessories
For my display I chose to go with the multi colored paper and wire eggs and different pastel colors of tall candles. This is where even more personalization can happen. If you have rattan balls, you can use those here and keep with white candles to keep a clean minimalistic look. (In this instance a white frosted paint or white glitter might be your choice of decorating the jar and plate.)
For the candles, if you choose to go the color route, you can mute the colors by frosting the outside of the glass.
Or perhaps you have ribbon from other decor you already have up. You can hot glue a band of that ribbon around the candle.
For this set, I’m going to apply vinyl decals onto the glass. Also I’ll apply a decal on the jar.
Coming back to the jar, you might choose to further decorate the inside. Perhaps you want to add battery powered tea or short pillar lights. Maybe you love fairy lights. (For this one I would recommend hot gluing the switch the bottom side of the lid. This allows you to turn on the light just by lifting the lid and not having to fish for the switch on the bottom of the jar.) You could be a flower person. You could arrange your favorite silk flowers inside. Combined with fairy lights could be very dreamy looking. I think I’m going to have to find where I stashed my silk butterflies. The wing span is about 6″ and I could arrange 1 or 2 butterflies on the inside and have a little whimsy on the inside of my jar.
Advertisements
Put It All Together
Even with all the different ways of personalizing this project, it’s all going to take on a different life depending on how you will set this up. Will you use a colorful table runner? Or maybe you’ll display this set with absolutely no further modification. I can totally see the white frost, rattan balls, white candles set on a reclaimed wood side table.
The one thing that I love about budget and DIY weddings is that the couples, and their families, look for ways of reusing items after the wedding instead of using disposable items. And this is one thing that everyone can agree on, whether you’re a diehard Earth Day person, living Green, being Frugal, or just getting more bang for your buck.
I’m going to focus on one wedding item that tends to be wasteful or even a financial drain…wedding favors.
There are so many cute ideas out there. I really get it.
Some of them are practical. Like the paper fans on those hot summer outdoor weddings.
But if we’re being honest, how many of those items are really used by your guests after the wedding?
The problem that I see is that all those monogrammed, personalized items really don’t see a life outside of the wedding. The true exceptions are for the family and guests who are truly sentimental.
My husband is one of those sentimental people. I kid you not, he’s the one who collects the paper fans after the wedding and brings them home. His feelings are hurt if the one of the boys plays too rough with one and rips it. And 5 years later I just see a blue fan, but he remembers who wedding it was from and at least five new people he met, and a funny story or two from the reception.
So I want to challenge you to find a way to make your wedding favor do double duty. Or even triple duty!
One idea I have for you are little candles that you can purchase at craft fairs and support a local vendor.
Advertisements
Use #1 Wedding Favor
Instead of personalizing these with your names, initials and wedding date, try finding phrases or words that represent your love for each other. Funny phrases work if you’re a funny or prank making couple. When you take away the obvious personalization and go with personalization that your guests can identify with, you automatically guarantee that your guests are going to want to take your favors home.
Use #2 Year Round Gifting
For example, if you’re keeping with the romantic or Boho themes, this floral wreath is absolutly perfect! It adds to your wedding decor, but it’s absolutely something that people will love to decorate their homes with when they leave our reception. Worse case scenario, you take a few home and they are still an appropriate gift to give for birthdays, Valentine’s Day, an add on trinket to another couple or bride, the possibilities are endless.
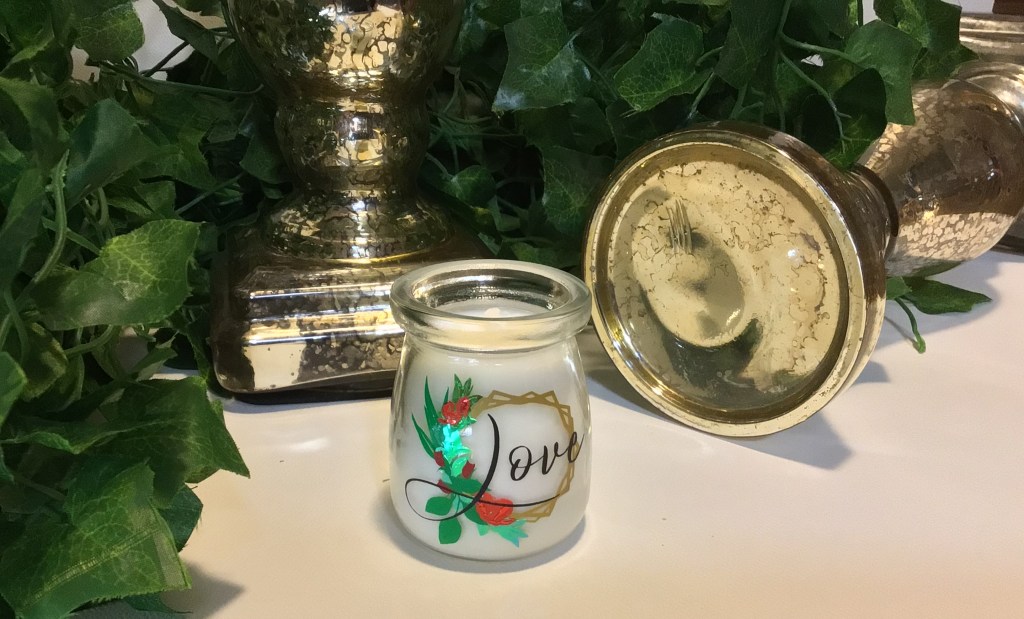
This decal is 2″ tall. Some of the details were eliminated to due to size. The rose buds you see here are about 3mm tall.
Use #3 Centerpiece Decorations
If you’re thinking about using tea light candles on your reception tables anyway, these are perfect because one purchase price for a favor is fully utilizable for your centerpiece. And if you design it just right, you can combine it with other candles. For example, here’s the same candle with gold mercury glassware.
Advertisements
Use #4 After the Candle is Gone
People love cute little things. Even more than that, they love cute little things that they can easily see using when the contents are gone.
This little jar is perfect for adding:
A new tea light
Coins
Q-tips
Toothpicks
Sink side jewelry holder
Small office supply holder (ex. tacks)
Tooth Fairy jar
Spice holder
And any crafty person can find a million uses for this size of a jar on a craft project
I think I bought several of these scented candles from a Christmas Craft Fair vendor for about $5 each. Yes, there are most certainly wedding favors out there that you can find cheaper per unit. BUT my big question is…
Which favor is going to be memorable for your guests? Pull double or triple duty for your decor? Will be used long after your wedding?
Another bonus to purchasing an item like this from a local vendor is that they are likely to work you a deal if you buy something in bulk from them. It’s something to talk to them about. But even at $5, it really is a great deal.
But the absolutely best thing about this favor is that it will absolutely not end up in the trash as soon as you leave for your honeymoon!
File Used Today, Love Wreath, will go live on Monday! There will also be other variations available. So be sure to check them out in my shop.
Processing…
Success! You're on the list.
Whoops! There was an error and we couldn't process your subscription. Please reload the page and try again.
I know that one of the biggest things to make right now are shadow boxes. And I LOVE them just as much as the next person. However, the one disadvantage they have is that they only have one viewing direction. So while shadow boxes are great for decorating homes, they lack greatly when it comes to decorating for events.
And that is where Cloches come in!
Think of a cloche as shadow box that can be viewed 360°, perfect for centerpieces.
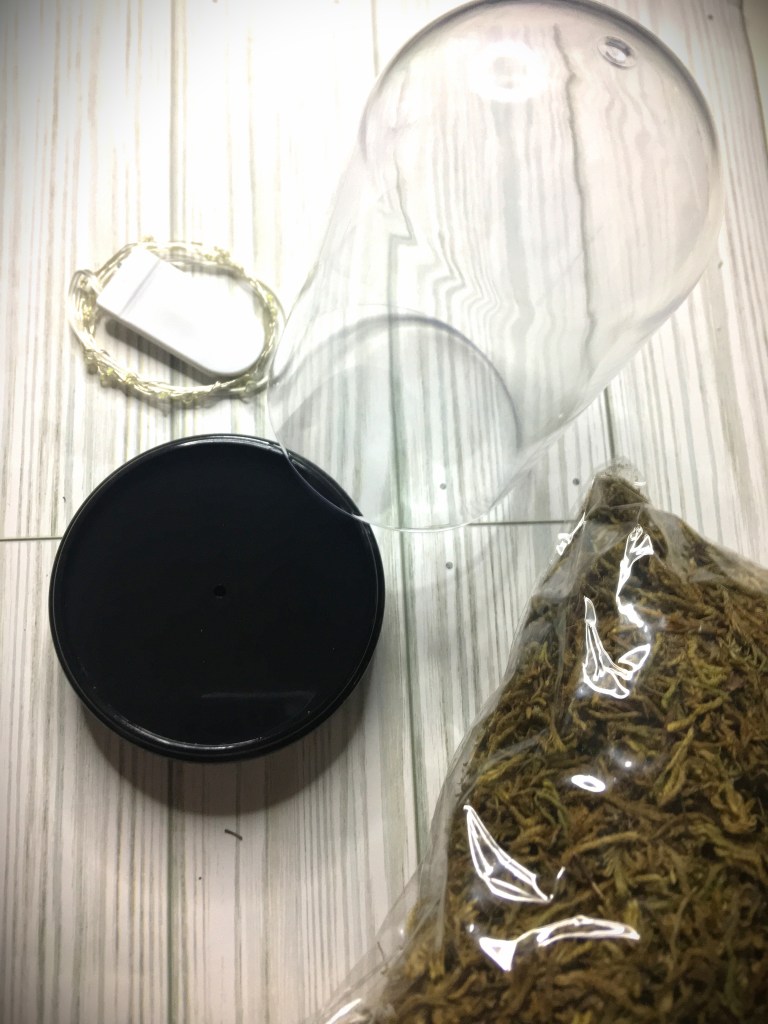
What I have for you today is a spring cloche that can inspire you for whatever you are looking to create unique decor for your events. Whether you’re looking for a wedding, a Princess birthday party, displaying an heirloom or memory… you are only limited by your imagination.
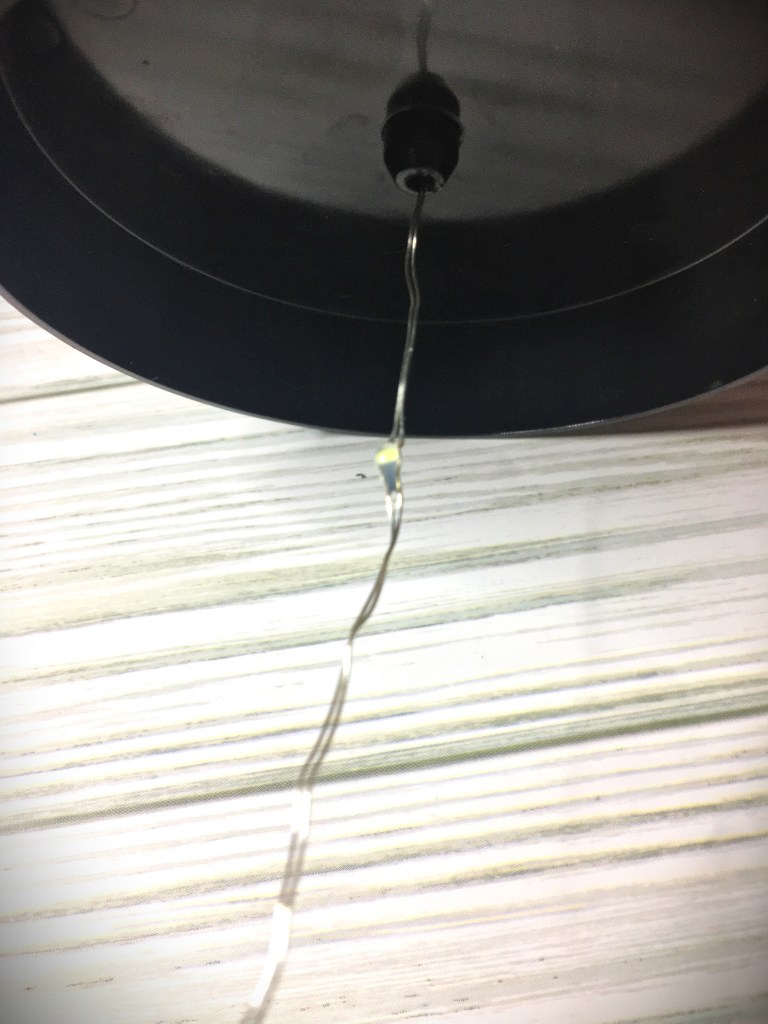
The perfect thing about this cloche, when it comes to lighting, is that there was a hole that I could thread the fairy lights through. This made it possible to hot glue the battery pack/switch to the bottom of the cloche, making it invisible. If you choose to also go this route for your lighting, I recommend that you glue the battery pack in such a way that you can unscrew the battery pack and change out the batteries without needing to remove it from the cloche base.
Once the pack is secure, you can flip the base over and position the wires on the top of the base.
Tip: before securing down the wires, place the cloche dome down on top and see how it’s positioned in relation to the base. With this particular cloche, the dome rests inside the lip/edge of the bottom. So if I had put one of the bulbs right up against the lip/edge, then my dome would not be able to sit flat when place over the finished project.
After trying a few different gluing options, I found the best way of securing the wires and moss was the following way. Bend the wire how you want the lights to go. Avoiding the bulbs, you will put dabs of hot glue on the wire and press the moss down on top of the glue. (If you have a silicone finger cot, you can press down directly with your finger without being burned by the glue.
Tip: To maximize the amount of light shining up from the moss, make sure you do not cover the bulbs. You may think you will have holes, but if you look in later pictures you will see that these holes are absolutely not visible. So work with the lights on. You will immediately see true blank holes vs. light holes.
With the base now complete, it’s time to move on to the paper components.
Flowers and Butterfly
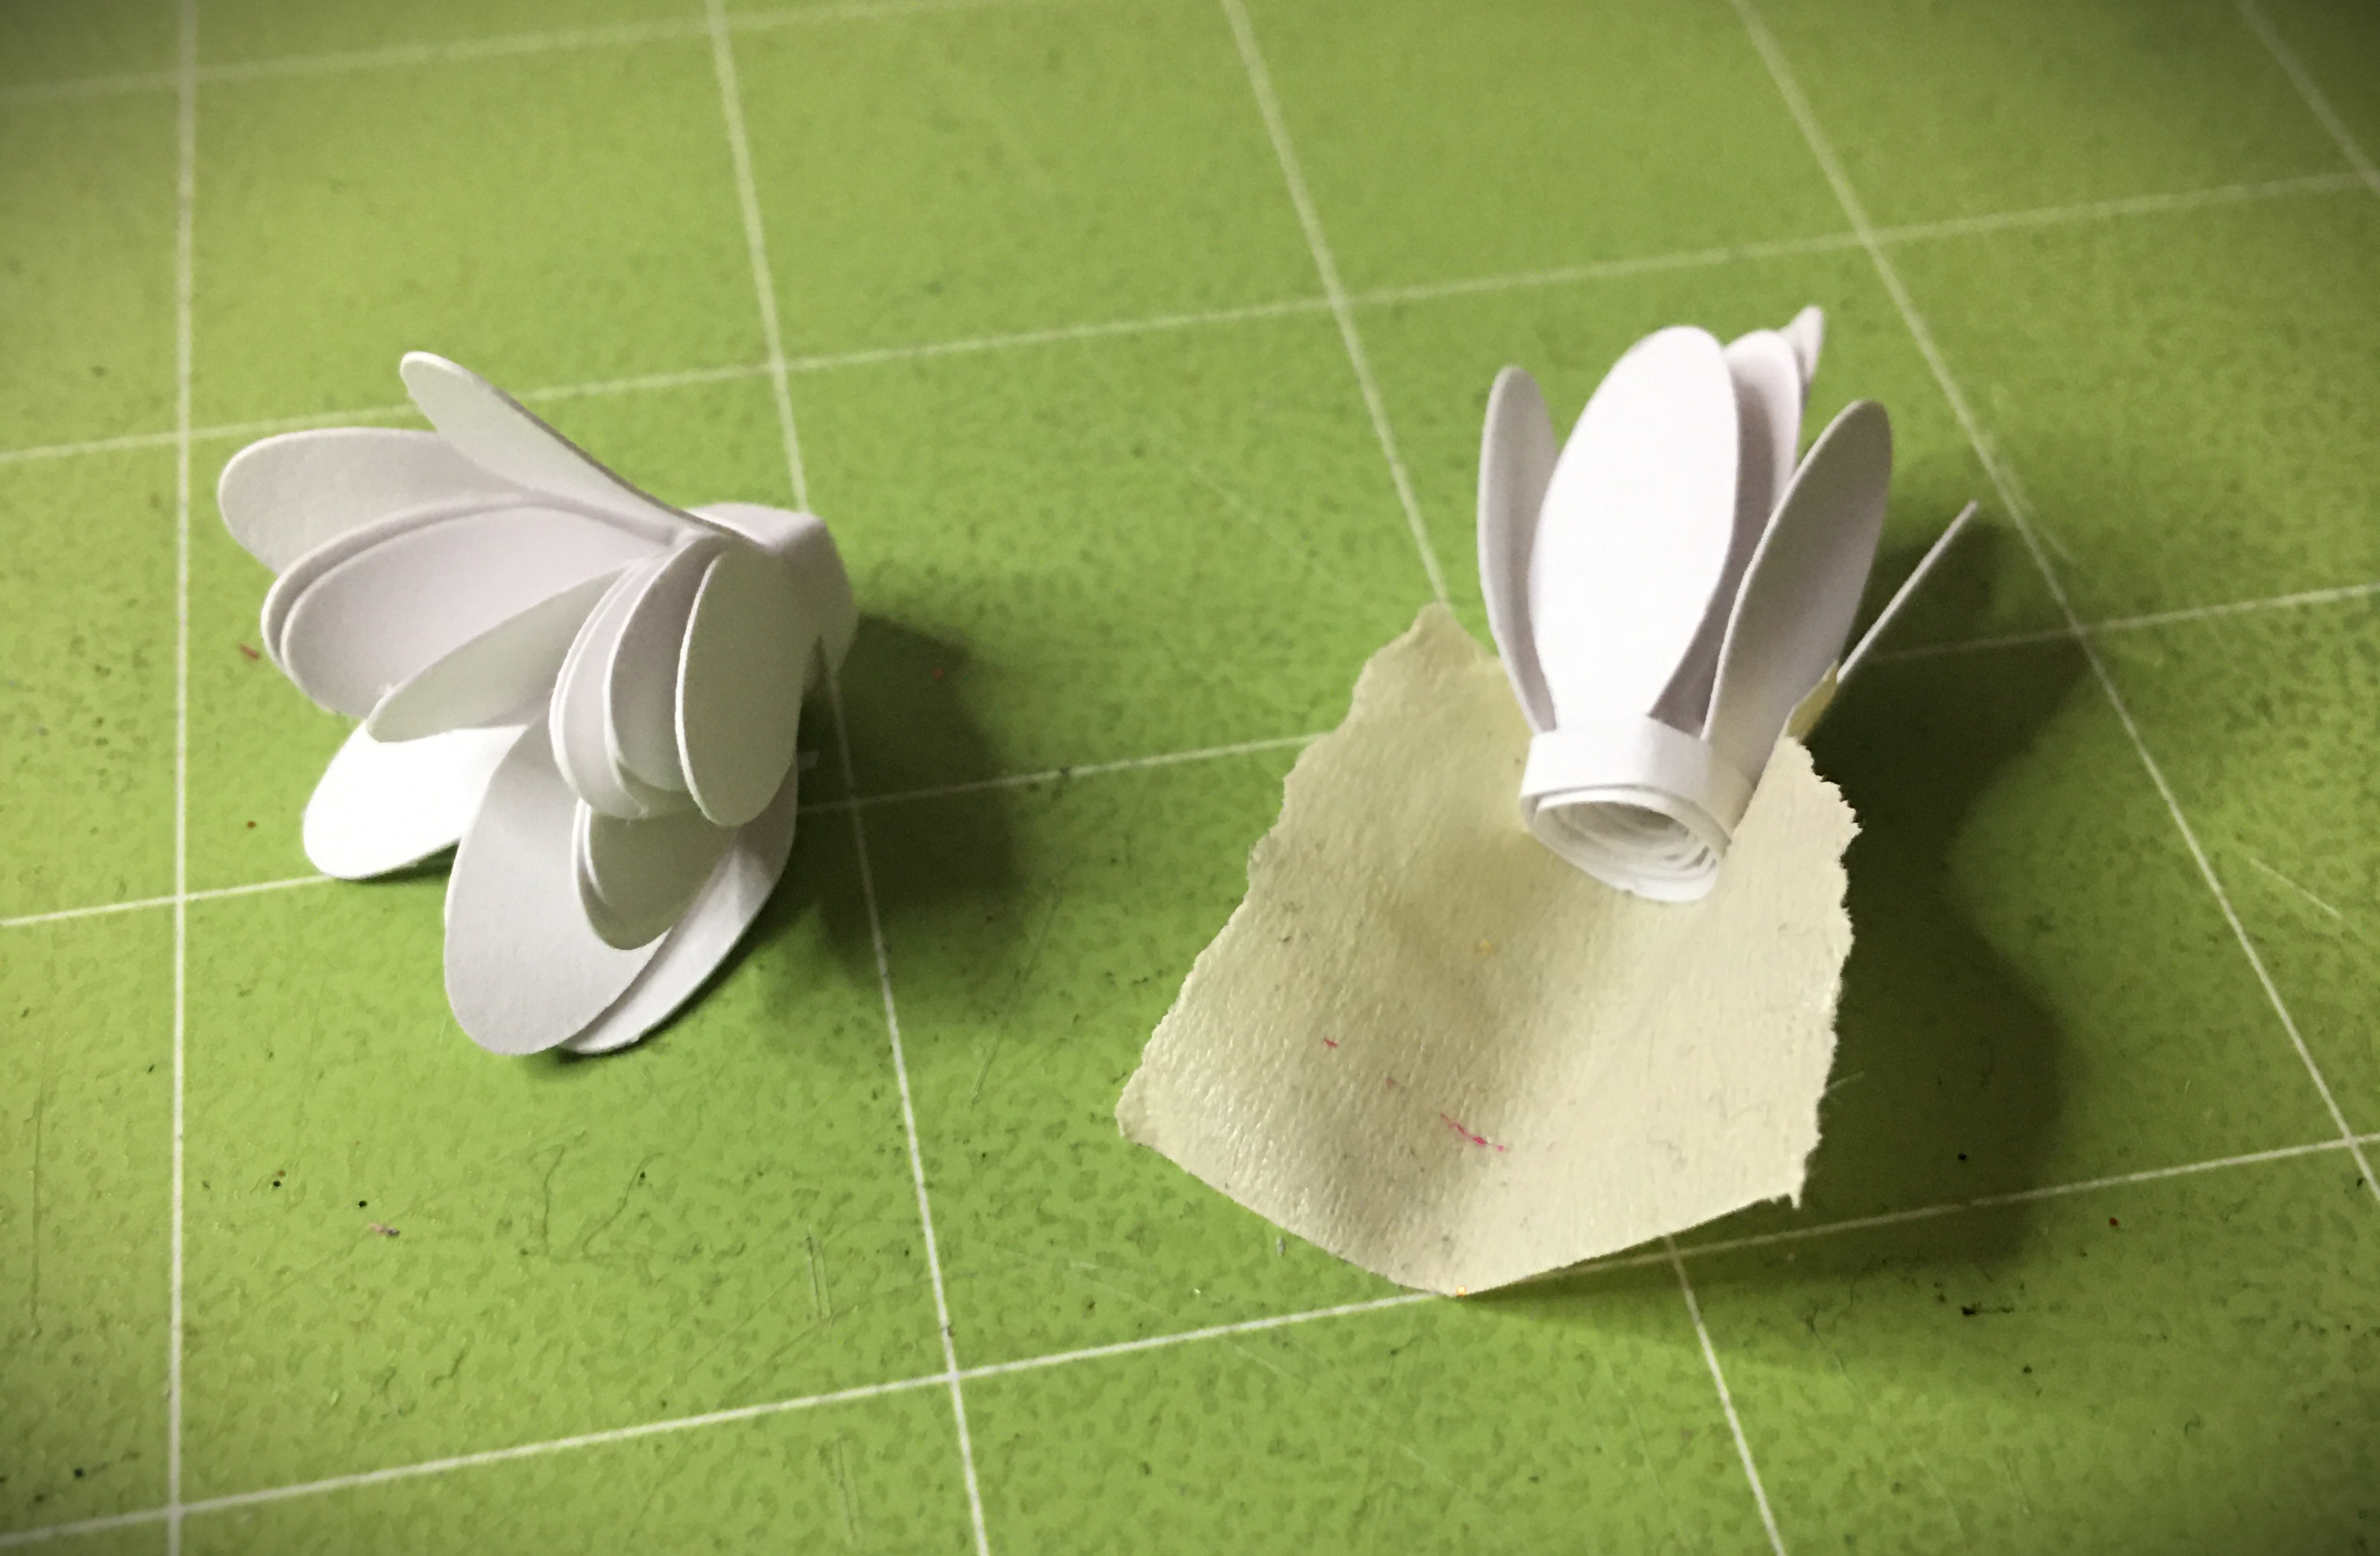
With your cutting machine, cut out 2 Butterflies, 4 Flowers, 1 Leaf, and 1 Stem. Because I already had green floral wire, I did not cut out the paper stem. I included the paper stem in case you did not have green wire but wanted to have a cover for a different wire, or even wanted to make the stem completely out of paper. If you choose to make a paper stem, roll it cigar style and glue the edge down. You can use masking or painters tape to hold the edge down while the glue dries.
(Reference Note: The Butterfly I cut was 3 inches tall. As you can see later on the Butterfly takes up all the space. So for this size of cloche, a larger Butterfly is not going to fit. And you are more than welcome to make the Butterfly smaller and even add a few of the smaller size.)
Butterfly
The two Butterflies are the front and back of your Butterfly. Inside these cut out pieces you can place cardstock, tissue paper, fabric, or whatever material you are inspired to use. Glue your first Butterfly down, trim that inner section the Butterfly. This will make it very easy to glue down that second Butterfly and make everything line up.
Tip: If your cardstock has a white core, you can take a marker with a matching color, and make a coordinating edge.
Set the Butterfly to aside and let dry.
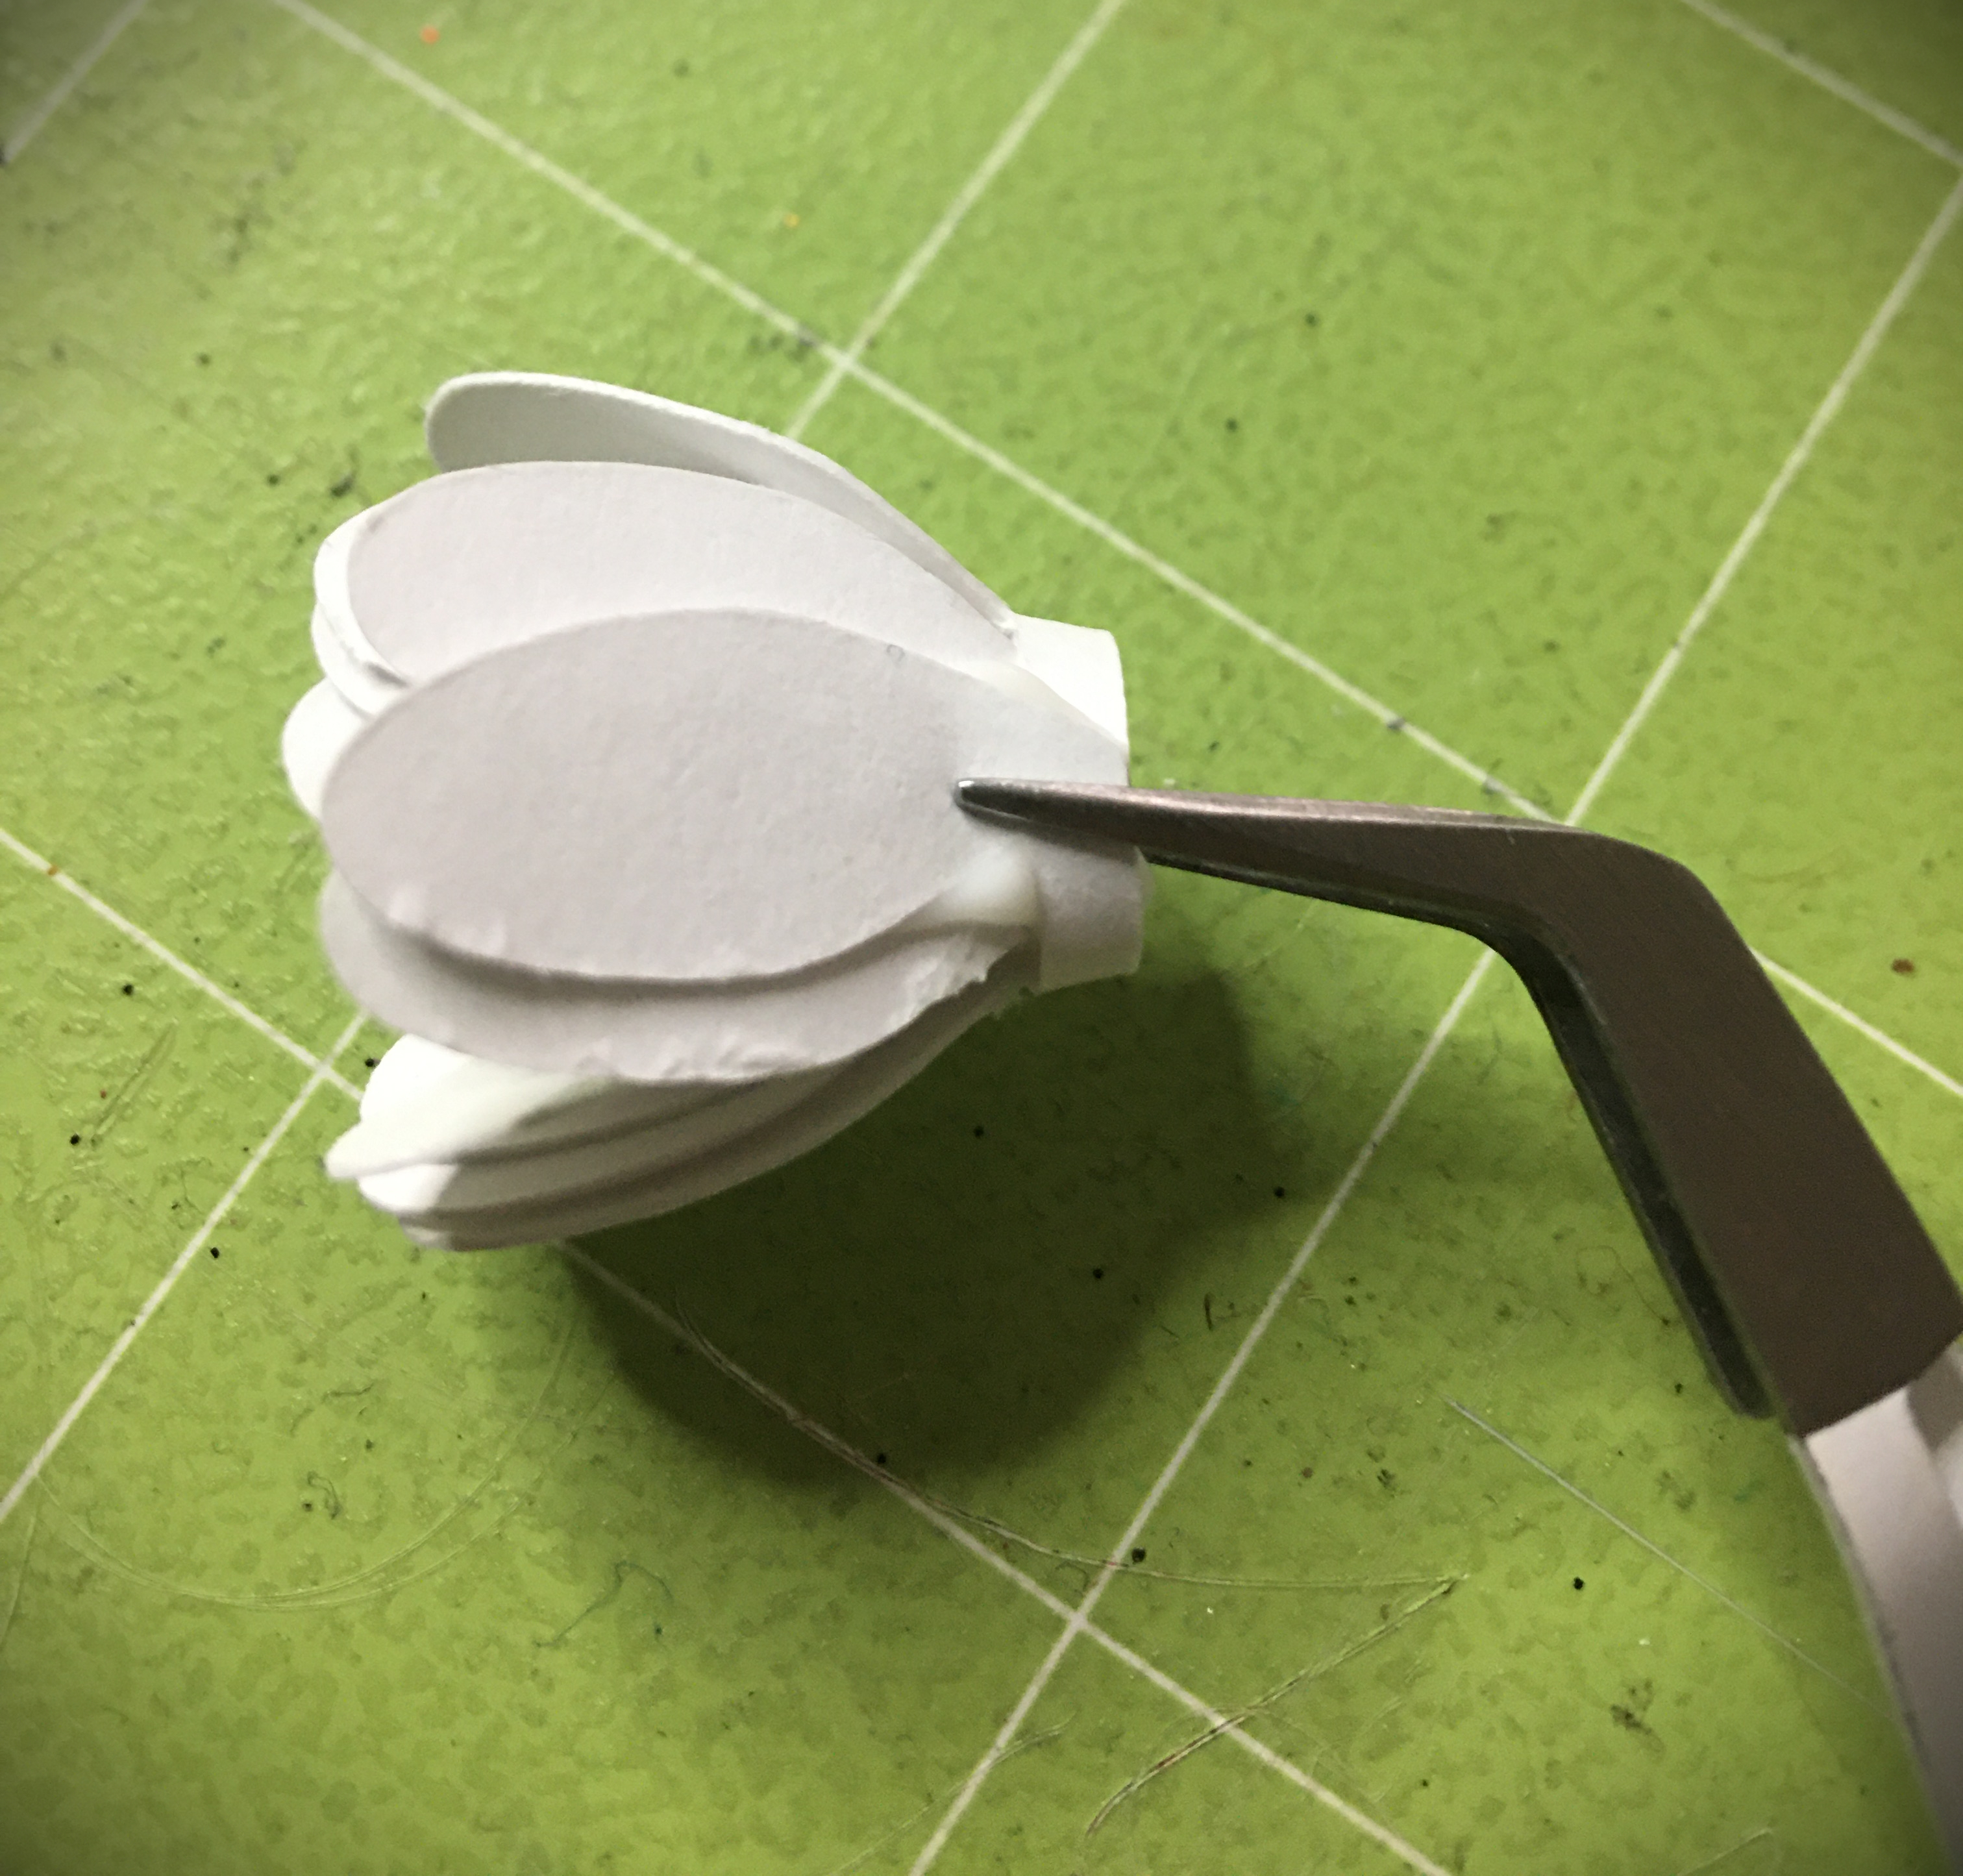
Flowers
Using tension tweezers (or other coiling took of choice), roll the flower. At the end of the line, apply an L-shaped dab of glue, and close the flower. The tension tweezers are great for holding that edge down while the glue dries. Or if this is the first of the flowers, masking or painters tape can hold your edge in place for the glue to dry while you move on to the next flower.
To shape the leaf, run a crease down most of the length of the leaf, from the bottom up. At the top of the leaf, coil it around a finger. This will give a gentle bend. If you make the gentle finger coil go off to one side, you will find that you give it a realistic bend.
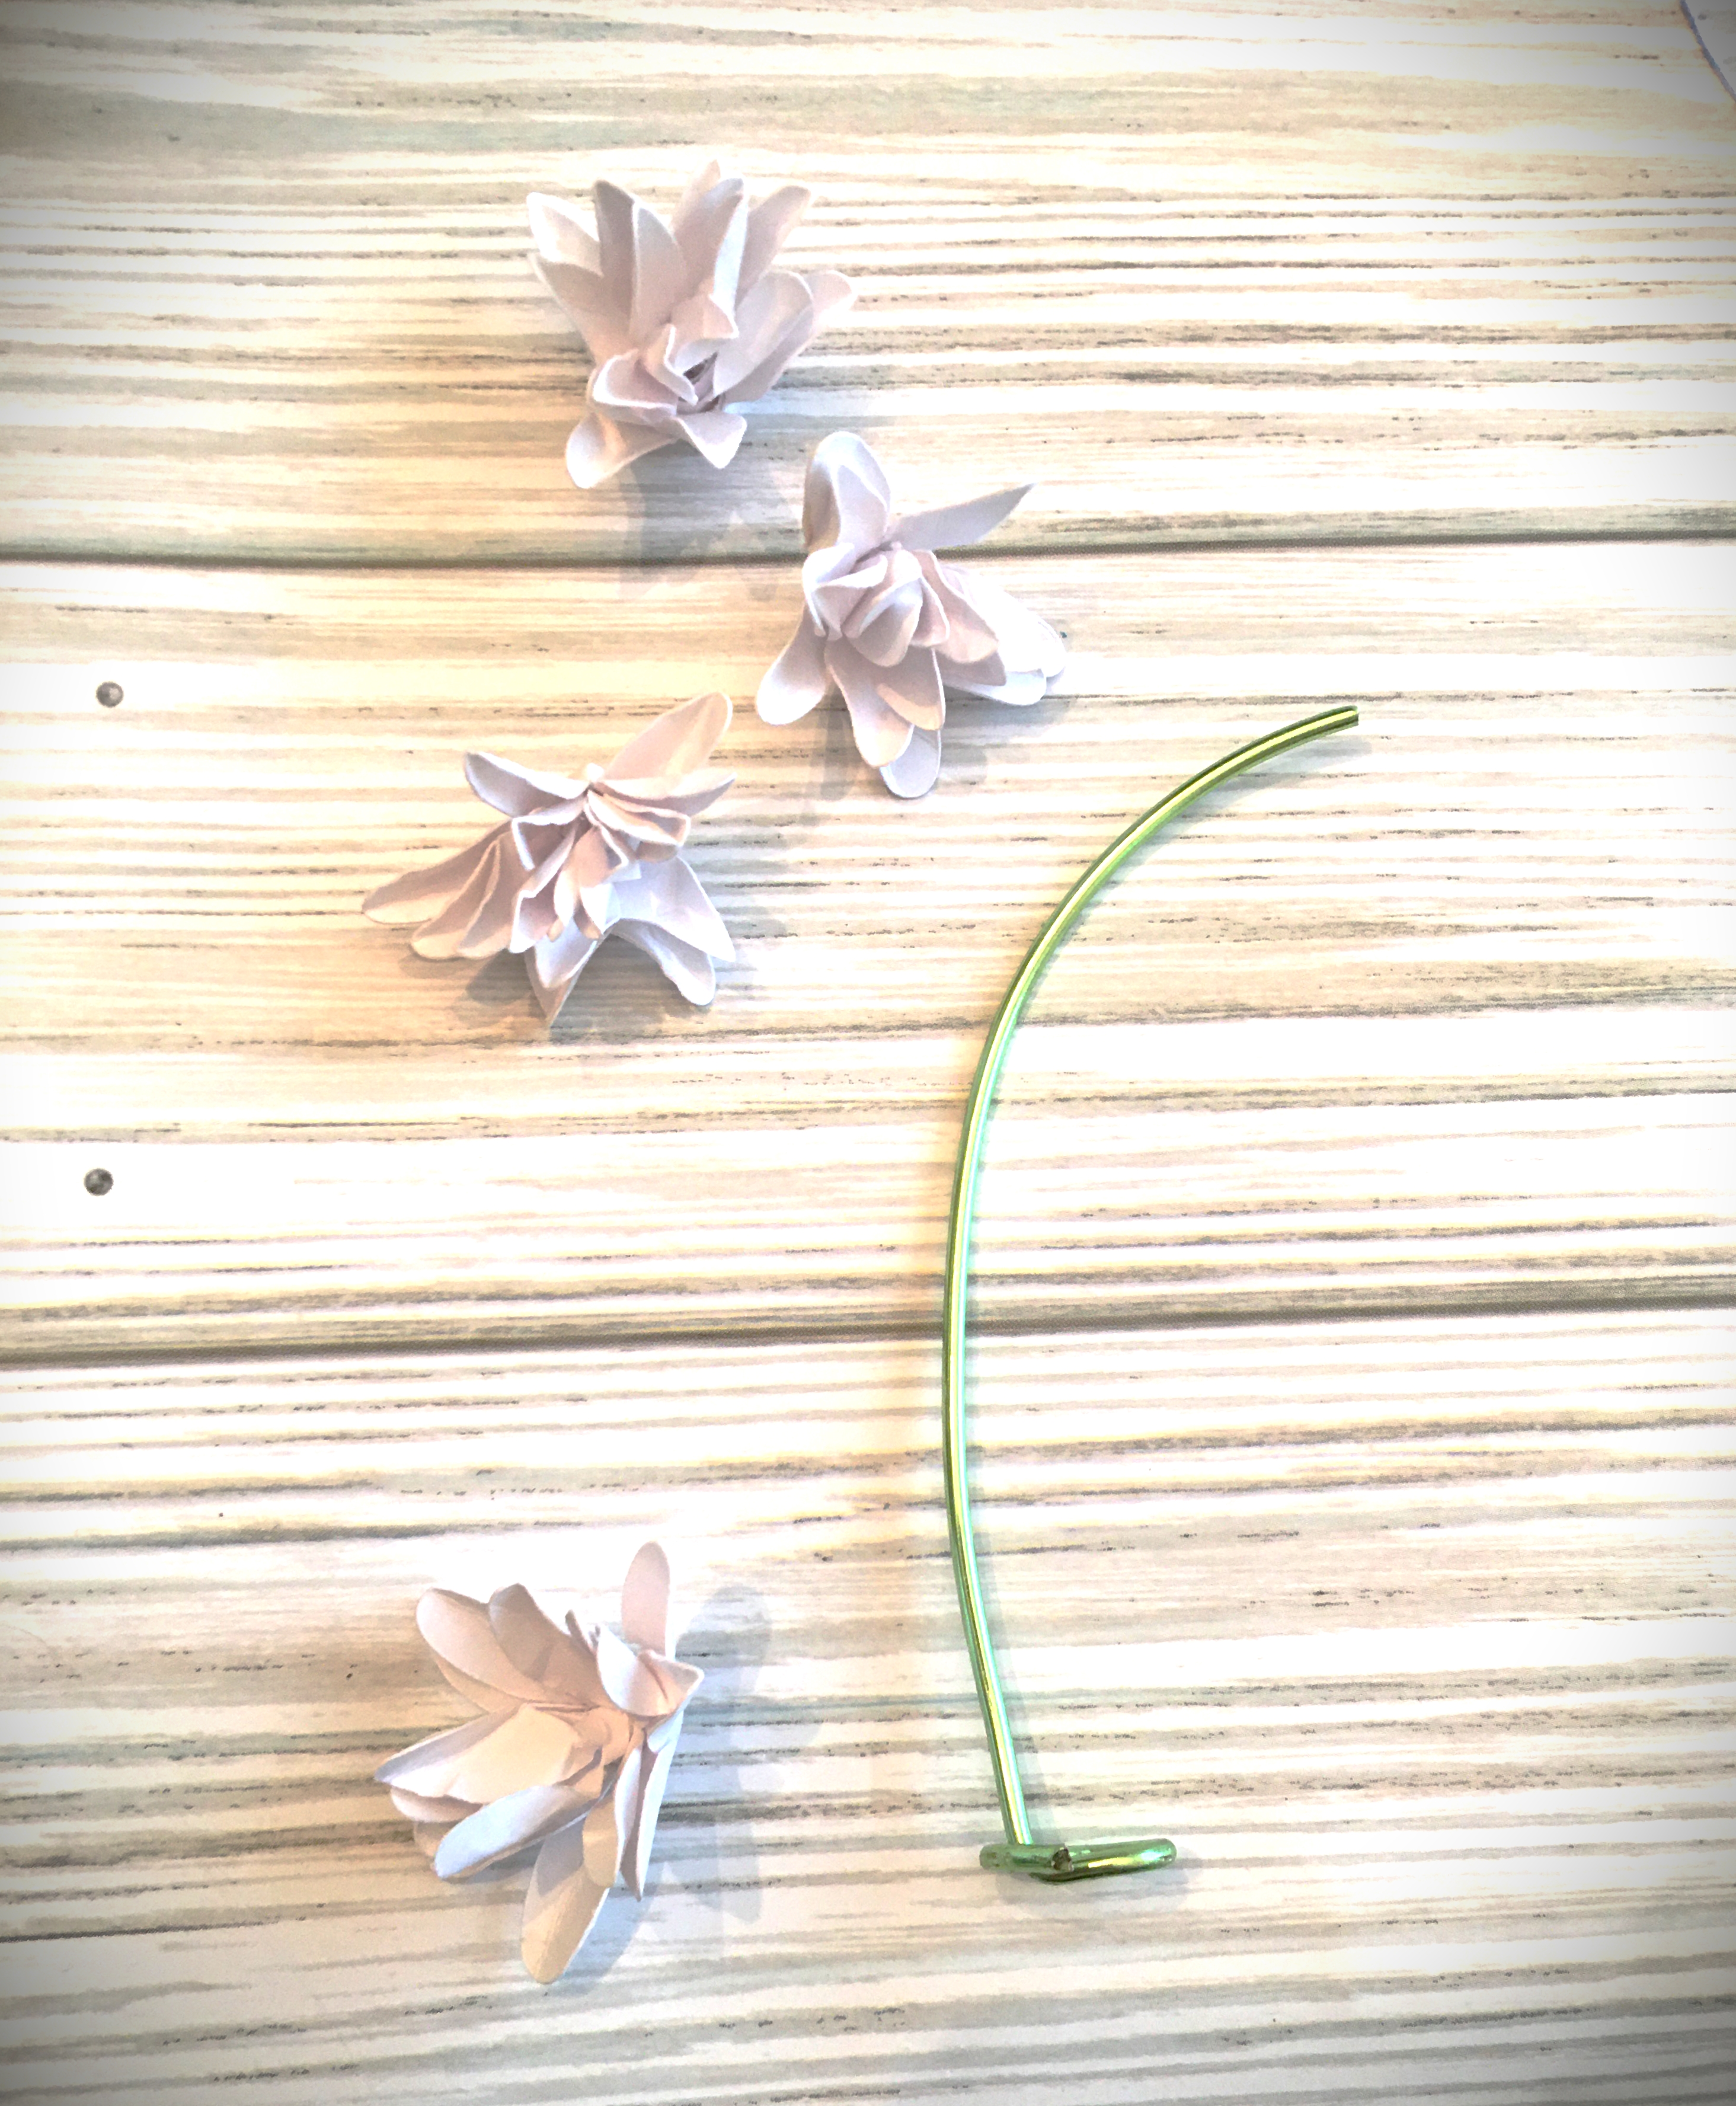
Stem
While the glue dries, let’s prep the Stem. This picture is a little deceiving; I had cut it before measuring how this size of Butterfly would fit inside the cloche. For a 3 inch tall Butterfly, all you need is a 2.5″ wire. On the bottom of your wire, use your needle nose pliers and form a circle, to make a stand.
When the Butterfly is dry, use your weeding tool or other thin object to bend the wings of your butterfly up.
When the glue on the flowers is dry, it’s time to shape the petals. If you keep the petals flat, but spread them downward, you will have a mum looking blossom. I chose to curl the petals downward and then crease the center. If you can keep the edges a little rounded downward, it has a chrysanthemum appearance. Either way, I wanted the white cardstock as an accenting color, and there are so many white flowers that have this shape, that it has a simple generic look that is just pleasing. Especially if you’re new paper flowers, this one is easy to play with and assemble.
Assembly
With hot glue, apply the glue on the bottom of the first blossom and insert the tip of the wire into the bottom center of the blossom. With the second blossom, add glue, and attach it to the side of the stem. The third blossom, add glue, and position it on the other side of the stem a little lower on the second blossom.
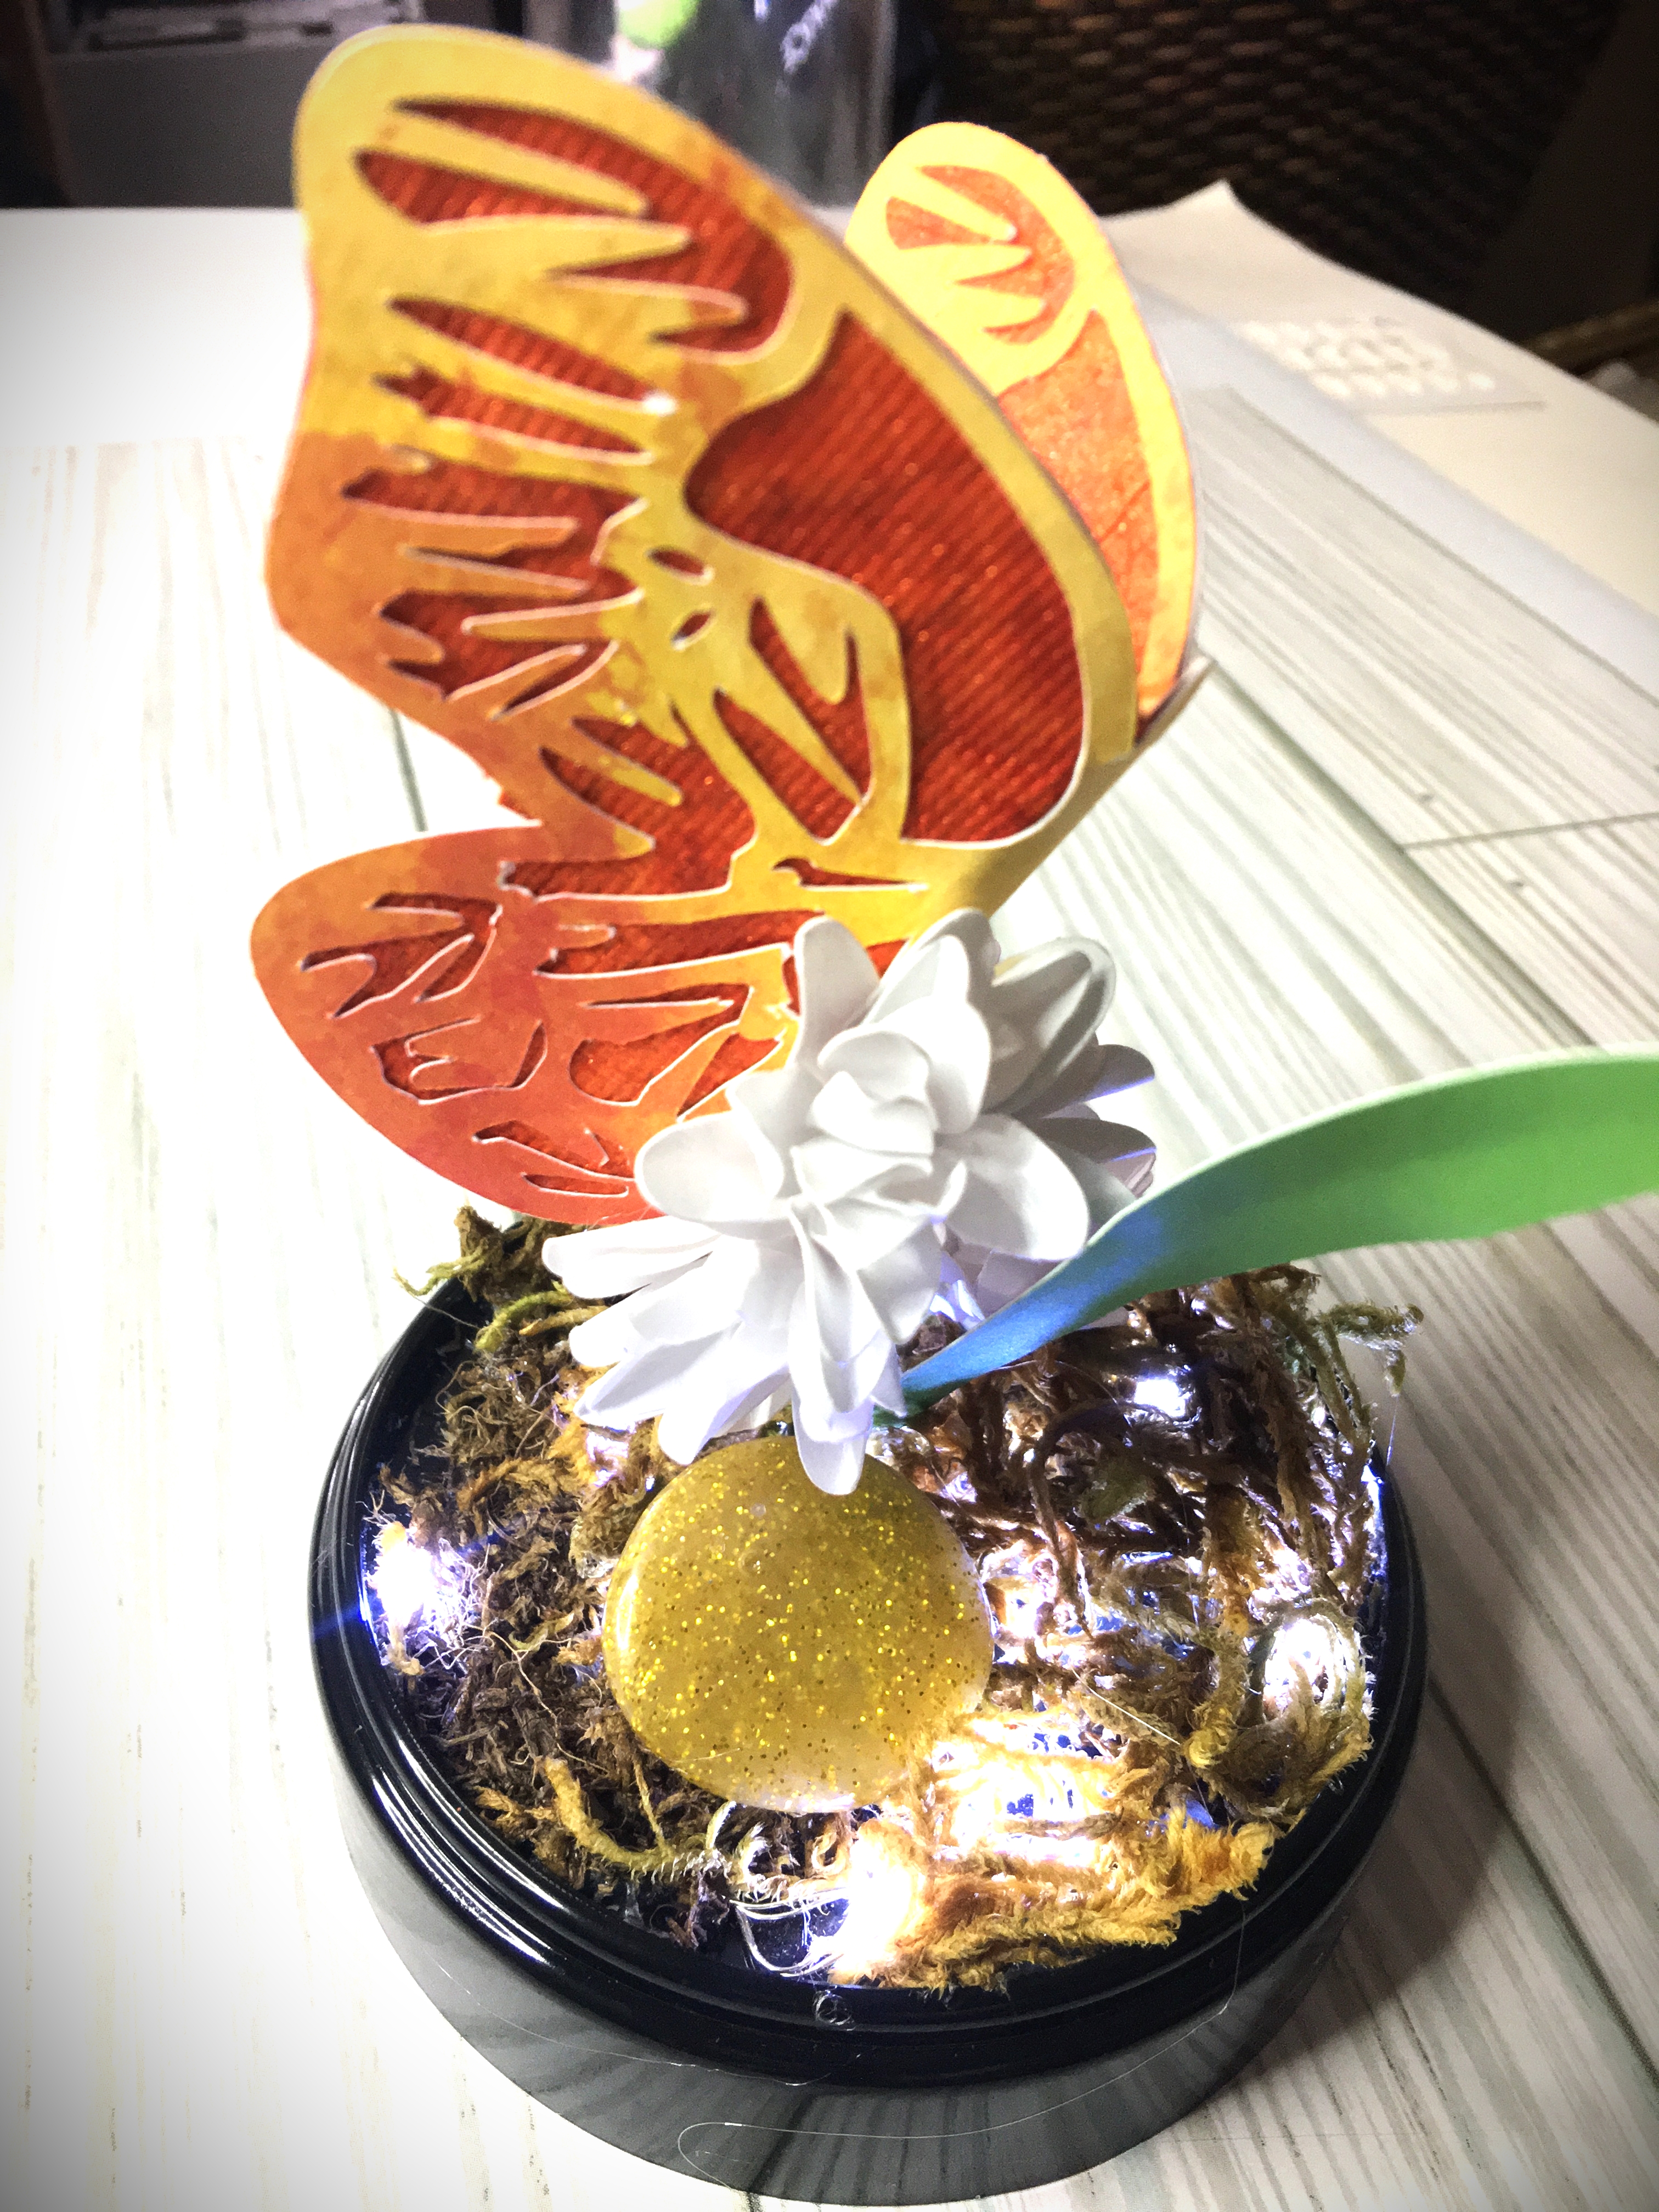
There is a little crevice between the second and third blossoms. Add glue to the wire and position the Butterfly. When these components are set, glue dried, position the wire circle base around a light bulb. (This will cause the light to still give an up light effect and not be covered.) Once you have the wire base where you want it positioned, apply a liberal amount of glue on top of the wire. Before you press down, apply more moss on top of the glue. Now when you press down, you will secure the stem and hide the glue at the same time. Near the base of the stem, add a drop of glue and place the leaf.
The fourth flower can be glued anywhere on the moss covered ground.
For further ground embellishments you could add anything you can imagine; a car, Poly Pocket accessory, miniature figurine, rock, sea shell, anything. In the second picture above you will notice what looks like a gold stone. In fact, my husband thought that I had added a gold nugget from of the boys’ games. In truth, this “stone” is the gold glitter stick that I had to clean out of my hot glue gun. I just let that pool on my desktop and dried as a puddle, instead of throwing it out.
This cloche is ready to go as is or you can further embellish it.
Further Embellishments
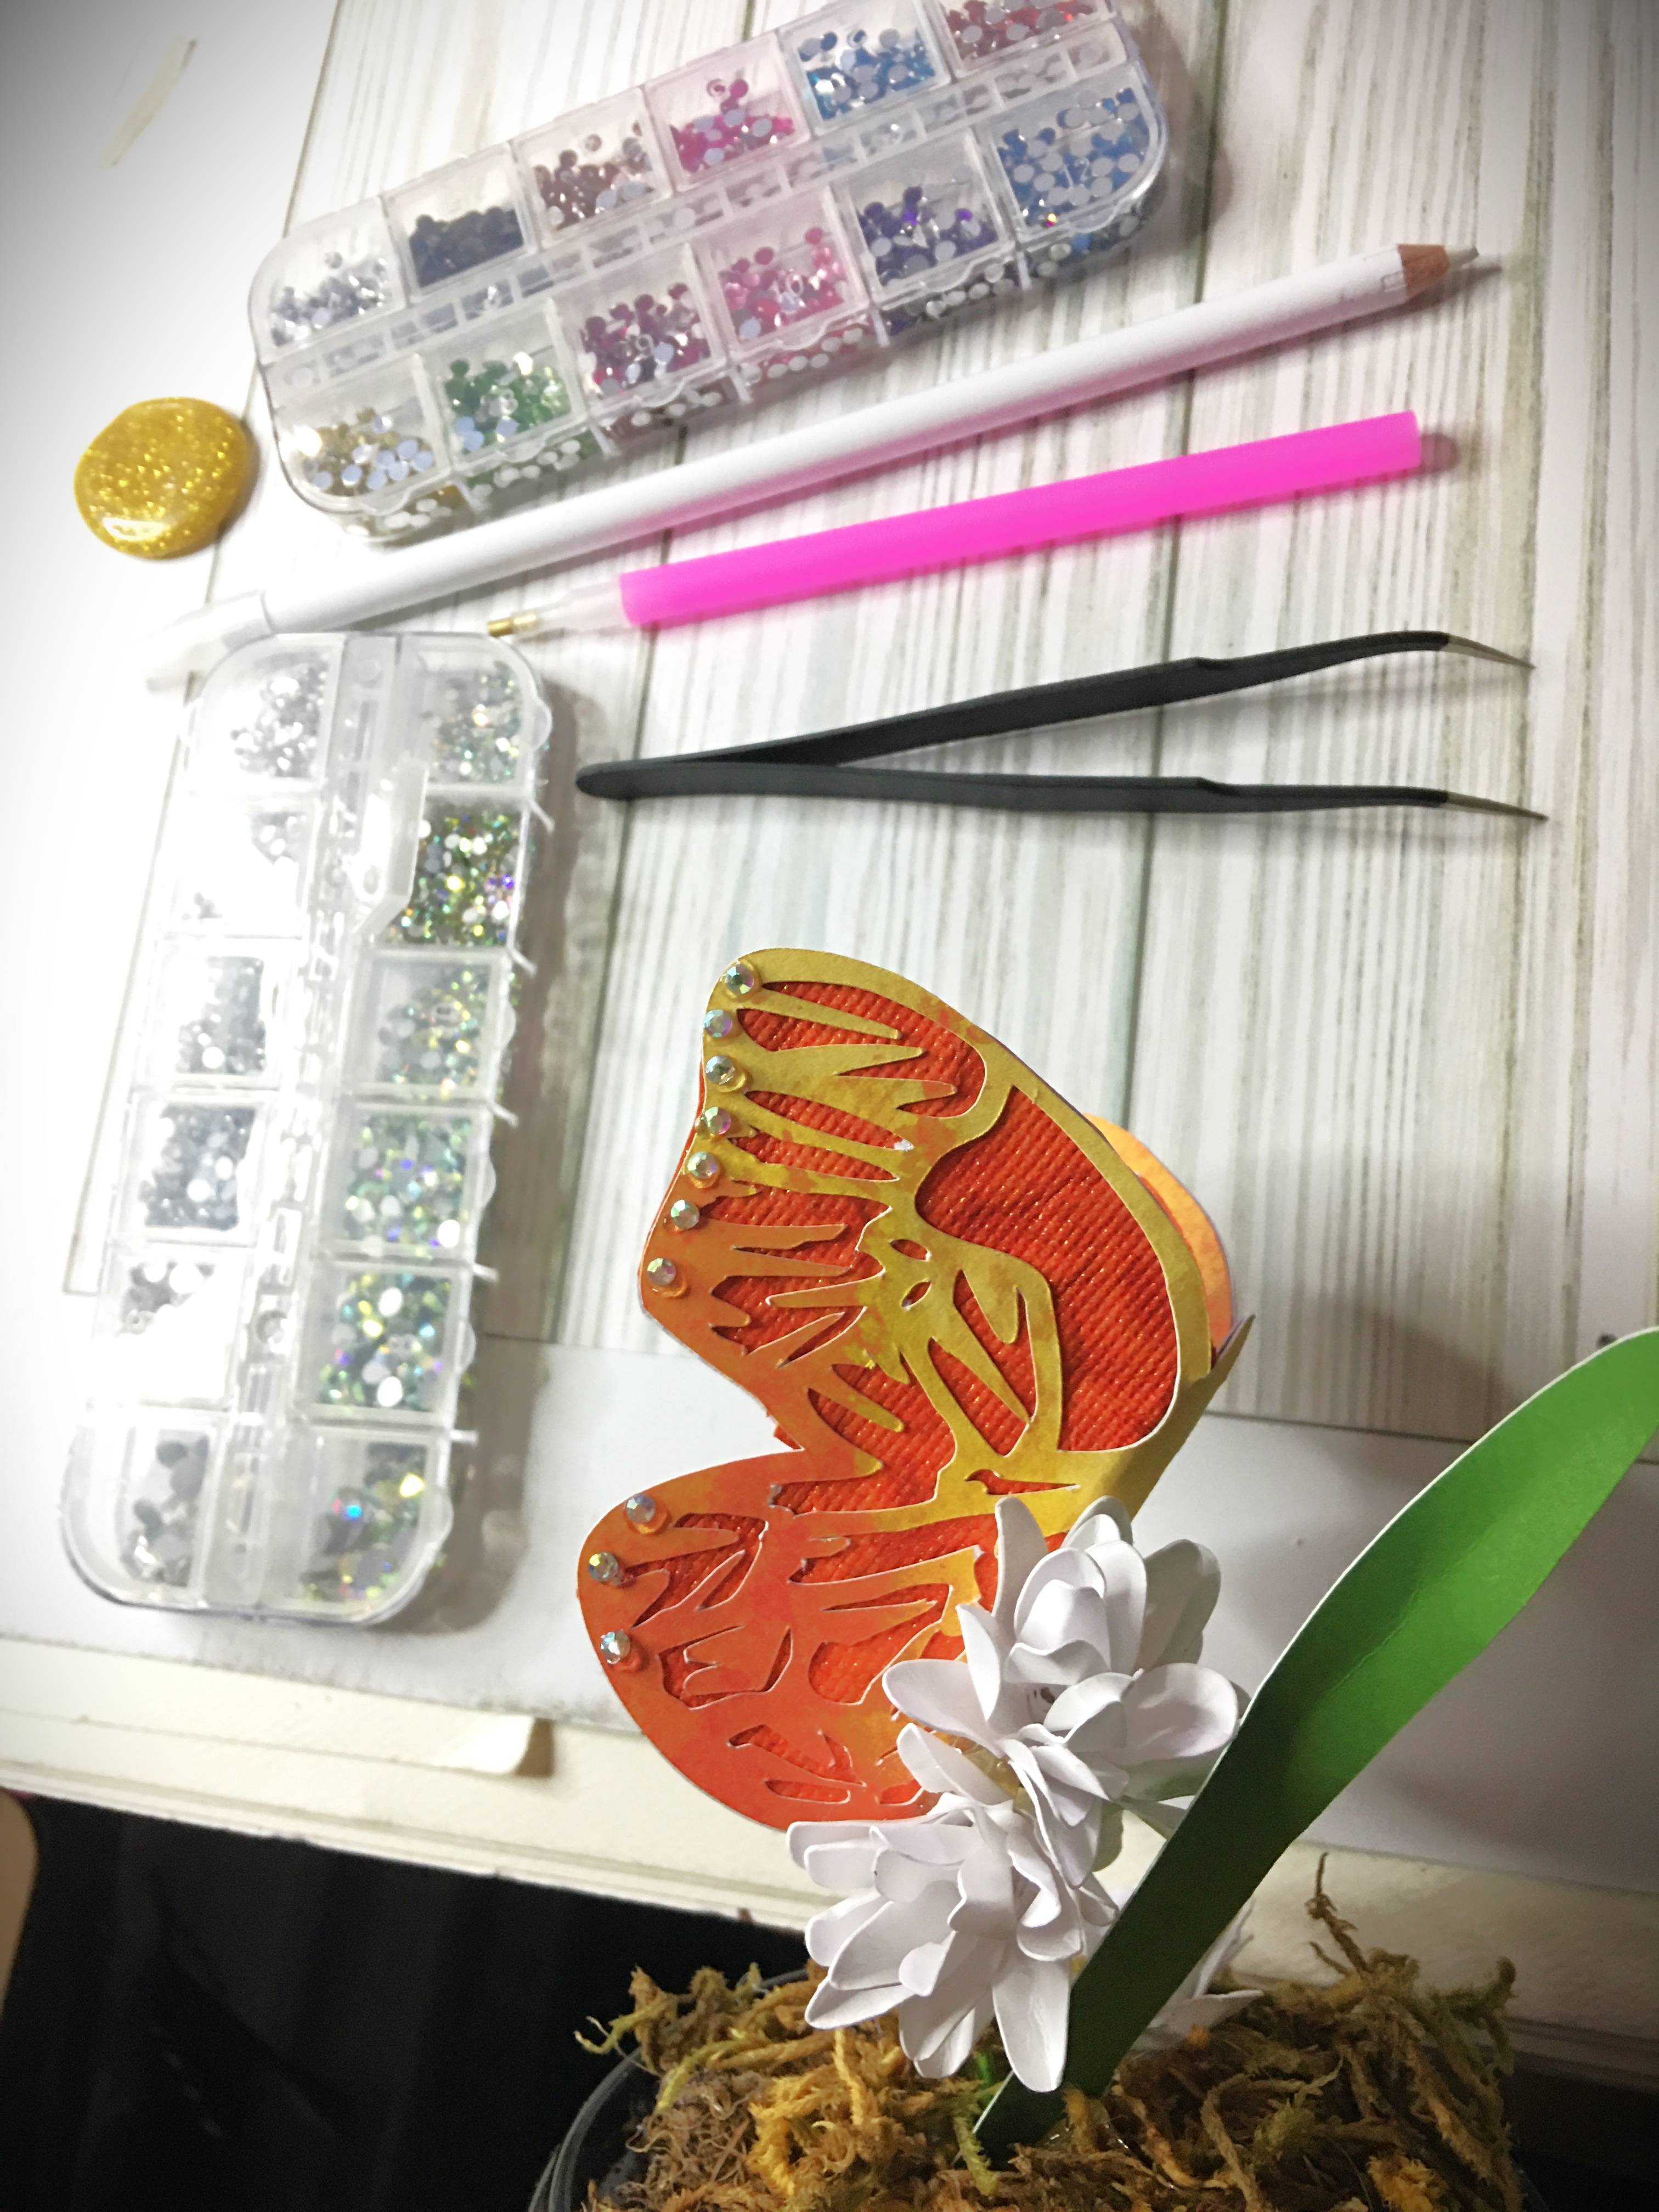
I always love to add more. In fact, this butterfly was really begging to be fully blinged out. However, for this moment I chose to show some restraint so I don’t look like the crazy bling lady.
From here on out the jewelry & metal glue works perfectly. It holds while wet and dries quickly.
Please take note on the first picture above. If you haven’t worked with crystals before, these tools description might help you have fun placing the stones. The two tools that came with the crystals that I bought were the tweezers and the white “pencil”. In my opinion, the tweezers were the most difficult tool. The problem with them is that these tweezers didn’t have grips on the tip. These ones were the smooth tip tweezers. If you think this is going to be slippery work for you, I can promise you it is. I shot a handful of stones across my work space before giving up. The white “pencil” doesn’t feel sticky, but when you press down on the stone with the tip, it grips the stones. Kind of. I couldn’t get the “pencil” to pick up the small stones that I used on the edge of the wing. However it was absolutely perfect for the larger stones that I used near the center of the wings and on the body.
Fortunately for me, I had another tool in my craft room. I do the crystal paintings and had one of those complementary placement tools (the pink tool in the picture). It still had a little residual glue in the gap and it was a dream picking up the smaller stones that I used on the wing edge.
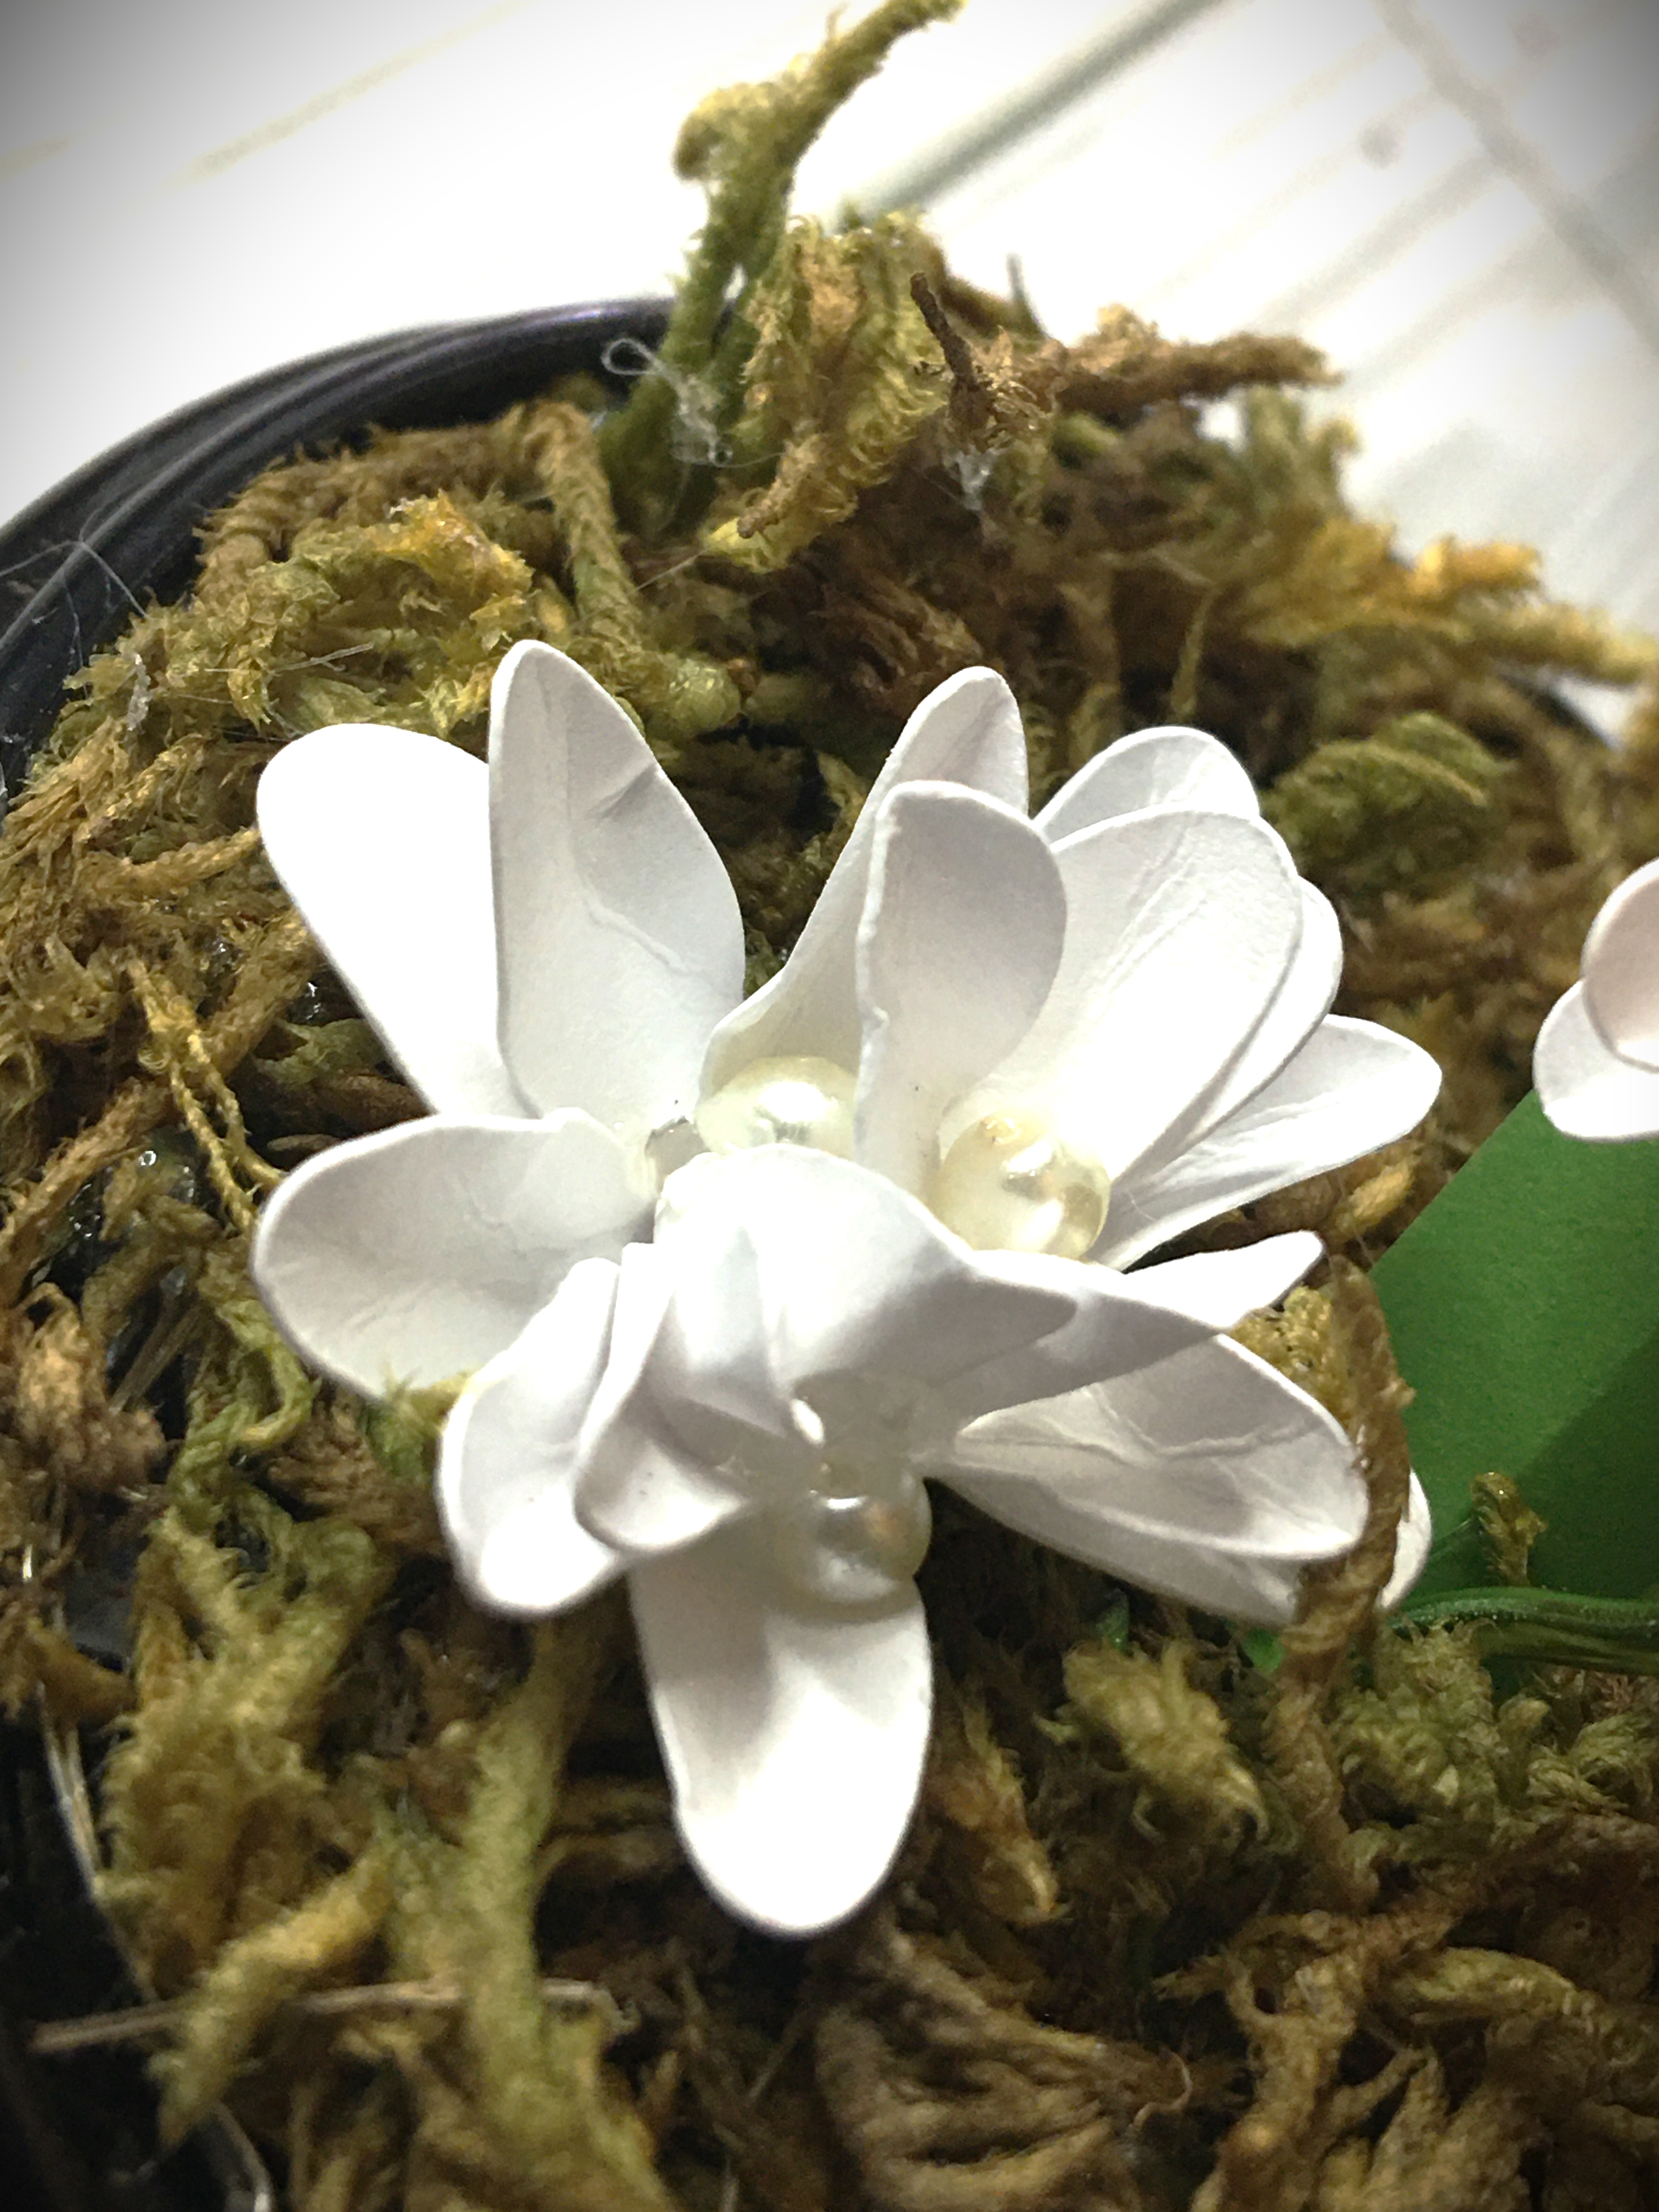
However, the tweezers were the perfect tool for placing the pearls in the center of the flowers.
Tip: If you’re new to paper flowers, and noted to yourself that some of the blossoms look a little wonky, pearl placement is going to be your life saver. In the close up picture, above, you will notice that there were three pearls that I used. Yes, that was a wonky flower. It got away from me. But the great things about flowers are that they can grow in clusters. And so there is no shame in strategically placing flower centers so you can make a misshaped flower into a cluster of two or three flowers.
Now that we’re finished with the assembly, we’re ready to put the dome on.
The only thing left to talk about is the difference between plastic and glass cloches. As you can see here, even though you don’t have to worry about the dome breaking when it’s plastic, you will note that it’s definitely not as clear looking as it would be if it were glass. If you are looking to just do a fun project, a project for a beginner crafter, or need to be particularly frugal, the plastic dome is probably going to be the cloche of choice. If you are looking for a wedding or to have a high impression impact, you most definitely want to opt for the glass cloche. My personal preference is the glass cloches, but realistically I live in a young child home with curious boys.
Everyone’s choices are going to be different. But I cannot stress enough…
IF you are doing a wedding, please do not opt for cheap. The wow factor is going to be from glass or higher quality of plastic than you find at the dollar store. However, if you are on a very tight budget (Absolutely No Shame Here!!!) and the dollar store cloche is the only thing in your budget here are my tips:
Select only the domes that are clear and free of scratches.
Between now and your event, try to not handle the dome.
You will be tempted to try your dome over the decor. Buy one extra cloche and use that dome as your dome tester.
While you are working with glue, keep it away from the dome. Especially the jewelry & metal glue. You may think you didn’t get any glue on the dome. …and then it dries.
In fact, it’s a good practice, whether glass or plastic, to always have one extra dome on hand. Accidents happen, especially on site.
Please email or comment below with pictures of what you create! I want to see what cloche you make.
With the increase of daylight, the approach of spring, and the first thoughts of Easter sprout ideas of how to bring new life and color into our lives.
This week end I’m participating in a crafting challenge. And one of the group crafts was a faux stain glass window.
When I go into these challengers, I focus on using the supplies in my office and only make a new supply purchase if I don’t have an item, or cannot think of an alternate item. Can I use a flat canvas instead of a framed canvas? Have my boys recently broken a toy that I can give a second life to? Have I recently purchased something that came in beautiful packaging that I can use to add dimension or further details?
I LOVE creating multi-medium products!
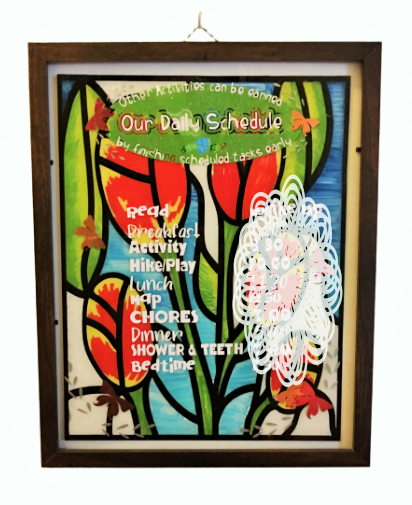
For this faux stain glass project, I didn’t have a framed piece of glass. (There are products on the market for making faux stain glass.) And I didn’t make that purchase because I have glass items I could pull from. What I chose to use was a half completed family schedule project.
I finally completed our family schedule for my early readers.
For over a year this picture frame hung, waiting for the inspiration for how to complete it. Do you have a project, or dozen, like that?
Well, this was the perfect glass for me to work with. All the vinyl already on the glass was placed on the front of the pane. And for faux stain glass, all the work is done on the back.
If you want to make a faux stain glass for your holiday switch out, an upcoming event, or as a fun project with your children, this is perfect for you. I’m working on my own designs to add to my shop. You might find another cut file artist who have some stain glass patterns. Or you can use a blank coloring book picture (children’s cartoon coloring book, adult coloring book, a blank mandala, or any other image). For these pages, all you have to do is upload them into your cutting machine program. When cutting out your glass outline, use a permanent vinyl that is the same color on the front and back. If you choose a vinyl that is printed or colored on one side and white on the back, you will have a white outline from your viewing side of your glass.
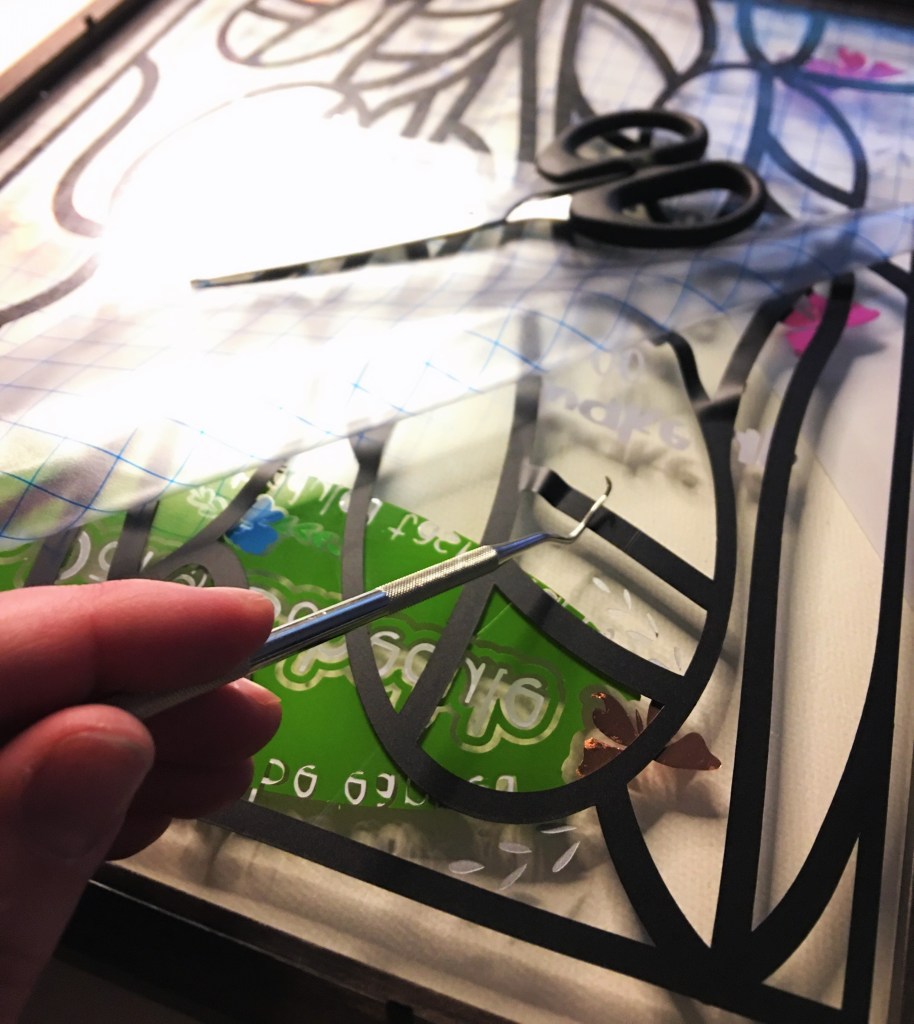
One common problem you may not avoid is your faux stain glass lines not releasing from your transfer tape. I have never had difficulty transferring to glass before. But even with all the tricks I know, I scrapped my first cut of vinyl and had to go with a Take Two.
I’m not sure if the problem was this pane of picture frame glass, the size of the project (10″ x 13″), or that my transfer tape was too sticky. But I did have to use my nails to scrape off the bottom quarter of my vinyl. So I adhered the transfer tape to both legs of my pants. I got the tack down to a barely sticky level. The vinyl still lifted in a couple of places, but at lease it released. The next time I do this technique with vinyl I am going to use transfer paper and see if the less tack released better.
An example of some extensive lifting of vinyl
To minimize the amount of lifting I recommend starting in a corner and slowly folding the transfer tape back on itself. As you start to see the lift, immediately start to press it back down with your finger. If you go too quickly, you will more thank likely have large sections pull back up from the glass. With the aid of your weeding tool, you can reposition and press down. However, it becomes more difficult to prevent creases in the vinyl when the uplifting sections get longer. So the sooner you can press these pieces down the better.
Another common problem is trapped air bubbles. You may not see it on this back side. But it is obvious from the front of the glass.
Advertisements
To overcome air bubbles, you will want to pierce the vinyl with the sharp point of our weeding tool or other needle. With a way for the air to escape, you can now use your finger nail to press the air out. This will also press the vinyl down. When you flip the glass back over you should notice that the bubble is gone.
If the air did not escape the bubble, then go back in with your weeding tool and make the hole a little bigger.
There have been several times I’ve done this on other projects. Most of the time the hole seals itself up. In a worst case scenario there will be a small wrinkle. But it will only be visible from the back side.
Once your vinyl is laid, you are ready for the fun part. Painting!
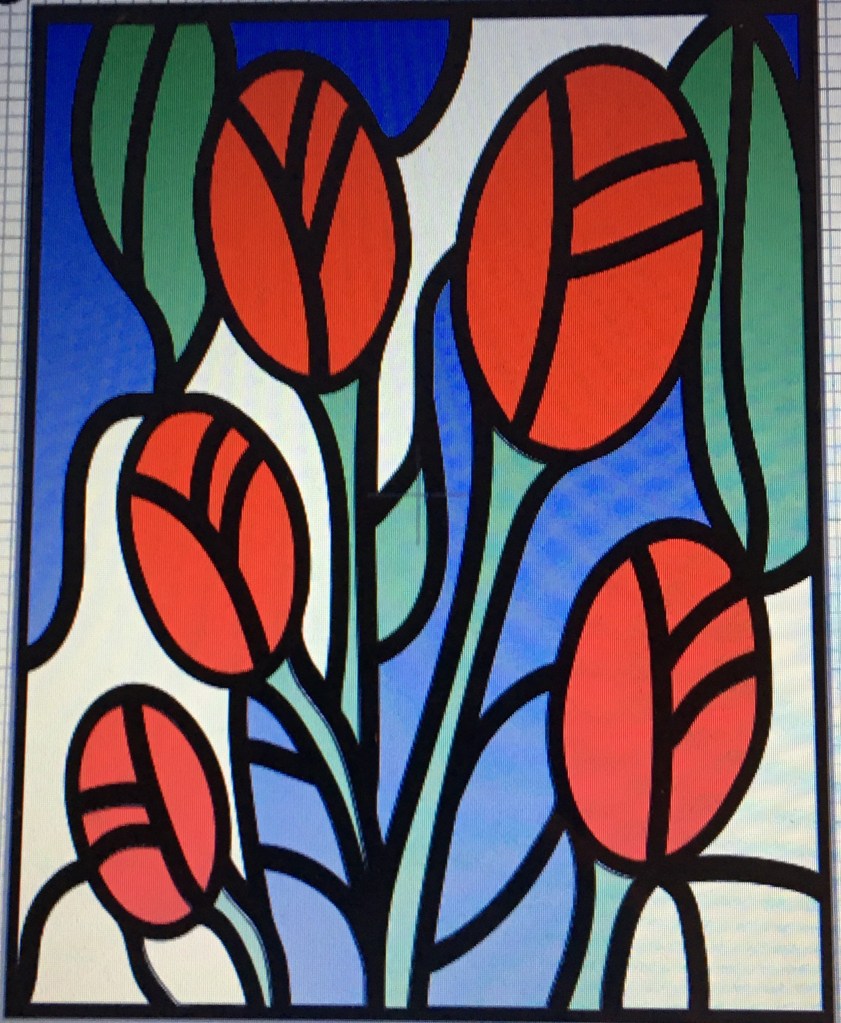
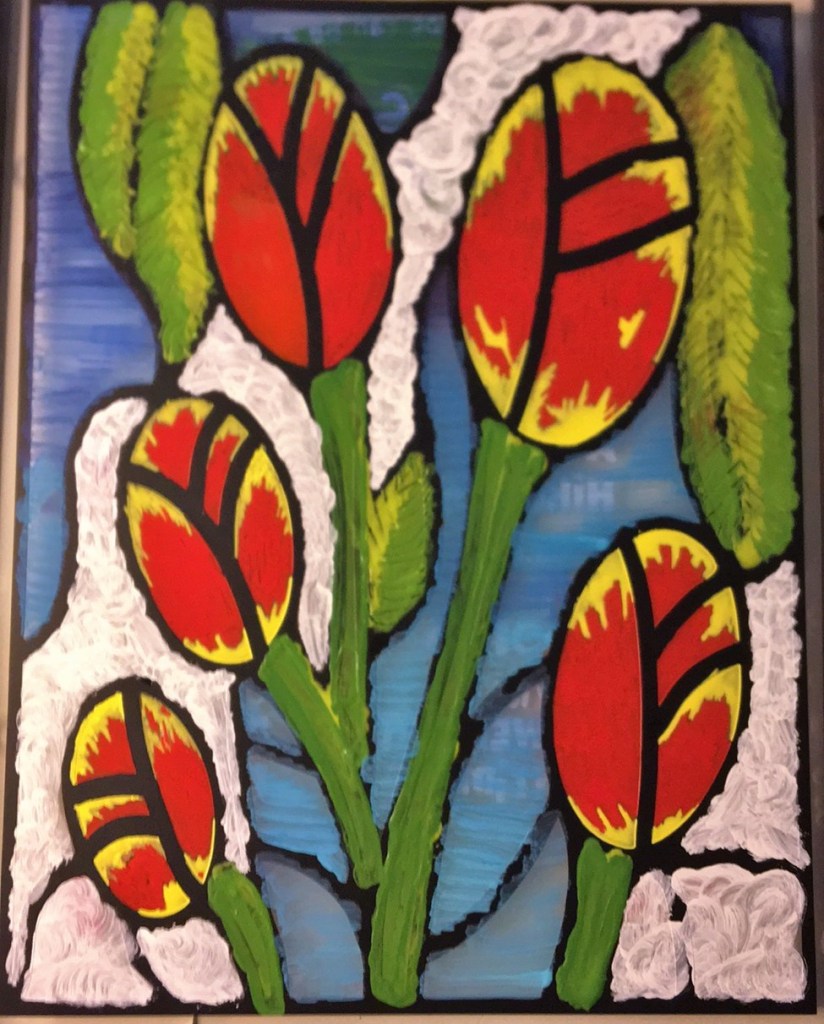
This time around, I tested a few different application methods to help you decide how you want to make your faux stain glass. In the picture below you will notice that the paint looks different between the greenery, tulips, and sky/clouds. I used three different preparations of acrylic paint. But in the past I have also used washable children’s finger paint and tempera paint. So don’t think you are limited to paint choices.
This is the paint side of the glass pain. You can see the difference of the three different acrylic techniques described below.
Glue Mixed With Acrylic Paint
What you see on the greenery is a mixture of Mod Podge with a couple drops of acrylic paint.
Depending on the directions you read, you might be told to use Mod Podge, white glue, or clear glue. The bottom line is, they’re all glue and they’re going to act the same. The problem I had with this method is actually a couple fold. First, glue clumps and thickens horribly the longer you work with this mixture. And even with a fine painting brush, your painting surface is going to increase the longer you work with the glue. With just the greenery portion, the tip of my brush doubled in size by the time I finished. So to combat the thickening glue paint mixture, start with your smaller/finer detailed areas first and end with your larger surface areas.
Another problem that I had with this method was the inconsistency of pigment placement. It didn’t matter what brush strokes I used, the color inconsistency was worse than a dog’s fur that is suffering from hot spots.
I kept flipping my glass over to check the visibility and progress. A second coat did not smooth things out. In the end I had to apply a third coat (by which the glue was already thick) where I was blobbing on dots right next to each other. Fortunately, at this point I was working with two shades of green. I took a toothpick and “drew in” leaf veins, blending in the shades. It brought a cohesion that was greatly missing.
My recommendation with this method: apply your glue/paint liberally. If you are using more than one color or shade in a single section, apply first at your lines and then work your way in to where you want the colors/shades to meet.
Acrylic Paint
My favorite paint to work with is acrylic paint. If it were possible to be in tune with an art medium, this is tied for first place with me. (It’s partner in crime is fabric.)
I was quickly frustrated with the glue mixture, that I decided to go straight to acrylic paint by itself. You will see this demonstrated in the blue sky and white clouds. (The clouds are not visible in the final product, because I painted the back of the picture frame holder white for cohesion.)
If you want paint brush stokes to add character to your glass, this is probably the medium of choice for you. The sky I applied with side to side brush strokes. The clouds I applied with circular strokes. So this is very easy to add textures and definition to your glass.
Here is the problem with this method. The front and back of your glass are going to look different. The front of the glass automatically gives the appearance of gloss. When acrylic dries, the finish is matte. Not to mention, if you’re choosing acrylic you’re choosing your stroke pattern. Your pattern is going to take precedence over painting over the finite edge of your vinyl (or permanent marker if that was the tutorial/directions your chose to follow).
That being said, with all the care and precautions I took, I was able to stay in the lines better with plain acrylic than I was with the glue and acrylic mixture. There was absolutely noway I could prevent going over the lines with the glue.
With these first two options, there was absolutely no way that I could keep the lines clean so that both sides were presentable. And I tried.
So that leads me to the third option I tested.
My recommendation: if you want visible brush strokes or create an umbre effect, this method is for you.
Advertisements
Acrylic Paint Pens
I chose this paint method for the tulip section, because I love visiting the Tulip fields each year. I love the bearded tulips and the multi colored ones alike. And if you couldn’t guess, I have an affinity for the red tulips with yellow tips.
And the acrylic pens were perfect for this kind of detail!
Again, I used the materials that i already had in my crafting stash. My acrylic pens are generic, but they did the job. And I can’t wait to purchase a better quality product to use.
For as much as I loved this method the best, over all the numerous products and techniques I’ve ever used on glass, they still had their own drawbacks. My number one problem is that the tips were so small in comparison to the size of my project. It’s a good thing that I find coloring calming and an avenue to my happy place. This was probably the most time consuming paint application.
Trial and error with this product is that the paint pen wants to apply a layer of paint too thin. I regularly had to shake the paint down to the tip. And about halfway through the tulips, I had to compress the tip to purposely create a small pool of paint to spread out.
Another draw back for this application method is that you cannot blend your colors. I, for one, have a pet peeve about muddying my pens. They can be ink, watercolor, or paint. I cannot muddy my tips. I need true colors. And because of this preference I worked with the yellow first, then went back through with the red. Even with my toothpick trick, the yellow was too dry to blend with using that method.
My recommendation: if you want to blend with the pens,work sections at a time. And if you like keeping your tips clean, leave a hair line separation between colors.
Another bonus for this method is that you have complete control over every application line of the paint. You have full control over not painting on or over the lines for each section. So if you want to have a flawless back and front, for duo viewing, this method is a must!
Drying Times
Maybe your method of choice is less about application and more about drying time. Believe me, I’ve conscientious about this because I have young children. Anything that takes long drying times I have to safe guard unless I want smears, prints, or transfers to my furniture and walls.
Acrylic Paint was the quickest. Especially since I only needed one coat of paint. The sections were dry pretty much when I finished the tulips. I give it an estimate of 20 minutes. As I mentioned before, acrylic paint dries with a matte finish. So the bonus here is that you don’t have to test touch to see if it is done drying. You see the difference.
The Acrylic Pen comes in second place for drying time. I have no estimate for you because on glass there was no noticeable change that I could see. The finish is just as glossy as when you first apply it. I had to test touch for dryness. I didn’t have a clock in front of me, so it could have been a ten minute dry time or twenty (from first painted section in relation to when I finished painting the entire project.) I would have zero qualms about putting the picture frame back on after an hour of drying time.
Glue with Acrylic Paint is like watching paint drying. It’s a slow process. But if you have worked with Mod Podge you know. Whatever wet glue you choose, you already know that takes several hours to properly dry. Mod Podge takes 24 hours to cure. And all of the drying time is very much determined by how thick you choose to paint. My glue had about an hour to dry.It was still mildly tacky, but I had to put the cover back on so little fingers didn’t damage the work I did.
Final Thoughts
With larger sections, this is a project that I believe even self proclaimed non-crafters can do. The important thing is selecting the paint method that you are most comfortable using. If the word paint intimidates you, but you still enjoy coloring a color page or two, then you will feel right at home with using an Acrylic paint pen set. It literally feels like coloring with markers. If you prefer a quick and done method, grab a brush and your choice of acrylic paint. If you love glue and/or medium manipulation than the mixture of glue and acrylic paint is definitely for you.
Everyone is going to have a different preference or comfort level. You craft with what is comfortable with you and your expectations. This is what truly sets you up for success. Whether you are making a faux stain glass window, the background for another project, or even transforming a vase into something more note worthy for your centerpieces.
If you want to clean up the back side of your glass pane, so that it’s more presentable, here are two options. If you have a steady hand and are good at lining pieces of vinyl up, you can cut out a second set of lines and apply it on the backside. The second option is picking your paint of choice and paint over the colors on the original set of lines. For example, on my project I could use a black sharpie, black acrylic paint with a fine tip brush, or my black acrylic pen to re-establish my black lines.
It’s my hope that you now feel enabled and courageous to try something new.
Paint Is Your Friend
And right now we can all use a little more color in our lives!
Processing…
Success! You're on the list.
Whoops! There was an error and we couldn't process your subscription. Please reload the page and try again.


Leave a comment