Baby Spiders

I love my outdoor plants. And often I’m asked, “Is there anything you don’t grow?” For me, the struggle is real when it comes to indoor plants. I pick up in the language of outdoor plants. I think I get confused when it comes to the dialect of indoor plants. “What are you telling me?!”

It was this past year when I was gifted me a clipping and an indoor propagation unit that I decided to give indoor plants another whirl.

Back in August I was thinking of winter months, being shut in with no fresh air. So I picked out a few end of season clearance plants that are known for being air purifiers in the home.

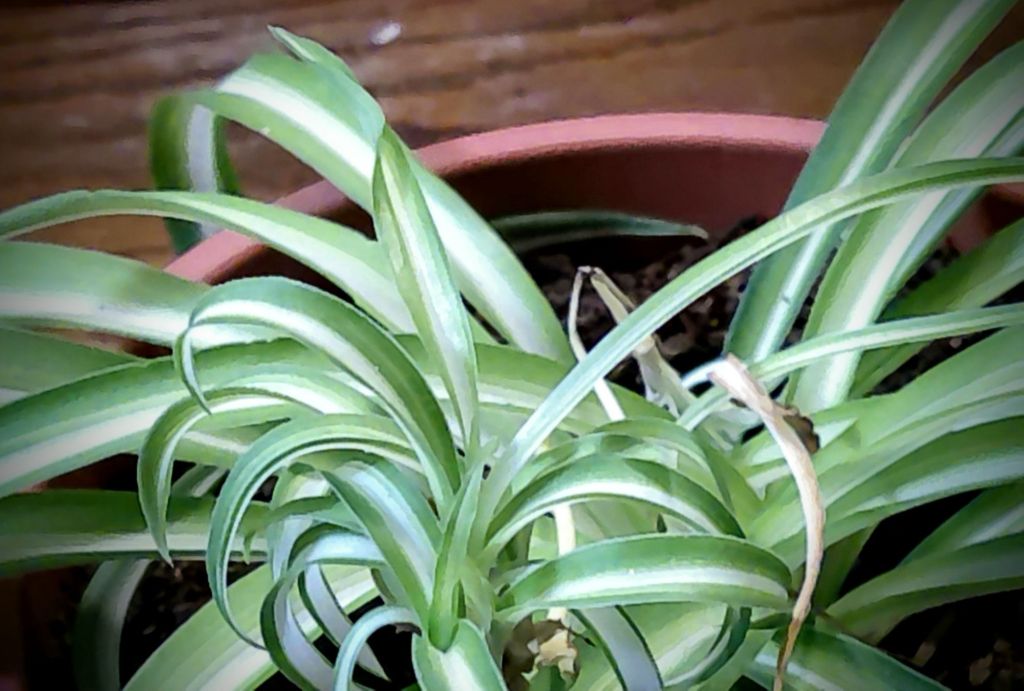
One that I bought was a Spider Plant (Chlorophytum Comosum Vittatum).

This is a great plant for those who struggle to keep indoor plants alive. We were gifted with a spider plant back when I was an event decorator and my hours were horrible. That plant lived for about two months of forgotten watering before it finally gave up on me.

I picked a spider plant this time around because of how hearty this plant is and it deals with neglect better than other types of indoor plants. Plus, with my homeschoolers who love commandeering my indoor plants and calling them theirs, this is a great one for young kids to learn about plant care with. My kids love over watering and this one loved their over attention

In fact, after the fourth or fifth time I had to empty my overflow bowl from a standing puddle, I noticed that this spider plant had started producing baby plants. The day after the first baby showed up, a second formed. And about a week later two more popped up.

I wasn’t counting on this plant living our home so we’ll to put off four babies almost right away. But since I’m now part of a bartering group, I figured that nurturing these babies over winter will give me four plants to barter with come spring. Or seeing how the boys have taken these baby plants over, I’ll let them take them to an event to barter with. (It’s a life skill that they’re starting to become comfortable with.)

Advertisements

How To Propagate the Babies

The first thing you’ll notice growing from your mother plant, when a baby is going to be produced, is a long rigid stem. Have you seen a rigid stem of an orchid? The baby spider stem reminds me a lot of an orchid stem. On this end of the stem, you will see a miniature spider plant start to sprout its leaves.

At this point many people say that you’re supposed to bend that stem over toward a new pit, set the baby in that soil, and stake it down until its root system grows. Then you can cut the stalk.

The reason for not cutting the stem first is because it acts like an umbilical cord and gives the baby spider plant nutrients while it grows its root system.

That way makes sense and I’ve seen it done as a child. But I didn’t go that route with propagation this time. I tried to wait and let the stalks grow so that they were long enough to lean over into a new pot. None of these stems grew longer than 9 inches.

Instead I went with the Water Propagation Method.

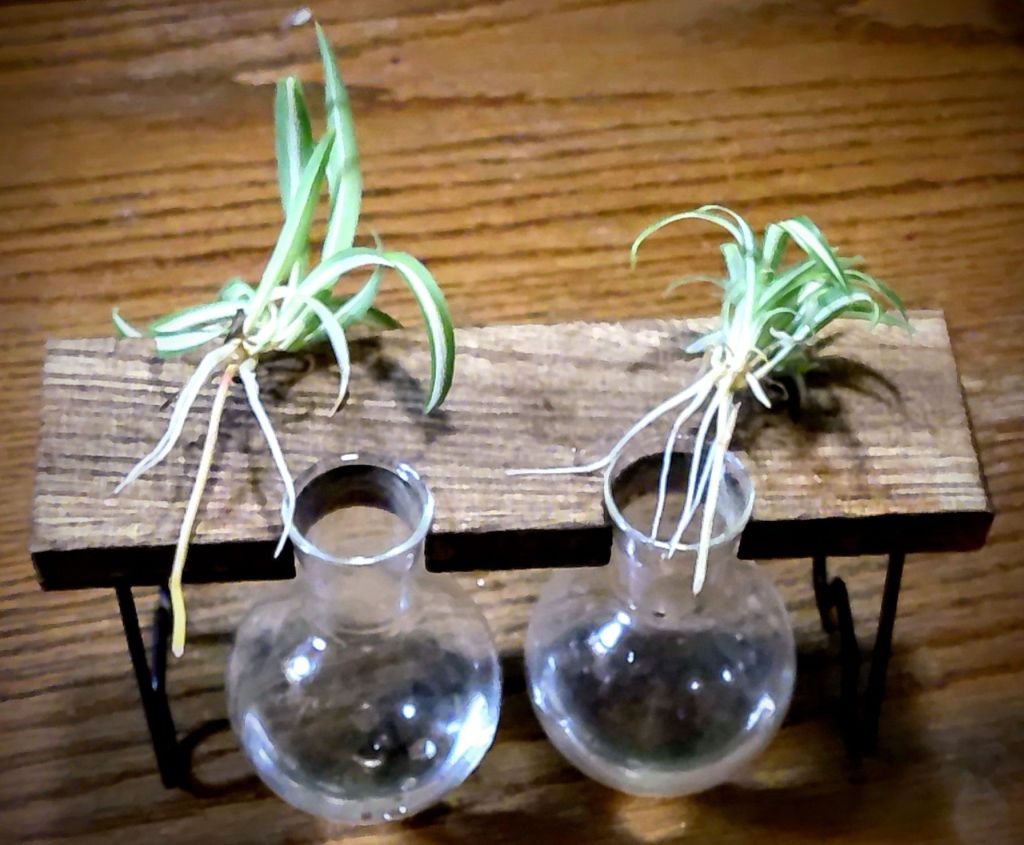
Here you can see the root growth from the Water Propagation Method that I started 4-6 weeks ago. I cut the stem of the baby spider plant a few inches long and then place them in these water propagation tubes.

The trick with this method is keeping the water level up to the base of the leaf cluster. As you can see from the pictures, this is where you see the root growth coming from. By keeping the water level high, it ensures that the emerging roots have contact with water at all times.

From there I simply place the stand in a window so the plants get sunlight. And then I wait for the roots to grow.

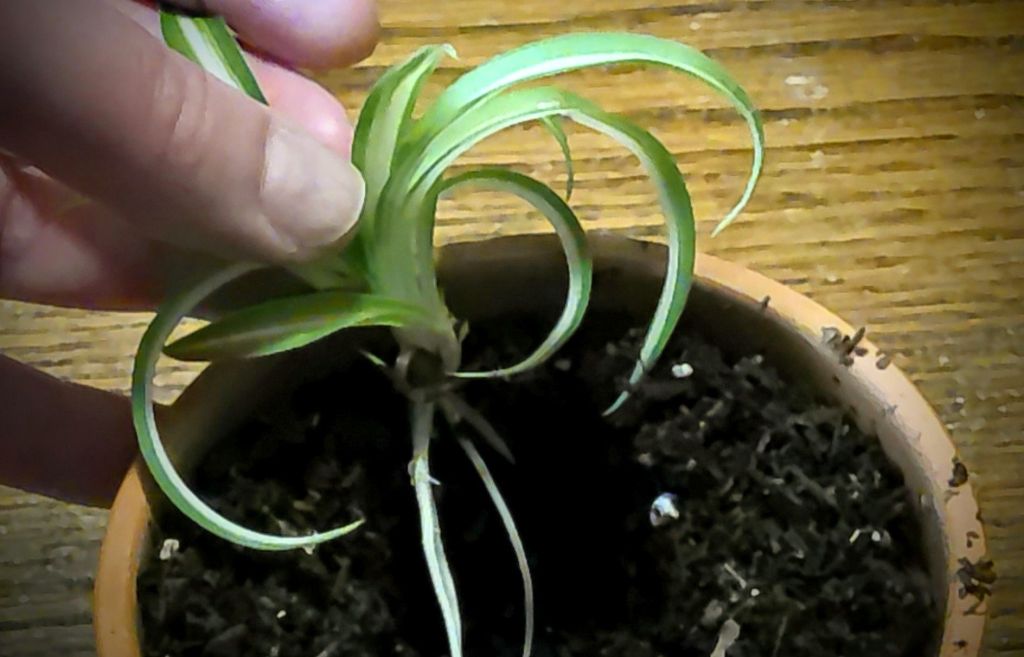
Here you see the far right and far left plants are the babies that I rooted several weeks ago and I’m ready to put them in soil. The center two babies are the ones that I just cut from the mother plant and are now ready to start the rooting process. I wanted to show you these side by side so that you can see the stems (which on my plant are a pale yellow) in comparison to the new roots (which are white).

With these newly rooted baby spider plants, I put some potting soil in a clay pot. I hollowed out the center of the soil, where I want the plant to sit in the soil. (I create the hole for the roots because they are tender and I don’t want to damage these young roots. After a few months, when I’m ready to repot, I’m not as concerned with the roots because they’ve had a chance to establish themselves in the soil. For now they are going to go through a little shock because they are changing from water to soil environment. Their function is going to change in this new medium.

While holding up the leaves of this baby plant I fill in the hole (with the roots held in place below surface level) with more potting soil. Once the hole is filled, I gently pat the soil down to give the plant a little stability. Not much is needed because these roots are around 2 inches long (some a bit longer).

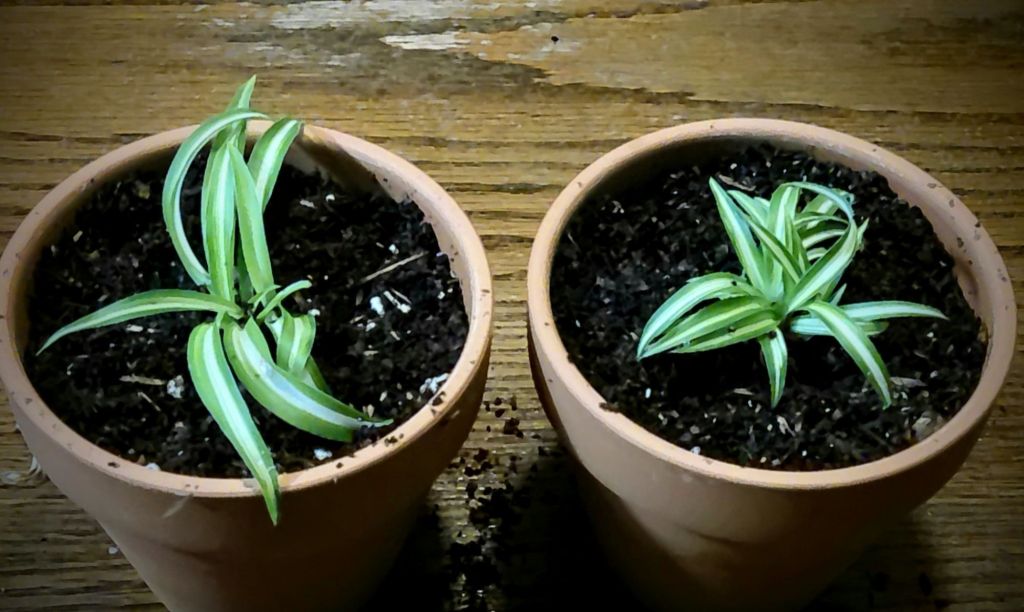
And here are how my new baby spider plants look in their new 4″ terra cotta pots. I gave them a bit of a watering and then set them back in the window.

Other than the time it took to allow the roots to grow, the setting up of this propagation took less than five minutes. And potting the rooted baby spider plants took another 5 minutes. This is something that doesn’t require much of your time, if you have limited time to care for indoor plants. And with spider plants, I water mine once a week. It’s been about 4 months since I first brought the mother plant home, so on my to do list is to give them a good fertilizing on their next watering.

Advertisements

Word of Warning for Propagation Equipment

This water propagation set up was gifted to me from a friend who hated it. It was my “transportation” unit for taking home a clipping of another plant for my drive home. After working with this stand for a year now, I fully understand why she didn’t like it. And yes, I am still that type of person that still uses it even when I hate it myself.

I look at it as a personal challenge to make it work!

If you’re looking to water propagate plant cuttings, let me walk you through this set up so you can have a little walking knowledge for choosing the set up that you end up purchasing or getting from a buy nothing group, or any other opportunity.

The reason why this stand is such a fail is because of the holes that the tubes slide into. In the above left picture you can see that the center of gravity of the holes are way off. They needed to be set back into the center of this board.

You can probably guess that when these tubes are filled to the top with water, they become front heavy and tip forward spilling water and cuttings everywhere.

In fact, in just this short period of time that I took to take all the photos for this post, the filled tubes fell forward not once… but twice!

To make matters even more entertaining, my husband decided to watch the process and freaked out with each of the dumpings. Water spread not just all over the table but also the floor. And that leads to the picture where I put the pot in front of the filled tubes. As much as I enjoy a good challenge, I really didn’t want to clean up a third water mess.

Advertisements

And that leads me to the solution of how I make this failed unit work for me.

When I have a new set of clippings to add to the tubes, I set the rack down in the window with the tube side facing the glass. When the rack leans forward, under the weight of the water, it leans into the window and holds itself up.

There are two other options that I have to fix this unit once these baby spiders are ready to be potted.

  1. I’m going to check to see if I have a drill bit that’s the right size so I can make the hold deeper into the wood so the tubes sit more center in the unit.
  2. If that doesn’t work, I’m going to take some thin crafting dowels and put legs in the front corners.
  3. And in case I need a third option… I’ll drill a hole in the back corners that’s big enough for a long screw that I can add enough nuts to create the correct counter balance to keep the unit upright even under all the water weight.

No matter what the situation, a solution can be found!

Advertisements

Final Task before Putting All the Plants Away

This mother plant has been so amazing to me that I just needed to take a couple of extra minutes and tend to her so that she can keep being a happy plant for me. I trimmed away some of her discolored and battered leaves and cut the remainder of the baby stems down to their base.

Why the trimming?

The stems were no longer supporting baby plants, so they no longer needed the energy being directed to them. The leaves were damaged and there’s no need for plant energy to go to them to see to the trauma. The overall health of the plant is very good and with plenty of healthy leaves, trimming away what I did would not affect the photosynthesis of the plant. But the trimming returns that amount of energy back to the mother plant to go elsewhere: whether new leaf growth, existing overall grown, it’s cellular immune health, or even gearing up for a push of new baby plant growth.

This mother plant is now ready for the next phase of whatever cycle she is on to now. And with the next watering combined with fertilizer, she’ll have all the nutrients she needs to move forward.


Here are some propagation units that I’m eyeballing for my next adventure in rooting plants.

I have not had a chance to see or use these units, but I wanted to share with you what other ones I’m looking that you can have an idea of what is out there.

This post contains affiliate links to products. We may receive a commissions on products purchased through these links, but at no extra cost to you. These items listed here are from Amazon but may be purchased at local markets.

3 Test Tube Glass Planter Terrarium Flower Vase with Wooden Holder

Plant Propogation Tubes, 2 Tiered Wall Hanging Plant Terrarium

Leave a comment

Processing…
Success! You're on the list.
Advertisements
Advertisements
Advertisements
Advertisements

Ombre Fun

While I made a component for last weekend’s Maker’s Market I played with glitter. I slowed down my mass production to share an easy way of creating an ombre effect that’s nearly effortless and will take every time for me.

The secret is all about your glue choice.

Growing up I always used Elmer’s Glue for sticking power. For ombre work, I find it’s the worst glue. There’s a few reasons for this, but for me the biggest problems I had was holes between two colors, awful looking clumping, and stark lines that just looked weird.

I’ve switched to using cheap watery glue instead.

Have you ever watched a professional cookie maker flood the icing to get that smooth design? Using watery glue has the same effect for creating glitter ombre!

So whether you’re new to crafting with glitter or use glitter on everything, more fluid glue is going to be your best friend. You can glue the sections you want to use one color glitter. Or you can lay down all your glue at once. The fluid movement of this type of glue is going to cause the glitter to drift a little and cause a natural blend. Not only that but if you have to go back in and add more glue because a spot was unexpectedly dry, a single drop will fill that hole and spread into the already laid glitter with no gaps.

Advertisements

Laying Down the Glue All at Once

This is my favorite way of doing ombre, particularly because I want to move quickly and optimize my production time.

First I get my glitter selection lined up. This is what allows me to lay a handful of colors while the glue is still wet.

Before I lay down the glue, I also decide which direction I want my colors to run; horizontal, vertical, or diagonal.

With that all prepped, that’s when I go ahead and lay the glue. I start at one end of my element and shake the glitter side to side to make a straight line. (Or a zig zag if I want peaks and valleys.)

If I’m going to make my own color blend, I’ll go ahead and shake out all the colors at once, without stopping between colors to put them back in their containers.

However, if I’m keeping my colors true, then I’ll lay that first edge color. Then shake off the excess with the glitter side down. Put the glitter away. Then grab the next color, shake out that next line. Shake off the excess with glitter side down. And repeat the whole process until all my glitter is put away.

Just so that you can go into this with confidence, I want to share with you the colors that I used here in Welcome Fall. The first color I used was a pale gold (as opposed to the bright and bold gold you usually see during Christmas). I followed that up with a bright pumpkin orange. And the final was a cherry red. I didn’t have concerns with the gold and orange because they had a similar base color that matched perfectly. The red doesn’t look bad here. I pulled it off in the final project that this was going on. However if you ever find that you’re questioning your color choices before you glue, I highly recommend taking some of the neighboring color and adding it in with the color you are hesitant with. This will tone down, and help bring the color into the family.

OR… another option, which you’ll see in the second picture above, let your middle color slide down on the glue and creates a drip effect. This will help from creating a stark line that can potentially form with colors of glitter that compete with each other.

Advertisements

Making Your Own Blend

As I mentioned above, you can blend your colors together. This green that I made is a perfect example of what happens when you blend.

The only green glitter I had on hand was a lime green that I bought from a spring line of glitter. There was no way that I could make that Easter egg green work in a fall theme. So I grabbed my blue and purple glitters to blend a darker green. If you look closely at this picture, you might be able to pick up the different colors. Around the middle, you’ll see some grains of blue that has a turquoise to it. And then around the perimeter you see the darkness of the purple glitter.

Maybe, you don’t want to make your own darker shade of green. Maybe you want a different color. How do you mix it?

Think about mixing paint and how when you use primary colors (red, yellow, blue) you make secondary colors (orange, green, purple). Glitter is going to work in the same manner. The big difference is that you’re not changing the individual grains of glitter to a new color. You’re creating the illusion of a new color by mixing different colors.

For the green that I made, I used the blue to take away the brightness of the lime. These two colors still have a fresh spring green color, so the addition of a darker color, like purple, makes the green dark. I didn’t use precise measurements. I added a little bit at a time so I don’t use my whole glitter stash and run out of colors to make corrections. Over all, it came down to the ratio of the lime taking up 50-60%, blue 30-40%, and purple 10-20%

The cherry red that I mentioned earlier, I partnered it with maroon that I absolutely love. The thought crossed my mind that I might need to make more of it because I bought it last fall and haven’t seen it since. My plan was to take the cherry red, mix a little bit of navy blue glitter (bright reds have an orange base and rich reds have a blue base–my reason for adding blue), and then black to get the red darker without changing the base color of the read. Brown would be an option if I wanted a lighter maroon. But for this dark maroon, black is the go to glitter.

The added bonus of mixing your own glitter blend is that you add dimension and something dimension to look at. Don’t get me wrong, glitter is enticing enough on its own. But the next time you play with glitter, mix a small batch of a color and look at it in comparison to the original flat color. You’ll understand what I’m talking about when it gives you something a little more.

Other Ideas

Before I close this post, I want to offer one more idea of what you can do to give your glitter work some dimension and adding a little “extra” to your work.

Take a look at “Give Thanks” in the picture above.

This one is a bit more subtle than the striped ombre, so you may need to get a closer look at this wooden tag. The picture doesn’t do it justice in comparison to what it looks like in person. But this is two different shades of gold. The darker (and more orange) gold is applied as a shadow on the left hand side of each of the letters.

Earlier I mentioned shaking glitter in a v or w shape to create a chevron pattern.

You can easily make poke a dots by dropping spots in one color and then surrounding the dots with a different color.

Feel free to not just play with colors, but also experiment with shapes and patterns. Depending on what pattern you’re making, you may need to be specific with how you lay down your glue. But there is no reason why you can’t make leaves, plaids, or anything else in glitter. If it becomes difficult to maintain shapes, take breaks between your layers. This will keep the glue from running and distorting the shape/pattern you make.

Advertisements

A Finishing Tip

The one disadvantage to working with fluid glue is that your glue might shed glitter because it doesn’t have the stick to keep the glitter in place. There are a couple of options that you have to seal in your glitter to minimize or eliminate shedding.

The first thing that I used, many many many years ago, was hair spray. This has the least about of stick out of the options I’ll share. It’s great if you’re in a pinch and don’t have any other products on hand. But the only shedding this is going to stop is contact shedding when you tap it. There will be some transfer if you run your finger in the glitter.

I love using clear acrylic spray! This is a great sealant that dries in a couple of minutes. The disadvantage is the fumes. But those disappear when the spray paint cures. I really don’t notice glitter loss through touch or contact/tapping. The finish is also the best option. However, you might see a dulling of the glitter’s sparkle depending on which brand you use.

If you have the time, polycrylic paint is the best as far as it goes to completely seal in all the glitter. This can be the determining factor if someone in your house, or the person you’re gifting too, hates glitter with a passion. This is completely sealed and there is no glitter loss. Just be aware that the fumes are strong and curing can take 24-48 hours. But the fumes will dissipate. I highly recommend that you dab polycrylic on. If you try to brush it on, you will get streaks, glitter will clump on your brush, and there will be brush tracks in your glitter.

How do you like using glitter?

Leave a comment

Processing…
Success! You're on the list.
Advertisements
Advertisements
Advertisements
Advertisements

Starting New Skills

The one thing that I appreciated from my childhood was just how many skills I learned from my parents; cooking, gardening, home repairs, auto repairs, and so much more. Part of this appreciation is seeing how many of these skills have become less and less commonplace in the younger generations. And it’s so promising to see a growing number of people seeking to learn these skills now.

Today I wanted to share a monthly experience that we have with our kids. Craft days!

I’m aware of three box stores in my local area that offer a free craft to kids; Home Depot, Lowes, and Joann Fabric. None of these stores are sponsoring this blog nor have they compensated me for this post. I mention them by name for the sake of helping out fellow parents who are looking to foster these skills in their kids or grand kids. They are free, which is perfect for families who don’t have the budget to purchase supplies.

Here’s what the corn hole craft project looked at the beginning of our morning.
Advertisements

We’ve been doing these hardware store crafts for five years now. And as long as the days get with small children, the time really flies by and they pick up the skills of using a hammer and screw driver too quickly.

This miniature corn hole craft was the first one where I sat down with my youngest and purposely focused on just being support. (The older kids decided they wanted to fly solo–time goes by too quickly where you’re sidelined on these crafts!).

My solo crafters wanting to build with no help.

Instead of telling my youngest how to build, I had him pull out the pictograph directions and tell me what we were doing for steps. I was just there to hold pieces for him while he built away.

My one and only job for the day, hold the project in place.

This is the child that loves having things in a certain order and done a particular way. But it was fun watching him process the building information and doing it the way that he saw makes sense. But what was a good surprise was seeing him use the claw end of the hammer when the nail wasn’t lined up the way he wanted it. He didn’t want to make corrections the way that I would. He wanted to fix the error his way.

This reminds me of a series of lessons from a virtual life skills summer camp that I watched with my kiddos this past month. This was a series teaching basic home electrical repair skills to teens. I watched it to learn for myself because this was one skill that I didn’t learn from my dad, but there’s times where my husband is so busy that I could do these things home repairs without waiting for his schedule to slow down for him to do it.

What’s amazing about whole families learning new skills is that we’re not dependent on one person taking care of a honey-do list. We’re enables to work as a team to get something done.

Advertisements

For example, even though my oldest is still in early elementary, he’s able to take care of nail and screw projects. I learned some new electrical skills to help my husband out. And my husband has been learning new food preservation skills to help in the kitchen.

For our family, it’s important to learn new skills and “cross train” because it creates value in our family. One person isn’t dumped on and obligated to do certain tasks by themselves. This can be overwhelming, especially as the adults in the house, because we’re constantly juggling our schedules and to do lists. Sometimes surprise tasks just become overwhelming because there’s not enough time in the day.

But when another family member knows how to do a task alongside you, it turns into a quality time moment instead of a stressed out I-don’t-have-time-for-this.

I don’t know about anyone else’s family, but my kids are already at the age where they want to feel valued and appreciated. And by giving them fix-it skills, it’s one thing where my kids can do something for my husband or I, feel accomplished, and then feel valued with a “thank you” and “you did a good job”.

And it’s not just with tools. The kids have been learning how to cook things on their own and they’re so proud of being able to cook breakfast for the family.

It doesn’t matter the age, people thrive on feeling appreciated and knowing that they contributed something. And that value isn’t taking into consideration the memories that are made in the process.

One of my favorite memories of working on cars with my dad was when he had me crawl under a car and do an oil change with only him available to talk me through the process. It was the late 80’s and one of the biggest fads for girls was wearing press on nails.

It was when I was removing the last bolt that two of my nails popped off and landed in the oil pan just as the oil gushed out. I started freaking out. My dad thought I had lost the bolt in the pan. He and my uncle started laughing their butts off when they found out that I was looking for my nails!

Let’s just say that after I fished the nails out of the oil that it didn’t take me long to realize that there was no way I was going to be able to salvage them.

Advertisements

There’s nothing in the world that would exchange for the memories that I have with working on cars with my dad. Nothing goes right all the time. And it’s these memories that bring patience when I’m working on skills with my boys. Things will go wrong. Some of those things will be hilarious. And it may only be these funny memories that they remember for the rest of their lives. But that’s okay.

I know that they don’t remember the times they’ve hit my fingers with a hammer. They won’t remember the frustration of first learning how to press down on a screw driver and turning at the same time, all just to get that screw to go down into a project. But their muscle memory will live on forever as they grow to learn more skills, such as home electrical repair, car repairs, garden building projects, making meals, and so many other valuable life skills.

What they will remember forever is that their mom and dad believed in them that they could make something. When frustration sets in, they know they can problem solve their way out of it because they were believed in. But above all they will take on the new challenge of learning something new because their parents continue to learn new skills.

We’re never too young to learn a new skill. Neither are we too old.

Maybe one day soon, they will learn a new skill. And as they show us, my husband or I will learn that new skill because they want to teach us something.

So whether you have kids or grand kids or not, learning a new skill is ageless. It’s a great memory building moment to teach the young (even teens) a new to them skill.

And it’s never too late to learn a new skill for yourself.

What new skill are you ready to learn now or pass on to the next generation?

One response to “Starting New Skills”

  1. best buy instagram followers site Avatar

    Way cool! Some extremely valid points! I appreciate you writing this post and also the
    rest of the site is extremely good.

    Liked by 1 person

Leave a comment

Processing…
Success! You're on the list.
Advertisements
Advertisements
Advertisements
Advertisements

Getting Buzzy For Spring

There’s one skill that I’ve wanted to learn from a friend of mine, incorporating mason bees into my garden.

Here in North America, mason bees are the indigenous bee. They pollinate 45 times more than honey bees. And if you have young children, you don’t have to worry about there being an altercation and your child (or pet) from being stung. (We’ve been teaching our kiddos about bees because one day I want to have honey bees for honey production. So they already know what’s expected of them when it comes to our pollinating friends.)

I can’t even begin how excited I was when I received an email from a family locally owned hardware store that they were doing a craft for Earth Day, which involved making a home for mason bees.

Today I’m sharing with you the process that my kiddos went through to make a home for mason bees.

We were instructed to bring a soup can or cardboard milk container. The hardware store supplied the craft materials to decorate and make the bee home.

All my milk cartons still had milk in them and I haven’t bout soup in a can for well over a year now. What I did have available was an empty ten pound can. So if you don’t have a small can, know that it’s possible to make a home with a larger can.

Things you will need:

(Feel free to modify with the materials that you have on hand.)

  • Milk carton or soup can
  • Construction paper (printer paper, non-toxic colored paper, recycled paper, whatever you have on hand)
  • Tape
  • Straws
  • Cardboard tubes: toilet paper or paper towel (optional)
  • Corrugated cardboard (optional)
  • Scissors
  • Glue
  • Stickers (optional)
  • Twine
  • Pens, crayons, or other decorating medium (optional)
Advertisements

If this is a kid’s project you’re setting up for, cut all rolled paper and straws to the length that fits from the back of the soup can to the front.

You can even prep other materials for your bee house. If you have scrap blocks of wood, you can several holes through the block.

I don’t know what you have in surplus in your craft room. But I have many wine corks that have been waiting for just the right project. When I get a free afternoon, I’ll make an adult version with rolled cardboard, drilled scrap wood blocks, and my collection of wine corks that will also be drilled.

Here are some additional bits of information about mason bees, if you are unfamiliar with them.

Here is another resource to get you started on your path for creating a home for mason bees. If you want to buy mason bees to start your bee colony, I found this site which is still selling until May 22, 2023. They have a bee info page that can instruct you in how to care for mason bees to make sure that they remain healthy and happy.

If you’ve watched the movie The Pollinators (2020), then you understand the need to help support our local pollinating community. If you haven’t seen this documentary yet, it’s worth the time to understand what it going on with the bee population in the United States. And if it’s happening here, it’s very likely happening in other places.

Last year (2022) was a bad growing season in the Pacific Northwest (PNW). To this day I still believe with my whole heart that the bees were what made my garden successful, when others in my local community found only hardship. So for my gratitude, I already planned on adding more flowers to my garden as well as being a more hospitable home for my pollinators. With that being said, I will leave you with the pictures of my family. And once the weather clears, I’m going to examine closely where our best place of hanging this mason bee home is going to go.

Happy Earth Day!

Processing…
Success! You're on the list.

Leave a comment

Advertisements
Advertisements

Quick Accent Piece

The one thing about approaching holidays is that you really get smacked in the face with everything that needs to be done.

Whether you’re decorating sideboards for an Easter get together or just looking for something quick that fits in a space as small as a window sill to add a little color before spring finally unfurls. This quick craft is for you.

What you need:

  • 1 Stemless Wine Glass
  • 1 Bag of stones 18 oz/794 g
  • 1 Faux Succulent
  • Any other accent piece that you would like to add (I chose a glittery bird)
  • Glue Gun
  • Accent Glitter

5 Minute Version

If you just want to toss something together, all you need is the glass, rocks, and succulent.

The succulent that I chose had a very thick stem. Because it was sturdy, I could pour the rocks in the glass and push the succulent stem into the rocks and moved on. (If the rocks have resistance, give the succulent stem a little swirl and it will sink right in.)

For whatever reason if the succulent just does not want to go into the rocks, never fear. Pour out the rocks with the exception of some in the bottom (or the level that you can easily push in the succulent). Then lift up the leaves on one side (and then the other) to add the stones in, around the stem.

Want to use real succulents?

You can do this using a real succulent of your choice. Make sure you verify if the succulent you want to use can life in rocks or if it needs cactus potting soil.

If your succulent needs soil, but you prefer the look of the rocks showing through the glass, you will need to take a little extra time layering the rocks outside and putting the soil in the center

Advertisements

Ten Minute Version

Follow the directions for the 5 minute version to get the glass filled and succulent set. The remaining time is dressing up accent piece that you are adding.

For example, the glitter bird that I’m using came from the dollar store and I wasn’t 100% satisfied with it. If I had feathers in my crafting room, I would have added feathers for the wings as well as the way it was set up with feathers on the tail. Unfortunately, I don’t keep feathers. So I needed to pull off the pink ones that came with the bird. The black eyes also seemed to stick out awkwardly. To remedy this, I grabbed my glue gun and black glitter and added glitter detail work to add dimension and character to the bird.


Thanks for spending a few minutes with me today. If you’re anything like me, you have a list as long as your arm to get done in less than 48 hours. My kiddos always look forward to a newly designed shirt. I haven’t got a fully developed idea for that yet. But I do have a spring edition ready to go dressing up some sock bottoms. They enjoyed the ones that I made for them for christmas. So I thought I would make a few more for them. You can check out sock designs here:

What are your Easter or Resurrection Sunday Traditions that you do with your family?

I’m always looking for new ideas!

Processing…
Success! You're on the list.

2 responses to “Quick Accent Piece”

  1. Naoma Avatar

    I truly enjoyed reading this article and learned some useful information. Thanks for sharing your insights with your readers.

    Like

    1. Pacific Northwest Event Design Avatar

      Thank you for reading and commenting. I love hearing from those who find me.

      Like

Leave a comment

Advertisements
Advertisements