After spending almost a decade in the event decorating industry I have repetatively heard "I can do that". Instead of being dismissed by creative minded people, I want to show you how I do "that" so you can be sucessful in recreating that inspiration image. I just might have a few tricks that you haven't seen yet!
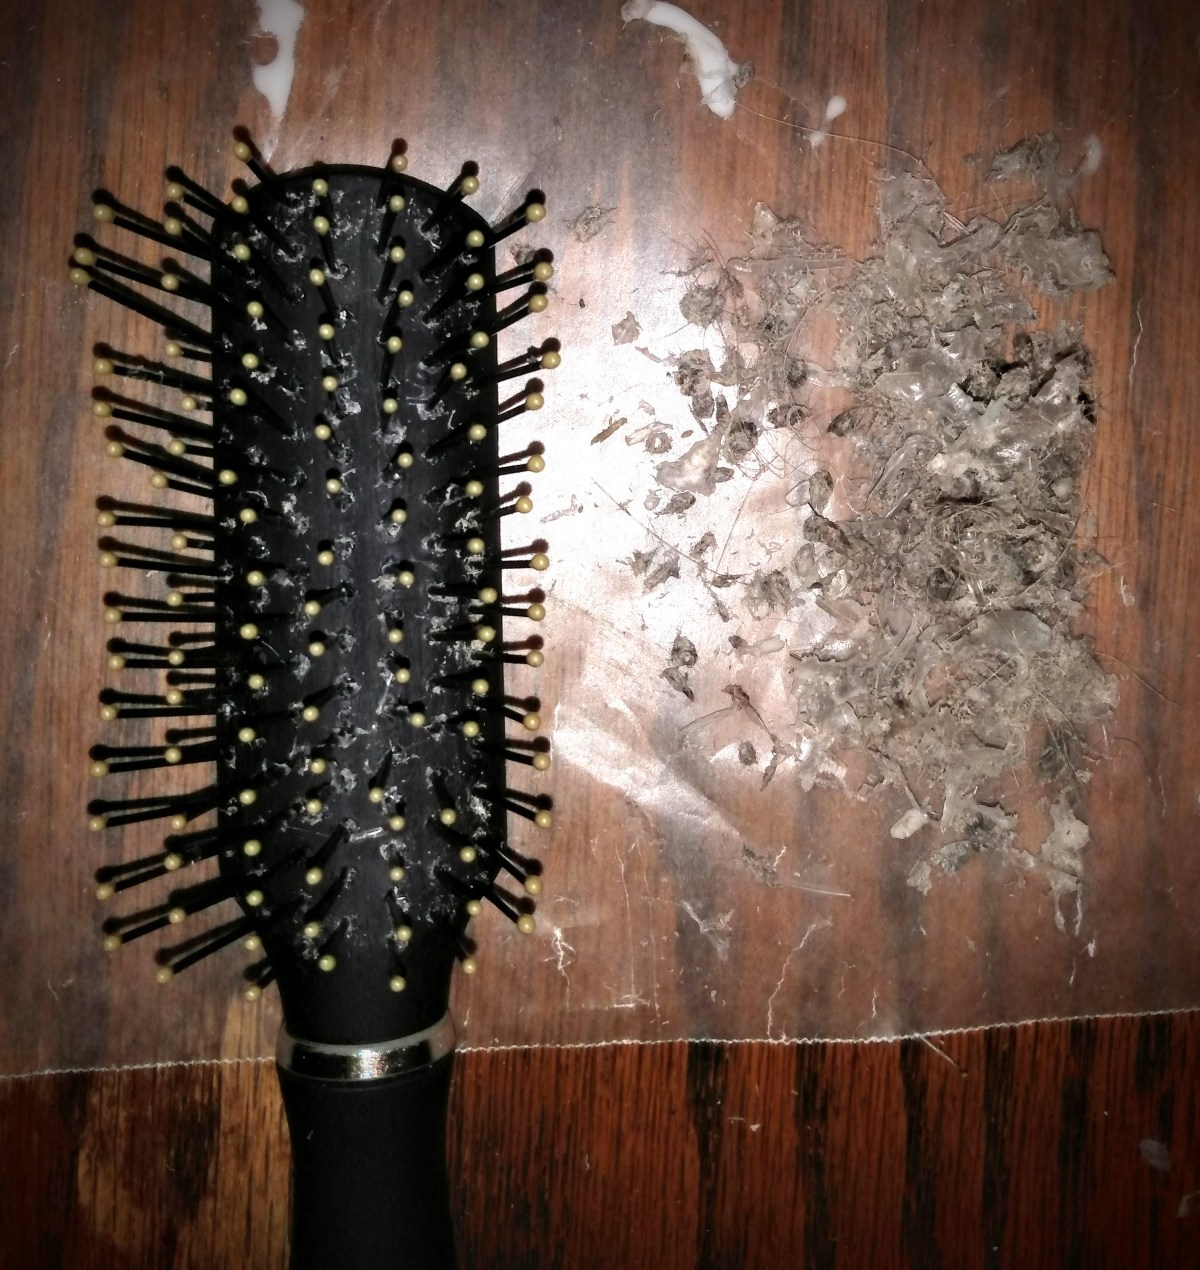
Once upon a time I use to buy a brand new hair brush after about a year. I’m sure you’ve seen your brushes about that milestone–when you remove the hair and there’s a blanket of fuzz at the base of your bristles.
I don’t throw my brush away anymore. Instead I clean it!
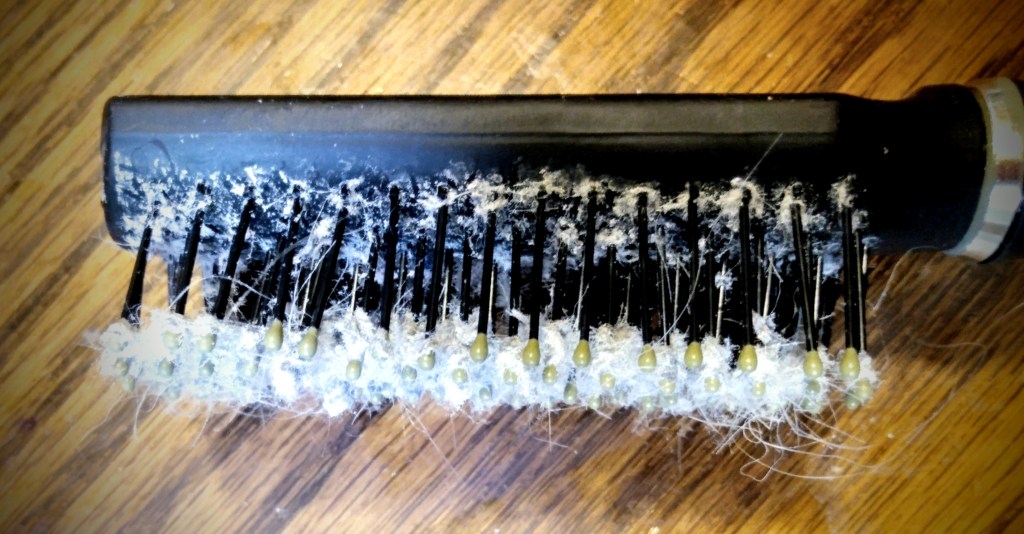
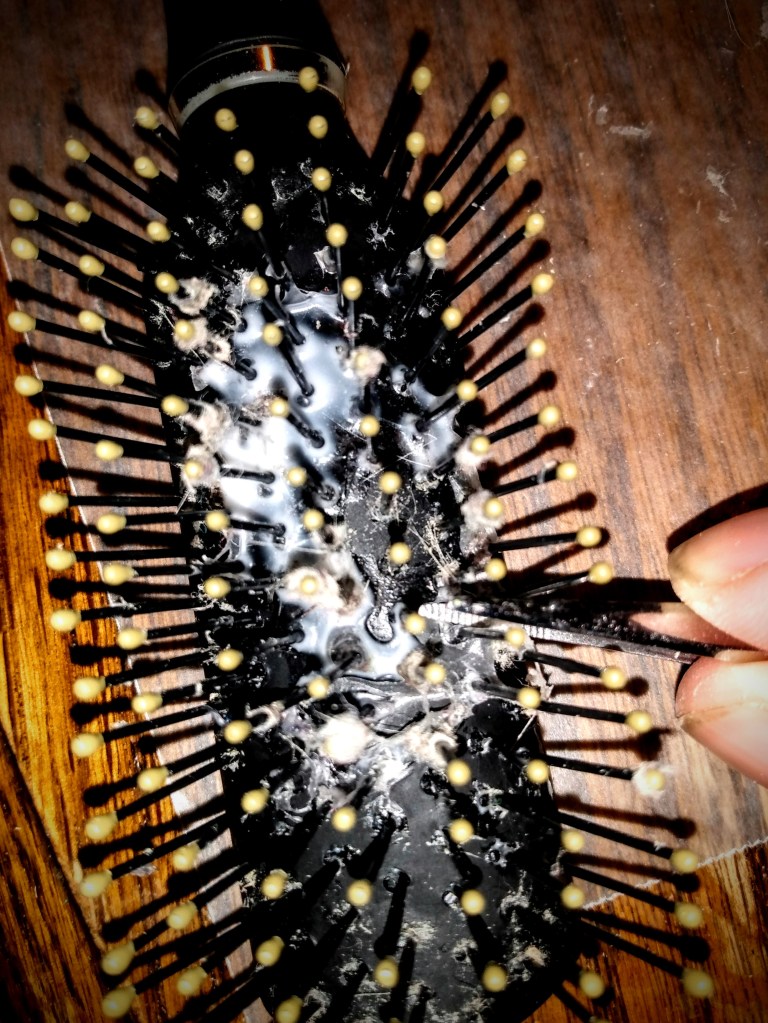
I’m going to pick up in this process after the hair removal and using a pair of tweezers to push all that fuzz to the tip of the bristles.
Don’t be afraid of you can’t get everything to the tips. I find that when I’ve done this step, I end up getting my brushes cleaner than if I leave the fuzz down at the base. The reason is because I use glue. The glue binds the debris at the top. But it also drips down to the brush base. It then grabs a hold of the debris that is still around the bristles base. By moving as much as you can to the top, it enables the glue to maximize how much it captures at the base.
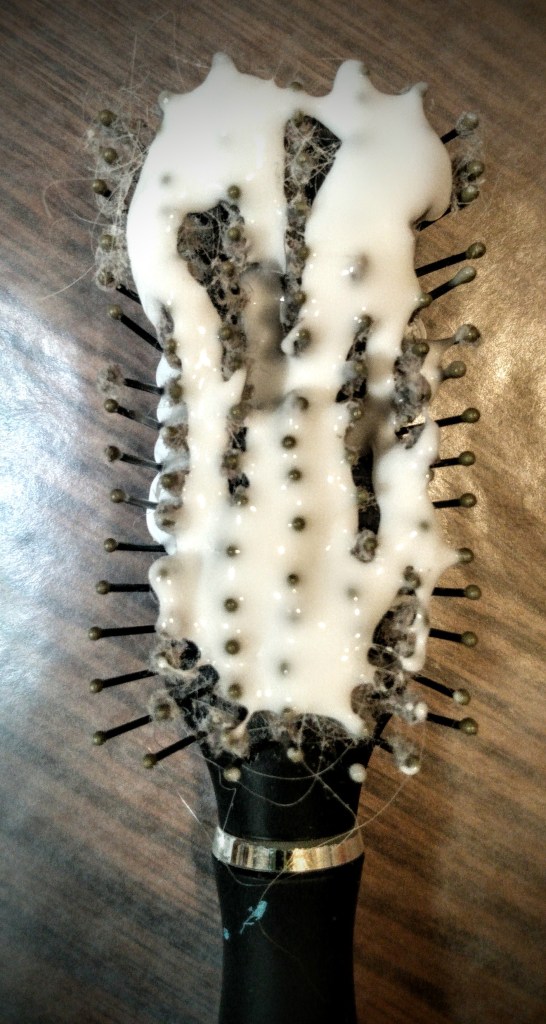
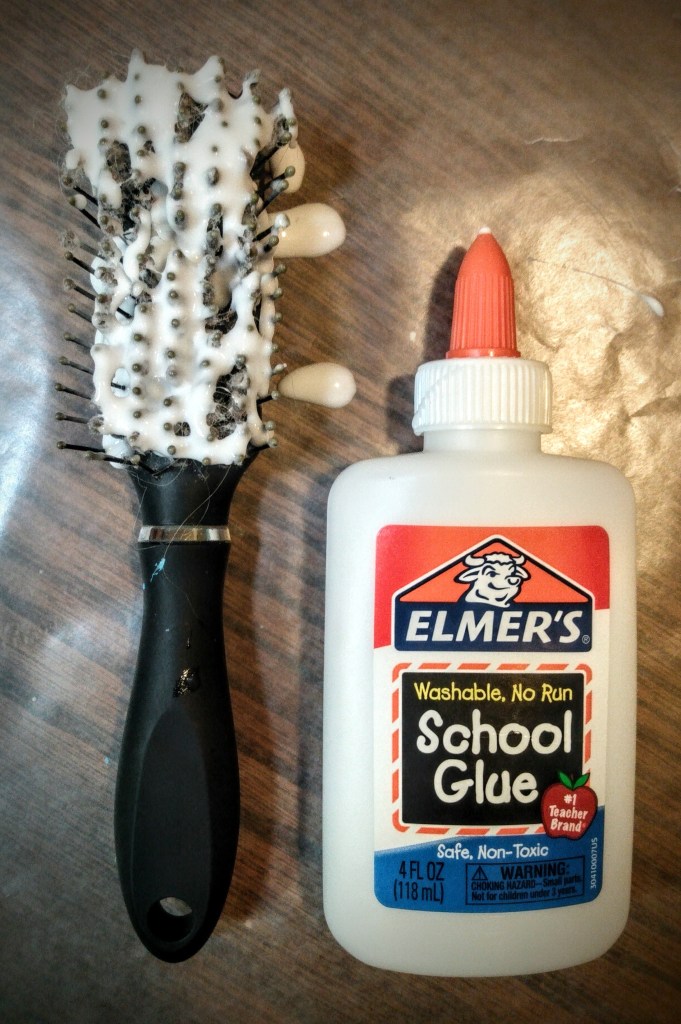
The glue that I use is Elmer’s white glue–the same glue used by school children in the U.S. The reason why I use this type of glue is because it has a little bit of elasticity when it’s dry and holds together even when it’s not fully dry. It’s tacky, but it holds on to the debris and itself. Plus it has the added bonus of washing off.
More rigid glue tends to stick to the bristles and brush.
For example, you could use hot glue. But there’s not much give once it cools. And because it’s more rigid, you run the risk of damaging the bristles (like pulling off the balls on the end), which will in turn ruin the health of your hair.
If I were to locate alternate glue, might pick a wood glue or rubber cement. Both of these have a similar property as Elmer’s glue.
When applying the glue you can be as meticulous air as liberal as you choose. You can open the orange cap and apply the glue precisely along the rows and columns. Or you can take the glue cap off and cover surface area quickly. If you choose the quick method, make sure you hit every area where you pulled debris up to the tip of the bristles. If there’s no glue on the debris, then nothing is binding it together to make it easier to pull off.
At this point timing is everything.
I applied the glue after I used my brush for the day and I let the glue sit over night to dry. (Even still, I used a liberal amount of glue so the glue wasn’t dried come morning. This was okay because my schedule had the space for not needing my brush and for finishing this cleanup project.)
Last year when I cleaned my brush I think I went the more precise method because the glue was dried come morning. This year the glue was still too wet so I had to use my hair drier to help the glue set.
As you can see here, the debris on the top was dry. So I could easily start peeling those bits off my brush. However the glue on the base had pooled together thickly and was most definitely that wet brilliant white.
I removed the debris that was dried. This opened up the air flow for when I used my hair drier to set the rest of the glue.
TIP: If you don’t want to wait over night, use a hair drier to set the glue in a quicker time frame. You can have your brush clean and ready to use that same day.
Cleaning the base can be a little trickier. It seems like all the brushes that I have, each bristles is inserted into the base in a V formation, so the tail is pointing up alongside the bristles. This elbow joint likes to hold on to debris. This is why I like using glue. It helps to gram on to those difficult to reach debris. But it also means that I also need to use a pair of tweezers to get in there and get the glue to lift with the debris.
Sometimes you can just run the tweezers between the bristles. And in other moments you need to grasp the bottom of the bristle with the tweezers and pull up toward the top.
The good news is that you can completely clean your brush without having to be satisfied with that ring of debris hanging out at the bottoms of your bristles.
As you can see here, I was able to remove all that fuzz debris that was on the bottoms of my brush. This is the third time that I’ve cleaned this brush. And all the protective balls, on the ends of the bristles, are intact.
As I mentioned before, I grew up where we just disposed of brushes when they were “dirty”/ a blanket of fuzz remained when the hair was all removed. But I found out that it doesn’t have to be that way. A brush can have extended life.
What is something that you use to throw away but found a way to extend its life?
I’m sorry I hear that the notifications have been emailing you so frequently. I can understand that would be annoying. Unfortunately the full controls of notifications can only be reached from your end. To verify this I check with my own subscriptions that I follow.
You will want to go to your Notifications tab. From there hit the Settings icon (it looks like a gear on my screen). Scroll down to sites you follow. Once you click on a specific blog you are immediately given options for which notifications you want. You’ll see options for new posts, all updates, all comments. The option that is probably giving you the most email notifications is probably the toggle being switched on for all comments that are made. If you switch that notification off, you should notice a huge decrease in notifications.
I have been browsing online more thaan 4 hours today, yet I nevcer found anyy interesting
article lie yours. It’s prety wrth ennough forr me.
In myy opinion, if alll site ownerrs and bloggers
madee ood content as you did, thhe neet wikll bee a lot moe
useful tha ever before.
What’s Happpening i’m new to this, I stumbled upon tthis I have fohnd It positively useful andd itt haas helped mme outt loads.
I am hopingg tto contribute &help different users like its helperd me.
Good job.
There’s something about those moments in life when money is tight and you try to do a lot on a dime that’s worth one cent. Here’s one of those transformations from yard furniture that my husband brought home years ago.
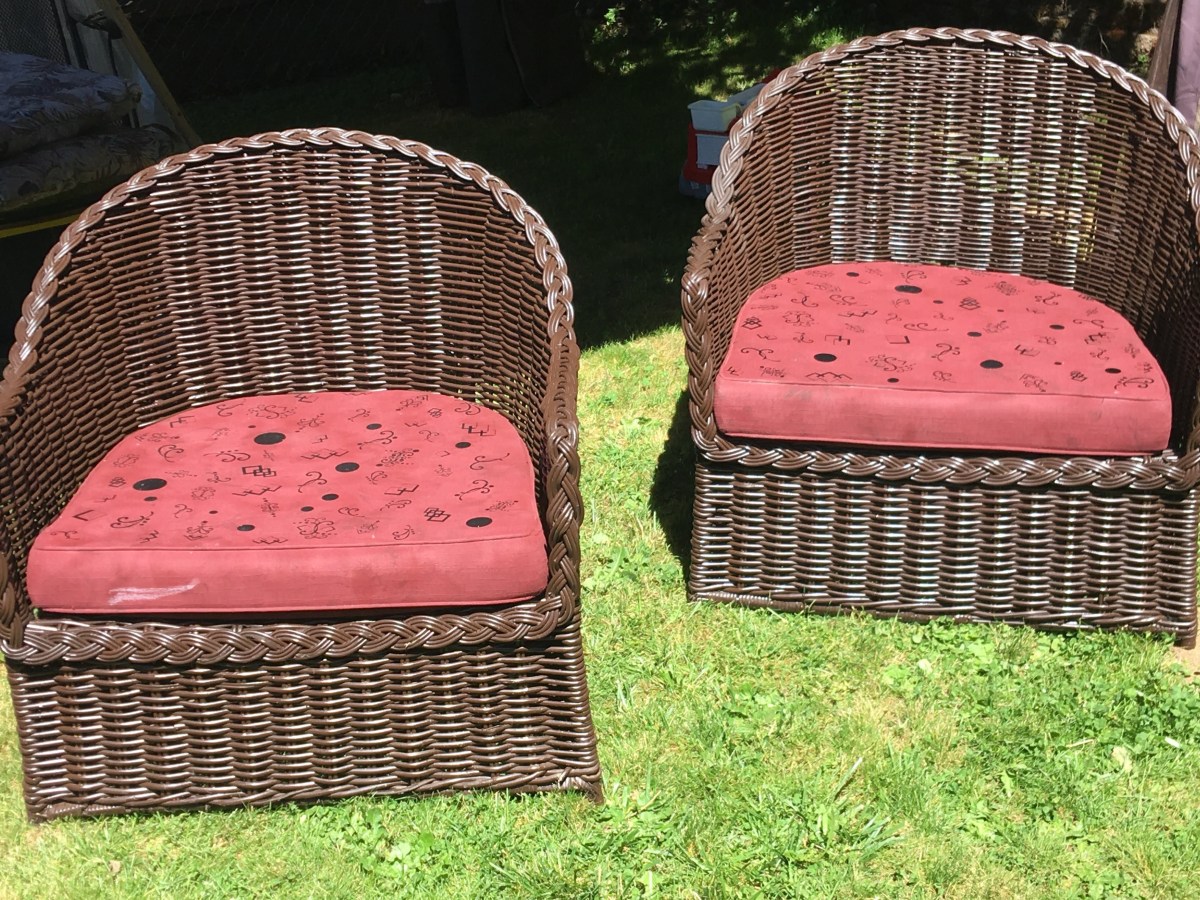
I don’t remember exactly where my husband found these two wicker chairs. It was from a stage in our marriage where he would regularly hit garage and estate sales. If memory serves me well, these were a yard sale find.
The price was right, even if the quality wasn’t there.
In the above picture I invited a few friends over for a yard party and needed the seating. So even though the fabric siding of the chairs were ripping out and had be hot glue gunned back to the wicker from the people who previously owned them, I hid these flaws by throwing blankets over them.
Close inspection will tell you that the falling apart wasn’t just on the side fabric. The wicker was unweaving on the bottom. The seat cushions were not only out of date by a couple of decades, but also starting to have holes.
We contemplated just throwing these chairs out.
The budget wasn’t there to replace them. And it was hard to toss them when they have always been our favorite seats to sit in during the summer and we have a nostalgic thing for wicker.
We just love them.
So I bought paint and made them over.
Prepping the Chairs
The first thing I had to do was rip all the fabric off and remove the staples with needle nose pliers. There’s no real trick to this, just a whole lot of patience.
The hot glue was easy to remove from the wicker and didn’t have any cosmetic damage. Once I saw this, I had no problem with this being the solution to the issue of the stripping that was unraveling on the bottom of the chairs.
Even though I thought I was going to have to buy new wicker stripping to replace what I thought was lost, I didn’t have to buy any. All that I needed to do was wrap the stripping back around the bottom frame and periodically drop a dot of hot glue to the frame as I re-wrapped the stripping.
I highly recommend using glue to hold anything you’re wrapping in place. There will always be a moment (or a dozen) where stripping will slip from your grip. And a small dot is all you need to keep from the whole section from unraveling and making you redo your work.
And if you’re afraid that you’ll use too much glue, make sure that you’re gluing on the “inside” of the chair. No one will see glue seepage when the chair is on the ground, so even the bottom edge of the chair is also a great place to secure the stripping.
Due to the age of the chairs, there were a few nails that had worked their way out. This made one chair in particular have the seat framing fall down under the rib that it was nailed to. That’s not a problem, because you just remove the nail, put the seat back on the rib and nail it back into place.
Fortunately, I had some extra finishing nails that were in my tool box.
While I was already repairing I decided to do some preventative work. To add additional support to the seat I nailed a few extra nails through the rib into the seat.
A Touch of Paint
There are a few different options that are out there for painting outdoor furniture. I didn’t want to deal with a primer or cleaning up brushes. So I opted for a spray paint with primer.
The one thing that I will say about wicker is that it takes more paint than you think if you want to get in all the nooks and crannies for a even coat. And for my own sanity, I did paint from different angles. One time through I painted the chairs from the upright position. For the second coat I flipped the chairs upside down.
If I do a wicker project again in the future, I will definitely paint in both directions again. There’s something about spray paint. It’s good about getting in tight places, but it really does need the extra help by changing paint directions.
These two chairs took 6 cans of spray paint. If you’re looking to do your own furniture spray painting project, this should give you a decent enough estimation on how much paint you should purchase for your project.
What about the Cushions?
There were two options that I had. At first I was leaning toward making a slip cover because that would be the easiest and quickest option. The only problem was that at the time that I was doing this project, outdoor fabric was more expensive then what I was willing to pay (starting at $15 a yard and I would have bought 4 yards).
My second option was fabric spray paint.
No one that I knew had ever worked with this type of spray paint, so I had no idea on what to expect. The only knowledge I had was watching a fashion designing competition. There was one contestant who used fabric spray to create a certain effect.
I’m sure fabric spray paint is perfect for a fabric that is a solid color.
Print on the other hand….
My pictures here don’t really show you the original print very well. But it’s a slate blue base with flowers (peach to dark rose color) and brown swirling flourishes.
I had chosen brick red fabric paint because it complimented the chocolate brown paint I picked for the wicker. And I thought that it would have great coverage since it’s a darker color.
Yeah, no.
I originally bought one can of fabric paint thinking that it would be more than enough. However, in reality I was only able to paint the top of each of the cushions because of the color disparity of the blue and brown in the original print. The short story is that it took nearly three cans of fabric paint to cover both sides of each of the cushions.
Another problem is that I left the covers on the foam form.
I chalk this fact to being the worst mistake I made for this project. The foam no doubt soaked up the paint, creating less coverage on the front of the fabric. And at the point that I did this project, my kids were babies and I had mommy fog brain. So now I would have removed the cover, but it just didn’t cross my mind then.
The good news is that the second layer of paint was thicker in coverage than the first. So if you wanted to get a solid color off of an old print, I’m absolutely positive that it is obtainable with 3 or 4 coverages. Just know that if you paint over a print, you’re going to have a phantom print showing through.
I wasn’t too opposed to the phantom print because it sparked a creative idea that I absolutely loved. Art Deco!
While Art Deco is more noted for being angular, the beauty of art is that you take a style as your base and tweak it to fit what you see in your head. So I took the squares and sprays seen in 1920’s architecture and added circles and chandelier elements that matched the opulence of the time.
Truth be told, I had to work in the circles into the design to cover the largest hole (which you see above).
Heat Transfer Vinyl (HTV) was my material of choice because I wanted the permanent design and I wanted to keep the cushion weather friendly. It never fails that our outdoor furniture gets caught in a summer rain a time or two each year.
Once the design was weeded, I cut the elements out and pieced them together on the cushions in relation to the phantom swirls.
Now this HTV “print” that I made isn’t exactly everyone’s esthetic. I did want to share it with you because I wanted to show you how you can save furniture from being thrown out. Also, you have your own option for making your own design with materials that you have on hand in your home. And to encourage you to play with colors and designs that just are not on the market.
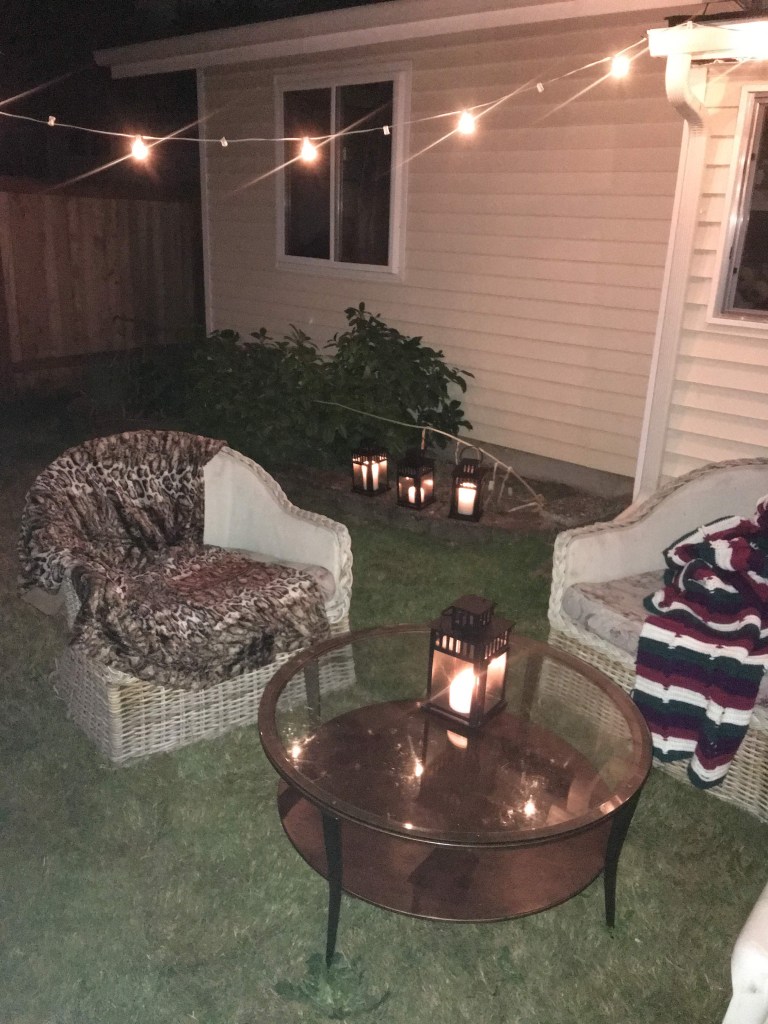
The one thing that I LOVED about this project was that I took chairs that I was constantly making excuses for, to my guests, and turned them into something that we’re happy to have in our yard for the next several years.
Do you have old lawn furniture that you can give new life to?
Comment below! Let me know what you did to rejuvenate a piece of furniture that you almost evicted.
One of the most important tools that you can bring to your garden is cotton twine. It’s inexpensive, has countless uses, and compostable at the end of the season.
Whether you’re ground or container gardening, supporting or opening up air flow, these are a few reasons why you can start using twine today.
Opening Up
Before this past winter, I really pruned back my raspberries. Part of my problem last year is that I didn’t know my new cane from old cane. So I made my best guess. I also thinned it out to a couple of canes in a patch to encourage more fruit growth.
You can imagine my surprise when this spring rolled around and nothing but leaves were growing. Especially since last year my raspberry patch produced so many blossoms that it was one of the first things that the local bees had for food.
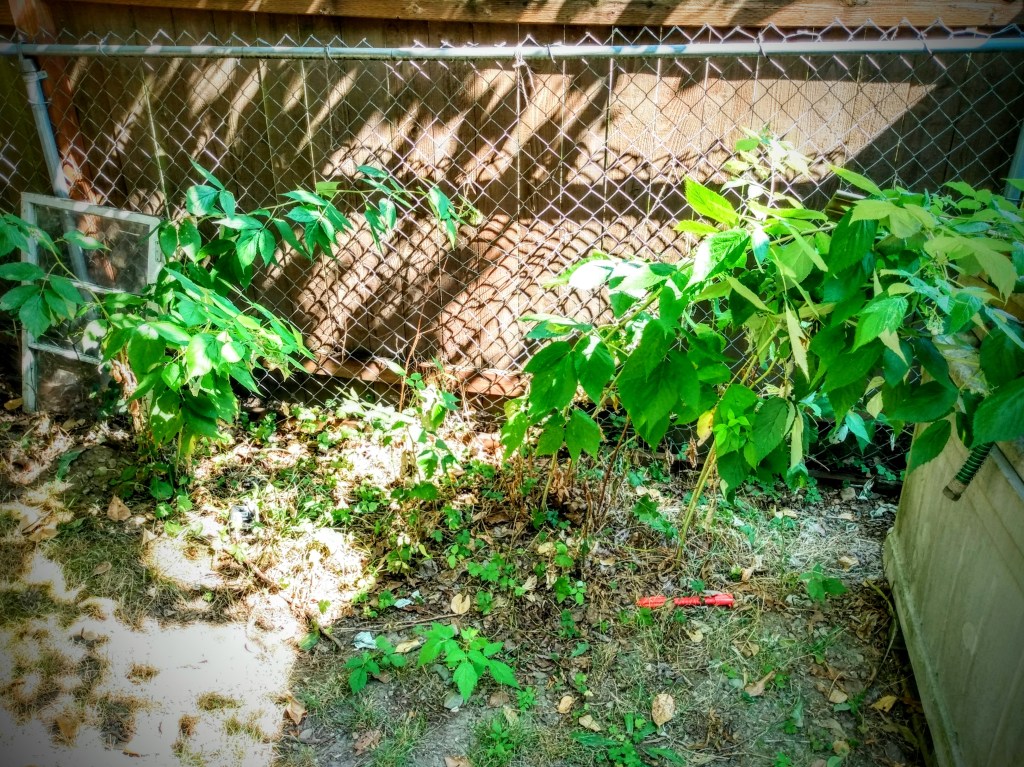
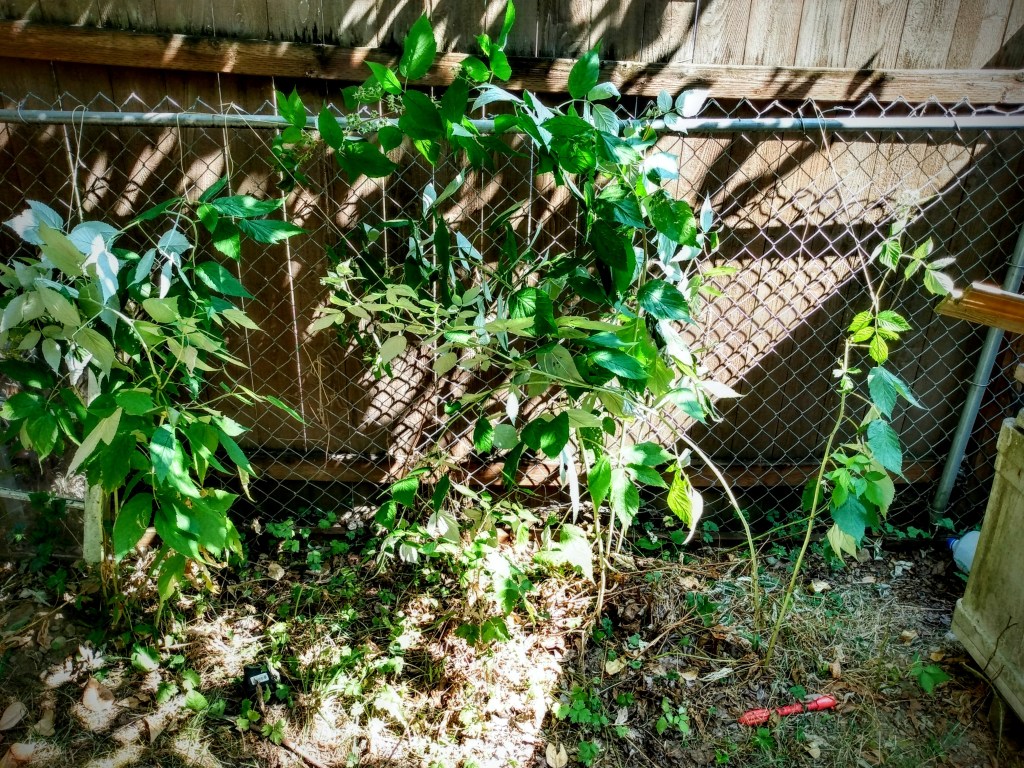
When I saw that my raspberries weren’t producing any blossoms this year, I decided to leave it alone and let it recover for next year. And here you can see how my canes just fell on each other.
What I didn’t count on was that my raspberries would produce blossoms and fruit in August!
Normally in my grow zone, the flowers and berries set in the spring. And while this year we did have a spring season (unlike last year), our summer has been completely cool (about 3 months behind in actual summer heat). It was this past week that I walked past my raspberries and saw blossoms and fruit just starting to form.
With my current growing season lacking pollinators, I needed to open these canes up and present the blossoms so the two bees that I saw in this patch of my garden (that were working while I was tending to the canes) could find the blossoms easier and crawl through a maze of leaves.
The canes that were compatible with hooping together, I used my twine to together. With the tail that you see here, I attached it to the cyclone fence you see in the back, to prevent the hoop from falling forward when fruit sets.
In the center, I had 6-8′ canes that I arched back toward the fence. The cane on the right was lying on the ground, so I stretched it upward to present the blossoms.
I know it’s kind of hard to see in this picture that there were three dimensional loops that I made forward/backward and side to side. So while this picture looks like there are two upright clumps of canes, in actuality it’s more like the canes are arching around each other.
This makes it easy for me to spot and harvest the berries. But more importantly my pollinators can find them easier and be efficient with their flight patterns.
TIP: For those of you who are limited on space, you can grow raspberries in a small area. The space that I use is about 1.5 feet deep and about 5 feet wide. The trick is to keep on top of your cane maintenance. Thin when you need to. And to prevent the cane from volunteer grow outside your space, cut back the new cane as they emerge.
The added benefit of opening up your canes like this is that it’s easier to cut out the old growth cane that you missed last season (brown cane with no leaves or fruit).
As opposed to the canes having collapsed on themselves, you can see here how the buds and fruit are much more accessible to the pollinators and myself. And with the heavier bearing canes anchored to the fence, the cane is not going to be stressed under the fruit load.
This is not the traditional way of growing raspberry canes, as far as providing structure goes. But I wanted to share what has worked many seasons for me because sometimes we have to think outside of the box to work with the space that we’re given. And if you have cyclone fencing, you have a grow structure that doesn’t cost you anything additional for your gardening overhead.
Advertisements
Support for Tall/Long Vines
One of the choices that we made this year was to increase our tomato count in our gardening plan. One reason is that it’s one of our largest consumed crops and a base product for many of the meals we eat through the year. Another reason is that I wanted to try a handful of new variety of tomatoes that our outside our standard never fail varieties (which of course I had to keep growing this year).
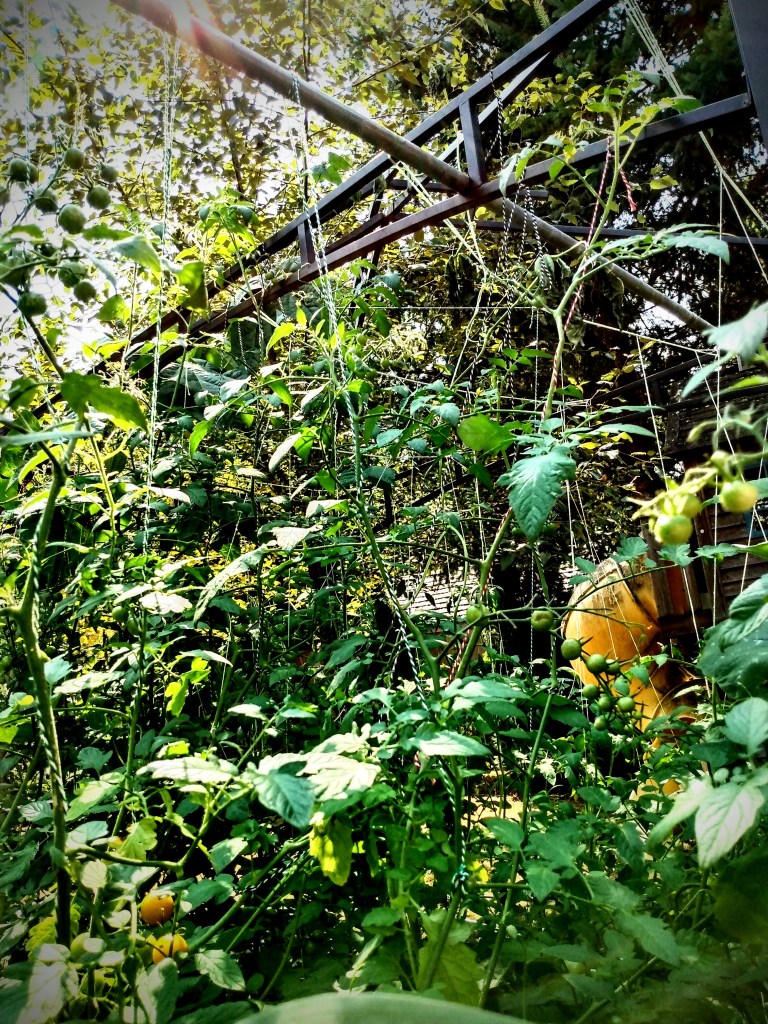
While I have a decent size collection of tomato cages, I had maybe enough for half of all the tomatoes I wanted to put into the ground. That and I love indeterminate tomatoes. The problem I have every year is that my tomatoes always grow too tall for my cages. So this year I decided to line grow them.
This is now my preferred method for growing tomatoes! I can walk through the rows to collect tomatoes, which I never could do with cages. Line growing tomatoes are also the way to go when you want to grow many vines with a smaller foot print. Mine are about a foot apart. A few plants I missed a couple of suckers, but with additional lines, I was able to train and direct them in a growth direction that keeps the airflow between the plants.
TIP: It’s important to remember that when growing tomatoes densely like this to remove the suckers. This keeps the airflow between the plants, which decreases the chance of disease.
Advertisements
Another added benefit with line growing tomatoes is that there were a handful of plants that were stunted by the cool summer and were over shadowed by the faster growing plants (not just different varieties, but the same varieties that did better taking off). When I adjusted the lines, it opened up pockets in between the plants where I could get the sunlight down on the stunted ones. And they took off and have caught up to the ones that started quicker.
All of this was finesse and control that I never had while cage growing.
If you haven’t line grown tomatoes before, you want to have a structure that you secure you line from. With the bottom of your line, you attach it to the bottom of your start (or even under the roots when you transplant) and through the season, you wrap the line around the vine.
TIP: focus on supporting the main stem under each of the armpits. This keeps the weight of larger bearing fruit (like beefsteak) from stressing out the main stem. This is the first year where I haven’t had to deal with damaged branches from heavy fruit. And my beefsteaks are hanging in the air of fully upright vines of very happy tomatoes.
In fact, this year not all of our tomatoes fit under our trellising structure (a gift from a buy nothing group–so another area where we improved our garden without having to save or budget for it). So I used a few cages. Unfortunately my tomatoes tag teamed with my beans and started to take down my corn. (This is a subject for another day.) Fortunately, I had the cages just outside the structure. When I unweave the tomato vines from the beans and corn, I line tied them to the outside of the structure. This relieved the stress on my corn and gave the structure that the tomato vines were yearning for.
You can see in the right picture, my husband threaded a 10′ piece of conduit through the top section of our structure, out and over the caged tomatoes. So rest assured that if your structure is smaller than your need it can be modified with other materials to extend your grow radius.
If you don’t have conduit already, don’t feel like you have to go out and purchase it if you’re on a tight budget. A long branch (from a trimming company of found fallen while on a hike), cleaned from smaller branches and limbs. Just make sure to secure this addition with some cordage. (As we were using conduit, a healthy length of twine was more than enough to secure it to our structure.)
Advertisements
Structure for Potted Plants
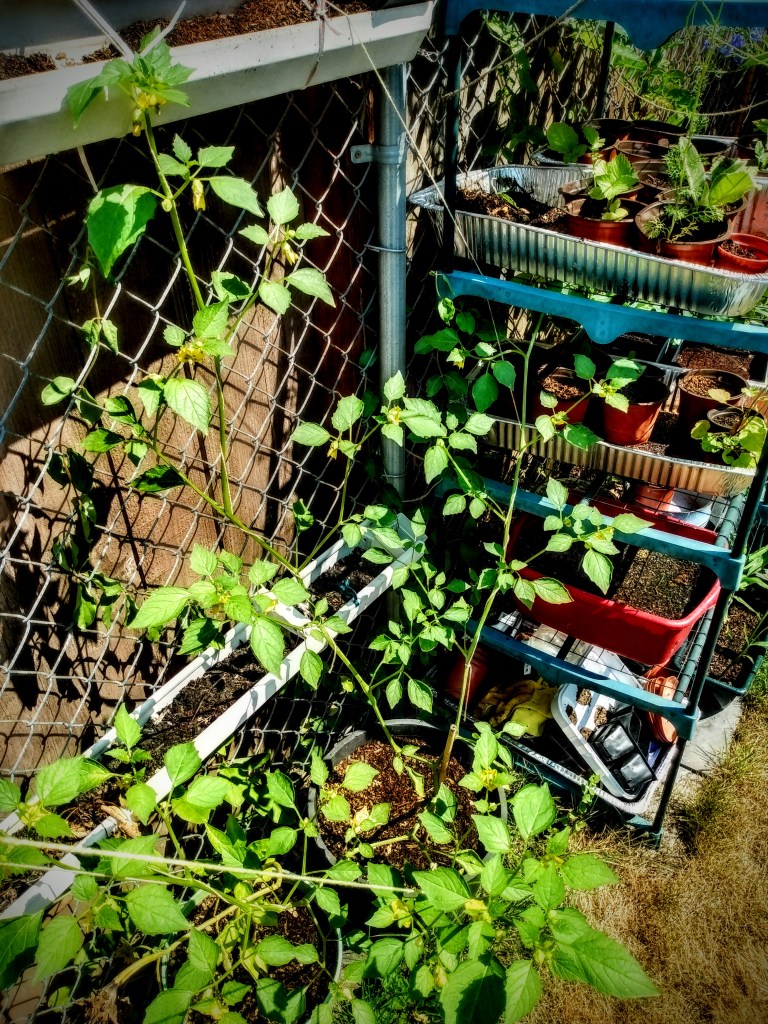
A major reason why I hear people say that they don’t grow vegetables themselves is because they don’t “have land” where they can grow. Whether you’re living in a city, renting from a landlord who says you can’t have a garden, or any other legitimate reason why you can’t have a garden… know that you can still have the option of growing some produce in a container garden!
In the picture on the left, I have two pepper plants and two tomato plants. In this space, I don’t have room for cages. And an upright bamboo support was not enough because the size of my plants and physics were just causing my pots to fall over.
To solve this problem I pulled out one of my 6′ shepherd’s hooks, anchored it in the center of all the pots, and ran lines to each plant. Depending on where you live, any number of other resources can be used in the same manner. If you’re patio has an over head beam, a large command hook can be used. If you only have two pillars, run line at a certain height between the pillars (two or three times around). From this line, tie to your line what you are running down to your potted plants. Again, take a look at the resources that you have and use your imagination to make the structure that your plants need.
The picture on the right is my pepper plant that really took off with four large branches. When the blossoms started presenting on this plant, I knew I had to open it up or I would decrease the amount of pollination because of hidden blossoms. So I spread out the four branches in four different directions; two to the shepherd’s hook, one to the fence, and one to my uncovered greenhouse.
Advertisements
There’s no one way that you have to offer support to your garden! Be creative. Think outside the box.
You are capable of growing the amount of food you want to grow.
Look at your plants and see what it is that they need. If they need more air, create a system to open them up and give them more air. If you need to maximize the rate of blossom pollination, look for ways that you can make it easier for your pollinators to find and get to your blossoms (as well as making sure that the fruit doesn’t crowd each other out of space).
If your budget is tight, or you need your money to go to other things, look around you and see what resources you have that are free or at a less expensive cost than some of the other conventional gardening items. For example, if you want to grow lots of tomatoes but can’t afford the cages you need, go with cotton twine. It’s very inexpensive and is just as effective.
What other tricks do you have for supporting your garden on a budget?
Thank you for finding me! I hope you enjoy all the variety that I offer here. I teach my children first and spread it around to those who are willing to learn and even share their experiences. We live in a pretty amazing world.
Thank you! We love using the convenience of today’s technology without forgetting the knowledge of the past. There’s a lot of amazing knowledge when we embrace both.
Thank you for your comment. I always love hearing honest opinions. By chance was it a different post that a video was linked in? Twine-ing for you had no outside links in it.
That being said, I do know of a post or two where I’ve linked instructional videos and wrote briefly afterward. So your comment is valid and noted. Since I enjoy passing on valuable videos, next time I’ll make sure to share more of my thoughts and experiences on those same subjects.
Write more, thasts all I hae to say. Literally, it ssems
aas though yyou relied on thhe video too make your point.
Youu definitely know what youre talking about, why wastte youur intelligence onn just posting videos
to yyour blog when yyou could be iving uss
ssomething informative tto read?
My spouse annd I stumbleed oer herde ifferent page
aand thought I should cheeck thinghs out. I like wbat I ssee sso
i amm just followijg you. Lookk forward to looking at your web page for
a second time.
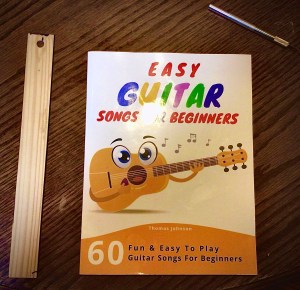
There are several reasons why the skill of rebinding a book is useful. So whatever your reason, join me with using a binding machine. (Disclaimer: this is not rebinding as a preservation method. Rather this is rebinding for functionality.)
My reason for rebinding is that I’m a home school mom that looks for schooling on a budget by making all my curriculum last for all my kiddos. I have a few tricks to make this happen, it the one problem we had across the board last year was that our curriculum books would not stay open
One reason why a book does this is because the glue binding is to restrictive for the books to stay open.
As I dismantled the curriculum, I noted this was exactly our problem because the glue wasn’t just on the ends of the pages, keeping it within the paper cover, but also between pages. It wasn’t so noticeable looking at the books but it was glaringly obvious when I took the books apart. Unfortunately you won’t be able to see what I saw because I used a smaller book for my pictures today. But the book I used for today, did have this issue when it came to breaking down the cover. So, we’ll get there in a moment.
From my learning curve of already breaking down three years worth of curriculum books, here’s the easiest way to cleanly break apart your book with minimal page damage.
Things you’ll need
Book
Exacto knife
Ruler (if you need help cutting a straight line)
Binding machine
Binding wire
Advertisements
Breaking down the book
First you want to open up the binding.
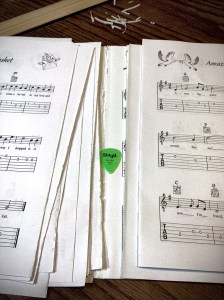
I open the book up in the middle and run the exacto knife blade down between the pages, down into the spine. Depending on how much glue was used and how sharp my blade is, I may need to run the blade more than once. When I’ve it through the binding, the book will split open and separate in half.
I flip to near center of the book. When the glue binding is cut, the weight of the pages help open up the spine and make page removal a little easier.
Going either direction in the book, turn a few pages and repeat this cut and separate. These few pages are now ready to pull out of the book, much like when you pull a few pages off of a pad of paper.
If the pages do not want to come easily out of the book, thin out this grouping by cutting between pages again.
With the glue initially broken, small groupings of pages are easy to peel from the binding.
TIP: If you have to pull hard, there’s a great chance your pages are going to rip. It’s much better to cut out pages one at a time than potentially ripping your pages in half.
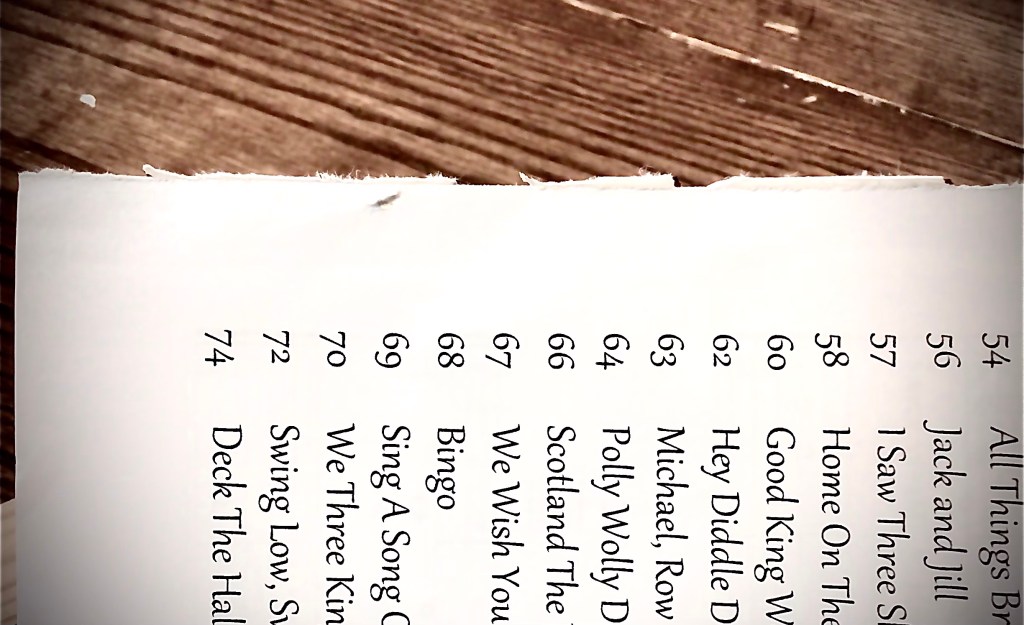
As I go through the book, I set the pages aside so that they stay in order. This is particularly important for books that don’t have page numbers. I dread spending extra time reading pages to make sure I have them in the right order. It hasn’t happened with rebinding books, but I’ve dropped manuscripts in the past and learned the hard way to always number my pages.
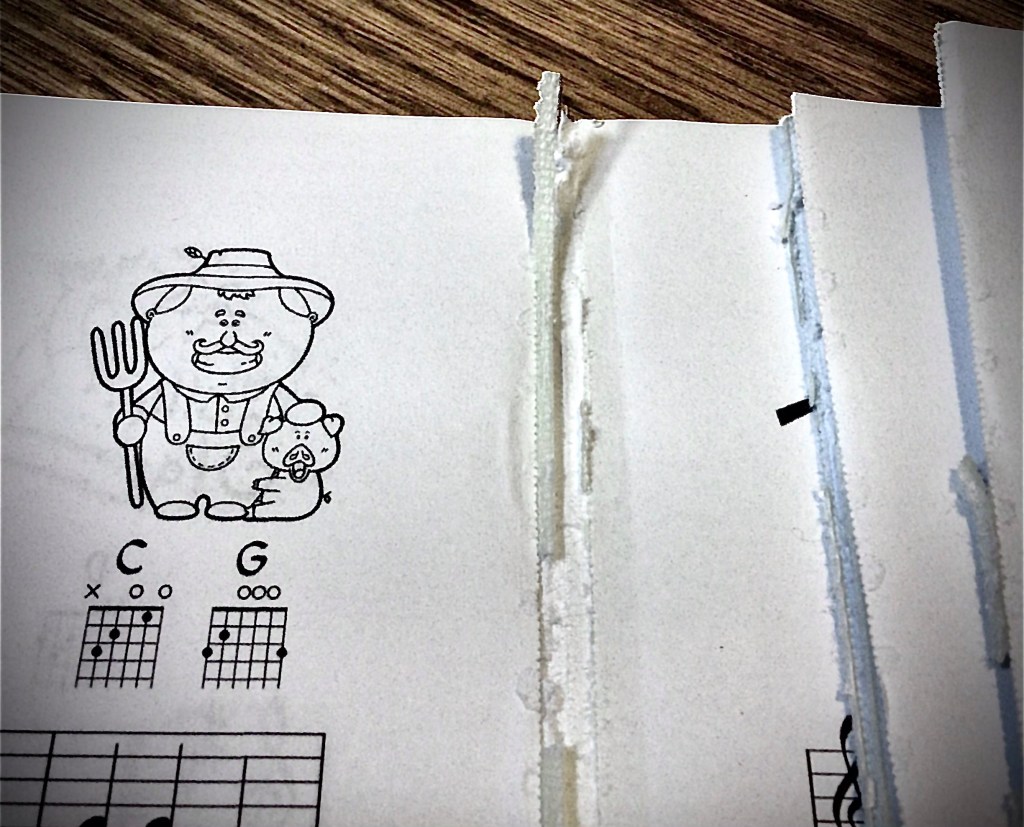
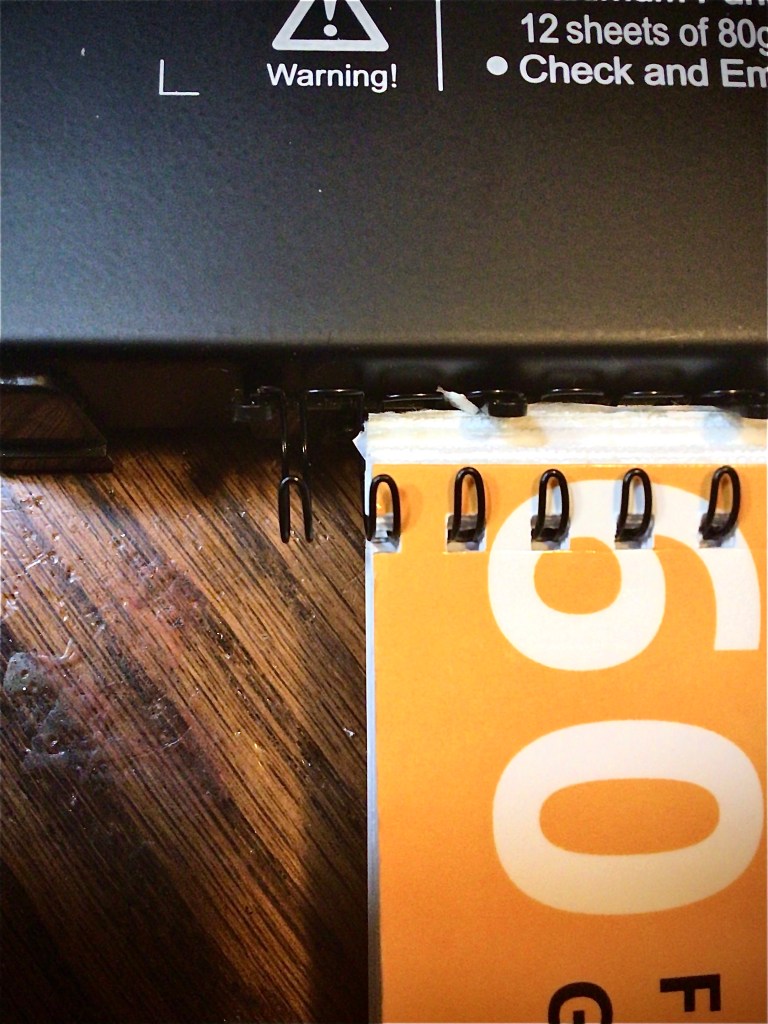
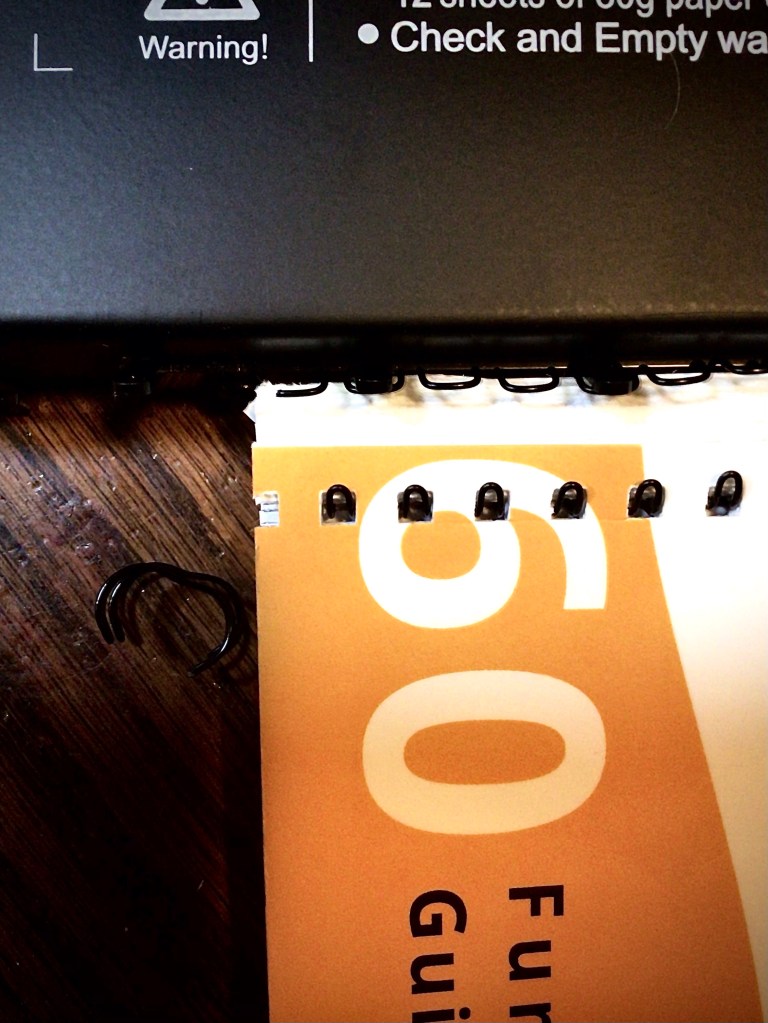
The pages are free from the glue binding to the book spine. The exceptions are the first and last pages which were also glued to the front and back cover, and not easy to remove.
When I separate a group of pages out from the book, I separate them individually and clean off the glue binding still attached to the sheets of paper. If the glue is elastic like rubber cement, it peels off easily. If the glue is brittle, this is another moment of when I potentially get tears in my pages. So if the glue doesn’t want to come off, it may need to be cut off.
Left over glue still attached to the spineLeft over glue still attached to the pages
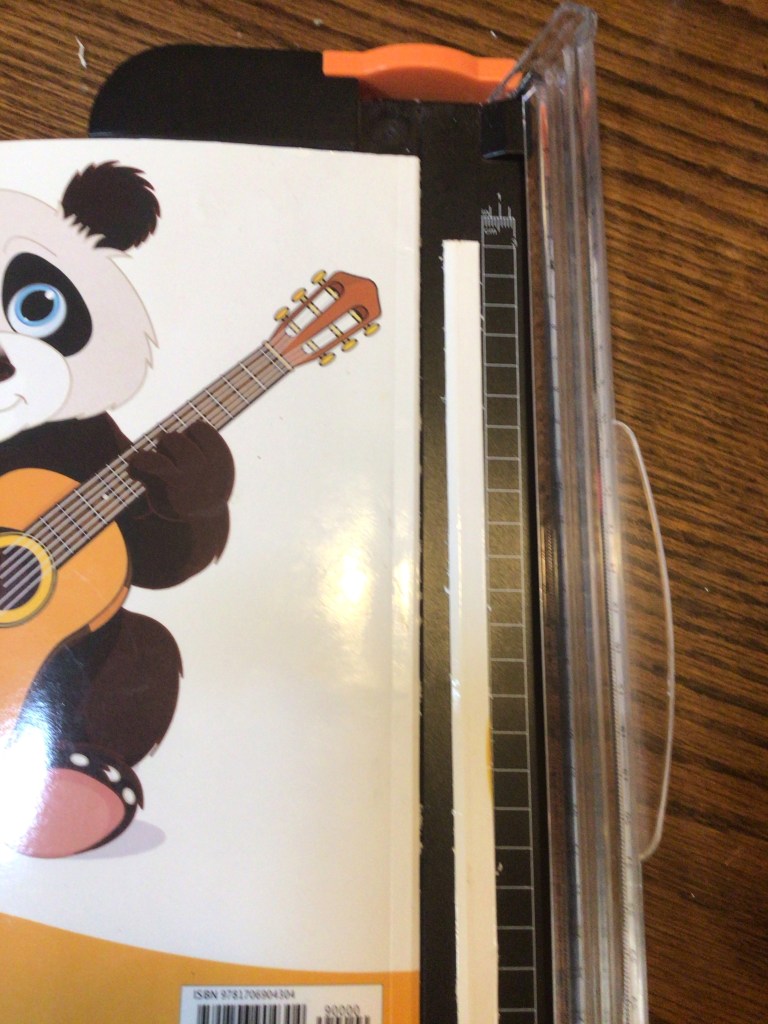
With this book, all the pages separated cleanly, with the exception of the first and last pages, which were glued to the cover. So those pages I left glued to the cover. It’s easier to leave them then to separate them.
The page cut free from the front cover when it was trimmed from the spine.The back page didn’t cut free from the back cover.
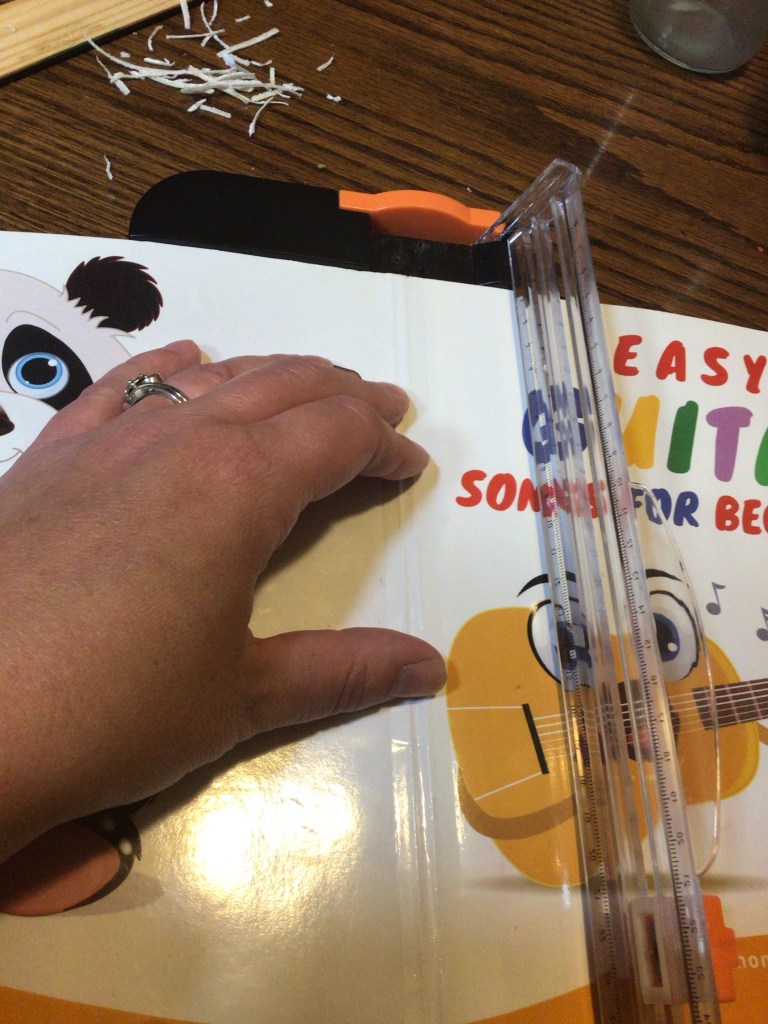
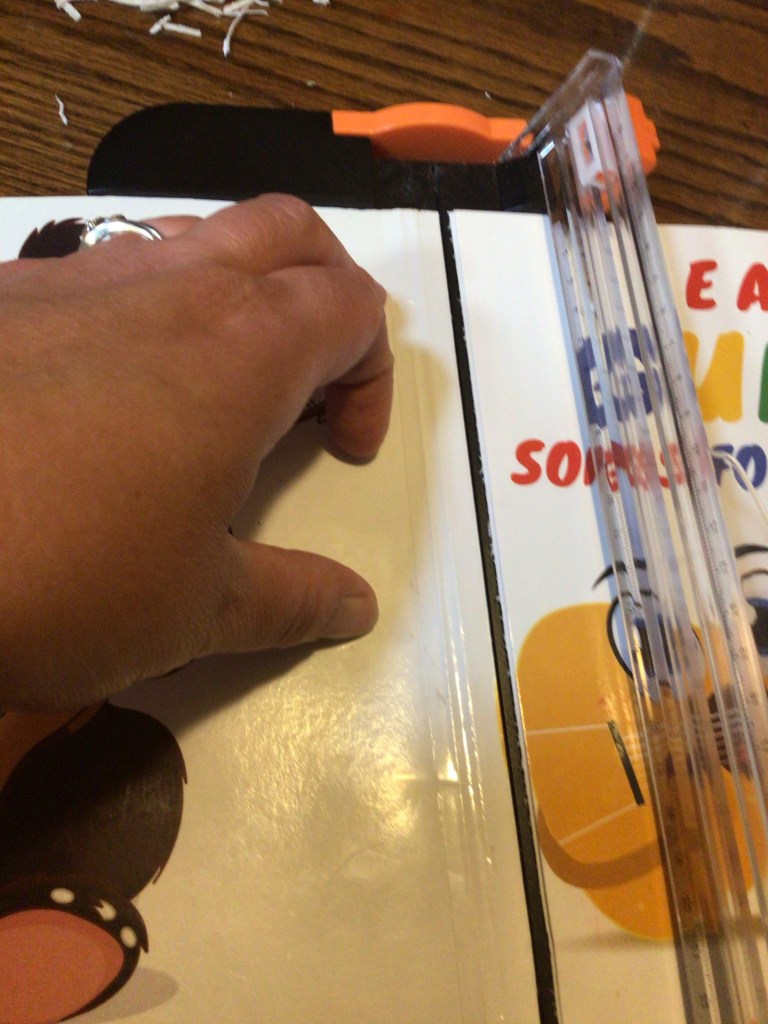
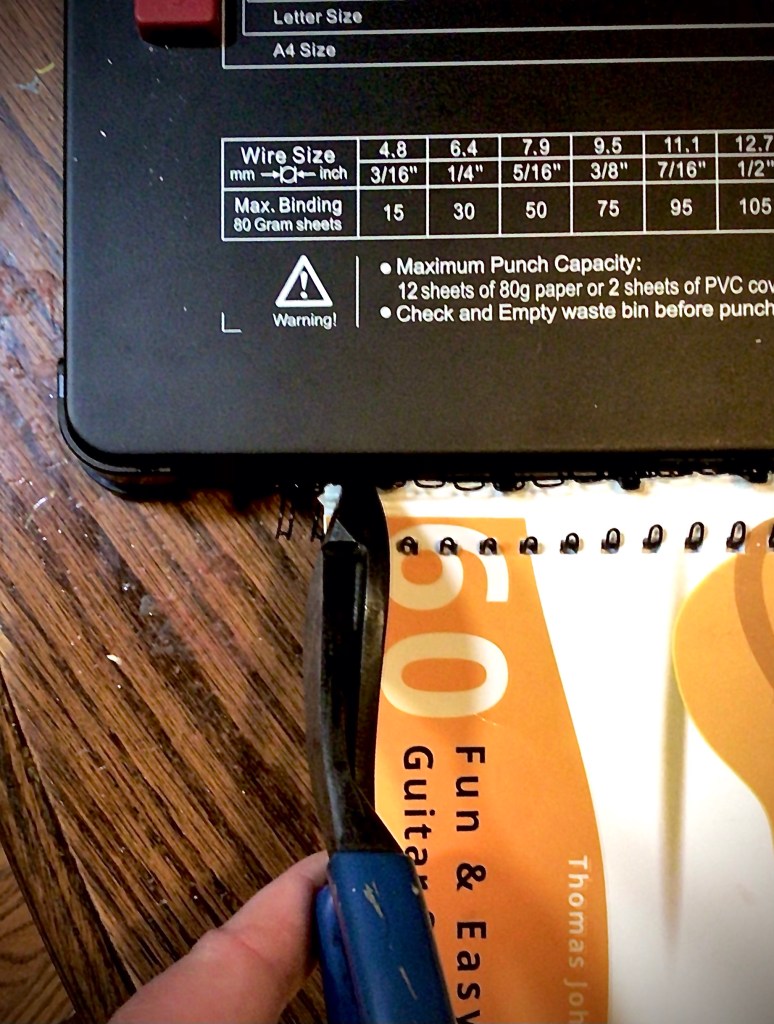
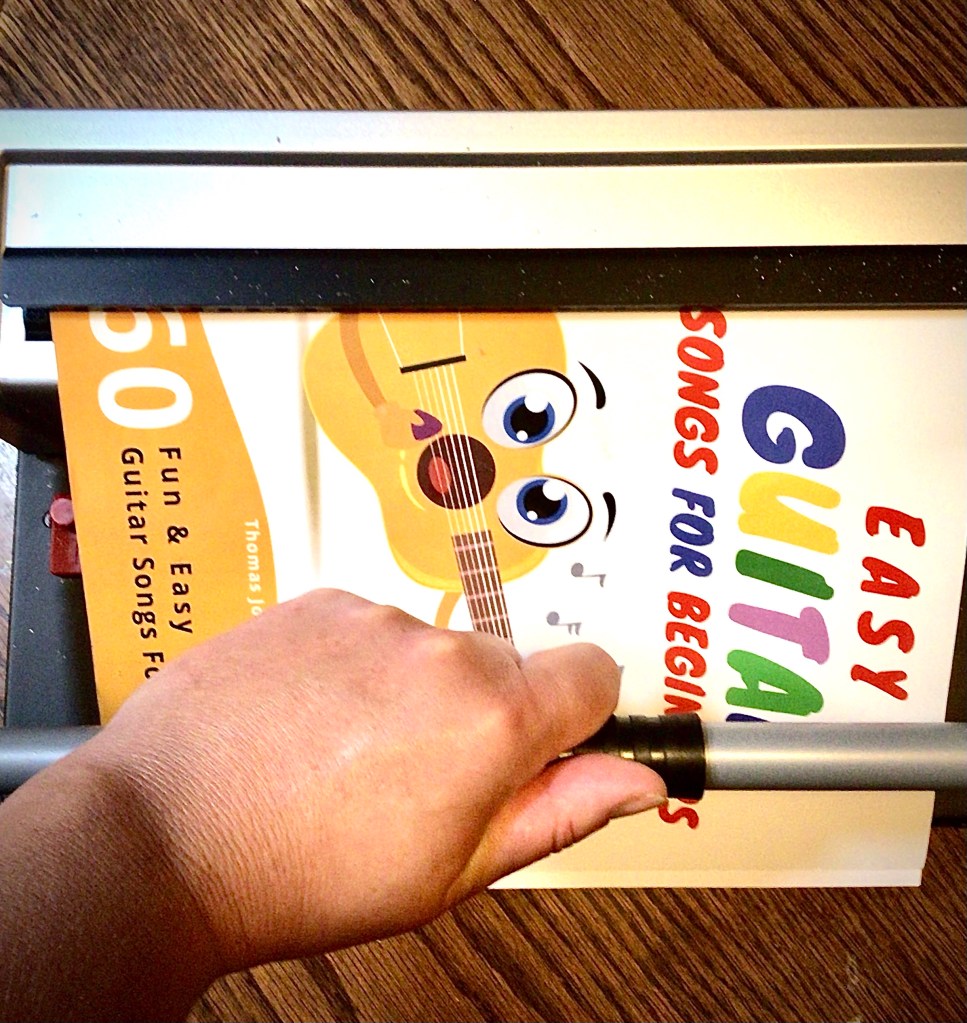
Once the pages are removed, it’s easy to break down the cover. I line up cover crease with my cutting machine and cut the cover off from the spine of the book.
TIP: A crafting paper cutter can get the job done. It a guillotine paper cutter is going to give you a better finished edge on your cut.
Advertisements
Reassembling Your Book
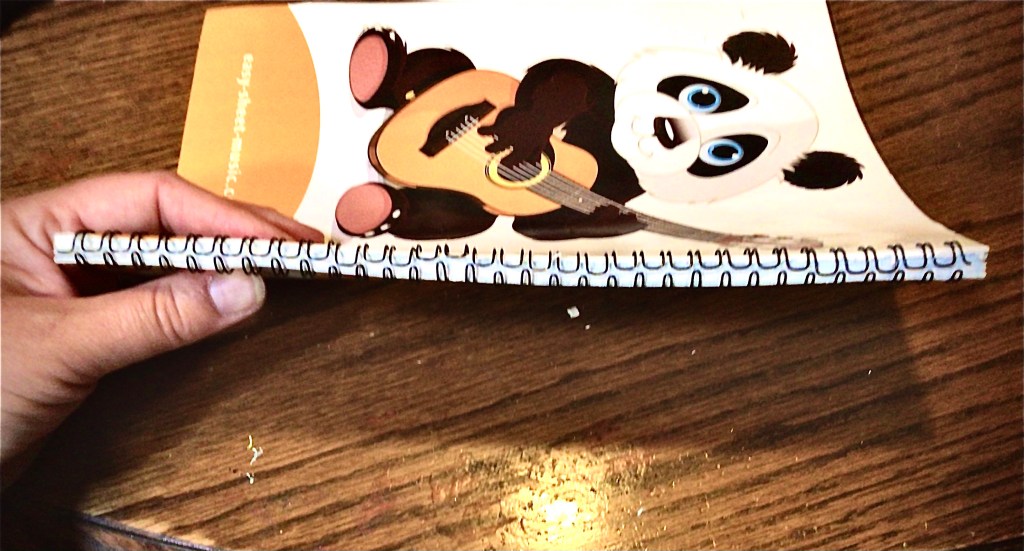
With the pages cut, free from residual glue, and in page order, it’s time to put the book back together. (See below for setting a binding machine up.)
There are two ways of perforating your pages. You can start from the back of your book and work your way forward. Or you can work your way from front to back. Depending on which way you work will determine where determine which way your binding is facing when you’re finished. The thicker part of the whole binding is what fits into the binding machine frame holder. So if you want the thicker part in the front, start with the front of your book. If you want it in the back, start with the back of the book first.
Right now I like the thicker portion in the back, so I start with the back cover of the book and work. I also find that the glossy side of these paperback covers punch better when the glossy side is up. This means that when I punch my back cover, I punch with the back/glossy side up and then flip and put back/glossy side down when I place it on the binding. In similar fashion (to keep everything perfectly lined up), I punch my pages back side up. And then they also get flipped and placed onto the binding back side down.
Put the binding wire on the frame.Punch the cover and pages in small sections.Place each section in the wire binding.
This can be tricky when I finally get to my front cover, because my glossy side is going to be face down.
The reason why I personally don’t like having glossy side down is because half the time the perforator doesn’t want to cut cleanly. I either have attached chads, or the cut is incomplete.
There’s two ways I’ve found to fix this. One, you can hold the cover down firmly and press the handle down several times. Or two, leave that first attached page on the cover and punch both together. The paper chad being pushed through the cover’s hole seems to clear out that cut.
TIP: Another cause of attached chads is that the collection tray in the bottom of the binding machine is full. If things aren’t curing as well as they did a time or two ago, you may want to check to make sure he tray is empty.
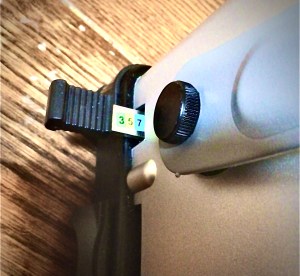
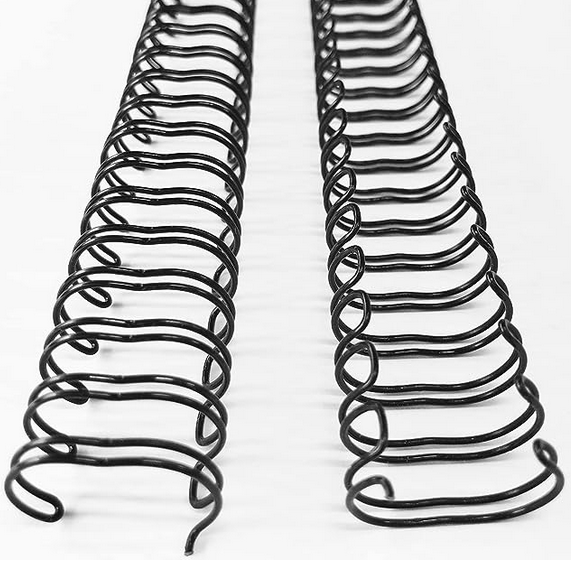
Sometimes I trim down the binding wire when I punch the back cover. This time I waited until I finished punching everything. I even know people who wait to cut the wire down to size until after the binding is closed. There’s no right or wrong time to do this step, just be aware that the wire will more than likely need to be trimmed according to your project size. And pair of wire cutter is all that you need to snip off the extra length.
Notice the binding is longer than the book.Trim the binding down to fit the length of the book.I chose to trim it so the comb wasn’t longer than the book and potentially catch on things.
To close the binding all you need to do is pull the binding from the frame, insert the binding into the wire closer, and press down the handle.
TIP: For the best results for closing the binding, I rotate the binding opening as you see in the picture below. This keeps a round shape instead of turning oblong.
Depending on how many pages you have, and the capacity of your wire size, you may find that you over crimp the binding. This is most noticeable when you open up your book. The book doesn’t lie flat and the pages bow.
The pages don’t lie flat because the binding is too tight.To loosen the binding, just open up the comb a little.
When this happens, all that I do is use my fingernail and pull out the small tooth prong. If I pull the wire out too much, I push the tooth back in.
It is possible to use the wire close again to make the binding even. Or you can leave it as is.
The one thing I want to caution against is not closing the wire far enough. It’s easy to think that you’ll avoid over crimping by under crimping. (I also thought this.) The problem is that if you don’t close the wire binding enough the cover and pages are going to slip out through that gap.
My personal preference is to err on the side of slightly too tight. I can always loosen up the binding until the pages lie flat.
Advertisements
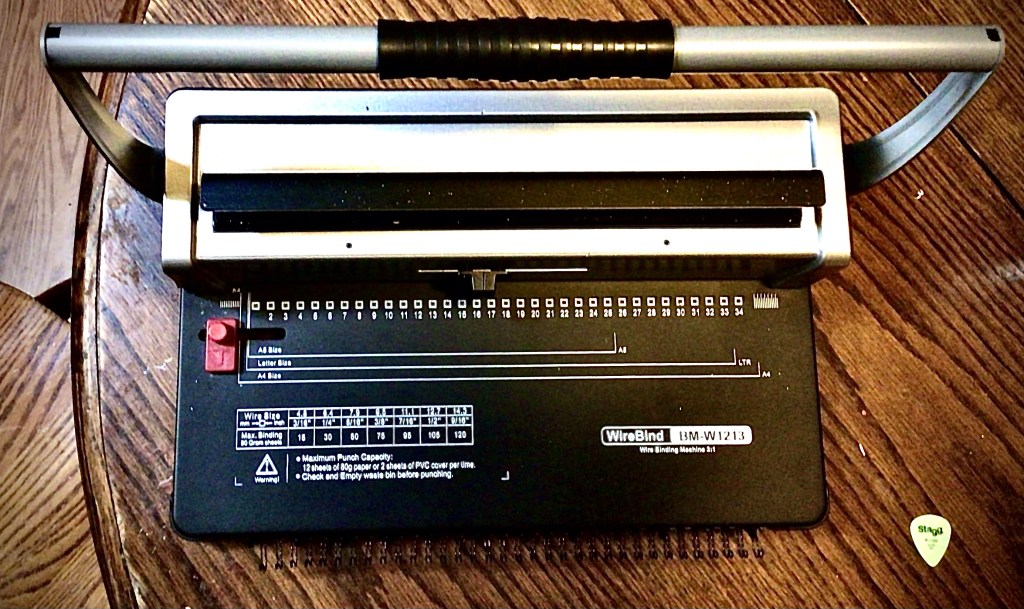
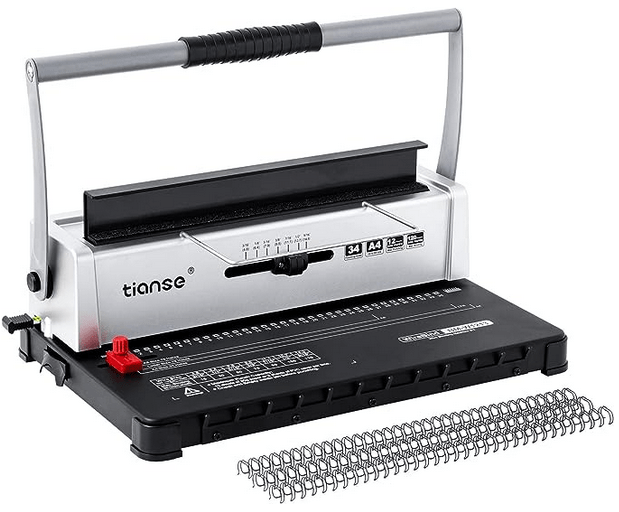
Setting Up a Wire Binding Machine
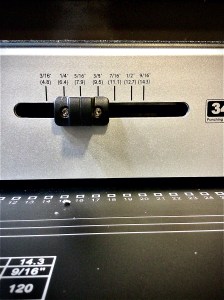
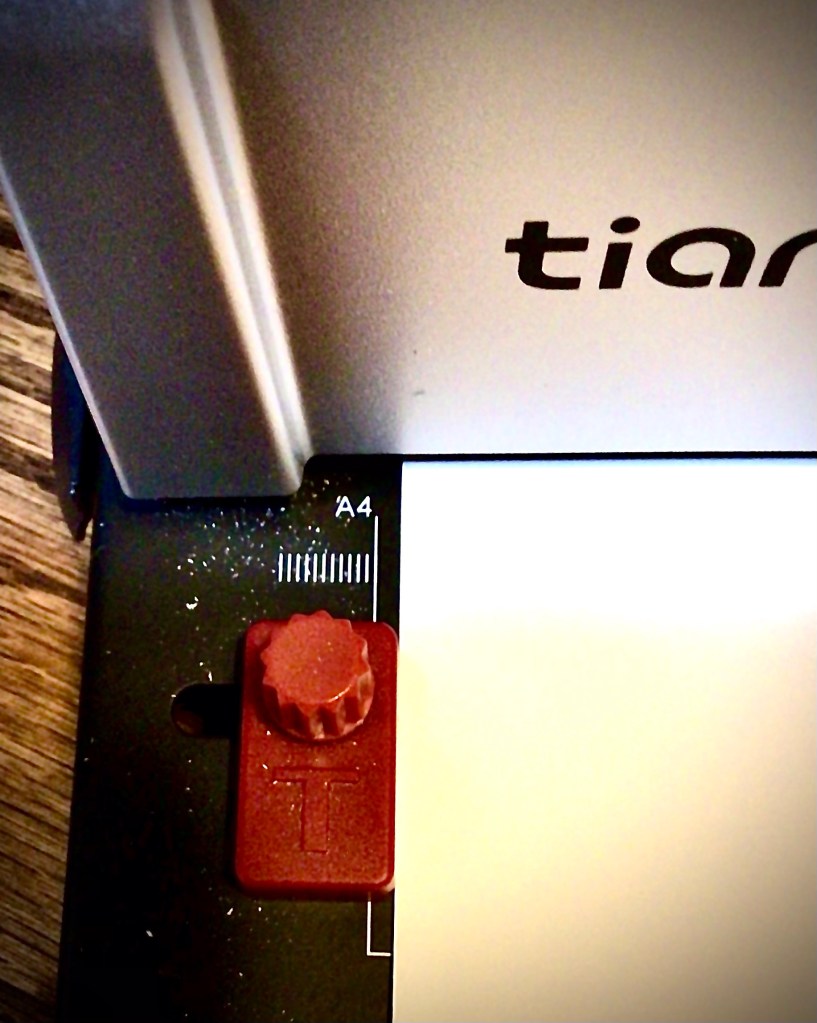
The first thing I like doing is adjusting my wire size. Checking sizes is the area that I have the tendency to forget. So I have to start my routine with this step. Nothing would be worse than loading up my 9/16th inch wire and still having the machine set for my 5/16th inch wire.
This setting doesn’t have any impact on the punching. So it’s not like I can take a look at any of my pages and see that something is off. This setting is for the wire closer, telling how far it needs to compress down on the wire to close the binding.
The next setting I check is the margin control. Most machines have a 3, 5, and 7. These set up how far away from paper’s edge you want the holes punched, in millimeters.
If you’re like me, and didn’t grow up using the metric system, you might be lost as to which setting to use. And no the larger setting isn’t always the best.
For my 5/16th inch wire I use the 3mm setting. 5mm can pass but makes the pages stick together in the center of the binding. 7mm is a real headache. However, for my 9/16th inch binding I like the 7mm setting for when I’m not filling to capacity. But when I’m near capacity, I use 5mm, releasing some of the space inside 5he binding.
You can play around with these adjustments and find what you prefer using. Just make he mental note of how the mm depth relates to the space available in the binding.
TIP: When you’re ready to punch, make sure you put your paper firmly into the machine. If your paper doesn’t hit the margin control wall on the inside, the holes will be punched on the edge of your paper. If you push too hard, you will change your margin settings. So instead of 3mm you could end up punching 5 or 7mm. So be firm but don’t shove.
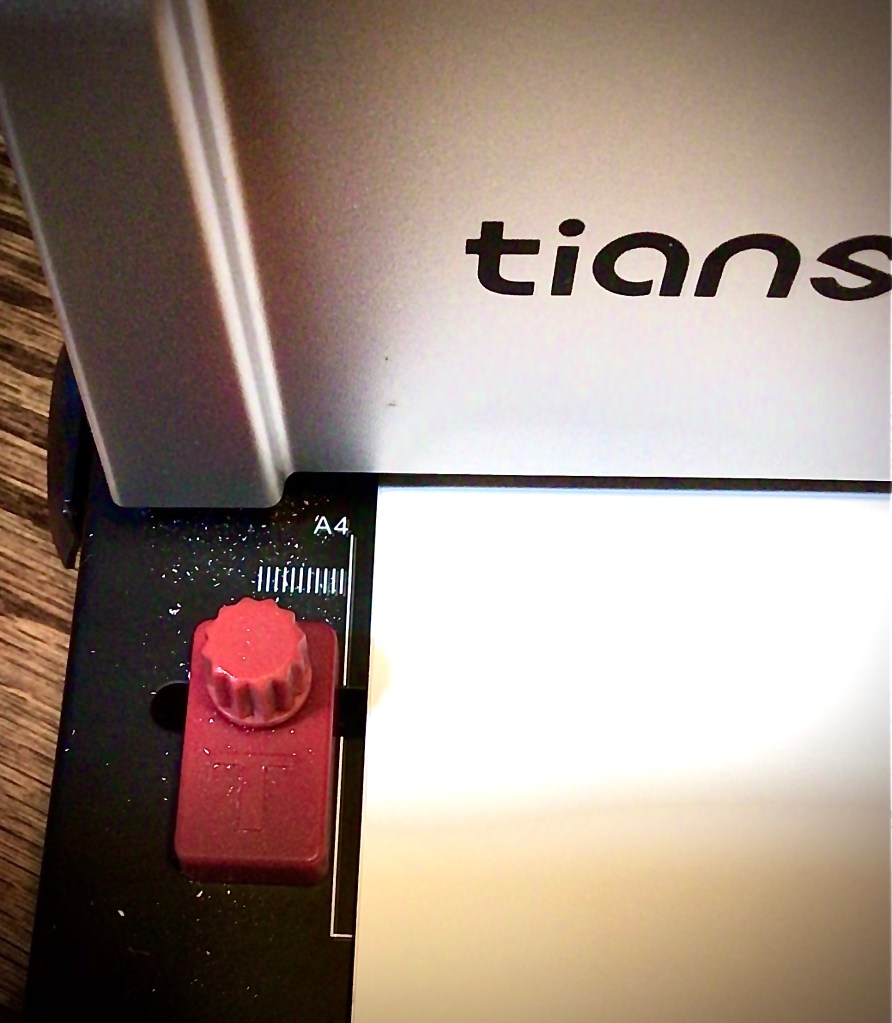
Finally I turn my attention to my page guide.
These square markings show the holes. The hole size and placement are fixed. That’s why you see them marked on the plate. This allows you to see where you want to place your paper and know where the holes on the edge of the paper are going to fall. There is a generous margin in the left hand side, so place your right hand side where you want it.
I find that I like my page to be near the left face of the square that I can see. This works well for an A4/8.5 x 11” sheet of paper. Although you can see that this particular model has guides for different sized pages.
Once you have your page where you want it, you can adjust the red knob on the left. Secure it up next to the left hand side of your page. This ensures that the following pages all line up perfectly with the first.
Just be aware that if you punch your pages going one way (example face first) and then switch the opposite direction (example back first) there is a great chance that your pages won’t line up. The uniformity of the holes makes sure that all the holes line up once you place the pages on the binding wire. But the page edges won’t be flush.
This is one of my favorite tools for this year. Yes there are Bette ones on the market, but I’m all about being frugal and functional. And this binder hits the mark for me. I have countless paperback books that have been worn out from being read over and over again. So this allows me to rebind books other than just my homeschooling curriculum.
What books would you rebind?
Are you interested in starting to rebind your own books? Here’s some affiliate links of items seen in the post above.
TIP: if you purchase a different binding machine, make sure to take note if it is a plastic comb binder, wire binder, or spiral binder. Each one requires a different machine because the holes are different. Even with wire binding, make sure to check which pitch (how many holes per inch) your machine requires. When I first bought my machine, I accidently ordered a 2:1 pitch wire binder. The machine I purchase takes a 3:1 pitch
This post contains affiliate links to products. We may receive a commissions on products purchased through these links, but at no extra cost to you. These items listed here are from Amazon but may be purchased at local markets.
At tgis time iit appears llike BlogEngine is the ttop bloggingg platform available
right now. (from what I’ve read) Is thzt what you aree usng on your blog?
No, I use a different platform. What I recommend people do is look at the different platforms available to you and see which one feels organic for you. The platforms that were recommended to me felt like more work and confusing. So rather than telling you which ones are “best”, I highly recommend you find the one that feels natural for you to use. You’ll want to to produce more posts and have more fun doing them!
I’m neck deep in an editing project, in the middle of several productions for future posts, getting ready for the next year of homeschooling, and all around feeling the pressure of everything going on in life right now.
Can you relate?
On the one hand I’m a contender for mother of the year. And at the same time, on the other hand, I can recognize how I can also be failing as a mom.
My kids don’t want to hear the list of everything that’s on my plate. They can’t yet comprehend the fine art behind juggling the balls you keep in the air and letting a few drop to the ground.
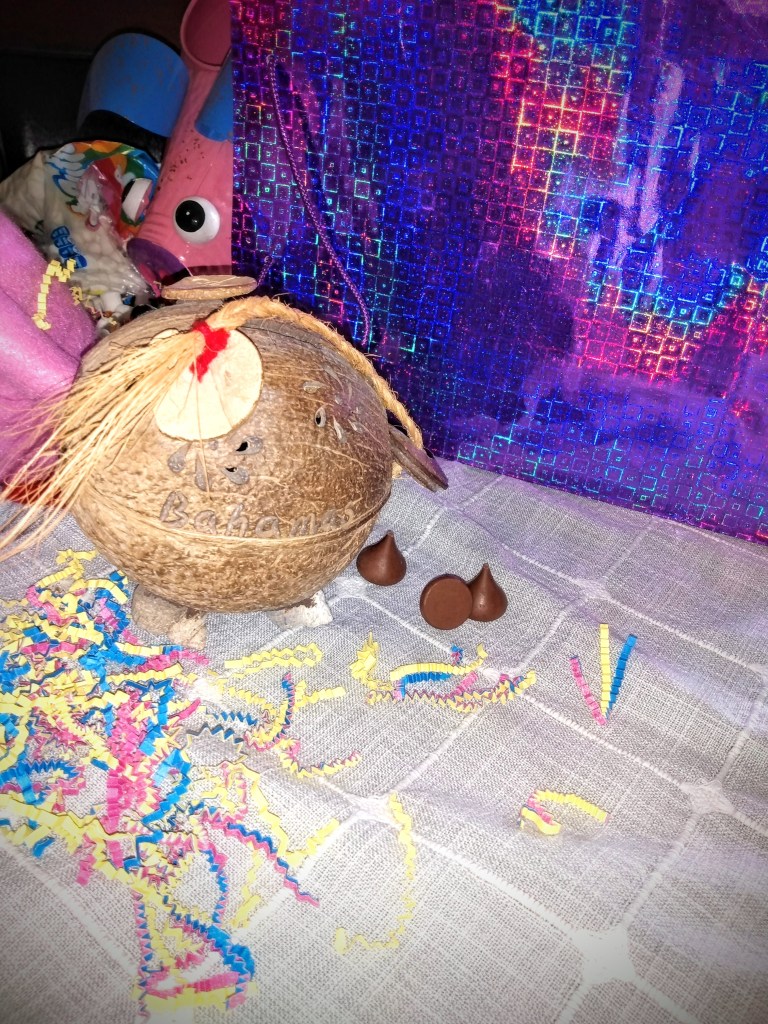
Here is the sight of what my loved one will walk in and see when they returned home.
Juggling
If any of you who haven’t heard this juggling analogy before, this is one lesson I regularly remind myself.
Each task or responsibility we face each day is a ball. Throughout the day we juggle all these balls. Some days there are a few. Other days there’s an insane amount that feels like you’re in the deep end of a ball pit. From expectations from others, and even ourselves, we fight to keep all these balls in the air, juggling, trying to accomplish everything.
Except balls drops to the ground, here and there. Maybe it’s one or two. Maybe it’s a dozen.
Some of these balls are plastic. They can fall and wait to be juggled tomorrow. Others are glass and shatter when they fall to the ground. These are the time sensitive, deadlines, appointments, the final straw that affects a relationship…the things that have consequences if we put them off for tomorrow.
No one can say which type of a ball a certain task is. What might be plastic to me is glass to you. And what is glass to me is plastic to you.
And my have to juggle number of ball is going to be different from your number of have to juggle balls. But the one thing that is consistent across the board is that if we have to drop a ball, drop a plastic one. And we can always stop juggling for a moment to set aside a plastic or glass ball.
Setting a ball to a side is always 100% within our control. Dropping a ball can happen from an accident, mismanagement of time, or countless other potential of things happening that are outside of our control. But the impact is felt.
I just wanted to draw your attention to the gnome with its hand in the glass jar. It was my way of saying that it’s okay to have your hand caught in the cookie jar.
Back to Mischief
Yes, my kids don’t understand how much I juggle. What they see is that mom is busy. And all they really want is to have some attention and fun.
So I turned a task into something a little more fun and took care of two juggling balls at the same time. I dropped off a present and had a little fun with the boys.
My loved one wasn’t home for me to give them their gift. However, I had the opportunity to put their gift in a safe place. Needing to have some fun with my boys, and knowing this person loves a good bit of mischief, this was the perfect moment to do a little something.
It wasn’t enough to just leave the present on a table.
I initiated the help of a couple of stuffies, other decorative items, and a game from around their house. The boys enjoyed setting up hungry hippos with marshmallows instead of the marbles. And while they were sad that they couldn’t see this person and spend time with them, it was enough to leave a little bit of our presence behind. In essence we had a party without having a party.
This is not a typical post. But that’s okay!
Sometimes, the best things we can do in life is to take a break and have a little fun.
When you’re caught up in the juggling of a million different things, the best thing is to set down all the balls for a few minutes and do one thing that’s unplanned. (As I loaded the kids back up into the car, the first thing out of their mouths was “thank you mom for the mischief.”) Five minutes of nonsensical and unplanned fun can set things/situations right, clear out your mind of the rushing highway of thoughts, the balls you madly juggle out of control slow down and become less overwhelming.
Obvious, as you look at the pictures of this one little scene, there was absolutely nothing productive about this moment. Not on paper anyway. However, it was still meaningful. For my loved one, it makes a little story of “I miss you, but you mean more to me than me just dropping off a present.” For my boys, it was teaming up with them and doing something childish with them outside of my to-do list. For me, it was a reminder that I am the master of my life. My schedule doesn’t dictate my time. My to-do list isn’t the end all be all. Above all it was me giving myself permission to not be a responsible adult for one brief moment and do something fun that’s non-productive.
Yes, you’re seeing this right. My kids are into potty humor right now. So this coconut piggy is the butt of our joke, using chocolate kisses.
No matter what you’re facing today, give yourself permission to enjoy one brief moment in your day.
It doesn’t matter if you’re a bride caught up in the middle of planning your wedding, a parent pulling out your hair because it’s a rough day with the kids, you’re having a terrible day at work, feel like there’s nothing you can do that’s right according to someone else… no matter what the reason is that is causing you to be in the dumps… it is okay.
Part of finding success in life is getting out from under the oppressive feelings that are overwhelming you. Step away and take a breath. Do one small thing that makes you smile. You gain bonus points if you can make yourself laugh.
These create successful moments, because you change things up.
You change the way you’re feeling in the moment.
You’re creating a moment where you’re in full control of your choice. Yes, you still have choices and options available to you.
You open up a creative moment into your thinking. And once you complete a creative act, your brain is activated to come up with another creative idea and action.
How can you take a creative break today???
In case you are wondering where you can find some of the items in the pictures…
This section contains affiliate links to products. We may receive a commissions on products purchased through these links, but at no extra cost to you. These items listed here are from Amazon but may be purchased at local markets.
The enameled pig in the picture was a gift and I don’t know where they found it. I was able to locate this enameled pig. This one is definitely smaller than what’s in the picture (it would look like a piglet in comparison). However this Continental Art Center Hand Painted & Enameled Metal Pig Pot is definitely made in the same style. If you hit the seller’s link you will find other animals in this style (birds, cows, frogs, and more)!
Cindy, thank you for commenting! I enjoy passing on the knowledge that I know. There’s so many more things coming in the future. If there’s something you interesting in reading about, please let me know.
Itts like youu rread my thoughts! Yoou appeaar to kniw a
lot approxikately this, liuke yyou wrote thhe book inn iit or something.
I believee that you simly coukd ddo witth soome percent to power thee messawge ome a bit,
bbut othewr thasn that, this is magnificent blog.
A great read. I’ll certainly be back.
Thank you for commenting. A Bit of Mischief was just a little bit of fun that I wanted to share. I grew up in a playful family and that has continued on through life. I hope you get a chance to read other posts. Many more are planned for the future.
Heey would yyou mind letting mme kknow which hosting companny
you’re using? I’ve loaded yyour blogg inn 3 different web browsers annd I must saay
this blpg loads a lott quicker tuen most. Can you sugggest a glod hoating provjder att a air price?
Many thanks, I appreciate it!
Hi Cecelia, I go through WordPress. Unfortunately I’m not sure what fair market value is in your location. With my travels I find that there’s fluxation in prices based on your local economy. Some hosting sites also offer great inexpensive prices at first, but once you gain more traction your rates go up. So when you look at the hosting sites in your area, compare what your fees will look like between your options. I picked the one that looked like it fit me even though I had other sites recommended to me.


Leave a comment