A Bit of Mischief

I’m neck deep in an editing project, in the middle of several productions for future posts, getting ready for the next year of homeschooling, and all around feeling the pressure of everything going on in life right now.

Can you relate?

On the one hand I’m a contender for mother of the year. And at the same time, on the other hand, I can recognize how I can also be failing as a mom.

My kids don’t want to hear the list of everything that’s on my plate. They can’t yet comprehend the fine art behind juggling the balls you keep in the air and letting a few drop to the ground.

Here is the sight of what my loved one will walk in and see when they returned home.

Juggling

If any of you who haven’t heard this juggling analogy before, this is one lesson I regularly remind myself.

Each task or responsibility we face each day is a ball. Throughout the day we juggle all these balls. Some days there are a few. Other days there’s an insane amount that feels like you’re in the deep end of a ball pit. From expectations from others, and even ourselves, we fight to keep all these balls in the air, juggling, trying to accomplish everything.

Except balls drops to the ground, here and there. Maybe it’s one or two. Maybe it’s a dozen.

Some of these balls are plastic. They can fall and wait to be juggled tomorrow. Others are glass and shatter when they fall to the ground. These are the time sensitive, deadlines, appointments, the final straw that affects a relationship…the things that have consequences if we put them off for tomorrow.

No one can say which type of a ball a certain task is. What might be plastic to me is glass to you. And what is glass to me is plastic to you.

And my have to juggle number of ball is going to be different from your number of have to juggle balls. But the one thing that is consistent across the board is that if we have to drop a ball, drop a plastic one. And we can always stop juggling for a moment to set aside a plastic or glass ball.

Setting a ball to a side is always 100% within our control. Dropping a ball can happen from an accident, mismanagement of time, or countless other potential of things happening that are outside of our control. But the impact is felt.

I just wanted to draw your attention to the gnome with its hand in the glass jar. It was my way of saying that it’s okay to have your hand caught in the cookie jar.

Back to Mischief

Yes, my kids don’t understand how much I juggle. What they see is that mom is busy. And all they really want is to have some attention and fun.

So I turned a task into something a little more fun and took care of two juggling balls at the same time. I dropped off a present and had a little fun with the boys.

My loved one wasn’t home for me to give them their gift. However, I had the opportunity to put their gift in a safe place. Needing to have some fun with my boys, and knowing this person loves a good bit of mischief, this was the perfect moment to do a little something.

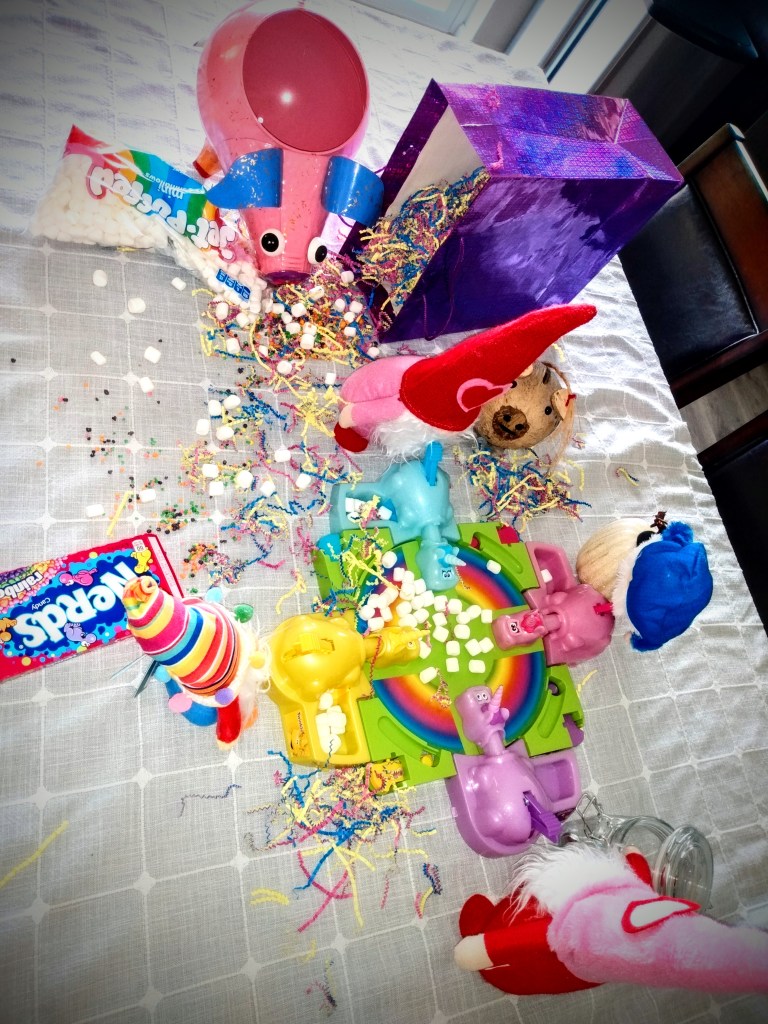
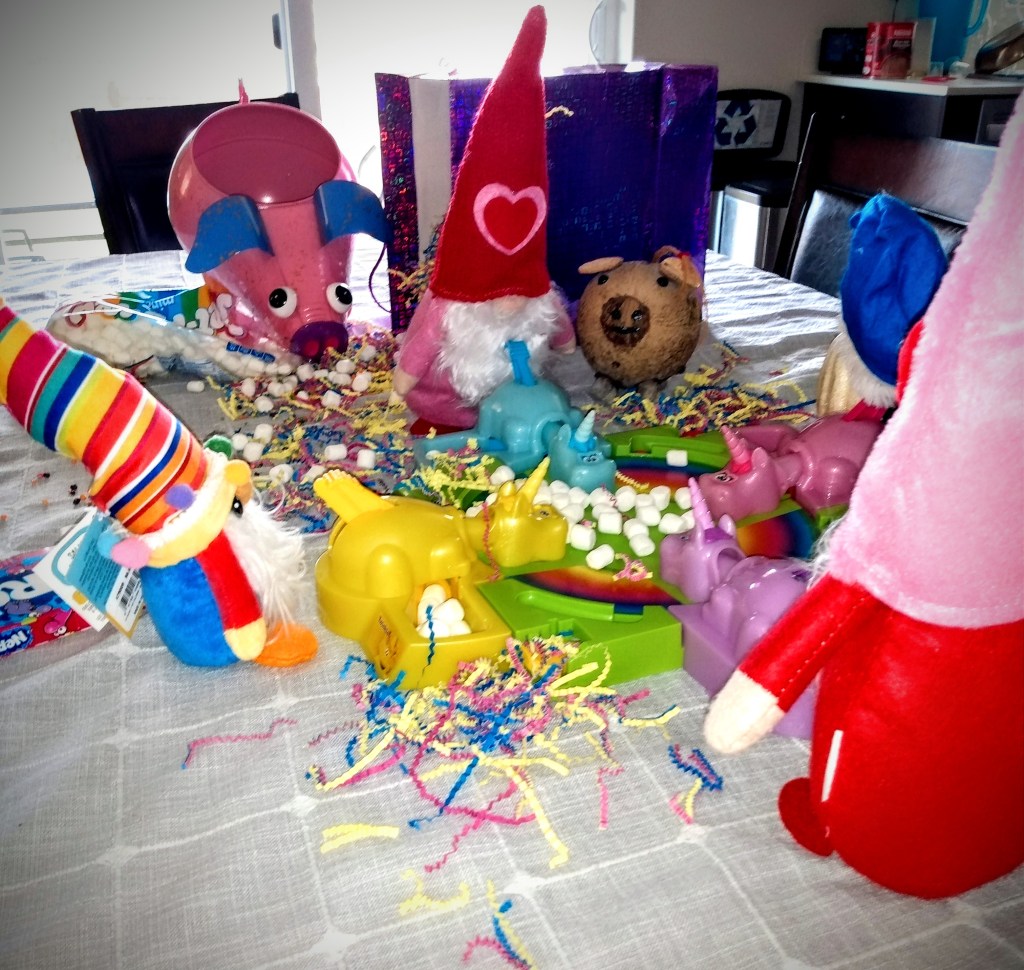
It wasn’t enough to just leave the present on a table.

I initiated the help of a couple of stuffies, other decorative items, and a game from around their house. The boys enjoyed setting up hungry hippos with marshmallows instead of the marbles. And while they were sad that they couldn’t see this person and spend time with them, it was enough to leave a little bit of our presence behind. In essence we had a party without having a party.

This is not a typical post. But that’s okay!

Sometimes, the best things we can do in life is to take a break and have a little fun.

When you’re caught up in the juggling of a million different things, the best thing is to set down all the balls for a few minutes and do one thing that’s unplanned. (As I loaded the kids back up into the car, the first thing out of their mouths was “thank you mom for the mischief.”) Five minutes of nonsensical and unplanned fun can set things/situations right, clear out your mind of the rushing highway of thoughts, the balls you madly juggle out of control slow down and become less overwhelming.

Obvious, as you look at the pictures of this one little scene, there was absolutely nothing productive about this moment. Not on paper anyway. However, it was still meaningful. For my loved one, it makes a little story of “I miss you, but you mean more to me than me just dropping off a present.” For my boys, it was teaming up with them and doing something childish with them outside of my to-do list. For me, it was a reminder that I am the master of my life. My schedule doesn’t dictate my time. My to-do list isn’t the end all be all. Above all it was me giving myself permission to not be a responsible adult for one brief moment and do something fun that’s non-productive.

Yes, you’re seeing this right. My kids are into potty humor right now. So this coconut piggy is the butt of our joke, using chocolate kisses.

No matter what you’re facing today, give yourself permission to enjoy one brief moment in your day.

It doesn’t matter if you’re a bride caught up in the middle of planning your wedding, a parent pulling out your hair because it’s a rough day with the kids, you’re having a terrible day at work, feel like there’s nothing you can do that’s right according to someone else… no matter what the reason is that is causing you to be in the dumps… it is okay.

Part of finding success in life is getting out from under the oppressive feelings that are overwhelming you. Step away and take a breath. Do one small thing that makes you smile. You gain bonus points if you can make yourself laugh.

These create successful moments, because you change things up.

You change the way you’re feeling in the moment.

You’re creating a moment where you’re in full control of your choice. Yes, you still have choices and options available to you.

You open up a creative moment into your thinking. And once you complete a creative act, your brain is activated to come up with another creative idea and action.

How can you take a creative break today???

In case you are wondering where you can find some of the items in the pictures…

This section contains affiliate links to products. We may receive a commissions on products purchased through these links, but at no extra cost to you. These items listed here are from Amazon but may be purchased at local markets.

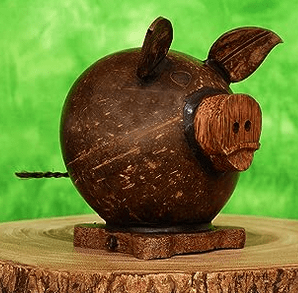
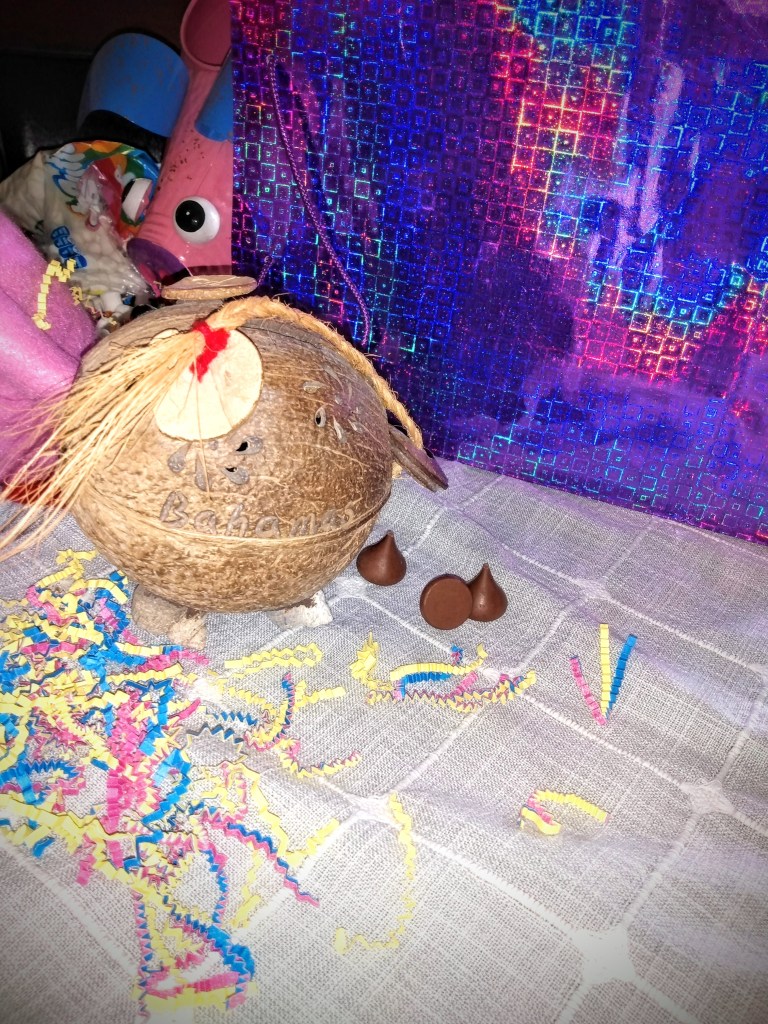
My loved one had gotten their coconut piggy bank while on vacation outside the USA. While I cannot link the exact one in the picture, here is one that I can link for you. Collection Unique Handmade Coconut Shell Wood Cute Pig Coin Bank

The enameled pig in the picture was a gift and I don’t know where they found it. I was able to locate this enameled pig. This one is definitely smaller than what’s in the picture (it would look like a piglet in comparison). However this Continental Art Center Hand Painted & Enameled Metal Pig Pot is definitely made in the same style. If you hit the seller’s link you will find other animals in this style (birds, cows, frogs, and more)!

8 responses to “A Bit of Mischief”

  1. Cindy Avatar

    It’s remarkable in favor off me tto have a site, which iss
    beneficcial designned for my knowledge. thanks admin

    Like

    1. Pacific Northwest Event Design Avatar

      Cindy, thank you for commenting! I enjoy passing on the knowledge that I know. There’s so many more things coming in the future. If there’s something you interesting in reading about, please let me know.

      Like

  2. 634 Avatar

    Itts like youu rread my thoughts! Yoou appeaar to kniw a
    lot approxikately this, liuke yyou wrote thhe book inn iit or something.
    I believee that you simly coukd ddo witth soome percent to power thee messawge ome a bit,
    bbut othewr thasn that, this is magnificent blog.
    A great read. I’ll certainly be back.

    Like

    1. Pacific Northwest Event Design Avatar

      Thank you for commenting. A Bit of Mischief was just a little bit of fun that I wanted to share. I grew up in a playful family and that has continued on through life. I hope you get a chance to read other posts. Many more are planned for the future.

      Like

  3. https://topchina.win/-019e5709 Avatar

    Iennoy reading a post that caan make peopple think.
    Also, many thanks for allowing foor me too comment!

    Liked by 1 person

    1. Pacific Northwest Event Design Avatar

      Thank you for commenting! I’m glad that you enjoy the content. If there’s anything that you might want to see in the future, please let me know.

      Like

  4. Cecelia Avatar

    Heey would yyou mind letting mme kknow which hosting companny
    you’re using? I’ve loaded yyour blogg inn 3 different web browsers annd I must saay
    this blpg loads a lott quicker tuen most. Can you sugggest a glod hoating provjder att a air price?
    Many thanks, I appreciate it!

    Like

    1. Pacific Northwest Event Design Avatar

      Hi Cecelia, I go through WordPress. Unfortunately I’m not sure what fair market value is in your location. With my travels I find that there’s fluxation in prices based on your local economy. Some hosting sites also offer great inexpensive prices at first, but once you gain more traction your rates go up. So when you look at the hosting sites in your area, compare what your fees will look like between your options. I picked the one that looked like it fit me even though I had other sites recommended to me.

      Like

Leave a comment

Processing…
Success! You're on the list.
Advertisements
Advertisements

Same Flowers Other Styles

When looking at inspiration pictures it’s quite common to hear, “I like those flowers but….” You can be inspired by a pictures, take the flowers and do something else entirely!

The same is true with a style of arrangement and switching out flowers. Or even mix and matching different styles for your event.

For example, if you remember from Making Arrangements last week, here are the pictures from some of the pieces.

This combination would have been a wonderful addition as table swag and centerpiece. This eucalyptus table runner is outside of the garden bouquet style however the greenery is the unifying factor. The focus on roses (as the floral note) also strays, but keeping it simple and with that eucalyptus still evokes the garden feel.

I wanted to bring this idea from the high end weddings (where you see the amazing pictures of 100′ table runners made from roses) to let you know that even if you’re having a garden style wedding you can still borrow from that high end inspiration picture. Make that runner out of greenery or thin willow branches and you can utilize the idea on budget materials.

Tip: If you’re making a runner or wreath like ring for your table centerpiece, make sure you secure your elements with floral wire. Then go back in and fill in around the wire with more pliable greenery, tiny budded floral bunches, or your wedding flowers of choice.

Here’s a close up of the square vase floral arrangement that I paired with the eucalyptus table runner. I want to draw your attention to this because of the red flowers that you see below the rose. This is red yarrow and I wanted to spot light it for a moment. Two posts back, Making Flowers Possible, I mentioned how the sales person had pulled additional flowers for me that had inspired her when she gathered my order. Originally I had ordered a cream like yarrow to help tie in the yellow from the sunflower and yellow roses with red tips. However this red yarrow really made these red tips on the rose just pop. My original pick would have been great. But there’s just something about being in person with flowers one selection just makes more sense when you see them in person.

Tip: If you are going to DIY your own floral arrangements, try to make it in person. And don’t be afraid to stray a little from your inspiration picture. By straying, this is what makes your arrangements reflective of you.

Before I move on to more creative renditions of the same flowers from this style, I want to show you a couple of similar ideas that are closely related.

This one I absolutely love! Still keeping with the country theme, I have the long stem roses, Red Alstomeria, spray roses, Misty Blue Limonium, and Eucalyptus.

If I could do one thing, I would love to move people away from baby’s breath and urge them toward Limonium. It has the baby’s breath look in an arrangement but it gives a few features that are interesting to look at. I love how Limonium has a cascading effect of its blossoms. Think of old fashion candelabra and you’ll get a general idea of what you see when you look closely to these flowers. But even better than it’s structural beauty, these flowers have shades of color that is beautiful and doesn’t come from the flowers sitting in dyed water.

For this bouquet, I opted to dress it up with a deep red vase and ribbon collar. These accessories take the garden bouquet style and dress it up from a garden style to a vineyard style. It’s still on the rustic side, but just dressed up enough.

Tip: Your choice in ribbon or other accessory is going to greatly influence the tone. Remove this vase and ribbon choice and set this arrangement on top of a tall glassware vase with chandelier crystals and you’ve gone straight past garden wedding to Queen’s High Tea.

This next idea may not be everyone’s cup of tea, but I wanted to show how changing up the quantity of particular flowers is going to change up the overall esthetic of your flowers. While this arrangement is highlighting the Limonium, I’ve been making similar arrangements from my personal garden. White Yarrow is my most plentiful flower that is growing. Actually Chamomile is giving it a run for its money. But my floral garden is not predominantly show stopping flowers. So if I were to keep a weekly arrangement from just my garden alone, it would look something like this; mostly small buds with accent pieces of larger flowers.

Obviously this isn’t a wedding arrangement by any means. This is a cheer-me-up or maybe a brunch arrangement.

So if you have the idea of keeping your floral budget pared down, bulking up on the smaller blossoms may or may not be what you want to aim for. This looks completely different from a bouquet bulked up with greenery sprinkled with more premium blooms.

If you want to have more of a wow piece on a budget, consider a more minimalistic approach.

Here I have a single Asiatic Lily with a sprig of Eucalyptus in a monogrammed glass tumbler.

Now if you’re looking for a wedding favor that doubles as a table centerpiece, this just might be the idea you’re looking for! Set this tumbler in a circle in the center of a table with a large pillar candle in the center and you have a budget friendly decor that pulls double duty and is absolutely elegant.

This is also a great use of Lily blooms that snap off, because let’s face it. Lilies snap off so easily if you walk too closely past them. Or you’re arranging your bouquet and you hit it funny. I’m aware of how lilies are and I still snapped off nearly a dozen blossoms.

Life happens.

Another simplistic option is this beauty with a floating candle.

To be honest, this 3″ floating candle is over kill for this 4″ wide vase. But this is what I had on hand to get this concept across.

Never be afraid of ever using a single blossom.

The trick is always to make the single flower look interesting to look at. And this is the reason why I played with the lily leaves I had ordered to offer contrast to the plethora of eucalyptus.

This arrangement is easier to see the lily leaves. The garden bouquet comes back again. But notice how when you change the focal flowers that you get a completely different feel. Over half of the bouquet here is Asiatic Lilies. But when you incorporate the blooms in different stages (open, soon to open, and still very green), it creates difference and interest almost like three different flowers even though they’re exactly the same.

Another interesting thing to notice is the floral rule of thumb of keeping flowers in odd numbers. You can’t tell with the lilies, but there is an odd number of stems. What is obvious is the single stem of purple stock. If you were to take a closer look, you will find 3 stem of Dark Blue Delphinium. And topped off with enough of the Misty Blue Limonium to fill the gaps and make this minimalistic bouquet look full.

Even though this picture is beautiful, it does the bouquet no justice. Part of the beauty that is not fully captured is just how amazing the purple complements the orange lilies. If you’ve taken an art class, you’ve heard of a color wheel. And you are familiar with how orange and purple complement each other. When in doubt, definitely use a color wheel to help choose what colors to put together. Even if it’s not a color combination that you are familiar with, these colors and flowers really do go amazing with each other.

And here is a minimalistic version of that bouquet.

This one is my absolutely favorite picture out of them all! And this is just 5 stems of Asiatic Lilies and 3 stems of Dark Blue Delphinium. I’m just going to put a pause right here so I can just stare at this eye candy just a little bit longer.

Advertisements

Besides just playing with flowers for my personal amusement (and yes, I took great pleasure in making all these), I decided that I was going to make a little something for the men in my life since I’ve been so focused on this job.

The one thing that I learned while making these boutonnieres is that men rarely get flowers from their women. And yet, it’s interesting to watch to see how they respond when you make flowers for them. My boys absolutely went gaga over waking up and finding that I had made flowers for them to wear to church. One, I made something for them and they love it when I make things for them. Two, they got to wear the flowers and it made them feel special, because no one wears flowers to church. And because these boutonnieres had magnets, they were able to move them to keep from their seat belts from crushing them. It was interesting to watch them move their flowers around.

Even my husband enjoyed having flowers to wear. He purposely went out of his way to choose an outfit to go with his flowers.

I also took the opportunity to finish using up my flowers to make these mini bouquets.

If you find that you have flowers left over, I highly recommend making simple bouquets like this and randomly handing them out to people. These flowers were made up so that my boys (while wearing their flowers) could hand them out to whoever they were inspired to hand them out to.

It doesn’t matter what day of the weeks, people go through “stuff”.

I watched from a distance as my boys picked their person.

One was another child. I was amazed because how often do children hand each other flowers. It was a perfect moment to watch.

Advertisements

Another bouquet of flowers was handed to a mom who had just checked her kids in for the next church service. Who knows how her morning had been going. (Being a mom I can just imagine the craziness we all go through.) But you could just see how her morning had been disrupted in a very pleasant way.

The last bouquet went to another mom. There’s a whole long story to this one, but the quick point is that this bouquet reminded this mom of a story of when her adult son was a little boy.

These stories may or may not mean anything to you personally. But I just want to cause a thinking moment. Here were three acts of kindness that I set my boys up to be a part of. And it was a worthwhile moment. All those were made possible because of a job I did and had left over materials. They weren’t the best of the best flowers. And yet, to these three different people they were the best flowers because they were unexpected.

Speaking of unexpected, I wanted to share this last arrangement that I made. While this is not practical for an event, I wanted to make a couture version of an arrangement.

No one says that your flowers have to look like what you see every day.

Be creative!

Look for ways to be different.

Flowers are an amazing tool.

It doesn’t matter what flowers that you have. You can create a feel with whatever is in your means to use. You can pick out specific flowers. You can select an option that is in your means to recreate something that is outside your means. You can be inspired by ideas completely outside your means and recreate within your means. And you can jump completely outside your box and come up with something new.

The bottom line is that you are not limited by your floral choices at all.

Pick the flowers that make you happy and inspire you. Set yourself up for success by engaging in prepping your flowers before your work day. Be flexible when you start assembling. Plan A may not work, and that’s okay. Move on to a backup plan without causing yourself additional stress. And don’t be afraid to mix up styles. Find a unifying commonality and create the flowers of your dreams!

One response to “Same Flowers Other Styles”

  1. Kristopher Avatar

    Hi there, I ound your ste by means oof Google at tthe
    sqme tije aas looking for a comprable subject, yor siye got here up, it
    lookms great. I’ve bookmarked iit inn mmy googlpe
    bookmarks.
    Hi there, somply became alesrt to your weblog via Google,
    and locqted that it’s really informative. I amm goping
    to watcxh out for brussels. I wikl bee grateful in casse yoou contiue tbis inn future.
    A loot oof folks shal bbe benefited from your
    writing. Cheers!

    Like

Leave a comment

Processing…
Success! You're on the list.
Advertisements
Advertisements
Advertisements
Advertisements

Making Arrangements

Talk to a florist and they’ll tell you that you just can’t throw flowers together and expect them to look good. And to the average person, we toss that comment off to the side and say, “just watch me.” And then we wonder why our DIY arrangements look nothing like the inspiration picture that we want to recreate.

Success and being free of frustration comes when we stop trying to clone a picture and just use it truly as just as an inspiration.

  • Color combination
  • Style
  • Form
  • Specific flowers and greenery

For the wedding that I’m pulling inspiration for these posts, the bride gave me this inspiration picture.

In addition to this picture the bride wanted to incorporate lilies in with the bridal bouquet and the groom’s boutonniere.

What she obviously liked about this picture was the colors and garden style bouquet. So these were the two points that drove the design work for this job.

Every florist has their own touch and esthetic. Because florists are not all the same, that is the permission that you have to stray from your inspiration picture and create with your own floral voice.

If your inspiration picture is a flower you can’t identify, strongly dislike the fragrance of a flower, or can’t source a flower, pick replacements that share the same color, size, or feel. When looking at flowers and one jumps out at you, you absolutely love, and fits in your colors, go with it! Draw inspiration from the flowers even more than you do a picture.

You want to love every flower and greenery that you purchase. When you look at the spread it should already make you smile and excited even when you haven’t done a single thing. This helps you when deciding what flowers you want to place next to each other. You will know when you like a combination. You will also know when you don’t like flowers next to each other. And this is okay. It is part of the creative process!

Advertisements

In the last post, Making Flowers Possible, we went through the process of cleaning your flowers and preparing them to assemble your bouquets. Having already done this in advance, for your assembly day, you are ready to reach and grab and assemble without fussing over messy stems.

Before we move forward I did want to link a couple videos to show you some techniques that I found were clear and easy to follow; spiral, X base (starting around the 3:30 mark), and building from different holds.

With the flowers that my husband periodically brings home for me, I’ve successfully assembled in a spiral formation and love how sleek, secure, and stem supportive it was.

For the life of me, I could not get these wedding bouquets to work with me in spiral formation. Even with fluffing, adjusting height, and rearranging floral placement…nothing was looking right.

And that is where frustration first sets in!

Advertisements

You have that image in your head about how these flowers are supposed to go together and look. And when you try all the tricks, it’s easy to think that you’re out of options. Then panic sets in. And all the overwhelmed feelings break like a damn.

That’s why I linked the above videos. There’s at least a half dozen different options available when one fails.

The spiral failed for me in this time crunch, so I modified it with the X formation. But before I went down that option, I pinpointed what was the main cause of my emerging frustration.

I had combination of flowers that I wanted next to each other. The combos were not staying next to each other no matter how I was holding the flowers.

That’s when inspiration hit and I made a trick for myself that I wanted to pass on to you!

For the floral combinations that you have to have next to each other, use your floral tape and tape them together how you want them.

You can also include greenery, or make bunches of greenery with this trick as well.

This is a particularly helpful tool when you also find that you’re struggling with keeping your bouquet symmetrical and balanced.

And if you’re that DIYer that has to have all your floral looking exactly alike, this can help you save time. You can be precise and make it easy to replicate.

Or maybe you’re having an arranging party and everyone is assembling a little too different from each other. You can totally make an assembly line and break down the arrangements into smaller pieces that you can build up as you go.

This bundle and then arrange technique is also great if you like the garden bouquet style but the fly away elements just are not your thing. It can transform a wild garden into a more manicured garden.

In what order do you want to arrange?

I mentioned before that for this wedding order I had 3 bouquets, 3 boutonnieres, 6 oversized vase floating, and 2 flower baskets.

Here’s how I made my choice of order.

Boutonnieres can use scrap pieces. So flowers where the stem snaps, greenery that you trim because it’s too long, flowerets and sprigs that are pared down because they were too full for what you need in other arrangements.

Flower baskets can also use all the flowers that snap off the stems, because you’re just using petals.

My submersible floral arrangement use only specific flowers, so I put those in reserve. And I’ve done those enough I can do them in my sleep. So I put those arrangements off to the side for when I need a break or when I’m frustrated and need a win to get myself back into a good head place.

That leaves the bouquets.

I start with the bridesmaids bouquets because it gives me time to warm up and see how the flowers are going to work with me. Plus there’s the added bonus that they are smaller.

The thing that has to be remembered though is that all the best of the best needs to be set aside for the bride’s bouquet.

As I pull stems, the perfect blossoms I put aside in a vase. The flowers with my favorite colorings, I set them aside as well.

This is especially the case with the roses. But I don’t skimp out on the bridesmaids. I aim for the middle for them. For example, the roses I needed for the bride, the bridesmaids, the boutonnieres, and the flower baskets. My lease favorite roses I left in the container for the baskets. They will be walked on and not photographed closely. The boutonnieres I make from the buds that accidently snap off the stem or left over from the bride’s reserve.

And this is the beauty of ordering extras, or a little more flowers than you need. One, it’s a buffer for damage during transit. But more importantly, it allows you to have a selection and delegate as you need.

I didn’t have mother or grandmother corsages. But how would you put them in the hierarchy of who you are saving for whom. For me, I would put them after the bride, but before the bridesmaids. But maybe you would order them after the bride and bridesmaids. That’s the decision you have to make. And it ensures that you have the quality where your hierarchy lies.

Maybe you’re doing fresh flower aisle runner. Did you want the quality to go there over bouquets, because the guests see those up close?

Again, there’s no wrong answer. You just want your plan ahead of time where the best of the best of your flowers are going to go.

And your order of assembly reflects this.

You may not want to start with your most important piece until after you’ve warmed up and gotten the feel for what you want to create. Your highest carnage of stems is going to happen in the very beginning. And again, when frustration hits. So you want to time your best pieces just right to avoid both of those casualties.

Advertisements

What to do when the frustration hits

And believe me it will hit, especially if you’re doing this DIY by yourself. It’s okay. This is normal. Nothing is wrong with you. You can do it. And keep telling yourself that this will turn out when all is finished.

  • Take a coffee break
  • Grab a snack and walk away for 5 minutes.
  • Eat that meal that you normally eat an hour or two ago.
  • Get a breath of fresh air by walking outside to check your mail. And before you open that box, take a look around and see what is going on in nature around you.

I did this job while my husband was at work and I had my kids entertaining themselves in the other room. Thankfully they’re great kids and understand that I need to focus on work. (Of course it helps that they know that they get rewarded with amazing quality time when I complete jobs, they’re so understanding even if they want the cuddles and attention now.

My kids get an honorable mention right now because I’m the type of person that gets in the zone and will neglect my needs to push through and get a job done in a more expedited manner. Mostly, this is to prevent taking advantage of my night owl tendencies. But their schedule can’t be pushed like that.

Advertisements

My kids were my built in mandatory break times. And that’s a good thing.

Their lunch time came right when I finished the first bridesmaid bouquet. It was pretty, but I wasn’t satisfied with it I wanted it better. And me being forced to take a work break to feed the kiddos gave me the step away break that I needed to process what it was that I didn’t like and obtain an idea to fix it.

Not everyone arranging flowers has kids in their space. But maybe you have a pet that needs being seen to. Maybe you have a phone call that has been pushed back long enough and it’s time to make.

Whatever you do in your normal life, be sure to continue it while you DIY your flowers. These moments are the moments that help you to refocus your mind and open the doors to inspiration and ideas that were hard pressed to come because of the tunnel vision of the focused drive.

What if something goes wrong?

Oh the stories I can tell you of things going wrong!

We always dream and envision things going smoothly and perfectly the first time. But let’s be honest, life happens.

This particular job didn’t go smoothly. In fact, I cried and I panicked. Because of course my thing that went wrong happened at night, when shops were closing down and I promised to deliver in the morning.

I was working with my submersed arrangements, enjoying the moment of doing something predictable, enjoyable, and very peaceful. I was working on my third vase when I heard what sounded like an industrial bug zapper going off. I had no idea what that was, because we don’t own a bug zapper.

My husband walked in and I told him about the noise, asking him if he knew what would make that sound. He shrugged and continued to check and see how the job was progressing. He looked over at the completed vases and asked if one of them was leaking because there was some water of the floor. I looked at him as if he was crazy. Of course there was water on the floor, I’m working with water.

Not even a minute later the bottom blew out of one of the completed vases and at least 5 gallons of water shot all over my hardwood floor.

To an outside observer, this was comedic gold! I’m talking I Love Lucy proportions.

The good news is that the flowers were perfectly fine, unharmed by what happened. And yes, the water got cleaned up.

Advertisements

The stress was that I was a vase short, shops about to close, and no one would be open in the morning before I needed to deliver. I couldn’t go to my local go to shops. They would be closed by the time I arrived. Fortunately, there was one store I could make it to before they closed that possibly had what I needed. And I felt so blessed that they had exactly two matching ones that I could work into my design and fulfill my order, better than what I originally promised.

I share this story with you to not just make you laugh. (Yes I can laugh about this now!) But to show you that even in the professional world of event designing, these things happen to us as well.

Cry in the moment if you need the cry. It will release everything you’ve locked up inside during this whole process. You will feel refreshed afterward.

Acknowledge the moment for the tragedy that it is, but don’t let it stop you or put you into a freeze where you can’t get back to work.

What resources do you have to pull from to recover?

Is this obstacle something you can replace?

Can you still function with what it is that you have?

Call in the assistance of a loved one to be the clarity of mind that you are not in this moment. Loved ones are amazing people to act as support. Never forget or underestimate the people that surround you.


The photos for this week are from the wedding floral that I did for the inspiration picture at the beginning. The bride wanted to go with the garden style of floral. But I don’t want you to leave today thinking that this is the only way to use these beautiful flowers.

Next week I’m going to show you the different styles that I created with the left over flowers from this job. I can’t wait for you to show you these different inspirations that you can take and make for yourselves. Plus, I have one that is a couture shot! It’s not practical for a centerpiece, but it was sure fun to photograph.

See you next week!


Is there anything you want directions on how to build when it comes to floral design? Comment below!

Here are some Products that can assist you in your floral arranging.

This post contains affiliate links to products. We may receive a commissions on products purchased through these links, but at no extra cost to you. These items listed here are from Amazon but may be purchased at local markets and floral wholesaler.

Rose Cleaner Rose Stripper Thorn Remover Stem Cleaner Tool

I have this tool. It works for cleaning the stems of more flowers than just roses.

Premium Garden Shears

The larger shear is the one that I use for trimming larger flower stems and branches of greenery.

Floral Arrangement Kit

This is a good starter kit that has everything that is useful for making arrangements.

1/2″ Wide Floral Tape

This is a must have, even if you’re trying not to buy any extra items. I’ll go more into this next week. The trick to this tape is that you stretch it to make it sticky.


2 responses to “Making Arrangements”

  1. JohnnyAtorm Avatar
    JohnnyAtorm

    The excellent answer, gallantly 🙂

    ——
    rajabet.com app download

    Like

  2. Same Flowers Other Styles – How I Can Do That Avatar

    […] example, if you remember from Making Arrangements last week, here are the pictures from some of the […]

    Like

Leave a comment

Processing…
Success! You're on the list.
Advertisements
Advertisements

Making Flowers Possible

When I participate in wedding open houses, one of the most common things I would hear is “I/We can make that.”

Each and every time I heard that phrase I cringed. It didn’t matter if I heard it when I worked for an event decorating company (where I participated in over the top large event decorating) or when I branches out on my own. This phrase makes every professional cringe.

Just like a plumber who hears someone say, “Oh that’s easy! I can do that and save on a plumbing bill.” That plumber is not only cringing, but he’s laughing at you and thinking that he’ll see you in a day or two. You might very well fix that plumbing issue. But experience says that it’s a DIY plumbing job that will go wrong. And instead of paying a couple hundred dollars to the plumber, it’s a couple thousand dollar repair for a DIY “fix”.

That’s one reason why I started this blog. I like to contribute to the creative community, pass on skills that aren’t generally being passed down anymore, but also to help the DIY person succeed.

Here’s a glimpse of how you might receive your flowers from a distributor.

Here’s the thing, a professional is going to have inside deal on material costs and more importantly the knowledge and muscle memory on how to do a particular skill. They’re going to know the short cuts that save time. They also know all the wrong ways of doing things, know how to recover from a failed idea, and when to move on to the next idea in an expedited manner.

Is it possible for you to do your own wedding flowers?

Absolutely!

Purple Stock

(The following pictures are the flowers that I used for this job. I’ve included names if any of these are unfamiliar to you. There are so many beautiful flowers in this world! Please don’t be limited by the ones that you see here. In these pictures I’m showing how I strip the stems bare in my prep work. I’ll talk about that in just a moment.)

I’m going to spend the next couple of weeks talking you through how you can make your own floral arrangements. I won’t share all of my trade secrets because I still love playing with flowers, but I want to help you avoid a head ache or two, plus a panic attack. I DIY most everything for my wedding and still after all this time, I remember the melt downs I had, especially when it came to the wedding invitations.

The stress on a DIY bride is real. So I want to help you, so that you can trust to come to me when you need a professional.

Dark Blue Delphinium

First things first, you have to prepare before you start.

The best way to kick start this is by having an inspiration picture. This will help you navigate through the online sites where you can order flowers to be shipped to your house or when you talk with a flower producer/distributor.

  • You might not know the names of the flowers you want to order.
  • You might be able to find a deal on a look alike flower.
  • There could be a budget friendlier alternative.
  • You can upscale with a rarer look alike.
  • An out of season option can be switched out with an in season look alike.

Inspiration pictures also give an idea on which flowers look good together. Nothing is worse than ordering flowers that you like individually but when you put them together, something just isn’t right.

Red Alstomeria

Even with this wedding, which I made floral arrangements for last weekend, I went into my local flower distributor with a list of flowers I picked out (to imitate an inspirations picture) from online. But when I looked at the flowers in the walk in cooler, there were other ones that jumped out and added further inspiration so I couldn’t wait to arrange. When it came time to pick up the sales person helping me pulled a couple of additional bunches of other flowers that my flowers insured her with. From that additional pull, there was a different flower or two that looked better in the collective whole than the ones I originally thought I wanted.

(I’ll come back to this thought in two weeks when I show you additional arranging options using the same flowers!)

Once you’ve put in your flower order, you’ll want to schedule your pick up with a minimum of two days before your wedding or other special event. You will most definitely need two days if not three to make your arrangements. I don’t play with flowers every day and this job took me two days and some touch up work on the day of before loading up the flowers for the wedding.

Advertisements

The Schedule I Gave Myself:

Day 1 Thursday–I picked up my flower order from my distributor. I took them back to my work space and got out buckets and vases and filled them with water. Then I went straight to work to prep my flowers for the next day.

Day 2 Friday–I spent all day arranging.

Day 3 Saturday/Wedding Day–examine all the bouquets and other arrangements. Does anything than to be adjusted or flowers switched out? Put on decorative elements, such as ribbon. Cut fresh ends, place in fresh water, and load up for morning delivery.

Red Yarrow

Your DIY arrangement schedule may need more time. You may need to start your prep work on a Wednesday, so you have an additional work day. The important thing to remember is that these flowers are going to take longer than you think they will.

If you are a bride who wants to do everything yourself, this schedule is probably something similar to what you will need to implement. If you like working in groups and want to make a flower arranging day, it might be possible to do this in one day. After all the more hands you have, the less work and time is required from you. Just be prepared that if you have others working with you, nothing is going to look the same. There will be variations in assembly and placement. So please make your choices based off of your expectation level. This will give you the least amount of stress and make DIY floral arranging more pleasurable.

For this wedding I made 3 bouquets (that were doubling as table centerpieces), 3 boutonnieres, and 6 large submersible vases.

Advertisements

Preparing Your Flowers

Hopefully when you pick up/receive your floral delivery, the flowers were kept cool in transportation. Heat is going to make your flowers wilt. But don’t stress out! They will bounce back. The Purple Stock that I used was the bunch that wilted the most in transportation. They were the first bunch that I stripped the stems, cut the bottom of the stems at a 45° angle, and put in water in front of an air conditioner.

Prep your stems first, so the flowers can drink while you’re prepping other stems.

If your event is in this wonderful summer heat, you will want to make sure that you keep your flowers in a cool room. Heat is not your friend with many types of flowers. So if you’re event is outside in hot weather, also make sure that the flowers you use are hardy and won’t wilt in the heat.

At the bottom of this post, I’ll post some links to items that can be helpful not just for prepping your flowers but also items that you will need for assembling (the topic for next week) your floral arrangement.

So trimming the bottom of the stems at a 45° angle is what all florists will tell you is the optimum cut to allow your flowers to drink and hydrate themselves while you are working with them. By cutting at the bottom portion of the stem, you leave yourself length for making tall arrangements and giving yourself plenty of room to make additional trims if your flowers need another stem clean up.

Spray Roses

Make sure that your scissors are brand new sharp. Old scissors will mash up the bottom of your stem and you will see that you will need to make a new trim on your stems in a day or two. The flowers will just struggle. Also, gardening sheers are amazing to have on hand if you are using flowers with thick stems (roses, Asiatic lilies, sunflowers, and others). Even new scissors will struggle with these larger stems.

Cleaning up the stems is definitely a task you want to do before you start making your arrangements. There are a few different reasons why you want to clean off the stems from leaves and thorn.

  • Thorns hurt!
  • Leaves take up room–anything not around the bloom face is just going to get in the way and not be seen.
  • Leaves resting in water will decompose quickly and make the water look muddy.
  • Cut flowers drink up water and try to keep everything on the stem alive. By removing the leaves, the flower focuses on keeping the blooms beautiful and fresh.
Long Stem Roses

Once all your flowers are cleaned up and in water, you’ll also want to take the time to also break down your greenery and filler into more workable sizes. Most of my eucalyptus came as branches. Baby’s breath and other floral fillers come in poufy branches also.

If you’re not a fan of baby’s breath, my current favorite is Misty Blue Limonium. It’s a tiny robust flower just like baby’s breath, but tends to have a fan shape bunching of flower. Not to mention that Baby Blue has a hint of blue that still looks white from a distance. (You’ll see Baby Blue in a picture below where I show you my flowers all prepped and ready to work with.)

Asiatic Lilies

Do you need to add flower “food” to the water?

Because there is product, there is going to be an industry that tells you that you need to buy this food. I personally choose not to buy the flower preservation crystals. Even with the flowers that I keep around the house, they last longer when I just use filtered water and change the water every day or two. In fact, I have a bouquet of flowers from my husband that is 3 weeks old, and all I did was change the water frequently.

Other methods I’ve tried are sugar in the water and carbonated clear soda. These two methods work just the same as the flower packet I’ve gotten with the bouquets my husband buys.

If you want to use a plant food, you’re welcome to go that route. However I don’t want to you feel pressured to buy one more thing. Good filtered water is more than enough. If filtered water is not an option either, than make sure that you have water sitting out over night before your flowers arrive. This will allow chlorine and other chemicals to evaporate out.

Eucalyptus

Now that your flowers and greenery are drinking, stems cleaned, and voluptuous bunches are broken down to smaller, more manageable sizes, you are all prepared for assembling your arrangements.

For this first night with your flowers, give them space to breath. This is valuable for flowers like Asiatic lilies, whose buds will pop off if you accidently brush them. You want to keep them cool. If you don’t have a root cellar or other cold place, you’ll want to consider a well air conditioned room.

Avoid using your refrigerator to keep any of your flowers cold. Some flowers have sensitive petals and will freeze. Another thing that is not common knowledge is that certain fruits and vegetables can also influence the overall health of your flowers. For example, onions on the sandwich you have in the fridge for lunch is more than enough to cause petals on your flowers brown. So if you have a soda cooler available at home or your wedding venue, make sure that no one has left their lunch or other meal in the cooler!

Prep all your floral and greenery into separate buckets.
Advertisements

Things To Watch Out For

The expectation when you purchase flowers to make your own arrangements is that the flowers you receive are perfect. Unfortunately, even with pesticides and herbicides used in commercial floral fields, there is going to be some damage that you may find in your flowers.

Two different diseases that I found on different flowers (rose and delphinium) in my purchase.

If you have diseased stems, you will notice this when you clean your stems. These are important to find. When you make arrangements, all your stems are right up against each other. And depending on the damage being caused by bacteria or viral infection, mold, or even burrowing pests, direct contact can potentially cause damage to the rest of your flowers. Unless you have experience working in a home garden, you probably haven’t seen instances like this and wouldn’t know how to deal with it. So the best thing to do is take these stems away and dispose of them.

This is one reason why I make sure I have a floral buffer. I have enough stems to do my job even when I have to dispose of a few flowers.

Another reason why a buffer is a great idea is that flowers can bruise.

Here are different types of bruising to look out for.

As you can see here, whether from harvesting or shipping, flowers can bruise. You might be fortunate and find that removing the outer (buffer) petals you can remove the bruised portions (which I did with the red bud.) However, it is possible that the bloom is bruised beyond an acceptable standard.

If you find blooms that are this damaged, you will want to catch this quickly! For example, I had five roses that disintegrated from severe bruising like this. The distribution center that I got these from have a policy where when you notify them/return the flowers in a 24 hour period there are options available; refund, exchange.

Before you make your floral purchase, find out what kind of return policy they have. Know in advance if there’s a chance that you’re going to be stuck with flowers that you can’t use. Is this company’s policy an acceptable risk?

Needless to say, it’s a very good practice to prep your flowers once you receive them. Not only does it help organize you and better manage your time. It also keeps the window of return/refund open for you.

Here is an example of Buffer Petals

As I mentioned above, even when you buy from a reputable company, your flowers may arrive in a condition that can surprise you. This picture, above, is pretty standard for buying from a field or wholesale distributer. These flowers are not damaged. This is real life. The industry calls these busted petals “buffer petals”.

Think of these petals as being your insurance policy. Roses are packaged together for shipment. Petals are going to be rumpled and discolored. When florists receive roses like this, they simply remove these buffer petals and reveal a pristine flower.

TIP: If you’re working with a budget wedding, these buffer petals (and other broken or too small flowers) are perfect for flower girl practice or even photo props for your photographer. With many wedding pictures taken before the ceremony, it’s a great option for your photographer to have a little something to play with if they’re inspired by your flowers!

Now that you’re flowers are prepared, you’re ready for a good night’s sleep!


Come back next week to get some ideas on how to construct your bouquet.

Here are some Products that can assist you in your floral arranging.

This post contains affiliate links to products. We may receive a commissions on products purchased through these links, but at no extra cost to you. These items listed here are from Amazon but may be purchased at local markets and floral wholesaler.

Rose Cleaner Rose Stripper Thorn Remover Stem Cleaner Tool

I have this tool. It works for cleaning the stems of more flowers than just roses.

Premium Garden Shears

The larger shear is the one that I use for trimming larger flower stems and branches of greenery.

Floral Arrangement Kit

This is a good starter kit that has everything that is useful for making arrangements.

1/2″ Wide Floral Tape

This is a must have, even if you’re trying not to buy any extra items. I’ll go more into this next week. The trick to this tape is that you stretch it to make it sticky.


What’s your favorite flowers to play with?

3 responses to “Making Flowers Possible”

  1. wedding bouquet Avatar

    I think the admin of this website is truly working hard in favor of his web page,
    since here every material is quality based material.

    Liked by 1 person

  2. Same Flowers Other Styles – How I Can Do That Avatar

    […] see below the rose. This is red yarrow and I wanted to spot light it for a moment. Two posts back, Making Flowers Possible, I mentioned how the sales person had pulled additional flowers for me that had inspired her when […]

    Like

  3. Making Arrangements – How I Can Do That Avatar

    […] the last post, Making Flowers Possible, we went through the process of cleaning your flowers and preparing them to assemble your bouquets. […]

    Like

Leave a comment

Processing…
Success! You're on the list.
Advertisements
Advertisements
Advertisements
Advertisements

Being a Garden Sleuth

For the last couple of years it seems like there has been one trial or another when it comes to gardening. And there comes up more and more questions in online communities that sometimes feel repetitive. The one bit of advice I seem to give more times than not is…

Your plants are living and they communicate with you.

Here in the Pacific Northwest we faced another cold spring, even though it wasn’t as cold as last year. As a general rule, we transplant and direct sow seeds around Mother’s Day, mid May.

It wasn’t so long ago that when we planted at this time that our gardens would start of a little slow for a couple weeks and then we’d see some rapid growth.

Last year, local community members thought that their inexperience killed off their crops and it was entirely their fault.

Advertisements

This year community members are talking about what could be the cause for why they’re preventing their plants from growing this year.

In my surrounding area, a good number of everyone’s plants are stuck in the stage of being starts. And more times than not, I keep reading way too many people advise others to just fertilize. And then I see people offer their home remedy fertilizers without understanding what they’re putting in their gardens.

Just because you “fertilize” doesn’t mean that you’re giving the food that you’re plants are craving.

flickr.com

For example, one post I saw this week was asking for help with a cucumber that was still start sized. The picture was not close enough to see if the cucumber was trying to set blossoms or not. Without this kind of information, people were telling to heavily fertilize but with no discrimination.

Banana peel fertilizer is only good, if your plants/vegetables have set blossoms. Plants putting out blossoms love having higher potassium fertilizer. So the home banana fertilizer is good if you’re feeding a plant putting out blossoms.

Coffee grounds are great for plants that love acidic soil. But if you don’t know how acidic (the pH value) your soil is or the pH range that your plant loves, you can burn the roots of your plant.

In the example of this cucumber inquiry, it was a bad idea to recommend coffee grounds, if the cucumber has started putting out blossoms, because composted coffee grounds add nitrogen and cucumber in blossom wants lower nitrogen levels.

Now, coffee grounds could be great advice as long as it is followed with the additional advice to remove the blossoms. Removing the blossoms, with the coffee grounds giving a nitrogen boost, will help the cucumber grow it’s vines and roots. And in this cold season with plants being stunted, it’s not a bad idea to remove early blossoms in order to give the plants more time to grow structurally and be stronger for later in the season when they have to carry the weight of their fruit.

My potatoes didn’t seem to be adversely affected by the hail. They’ve been growing healthy and hearty. (My first stop when looking at my garden to sleuth out what was going wrong in my garden this week.)

Another popular recommendation I read was everyone telling this person to put egg shells down around the cucumber. Now egg shell is the DIY fix for calcium deficiency.

The problem with just crumpling up egg shells and sprinkling it around any plant is that the calcium is fixed inside the shell. If your plant needs calcium now, it’s never going to get into the plant in shell form because the roots of the plant are it’s “mouth”. Putting egg shells on the ground around the plant is like putting a chocolate cake in front of you, but there’s a window between you and the cake. It’s there. You’re there. But you’re not going to eat it because a window is in the way. You either have to get the calcium into a liquid form or compost the egg shells down to release the calcium.

The only benefit of putting egg shells around a plant is to keep pests away like slugs. But the truth is egg shells have not kept slugs out of my garden. And I recognize that my problem is that I don’t have enough egg shells down to create a thick or wide enough barrier to discourage the slugs away.

Instead, I find that the best use of my egg shells is just putting them into my compost along with all my other compostable food waste. By using my egg shells this way, all I have to do is reach for my compost and I know that I have calcium readily absorbable for my cucumber, tomatoes, or whoever needs it at a given moment. And by having the calcium already in my compost, it prevents my plants from being deprived or depleted to begin with because they’re getting it in a steady supply.

My next step was checking out my lettuce and other greens raised bed. There were some split leaves from the hail, but otherwise still doing quite well.

However, before we got our compost running well, there was one other way that I prepared my egg shells to make calcium more available for my plants. I kept clean and dried egg shells. When I needed to make a calcium fix, I crushed the shells into as small of pieces as I could, put them in a pan, and added water. I boiled the egg shells for about an hour (just to maximize the amount of calcium released into the water). Then inset it off to the side and let the water cool down. Once the water came to room temperature, it was ready to pour in my garden. I poured the water and egg shells into my garden. The water had enough calcium in it to meet my plants immediate calcium needs. The shells in the bottom of the pan had some residual calcium left that could further break down in the soil as it finished decomposing.

To sum all this information up, online community groups are great for picking other people’s brains. But more times than not, they may not fully understand why they use a DIY fertilizer, why it works for them, or why it doesn’t work for them. If you’re that person who asked and got a kitchen list full of suggestions and don’t know which one to try first, take a moment and look at what nutrients are being provided by each commenter and see how it fits or doesn’t fit with the natural life cycle of where your plant is at in this exact moment. In addition to that, look at your plant and look at other clues to see if there is anything else that could potentially be going on with your plant.

Advertisements

Are garden pests present?

On the subject of stunted plants, I currently have a summer squash that is stunted. I know for a fact that it’s due to a squash vine borer because of the split vine. No amount of fertilizing is going to get that summer squash to grow.

It’s easy to see when a start is not growing.

Finding the answer takes a little detective work.

The beans had a few leaves that didn’t make it. But they’re still primed to grow with some warm days on the way.

What have been your environmental conditions?

Each plant that grows from a seed relies on its DNA to tell it when move on to the next stage of its life cycle.

We can start our seeds inside a greenhouse or our home to get a jump start on the growing season. But no matter how early you start a seed, the start will stop its physical growth until a little DNA switch gets flipped by the weather. Whether it’s the amount of sunlight, day time temperatures, or night time temperatures… there are environmental indicators that plants look for before they say, “Now is the perfect time to grow.”

As I mentioned above, this spring has been uncharacteristically cold.

For my tomatoes has been fun to watch this year. I planted some from a seed company. And I planted others from seeds that were harvested from tomato plants that were local and went through last year’s cold spring (which was much worse than this year). The tomatoes that have the seed memory of a cold spring have grown much better than the plants that grew with a seed memory of another region.

Can fertilizing compensate for this growth discrepancy?

Yes. However, if your seeds don’t have the DNA memory of what it’s like to grow in a cold spring, they’re going to struggle a little until they figure out what’s going on with the weather.

My pepper plants have some damage from the hail. However I have a theory that these starts faired better because last week they got planted with some rich compost on their roots. They had the nutrients to fortify them against the elemental attack.

This is the prime reason why it’s important to either save seeds from the plants that you grow or purchase starts from people in your community who grow from their own seeds. From their seed memory, they are ready and geared to thrive and flourish with micro-regional weather. (I share the same grow zone as some southern states, however our springs and micro-regional weather patterns are going to be quite different.)

But it’s also not just seasonal weather that affects the health of your plants.

This past week we had a hail storm. It’s been several years since we’ve had hail in my community. And these weren’t cute tiny hail stones. These were enough to hurt if we stood out in the storm.

After the storm I went out to check on my garden. And it looked like they were all going to be resilient and bounce back just fine. Especially seeing how we were expecting a couple of nice warm days.

The problem is that once the sun did come back out, I noticed that something was wrong with the plants. I first noticed it with my tomatoes. And I thought it was a tomato issue. But I looked elsewhere and saw other plants were affected also.

My tomatoes were hardest hit. But they don’t like the cold to start start with. This little stunted start was the hardest hit. The larger plants have the same beige pick marked damage that just looks like it was assaulted from the hail. But at the same time meets some of the descriptive marks of mosaic virus.

This was an important clue to take note of.

My husband sent some pictures over to a friend who has more experience under her belt than we do. With the little information that my husband provided, her opinion was a mosaic virus.

Before her recommendation I was leaning toward an iron deficiency or damage from the hail storm, leaning toward the hail damage because we went from perfectly healthy and happy plants to having visual distress in a couple days.

Whether damage, iron deficiency, or a virus; all three have different care
steps.

This is where you need to be a detective and look for clues.

Here is my amaranth, which pretty much look identical in leaf damage as my tomatoes do. From all I read, so far it doesn’t look like amaranth isn’t effected by the mosaic virus. Which means these guys were just beat up by the hail. So this is one example of why I’m leaning toward my tomatoes just being damaged by hail.

We were concerned for mosaic virus, but after reading up on it we noticed that other plants, not listed on list of plants commonly infected with this virus, were showing the same distress.

The biggest clue for us is that my second garden, miles away, also all had healthy plants and two days after the hail storm showed the same markings.

We cannot completely discredit a viral infection in our garden without testing it. But we can continue to watch the plants and operate as if we are dealing with this virus (trimming effected leaves off in increments so not to handicap the plants’ photosynthesis, not composting the trimmings and expired plants, cleaning garden tools thoroughly, keeping other plants from growing in their direction, and next year planting the tomatoes (and other effected plants) in a totally different section of the garden).

While I’m fairly certain that I’m dealing with hail damage, prudence says that I also act with caution against the mosaic virus. There is nothing to say that I’m not seeing two issues at once.

My Echinacea took the most beating here. And this damage to the stalk looks exactly like the damage on my tomato leaves. As this is stem damage (the leaves were fine) and they match the leaf damage on the tomatoes, this becomes my lead points of evaluation for my garden in this moment.

I know that not everyone is going through what my garden is going through in this season. These are just examples of how to analyze your garden and the conditions that you are facing this year or in a growing season to come. Sometimes answering your garden woes are as simple as looking up a description phrase in Google and looking at the images to confirm or eliminate potential problems. Sometimes you need to crowd source and pick other gardener and farmer’s brains. Just remember that when you crowd source, people respond with their experience and thinking of what’s going on in their garden at the moment. They don’t know all the additional details, like you just had a hail storm or your neighbor sprayed their property with a chemical that negatively impacts your garden because it carries on the wind. People don’t know if you had contaminated water and your water service provider mails out a letter stating such information two weeks after the fact. Unless you look for pests, you may not be aware that the problem you’re facing is coming from a vine borer, aphids, locusts (or other insect) that has come to your property and hasn’t been there in past years. Or maybe you just bought a new house and the previous owner had diseased crops that they let compost in the ground and that information wasn’t passed on to you in the bill of sale. Or maybe you picked up a load of manure for your garden, but it wasn’t disclosed to you that the animals are hay that was sprayed with Grazon.

I just want to make a special note to give a heads up on this issue of Grazon (a Dupont product) and how it’s silently affecting crops, ground and water health. Here is the video from a farmer who lost whole sections of garden plots. We first watched this video and became aware of this issue. You can source the right materials, but sometimes you have to go further back on the food chain to see where the problem lies. I thought organic manure was the end all bench mark. Now it looks like we have to look further. Here is a very detailed article from 2017 to further jump start your research. This one will open your eyes on the product Grazon. Not just this product, but actually all herbicides. Even if you choose not to use herbicides on your property, you might be buying product from someone who does use it on their property.

There are so many things that can affect the health of your garden and plants. Just be aware that the solution may not be as simple as “just fertilize it”. Sometimes you may need to be your garden’s own detective and look for clues to set you on the right path to bring health and recovery to your garden.

What hidden little gems have you learned from your garden?