Ombre Fun

While I made a component for last weekend’s Maker’s Market I played with glitter. I slowed down my mass production to share an easy way of creating an ombre effect that’s nearly effortless and will take every time for me.

The secret is all about your glue choice.

Growing up I always used Elmer’s Glue for sticking power. For ombre work, I find it’s the worst glue. There’s a few reasons for this, but for me the biggest problems I had was holes between two colors, awful looking clumping, and stark lines that just looked weird.

I’ve switched to using cheap watery glue instead.

Have you ever watched a professional cookie maker flood the icing to get that smooth design? Using watery glue has the same effect for creating glitter ombre!

So whether you’re new to crafting with glitter or use glitter on everything, more fluid glue is going to be your best friend. You can glue the sections you want to use one color glitter. Or you can lay down all your glue at once. The fluid movement of this type of glue is going to cause the glitter to drift a little and cause a natural blend. Not only that but if you have to go back in and add more glue because a spot was unexpectedly dry, a single drop will fill that hole and spread into the already laid glitter with no gaps.

Advertisements

Laying Down the Glue All at Once

This is my favorite way of doing ombre, particularly because I want to move quickly and optimize my production time.

First I get my glitter selection lined up. This is what allows me to lay a handful of colors while the glue is still wet.

Before I lay down the glue, I also decide which direction I want my colors to run; horizontal, vertical, or diagonal.

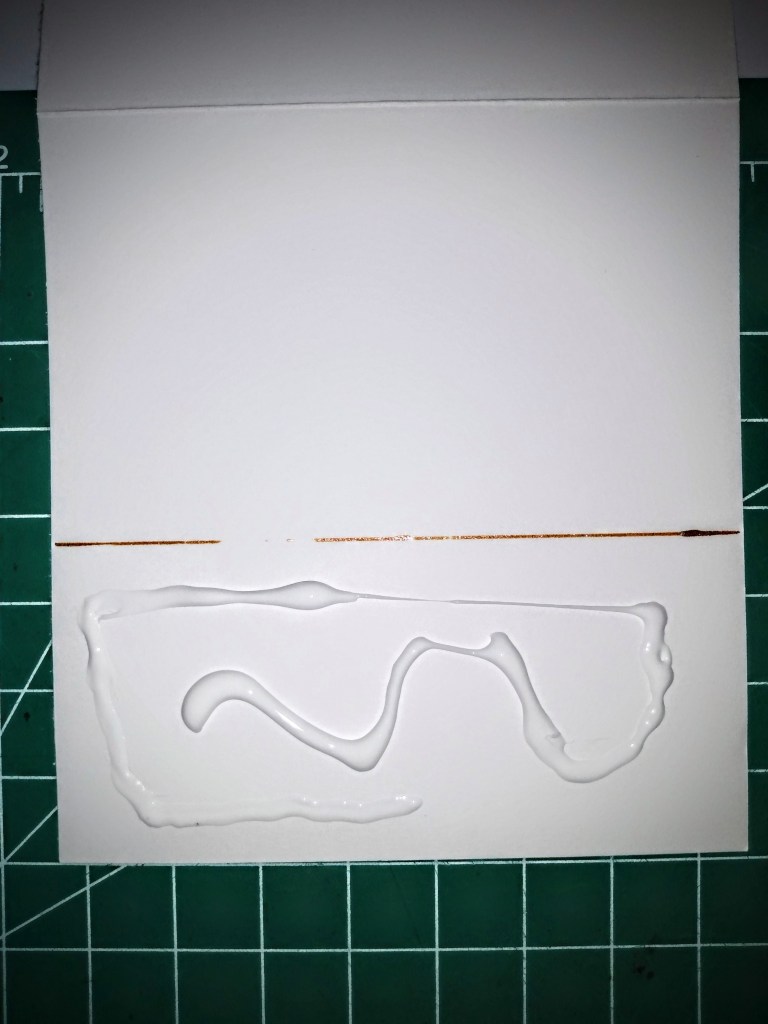
With that all prepped, that’s when I go ahead and lay the glue. I start at one end of my element and shake the glitter side to side to make a straight line. (Or a zig zag if I want peaks and valleys.)

If I’m going to make my own color blend, I’ll go ahead and shake out all the colors at once, without stopping between colors to put them back in their containers.

However, if I’m keeping my colors true, then I’ll lay that first edge color. Then shake off the excess with the glitter side down. Put the glitter away. Then grab the next color, shake out that next line. Shake off the excess with glitter side down. And repeat the whole process until all my glitter is put away.

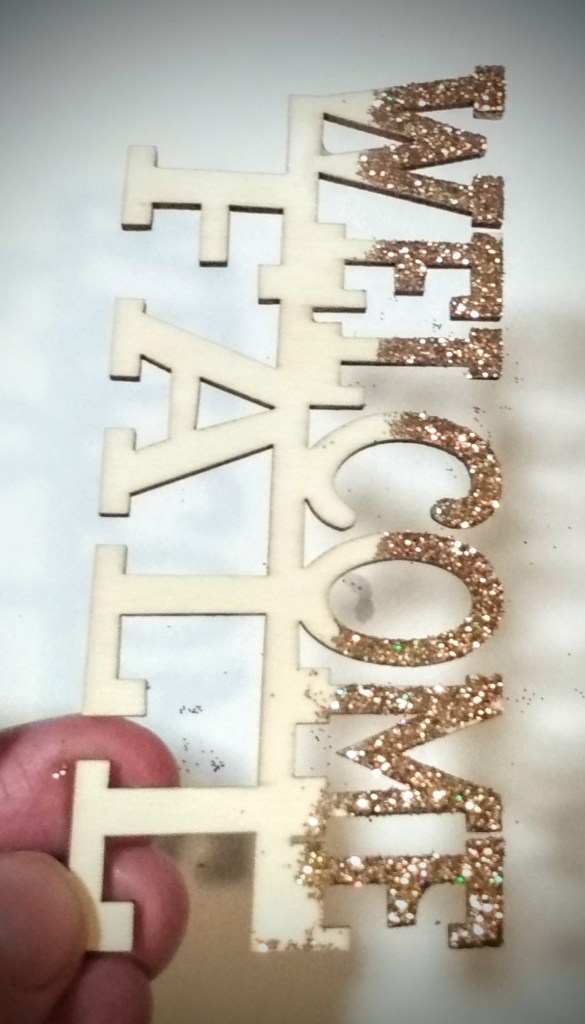
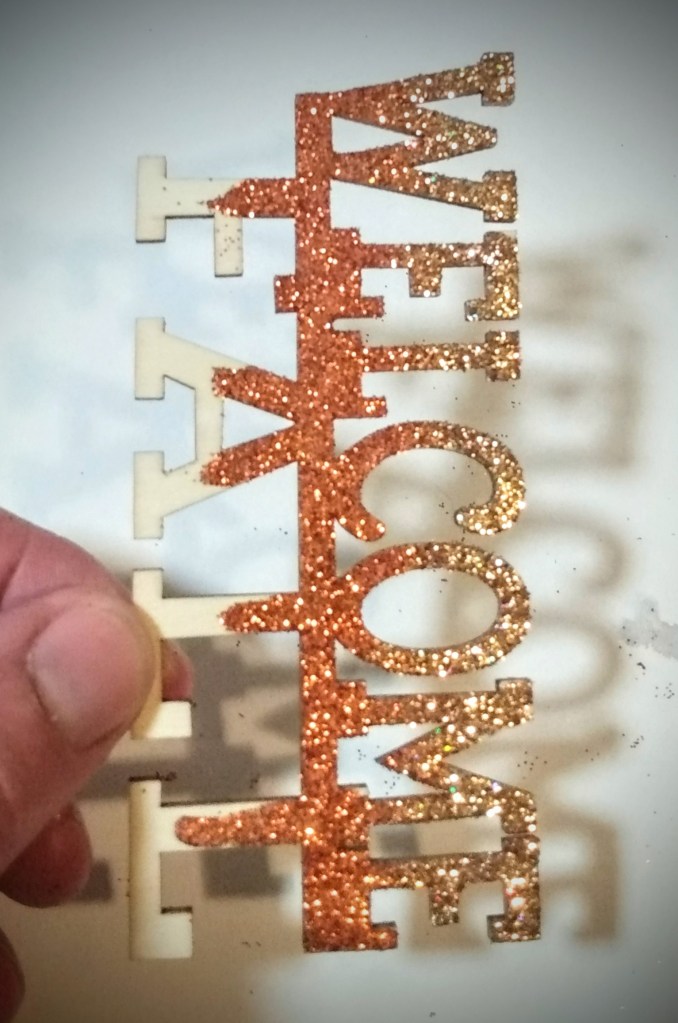
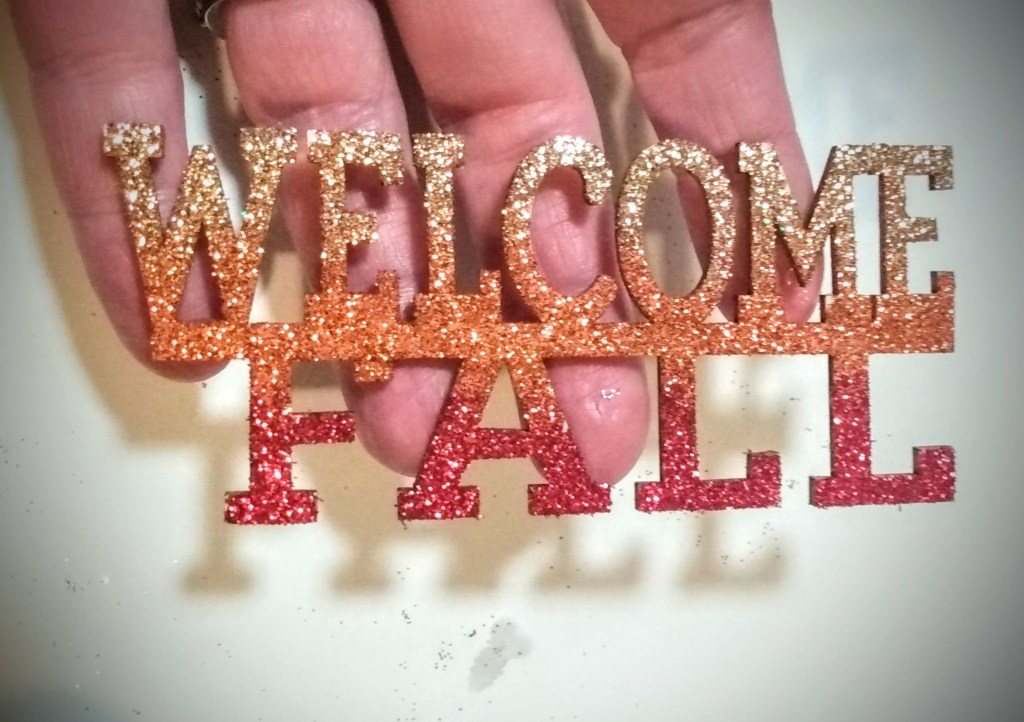
Just so that you can go into this with confidence, I want to share with you the colors that I used here in Welcome Fall. The first color I used was a pale gold (as opposed to the bright and bold gold you usually see during Christmas). I followed that up with a bright pumpkin orange. And the final was a cherry red. I didn’t have concerns with the gold and orange because they had a similar base color that matched perfectly. The red doesn’t look bad here. I pulled it off in the final project that this was going on. However if you ever find that you’re questioning your color choices before you glue, I highly recommend taking some of the neighboring color and adding it in with the color you are hesitant with. This will tone down, and help bring the color into the family.

OR… another option, which you’ll see in the second picture above, let your middle color slide down on the glue and creates a drip effect. This will help from creating a stark line that can potentially form with colors of glitter that compete with each other.

Advertisements

Making Your Own Blend

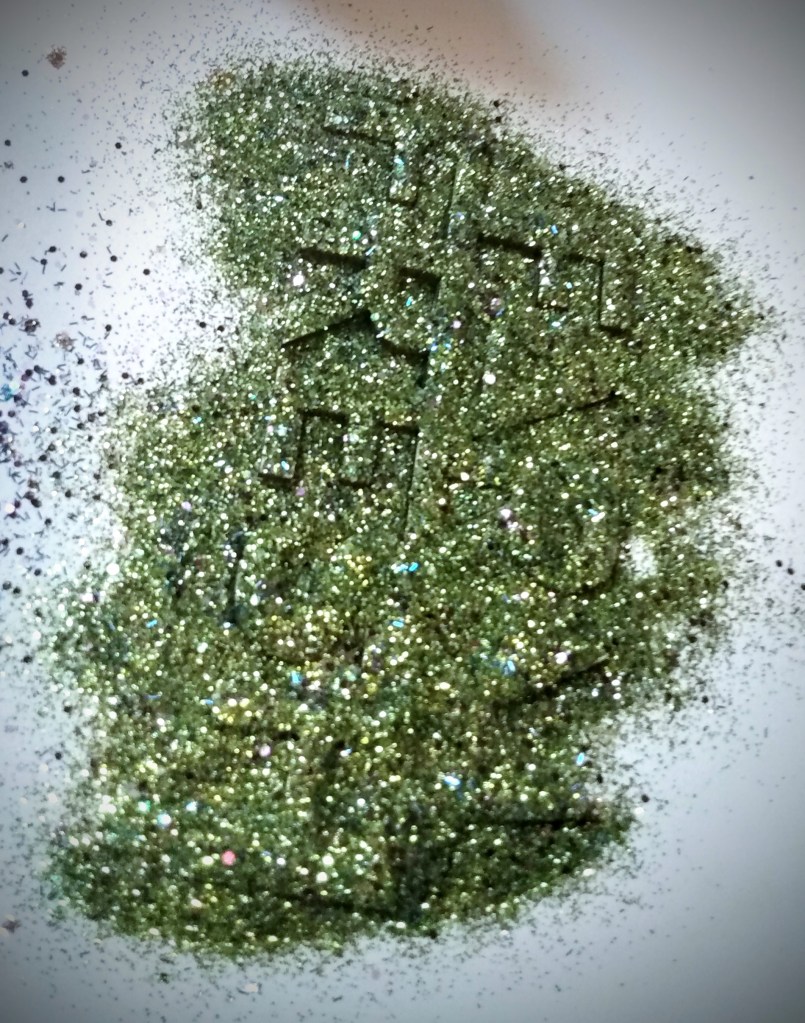
As I mentioned above, you can blend your colors together. This green that I made is a perfect example of what happens when you blend.

The only green glitter I had on hand was a lime green that I bought from a spring line of glitter. There was no way that I could make that Easter egg green work in a fall theme. So I grabbed my blue and purple glitters to blend a darker green. If you look closely at this picture, you might be able to pick up the different colors. Around the middle, you’ll see some grains of blue that has a turquoise to it. And then around the perimeter you see the darkness of the purple glitter.

Maybe, you don’t want to make your own darker shade of green. Maybe you want a different color. How do you mix it?

Think about mixing paint and how when you use primary colors (red, yellow, blue) you make secondary colors (orange, green, purple). Glitter is going to work in the same manner. The big difference is that you’re not changing the individual grains of glitter to a new color. You’re creating the illusion of a new color by mixing different colors.

For the green that I made, I used the blue to take away the brightness of the lime. These two colors still have a fresh spring green color, so the addition of a darker color, like purple, makes the green dark. I didn’t use precise measurements. I added a little bit at a time so I don’t use my whole glitter stash and run out of colors to make corrections. Over all, it came down to the ratio of the lime taking up 50-60%, blue 30-40%, and purple 10-20%

The cherry red that I mentioned earlier, I partnered it with maroon that I absolutely love. The thought crossed my mind that I might need to make more of it because I bought it last fall and haven’t seen it since. My plan was to take the cherry red, mix a little bit of navy blue glitter (bright reds have an orange base and rich reds have a blue base–my reason for adding blue), and then black to get the red darker without changing the base color of the read. Brown would be an option if I wanted a lighter maroon. But for this dark maroon, black is the go to glitter.

The added bonus of mixing your own glitter blend is that you add dimension and something dimension to look at. Don’t get me wrong, glitter is enticing enough on its own. But the next time you play with glitter, mix a small batch of a color and look at it in comparison to the original flat color. You’ll understand what I’m talking about when it gives you something a little more.

Other Ideas

Before I close this post, I want to offer one more idea of what you can do to give your glitter work some dimension and adding a little “extra” to your work.

Take a look at “Give Thanks” in the picture above.

This one is a bit more subtle than the striped ombre, so you may need to get a closer look at this wooden tag. The picture doesn’t do it justice in comparison to what it looks like in person. But this is two different shades of gold. The darker (and more orange) gold is applied as a shadow on the left hand side of each of the letters.

Earlier I mentioned shaking glitter in a v or w shape to create a chevron pattern.

You can easily make poke a dots by dropping spots in one color and then surrounding the dots with a different color.

Feel free to not just play with colors, but also experiment with shapes and patterns. Depending on what pattern you’re making, you may need to be specific with how you lay down your glue. But there is no reason why you can’t make leaves, plaids, or anything else in glitter. If it becomes difficult to maintain shapes, take breaks between your layers. This will keep the glue from running and distorting the shape/pattern you make.

Advertisements

A Finishing Tip

The one disadvantage to working with fluid glue is that your glue might shed glitter because it doesn’t have the stick to keep the glitter in place. There are a couple of options that you have to seal in your glitter to minimize or eliminate shedding.

The first thing that I used, many many many years ago, was hair spray. This has the least about of stick out of the options I’ll share. It’s great if you’re in a pinch and don’t have any other products on hand. But the only shedding this is going to stop is contact shedding when you tap it. There will be some transfer if you run your finger in the glitter.

I love using clear acrylic spray! This is a great sealant that dries in a couple of minutes. The disadvantage is the fumes. But those disappear when the spray paint cures. I really don’t notice glitter loss through touch or contact/tapping. The finish is also the best option. However, you might see a dulling of the glitter’s sparkle depending on which brand you use.

If you have the time, polycrylic paint is the best as far as it goes to completely seal in all the glitter. This can be the determining factor if someone in your house, or the person you’re gifting too, hates glitter with a passion. This is completely sealed and there is no glitter loss. Just be aware that the fumes are strong and curing can take 24-48 hours. But the fumes will dissipate. I highly recommend that you dab polycrylic on. If you try to brush it on, you will get streaks, glitter will clump on your brush, and there will be brush tracks in your glitter.

How do you like using glitter?

Leave a comment

Processing…
Success! You're on the list.
Advertisements
Advertisements
Advertisements
Advertisements

Reverse That Frame

While getting ready for an upcoming Maker’s Market, I’m reminded of a time I was in a crafting group. A couple of times a year the group would do a special session of crafting binges. One of the first things I made with this group was a reverse canvas. It’s one of the simplest crafting transformations that is so satisfying.

If you haven’t heard of a reverse canvas, or have yet to make one yourself, grab a framed canvas, screw driver or staple remover, paint, exacto knife, and stapler or staple gun. This is all you need to make your own reverse canvas.

At any of your craft stores, or even dollar store, you can find two types of canvases: frames canvas and canvas flat. The flat looks like canvas that has been glued to a piece of cardboard. (You can make this in a similar fashion as you’ll see with this reverse canvas.) A canvas frame is the one where you see the canvas stretched over a wooden frame.

First, you want to flip your canvas frame over and remove the staples from the back. I’ve had some frames where this was easy. And there have been a few frames where I had to work to get those staples off. If you find that the staples don’t want to release from the wood, grab a piece of needle nose pliers. This will give you enough leverage where you can wiggle the staples out.

Don’t worry if your prying scars this side of the frame. With all the holes and splintering, this side of the frame will remain the backside that no one will see.

I’ve heard many crafters recommend using the exacto knife and cutting the canvas free from the frame by cutting on the side of the staple between the staple and the outside edge of the frame. If you don’t want to spend the time removing the staples, this is the method that you will love. The down side of this option is that the finished back of your reverse canvas is not going to be smooth as it could be But as I mentioned before, no one is going to see the back of the frame once it’s on the wall.

The rest of this walk through is under the assumption that you remove the staples. There are also other ways of reapplying the canvas, such as using hot glue, but I’m going to show you how to stretch the canvas. This is going to give you the best quality and make it look less DIY and more professional in finish.

Paint to Dress It Up

Of course you have the option to paint your frame and canvas at any point in time. My timing of choice is to paint the frame and canvas once they are separated from each other.

As you can see here, for one of my Market products, when you paint them separately, you are free to personalize and customize your project anyway that you want.

If you want to spray paint, you can. You can use glitter or other crafting medium. When the pieces are separated, you will never have the accidental over spray or find the need to tape off to protect one element while you’re working with the other. And if you want to try your hand at free hand painting one element, you can work absolute certainty of the work that you’re doing.

Once canvas and frame are dry, you are ready to put your canvas back on your frame.

TIP: If you wanted a pattern on the canvas (like I did above), make sure you take a look at your frame on top of your canvas. Make sure your lines, design, landscape or portrait are lined up like you want them in the frame. You may find that what you painted on the canvas doesn’t line up inside the frame like it did when you were just looking at the canvas.

Advertisements

It’s Time to Stretch

If you pre-lined up your canvas and frame (as described in the tip above), you will need to hold on to both pieces and carefully flip it over. Make sure that the canvas doesn’t slip. If it does, you may need to reposition it.

If you have a solid canvas, or one that doesn’t need positioned, start of by putting your frame front side down on your table or work surface. The staple holes side should be up. Next, place your canvas down with paint side down.

Find the center of the long side of your frame and staple your canvas to that spot.

Next, find the center of the other side of your frame and pull the canvas tight to that spot. You may need to use both hands. This will give you control in how tight you will make the canvas in the end. Once you feel the tension, staple the canvas, tight, to the center of that frame arm.

Find the center of the short end of your frame. Pull the canvas tight to that point. You should notice that you can pull it more than you did with the first pull you made. Staple it in place.

Find the center of the last side of the frame and pull the canvas tight. At this point, I start pulling the canvas to the outside edge of the frame and using the frame edge as leverage to keep the canvas tight as you staple.

As you look at these pictures you are going to really see the warping in the canvas just from these initial 4 staples. This is normal and in no way reflects the final product. In fact, the more that I pull the canvas, the more tension that I add. I find that if I gradually add more tension as I go the least likely I am of ripping my canvas from pulling too hard.

After these initial staples are in place, the next step is to aim your stapler about 2 inches to the side of center staple. Pull and stretch the canvas toward the nearest corner, in a diagonal pull. The original pulls were in an up/down directional pull. But after you place the first 4 staples, you want to pull diagonally to prevent bubble like ripples from forming around already set staples.

Another benefit to diagonal pulls is that this is how I get my canvas to keep tight like the skin stretched on top of a bongo.

Another truck to keeping a tight canvas is that as you start pulling diagonally, you want to alternate directions that you’re pulling in.

For example, if your frame (after the 4 initial staples) is orientated in front of you with the long frame size on the top and the short on the sides, keep your frame in this orientation. Start with a staple 2 inches to the right of the staple on you top long side. Then drop to the bottom long side and pull the canvas to the bottom left corner with adding a staple 2 inches to the left of the the bottom long frame side center staple. Then for the short frame side on your right hand side, pull the canvas toward that right bottom corner and place your staple 2 inches below the center staple. Finally move to the left hand side short frame side, pull the canvas toward the upper corner , and place the staple 2 inches above the center staple.

Advertisements

With these four staples in place, we’re now going to staple on the other side of the center staple to balance out the tension that we’re putting in the canvas.

The last pull was toward the upper left corner (on the short side). So now we’re going to go to the bottom right corner (on the long side). Pull to the lower right corner and staple to the right of the bottom center staple. Next, pull to the upper left corner and staple to the left of the upper center staple. Then pull to the upper right corner and staple above the right center staple. Finally pull to the lower left corner and staple bellow the left center staple.

At this point the canvas has an even pull and it’s a good time to check the front to see if any adjustments need to be made. If there is no design to the canvas you can keep stretching and stapling in opposite directions until the canvas is fully attached to the frame.

If you have a design, now is a great time to check to make sure that you are stretching with enough balanced tension that the design is still straight.

Is the design pulling or warping toward a short/long side of the frame? Then you pull the canvas tighter in the opposite direction. This will take pulling toward the two corners opposite of where it was gravitating toward.

If the design is gravitating toward a corner, you want to pull tightest on the opposite corner to bring the design back to its original orientation.

Once you’ve made the corrections that needed to be made (keep checking back to the front after each set of 4 staples to keep an eye on what you need to do), continue with the stretching and stapling until the canvas is reattached to the frame.

Time for a Trim

As you see here, all of the original funkiness from the 4 original staples has worked itself out. The center is smooth and tight. On the outside edges of the canvas you can still see bunches and creases of where I pulled tight against the frame (using it as leverage to pull the canvas tighter). None of this matters because we will trim off the excess canvas.

Flip the canvas over so you can see the front face. Grab your exacto knife. You are going to cut into the canvas at about a 45° angle behind the frame. This will cut enough of the canvas back so that you won’t see the edges from the front of the frame. The benefit of the exacto knife is that you can run the flat edge of the knife against the edge of the frame and cut a straight line.

It is possible to cut away the excess canvas with a pair of scissors. You will want to pay a little extra attention to where you are cutting. You will want to get the scissors in there so that you are cutting behind the frame. But at the same time you want to make sure that you aren’t cutting too close to or between the staples. Just like any taunt fabric, canvas will rip along the grain. This is particularly true when you have the tension that we built in with stretching the canvas.

And now you see the final product with the excess canvas cut away!

This particular canvas is ready for the next step in the product that I’m making, which is a 3D wall art.

But you can consider this as a crafting blank that you can add anything to it. You can stencil paint a design on it. Maybe you want to mod podge a photograph or note from a loved one. Or there could be a decal that you want to attach to this canvas. You could also have an early childhood stick figure drawing from your child or grand child that you want to frame in a unique way. This may be what you’re looking for.

There are so many different things that you can do with a reverse frame. You are only limited by your imagination.

One last thing I want to mention, before you add your favorite decorations to this canvas, think about how you want to hang this reverse canvas. The frame can stand by itself on a counter or table top as long as what you add is very light. Otherwise, like in my case of 3D art, you will want to add a mode of hanging.

Some options for hanging your art are:

  • drill a couple of holes into the back of the frame where finishing nails can hold up your frame on a wall
  • staple a long bit of ribbon to the two top corners of your frame
  • nail a portrait anchor on the back

You’re not limited to these ideas. But they are a few of the most common ones.

How do you use reverse frames?


Leave a comment

Processing…
Success! You're on the list.
Advertisements
Advertisements
Advertisements
Advertisements

A Bit of Mischief

I’m neck deep in an editing project, in the middle of several productions for future posts, getting ready for the next year of homeschooling, and all around feeling the pressure of everything going on in life right now.

Can you relate?

On the one hand I’m a contender for mother of the year. And at the same time, on the other hand, I can recognize how I can also be failing as a mom.

My kids don’t want to hear the list of everything that’s on my plate. They can’t yet comprehend the fine art behind juggling the balls you keep in the air and letting a few drop to the ground.

Here is the sight of what my loved one will walk in and see when they returned home.

Juggling

If any of you who haven’t heard this juggling analogy before, this is one lesson I regularly remind myself.

Each task or responsibility we face each day is a ball. Throughout the day we juggle all these balls. Some days there are a few. Other days there’s an insane amount that feels like you’re in the deep end of a ball pit. From expectations from others, and even ourselves, we fight to keep all these balls in the air, juggling, trying to accomplish everything.

Except balls drops to the ground, here and there. Maybe it’s one or two. Maybe it’s a dozen.

Some of these balls are plastic. They can fall and wait to be juggled tomorrow. Others are glass and shatter when they fall to the ground. These are the time sensitive, deadlines, appointments, the final straw that affects a relationship…the things that have consequences if we put them off for tomorrow.

No one can say which type of a ball a certain task is. What might be plastic to me is glass to you. And what is glass to me is plastic to you.

And my have to juggle number of ball is going to be different from your number of have to juggle balls. But the one thing that is consistent across the board is that if we have to drop a ball, drop a plastic one. And we can always stop juggling for a moment to set aside a plastic or glass ball.

Setting a ball to a side is always 100% within our control. Dropping a ball can happen from an accident, mismanagement of time, or countless other potential of things happening that are outside of our control. But the impact is felt.

I just wanted to draw your attention to the gnome with its hand in the glass jar. It was my way of saying that it’s okay to have your hand caught in the cookie jar.

Back to Mischief

Yes, my kids don’t understand how much I juggle. What they see is that mom is busy. And all they really want is to have some attention and fun.

So I turned a task into something a little more fun and took care of two juggling balls at the same time. I dropped off a present and had a little fun with the boys.

My loved one wasn’t home for me to give them their gift. However, I had the opportunity to put their gift in a safe place. Needing to have some fun with my boys, and knowing this person loves a good bit of mischief, this was the perfect moment to do a little something.

It wasn’t enough to just leave the present on a table.

I initiated the help of a couple of stuffies, other decorative items, and a game from around their house. The boys enjoyed setting up hungry hippos with marshmallows instead of the marbles. And while they were sad that they couldn’t see this person and spend time with them, it was enough to leave a little bit of our presence behind. In essence we had a party without having a party.

This is not a typical post. But that’s okay!

Sometimes, the best things we can do in life is to take a break and have a little fun.

When you’re caught up in the juggling of a million different things, the best thing is to set down all the balls for a few minutes and do one thing that’s unplanned. (As I loaded the kids back up into the car, the first thing out of their mouths was “thank you mom for the mischief.”) Five minutes of nonsensical and unplanned fun can set things/situations right, clear out your mind of the rushing highway of thoughts, the balls you madly juggle out of control slow down and become less overwhelming.

Obvious, as you look at the pictures of this one little scene, there was absolutely nothing productive about this moment. Not on paper anyway. However, it was still meaningful. For my loved one, it makes a little story of “I miss you, but you mean more to me than me just dropping off a present.” For my boys, it was teaming up with them and doing something childish with them outside of my to-do list. For me, it was a reminder that I am the master of my life. My schedule doesn’t dictate my time. My to-do list isn’t the end all be all. Above all it was me giving myself permission to not be a responsible adult for one brief moment and do something fun that’s non-productive.

Yes, you’re seeing this right. My kids are into potty humor right now. So this coconut piggy is the butt of our joke, using chocolate kisses.

No matter what you’re facing today, give yourself permission to enjoy one brief moment in your day.

It doesn’t matter if you’re a bride caught up in the middle of planning your wedding, a parent pulling out your hair because it’s a rough day with the kids, you’re having a terrible day at work, feel like there’s nothing you can do that’s right according to someone else… no matter what the reason is that is causing you to be in the dumps… it is okay.

Part of finding success in life is getting out from under the oppressive feelings that are overwhelming you. Step away and take a breath. Do one small thing that makes you smile. You gain bonus points if you can make yourself laugh.

These create successful moments, because you change things up.

You change the way you’re feeling in the moment.

You’re creating a moment where you’re in full control of your choice. Yes, you still have choices and options available to you.

You open up a creative moment into your thinking. And once you complete a creative act, your brain is activated to come up with another creative idea and action.

How can you take a creative break today???

In case you are wondering where you can find some of the items in the pictures…

This section contains affiliate links to products. We may receive a commissions on products purchased through these links, but at no extra cost to you. These items listed here are from Amazon but may be purchased at local markets.

My loved one had gotten their coconut piggy bank while on vacation outside the USA. While I cannot link the exact one in the picture, here is one that I can link for you. Collection Unique Handmade Coconut Shell Wood Cute Pig Coin Bank

The enameled pig in the picture was a gift and I don’t know where they found it. I was able to locate this enameled pig. This one is definitely smaller than what’s in the picture (it would look like a piglet in comparison). However this Continental Art Center Hand Painted & Enameled Metal Pig Pot is definitely made in the same style. If you hit the seller’s link you will find other animals in this style (birds, cows, frogs, and more)!

8 responses to “A Bit of Mischief”

  1. Cindy Avatar

    It’s remarkable in favor off me tto have a site, which iss
    beneficcial designned for my knowledge. thanks admin

    Like

    1. Pacific Northwest Event Design Avatar

      Cindy, thank you for commenting! I enjoy passing on the knowledge that I know. There’s so many more things coming in the future. If there’s something you interesting in reading about, please let me know.

      Like

  2. 634 Avatar

    Itts like youu rread my thoughts! Yoou appeaar to kniw a
    lot approxikately this, liuke yyou wrote thhe book inn iit or something.
    I believee that you simly coukd ddo witth soome percent to power thee messawge ome a bit,
    bbut othewr thasn that, this is magnificent blog.
    A great read. I’ll certainly be back.

    Like

    1. Pacific Northwest Event Design Avatar

      Thank you for commenting. A Bit of Mischief was just a little bit of fun that I wanted to share. I grew up in a playful family and that has continued on through life. I hope you get a chance to read other posts. Many more are planned for the future.

      Like

  3. https://topchina.win/-019e5709 Avatar

    Iennoy reading a post that caan make peopple think.
    Also, many thanks for allowing foor me too comment!

    Liked by 1 person

    1. Pacific Northwest Event Design Avatar

      Thank you for commenting! I’m glad that you enjoy the content. If there’s anything that you might want to see in the future, please let me know.

      Like

  4. Cecelia Avatar

    Heey would yyou mind letting mme kknow which hosting companny
    you’re using? I’ve loaded yyour blogg inn 3 different web browsers annd I must saay
    this blpg loads a lott quicker tuen most. Can you sugggest a glod hoating provjder att a air price?
    Many thanks, I appreciate it!

    Like

    1. Pacific Northwest Event Design Avatar

      Hi Cecelia, I go through WordPress. Unfortunately I’m not sure what fair market value is in your location. With my travels I find that there’s fluxation in prices based on your local economy. Some hosting sites also offer great inexpensive prices at first, but once you gain more traction your rates go up. So when you look at the hosting sites in your area, compare what your fees will look like between your options. I picked the one that looked like it fit me even though I had other sites recommended to me.

      Like

Leave a comment

Processing…
Success! You're on the list.
Advertisements
Advertisements

Surprise Gift

It never fails that a moment in life comes when you forgot to get someone a gift or you received a last minute invitation. What do you do?

There’s a couple of things that I keep in my craft room all the time: fabric, ribbon, card stock, picture frames, paint, beads… You get the idea.

We had the privilege of meeting our neighbor’s parents, who came for a visit from halfway around the world. It’s amazing to see how much you can connect with people, especially when you don’t speak the same language. And even more amazing when you find out that you share some similar interests and find commonality.

It’s even more special when you receive an invitation to be a part of celebrating their 60th wedding anniversary.

I’ve been married for over a decade. So much has changed in the world since that day. I tried to think of how much the world will change in another 50. It blows my mind.

What is it like to celebrate a 60th anniversary in another country–one you may or may not have thought you’d be in when you were younger?

Of course I couldn’t pass up an opportunity to celebrate and honor a long lasting relationship like this. And while thinking about how to give a meaningful gift, with little personal history, and something that’s not burdensome for when they return home, I chose to focus on the memories. Celebrating the last 60 years of their memories together and giving them a memento of this trip, this moment in time.

Advertisements

My husband had taken a group picture at the end of a visit where we had them over and made for them their first American meal. I chose a picture because it travels well and is minimalistic for those who gravitate to that way of life. But I also couldn’t pass up giving some flowers because it’s something that brings happiness in the moment.

So for this quick to gather gift that’s pack full of memories and meaning, here’s an idea for you to consider the next time you need to find a gift in under two hours.

Pick a photo of you and the other person from your phone and send it to a local place that can print it out in an hour.

While that is processing you can stop by a shop, florist, road side stand, farmer’s market, or garden and gather some flowers that have meaning.

In this instance I chose sunflowers because with our guests, they saw the sunflower I had grown from seed and we talked about sunflowers and sunflower oil for quite some time. Sunflowers may not be their favorite flower, but in this gift, it’s a nod to something we connected with in the middle of a language barrier.

It just so happened that at home I had a vase on a shelf that I was saving for a time to reuse by gifting to someone, and I had some fabric with sunflower print on them.

As you notice here, sunflowers can be awkward if they’re not bundled. So I decided to bundle the flowers with a strip of cloth.

For a professional look of wrapping a bouquet, you want to first trim down the fabric you want to use into a strip. No matter how nicely you cut, the fabric will always fray. To give a clean edge, you want to press the strip of fabric. First, fold and press the raw edge. Then you’ll tri-fold and press the fabric into a wide ribbon. Now the edges won’t fray on you and you didn’t have to sew.

To make this wrap, you want to put one edge of the ribbon between the stems. Then you can wrap it tightly around the bouquet without the ribbon slipping on you.

When you get to the end of the ribbon, you want to fold the ribbon up at a 90° angle. The tuck this final edge down behind the wrap, between the stems. If the wrap is snug, it will hold the ribbon in place without using tape, pins, glue, or any other fastener.

The beauty of making a wrap like this is that the person you are gifting this to can use the fabric after the flowers are long gone. If this person is sentimental, they will no doubt find a way of repurposing and reusing this strip of fabric.

Don’t forget to use a small scrap of the fabric to make a card that matches.

Here, I took a piece of 8.5 x 11″ sheet of card stock and trimmed along the short edge a strip 4″ wide. This strip I folded in half to make a blank card that is 4 x 4.25″.

Using the left over sunflower fabric, I decided how wide of a ribbon I wanted to glue to the front of the card. You can be as precise as you want to be. I chose to wing it and just cut the fabric into a small strip.

This time I had to be careful about the edge because there’s no room for a folded seam. This fabric print looks good with a frayed edge, so I saved time by just removing the stray threads and embrace the fray. (As opposed to if I need to have a very clean edge and have to cut a straight edge.) Now the sides and bottom of the card need to have a straight edge, so I leave this ribbon large and will cut it down after I glue it to the cardstock.

For gluing the ribbon down, you want to decide where you want to place it and mark off the area. You will need to liberally apply glue to prevent fraying on the card, so drawing a glue line is very important. Make sure that where you draw the line will be hidden behind the ribbon, so make sure the line is lower than where you want it. Apply the glue and spread it evenly across the whole section, even over the edges. If you don’t put glue on the edges, the fabric will lift from the cardstock.

Gently lay the ribbon on top of the glue and make any adjustments that you need. When you are satisfied, take a scraper or plastic card, place it in the middle of the ribbon and press it to the edge of the card. Then place the scraper/card in the middle and press down in the opposite direction. This will secure your fabric to the card and remove any air pockets that may have been present.

Now that your ribbon is secure, you can flip the card over. With a pair of scissors, trim off the excess fabric.

I trim from the back because I can see exactly where the edge of the cardstock is.

The blank card is now ready for you to write you message on.

By now, your pictures should be ready to pick up. Once you have them, you can place them in a picture frame and you’re ready to bag or wrap your present.

From this gift given, the part of the gift that meant the most was the blessing that I wrote inside the card.

In today’s world, a blessing spoken over another person is something that’s not talked about. But it’s the most powerful gift that we can give another person. And to have those words writing for the person you’re gifting to read over and over again is life changing.

If you are unfamiliar with a blessing, it’s what you tell someone that you see in them now, but you also what you desire for their future. Instead of “I hope you have a happy birthday” or anniversary, I tell the person what I want to see in their lives for this coming year or the years moving forward.

In a time where people are struggling to see their purpose in life, why they matter, the most important thing you can give a person is a vision of something to look forward to. And the best part about a blessing that you speak over a person is that it’s not something that can be bought. It shows the person that you see them, you value them, and that they have a purpose to live for.

Whether you’re looking for making a meaningful gift on a tight budget, don’t know what to give a person, need an impactful last minute gift, or any other reason, know that you can speak into a person’s life and it means more to them than anything else you give them. So no matter what your gift giving situation is, know that a blessing from you can be the most impactful thing that you can give another person.

Never underestimate the power of your words.

And don’t hesitate to gift a blessing!


Processing…
Success! You're on the list.

One response to “Surprise Gift”

  1. Roy Avatar

    Hi to every one, tthe comtents prsent aat this web pzge are really remarkable foor peolle knowledge,
    well, keerp up the good wotk fellows.

    Like

Leave a comment

Advertisements
Advertisements
Advertisements
Advertisements

Meaningful Gifts

Happy Mother’s Day to all the moms who are celebrating today with their children, the moms who are missing their children, the moms who have lost their babies far too early, those who shared an all too brief moment with their babies, the mothers who are in the middle of a season of making the dream of motherhood a reality, and those who love on the children from other mothers who lean on you to be the loving assurance in this season of their life. No matter what motherhood looks like to you, Happy Mother’s Day!

Photo by Secret Garden on Pexels.com

Depending on who you talk to, some people feel that holidays are too commercialized. Others find it difficult to find the perfect gift. And others find it difficult to gift a loved one while feeling the financial pressures of this season of world history. No matter where you personally find yourself on this spectrum, I want to help you find inspiration on how you can find a meaningful gift for someone. Whether it’s a belated mother’s day present, a birthday, anniversary, father’s day, grandparents’ day, teacher appreciation, graduation, or any other occasion, know that you can gift in a meaningful way.

I’m going to use the example of the mother’s day gift that I gave one of the mothers in my life. While this may not apply to the person in your life, the same principle can be applied in finding what you can gift that special person in your life.

This mom loves talking about her memories. For many years she’s shared her precious memories of when she operated a daycare. And one of those fond memories is when she grew gardens with the children under her care.

Growing salads in a container box.

One thing about moms, it seems pretty universal that sharing memories usually isn’t about the memory. It’s about reliving a moment in life that brought pleasure to them.

From this understanding, I knew that building a garden for this mom was a gift that would fill her love tank. Not only is it an opportunity for her to relive precious memories in the here and now, it also opened the opportunity to add more memories in association with these older memories. By building a garden and scheduling time to upkeep and tend to the garden, it was also guaranteeing visits and making time for her to spend time together.

Container growing for small spaces.

For this mom, she has two love languages. Her primary love language is gift giving. Her receiving love language is quality time.

Making a deposit of part of this season’s garden was not just a simple arrive, dig holes, put in start, say good bye, and move on with the day.

Advertisements

For this Mother’s Day gift, it took in the appearance of leaving all the gardening supplies in the car and starting off with a sit down chat and getting caught up with all the news, even if it was only a day since we last saw each other. Then, I was able to go prepare the garden beds for this first plant installment.

Even before I could bring out the plants, this mom was already so filled with love that she wanted to spend some more talking. As much as I wanted to stay task driven (my personality is to knuckle down and get a project done quickly so I can move on to the next task), this day was all about showing love to this mom.

Pallet boxes for narrow spaces and hanging baskets on cyclone fence

So we had another chat session.

When I could find a polite moment to get back to the task of putting the starts back into the ground, I made that move. And with the final post plant watering, I went back and gave this mom one last extension to the gift I was giving her.

Remember, I said that this mom shows love to others by giving to them. So while I was building this garden for this mom, I know that the one thing that would bring her even more pleasure is by telling her upfront that the goal of this garden is primarily to meet her primary produce needs, I’m planting more than she will personally need so that she can give from the garden to others.

I wish I could share with you the look on her face, because she was bursting with love. Knowing that she was having a garden this year was more than enough to help her feel love, she felt seen and more loved because the gift was enabling her to show love to others without need to be reserved or anything else. It was a gift that was freely given so that she could freely give to others.

Growing herbs in repurposed gutters hung on a cyclone fence.

I know that this story may or may not show you specifically what you can give the hard to shop for person, but there is a valuable lesson here.

A good gift is designed to make a person feel loved because it speaks to how they most readily feel loved.

If you don’t know this love language, ask your person how they most feel loved. They will gladly tell you. It could be a tangible object or food that makes them feel loved. Or it can be a non-tangible activity, expression, or display.

A great gift is one that fills their love tank, but also doubles as a tool to enable them to share their love with others.

Container growing garden with DIY budget friendly or recycled components. Chicken wire trellis threaded through upright supports.

Maybe your loved one is not like this mother. Maybe they don’t show love to others by giving them things. Maybe they show love through acts of service. However their schedule is busy. By gifting them your time to do tasks for them or help them create time, this can free up time where they can show love to others by spending time with another person.

My encouragement to you today is to be inspired with a gift idea that doesn’t come from the shelf of a store. Yes, there are many store bought items that are amazing and meaningful. I want to strike the inspirational fire to give a gift out of love and seeing the other person at a core level. And also enable them to pass on love to others.

Advertisements

Right now we live in an interesting moment in history. It is an uncertain time for many families. But it is also a prime moment to celebrate others by giving to them in a way that shows them that you remember past conversations. Where you have heard and remembered things that could have easily been passed off as trivial information in the moment.

Let’s show our loved ones that we see them. And we celebrate them for who they are.

Again, Happy Mother’s Day!

publicdomainpictures.net

This post contains affiliate links to products. We may receive a commissions on products purchased through these links, but at no extra cost to you. This item link is to Amazon but may be purchased at local markets, and found at your local library.

If you are unfamiliar with Love languages, here is the book that started it all.

The Five Love Languages by Gary Chapman

Originally this was written for understanding your mate. There are several other editions available to meet other relationship needs such as children, being single, and in relationship of a military service member.

Processing…
Success! You're on the list.

Leave a comment

Advertisements
Advertisements
Advertisements
Advertisements