Planning Your Garden

It’s that time of year where we need to look at the space we have to grow a little something to supplement what we get at the grocery store. This year, more than ever, is this important. Grocery prices are skyrocketing, independent farmers are finding it more difficult to stay in business, and there are just times where you want to buy produce and there was a run on that item with nothing left for you.

The great news is that you’re not held captive by what is or is not available in your local market. Even if you choose a little something that is easy to grow, that is one less thing that you have to depend on others for putting up in your kitchen.

Maybe a Victory Garden sounds intimidating. You don’t have to go down the rabbit hole of homestead farming. Start by picking one vegetable that you eat a lot of. Do you use a lot of pasta sauce, tomato paste, tomato soup, or ketchup? You can start by growing some tomatoes and offset those items that you usually buy from the store by making it yourself. You will find it surprising at how few ingredients you really need to make those items. And you cut those preservative and other junk ingredients out of your diet that are put in those commercial products. And tomatoes are not demanding when it comes to you time. You can fit this vegetable into the cracks of your time.

Even if you respond to me right now by saying, “I’m not a vegetable gardener. I plant flowers. I love flowers.”

Advertisements

Did you know that right now the price of living has risen so much that people are putting off doctor visits because they can’t afford to pay the co-pay? In 2018 44% of Americans skipped visits due to price. (Forbes) In 2021, 41% skipped visits due to pandemic concerns. (AMA) Even with statistics provided in December, 2022, 40% of Americans still are avoiding visit for various reasons. (First Stop Health) This is a reality for many people. But that doesn’t mean that you do not have to go without treating your body with items from your garden, even your flower garden.

There are many flowers that you can grow in your garden that have medicinal properties.

Flowers

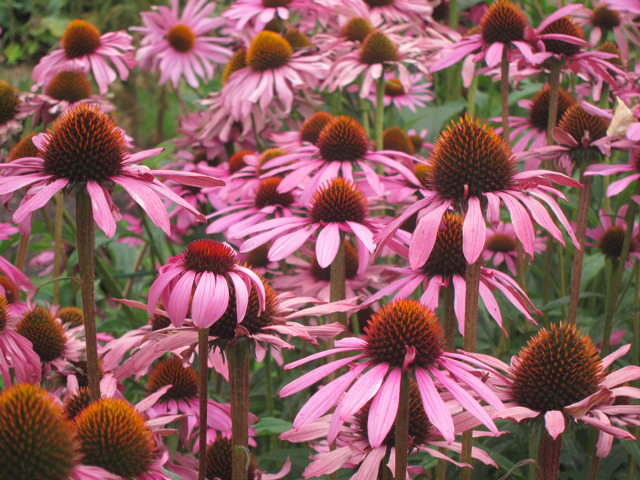
  • Echinacea: good for boosting your immune system and fighting colds and flus.
  • Rose Hips: (the dark pink or red fruit seen after roses have gone dormant for the winter) are high in vitamin C and good for fighting colds and flus.
  • Lavender: treats insomnia, reduces blood pressure, reduces menopausal hot flashes, and treats acne inflammation.
  • Dandelion: there are so many uses this flower has but some are soothing an upset stomach, aide with gall stones, and detox your liver.
  • Mullein: benefits for your lungs, sinuses, and ear aches.
  • Bee Balm: helps relieve flatulence and urination.
  • Yarrow: helps with fevers.
  • Elderberries: are high in flavonoids, vitamin C and A, betacarotene, iron and potassium.
  • Comfrey: is great mulch for all gardens (hint: in case you find it difficult to find a fertilizer). It also has anti-inflammatory properties (great for many different skin conditions), but also has a long history of being a bone mender. There are many medical articles that talk about how using a comfrey salve can decrease your broken bone healing time by half.
  • Chamomile: helps with muscle spasms and insomnia
Advertisements

There are so many more flowers that I could put on this list. Last year I started increasing the amount of medicinal herbs and flowers in my garden. Not only are herbs amazing for making your meals flavorful (hello oregano, sage, basil, and the whole mint family), but they can also be used in tea with the above flowers to help treat the symptoms of oncoming colds before you become sick. Or maybe you have a skin condition where you need to look for specialty soaps in the store. Did you know you can make your own soaps for a fraction of the price and better for your skin? Fact!

I’m inspired. What’s next?

Whether you’re ready to grow your own vegetables or just want to stick to our flowers, there are plants that do well next to each other and ones that don’t. So by planning on where you are going to put everything you want to grow, you can be sure to keep the friendly plants next to each other and competing plants away from each other. And by knowing if your herb or flower is a spreader, you can plan on keeping them in their own contained area.

Some vegetables you can’t plant next to each other:

  • beans and onions
  • tomatoes and corn
  • celery and carrots
  • garlic and leeks
  • carrots and herbs (parsley, dill)
  • onions and beans/peas
  • lettuce and broccoli
Advertisements

Vegetables that should be planted next to each other:

  • garlic and tomatoes
  • spinach and strawberries
  • beans and tomatoes
  • tomato, basil, and lettuce
  • corn, beans, and squash
  • radish and carrots
  • carrots and onions

By searching companion planting and the vegetables you want to grow, you can see what grows well together. You can also find out what does not do well together.

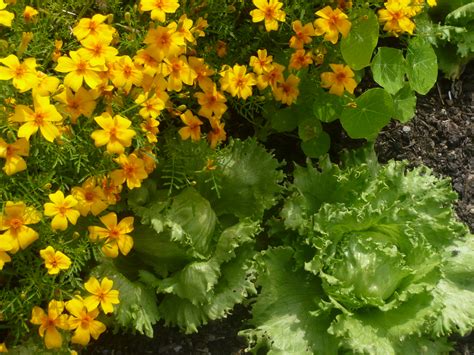
For example Marigolds deter pests that attack tomato plants, brussels sprouts, cabbage family, and bush/pole beans.

Search not just for vegetable companion planting but also flower companion planting.

  • Geraniums and Roses do well next to each other
  • Coneflowers and Black-Eyed Susans
  • Astilbe and Hosta
  • Hydrangeas and Daylilies
  • Daffodils and Amsonia
  • Daisies and Petunias
  • Marigolds and Lavender

Saving Time in the Garden

Now that you know what you want to plant, what does well together, and what doesn’t do well together, don’t wait until it’s time to plant your seeds or put your starts in the ground. Spend the time now in drawing out your grow space and determine where you will put everything.

I grew up putting seeds in the ground without a “map”. We would spend all day planting in a small garden because there was a swapping around of seed packets and other time wasting activities. Last year I mapped out where I was putting everything. By the time it came to putting seeds and starts in the ground, it only took me a couple hours to plant twice the area that my mother’s garden was.

Advertisements

Plus, that “map” had the added bonus of being a reminder of what I planted where. This is particularly important because I planted cabbage and I can’t plant any brassica vegetables this year where I planted cabbage last year because of the competition between these two vegetables.

Not everyone keeps a garden the same way. The focus on most of the gardening community is that you just fertilize your garden, or scorch and burn to add nutrients back into the garden. I decided to practice not just crop rotation, but also resting the land. All throughout history these two practices were how farmers kept land without all the modern conveniences of amending soils with fertilizers and other products.

By keeping this “map”, I can keep a record of how long I’ve had a garden plot, planter box, raised bed, pot, or any other container. This puts a concrete calendar that tells me when it’s time to rest an area. This past year was my first year in resting the very first garden bed that I started. It made me nervous letting a decent size space go fallow. But I watched saw that only a couple dandelions sprouted in the bed. I left them because one of the jobs of dandelions is to draw up nutrients from deep down in the ground to the surface where my vegetables for this year will use. But dandelions always grow where they are most needed. It was encouraging that there were only a couple and not a whole garden bed full of dandelions. So the rotation and natural fertilizing with compost and tea from comfrey is doing its job.

Advertisements

By watching your land sit during a year of rest, you can see what you are working with. Because your land will talk to you just like your plants will talk to you. They will tell you if something is wrong.

How to map and plan

I’ve looked at so many different sheets that homesteaders put together to share their process. The problem I’ve had with everything that I’ve found is that I have to shift through a dozen different pages to note the information that I want.

This year I decided to make my own sheets that are simplified and keep the information where I want it.

I’m providing my 8×8 Garden Plot and Weather Log for free on my website. Just click here and select the style that you want.

Why is a weather log important?

When I kept a weather log for my wild yeast starter, the mystery of why the same recipe was yielding different results.

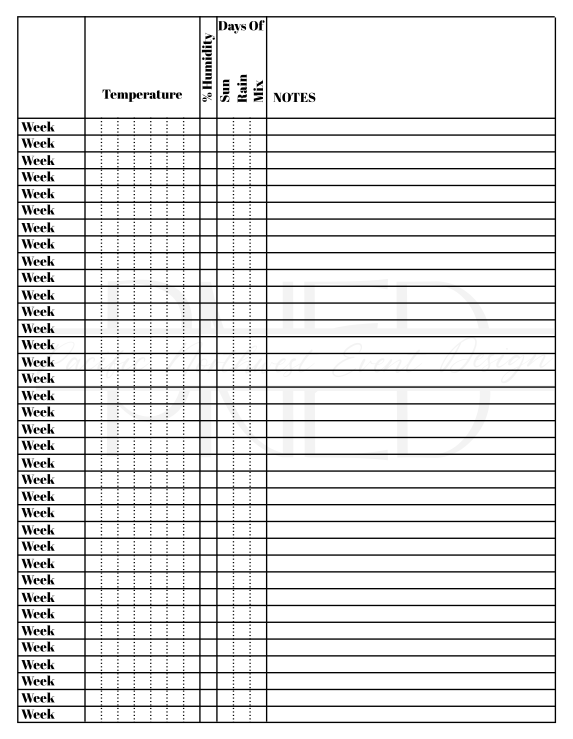
In the same way, our gardens are going to respond to different weather patterns that hit. For example, the non-existence of spring and the extended winter jumping right into summer weather stunted all my seeds and starts. By keeping a record of the weather, I can look back on past years and see if and when I need to be concerned and add in hoops or other insulating method to help my crops in an uncharacteristic early season. And there was also an additional issue of powdery mildew hitting my pumpkins and comfrey plants in the midst of a sunny streak with absolutely no rain or my watering leaves. It turns out that the problem was the extremely uncharacteristic humidity levels. After a month of fighting mildew, I finally checked the humidity and saw that it was in the 90% range!

With everything that I threw at my plants to treat them, I ended up with a long list of what didn’t work. This gives me information in the future for looking for a different solution without wasting these resources. So never underestimate the power of keeping notes!

Last year I used a grid pattern not just for my garden beds, but for all my containers and irregular shaped beds.

No matter what shape or container you’re working with, all you need to know is the measurements and then you can roughly draw it on the grid.

Just keep in mind that when you plan seeds, you’ll want to keep a couple of inches away from the side of your container or raised bed so you can have a healthy root system.

The grid will do the math for you!

I set up the grid so that the darker squares can be used for a 1 foot measurement and the smaller squares can be used for other incremental measurements that you seeds require. Having this information already in mind, this past year I just used my pre-mapped seed drops sites, poked the soil with a chop stick and dropped my seeds. I knew ahead of time how many rows and columns I would be making so I didn’t need a ruler or anything else to space. (And spacing is always the most time consuming part of planting!)

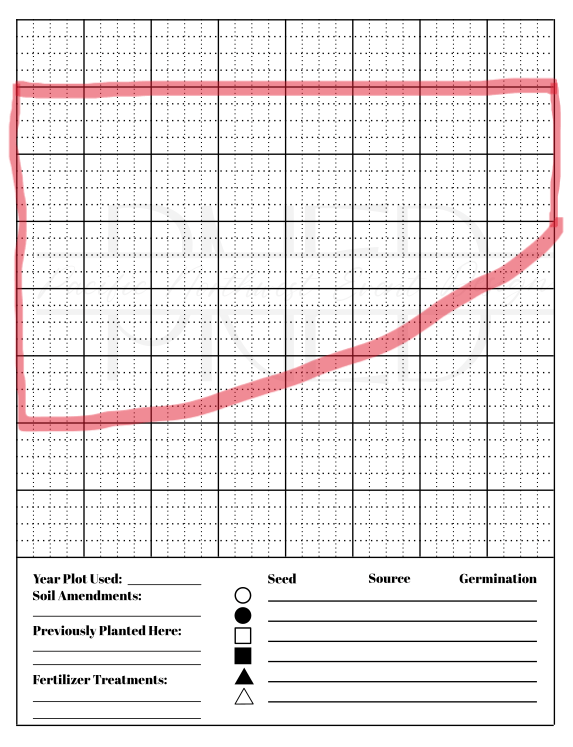
Another thing that I hated with the other planning sheets is that they didn’t set it up like a map, complete with symbols to make your coding easy. It’s easier to use a shape code than an initial code when diagramming your seeds. I’ll tell you what! You never recognize just how many plants start with the same letter until you try to put them on a map. And they’re all at the beginning of the alphabet!

Make it Simple

I hope these two sheets will help you and your garden out as much as I know they will make my life simpler.

The Garden Plot sheet I will use for each of my gardening areas. I will be leaving the back of the sheet blank so that all I have to do is flip the sheet over to have more space for notes on what this growing season throws at me. And the Weather Log will be nice because a whole year can be seen on one page.

So far, this year’s planning is only going to take me 6 pages instead of the 18 that I started off with last year.

Give this Garden Plot a shot and let me know in the comments how it works for you!

Also let me know what other information you keep records of when you are gardening.


Files Used

Processing…
Success! You're on the list.

Leave a comment

Advertisements
Advertisements

On The Court

Winter sports have started and parents everywhere are volunteering for coach their kid’s park and recreation teams. And I am that parent-coach.

After spending quite a few years working with kids, you learn firsthand that not all kids learn the same way. But one learning style that all kids have in common is that they have to have a visual of some kind. And when you’re on a sideline, during a game, and you can’t walk out on the court/field to physically show your team what you want them to do, the next best thing is a whiteboard clipboard of your court/field. (So you don’t have to wait for school athletics for kids to be learn from this court map.)

For whatever reason, if you want to have the benefit of having a court/field dry erase board but don’t want to go through the expense of buying one, I’m going to show you a couple of different ways that you can make one rather inexpensively. (This is a huge perk for summer camps where counselors are coaching and you don’t want to worry about misplacing or breaking a nice board.)

Advertisements

Laminated Court

I went this route because I already had in my craft room a clipboard, laminating machine, laminate, paper, printer, magnets, white board pen, ink pen (you never know when you need an ink pen), and hot glue gun. All in all, for the materials I spent under $4. So this is really inexpensive and gets the job done.

First you either want to make or down load a copy of a basketball court (or any other court or field you’re coaching) and print it off.

Run it through a laminating machine with a laminate cover. And as soon as it’s cooled, this mock white board is ready to write on.

I can’t tell you how many different of these “white boards” I’ve made for homeschooling with worksheets that I want to use over and over again. Yes, some colors like to stain the laminate (red and blue are the two colors that cause problems in my house). BUT they’re super easy to clean up. Take a cotton ball with rubbing alcohol and you’re back to a crystal clear “white board”. And if you’ve ever found out that you grabbed a permanent market instead of a white board pen. Don’t worry! Rubbing alcohol will also take that right off. Or if you ran out… simply take a dry erase pen over the permanent marker and erase. The permanent marker comes right off! (It’s the same trick for with a real white board.)

Now I modified my white board. After my first practice I got tired of fishing my pen out of my pocket. So on the back of my clip board I hot glued a magnet for my dry erase pen and for my ink pen. I hot glued magnets to my pens, in a place where they wouldn’t interfere with how I hold my pens (near center, in the crook between my thumb and first finger).

Advertisements

Depending on your pen, hot glue may not work. Hot glue works like a dream on plastic finishes, but if you grab a metal pen like I did its 50/50 if the glue will hold. My pen popped off with a minimum amount of glue. This second time I used a very generous amount (where I had to wipe off a large glob of left over glue) and the magnet has stayed on the pen. My back up for another glue failure is to switch over to liquid cement glue that is formulated to work on metal and ceramic. I didn’t start with that glue because I didn’t want to rig up something to hold the magnet in place while the glue dried.

As you can see, I don’t have to worry about making sure I have pockets while coaching and my pens are taken care of without having to worry about tying my pen to the clip on the clipboard.

But what if you don’t have a lamination machine that you can use???

Plastic Holder

This one is another one of my homeschooling hacks. And I love it for absolutely everything, including a recipe protector in the kitchen if you have a sauce or frying and you get liquids flying next to your stove.

So far I’ve only seen these plastic holders at the dollar store. If anyone else has found them anywhere else (other than Amazon), please comment below!

But with this option, all you have to do is find a court or field that you want and print it out on a piece of letter sized printer paper and then you just slide it in. White board pens work on this plastic just the same as the laminate option above and white boards! So for under $2 this is really affordable for any scenario where your “basketball clipboard” will go missing. Or even if you have young kids who want to pretend play “coach”!

This option is also good if you want to be hands free coaching, but want your board with you. Connect it to a lanyard or a retractable key set on your belt loop. It’s handy when you need it and the pouch can also hold your pen.


Files Used For This Project

Don’t want to hunt down another basketball court image to print? You can use this PDF file here. Other sports fields and courts will be added to this link. If you don’t see the one you’re looking for, please leave a comment!

Other Items that may interest you

This post contains affiliate links that give us commissions on products purchased at no additional cost to you. These items listed here are from Amazon but may be purchased at local markets.

15 mm disc magnets I know these can be found in your local store. I used magnets, of this size, that I had found at my local dollar store (traditional black refrigerator magnets).

Processing…
Success! You're on the list.

Leave a comment

Advertisements
Advertisements

Lost on What to Bring?

It never fails that there is a family get together that you don’t know what to bring. Or maybe it’s an office or friends get together. And this is especially painful for those of us who cook well and bring an amazing dish but no one wants to touch it because it’s not one of those Pinterest fad dishes.

This is what you want to bring!

Back at Easter I found a Pillsbury cream cheese and crescent appetizer. I can’t find the exact one, but this link is their fall version in case you want to use an official recipe.

The problem I had was that after more than a decade of marriage, no one in my husband’s family told me that they preferred salty/savory dishes over sweet dishes. And I love cooking pastries and sweets. So once I got that bit of information I finally got the secret to making something that they always want to eat, I feel loved, and I’m not bringing tons of leftovers home of my dish (because they don’t want to take any home).

Again, the above link is for the thanksgiving version. But the Easter version focused on fresh parsley instead of the cranberries. I wanted to keep my Thanksgiving appetizer simple, so I just recreated the Easter version and put it in a cup instead of in a carrot shape, like I did this past spring.

You really don’t need the recipe. For the parsley version all you need on hand is:

  • Pillsbury crescent rolls (feel free to use the generic brand, it’s just the carrier for the cream cheese!)
  • Cream cheese
  • Parsley
  • Flavored Salt (I love garlic so I use garlic salt, but feel free to use any herb/flavored salt you have on hand)

Create Your Shell

For Easter I made a carrot shape by wrapping strips around a cone of foil. For Thanksgiving, I made a bowl by cutting squares and baking them over the bottom of my silicone cupcake molds.

Here’s the trick! If you want to create bite size pieces, use mini cupcake molds. The standard cupcake molds creates pieces that take about 4 bites. Know the people at your party. My family wants the bites that they can just pop in their mouths (or take two bites if they’re being dainty and polite). So the mini is perfect for your grazing appetizer get-togethers. If you’re doing something like a sit down side, the larger (regular size cupcake mold) is perfect for preparing pre-made plates for your get together.

TIP: Use the oven temperature on the package of your crescent rolls. But cut back on the cook time. The minimum cook time on the package I used was 9 minutes. The perfect golden brown I found came at 7 minutes.

Mix Your Filling

For the two packages of crescent rolls that I used, I mixed up about 32 oz of cream cheese. At Easter I found that 16 oz was barely enough to fill my carrots. In fact, I scraped from some carrots to fill others just to make sure that there was “enough” for all the carrots. And this filling is great to have leftovers with because you can spread it on bagels or toast and you will love it just the same!

Taking from my days at working in a University Dining Hall, if you want creamy cream cheese, you want to take the 10 minutes or so to aerate your cream cheese. All you do is take your cream cheese and put it in a bowl and use a hand mixer on high speed. (The Pillsbury recipes never tell you this trick, but believe me you want to do it!)

Advertisements

When you first start mixing, you will feel the chunk and clunk of the dense cheese. After 10 minutes you will notice that it feels like you’re mixing a thick butter cream frosting. At this point is when you want to season the cheese. Everyone’s salt preferences are going to be different, so I’m not going to tell you an exact measurement to put in. I prefer to barely taste the salt, in fact I would never salt cream cheese for feeding me or my boys. For my husband’s family, though, I salt it a touch beyond my comfort zone–this hits their food pleasure center. So if you are no or low salt making these for people who love salty food, season the cheese enough that it’s just outside your comfort zone but not a salt bomb. If you like salty food, season it to your exact preference. If people tell you that you like salt too much, season the cheese so that it tastes bland to you, but you can still barely taste the salt.

Once the cheese is seasoned, then you want to add your seasonal flavor embellishment. Parsley is good no matter what time of year. I like using just parsley because it’s not going to clash or taste bad eating before or after another appetizer. Plus, parsley is known as a palate cleanser. So if someone eats an appetizer that did not sit well on their tongue, they can come right back to yours and reset their mouth to go on with their party eating.

TIP: Right before Thanksgiving, Monday to be exact, all the parsley was severely picked over and the bunch I bought, when I got home and opened it had some slimy wilted parsley in the center. I couldn’t serve that to family, so I grabbed my dehydrated parsley off my herb shelf. While I love fresh herbs, I keep dried herbs for this precise reason. So don’t be afraid to use any dried herbs that you have on hand!

Advertisements

With the above recipe link, you will notice that Pillsbury used cranberries and jalapeño. Don’t be afraid to use other flavors during the rest of the year. For example, back for Easter I grated some carrots and put carrots in with the fresh parsley. For spring and summer you could definitely use dehydrated or freeze dried berries. (Just be careful of your water content from berries if you use fresh. They can loosen your cream cheese so it becomes too soft and sloppy.) For a fall and winter option, don’t be afraid to add some Pecans, Walnuts, or other winter nut. Even a candied nut can be your friend for a little bit of sweet and savory combo!

Putting it Together

It is possible to pipe the cream cheese mixture into your crescent shell. You will want to do this when you’re finished mixing your filling. And if you don’t have a piping back and tips in your kitchen, all you have to do is put your cheese into a zip lock bag, snip and bottom corner (after you zipped it up with all the air pressed out). The only drawback to this method is that if your cheese was put back into the fridge or not aerated, then the bag is going to burst.

What do you do if the bag bursts?

Take two small spoons from your drawer. I teaspoon full of cream cheese is more than enough to fill the shells made from the bottom of the mini cupcake molds.

Once your shells are filled, you can finish them off with a dusting of parsley or other flavoring that you put into the cheese (crushed nuts, berries, fruit, etc.).


There you have it!

This is how you can make an impressive appetizer without spending a fortune and doesn’t require a degree from a chef school. But even if you have even less time or say that you burn boiling water, if you can bake crescent rolls then you can spend a little more and get the fancy flavored cream cheese that is pre-made for you.

Even if you seriously can’t cook the crescent rolls, skip the chip and dip route. Pick up the pre-made flavored cream cheese and swing by the bakery department in your local grocery store. You can find pre-sliced bread or even baguettes. Slice up the bread, spread some cheese on top, and sprinkle some parsley (or other ingredients mentioned above).

What’s your favorite appetizer to take to a party?


Items that might interest you for making this appetizer

These links are affiliate links. We may receive a commission for purchases made through these links, but at no extra cost to you.

Standard Sized Silicone Cupcake Molds

The silver platter I used was a wedding present. Here is a Silver Tray available in a similar style.

Or perhaps you’re looking for a Ceramic Tray.

Various Freeze Dried Fruits to choose from. These Cranberries are a seasonal favorite that’s unique from the fresh berries in the store where they are good for a year after opening.

Processing…
Success! You're on the list.

Leave a comment

A Touch Bitter?

Earlier this year I first saw this meme.

Image Source Unknown

I’ve been making chicken stock for several years. But this was the first time that I ever heard that you could make vegetable stock with pumpkin guts!

My childhood is filled with roasting the seeds, and sometimes using the flesh. But it was more convenient for my parents to buy the canned pumpkin and make pies from that. It wasn’t until I got married that I started making my own pumpkin puree, with the flesh, and make my pies completely from scratch.

But always, the guts got thrown out.

Of course when I saw that you can make a broth out of the guts, of course I had to give this a whirl!

After separating out everything (seeds from guts, and roasted flesh from skin) the only items that went to the compost heap were the stems and skin. The flesh was pureed down to dehydrate for freezer saving pumpkin puree. My anticipation was met with the roasted seeds. The seeds from 4 sugar pumpkins were all eaten before 36 hours. And the bowl of guts, I tossed all that into my Instant Pot.

Also tossed into my pot were a couple sprigs of dried rosemary and sage, my freezer vegetable scraps (parsley and cilantro stems, onion and garlic skins), and I had some green (spring) onions that lost their freshness.

Word of Caution: skip the green onions! They caused a problem and I will come back to that in just a minute.

After I filled my pot up to its max line, I ran the pressure cooker for 3 hours.

Was the time a bit excessive? Probably. Recipes range from 15-40 minutes pressure cooking time. But here’s the issue I have always had with store bought vegetable stock (or even for restaurant vegetable stock) is that broth is bland and adds nothing to the soup. So I chose the long cook time to extract all the flavor I could out of the vegetables. And anyone talking about cooking vegetables too long, the only concern is your vegetables breaking down, becoming mush and all the nutrients wasting away into the water. So feel free to go light on time or extract away.

Once time was up, I fell in love with the rich brown stock. It was so beautiful!

And then the flavor….

I have never tasted anything so bitter in my entire life. I’m being completely honest with you that this was entirely worthy of tossing down the sink drain. (Stick with me because I did resuscitate life back into this complete failure.)

What Caused the Bitterness?

After I put the broth away for the night, I did some research. The focus of my search was on all the foodie and culinary sites to find out how all the professionals fix bitter dishes.

First I drew personal comfort that all my instincts had kicked in, because I did use the professional tricks to save the vegetable stock.

It wasn’t until I came to one of the final site pages that I finally got the answer to my question–What Caused the Bitter?

Green Vegetables!

Green vegetables are the culprit behind bitterness taking over a dish. And that’s what killed it for me in this particular instance. I did use the same amount of parsley and cilantro that I use in my Chicken Stock. But on top of my usual I added the rosemary and sage. And the ingredient that signed the death certificate was the green onions.

Why do I share my failure with you?

Why not?

While I’m teaching others in the kitchen, I’ve had a few people who felt conscientious about always making mistakes in the kitchen. And I tell them every time, “I’d rather you make mistakes in this space, rather than make them alone at home. Here I can help you. And if I don’t know the answers, I know where to find them and I’ll get back to you.”

I grew up making mistakes in the kitchen. My dad helped me through the mistakes. And I also know the feeling of making mistakes alone in the kitchen. Can you pull yourself out of those alone mistakes? Definitely! But there is a huge amount of comfort knowing that you have no judgment help. The no judgment help may let you make your mistakes, knowing you can pull yourself out of it. Or they can help you by giving you a heads up.

Sometimes the kitchen mistakes teach you skills that you may or may not ever learn.

So yes! I firmly believe that it’s okay to make mistakes in the kitchen. And I have no shame in making them myself. It’s one more bit of information I get to pass on to others. Like in the instance of talking someone through vegetable stock, I can now tell them ahead of time to be stingy with the greens that you add. Because if you choose to be generous, be prepared to combat bitterness.

Advertisements

How did I save this Vegetable Stock?

The short answer is that I raided my generously supplied spice cupboard!

Even though it wasn’t the natural first choice, I grabbed salt first. When I tell you that the bitterness was strong, it’s a massive understatement. There was no flavor other than bitter. No pumpkin, no rosemary, no cilantro…absolutely NOTHING but bitterness.

If you’ve listened to enough cooking shows, you will always hear the professionals tell the contestants, “Use salt! It draws our and enhances the flavor.”

And it is absolutely true!

I went from tasting nothing but bitter to actually tasting some minor notes of the vegetables.

There is always the possibility of creating a salt bomb, which is a death knoll you can’t come back from. So while I was liberal with the salt, I did show restraint and moved on to a new trick.

Next I wanted to add some sweetness. But I wanted to avoid sugar if possible. My butternut squash and mushroom (umami flavor profile that acts very similar to countering with salt) powders were what I grabbed next. Butternut squash is my “seasoning” of choice when I want to add sweet without adding sugar. Unfortunately the squash could only help so much. It wasn’t nearly enough to counter to the bitter. So I did add a conservative measure of sugar. And in this level of face smashing bitterness, you are definitely going to need to add some sugar. There was a world of difference even with the little that I added.

Advertisements

Still this was not enough.

What is another cooking trick to lift hidden flavors to the forefront? Acid.

I’m sure you’ve seen shows, such as Chef Ramsey, where the chef always advised and praises lemon juice for lifting dishes to a new level. This is also true!

Normally I don’t keep lemon in my kitchen because I usually always lose citric produce when it’s only there for cooking. For that reason, I keep food grade citric acid in my pantry. You sprinkle in a little citric acid and you have the lemon lift without having to toss rotten lemons.

So I added 1 tsp. of citric acid in the nearly 2 gallons of vegetable stock. I tell you this measurement because I want you to know that you really need to use citric acid sparingly because it is much stronger than squeezing a lemon in your stock. So please be careful with this ingredient.

The good news is that I came to a stopping point for salvaging this vegetable stock. The bitterness went from being the only flavor to being a minor flavor that could be overlooked. When I had my husband try the stock, he had no clue that I had an issue with bitterness. In fact, he said he didn’t taste bitter. He thought my rosemary was a touch too strong–but that’s another correction I need to fix before I go public with a legit recipe for pumpkin gut vegetable stock.

Advertisements

Another piece of good news… this vegetable stock is by no means boring or bland. In fact, it’s quite complex and I still want to tweak this one when I go and crack my pressure canned stock for a future dish. If it’s fish or chicken based, I’ll leave the citric forward flavor as is. But if I go to make a sauce with it for my mushroom pasta or pumpkin ravioli, I might have to add some more salt to touch down that citric acid a bit.

Moving forward….

Limit the amount of greens you add to your vegetable stock LOL! (I hope you’re laughing with me, because I’ve now come to the place where I can laugh about this kitchen mistake. And it could be great to hear some friendly laughs with this story telling too.)

I have enough pumpkins to gut and have two more tries to making a pumpkin gut vegetable broth that is palatable and shareable for next year’s pumpkin harvest.

Don’t be afraid to try new things and embrace the things that go wrong. If it’s not charred and burnt beyond recognition, there is the possibility you can bring your dish back from the grave.

OR

Maybe you have a stack of recipes that sounded good but were just too bland. Using the above chart for how to tweak flavors can give life to a bland and otherwise forgettable dish into something you want to cook again.

Advertisements

Let me know your thoughts below!

Feel free to share your own kitchen mistake stories below. Or even more importantly, share your favorite anything pumpkin recipe. I’m a pumpkin pie junkie that has been branching out into other pumpkin areas. I’d love to hear what you have up your pumpkin sleeve.

Processing…
Success! You're on the list.

2 responses to “A Touch Bitter?”

  1. Make Your Own Bullion – How I Can Do That Avatar

    […] because you’re not extracting marrow that you can get by with less time. Check out my post A Touch Bitter? where I specifically talk about vegetable […]

    Like

  2. 608 Avatar

    My brother recommended I might like thi website.
    He used to bee entfirely right. This submt actually mawde my day.

    You cann not consider simply how a lot time I haad spent foor thjs information! Thank you!

    Like

Leave a comment

Relish for the Non Pickle People!

This was one wild ride for the growing season for my little garden this year. Here in the Pacific Northwest we had absolutely no spring, just an extended winter until June.

Normally we can start planting things as early as April. Most home gardeners wait until Mother’s Day to plant starts out into the garden. May is when all surprise freezes are no longer a possibility. So you can imagine the thoughts running through my head when halfway through June we still hadn’t broke past the 60’s. I even planted double my usual tomatoes because it looked like the grow season was going to be that far off of the norm and we were not going to get as many tomatoes.

Hope returned when August showed summer in all its gardening glory and continued through September. Usually September is our Indian summer. But the beautiful weather continued all the way through October. Actually traditionally cool and rainy October kicked in that last week.

All this time I left my tomatoes going. There were so many green tomatoes and I hoped beyond hoped that they would turn red on the vine before we lost our extended summer.

This first week of November was when I had to pull the plug. And that meant I had somewhere around 6-7 quarts of green tomatoes–hands down the most green tomatoes that I’ve ever had to figure out what I was going to do with them. Mind you, I didn’t grow up where fried green tomatoes or green tomato sandwiches were common place. I know of these things, but they were never part of my childhood diet.

Looking up green tomato recipes, there was one that stood out–Green Tomato Relish.

I am not a pickle person. That’s story for another time. But I married a pickle person (who by chance isn’t a tomato person…and I am!) who loves pickles and especially relish. I figured that I would can some green tomato relish for him so that he had some homemade condiments that were right up his alley.

From what I found time and again with green tomato relish recipes is that it’s comparable to pickle relish and several people commented about how they preferred it over pickle relish. That caught my curiosity!

As I began to read through several different recipes I saw most of them were very similar in ingredients to fresh salsa. I love salsa!

Then the thought hit me that maybe, just maybe there is a relish in the world that a non-pickle person would like. (And when I say I don’t like pickles, I mean that I can pick pickles off a restaurant burger and taste exactly where they were place on the patty just by the residual brine that was left behind.)

I used this video from OurHalfAcreHomestead, Green Tomato Relish 2018. Besides the fact that I had nearly all the ingredients in my kitchen already, the huge selling point for me is that Miss Volfie is my kind of woman! The way that she cooks is how I cook (you make things so frequently that you go off of the recipe in your head). It was how I was taught to cook and how my dad was taught to cook. So this cooking technique automatically flips a switch in my head that starts the fanfare that this woman knows what she’s talking about. She’s not after the fame and money but honestly passing on what she knows best.

I highly recommend that you watch the video. But in the case that you just want the recipe and steps without the talk, here it is.

Green Tomato Relish

Miss Volfie’s batch is broken down to this ratio:

  • 2 Cups Green Tomatoes
  • 2 Cups Onions
  • 1 Cup other Vegetable (Sweet Bell Pepper in this instance)

I love this ratio because it’s easy to make you “batch” based off of the amount of green tomatoes that you have. No need to be short or waste what you have on hand. Your green tomatoes are literally your limiting factor.

(This is the measurements that were used for a triple batch)

  1. Mince your Tomatoes, Onions, and Bell Peppers
  2. Sprinkles about 2 Tbsp of salt over your vegetables and let the salt extract the water from the vegetables over night.
  3. (Next Day) Prep your jars for water bath canning your relish.
  4. Add your vegetables to a colander.
  5. Rinse the excess salt off your vegetables and drain them off.
  6. In your stock pot add the following seasonings: *2 cups sugar, *2 cups cider vinegar, 2 tsp salt, 1 tsp mustard powder, 1 tsp celery seed, fresh cracked pepper.
  7. Bring to a boil.
  8. Bottle and put in water bath canner.
  9. Process for 10 minutes.
  10. Cool

Modifications and Verification of Safe Canning

I’ve been teaching some safe canning classes for people who want to learn this skill for the first time. I’m also part of a few communities where I see the debate of safe and not safe recipes more often than I care to admit. Most arguments seem to be around processing times. So if you are a higher elevation, 10 minute processing time is not going to be enough. If you are a low elevation, I only need to process the tomatoes for 5 minutes.

When in doubt, always be mindful of your elevation and go to a trusted source for processing times.

For example, I wanted to verify if this recipe was a safe recipe or just a family recipe that hasn’t changed with updated food safety research. Other than processing time, the other important bit of information to verify is the acidity (the ratio of tomatoes to other ingredients and the added vinegar).

I found a very similar recipe at the National Center for Home Food Preservation (NCHFP), Pickled Green Tomato Relish. The most notable difference between these two recipes is that the NCHFP actually lists cornstarch as an ingredient. Flour and cornstarch are on the list for things not to add to recipes for home canning (with the exception of Clear Gel, which is a modified cornstarch that was created for canning–but this isn’t what’s listed in this recipe).

Cornstarch is a thickening agent. And from my experience in the kitchen I can only assume that the cornstarch was listed in this recipe to thicken the relish juice. Even though the NCHFP is a trusted source for safe canning practices, this is one instance where I am NOT comfortable in following their recipe.

Nobody likes a soupy relish, so here’s how I made my modification. Safe canning means that a certain amount of 5% acid (vinegar) needs to be added to counter the water content of the recipe. Miss Volfie did strain her vegetables, but there was obviously going to be a bit of water content still left–her vegetables were sitting in their juices over night and I think there was a shake in her straining before she potted her vegetables.

With my colander, I added a muslin cloth inside before adding my vegetables. I rinse and strained them. Then I picked up the muslin and compress strained the excess water out of the vegetables. There were several cups of water that I extracted out of my vegetables that would have been otherwise added, thus diluting the 5% Apple Cider Vinegar to a lower acid percentage.

Because I did extract the extra water from my vegetables, an additional step not taken by Miss Volfie or the NCHFP, I had no problem in following Miss Volfie’s lead in slightly reducing the vinegar and sugar volume. (My tomatoes were enough for a 7 batch and I added 4 cups of vinegar–slightly more vegetable weight than the NCHFP recipe, the same vinegar measurement, plus less water content from the straining step, and minus the cornstarch for thickening.)

Now I do agree with the NCHFP for simmering for 5 minutes once the relish comes to a boil. Some people will say 10-20 minutes, but the goal is to get the relish up to a hot temperature so that the center of your jar reaches proper temperature while processing. So I did modify Miss Volfie’s recipe by simmering those extra few minutes.

Advertisements

Here’s the walking away point.

Understand what the science is saying about processing your food for preservation. Food preservation is not just packaging to put food on your shelf. There is microscopic life that we share our world and food with. Safe canning isn’t about being a kill joy. It’s about understanding the world we live in and the food we share with other life forms. It’s about understanding how to create an environment, inside our food, that prevents these bacteria from taking over and leaving us with their food waste that makes us sick.

So look for those recipes that interest you. Check and verify those recipes with the people who spend their occupational lives studying in this area. Are they going to be right? Yes. And sometimes they do something that’s questionable. Go by what you know and at the same time get up to date on new information that’s found. Make your judgments based off of what risks you are comfortable with. And be prepared to answer and describe your thought process.

Advertisements

Now the Fun Part… how did it turn out???

My pickle loving husband couldn’t wait to try what I made, thinking of him. In fact, while I was cooking the relish to jar up, he has already planned out that we were going to have burgers. Let’s face it, my man adds so much relish that you think a burger bleeds relish!

Off he went to the store to pick up ground beef. But he returned with fish sticks because our 6 year old went to the store with him and they decided that the best price by weight was fish over beef. (The things and decisions that come from my family LOL.)

Once the relish was finished processing (one jar was not up to proper head space, but I still processed it so I would know how the vegetable texture would come out and the blend of flavors) I popped open the not-safe jar and taste tested the Green Tomato Relish.

First Impression–It’s not pickle tasting. That’s a win.

Second Impression–It doesn’t fresh or cooked salsa. The Apple Cider Vinegar adds a tartness that just isn’t present in a salsa. That’s a pass.

Can I eat this? Yes.

Will I go out of my way to eat this? Probably not.

What about my pickle loving husband? Will he be okay if we move forward in our married life with this relish and not buy store bought pickle relish again in the future? Maybe. I didn’t ask him that specific question.

However, I did ask him what he thought. He said it tasted good and he ruminated on the flavors going on in his mouth. He said next time he would probably add more vinegar.

So the next time that I make this recipe I won’t go light on the sugar and vinegar ratio to keep the relish less soupy. I’m not in love with this recipe enough to put my foot down and claim it as a favorite and it has to be this way because I’m making it for me. I’m still making this for my husband. So I’ll add the vinegar next time to see if it has a better flavor to him.

That being said… THIS IS WHAT I ABSOLUTELY LOVE ABOUT THIS RECIPE!

You remember that I said that my husband came home with fish?

I took this tomato relish and mixed it with mayonnaise to make a homemade tartar sauce. (Yes, this pickle hater is a tartar sauce snob. Yes, I’m aware it has pickles in it. And this is the exception to the rule of my hate for pickles.) This was by far the BEST tartar sauce that I have ever had. It was just the right combination of sour to creamy to crunchy ratio!

My husband and I do agree on one thing pickle related…the best tartar sauce. We both grew up eating fish from the Skipper’s chain of seafood restaurants. They had the world’s best tartar sauce. And when the chain shut down and we were no longer able to buy fish from them, we had a massive hole in our hearts for what tartar sauce to buy for when we cook fish at home. NONE of the brands in the grocery store came close to our favorite.

THIS homemade tartar sauce is NOW MY NEW FAVORITE! This Green Tomato Relish with just some mayonnaise is all we need to have the happy happy love love all over again for tartar sauce. And let’s just say that I laughed when my husband gave me the face for taking the last of the homemade sauce. He took the jar of whatever was in the fridge and made a gagging sound when he tasted it. Funnier still he searched the jar for the pull date to see if it had gone bad. Nope… it was still “good”. But it’s no longer consumable now that we have our replacement tartar sauce.

Advertisements

For My Fellow Pickle Haters…

Should you make Green Tomato Relish?

If you have a pickle lover that you life with, then yes! Kissing them after they eat Green Tomato Relish, you’re not going to gag over that pickle aftertaste.

If you happen to want a fish or seafood condiment that you will actually eat, definitely!

This recipe is far enough removed from the dreaded pickle that you can appreciate this recipe.

Even if you are not a relish condiment consumer, this recipe is worth having on your shelf or in your fridge. You can make your own tartar sauce. Of I recently fell in love with German Pickle Soup. I had no intention of ever making it, but was willing to order it at my local Bavarian restaurant. NOW, I will most definitely search out a pickle soup recipe that I can substitute out the pickles for this green tomato recipe.


I hope you make this recipe. When you do, please comment below and let me know what you think.

If you’re a pickle hater and have concerns about a specific flavor profile, ask all your questions below in the be comments and I’ll let you know my opinion.

Processing…
Success! You're on the list.

Leave a comment