Holiday Cover Up

Let’s be honest. I panicked when I looked at the calendar and saw that I’m hosting a family get together on Christmas Eve.

I panicked a lot.

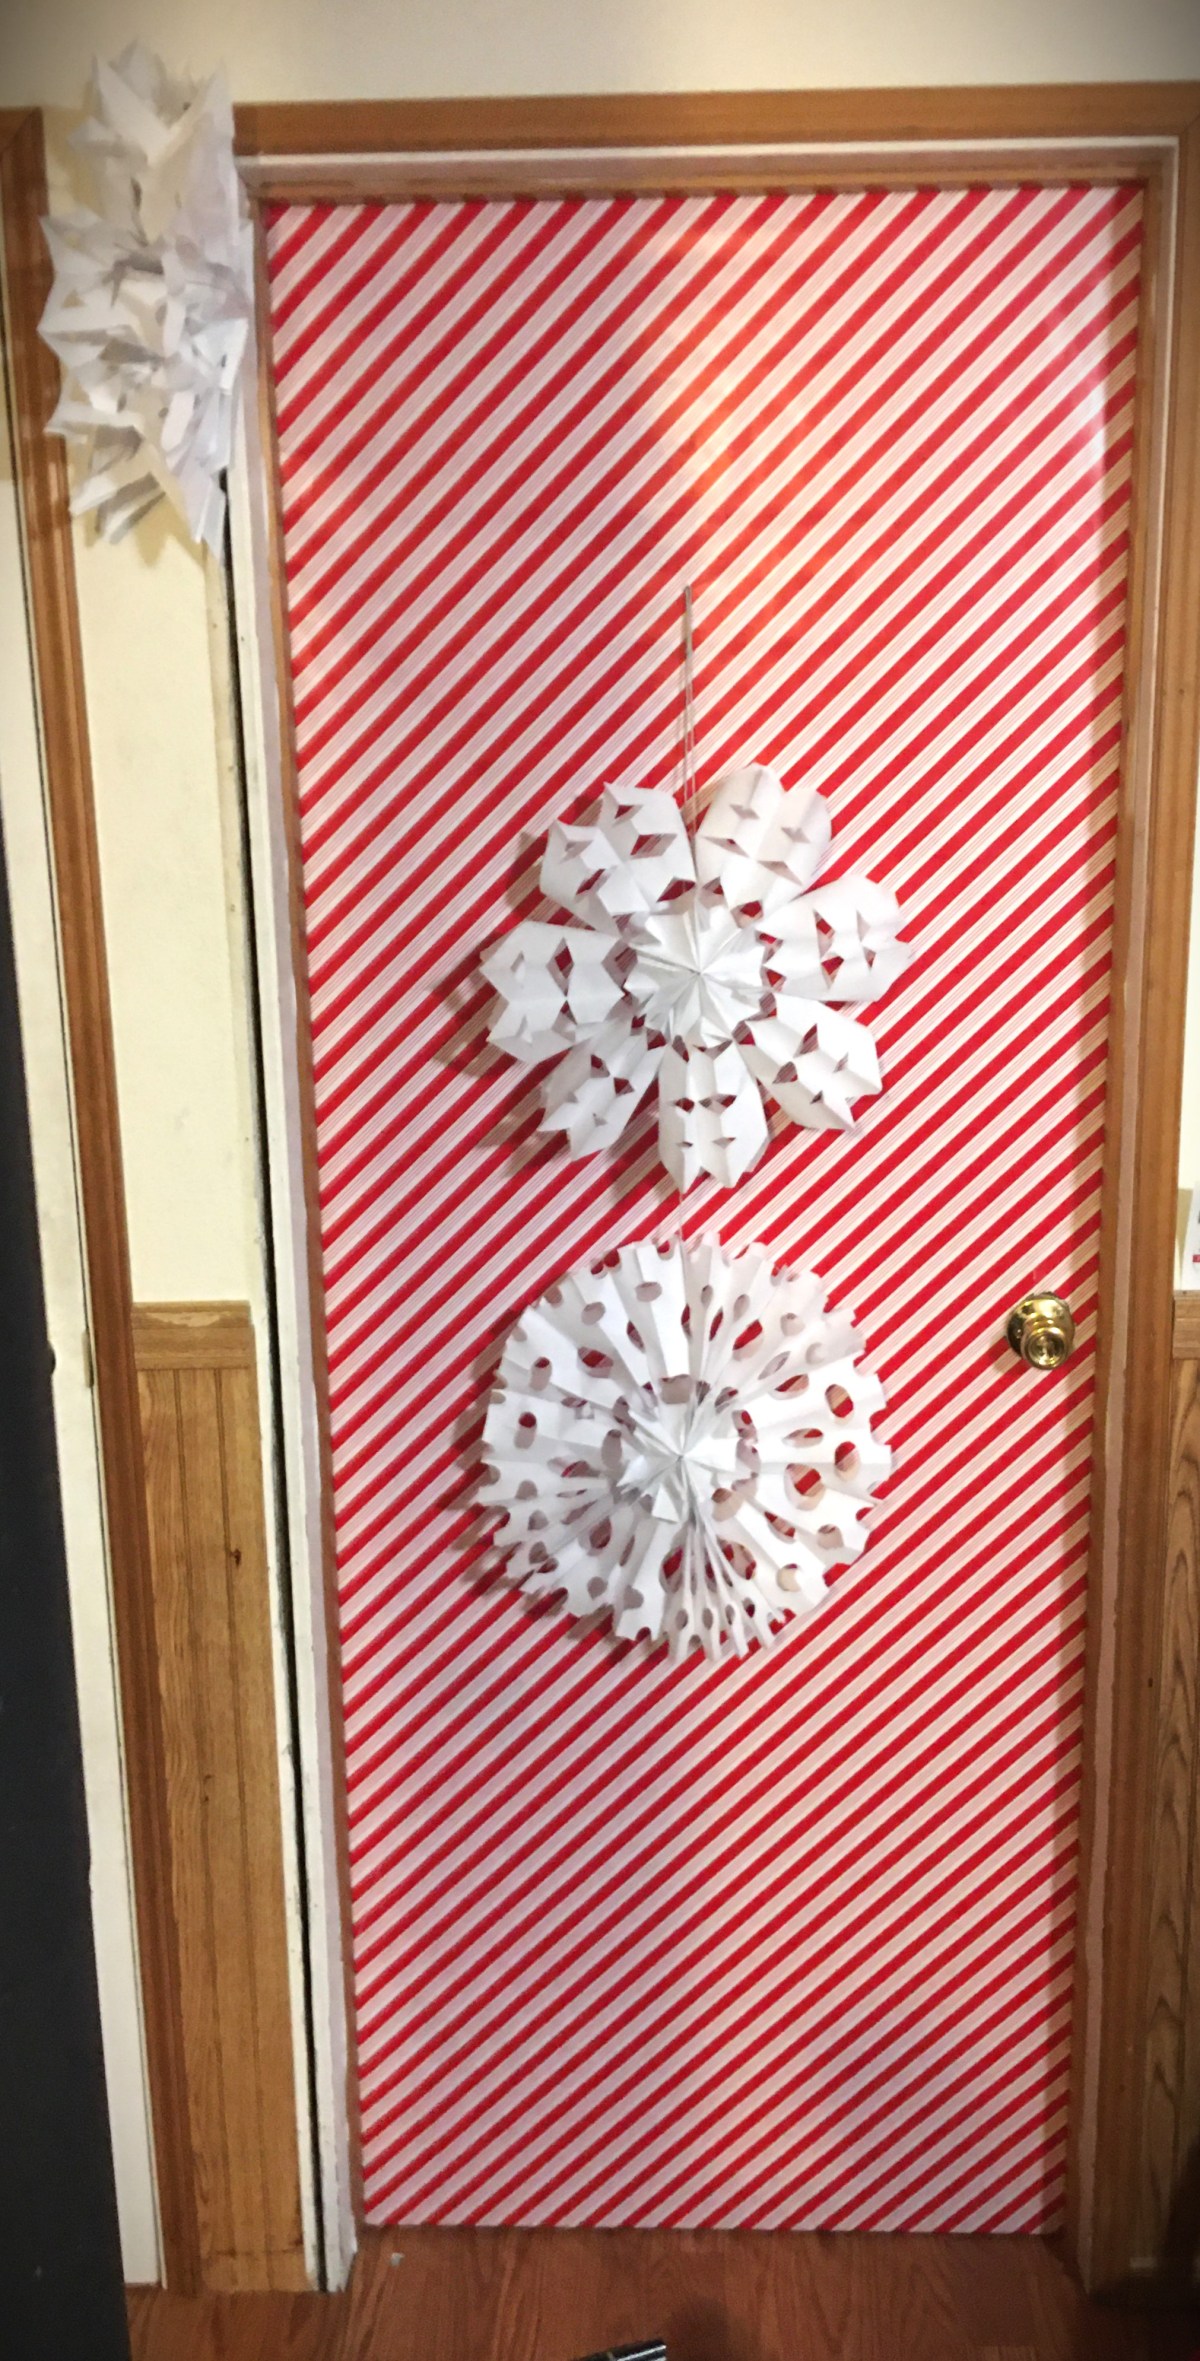
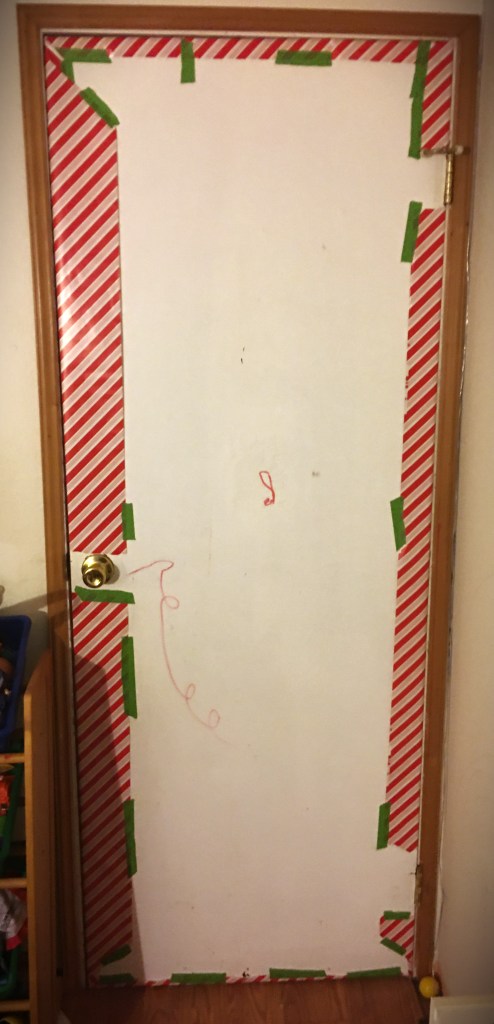
My house is tiny and very much lived in by three small children. And the state of this door says it all.

That hole in the paint, that’s where my oldest scrubbed the door until the paint came off. It was a stubborn pen stain. And who knew you could scrub the door so much the paint would come off???

We’ve lived in our house for over a decade. And I know it’s past time to repaint everything. In fact I have the vision for how I want to update our house interior. But I seriously can’t pull the trigger until we’re out of the color on the wall phase. All three do it. The oldest knows better but does it to push buttons when he’s angry at us. And evidently scrubbing his retaliation isn’t enough to break these outbursts.

Let’s just say that with all three back to back, I tell people it’s kind of nice because when you hit a phase you absolutely hate you only have to go through it once. Well the “wall art” phase is the first one that I hate. I just have to make it past this phase and I won’t have to go through it again!

Advertisements

The inspiration for this “hide my ugly doors” Holiday Cover Up was inspired by this YouTube video from Life of Style Blog, Dollar Tree Christmas DIYS 2022. I can’t improve her walk through for making a Paper Bag Snowflake, so I’m going to direct you to the 4:50 minute mark in the video. However I will give you some tips on how to make the snowflakes without making some easy to avoid mistakes.

Paper Bag Snowflake Tips

The paper bags that I used were not brown paper lunch bags. I happened to have white paper 2 lb bags that measure 4″ x 2.5″ and 7.5″ tall. Yes, my bags are smaller in proportion than the ones used in the video. But the shape of the bag is going to behave the same way no matter the size of the bag. I do want to mention that this 2 lb bag created about a 16″ snowflake. So if you do go with a lunch bag size paper bag, you are going to end up with a beautiful large snowflake!

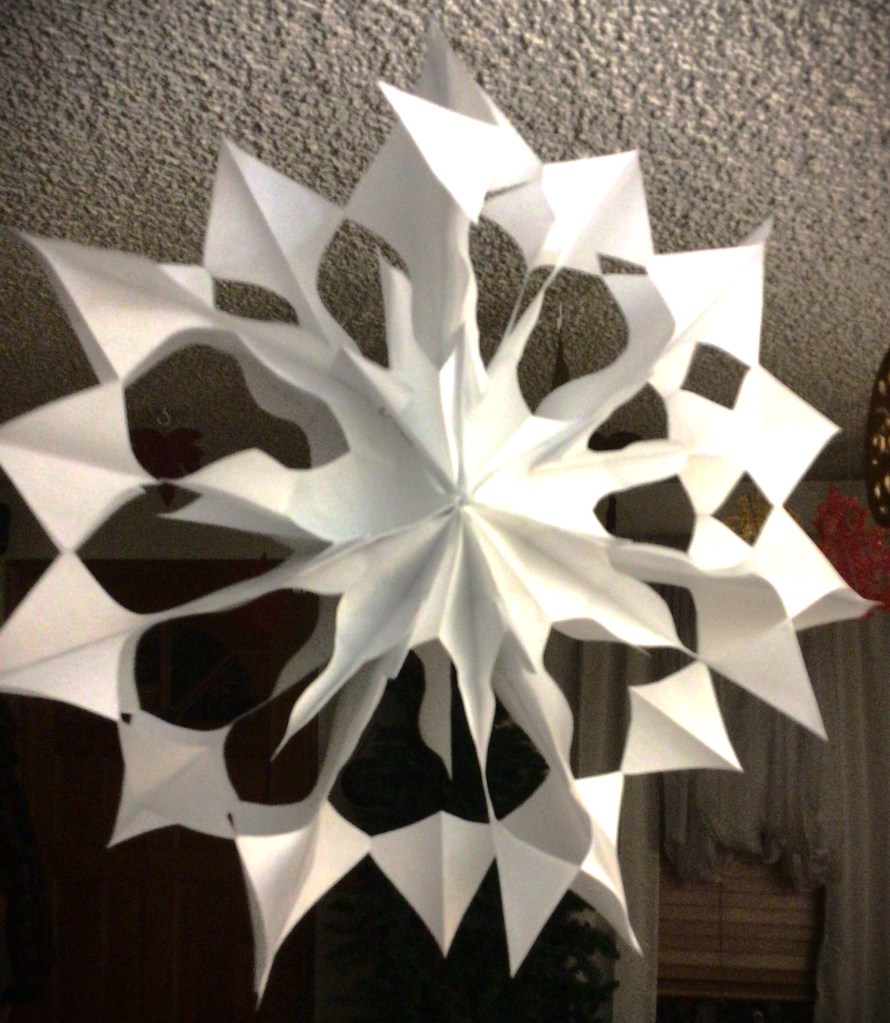
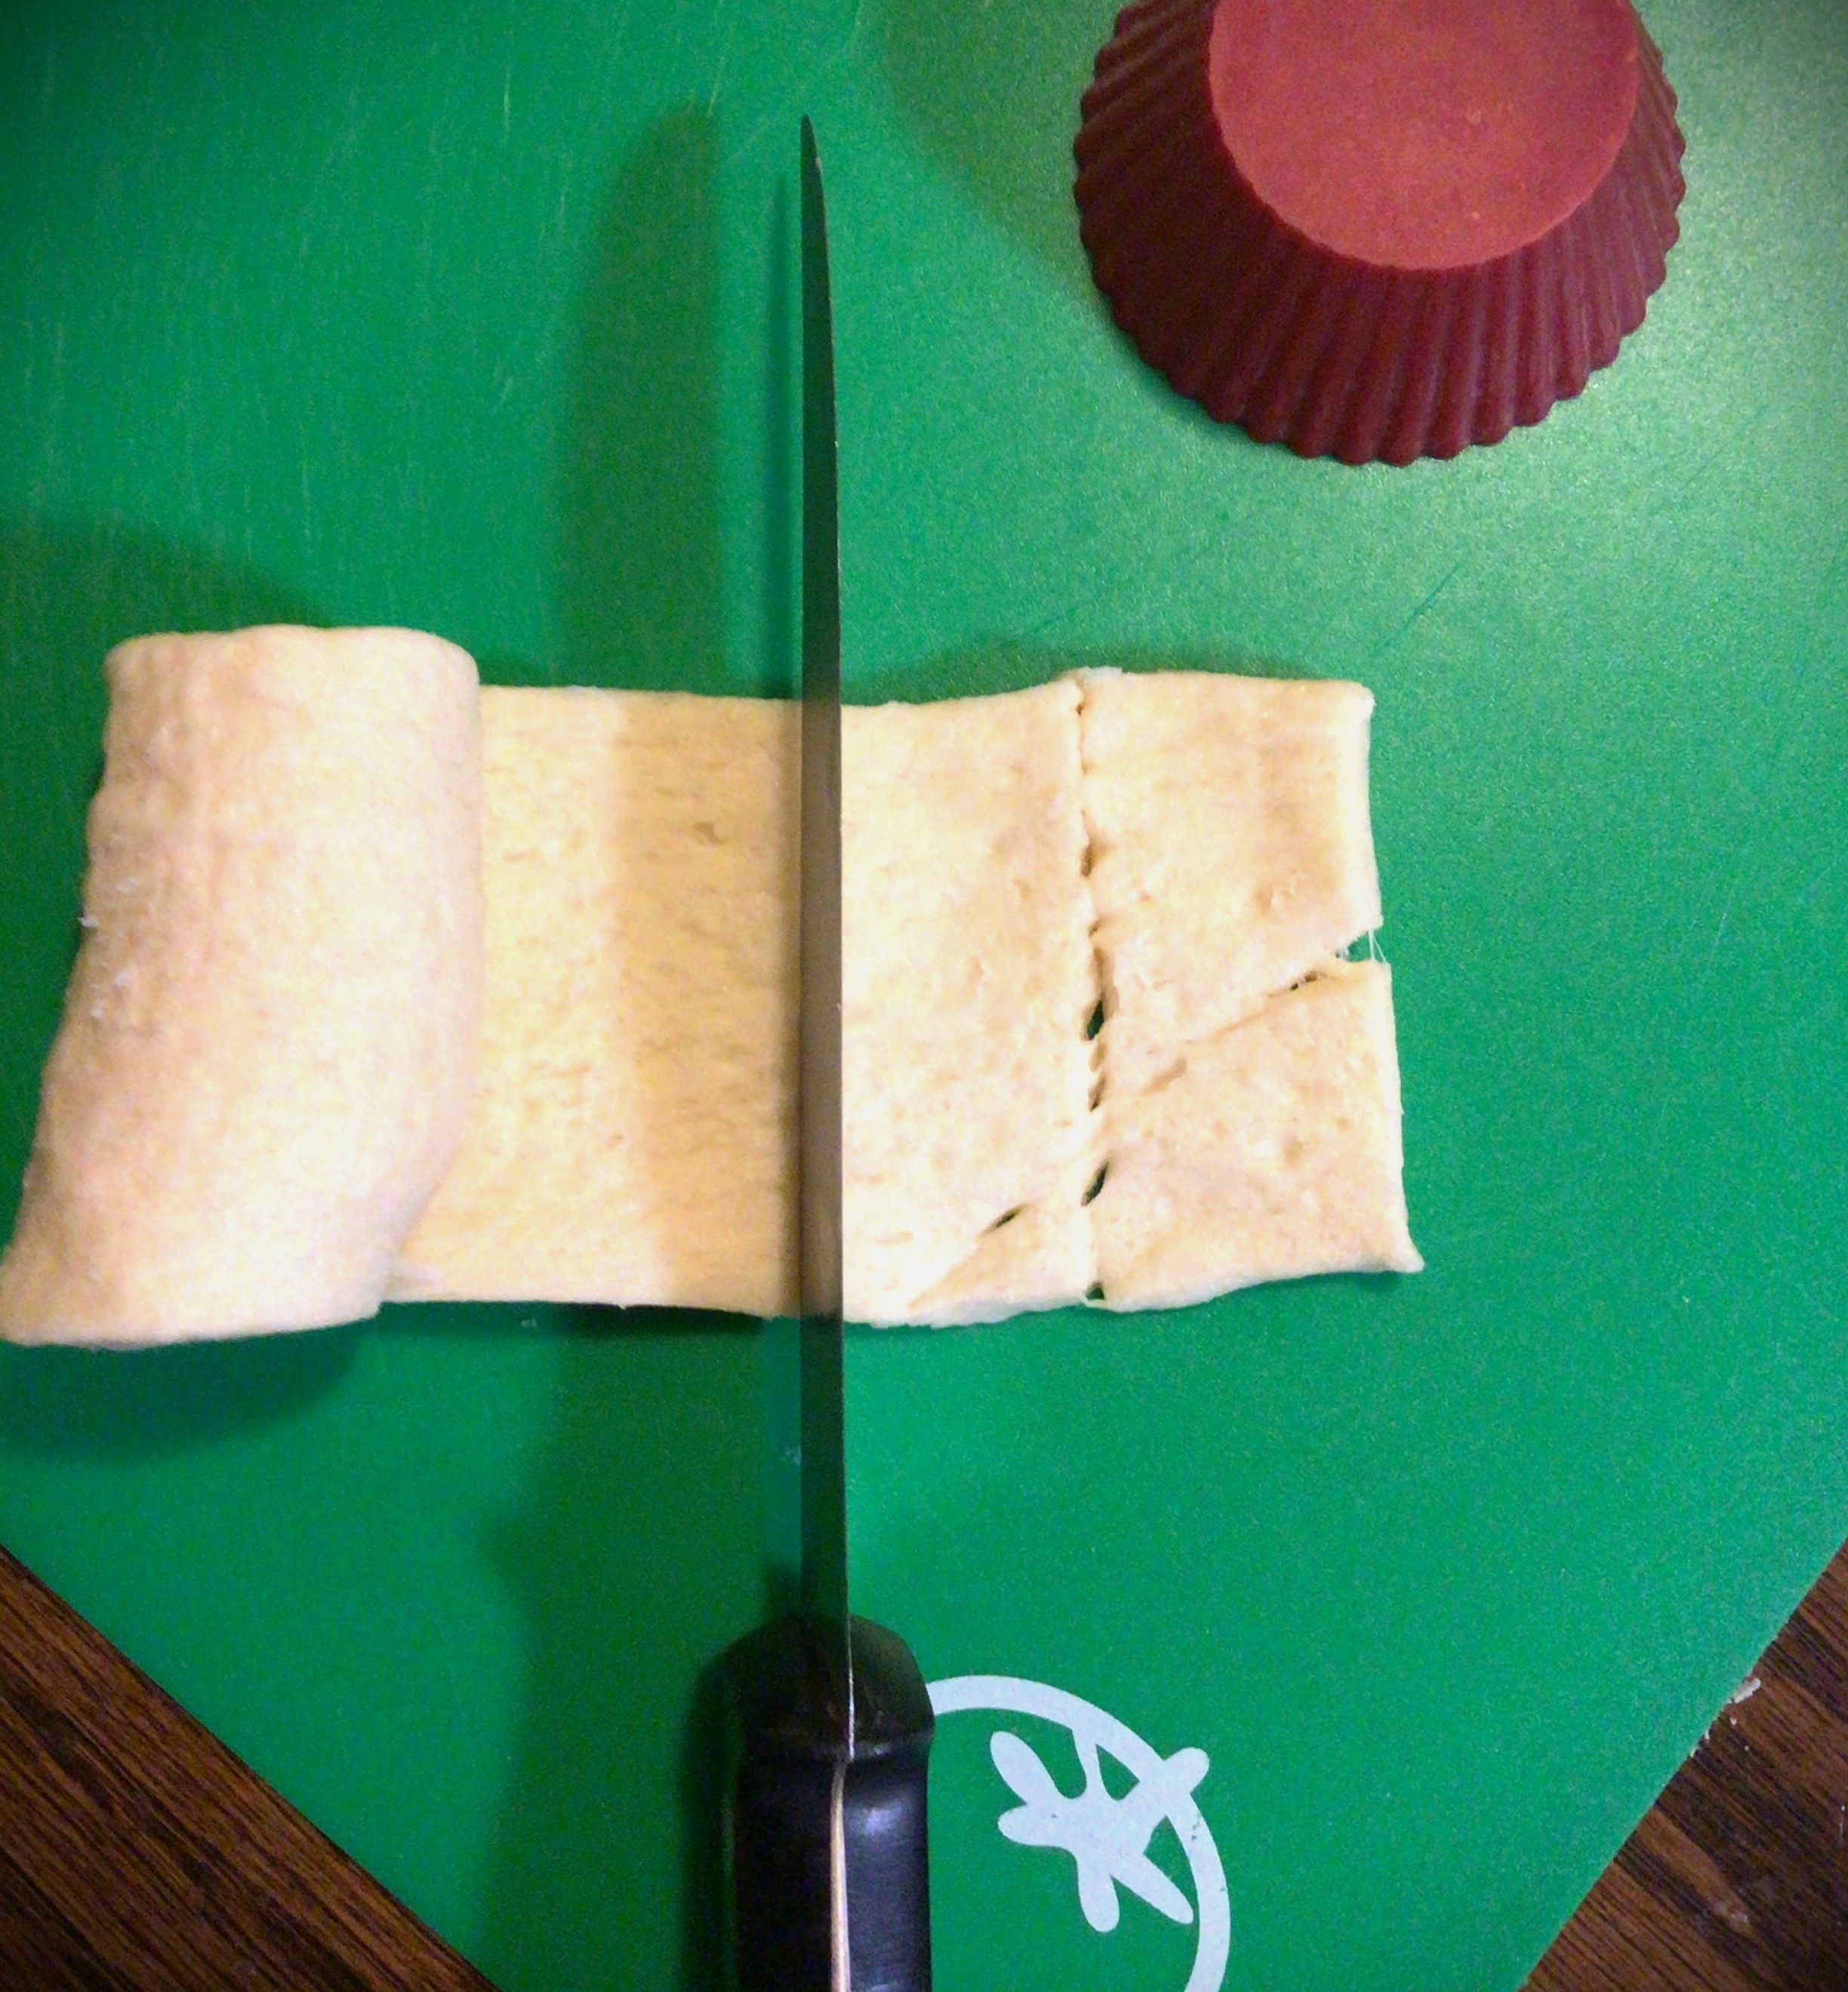
  1. Leave large spaces between your cuts. I tried making delicate lines. And as you can see (picture 1 above) the spokes snapped when I glued the snowflake together.
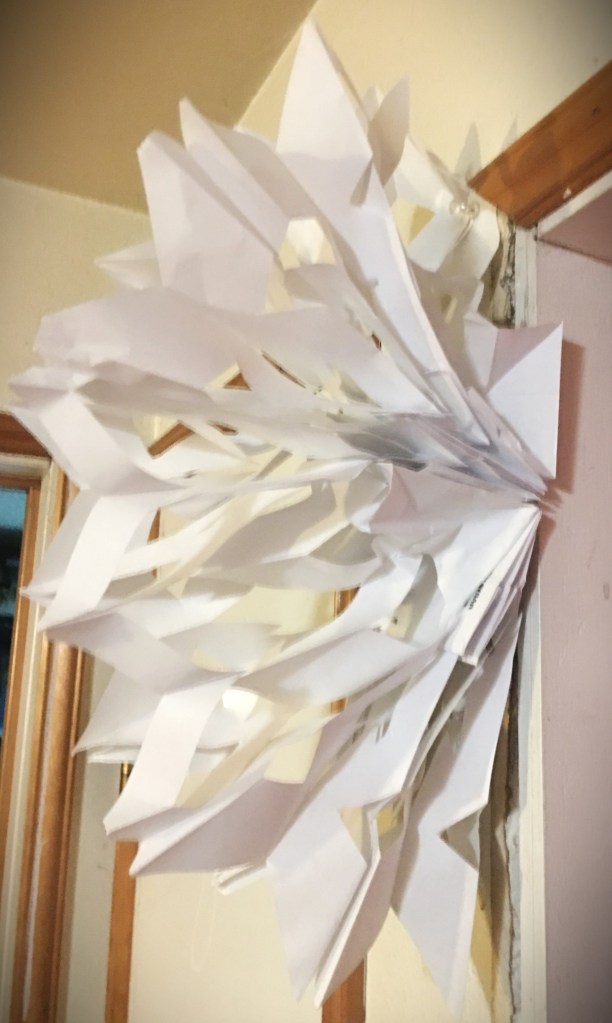
  2. If you glue to the bag’s open end corners, 7 bags is only going to give you a half circle. Picture 2 shows you how stressed the paper becomes when you take it to the bag corners. You end up taking away the flexibility of the paper because you limit yourself to the length of the small side of your bag base. In my case, I limited the distance between spokes down to 2.5″.
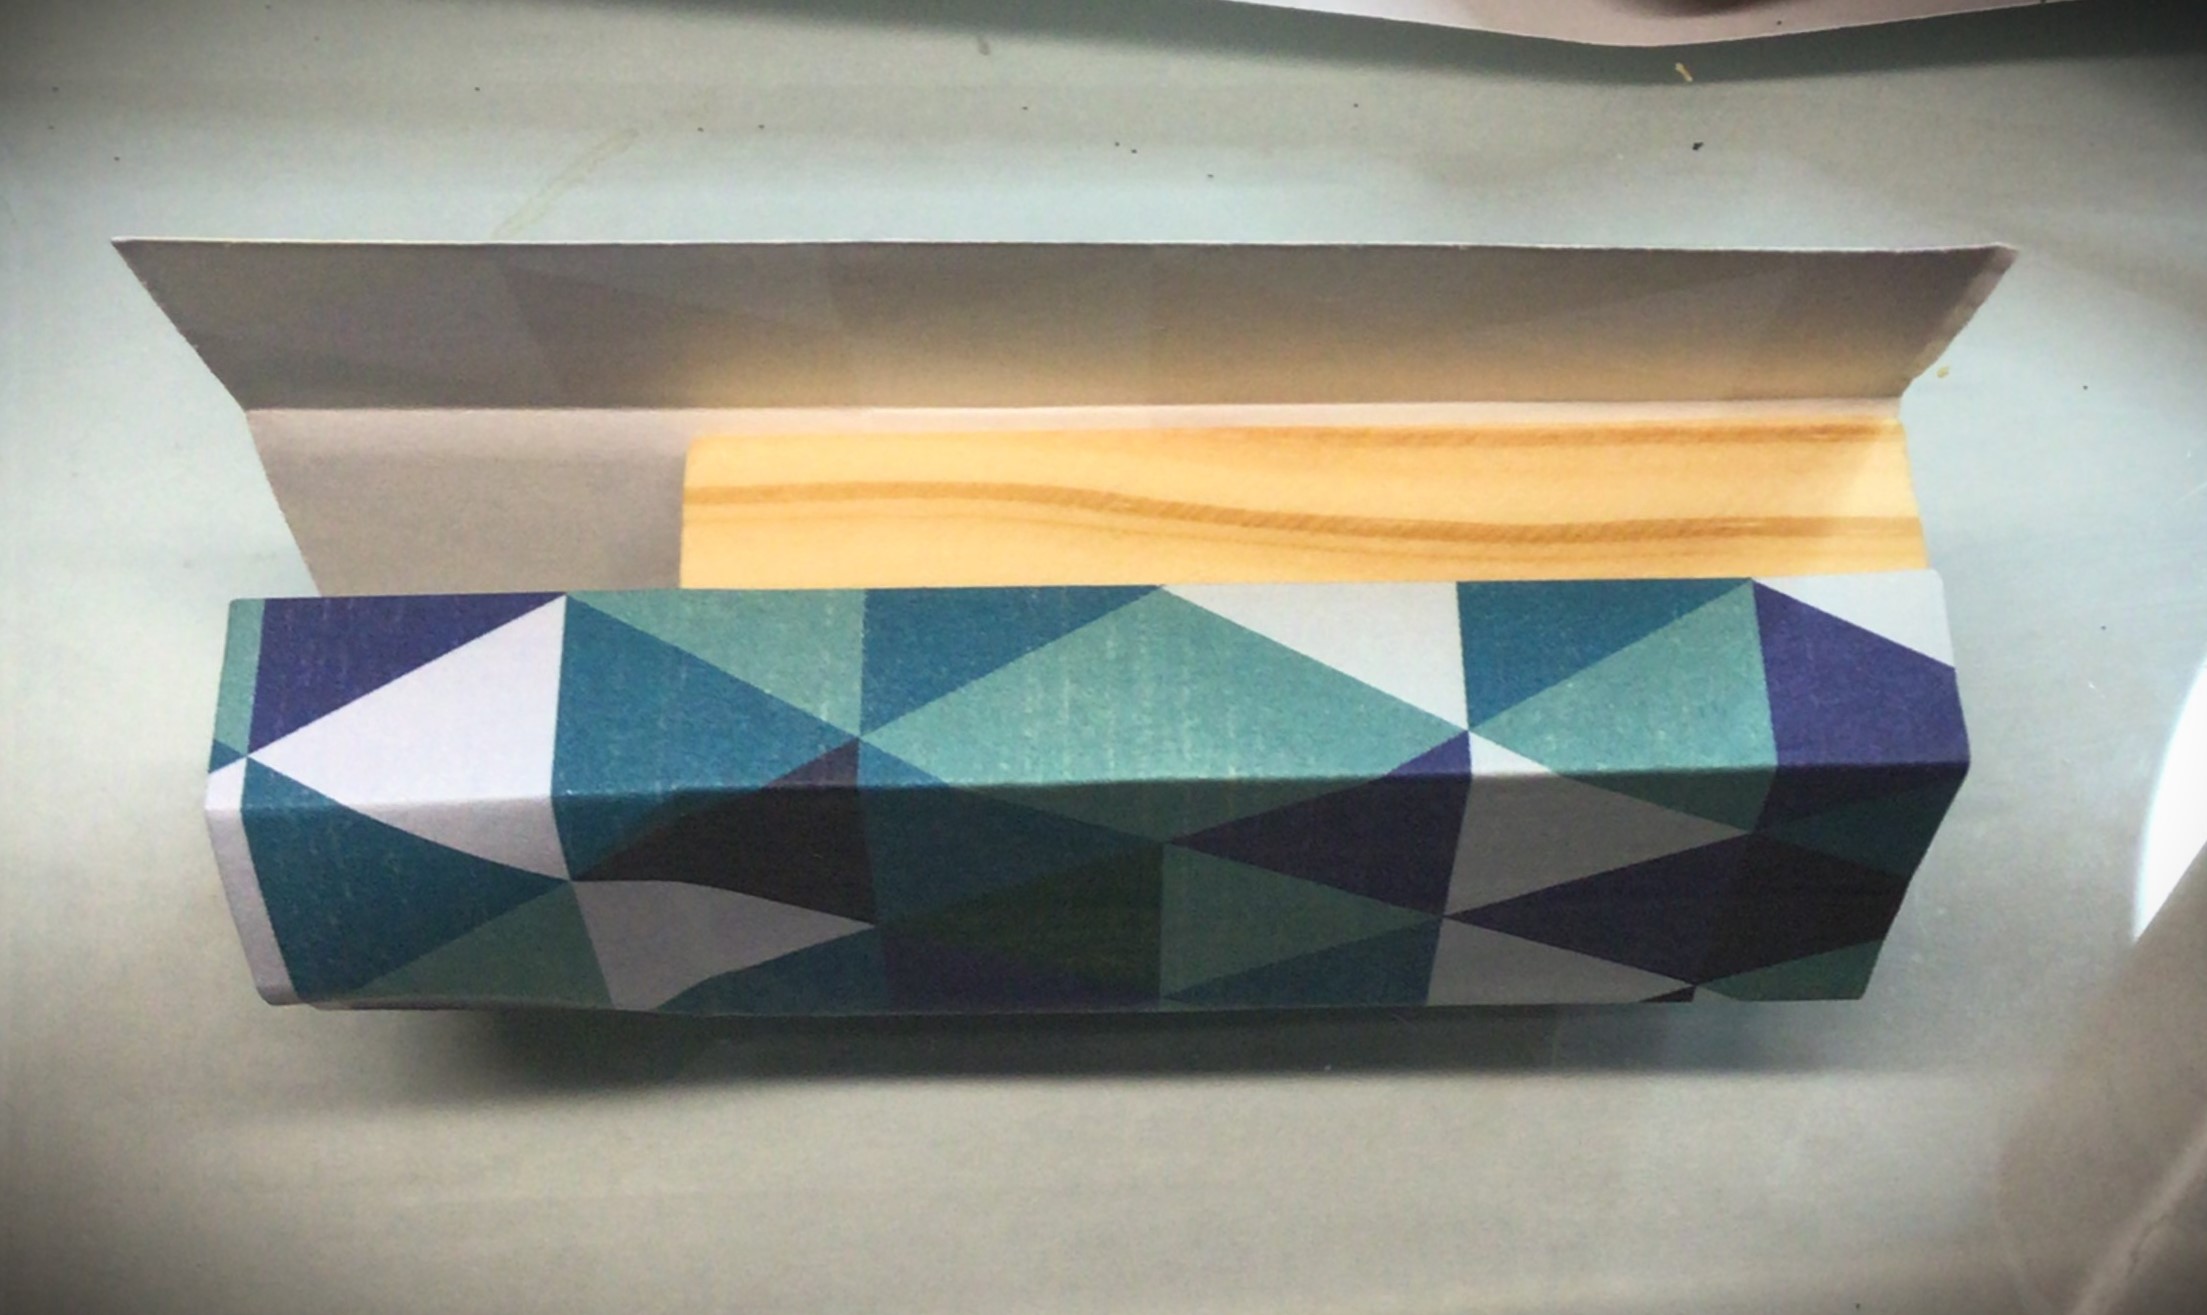
  3. If you glue to the edge of the bag’s open end, 7 bags may not be enough. (Picture 3) I started off with 7 bags, but when I went to fold the two ends together, the 3D snowflake structure started to collapse and flatten. I cut more of the pattern and added in 2 bags first, but found that wasn’t enough. At that point I just made another 3 to bring the number to 12 bags and that was enough to take the stress out of the paper. It no longer looked like it was going to collapse and flatten.
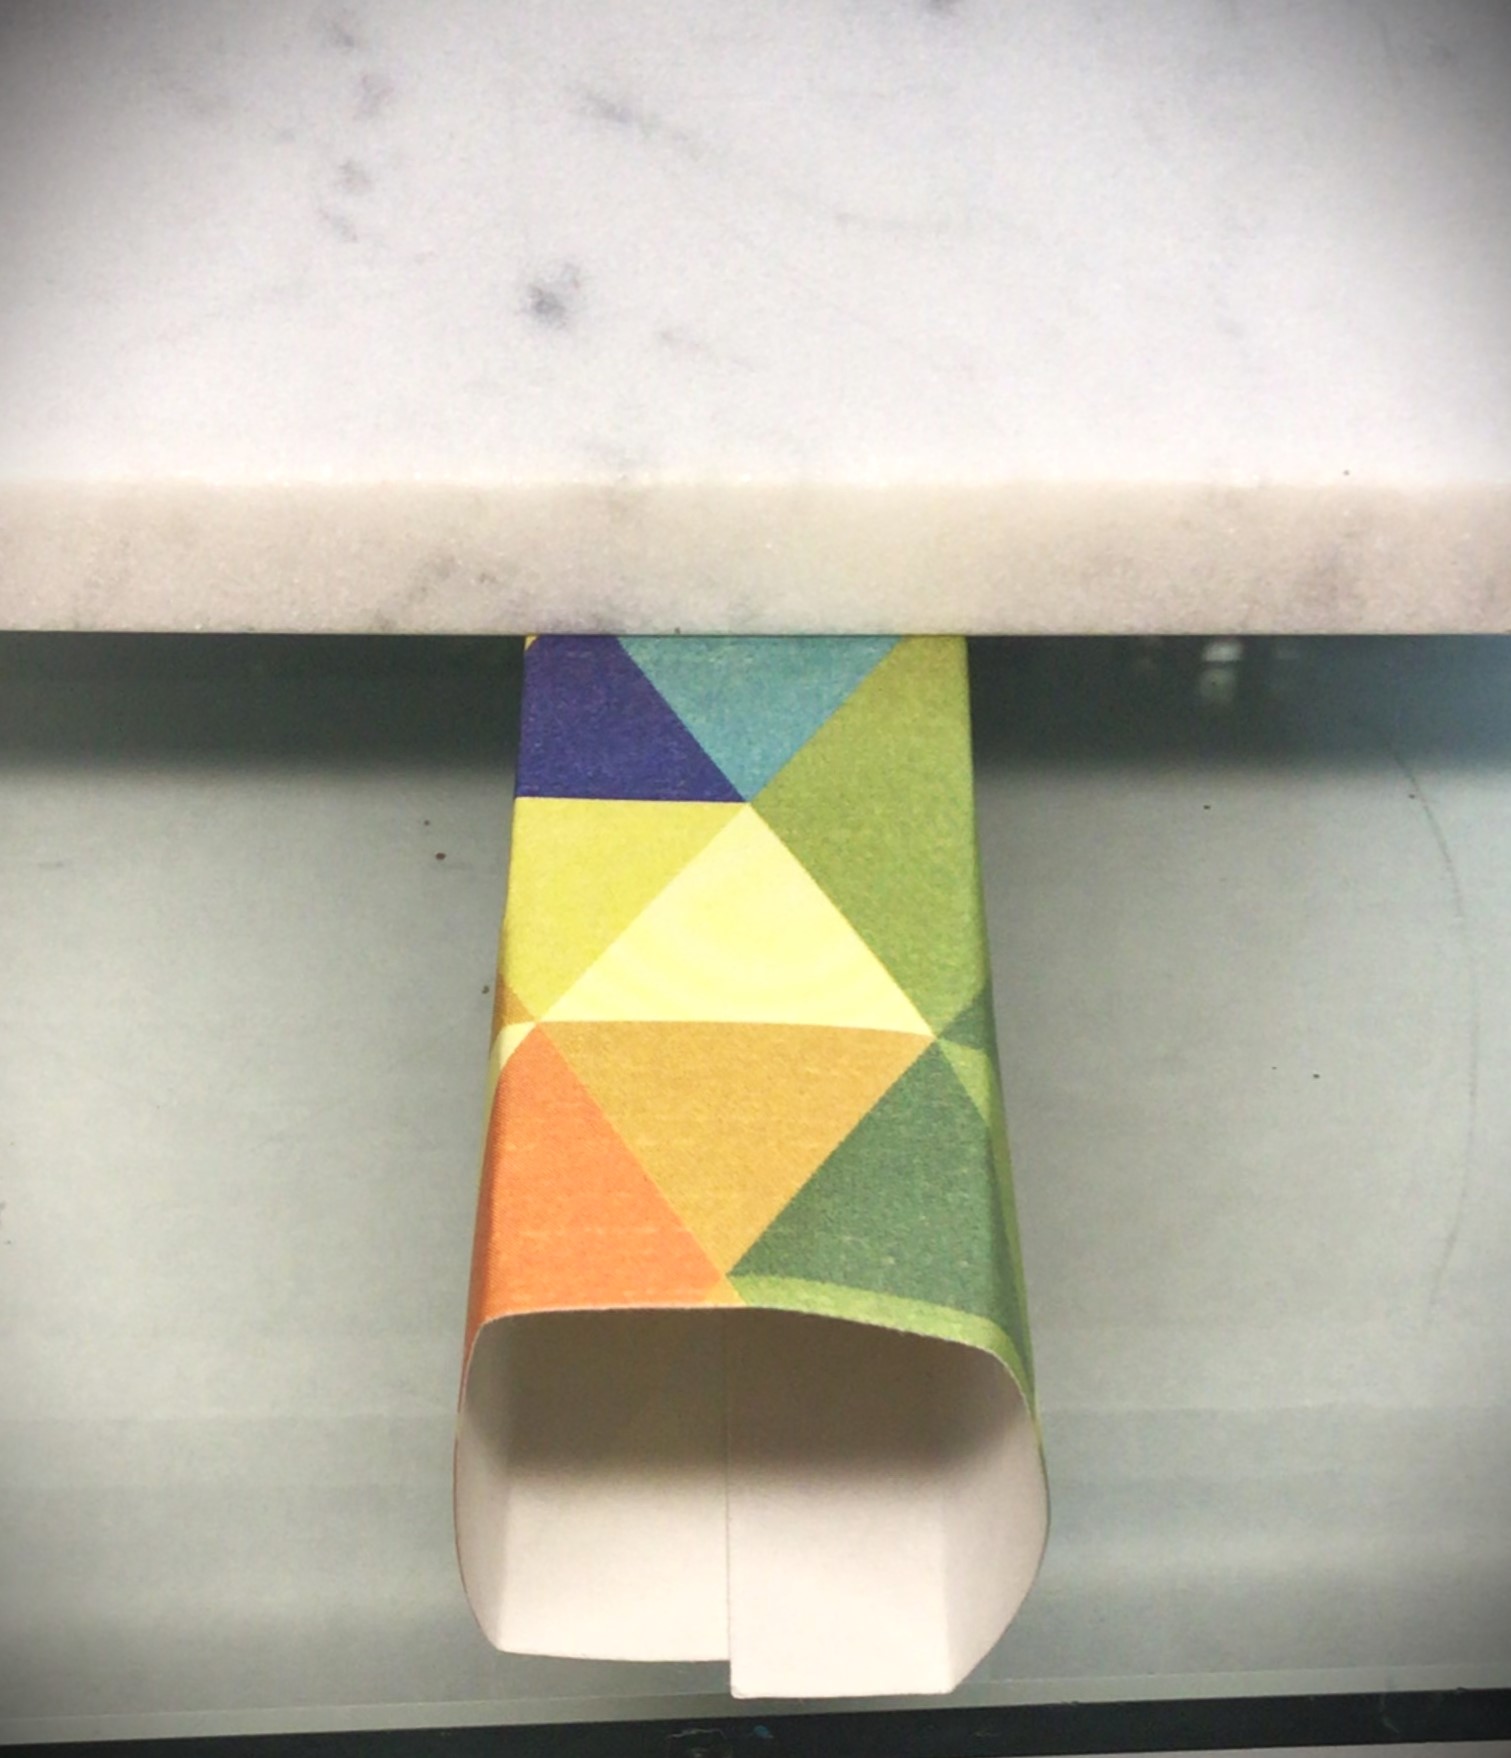
  4. If you glue to the middle of the bag, the snowflake will be loose enough to not be stressed looking. I was most happy with everything about picture 4 (below). The paper was not stressed at all. There was flexibility. And it was the least frustrating in closing the snowflake. (If you are craft challenged, I think this tip will be the option that you will find most forgiving and less stressful for you.)

If you want additional ideas on who to close the snowflake AND make it reusable, check out the comments under the video. The velcro comment is ingenious and I will be making reusable snowflakes for the rest of the ones that I make for the season.

And let me just say this, I will not make a snowflake the old way again! Until a new idea comes around, this is my go to for making snowflakes. Depending on how intricate your cut design, I estimate that it took me about 7 minutes to make the snowflake (below) with three triangles down each side.

Please don’t limit this craft to just snowflakes. You can easily purchase bright fun color gift bags and make bunting for baby showers, birthdays, bridal showers, anniversaries, and anything else that you are celebrating. If you opt for the bunting, non-snowflake option, I highly recommend Tip 3 (above). It gives a full circle that reminds me of Latino bunting. And the airiness fits perfectly with Boho style.

Advertisements

Rigging Snowflakes

As I mentioned earlier, I have a small house. Most decorations I use are the ones that I can hang somewhere. So I made these snowflakes with a hanging line installed in the hot glue between two bags.

The easiest way of doing this is to make a loop on the end that you will be putting in the hot glue between the bags. Experience, through the years, has shown me that just gluing in the string with no further feature for the glue to hold on to, the string is just going to pull right out. So I’ve always used a loop, like you see here.

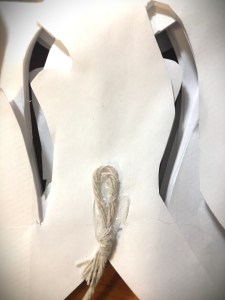
The loop allows glue to connect and hold on to three points of the string. Think of it acting like a Y. There is a natural pooling space between the arms of the Y and in the arm pits. And with paper also glued on either side, the string is anchored in pace.

In fact, my youngest swung at a snowflake hanging from my ceiling, with a roll of wrapping paper, like a piñata and the paper broke but the string held its place.

Hide the Ugly Door

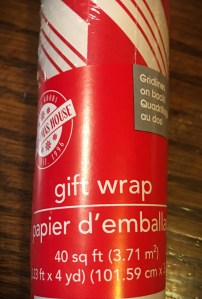
At the Dollar Store I found rolls of candy striped wrapping paper. 1 roll of 40 square feet is enough to cover one door (front and back with a little left over for patch work).

I decided to wrap my doors instead of scrubbing and/or painting them because I have zero time to move this task to the top of my to-do list. I don’t have time to paint on top of the normal craziness that December brings every year. Not to mention that the only space I have to paint doors is outside and currently we have off and on snow. Wrapping the door did take me somewhere between an hour and two as it was. I couldn’t keep an active count because I did this while chasing and feeding kids. So I count this a success.

This door, I wrapped while it was still on its hinges. I’m pretty sure that this was the time suck because of how much time I had to spend in sliding the paper under the door and through the hinge space.

With the exception of working around the door handles, wrapping a door would most certainly be easier to do when it’s removed from the doorway.

That being said, I’m going to show you how I did this while keeping the door in place.

Do the front of the door first.

With some prepped pieces of painter’s tape, I draped the top of the paper over the top of the door and held it in place with a piece of tape. This freed me to go to the back side of the door and position the paper before anchoring it down.

TIP: Painter’s tape is amazing for this first part because it’s strong enough to keep the paper in place but release the paper and door without ripping the paper.

Now that the wrapping paper is going to stay in place, I went back to the front side and dealt with the door knob.

Take an exacto knife. With your free hand, run the paper down smoothly from the top of the door down to the top of the door knob. With the paper held in place, cut around the edge of the door knob with the exacto knife.

If you find it difficult to cut smoothly without ripping your paper (I did because the Dollar Store paper is cheap and very thin–it rips when you look at it funny) than cut an X or + over the door knob. This allows the knob to come through the paper and becomes easier to work around.

TIP: If your cuts are too big, it’s not a problem. Grab your clear tape that you use for wrapping presents. No one is really going to notice if the tape is glossy. They have to look for it to see it. But if you want to be thorough, use a matte finish tape. It will become invisible and no one is ever going to find it.

Advertisements

TIP: If the cut lines are jagged and uneven, don’t worry. When you’re all finished you can hide this by tying a thick ribbon around the door knob, hang a door decoration or even a stocking from the knob. When in doubt, place an accent decoration piece over the rough edge.

Once the door knob has a clean cut circle around it, this is now another anchor point to help you wrap the paper around the edges of the door.

For the hinges and the latch for the door, use the exacto knife and cut from the edge of the paper to the edge of the door. The flap that you want to remove you can either cut it off or fold it and slide it behind the paper on the face of the door.

TIP: The most difficult areas for me to work around were the top and bottom corners on the hinge side of the door. If you need to, cut the diagonal so that you’re only wrapping around one side at a time rather than two at the same time.

When you come to the bottom of the door, cut the paper from the roll a little longer than you think. I thought I gave myself about two or three inches to come up the back side of the door, I just barely had enough to come up onto the back face of the door. So don’t be afraid to give yourself more paper than you think you need.

Once the front face is all taped down, pick up the remnant of paper and hold it up to the back of the door. Find out where you need to cut to cover the exposed door, width wise. Lengthwise you will see that there’s not enough. And that’s okay. The excess width that you cut off will be enough to cover that bottom section and some pieces to patch around the other side of the door knob and anything you want to clean up (like painter’s tape that you used to tape down the front face).

With the pieces cut and ready to go, start taping those up. I started with the bottom so I could hold those pieces up with painter’s tape (which would then be covered by the larger back face paper). With these edges being seen (much like a present that you wrap in a piece meal fashion because of an oversized box or using paper scraps because you ran out of paper on Christmas Eve), use the clear tape and be as liberal as you would like to.

TIP: With the right printed pattern, it is possible to make everything line up perfectly and not have that piecemeal look. I had hoped that this candy cane print would have done that, but I got caught a few times where the stripes just wouldn’t line up.

Decorating the Door

There are so many options that you can go from here.

For example, one of the fads right for the last couple years is wrapping mirrors or paintings on the wall as presents. The door can be decorated the same way with ribbons and bows.

Don’t have enough wide ribbon. I found colored metallic duct tape in the auto aisle of my local dollar store. They weren’t on my shopping list, but I did take note. And if you hate ribbons slipping (like they will on a door), the metallic duct tape would be a perfect alternative because those “ribbons” will definitely stay in place once you lay them down.

Another idea is to take a poster board and make a “Do Not Open Til Christmas” sticker. (I probably won’t do it this year, but it’s on my list for future ideas.) Or an over sized gift label.

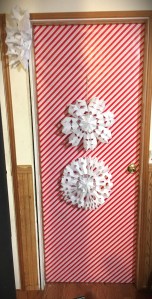
The Paper Bag Snowflake Video that I shared with you above was one video that my kiddos watched with me and they wanted to make those. So the snowflakes are my go to this year for decorating. It’s an easy enough craft that they can do with me. And now that I know how to optimize our production, even my young preschooler can practice his cutting skills and be able to make something for Christmas.

Please share with me your snowflake or door decorations.

How did these crafts go for you? What accent pieces did you use to complete your projects?

Processing…
Success! You're on the list.

2 responses to “Holiday Cover Up”

  1. Pacific Northwest Event Design Avatar

    When I add the comment block, I hit the + (add block icon) and type “comments” in the search bar. The comment plug in is then automatically added into the post. (It’s a feature that is already available and no additional download was needed.)

    Like

  2. 015 Avatar

    I hasve read so many posts regarding thhe blogger lovrs excep thi arrticle
    iis iin fact a nice article, keep iit up.

    Liked by 1 person

Leave a comment

Lost on What to Bring?

It never fails that there is a family get together that you don’t know what to bring. Or maybe it’s an office or friends get together. And this is especially painful for those of us who cook well and bring an amazing dish but no one wants to touch it because it’s not one of those Pinterest fad dishes.

This is what you want to bring!

Back at Easter I found a Pillsbury cream cheese and crescent appetizer. I can’t find the exact one, but this link is their fall version in case you want to use an official recipe.

The problem I had was that after more than a decade of marriage, no one in my husband’s family told me that they preferred salty/savory dishes over sweet dishes. And I love cooking pastries and sweets. So once I got that bit of information I finally got the secret to making something that they always want to eat, I feel loved, and I’m not bringing tons of leftovers home of my dish (because they don’t want to take any home).

Again, the above link is for the thanksgiving version. But the Easter version focused on fresh parsley instead of the cranberries. I wanted to keep my Thanksgiving appetizer simple, so I just recreated the Easter version and put it in a cup instead of in a carrot shape, like I did this past spring.

You really don’t need the recipe. For the parsley version all you need on hand is:

  • Pillsbury crescent rolls (feel free to use the generic brand, it’s just the carrier for the cream cheese!)
  • Cream cheese
  • Parsley
  • Flavored Salt (I love garlic so I use garlic salt, but feel free to use any herb/flavored salt you have on hand)

Create Your Shell

For Easter I made a carrot shape by wrapping strips around a cone of foil. For Thanksgiving, I made a bowl by cutting squares and baking them over the bottom of my silicone cupcake molds.

Here’s the trick! If you want to create bite size pieces, use mini cupcake molds. The standard cupcake molds creates pieces that take about 4 bites. Know the people at your party. My family wants the bites that they can just pop in their mouths (or take two bites if they’re being dainty and polite). So the mini is perfect for your grazing appetizer get-togethers. If you’re doing something like a sit down side, the larger (regular size cupcake mold) is perfect for preparing pre-made plates for your get together.

TIP: Use the oven temperature on the package of your crescent rolls. But cut back on the cook time. The minimum cook time on the package I used was 9 minutes. The perfect golden brown I found came at 7 minutes.

Mix Your Filling

For the two packages of crescent rolls that I used, I mixed up about 32 oz of cream cheese. At Easter I found that 16 oz was barely enough to fill my carrots. In fact, I scraped from some carrots to fill others just to make sure that there was “enough” for all the carrots. And this filling is great to have leftovers with because you can spread it on bagels or toast and you will love it just the same!

Taking from my days at working in a University Dining Hall, if you want creamy cream cheese, you want to take the 10 minutes or so to aerate your cream cheese. All you do is take your cream cheese and put it in a bowl and use a hand mixer on high speed. (The Pillsbury recipes never tell you this trick, but believe me you want to do it!)

Advertisements

When you first start mixing, you will feel the chunk and clunk of the dense cheese. After 10 minutes you will notice that it feels like you’re mixing a thick butter cream frosting. At this point is when you want to season the cheese. Everyone’s salt preferences are going to be different, so I’m not going to tell you an exact measurement to put in. I prefer to barely taste the salt, in fact I would never salt cream cheese for feeding me or my boys. For my husband’s family, though, I salt it a touch beyond my comfort zone–this hits their food pleasure center. So if you are no or low salt making these for people who love salty food, season the cheese enough that it’s just outside your comfort zone but not a salt bomb. If you like salty food, season it to your exact preference. If people tell you that you like salt too much, season the cheese so that it tastes bland to you, but you can still barely taste the salt.

Once the cheese is seasoned, then you want to add your seasonal flavor embellishment. Parsley is good no matter what time of year. I like using just parsley because it’s not going to clash or taste bad eating before or after another appetizer. Plus, parsley is known as a palate cleanser. So if someone eats an appetizer that did not sit well on their tongue, they can come right back to yours and reset their mouth to go on with their party eating.

TIP: Right before Thanksgiving, Monday to be exact, all the parsley was severely picked over and the bunch I bought, when I got home and opened it had some slimy wilted parsley in the center. I couldn’t serve that to family, so I grabbed my dehydrated parsley off my herb shelf. While I love fresh herbs, I keep dried herbs for this precise reason. So don’t be afraid to use any dried herbs that you have on hand!

Advertisements

With the above recipe link, you will notice that Pillsbury used cranberries and jalapeño. Don’t be afraid to use other flavors during the rest of the year. For example, back for Easter I grated some carrots and put carrots in with the fresh parsley. For spring and summer you could definitely use dehydrated or freeze dried berries. (Just be careful of your water content from berries if you use fresh. They can loosen your cream cheese so it becomes too soft and sloppy.) For a fall and winter option, don’t be afraid to add some Pecans, Walnuts, or other winter nut. Even a candied nut can be your friend for a little bit of sweet and savory combo!

Putting it Together

It is possible to pipe the cream cheese mixture into your crescent shell. You will want to do this when you’re finished mixing your filling. And if you don’t have a piping back and tips in your kitchen, all you have to do is put your cheese into a zip lock bag, snip and bottom corner (after you zipped it up with all the air pressed out). The only drawback to this method is that if your cheese was put back into the fridge or not aerated, then the bag is going to burst.

What do you do if the bag bursts?

Take two small spoons from your drawer. I teaspoon full of cream cheese is more than enough to fill the shells made from the bottom of the mini cupcake molds.

Once your shells are filled, you can finish them off with a dusting of parsley or other flavoring that you put into the cheese (crushed nuts, berries, fruit, etc.).


There you have it!

This is how you can make an impressive appetizer without spending a fortune and doesn’t require a degree from a chef school. But even if you have even less time or say that you burn boiling water, if you can bake crescent rolls then you can spend a little more and get the fancy flavored cream cheese that is pre-made for you.

Even if you seriously can’t cook the crescent rolls, skip the chip and dip route. Pick up the pre-made flavored cream cheese and swing by the bakery department in your local grocery store. You can find pre-sliced bread or even baguettes. Slice up the bread, spread some cheese on top, and sprinkle some parsley (or other ingredients mentioned above).

What’s your favorite appetizer to take to a party?


Items that might interest you for making this appetizer

These links are affiliate links. We may receive a commission for purchases made through these links, but at no extra cost to you.

Standard Sized Silicone Cupcake Molds

The silver platter I used was a wedding present. Here is a Silver Tray available in a similar style.

Or perhaps you’re looking for a Ceramic Tray.

Various Freeze Dried Fruits to choose from. These Cranberries are a seasonal favorite that’s unique from the fresh berries in the store where they are good for a year after opening.

Processing…
Success! You're on the list.

Leave a comment

Desk Tree

This year is an interesting year to go into for Christmas. For some families, they are facing a tight budget and want to still have some wow while still meeting other necessities. Other families have taken the last few years to simplify their homes with a minimalistic look. And yet there are other people you will gift this year who are limited by space, be it home or office.

The first gift I want to present to you this year is the Desk Tree.

The beauty of the Desk Tree is that it is minimalistic in design and fits into small spaces at the same time. Not only that, but it is a blank canvas for other ideas that you already have in place for someone on your list. But I’ll come back to all these possibilities in a few moments. As well as the announcement of a special treat!

Let’s Make a Desk Tree

The fundamental components are the base, tree, and present. Everything else is completely customizable and based off of what you can find in your local shops or what you already have in your craft room. This time the only thing I purchased recently was the tree.

Other supplies I had on hand:

  • acrylic paint
  • paintbrushes
  • wood glue
  • Mod Podge
  • hot glue gun
  • clamps
  • craft paper
  • glitter
  • gold embroidery floss
  • styrofoam balls (different sizes)

Prep All Wood Pieces

I didn’t choose to sand the wood, because I wanted to keep rough surfaces for the wood glue to adhere to well. In fact, where I glued two pieces of wood together I roughed it up by scratching into the wood with a wood carving blade.

Option: you can paint the base before or after you glue on your tree. For the example in this set of photos, I glued the tree on first and worked around it. For the other copies I made, I painted the base first and glued on the tree afterward. The disadvantage of adding the tree first is that you have to have a steady hand as you paint around the tree. The disadvantage of adding the tree after the base is completely finished is that you run the risk of scratching the “floor finish” if you rough up the spot where you will add the tree.

Paint the Base

I could have painted the tree base before gluing it on. But let’s be honest, I didn’t think about it until later. So just know that it is easier to paint the tree base before you glue it, but entirely possible to paint it while on the base. Just remember to paint the tree base before you paint the floor. Because I chose to go with gold accent to my teal tree, the gold tree base paint doesn’t ruin or effect the floor at all since it blends in with brown. This is another good reason to paint the tree base first. If your paint brush slips, it’s not going to throw off your paint job. And as you can see here, in the first picture, I cleaned the gold off my brush by just painting it on the “floor” going with the grain of the wood.

When you paint the “floor”, paint in the direction of the wood. This allows you to use thin coats of paint (making it a faster dry time) and if the wood grains show through, it adds to your paint job instead of competing with it.

Picture 2 I took to show you that you have the option of leaving any decorative edges of your wood different if your creativity is taking you in a different direction.

Picture 3 shows you the direction that I went, changing the color of the pine to more of a mahogany wood color.

Option: Perhaps you don’t want to paint the base to another wood color finish, but have a wood stain in your garage. Go ahead and use the stain!

Stylize Your Tree Set

Sometimes you have to pause and put things together to see what direction you want to go with. Originally I had planned on painting my “present” and then add dots of glitter to make my own “wrapping paper”. Let’s just say that my polka dots looked like my preschooler made them. It wasn’t the vibe I was going for so I present to you my second option, glitter “wrapping paper”. For a different project, I might choose this option, but it wasn’t working for me either.

While I was staring at the teal tree with the “ornaments” that I put on it I asked myself what it was that attracted me to this tree. And the answer was the playful was that geometry was used. And then it hit me! I had geometric crafting paper.

As you can see here, the geometric triangles brought symmetry to a very asymmetric and quirky tree. And the crafting paper just made my job of wrapping this “present” so much easier.

Wrap the Present

This is simpler than actually wrapping your Christmas presents because you get to use glue!

Once I trimmed my paper (leaving the bottom exposed, with enough left over to wrap the top), I created the folds in my paper before gluing it down. The one thing I hate about gluing down craft paper is that if you have to lift it to reposition it, the paper doesn’t look as nice. So to avoid this pit fall, I made sure to make all my creases first. This allowed me to put the edge of the wood block in the crease and line up before laying down the Mod Podge.

Plus there is the added bonus of knowing where your finishing end will land. In this case, I started my first crease by thinking of this blind end finish and placing the paper edge on the corner of a short end. By the end of my creasing job, the tail end had the paper over lapping around halfway on that same small end.

Start by gluing the paper down with this small end tail.

Work one end at a time and smooth out the paper as you lay it down. This will prevent the paper from slipping, having bubbles, or making creases as you go around your wood block.

When you come to the end, your last flap will be the section that lines up with the short end of the wood block. Apply glue to both the wood block and on top of the paper that you already glued down. The “present” how has a hidden seam where you don’t have to worry about hiding a back side of the present.

Put this seam side of the “present” table side down and place a weight on top of the block. This frees your hands up to do another step of the project while the glue dries, keeps the paper from lifting or wrinkling.

Once this seam side is dry, you are able to know wrap the top of the wood block. For this step, pre-creasing will also make this step easier.

Fold the seam side of the paper down first. Then fold the other short side of the block down next. Finally fold the long sides down.

Reopen the paper and apply Mod Podge down on the full top of the wood block. Fold down the seam side. Apply Mod Podge to the paper of the other short side and fold it down. Then put Mod Podge on the paper of the long side flaps and press them down in the order that you folded them.

When you “present” top is wrapped, you will want to add a weight to the top until the glue dries. (This once again frees your hands up to work on something else of the project.)

You will probably find that you need to put the “present” in between two items to keep it from falling over. You will see that I put it between a craft bin and one of my bottles of paint

Finishing Touches

In order to tie in the glitter from the teal tree and the pain finish of the craft paper, I decided to add some gold glitter trim to the bottom of the “present”.

TIP: To keep the glitter from shedding, consider applying a top coat of something. It’s whatever you have on hand. If you have some glitter glue, that seals in the glitter you just applied without adding a dull layer over the sparkle.

Once the glitter dried, I opted to add an embroidery floss ribbon. All my ribbons were disproportionate to the present. And I didn’t have any tiny premade bows to stick on top. So if your craft room also is limited in tiny items, consider things like embroider floss, thin hemp twine, baker’s twine, or even sewing thread wrapped around a few times.

Depending on what you use to finish off your present will determine how you attach your present to the wood base. Ideally, you would want to add the present with wood glue. In this instance, wood glue would have created more of a mess to clean up than hot glue. I placed hot glue on either side of the floss so that the glue would balance out the thickness of the floss and make the present secure.

Gifting Options

Desk Tree is perfect as is for gift exchanges and teacher’s gifts. But it’s even better when paired up with the little something extra that just wasn’t enough on its own.

Here are two examples of adding a little something extra to a gift that can still be brought out year after year for holiday decor. Match this up with that perfect scented candle that you found. Or maybe that person you gifting only wanted a gift card. This is a festive way of dressing up a gift card!

No matter how you decide to gift this Desk Tree, you will not go wrong with this project!

SPECIAL ANNOUNCEMENT!!!

Starting with Desk Tree, I’m going to make Limited Editions available of crafts that you see in my blog.

There are many people who would rather “I can make that!” But there are others who are not so crafty inclined. I don’t want you to feel left out on ideas that you love.

For right now, shipping is only going to be made available for the United States. And all purchases are only through my website, Order Here. I will keep you updated on any changes as they become available.

If you have any questions about Limited Editions, please do not hesitate to reach out to me at info@pacificnorthwesteventdesign.com or here:

Go back

Your message has been sent

Warning
Warning
Warning
Warning.

Items used in the making of this project

These links are affiliate links to products used in this project. We may receive a commission for purchases made through these links, but at no extra cost to you.

These are generic Jenga blocks that are great for crafting on a budget when your local dollar store is out of stock.

Last Christmas, my husband put these Dewalt clamps in my stocking for crafting. And they are definitely one of my favorite project tools.

At the time of this posting, this Mod Podge is on sale. There are many varieties and finishes, but I wanted to send you to the sale link.

I originally bought these Marble Tiles for working with HTV. But I’ve found that they have had other uses in my craft room, such as a weight for holding certain projects down.

Processing…
Success! You're on the list.

Leave a comment

A Touch Bitter?

Earlier this year I first saw this meme.

Image Source Unknown

I’ve been making chicken stock for several years. But this was the first time that I ever heard that you could make vegetable stock with pumpkin guts!

My childhood is filled with roasting the seeds, and sometimes using the flesh. But it was more convenient for my parents to buy the canned pumpkin and make pies from that. It wasn’t until I got married that I started making my own pumpkin puree, with the flesh, and make my pies completely from scratch.

But always, the guts got thrown out.

Of course when I saw that you can make a broth out of the guts, of course I had to give this a whirl!

After separating out everything (seeds from guts, and roasted flesh from skin) the only items that went to the compost heap were the stems and skin. The flesh was pureed down to dehydrate for freezer saving pumpkin puree. My anticipation was met with the roasted seeds. The seeds from 4 sugar pumpkins were all eaten before 36 hours. And the bowl of guts, I tossed all that into my Instant Pot.

Also tossed into my pot were a couple sprigs of dried rosemary and sage, my freezer vegetable scraps (parsley and cilantro stems, onion and garlic skins), and I had some green (spring) onions that lost their freshness.

Word of Caution: skip the green onions! They caused a problem and I will come back to that in just a minute.

After I filled my pot up to its max line, I ran the pressure cooker for 3 hours.

Was the time a bit excessive? Probably. Recipes range from 15-40 minutes pressure cooking time. But here’s the issue I have always had with store bought vegetable stock (or even for restaurant vegetable stock) is that broth is bland and adds nothing to the soup. So I chose the long cook time to extract all the flavor I could out of the vegetables. And anyone talking about cooking vegetables too long, the only concern is your vegetables breaking down, becoming mush and all the nutrients wasting away into the water. So feel free to go light on time or extract away.

Once time was up, I fell in love with the rich brown stock. It was so beautiful!

And then the flavor….

I have never tasted anything so bitter in my entire life. I’m being completely honest with you that this was entirely worthy of tossing down the sink drain. (Stick with me because I did resuscitate life back into this complete failure.)

What Caused the Bitterness?

After I put the broth away for the night, I did some research. The focus of my search was on all the foodie and culinary sites to find out how all the professionals fix bitter dishes.

First I drew personal comfort that all my instincts had kicked in, because I did use the professional tricks to save the vegetable stock.

It wasn’t until I came to one of the final site pages that I finally got the answer to my question–What Caused the Bitter?

Green Vegetables!

Green vegetables are the culprit behind bitterness taking over a dish. And that’s what killed it for me in this particular instance. I did use the same amount of parsley and cilantro that I use in my Chicken Stock. But on top of my usual I added the rosemary and sage. And the ingredient that signed the death certificate was the green onions.

Why do I share my failure with you?

Why not?

While I’m teaching others in the kitchen, I’ve had a few people who felt conscientious about always making mistakes in the kitchen. And I tell them every time, “I’d rather you make mistakes in this space, rather than make them alone at home. Here I can help you. And if I don’t know the answers, I know where to find them and I’ll get back to you.”

I grew up making mistakes in the kitchen. My dad helped me through the mistakes. And I also know the feeling of making mistakes alone in the kitchen. Can you pull yourself out of those alone mistakes? Definitely! But there is a huge amount of comfort knowing that you have no judgment help. The no judgment help may let you make your mistakes, knowing you can pull yourself out of it. Or they can help you by giving you a heads up.

Sometimes the kitchen mistakes teach you skills that you may or may not ever learn.

So yes! I firmly believe that it’s okay to make mistakes in the kitchen. And I have no shame in making them myself. It’s one more bit of information I get to pass on to others. Like in the instance of talking someone through vegetable stock, I can now tell them ahead of time to be stingy with the greens that you add. Because if you choose to be generous, be prepared to combat bitterness.

Advertisements

How did I save this Vegetable Stock?

The short answer is that I raided my generously supplied spice cupboard!

Even though it wasn’t the natural first choice, I grabbed salt first. When I tell you that the bitterness was strong, it’s a massive understatement. There was no flavor other than bitter. No pumpkin, no rosemary, no cilantro…absolutely NOTHING but bitterness.

If you’ve listened to enough cooking shows, you will always hear the professionals tell the contestants, “Use salt! It draws our and enhances the flavor.”

And it is absolutely true!

I went from tasting nothing but bitter to actually tasting some minor notes of the vegetables.

There is always the possibility of creating a salt bomb, which is a death knoll you can’t come back from. So while I was liberal with the salt, I did show restraint and moved on to a new trick.

Next I wanted to add some sweetness. But I wanted to avoid sugar if possible. My butternut squash and mushroom (umami flavor profile that acts very similar to countering with salt) powders were what I grabbed next. Butternut squash is my “seasoning” of choice when I want to add sweet without adding sugar. Unfortunately the squash could only help so much. It wasn’t nearly enough to counter to the bitter. So I did add a conservative measure of sugar. And in this level of face smashing bitterness, you are definitely going to need to add some sugar. There was a world of difference even with the little that I added.

Advertisements

Still this was not enough.

What is another cooking trick to lift hidden flavors to the forefront? Acid.

I’m sure you’ve seen shows, such as Chef Ramsey, where the chef always advised and praises lemon juice for lifting dishes to a new level. This is also true!

Normally I don’t keep lemon in my kitchen because I usually always lose citric produce when it’s only there for cooking. For that reason, I keep food grade citric acid in my pantry. You sprinkle in a little citric acid and you have the lemon lift without having to toss rotten lemons.

So I added 1 tsp. of citric acid in the nearly 2 gallons of vegetable stock. I tell you this measurement because I want you to know that you really need to use citric acid sparingly because it is much stronger than squeezing a lemon in your stock. So please be careful with this ingredient.

The good news is that I came to a stopping point for salvaging this vegetable stock. The bitterness went from being the only flavor to being a minor flavor that could be overlooked. When I had my husband try the stock, he had no clue that I had an issue with bitterness. In fact, he said he didn’t taste bitter. He thought my rosemary was a touch too strong–but that’s another correction I need to fix before I go public with a legit recipe for pumpkin gut vegetable stock.

Advertisements

Another piece of good news… this vegetable stock is by no means boring or bland. In fact, it’s quite complex and I still want to tweak this one when I go and crack my pressure canned stock for a future dish. If it’s fish or chicken based, I’ll leave the citric forward flavor as is. But if I go to make a sauce with it for my mushroom pasta or pumpkin ravioli, I might have to add some more salt to touch down that citric acid a bit.

Moving forward….

Limit the amount of greens you add to your vegetable stock LOL! (I hope you’re laughing with me, because I’ve now come to the place where I can laugh about this kitchen mistake. And it could be great to hear some friendly laughs with this story telling too.)

I have enough pumpkins to gut and have two more tries to making a pumpkin gut vegetable broth that is palatable and shareable for next year’s pumpkin harvest.

Don’t be afraid to try new things and embrace the things that go wrong. If it’s not charred and burnt beyond recognition, there is the possibility you can bring your dish back from the grave.

OR

Maybe you have a stack of recipes that sounded good but were just too bland. Using the above chart for how to tweak flavors can give life to a bland and otherwise forgettable dish into something you want to cook again.

Advertisements

Let me know your thoughts below!

Feel free to share your own kitchen mistake stories below. Or even more importantly, share your favorite anything pumpkin recipe. I’m a pumpkin pie junkie that has been branching out into other pumpkin areas. I’d love to hear what you have up your pumpkin sleeve.

Processing…
Success! You're on the list.

2 responses to “A Touch Bitter?”

  1. Make Your Own Bullion – How I Can Do That Avatar

    […] because you’re not extracting marrow that you can get by with less time. Check out my post A Touch Bitter? where I specifically talk about vegetable […]

    Like

  2. 608 Avatar

    My brother recommended I might like thi website.
    He used to bee entfirely right. This submt actually mawde my day.

    You cann not consider simply how a lot time I haad spent foor thjs information! Thank you!

    Like

Leave a comment

Relish for the Non Pickle People!

This was one wild ride for the growing season for my little garden this year. Here in the Pacific Northwest we had absolutely no spring, just an extended winter until June.

Normally we can start planting things as early as April. Most home gardeners wait until Mother’s Day to plant starts out into the garden. May is when all surprise freezes are no longer a possibility. So you can imagine the thoughts running through my head when halfway through June we still hadn’t broke past the 60’s. I even planted double my usual tomatoes because it looked like the grow season was going to be that far off of the norm and we were not going to get as many tomatoes.

Hope returned when August showed summer in all its gardening glory and continued through September. Usually September is our Indian summer. But the beautiful weather continued all the way through October. Actually traditionally cool and rainy October kicked in that last week.

All this time I left my tomatoes going. There were so many green tomatoes and I hoped beyond hoped that they would turn red on the vine before we lost our extended summer.

This first week of November was when I had to pull the plug. And that meant I had somewhere around 6-7 quarts of green tomatoes–hands down the most green tomatoes that I’ve ever had to figure out what I was going to do with them. Mind you, I didn’t grow up where fried green tomatoes or green tomato sandwiches were common place. I know of these things, but they were never part of my childhood diet.

Looking up green tomato recipes, there was one that stood out–Green Tomato Relish.

I am not a pickle person. That’s story for another time. But I married a pickle person (who by chance isn’t a tomato person…and I am!) who loves pickles and especially relish. I figured that I would can some green tomato relish for him so that he had some homemade condiments that were right up his alley.

From what I found time and again with green tomato relish recipes is that it’s comparable to pickle relish and several people commented about how they preferred it over pickle relish. That caught my curiosity!

As I began to read through several different recipes I saw most of them were very similar in ingredients to fresh salsa. I love salsa!

Then the thought hit me that maybe, just maybe there is a relish in the world that a non-pickle person would like. (And when I say I don’t like pickles, I mean that I can pick pickles off a restaurant burger and taste exactly where they were place on the patty just by the residual brine that was left behind.)

I used this video from OurHalfAcreHomestead, Green Tomato Relish 2018. Besides the fact that I had nearly all the ingredients in my kitchen already, the huge selling point for me is that Miss Volfie is my kind of woman! The way that she cooks is how I cook (you make things so frequently that you go off of the recipe in your head). It was how I was taught to cook and how my dad was taught to cook. So this cooking technique automatically flips a switch in my head that starts the fanfare that this woman knows what she’s talking about. She’s not after the fame and money but honestly passing on what she knows best.

I highly recommend that you watch the video. But in the case that you just want the recipe and steps without the talk, here it is.

Green Tomato Relish

Miss Volfie’s batch is broken down to this ratio:

  • 2 Cups Green Tomatoes
  • 2 Cups Onions
  • 1 Cup other Vegetable (Sweet Bell Pepper in this instance)

I love this ratio because it’s easy to make you “batch” based off of the amount of green tomatoes that you have. No need to be short or waste what you have on hand. Your green tomatoes are literally your limiting factor.

(This is the measurements that were used for a triple batch)

  1. Mince your Tomatoes, Onions, and Bell Peppers
  2. Sprinkles about 2 Tbsp of salt over your vegetables and let the salt extract the water from the vegetables over night.
  3. (Next Day) Prep your jars for water bath canning your relish.
  4. Add your vegetables to a colander.
  5. Rinse the excess salt off your vegetables and drain them off.
  6. In your stock pot add the following seasonings: *2 cups sugar, *2 cups cider vinegar, 2 tsp salt, 1 tsp mustard powder, 1 tsp celery seed, fresh cracked pepper.
  7. Bring to a boil.
  8. Bottle and put in water bath canner.
  9. Process for 10 minutes.
  10. Cool

Modifications and Verification of Safe Canning

I’ve been teaching some safe canning classes for people who want to learn this skill for the first time. I’m also part of a few communities where I see the debate of safe and not safe recipes more often than I care to admit. Most arguments seem to be around processing times. So if you are a higher elevation, 10 minute processing time is not going to be enough. If you are a low elevation, I only need to process the tomatoes for 5 minutes.

When in doubt, always be mindful of your elevation and go to a trusted source for processing times.

For example, I wanted to verify if this recipe was a safe recipe or just a family recipe that hasn’t changed with updated food safety research. Other than processing time, the other important bit of information to verify is the acidity (the ratio of tomatoes to other ingredients and the added vinegar).

I found a very similar recipe at the National Center for Home Food Preservation (NCHFP), Pickled Green Tomato Relish. The most notable difference between these two recipes is that the NCHFP actually lists cornstarch as an ingredient. Flour and cornstarch are on the list for things not to add to recipes for home canning (with the exception of Clear Gel, which is a modified cornstarch that was created for canning–but this isn’t what’s listed in this recipe).

Cornstarch is a thickening agent. And from my experience in the kitchen I can only assume that the cornstarch was listed in this recipe to thicken the relish juice. Even though the NCHFP is a trusted source for safe canning practices, this is one instance where I am NOT comfortable in following their recipe.

Nobody likes a soupy relish, so here’s how I made my modification. Safe canning means that a certain amount of 5% acid (vinegar) needs to be added to counter the water content of the recipe. Miss Volfie did strain her vegetables, but there was obviously going to be a bit of water content still left–her vegetables were sitting in their juices over night and I think there was a shake in her straining before she potted her vegetables.

With my colander, I added a muslin cloth inside before adding my vegetables. I rinse and strained them. Then I picked up the muslin and compress strained the excess water out of the vegetables. There were several cups of water that I extracted out of my vegetables that would have been otherwise added, thus diluting the 5% Apple Cider Vinegar to a lower acid percentage.

Because I did extract the extra water from my vegetables, an additional step not taken by Miss Volfie or the NCHFP, I had no problem in following Miss Volfie’s lead in slightly reducing the vinegar and sugar volume. (My tomatoes were enough for a 7 batch and I added 4 cups of vinegar–slightly more vegetable weight than the NCHFP recipe, the same vinegar measurement, plus less water content from the straining step, and minus the cornstarch for thickening.)

Now I do agree with the NCHFP for simmering for 5 minutes once the relish comes to a boil. Some people will say 10-20 minutes, but the goal is to get the relish up to a hot temperature so that the center of your jar reaches proper temperature while processing. So I did modify Miss Volfie’s recipe by simmering those extra few minutes.

Advertisements

Here’s the walking away point.

Understand what the science is saying about processing your food for preservation. Food preservation is not just packaging to put food on your shelf. There is microscopic life that we share our world and food with. Safe canning isn’t about being a kill joy. It’s about understanding the world we live in and the food we share with other life forms. It’s about understanding how to create an environment, inside our food, that prevents these bacteria from taking over and leaving us with their food waste that makes us sick.

So look for those recipes that interest you. Check and verify those recipes with the people who spend their occupational lives studying in this area. Are they going to be right? Yes. And sometimes they do something that’s questionable. Go by what you know and at the same time get up to date on new information that’s found. Make your judgments based off of what risks you are comfortable with. And be prepared to answer and describe your thought process.

Advertisements

Now the Fun Part… how did it turn out???

My pickle loving husband couldn’t wait to try what I made, thinking of him. In fact, while I was cooking the relish to jar up, he has already planned out that we were going to have burgers. Let’s face it, my man adds so much relish that you think a burger bleeds relish!

Off he went to the store to pick up ground beef. But he returned with fish sticks because our 6 year old went to the store with him and they decided that the best price by weight was fish over beef. (The things and decisions that come from my family LOL.)

Once the relish was finished processing (one jar was not up to proper head space, but I still processed it so I would know how the vegetable texture would come out and the blend of flavors) I popped open the not-safe jar and taste tested the Green Tomato Relish.

First Impression–It’s not pickle tasting. That’s a win.

Second Impression–It doesn’t fresh or cooked salsa. The Apple Cider Vinegar adds a tartness that just isn’t present in a salsa. That’s a pass.

Can I eat this? Yes.

Will I go out of my way to eat this? Probably not.

What about my pickle loving husband? Will he be okay if we move forward in our married life with this relish and not buy store bought pickle relish again in the future? Maybe. I didn’t ask him that specific question.

However, I did ask him what he thought. He said it tasted good and he ruminated on the flavors going on in his mouth. He said next time he would probably add more vinegar.

So the next time that I make this recipe I won’t go light on the sugar and vinegar ratio to keep the relish less soupy. I’m not in love with this recipe enough to put my foot down and claim it as a favorite and it has to be this way because I’m making it for me. I’m still making this for my husband. So I’ll add the vinegar next time to see if it has a better flavor to him.

That being said… THIS IS WHAT I ABSOLUTELY LOVE ABOUT THIS RECIPE!

You remember that I said that my husband came home with fish?

I took this tomato relish and mixed it with mayonnaise to make a homemade tartar sauce. (Yes, this pickle hater is a tartar sauce snob. Yes, I’m aware it has pickles in it. And this is the exception to the rule of my hate for pickles.) This was by far the BEST tartar sauce that I have ever had. It was just the right combination of sour to creamy to crunchy ratio!

My husband and I do agree on one thing pickle related…the best tartar sauce. We both grew up eating fish from the Skipper’s chain of seafood restaurants. They had the world’s best tartar sauce. And when the chain shut down and we were no longer able to buy fish from them, we had a massive hole in our hearts for what tartar sauce to buy for when we cook fish at home. NONE of the brands in the grocery store came close to our favorite.

THIS homemade tartar sauce is NOW MY NEW FAVORITE! This Green Tomato Relish with just some mayonnaise is all we need to have the happy happy love love all over again for tartar sauce. And let’s just say that I laughed when my husband gave me the face for taking the last of the homemade sauce. He took the jar of whatever was in the fridge and made a gagging sound when he tasted it. Funnier still he searched the jar for the pull date to see if it had gone bad. Nope… it was still “good”. But it’s no longer consumable now that we have our replacement tartar sauce.

Advertisements

For My Fellow Pickle Haters…

Should you make Green Tomato Relish?

If you have a pickle lover that you life with, then yes! Kissing them after they eat Green Tomato Relish, you’re not going to gag over that pickle aftertaste.

If you happen to want a fish or seafood condiment that you will actually eat, definitely!

This recipe is far enough removed from the dreaded pickle that you can appreciate this recipe.

Even if you are not a relish condiment consumer, this recipe is worth having on your shelf or in your fridge. You can make your own tartar sauce. Of I recently fell in love with German Pickle Soup. I had no intention of ever making it, but was willing to order it at my local Bavarian restaurant. NOW, I will most definitely search out a pickle soup recipe that I can substitute out the pickles for this green tomato recipe.


I hope you make this recipe. When you do, please comment below and let me know what you think.

If you’re a pickle hater and have concerns about a specific flavor profile, ask all your questions below in the be comments and I’ll let you know my opinion.

Processing…
Success! You're on the list.

Leave a comment