Saving Seeds

I know this isn’t talked about in early spring, because the focus is putting seeds in the focus is on planning and putting into ground right now. BUT….

Here’s my garden right now. Even before the seeds go in the ground, I still have seeds that are preparing to be ready to harvest.

Talking with others who are expanding their seed saving skills, they haven’t yet experienced saving seeds from the Brassica family (cabbage, kale, cauliflower, broccoli and others). One reason for this is most likely because we grew up being told to clear out garden beds at the end of the year. But for gathering these seeds, you need to leave the plant in the ground after you’ve harvested.

In previous years, I harvested cabbage in the spring after the pods have formed and dried. But when I let this bed go fallow, I left the cabbage in for a second year. Mainly it was to see what the life cycle of cabbage looks like after I’ve long pulled mine.

Advertisements

In the second year with cabbage, any additional heads that grow are much smaller than the original year (for growing purposely, definitely not the best use of garden space). What I hadn’t counted on was a second gathering of seeds.

Why might you consider these seeds?

The general rule of thumb is that you save the seeds from successful plants–the biggest and best. But as I said, this second year cabbage didn’t really produce heads of quality in the second year.

Seeds are the memory of the plant.

The seeds of this second year cabbage not only contain the memory of the first year head growth AND it remembers the bad growing season this past year (unseasonably cold and wet that made me question if I’d grow anything).

Originally I wasn’t going to save these second year seeds because the potential passing on of tiny cabbage heads is not what I’m looking for. However the seeds do contain the memory of surviving through an uncharacteristic cold year.

So after going back and forth on what I’m going to do, I’ve decided to keep these seeds. I’m going to perform a comparison of first and second year seeds to see what the difference in performance will be.

This will be a future post since the seeds are not ready to do the comparison this year.

Advertisements

What is the life cycle of Brassica and their seeds?

Whether you’ve allowed your Brassica family plants go to seed or they just bolted on you when the heat of summer came, you may have seen something like this:

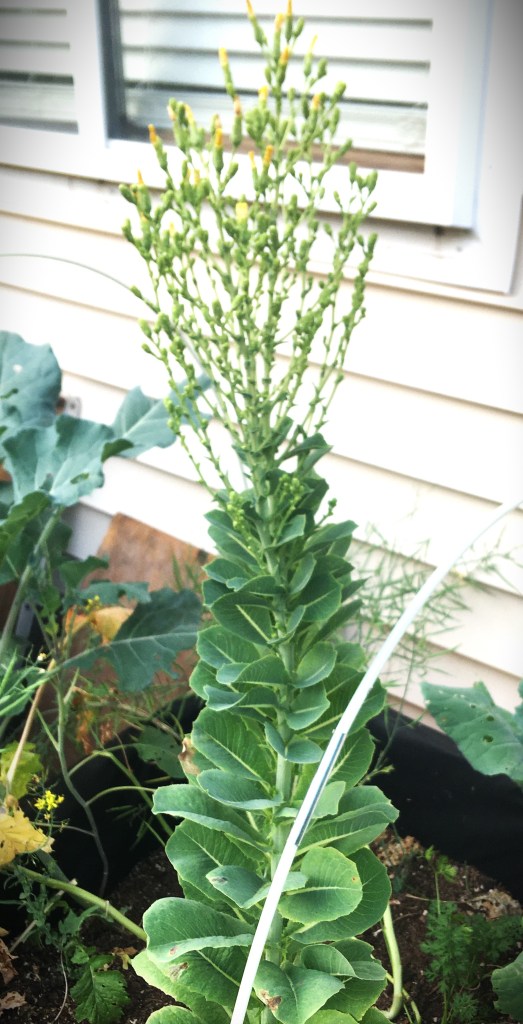
This was one of my rapini that bolted on me. The first thing that you see is the bolt.

Next, the flowers (which form the seed pods) grow for pollination. While there are still flowers you will see some of the seed pods developing.

Out of all the plants that I’ve collected seeds from, I think the Brassica family is the one that I’m most impatient with. I don’t know if it’s just my grow zone or everyone starts tapping their toe asking their plant, “Are you done yet?”

These pods remind me so much of beans. And I honestly expected them to bulge out more than you see above. But this is what the end of the seed maturing stage looks like, immature beans. Even though these pods are fully grown, they still aren’t done yet. They will turn beige.

Everyone I’ve heard always described them to turn brown. I translated that to mean that they would darken. But the first time that I saved these seeds, they started bursting open when they were beige in color. So once you start seeing the green fade from these pods, you know it’s almost time to pull the plant and collect the seeds.

What you are waiting for is the pod to turn papery dry. If you go out each day to check on your seed pods, you will get the feel for it when you see the first one pop open. The pod will look very much like this threaded hook:

Do you see how the center of this hook has a frame and then there is negative space?

Theseed pods of Brassica have the exact same structure. There is this frame like structure with negative space in the middle.

When the pod bursts, it’s the dry skin that cracks open and falls away. The seeds live in this center portion of the frame. So when the pods open, the seeds fall out and the frame remains on the Brassica stem.

The goal is to catch your Brassica with fully mature branches, dry beige skin, before they release their seeds. Once you accomplish this, you cut the branches off or uproot the whole plant.

If you can’t open a pod by rubbing it between your fingers, you will want to hang your branches/plant upside down in a cool dry place. This can take a week or two. But the pods will crumble.

Advertisements

Removing the Seeds from the Pod

Once the seeds opened in my hand, I chose to put the branches into a pillow case and tie off the open end. Then I gave the pillow case to my kiddos and told them to hit the pillow case against the deck!

This was perfect timing for this project because my kiddos were at each other and I couldn’t keep them from hitting each other. So I gave them an alternate action of being aggressive. After each one had a turn, the pods had all broken open and the seeds were all released inside the pillow case.

To separate out the seed from the chaff (stems and pods), I just used the traditional method of winnowing. I modified this by using a little modern convenience of a box fan on high speed. Because the chaff was so thoroughly dried out, they blew away with ease. And even though the seeds are small, they really do drop back down into the pillow case that I kept at the porch in front of my box fan.

Advertisements

If you want to see how this type of winnowing process is done, there are countless videos on YouTube. There are some that do this winnowing with Brassica seeds, but the majority is in relation to wheat and other grains. The process is the same. So whether you watch how grains or Brassica are winnowed, you will understand this process. There’s no need to invest in a winnowing box or other tool unless that is the path you want to go down. All you need is your seeds on a cloth and a wind source (whether natural or manufactured).

There’s no further step that you need to take in processing your seeds. Just store


Even though now is the time to plan and plant in your garden beds, I wanted to talk about saving Brassica seeds now. Where you plant your Brassica now for a spring crop, it will stay there for the rest of the growing season. And in some locations, it will need to overwinter to give your plant enough time to make its seeds and mature them.

This is a slow process. But it so worth it when you can grow hundreds upon hundreds of seeds in a single season and not be dependent on what’s available in future market sales.

What are your tips for saving Brassica seeds?

What other seeds do you save from your garden?

Processing…
Success! You're on the list.

4 responses to “Saving Seeds”

  1. Cary Avatar

    This post answered some questions I was having, thanks.

    Like

    1. Pacific Northwest Event Design Avatar

      I am so glad that I was able to help!

      Like

  2. Andre Avatar

    Love the unique perspective you bring to this topic.

    Like

    1. Pacific Northwest Event Design Avatar

      Thank you for reading! I hope you enjoy other posts as well.

      Like

Leave a comment

Advertisements
Advertisements

Fresh From The Garden

(This post contains affiliate links to products. We may receive a commission for purchases made through these links, but at no extra cost to you.)

I am so happy that the recent sun and high heats have hit my garden the last couple of weeks. The spring here has been cold and wet and I second guessed, third guessed, and fourth guessed whether my spring plantings were going to be viable in making produce.

The great news is that my leafy greens are all doing well and have come to maturity for harvesting. My tomatoes are finally putting forth fruit. Truth be told, I keep looking for more blossoms and hunting for more new fruit. I really want to put away more pasta sauce and try my hand at tomato paste. Usually we just go through so much sauce that I really don’t get the opportunity to make anything else. So fingers crossed, I am so hoping to make other tomato products.

My corn is finally starting to outgrow my oldest child. Fortunately I drive past farms that grow fields of corn, so I compare my humble hobby garden to the professionals. And I’m glad that my few rows of corn are keeping pace with the large farms. So there’s hope. And particularly since I grew popping corn last year, for the first time, my boys are hooked with “our” popcorn. And I planted more corn than I’ve ever done before in hopes of making a year’s worth of popping corn. When the ears have matured, I’ll make a post on this so you can know which types of corn to grow to make your own popping corn. Also, you can see just how easy it is to make pop corn. Other than the wait, making pop corn is super easy!

I won’t go into all the details of everything that I’ve grown this year, but I will end here by stating that my fall seeds have already sprouted and are doing so much better than my spring planting. And even today, I’ve come across so many videos on YouTube talking about what crops you can plant in August and still harvest in the remaining time for this growing season. So if you are curious to try your hand at growing something before fall hits, there is definitely still time!

Fresh is what’s for dinner!

Out of the five items I harvested from my garden this morning, I used three of them for dinner tonight; Cabbage, Bok Choy, and Mizuna.

If you’re asking, “what is mizuna?” believe me, so did I. This past fall I bought seeds from Baker Creek. (Not an affiliate link, just a great product.) When I got that delivery I found out that the gift packet of seeds I got from them was mizuna. I had never heard of this green before. So I took a chance and grew it on the blind. And tonight I found out that it is a type of bitter green. Some of the bitter greens are quite bitter and I have to douse restaurant salads that come with them, because they’re so bitter. However the mizuna is not so strong. It has a mild bitter flavor, but is not bad at all if you’re sensitive to the bitter profiles, like I am.

Advertisements

Knowing that I have so many green to bring in starting tomorrow and for the next week or so, I had to come up with a new idea on how to use them. Other than dehydrating my greens and turning it into a powder to use in countless recipes, I can’t think of a way (other than freeze drying, but I don’t have that machine yet) of preserving them without becoming a wilty mess. Granted Cabbage is good for kraut and ferments–which I will be doing when I get a few more heads ready for harvest. Once my green cabbage comes in I’ll post an amazing Italian ferment that I found. And with the red cabbage I’ll post on making a red kraut. So there are a few things to keep an eye out for.

Back to dinner, I needed to find a use for these three greens to make dinner. Cabbage and Bok Choy can both handle some cooking. But one look at Mizuna and I knew I couldn’t do a stir fry with it. It’s definitely a salad green.

But Asian sounded so good!

And that’s when inspiration hit. Two of the three greens could handle the heat, so I cooked my rice and chicken in a marinade (Mr. Yoshida’s Original Gourmet).

While everything cooked, I prepped the greens.

For a single plate I used (from top to bottom) 4 stalks of Bok Choy, a few leaves of Cabbage (the head was small, so I used about 5 leaves), and 4 stalks of Mizuna.

The Bok Choy and Mizuna I chopped. Because the cabbage is raw, I rolled the leaves together and julienne cut the leaves. Once these are cut, they just mix together easily like this.

I usually dread buying mixed salads at the store because either their mixes don’t taste good to me, are old, don’t keep long in the fridge, or all the various recalls over the last few years. Now that I have these greens ready to pull from my garden (plus spinach once it reaches maturity), I can put together a salad mix that is far superior than what’s found in the stores AND it takes less time than driving to my local store (about 4 minutes away).

The great thing about this mix combo is that I can place hot rice right on top of the salad and it retains its crisp texture. Cabbage isn’t phased by the heat. Bok Choy naturally can be cooked for a couple of minutes and keep firm texture in the stalk with mild wilt in the leaf, but retain full pleasurable taste. Mizuna, I fully expected to not hold up to the heat, just because it did wilt in the time between me rinsing the greens off and making dinner.

All in all Mizuna acted much like Bok Choy. The greens did wilt. BUT the beautiful purple stalks remained crunchy just like the Bok Choy stalk.

Top off the salad greens with rice, and then marinated chicken. And as a side note, left over chicken is just as perfect as having warm chicken. I ate this both ways.

You can see here that the rice I had on hand in my kitchen is basmati rice. I couldn’t have picked a better rice for this dish. White (short or long grain) rice tends to be sticky and would just be globular bunches of rice on this dish. Brown rice could be used. But if given the choice between basmati and brown rice, I would pick basmati for textual reasons. But know that you can choose your favorite rice.

Alternate Ingredients

I don’t have much experience with grain alternates to rice. I wouldn’t recommend quinoa (too nutty for this flavor profile), potato, or riced cauliflower(too gummy of a texture). Couscous could work, especially if you use a different marinade for the chicken.

If you didn’t want to use Mr. Yoshida’s Original Gourmet, Teriyaki would be just as perfect for this rice on salad. Sweet and Sour would be a fun alternate. I’m leaning toward trying the next time I make this, using a honey ginger sauce. And maybe you’re not into a sauce at all, for any dietary reason, but prefer vinaigrettes. You are most certainly not limited in how you dress your chicken or rice.

And once you opt for a different dressing, you can make any of your other alternate grains work in the place of rice.

You’ve also then opened up the window for other additional ingredients. Have garbanzo beans that you’ve been looking for something new to make with it? What about dehydrated fruits or vegetable chips? Pomegranates, fruit slices (fruit or canned)… as you can now see, you can really turn your salad on its head with adding a heated element on top of something traditionally thought of as being a cold entre. You can use dehydrated or preserved ingredients–especially if you need to use up some of your previously shelved preserves to make room for what is coming up in your current garden.

I can’t even begin to share with you just how excited I am about this! With all the recent hot weather and the lack of desire to cook dinners, I am actually looking forward to making this a meal a couple of times a week, different meats, different dressings, different additions. Plus it’s the bonus of eating all the leafy greens that don’t normally keep well, like some of the other produce I grow to preserve. And that’s not even taking into consideration all the edible flowers that abound this time of year (such as culinary lavender and dandelions)!

As you can see here, with how beautifully this all mixed together I’m positive your imagination has already added in additional ingredients to make this meal individually you!!!

Here’s the cut files that were newly released this past week. New files are released every Monday!

Processing…
Success! You're on the list.
Advertisements