
Some of my favorite moments are helping make clients’ DIY moments turn into successes. And here is one of those moments.
The inspiration picture that Tina sent me was this burlap birthday banner.

I am such a fan of Pinterest and other creative social media. They provide the perfect jumping off point for communicating a clear vision.
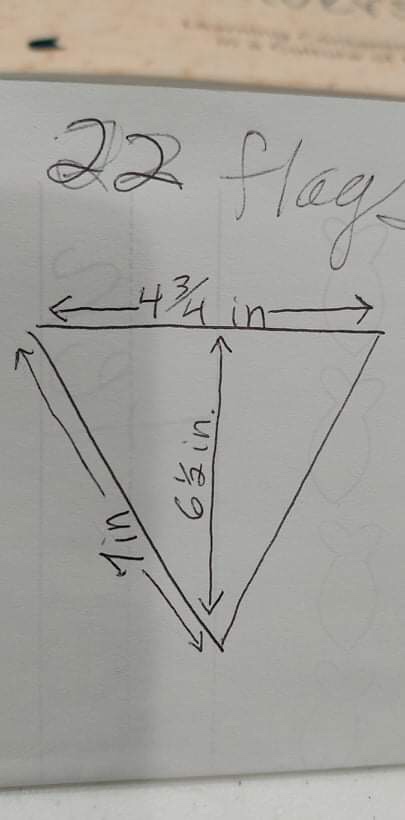
For Tina, she already had the burlap banner that she wanted to use. Because hers was triangular instead of rectangular (as in the inspiration picture) the information that was imperative was the dimensions of the triangles.
From there, I was able to put together a mock up for her with two of the closest fonts I had, to the inspiration picture, and one slightly different just for fun.
The important thing to remember when changing up a shape is understanding how to maximize the space. For triangles you are going to be limited by bottom heavy letters and numbers. So in this case H, A, and 8 are the limiting characters to the font size. When doing a mock up usually the P is the problem child because centering the letter on the triangle usually ends up with the P running off of the pennant. However this is easily overcome with an optical illusion. Keep the P in perfect line with the other characters, but you bump it off center toward the right.
So if you ever find that your characters are running off of your pennant, and they are top heavy on a triangle, you can shift your character over and keep it on your pennant.

I was so happy that Tina and her family were excited who this banner turned out for their mother’s birthday. Tina was able to use a banner that she already owned and she made something for her mom.

If you are looking to DIY a Burlap Banner and wondering wondering what is the best way to attach characters, there are two methods that I recommend. My favorite is glue dots. The dots have the right about of stick power to last through your event. Plus it has the added bonus of being easily removed from the burlap without added work.
The second method is hot glue. if your event is outside on a nice hot day or with some strong winds, the glue dots will not be strong enough. The hot glue is prefect. The drawback to this method is that sometimes the glue does not want to release from the burlap. There are a few different ways of removing hot glue from burlap. My favorite, is to place the fabric between two sheets of parchment paper and reheat the glue with a hot iron. The parchment protects your iron and table from getting glue on them. With the hot glue fluid again, you can peel the glue off the fabric. A tooth pick, or other narrow tool, is useful in reaching any glue caught in the weave.
No matter if you are a beginner at crafting or trying a new crafting skill, if there is an inspiration picture or question about how to do something, do not hesitate to reach out.
I’m here for you!
