After spending almost a decade in the event decorating industry I have repetatively heard "I can do that". Instead of being dismissed by creative minded people, I want to show you how I do "that" so you can be sucessful in recreating that inspiration image. I just might have a few tricks that you haven't seen yet!
The one thing that I love about budget and DIY weddings is that the couples, and their families, look for ways of reusing items after the wedding instead of using disposable items. And this is one thing that everyone can agree on, whether you’re a diehard Earth Day person, living Green, being Frugal, or just getting more bang for your buck.
I’m going to focus on one wedding item that tends to be wasteful or even a financial drain…wedding favors.
There are so many cute ideas out there. I really get it.
Some of them are practical. Like the paper fans on those hot summer outdoor weddings.
But if we’re being honest, how many of those items are really used by your guests after the wedding?
The problem that I see is that all those monogrammed, personalized items really don’t see a life outside of the wedding. The true exceptions are for the family and guests who are truly sentimental.
My husband is one of those sentimental people. I kid you not, he’s the one who collects the paper fans after the wedding and brings them home. His feelings are hurt if the one of the boys plays too rough with one and rips it. And 5 years later I just see a blue fan, but he remembers who wedding it was from and at least five new people he met, and a funny story or two from the reception.
So I want to challenge you to find a way to make your wedding favor do double duty. Or even triple duty!
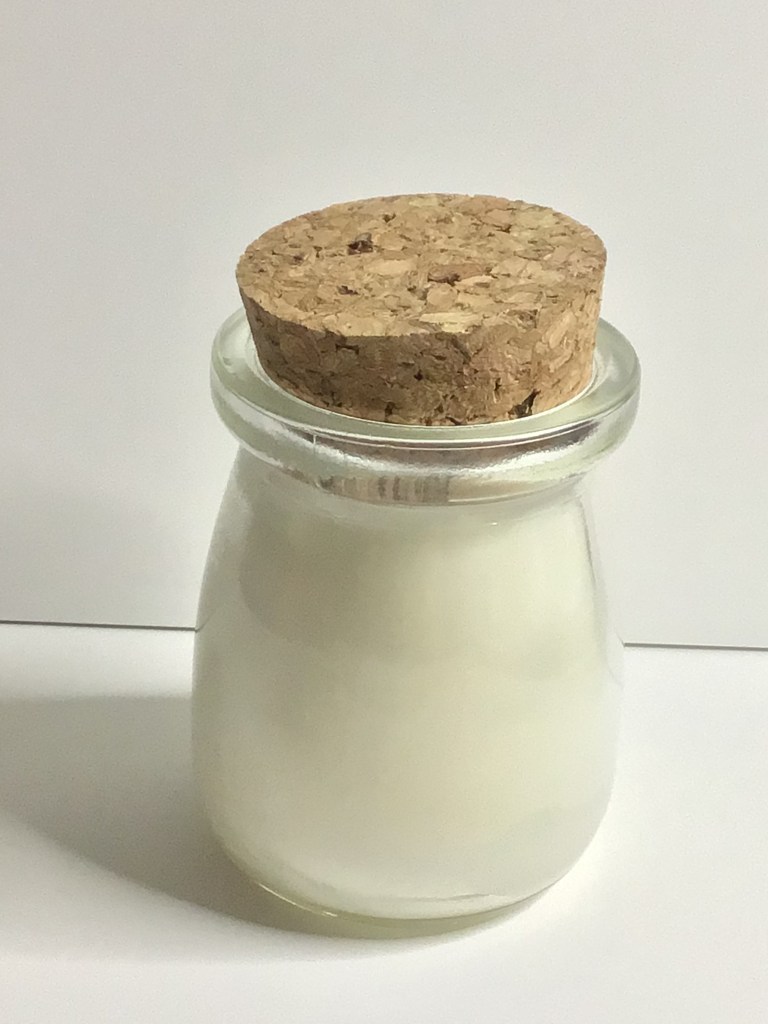
One idea I have for you are little candles that you can purchase at craft fairs and support a local vendor.
Advertisements
Use #1 Wedding Favor
Instead of personalizing these with your names, initials and wedding date, try finding phrases or words that represent your love for each other. Funny phrases work if you’re a funny or prank making couple. When you take away the obvious personalization and go with personalization that your guests can identify with, you automatically guarantee that your guests are going to want to take your favors home.
Use #2 Year Round Gifting
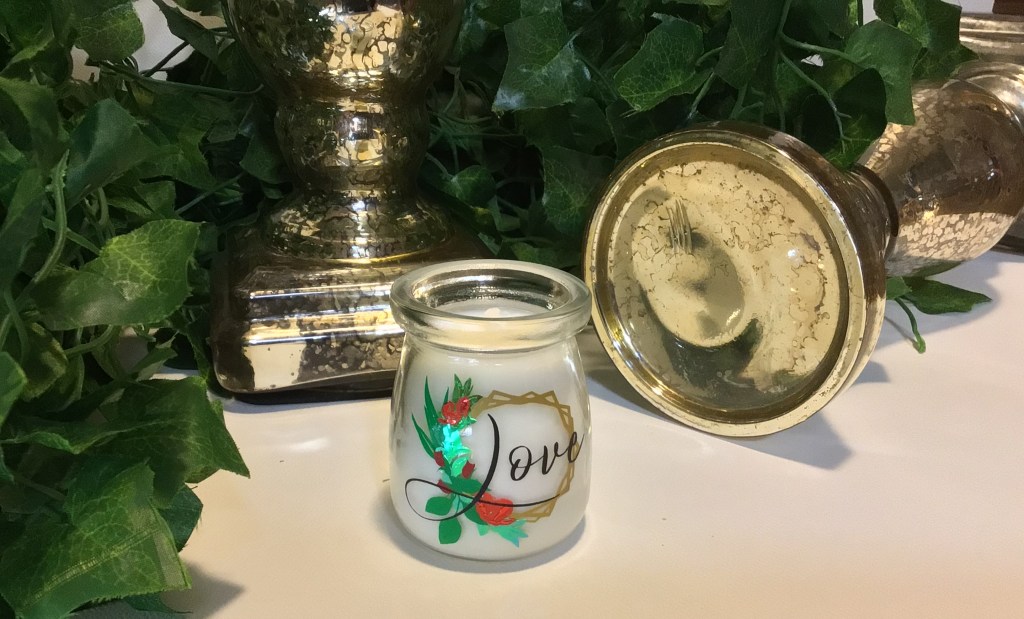
For example, if you’re keeping with the romantic or Boho themes, this floral wreath is absolutly perfect! It adds to your wedding decor, but it’s absolutely something that people will love to decorate their homes with when they leave our reception. Worse case scenario, you take a few home and they are still an appropriate gift to give for birthdays, Valentine’s Day, an add on trinket to another couple or bride, the possibilities are endless.
This decal is 2″ tall. Some of the details were eliminated to due to size. The rose buds you see here are about 3mm tall.
Use #3 Centerpiece Decorations
If you’re thinking about using tea light candles on your reception tables anyway, these are perfect because one purchase price for a favor is fully utilizable for your centerpiece. And if you design it just right, you can combine it with other candles. For example, here’s the same candle with gold mercury glassware.
Advertisements
Use #4 After the Candle is Gone
People love cute little things. Even more than that, they love cute little things that they can easily see using when the contents are gone.
This little jar is perfect for adding:
A new tea light
Coins
Q-tips
Toothpicks
Sink side jewelry holder
Small office supply holder (ex. tacks)
Tooth Fairy jar
Spice holder
And any crafty person can find a million uses for this size of a jar on a craft project
I think I bought several of these scented candles from a Christmas Craft Fair vendor for about $5 each. Yes, there are most certainly wedding favors out there that you can find cheaper per unit. BUT my big question is…
Which favor is going to be memorable for your guests? Pull double or triple duty for your decor? Will be used long after your wedding?
Another bonus to purchasing an item like this from a local vendor is that they are likely to work you a deal if you buy something in bulk from them. It’s something to talk to them about. But even at $5, it really is a great deal.
But the absolutely best thing about this favor is that it will absolutely not end up in the trash as soon as you leave for your honeymoon!
File Used Today, Love Wreath, will go live on Monday! There will also be other variations available. So be sure to check them out in my shop.
Processing…
Success! You're on the list.
Whoops! There was an error and we couldn't process your subscription. Please reload the page and try again.
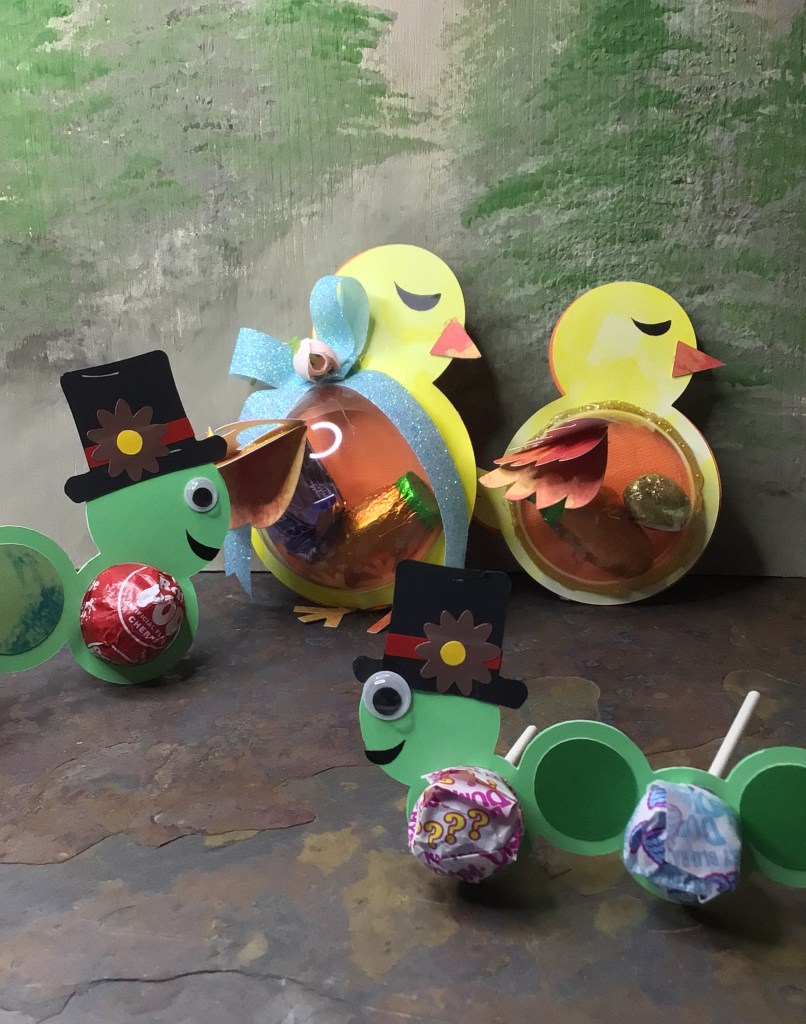
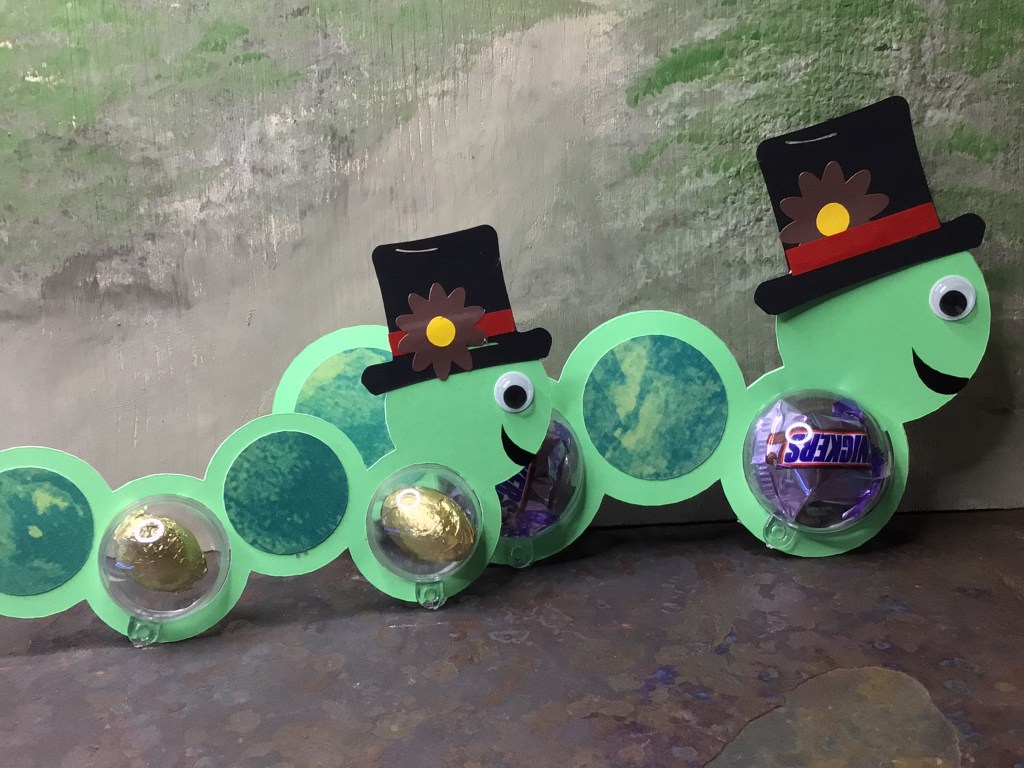
With Easter tomorrow there is a common crafting problem that pops up with those cute egg and sucker holders…resizing.
Not all eggs are sized the same. Not all suckers are sized the same. There are even some holders for chocolate balls. Not all chocolate balls are the same size.
I’ve seen more frustrated crafters than I care to mention. Either the designer miss-sized the holes, so things don’t fit or the crafter bought a candy that was not standard size for the file they bought.
The good news is that you don’t have to throw out the files that didn’t work for you. All you need to do is resize your file in your cutting program. And I’m going to show you how.
Resizing Your Critters
Step 1: Measure the diameter of your egg, sucker, or chocolate.
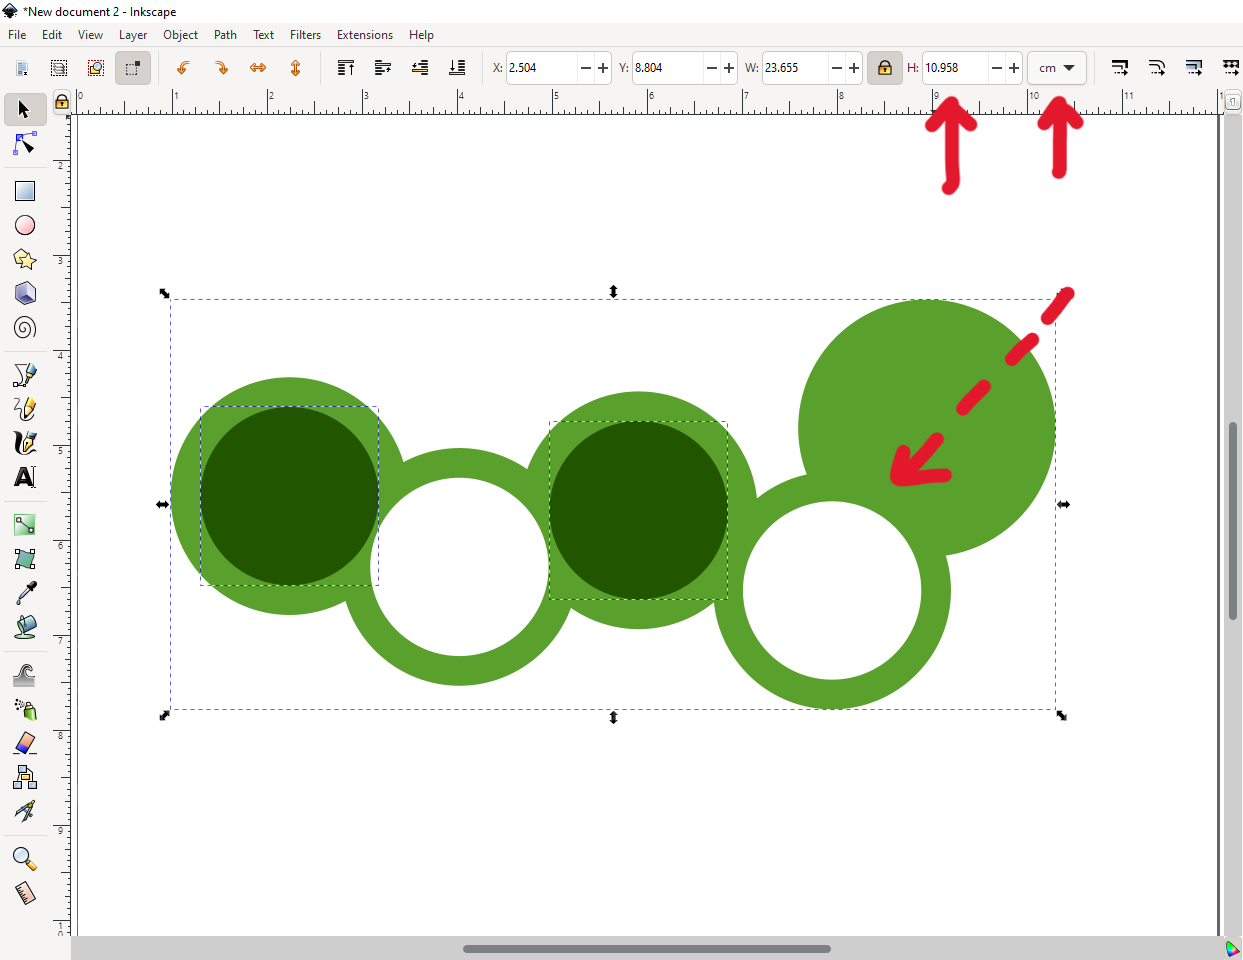
Step 2: (After checking to make sure your entire critter is grouped, to make sure you resize everything in proportion) Make a circle that fits the hole. You will use this circle to verify you have reduced or enlarged your critter to the size you need it. (See Photo 1 above)
Step 3: Check your program’s measurement type and decide if you’re going to do your measurement based off of your objects height or width. (See Photo 2 above)
You will notice in the photos that I have my measurements set to centimeters. The reason for this is because the plastic ornaments I’m using were sized in the metric system. I love designing in Inkscape because I can switch back and forth between the metric and imperial system with just a drop down menu.
The ornament I’m sizing down for is 4 cm.
Step 4: Select All: your entire critter and your sizing circle. Then increase or decrease your critter as you need.
This step will take a little time, because your entire critter is not going to be directly proportional to the hold diameter. I’m sure there’s a math equation that you could come up with to get you the answer every time. I am not a mathematician. So I use the computer program to do the work for me.
Step 5: Stop sizing in accordance to what you’re sizing for. (See Photo 4 above)
As I mentioned, I’m sizing down for a 4 cm plastic ornament. The ornament has no lip, other than the tab to string the ornament. And the caterpillar holder that I’m using does not have a base to deposit and hold the ornament.
If you’re using a cut file that holds your egg, sucker, or chocolate ball, you don’t have to be precise with your hole sizing. You just need the whole holder to be big or small enough to precisely hold your sweets.
However with a plastic ornament (I needed to use up my 3 cm and 4 cm ornaments that just are NOT standard size for any cut file on the market) I need to have a pretty precise hole size. I need to have it snug to keep the project together. So I made the hole slightly less than 4 cm so the tension of the two pieces of cardstock (glued together) was enough to hold the ornament with no other crafting tricks.
Step 6: Cut your file!
Obviously I didn’t resize in my cutting software. My software does not have a measuring system conversion tab. It’s permanently set in the Imperial measurement system.
If you find that you are also resizing outside of your cutting software, always make note of the height and width of your entire critter. This will allow you to quickly resize your entire critter in your cutting software without the guess work.
Let Me Do the Math For You
I want to make conversion easy for you, if you decide to go with my Caterpillar Ornament cut file!
Here are the measurements I used to make these Caterpillars for my boys.
Small Caterpillar
3 cm
Height 2.7″ / 6.85 cm
Medium Caterpillar
4cm
Height 3.6″ / 9.15 cm
Cheat Sheet for converting the Caterpillars for full ornaments.
3 cm Ornament
Circle Back Cover 3.5 cm / 1.38″
4 cm Ornament
Circle Back Cover 4.5 cm / 1.77″
Another option is to use half of an ornament and use decorative paper for the back cover.
Tootsie Pop
3 cm
Height 2.7″
Dum Dum
2 cm
Height 1.85″
Cheat Sheet for converting my Caterpillar Design into sucker holders!
Honestly, with converting you could go as large as you want to. You could size up even more for gifting sox, underwear, baby onsies, and baby burp clothes. Literally you can convert to package any kind of gift in a new way!!!
What do you do when it all goes wrong?
Let’s be honest. Sometimes we forget to resize something. Or we think the designer made it correctly, but our cutting software program uploads the file at non-original dimensions (which has happened!) Or there’s an entirely different reason. Maybe the item you’re crafting with is not uniform in size (which happens with cheaply made items).
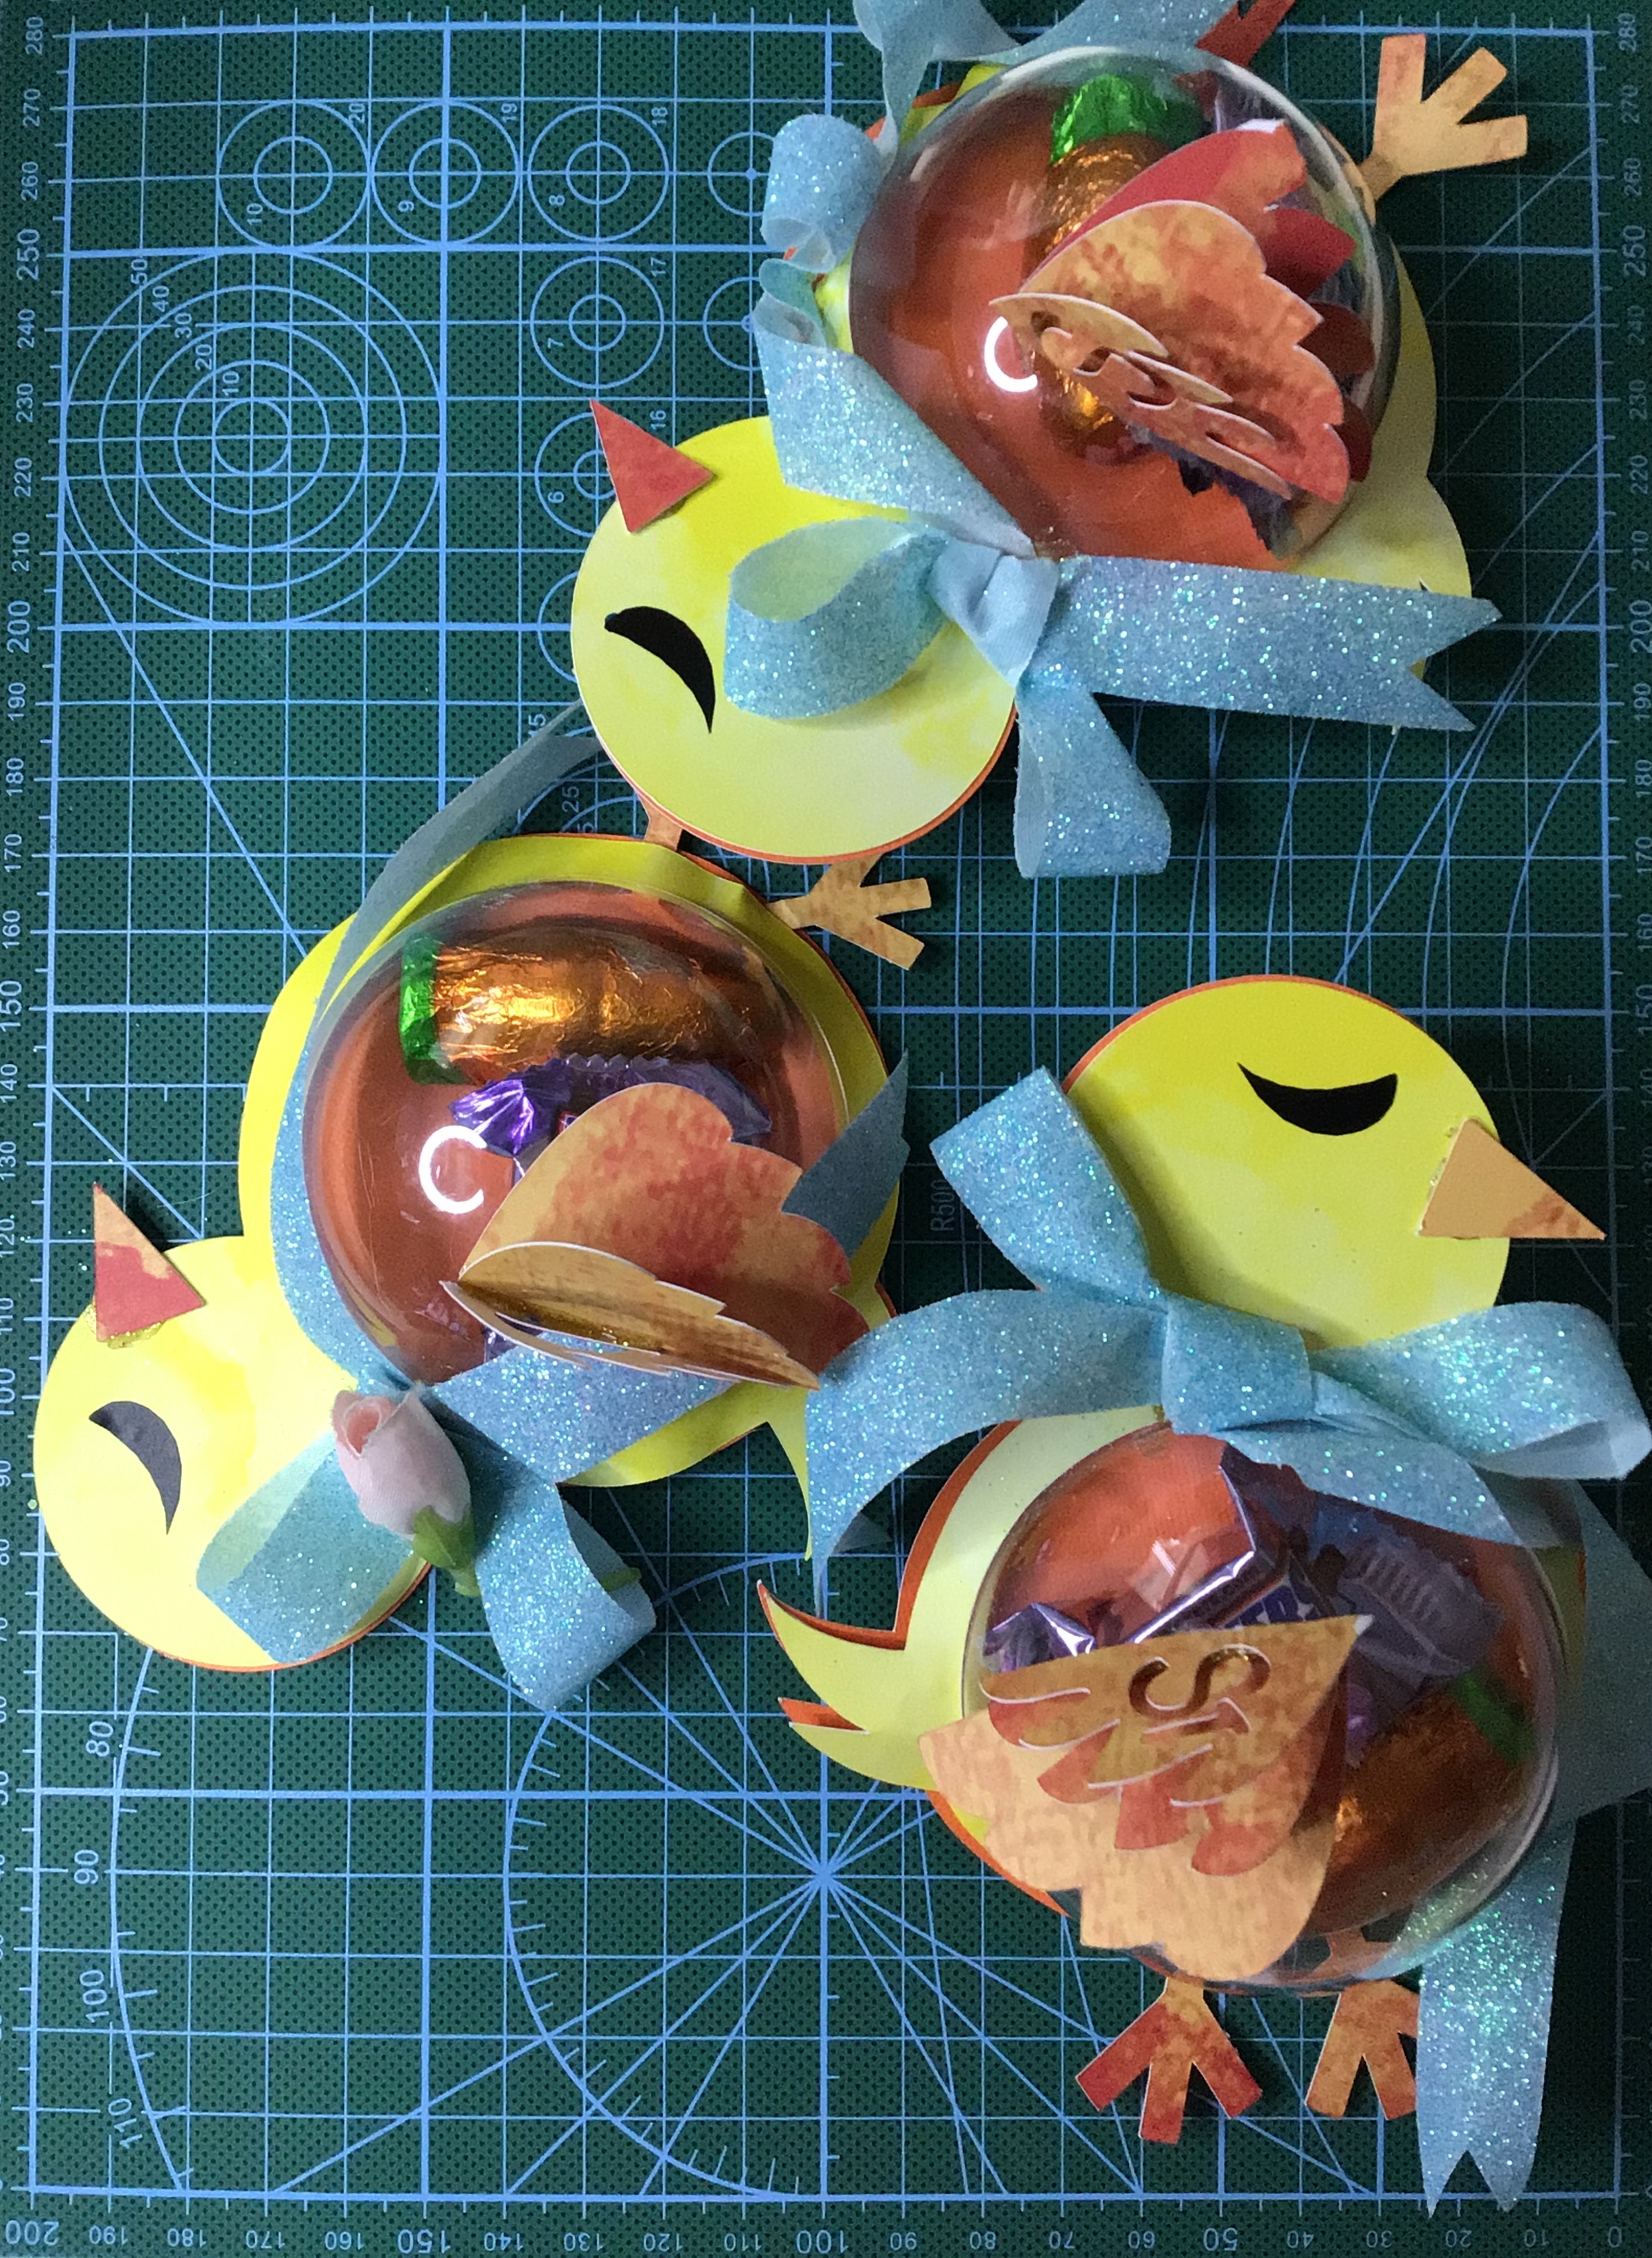
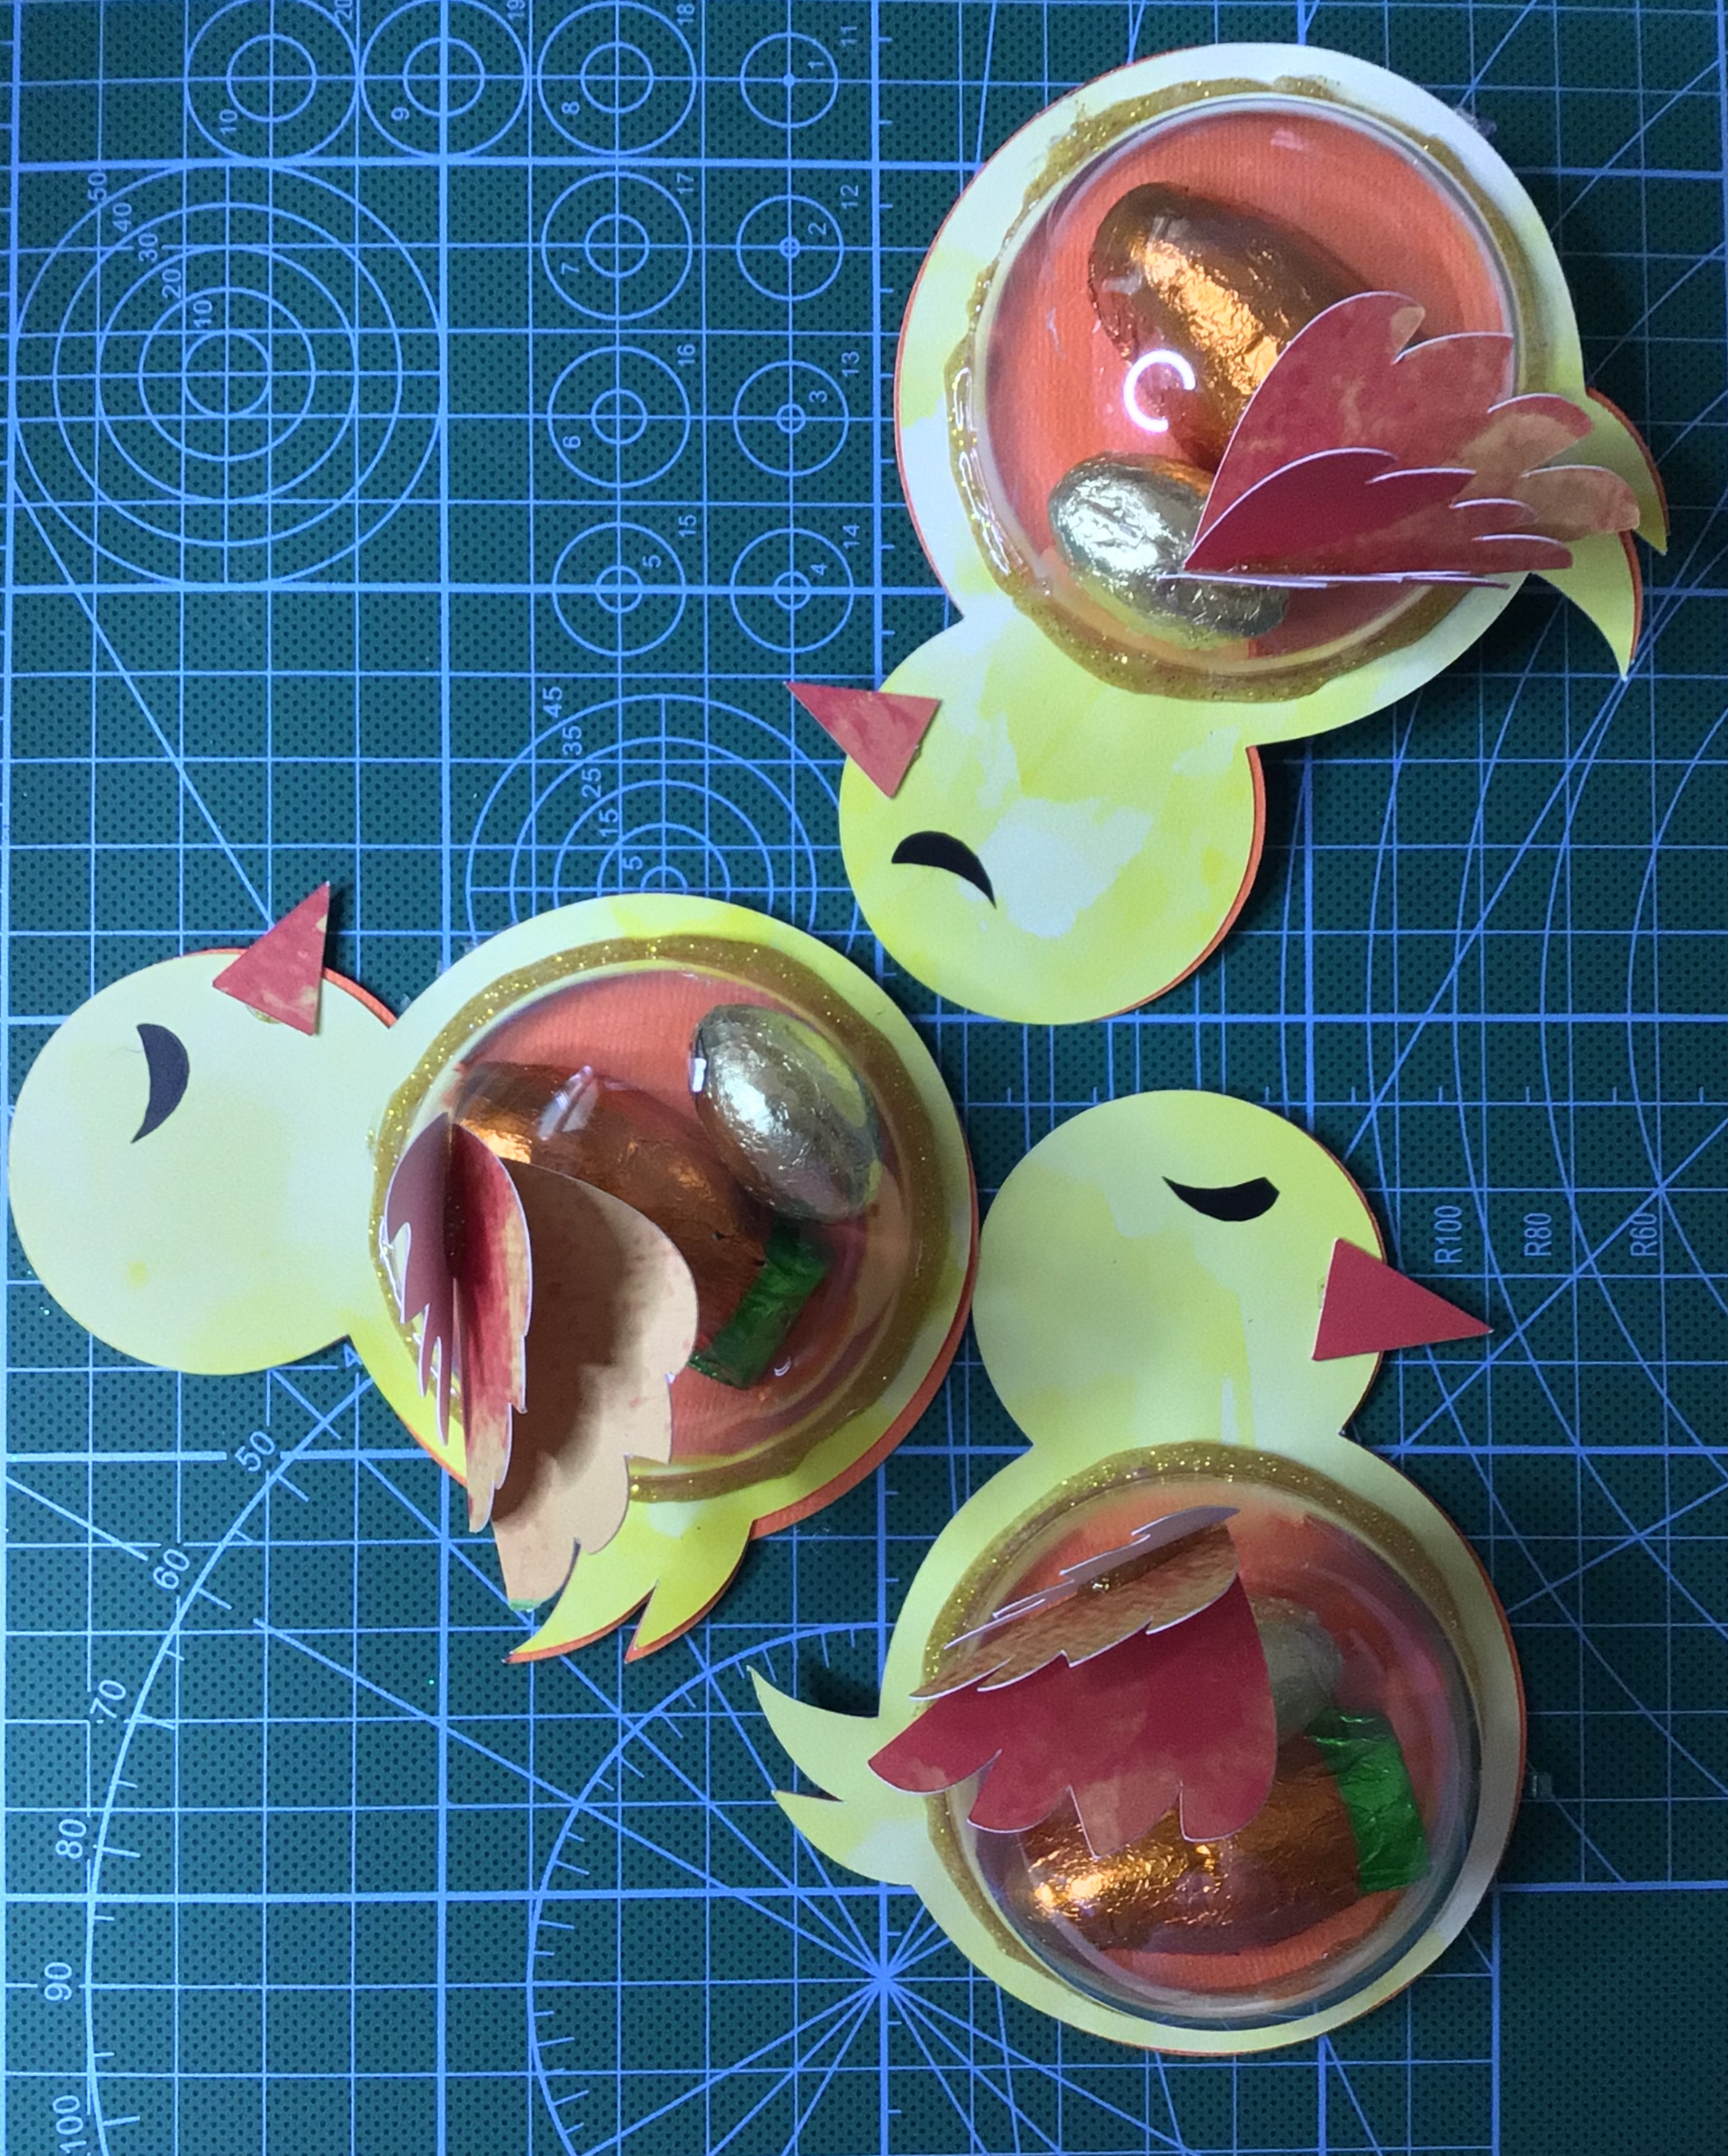
That is what I ran into with another designer’s file while I was finishing my Easter crafting for my boys. I had used this other designer’s file for Rabbits with my 5 cm and 6 cm plastic ornaments. I had also gotten her Chick file. I had to make conversions for her files because all my ornaments were smaller than hers, for which she used to design her file. The Rabbits turned out perfect. The Chicks were hit and miss. The 5 cm Chicks turned out near perfect. The 6 cm Rabbits were perfect. But the 6 cm Chicks were too small!
Now if I were making these for clients, of course I would make the adjustments and make them new. However we all know that my boys are just going to rip into the cardstock and go straight for the candy! They’re not going to notice any flaws. So I’m free to make corrections.
The 6 cm Chicks (on the left with ribbons) had front bellies that just would not seal to the back cover. I mean we are talking eye sore, obviously not the right size at all. So to solve this problem I took ribbon bows and curled the ribbon down over the mistakes. Hot glue is amazing for tacking ribbon down in precise locations.
For the 5 cm Chicks (on the right), the half ornaments were having the issue of not staying in place at all. So I pulled out my glitter glue sticks and glued around the entire circular edge. I might have had smoother edges had I used Elmer’s glue and actual glitter. However, with a full weekend ahead and running out of crafting time, I opted for the glitter glue for the glue and done option.
The lesson I learned with embracing the imperfect (for a situation that doesn’t demand perfection) is to think outside the box. Cover up, fill the gaps with extra accessories, glue… it can all add to the beauty of hand crafting.
So if resizing is not exactly your cup of tea, do not fear. Don’t get anxious. Get close to being what you need and use your other skills to make it work. After all, a cut file is just a blank slate for you to make it entirely yours with the touch of your creativity.
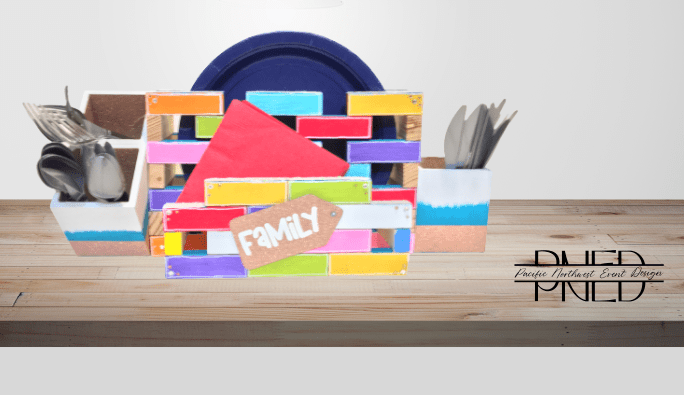
I know these are common problems for family get-togethers. Either, your family is so large, that when you have a pot luck style meal there is always the problem of not having enough table space. Or your family is enjoying the sun with a BBQ and you spend more time than you can admit chasing down paper plates, napkins, and even silverware.
My family suffers from both of these problems. Every year.
Inspiration hit when I watched this video, tutorial using dollar store Jenga Blocks, from She So CraftDee. This video was so well put together with directions, that I don’t want to recreate what this talented woman did. So I will just direct you to her video if you want to learn how to create structures using Jenga Blocks. Instead, I will proceed with the road blocks I faced while working with this tecnique and how I made this Paper Goods Caddy.
Materials
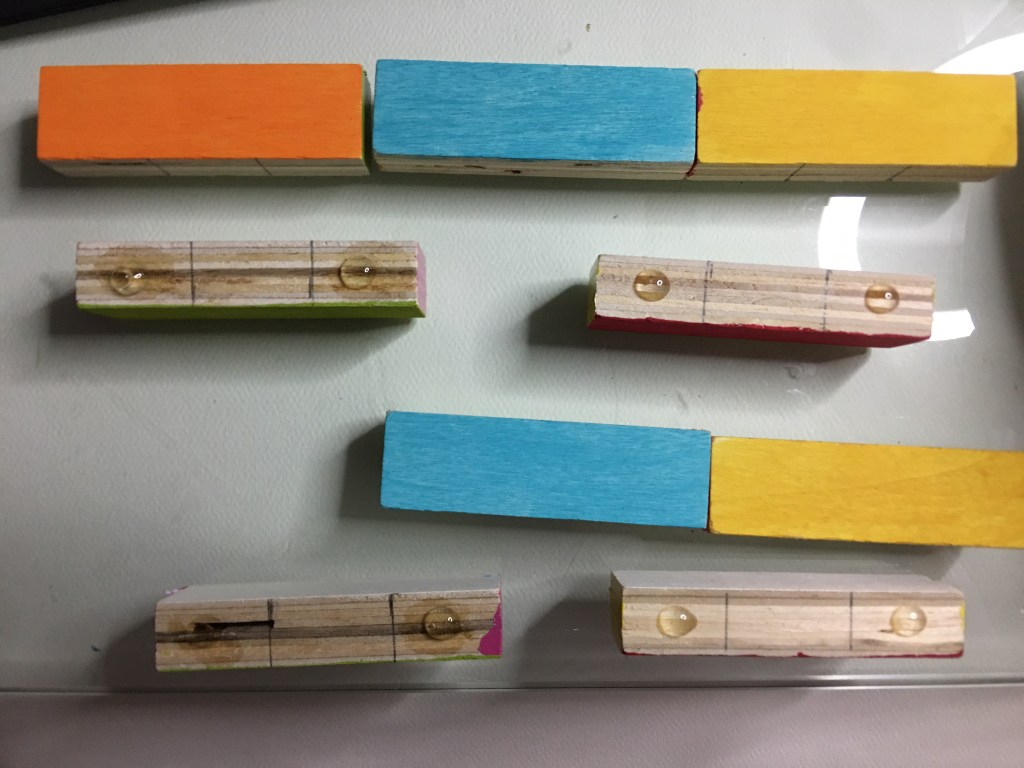
(54) Jenga Blocks (I used 48 of one style of blocks and 6 blocks of another style)
Hot Glue Gun and Glue
Multi-Purpose Cement 0.5 fl oz (E6200 would be the best choice)
Ruler (Optional)
Paint
1.25″ Nails
Hammer
(14) 0.5″ Wood Cubes
(3) Square Pen Holders
Glitter Paper
Metal Gift Tag
Vinyl
Transfer Tape
Elmer’s Glue
Glitter
Acrylic Paint Pen (optional)
Flat Face Rhinestones (optional)
Jewelry & Metal Glue (optional)
Project Dimensions
The overall dimensions are 17″ wide by 6.5″ high by 7.5″ deep. The interior of the silverware holder squares are 2.5″. The plate holder is 9.5″ wide by 1.75″ deep. The napkin holder is 7.5″ wide by 1.75″ deep.
This accommodates 9″ paper plates and standard sized napkins. In the picture are 9″ plates and cocktail napkins (6.5″). The dimensions can be adjusted according to your family needs.
Before I jump into how to assemble this caddy, I want to start with the pitfall of gluing options.
She So CraftDee only uses hot glue. I do want to draw attention to the fact that it’s not just any hot glue stick, but wood glue. Full disclosure, I have not yet worked with hot wood glue so I cannot attest to the strength or durability. But for the crafter who does not use hot wood glue or have never heard about it, it is not going to function the same way as the standard glue stick that you have in your craft stash. So please do not expect standard hot glue to work like hot wood glue.
I have decorated in enough wedding and other events that, professionally, I would not put trust in wood glue alone to hold a vase that holds water and everything else that adds weight. An LED pillar light is only going to weigh ounces. However, the weight of a glass vase filled with water, stones, flowers, and anything else of weight is going to add up quickly. There is no telling if and when glue will fail. So I would highly recommend that you reinforce your build in the legs and the base frame so that you can rest assured that you won’t have a catastrophe on your table tops. Wood glue and standard hot glue would all be adequate for any non-weight baring sides.
Advertisements
Because this Paper Goods Caddy is a functional piece, you will definitely need to use something much more substantial, for reinforcement. I used Multi-Purpose Cement (from the dollar store) as my primary gluing option, with the use of standard hot glue to hold the blocks in place while the Cement cured. For a home craft, the Multi-Purpose Cement is a good choice if you just need a little bit of glue. You will use the full 0.5 fl oz tube for this project. However if you are a professional, I would recommend E6200 over all other glue.
TIP #1: Examine your Jenga Blocks. You want to make sure they are solid wood with no cracks, grooves, or holes. The cheaper Jenga Blocks do not give you the easiest surfaces to work with. I had a couple of blocks that had a gaping hole where the wood was laminated together. The glue went straight down to my work surface. If sanding doesn’t give you a smooth working surface, paint your blocks. The glue actually held much better to the painted surface than the laminated wood surface. Plus, the paint fills the gapes and grooves for you. Just be sure to let your paint dry overnight.
TIP #2: If you are using colored blocks, like I did, set up the pattern that you want your bricks to be in before you start gluing. This will keep your pattern uniform in the front and the back.
Prep the Silverware Holder
Please feel free to decorate the silverware holders in your personal style. However if you want to recreate what you see in the pictures, these are the steps that I took.
Paint the top 2/3 of the pen holder with white acrylic paint. (Allow to dry.)
Paint the bottom 1/2 with teal acrylic paint. (Allow to dry.)
Cut Glitter Paper (or vinyl of choice) into 2.5″ strips (the number will vary depending on the length of your Glitter Paper or vinyl choice). Also cut 3 additional strips at 1″.
Slide a 2.5″ strip into a box and crease the edge. (This will give you the cleanest edge and prevent you from mismeasuring the inside of the box.) Trim on the crease.
Remove the backing and place on the inside face of the box.
Repeat 4-5 for the remaining 11 inside faces of the three boxes.
Take a 1″ strip of Glitter Paper and apply it to the bottom outside edge of the pen holder box.
Tack the edge of the Glitter Paper closed with a dot of glue.
Repeat steps 7-8 for the other two pen holder boxes.
Glue two of your boxes together, Glitter Paper seam sides together. Use a very liberal amount of Multi-Purpose Cement in the center, with a rectangular frame of Hot Glue. NOTE: Hot Glue does leave a gap between items glued together. So if you want zero gap please use Cement only. You will need to clamp together the boxes until the glue dries (an estimate of 1-2 hours).
Set Aside for Assembly.
Advertisements
Prep Gift Tag
Take a left over piece of 2.5″ strip of Glitter Paper. If it is large enough, wrap it around from top front, down, over the bottom edge, and up the back side. If it is not large enough, take two pieces that fully cover the front and back and cover each side.
Trim the edges of the Glitter Paper that run over the edge of the metal gift tag.
Create the hole, matching the metal gift tag, by piercing the Glitter Paper covering the hold.
Using your cutting machine, cut “Family” (or any other phrase of choice). The Font I used was Chunky Confetti.
After you weed your vinyl, apply “Family” with transfer tape onto your gift tag.
Prep the Paper Goods’ Feet (Optional)
My oldest son informed me that we needed to add a bottom so that the napkins and the plates could stay in the holder. He was concerned about his grandma having to put in and take out her paper goods. So I designed this so that the Caddy is not just a holder, but it’s a moveable container that can keep the goods in and be easy storage.
Take 7 of the 1″ cubes and glue them end to end. This is one foot.
Repeat with the other 7 cubes to make a second foot.
NOTE: you can use Hot Glue for this prep because the feet will not hold a lot of weight. I chose to the Multi-Purpose Cement because I have clamps, and I want to ensure that in the heat of the summer sun, the hot glue will not soften and become weak.
Advertisements
Paper Goods CaddyAssembly
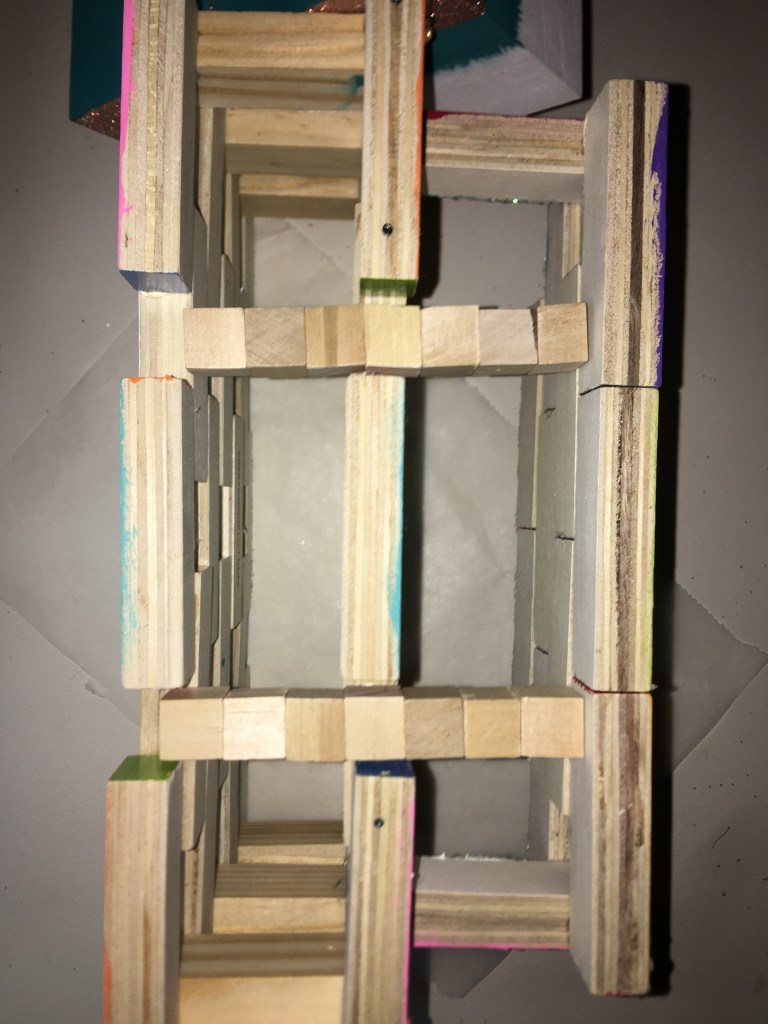
From my stash of Jenga Blocks, I wanted to use ones with colored ends, but didn’t have enough. So this is the reason why I used 48 blocks of one style and 6 blocks of another style (which were used on the sides of the plate holder). The two different styles of blocks had different heights, which lends to the floating brick illusion. The floating bricks could be more prominent by using an even smaller set of Jenga Blocks, still using the 2 row build.
TIP: If you have clamps, you can line your blocks up, like this, and mark several blocks at once.Here is how I added the Multi-Purpose Cement. I placed Hot Glue to the left and right of the Cement.
Mark off your Jenga Blocks. My blocks were about 3″ wide so I drew two lines at inch increments so that I could work fast and glue all the bricks together uniformly.
Glue together your two row sections, 3 bricks on top of two. In the inch section I put a large circle of Cement with two dabs of Hot Glue on either side. Once Hot Glue dries, you are free to move on to the next piece to glue.
You will have 6 sets of two rows.
Glue together your napkin face plate, starting with the rows. Make 2 sets of 3 blocks, glued together end to end. And make 2 sets of 2 blocks, glued end to end.
Start with the base and work your way up. One top of one of the 3 blocks, center a 2 block set and also glue on the arms that will attach to the plate holder. On top of the two arms and the set of two, glue on the other set of 3. On top of that glue on the last section of 2.
Set the base for your plate section, by making 2 corners. If you are using two different sized blocks for a floating brick look, your larger blocks will be used here on the sides (they are the unpainted bricks in my photos). Glue your side piece on top of your front and back corner piece. Do this for the other side. NOTE: your center bottom piece is not going to be attached to anything for a few steps, so set those off to the side for the moment.
Space out your corners by setting a two row section on top, do not glue.
With your corners set, remove the two row section without moving the base corners, place your napkin face plate. Once you have the napkin face plate center, you know where to add the Cement and a single dab of Hot Glue.
This amount of glue is not enough to keep the napkin face plate in place, so you will need to hammer one nail into each arm of the face place, into the base corner, so that it will offer the stability to the napkin face plate.
Glue the two row section, which you used to space the corner sections, onto the middle arms on the side of the plate section. Use a dab of Cement and Hot Glue.
Repeat this last step with a two row section for the back of the plate section.
Glue a side arm, on top of the two row sections, on each side.
Repeat steps 10-12 to form the middle of the plate section.
Repeat steps 10-11 to form the top of the plate section.
Turn the Caddy upside down and glue in the middle sections that were set off to the side, back in step 6.
To reinforce the face plate a second time, you will use 4 nails to nail both sides of the left and right Jenga Blocks above it.
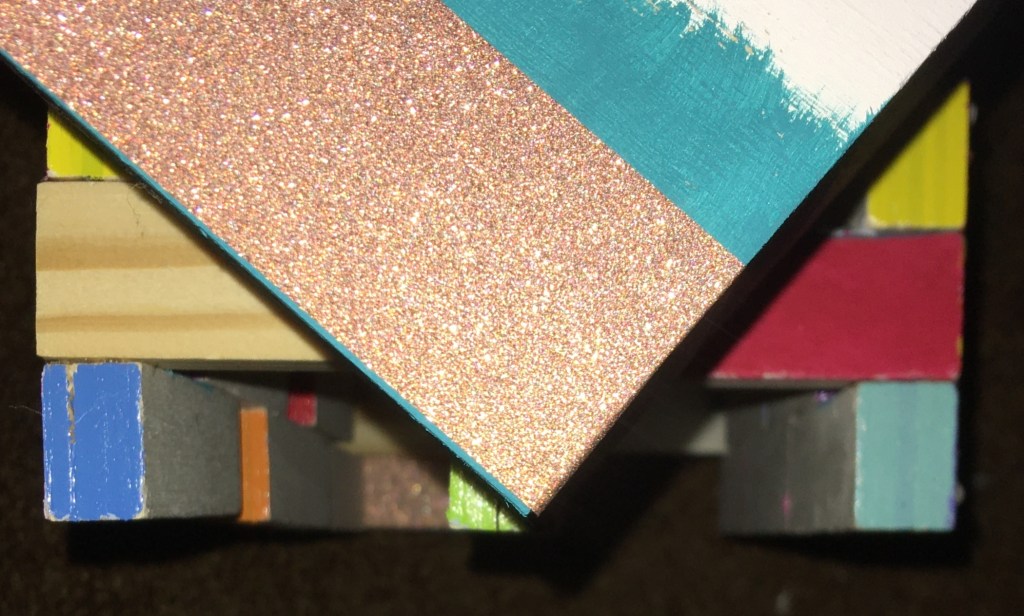
Where you would like to add glitter, paint on your glue and apply glitter.
(Optional) Use your acrylic pen and draw on a frame around the front edge of each of your blocks, front and back.
(Optional) To add gems, place a dot of Jewelry & Metal Glue where you would like to add your Rhinestones. You can glam this up as much as you want, including using only Rhinestones instead of glitter (step 17).
Hot Glue your “Family” Gift Tag to the Napkin Faceplate.
Glue the single silverware box, upright on the right hand side. Apply the Multi-Purpose Cement Glue and Hot Glue onto the Jenga Blocks (to the height of the silverware box). Attach the silverware box.
Tip the Cady on its side so you can position the Double Silverware Box. As you look at the side of the Cady, note that the middle row is the front of the Plate Holder. Use the Jenga block to create a 45° angle. The front bottom of the Silverware Box is lined up with the bottom edge of that middle Jenga Block. The top back edge of the box will be in alignment with the front of that back row of the Plate holder.
Remove the double box and apply the Multi-Purpose Glue and Hot Glue to the side of the Cady where the Double Box will sit.
Attach the Double Box to the Caddy.
Turn the bottom of the Caddy upside down and apply Multi-Purpose Glue and small dabs of Hot Glue to the two recessed sections of the middle row.
Attached the two feet, centered on that middle 4th square, into those recessed sections.
Nail placement for reinforcementPlacing the Paper Goods FeetClose up of how I angled the Double Box.
Congratulations! You have completed a space saving Paper Goods’ Caddy.
Please leave a comment how this caddy turned out for you.
If you’ve seen a project that you want more information on how to make, please let me know so I can set you up for success!
Empty Tomb is now live. 100% of preceeds will go to the support of orphans in Rwanda.
Processing…
Success! You're on the list.
Whoops! There was an error and we couldn't process your subscription. Please reload the page and try again.
I know that one of the biggest things to make right now are shadow boxes. And I LOVE them just as much as the next person. However, the one disadvantage they have is that they only have one viewing direction. So while shadow boxes are great for decorating homes, they lack greatly when it comes to decorating for events.
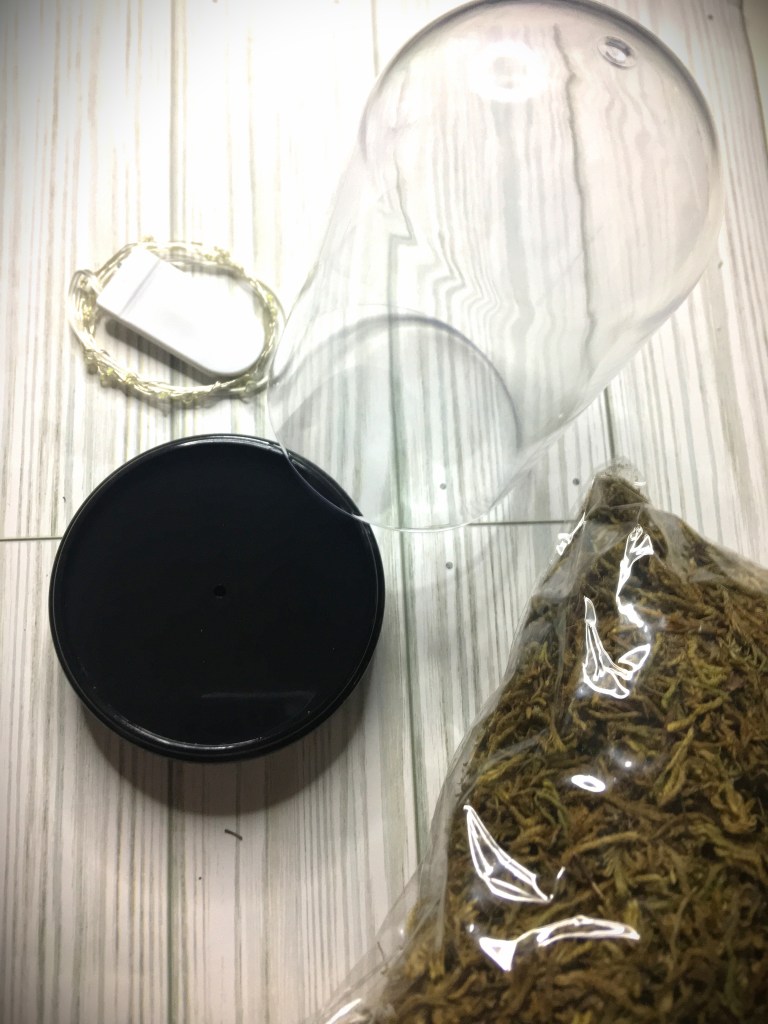
And that is where Cloches come in!
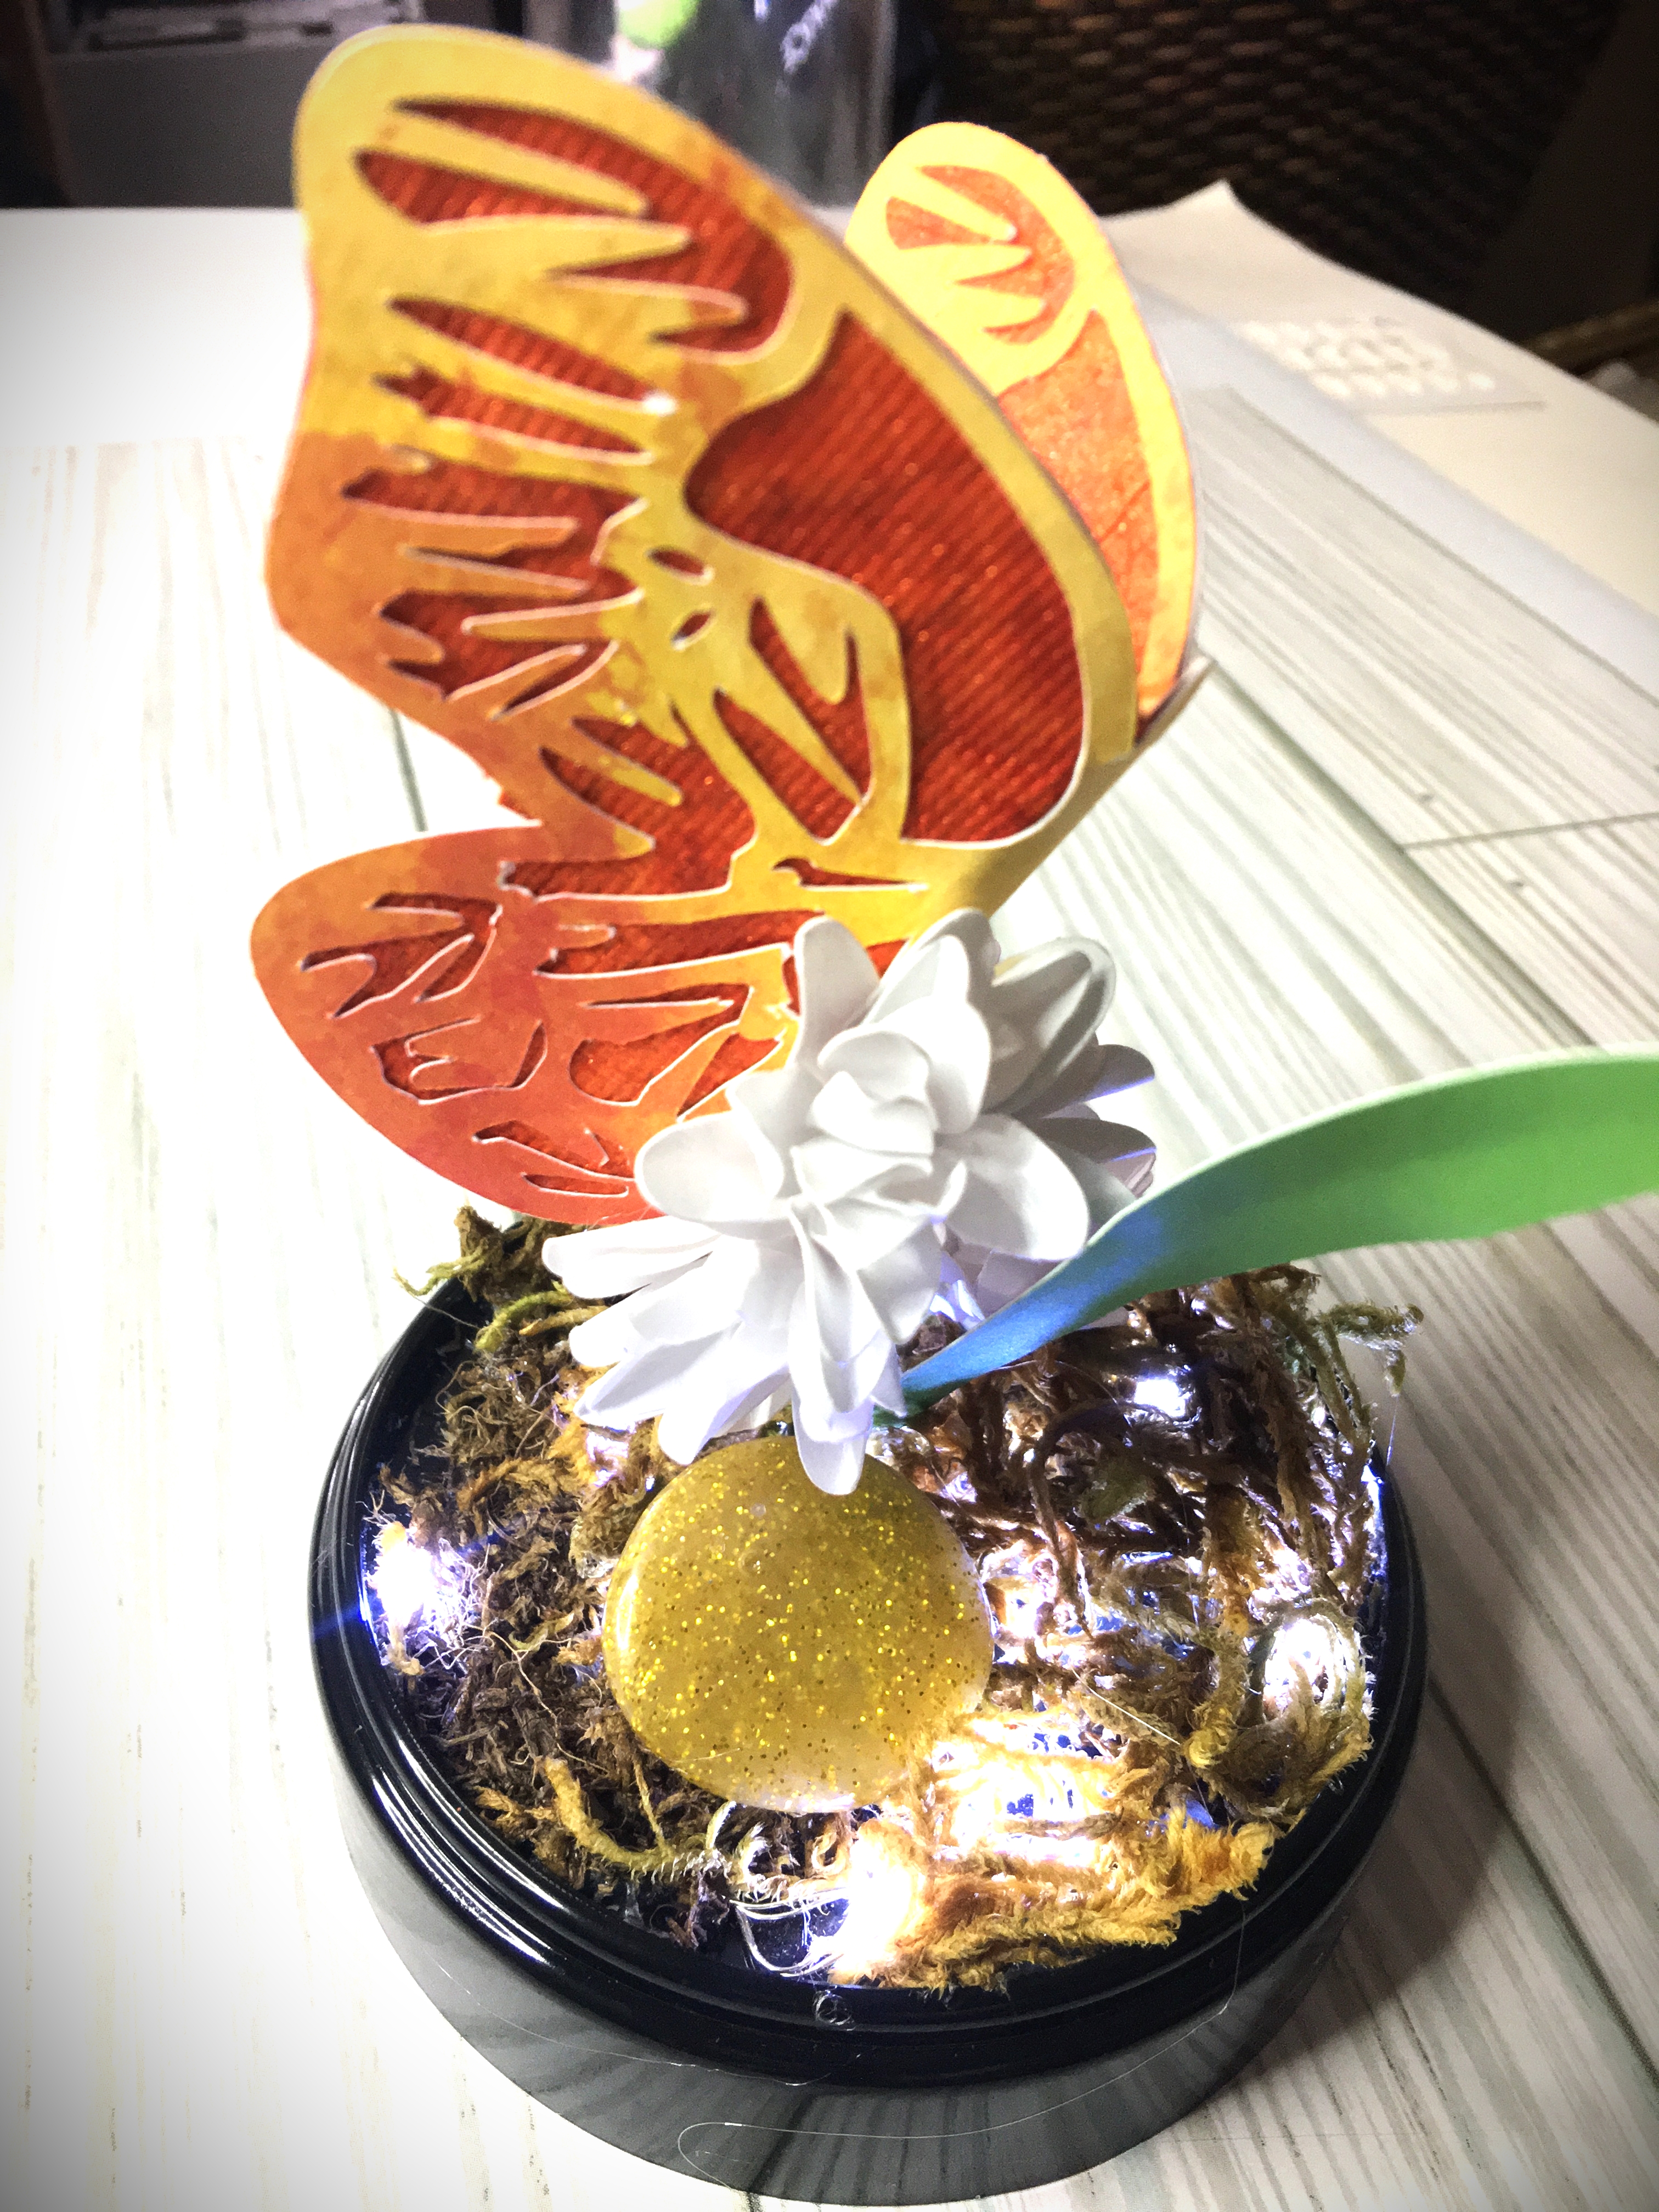
Think of a cloche as shadow box that can be viewed 360°, perfect for centerpieces.
What I have for you today is a spring cloche that can inspire you for whatever you are looking to create unique decor for your events. Whether you’re looking for a wedding, a Princess birthday party, displaying an heirloom or memory… you are only limited by your imagination.
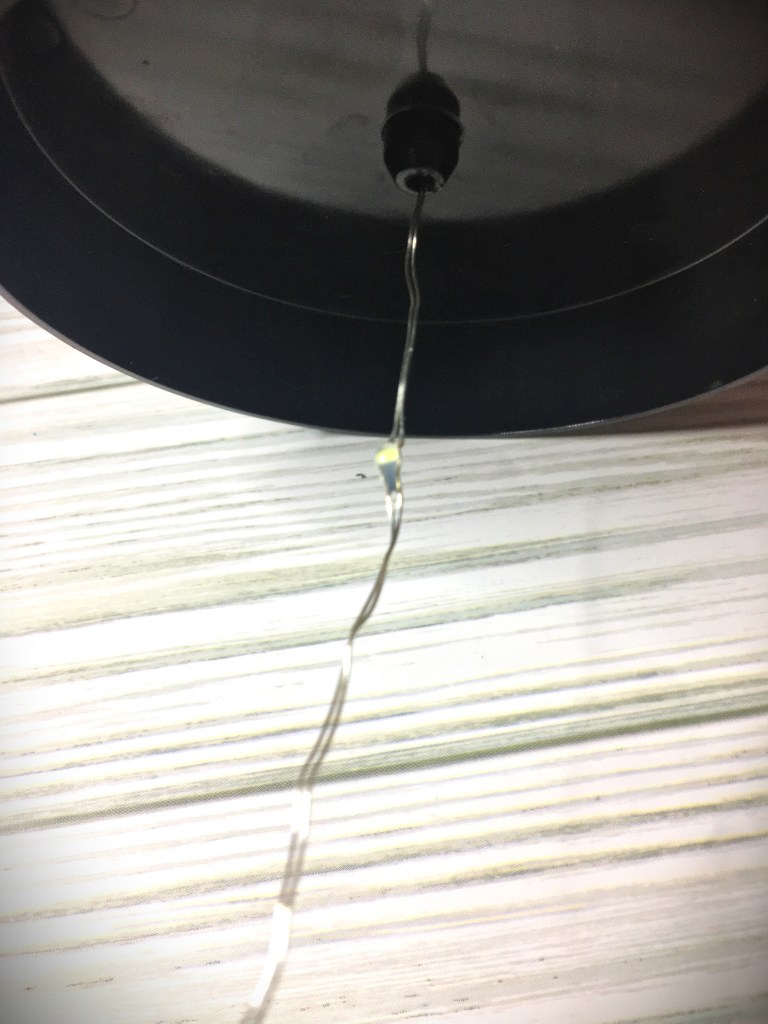
The perfect thing about this cloche, when it comes to lighting, is that there was a hole that I could thread the fairy lights through. This made it possible to hot glue the battery pack/switch to the bottom of the cloche, making it invisible. If you choose to also go this route for your lighting, I recommend that you glue the battery pack in such a way that you can unscrew the battery pack and change out the batteries without needing to remove it from the cloche base.
Once the pack is secure, you can flip the base over and position the wires on the top of the base.
Tip: before securing down the wires, place the cloche dome down on top and see how it’s positioned in relation to the base. With this particular cloche, the dome rests inside the lip/edge of the bottom. So if I had put one of the bulbs right up against the lip/edge, then my dome would not be able to sit flat when place over the finished project.
After trying a few different gluing options, I found the best way of securing the wires and moss was the following way. Bend the wire how you want the lights to go. Avoiding the bulbs, you will put dabs of hot glue on the wire and press the moss down on top of the glue. (If you have a silicone finger cot, you can press down directly with your finger without being burned by the glue.
Tip: To maximize the amount of light shining up from the moss, make sure you do not cover the bulbs. You may think you will have holes, but if you look in later pictures you will see that these holes are absolutely not visible. So work with the lights on. You will immediately see true blank holes vs. light holes.
With the base now complete, it’s time to move on to the paper components.
Flowers and Butterfly
With your cutting machine, cut out 2 Butterflies, 4 Flowers, 1 Leaf, and 1 Stem. Because I already had green floral wire, I did not cut out the paper stem. I included the paper stem in case you did not have green wire but wanted to have a cover for a different wire, or even wanted to make the stem completely out of paper. If you choose to make a paper stem, roll it cigar style and glue the edge down. You can use masking or painters tape to hold the edge down while the glue dries.
(Reference Note: The Butterfly I cut was 3 inches tall. As you can see later on the Butterfly takes up all the space. So for this size of cloche, a larger Butterfly is not going to fit. And you are more than welcome to make the Butterfly smaller and even add a few of the smaller size.)
Butterfly
The two Butterflies are the front and back of your Butterfly. Inside these cut out pieces you can place cardstock, tissue paper, fabric, or whatever material you are inspired to use. Glue your first Butterfly down, trim that inner section the Butterfly. This will make it very easy to glue down that second Butterfly and make everything line up.
Tip: If your cardstock has a white core, you can take a marker with a matching color, and make a coordinating edge.
Set the Butterfly to aside and let dry.
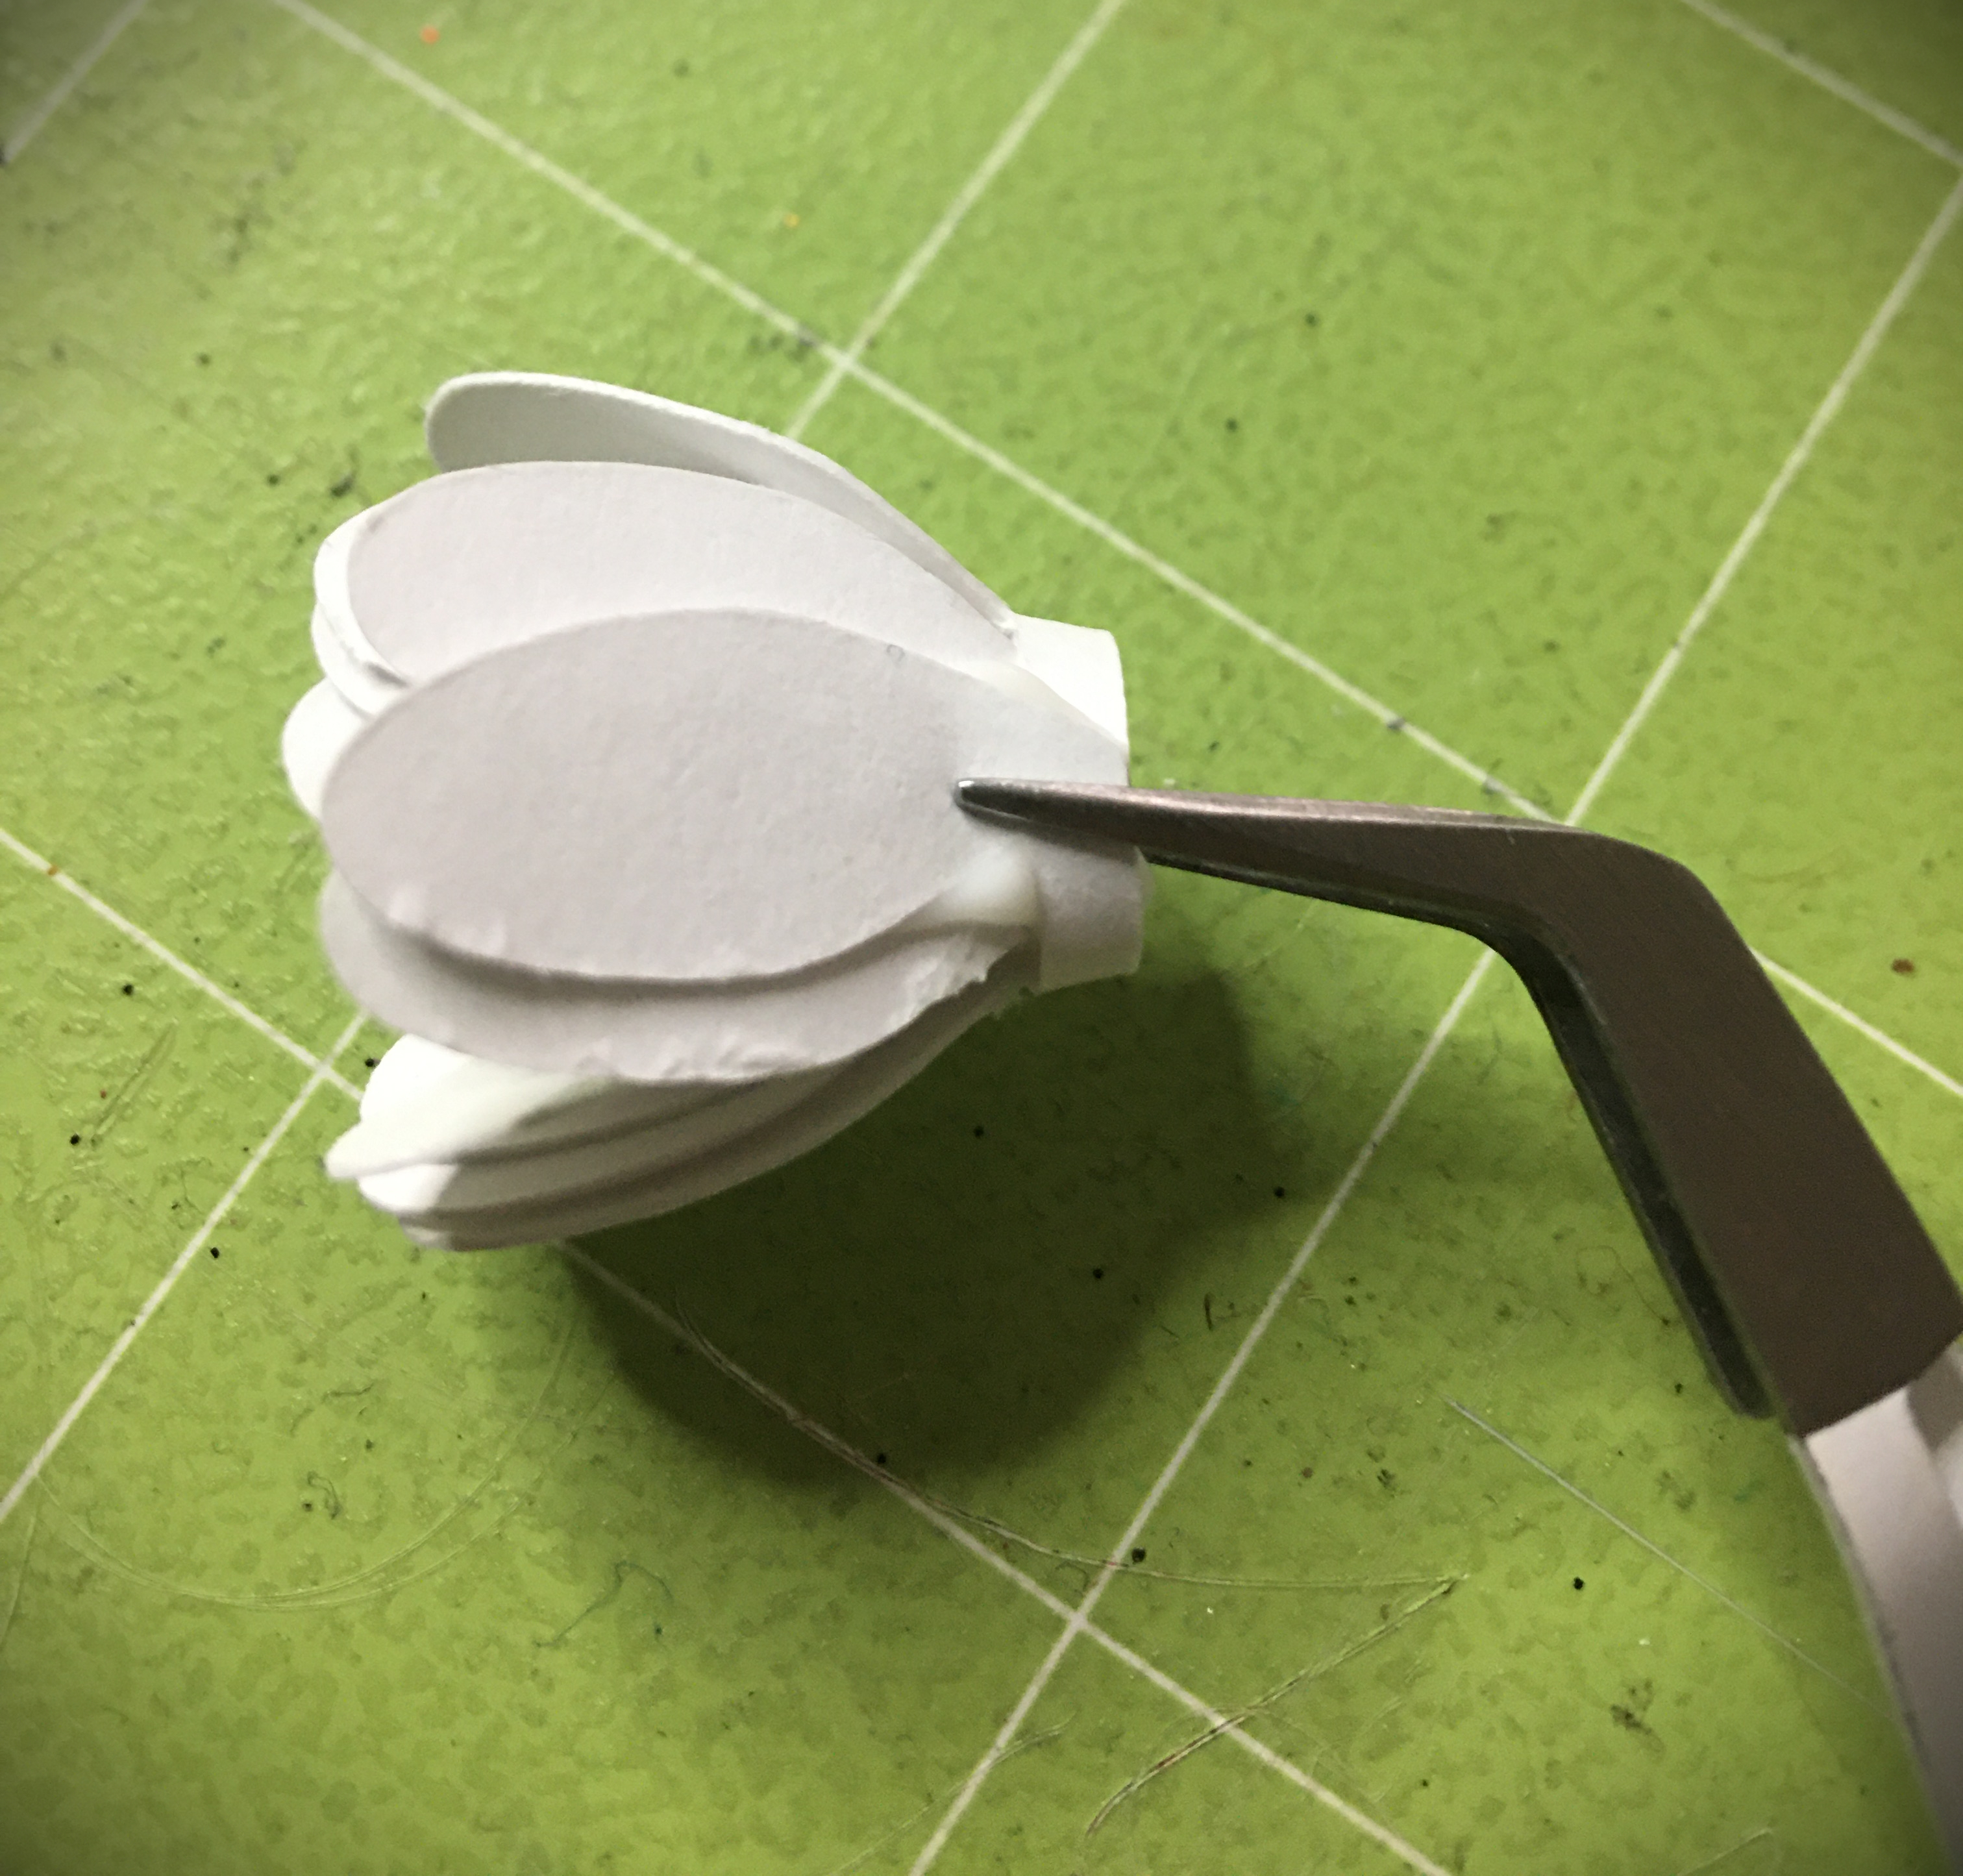
Flowers
Using tension tweezers (or other coiling took of choice), roll the flower. At the end of the line, apply an L-shaped dab of glue, and close the flower. The tension tweezers are great for holding that edge down while the glue dries. Or if this is the first of the flowers, masking or painters tape can hold your edge in place for the glue to dry while you move on to the next flower.
To shape the leaf, run a crease down most of the length of the leaf, from the bottom up. At the top of the leaf, coil it around a finger. This will give a gentle bend. If you make the gentle finger coil go off to one side, you will find that you give it a realistic bend.
Stem
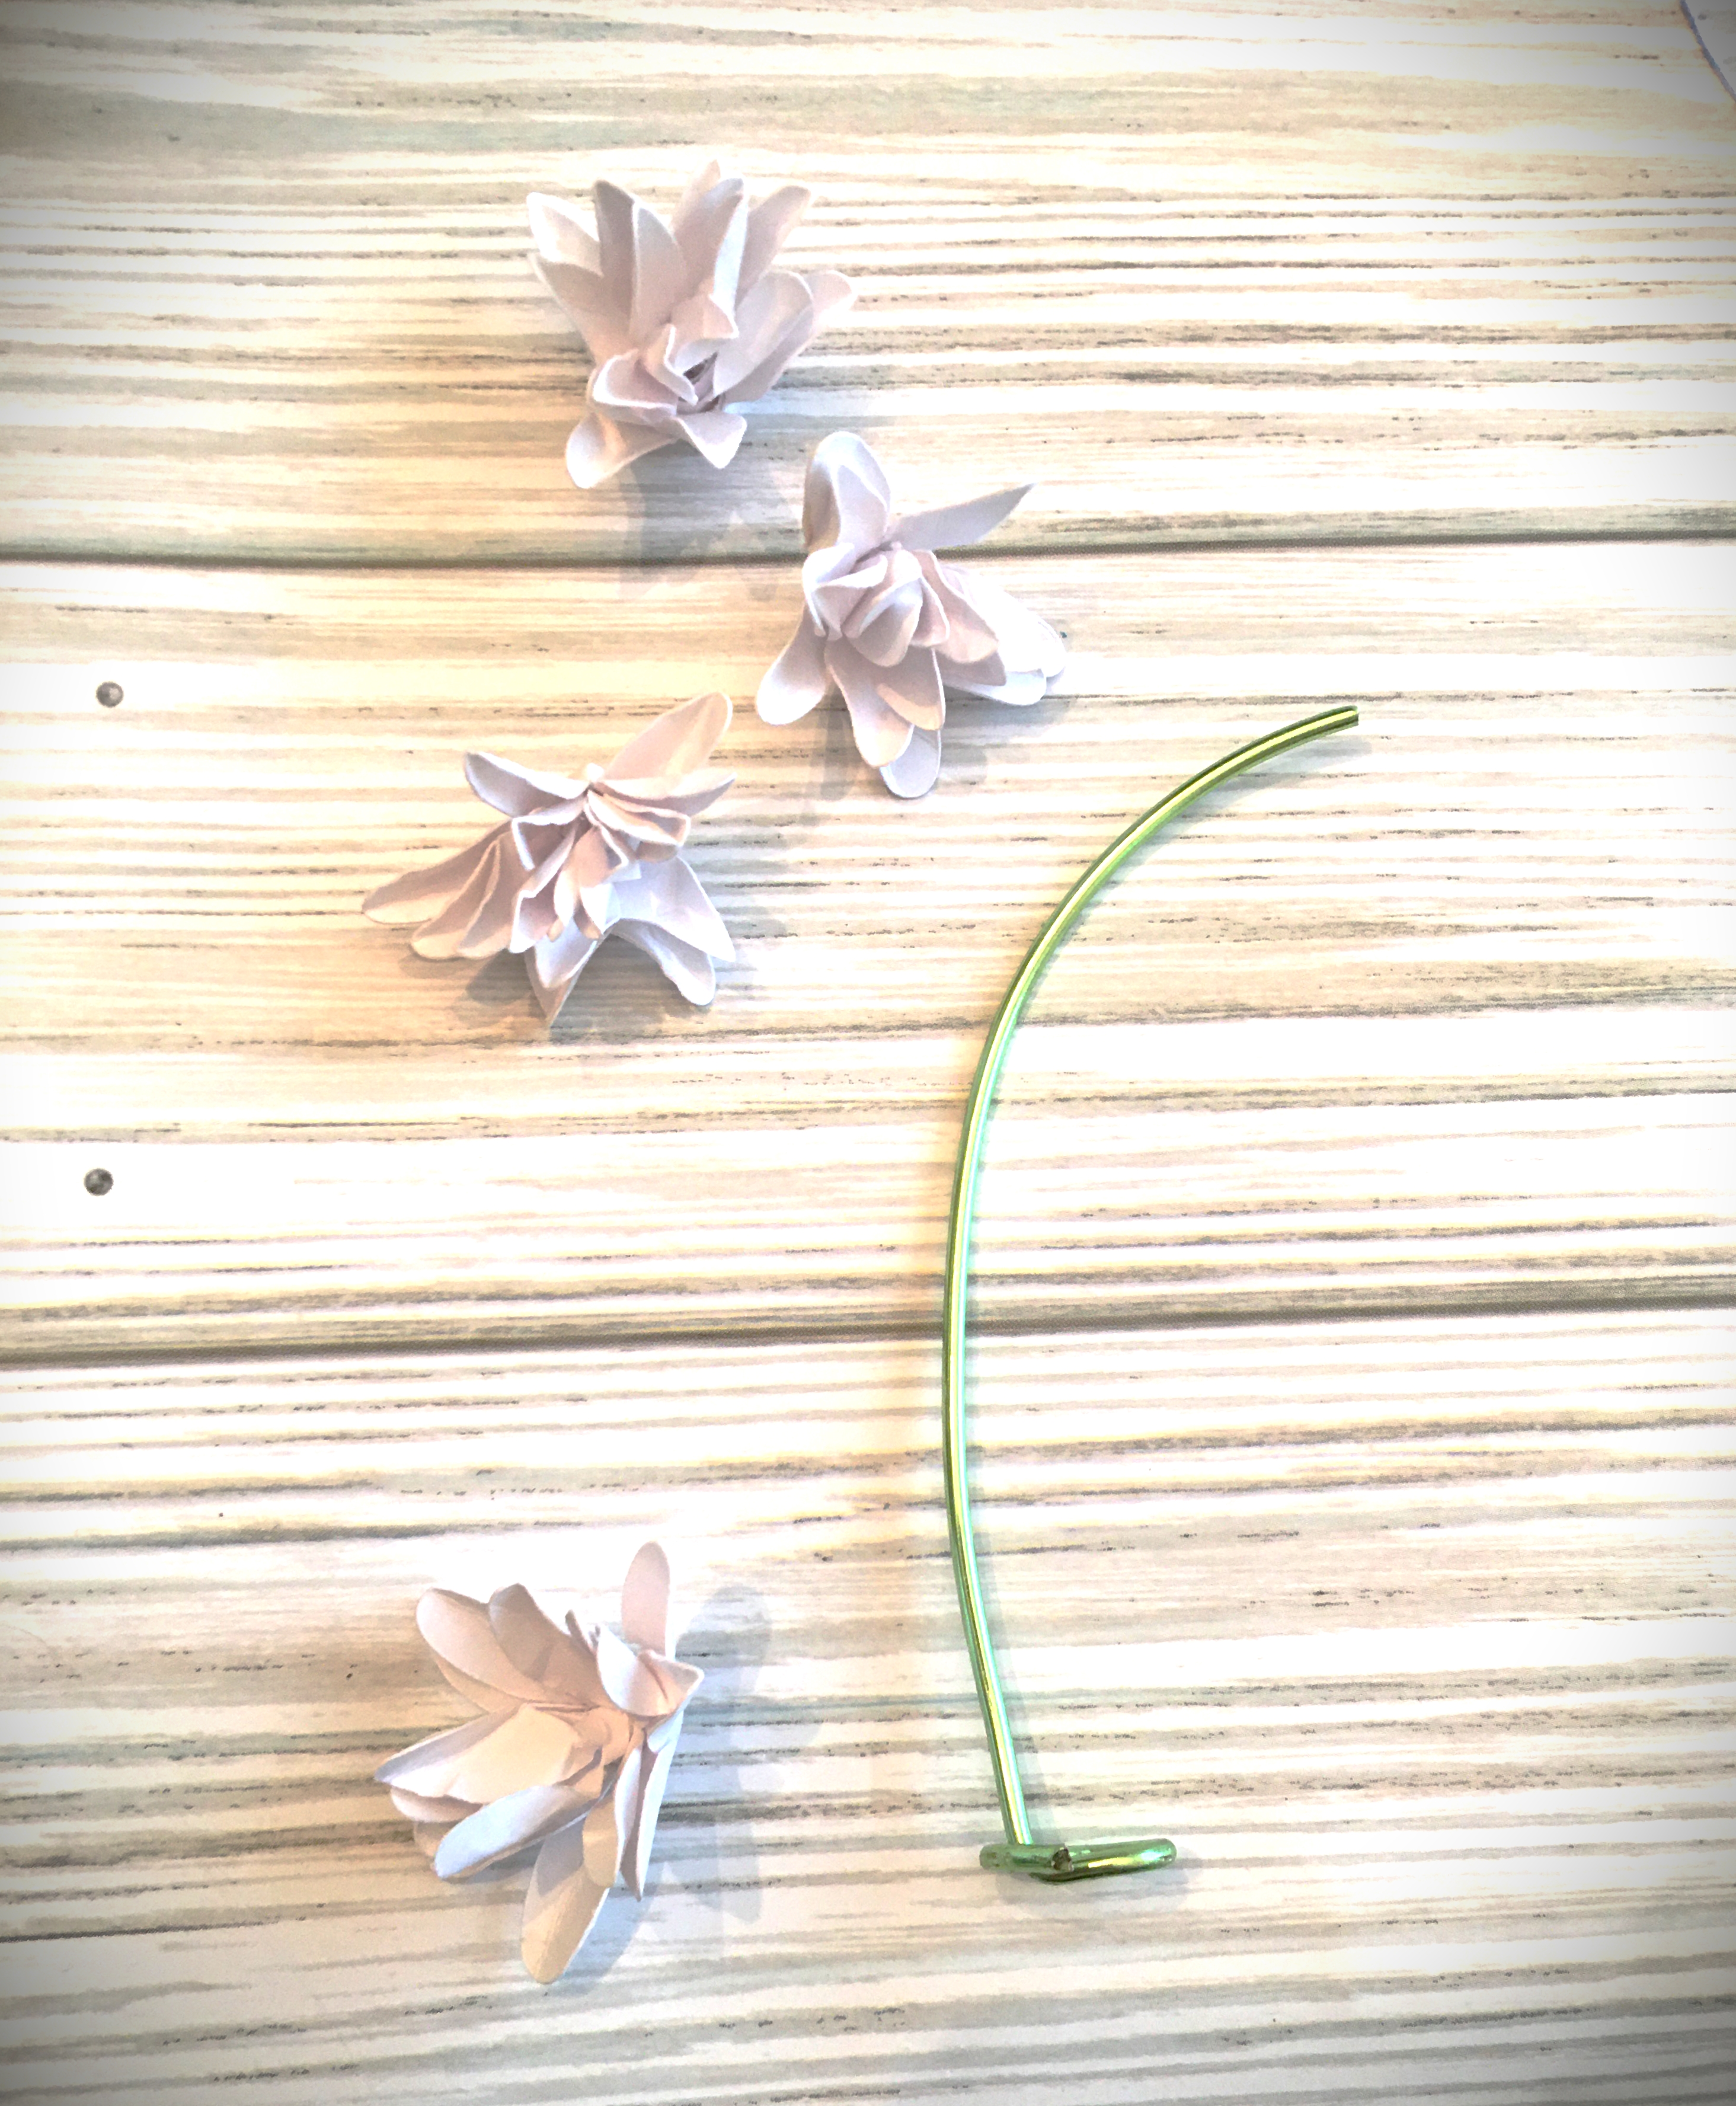
While the glue dries, let’s prep the Stem. This picture is a little deceiving; I had cut it before measuring how this size of Butterfly would fit inside the cloche. For a 3 inch tall Butterfly, all you need is a 2.5″ wire. On the bottom of your wire, use your needle nose pliers and form a circle, to make a stand.
When the Butterfly is dry, use your weeding tool or other thin object to bend the wings of your butterfly up.
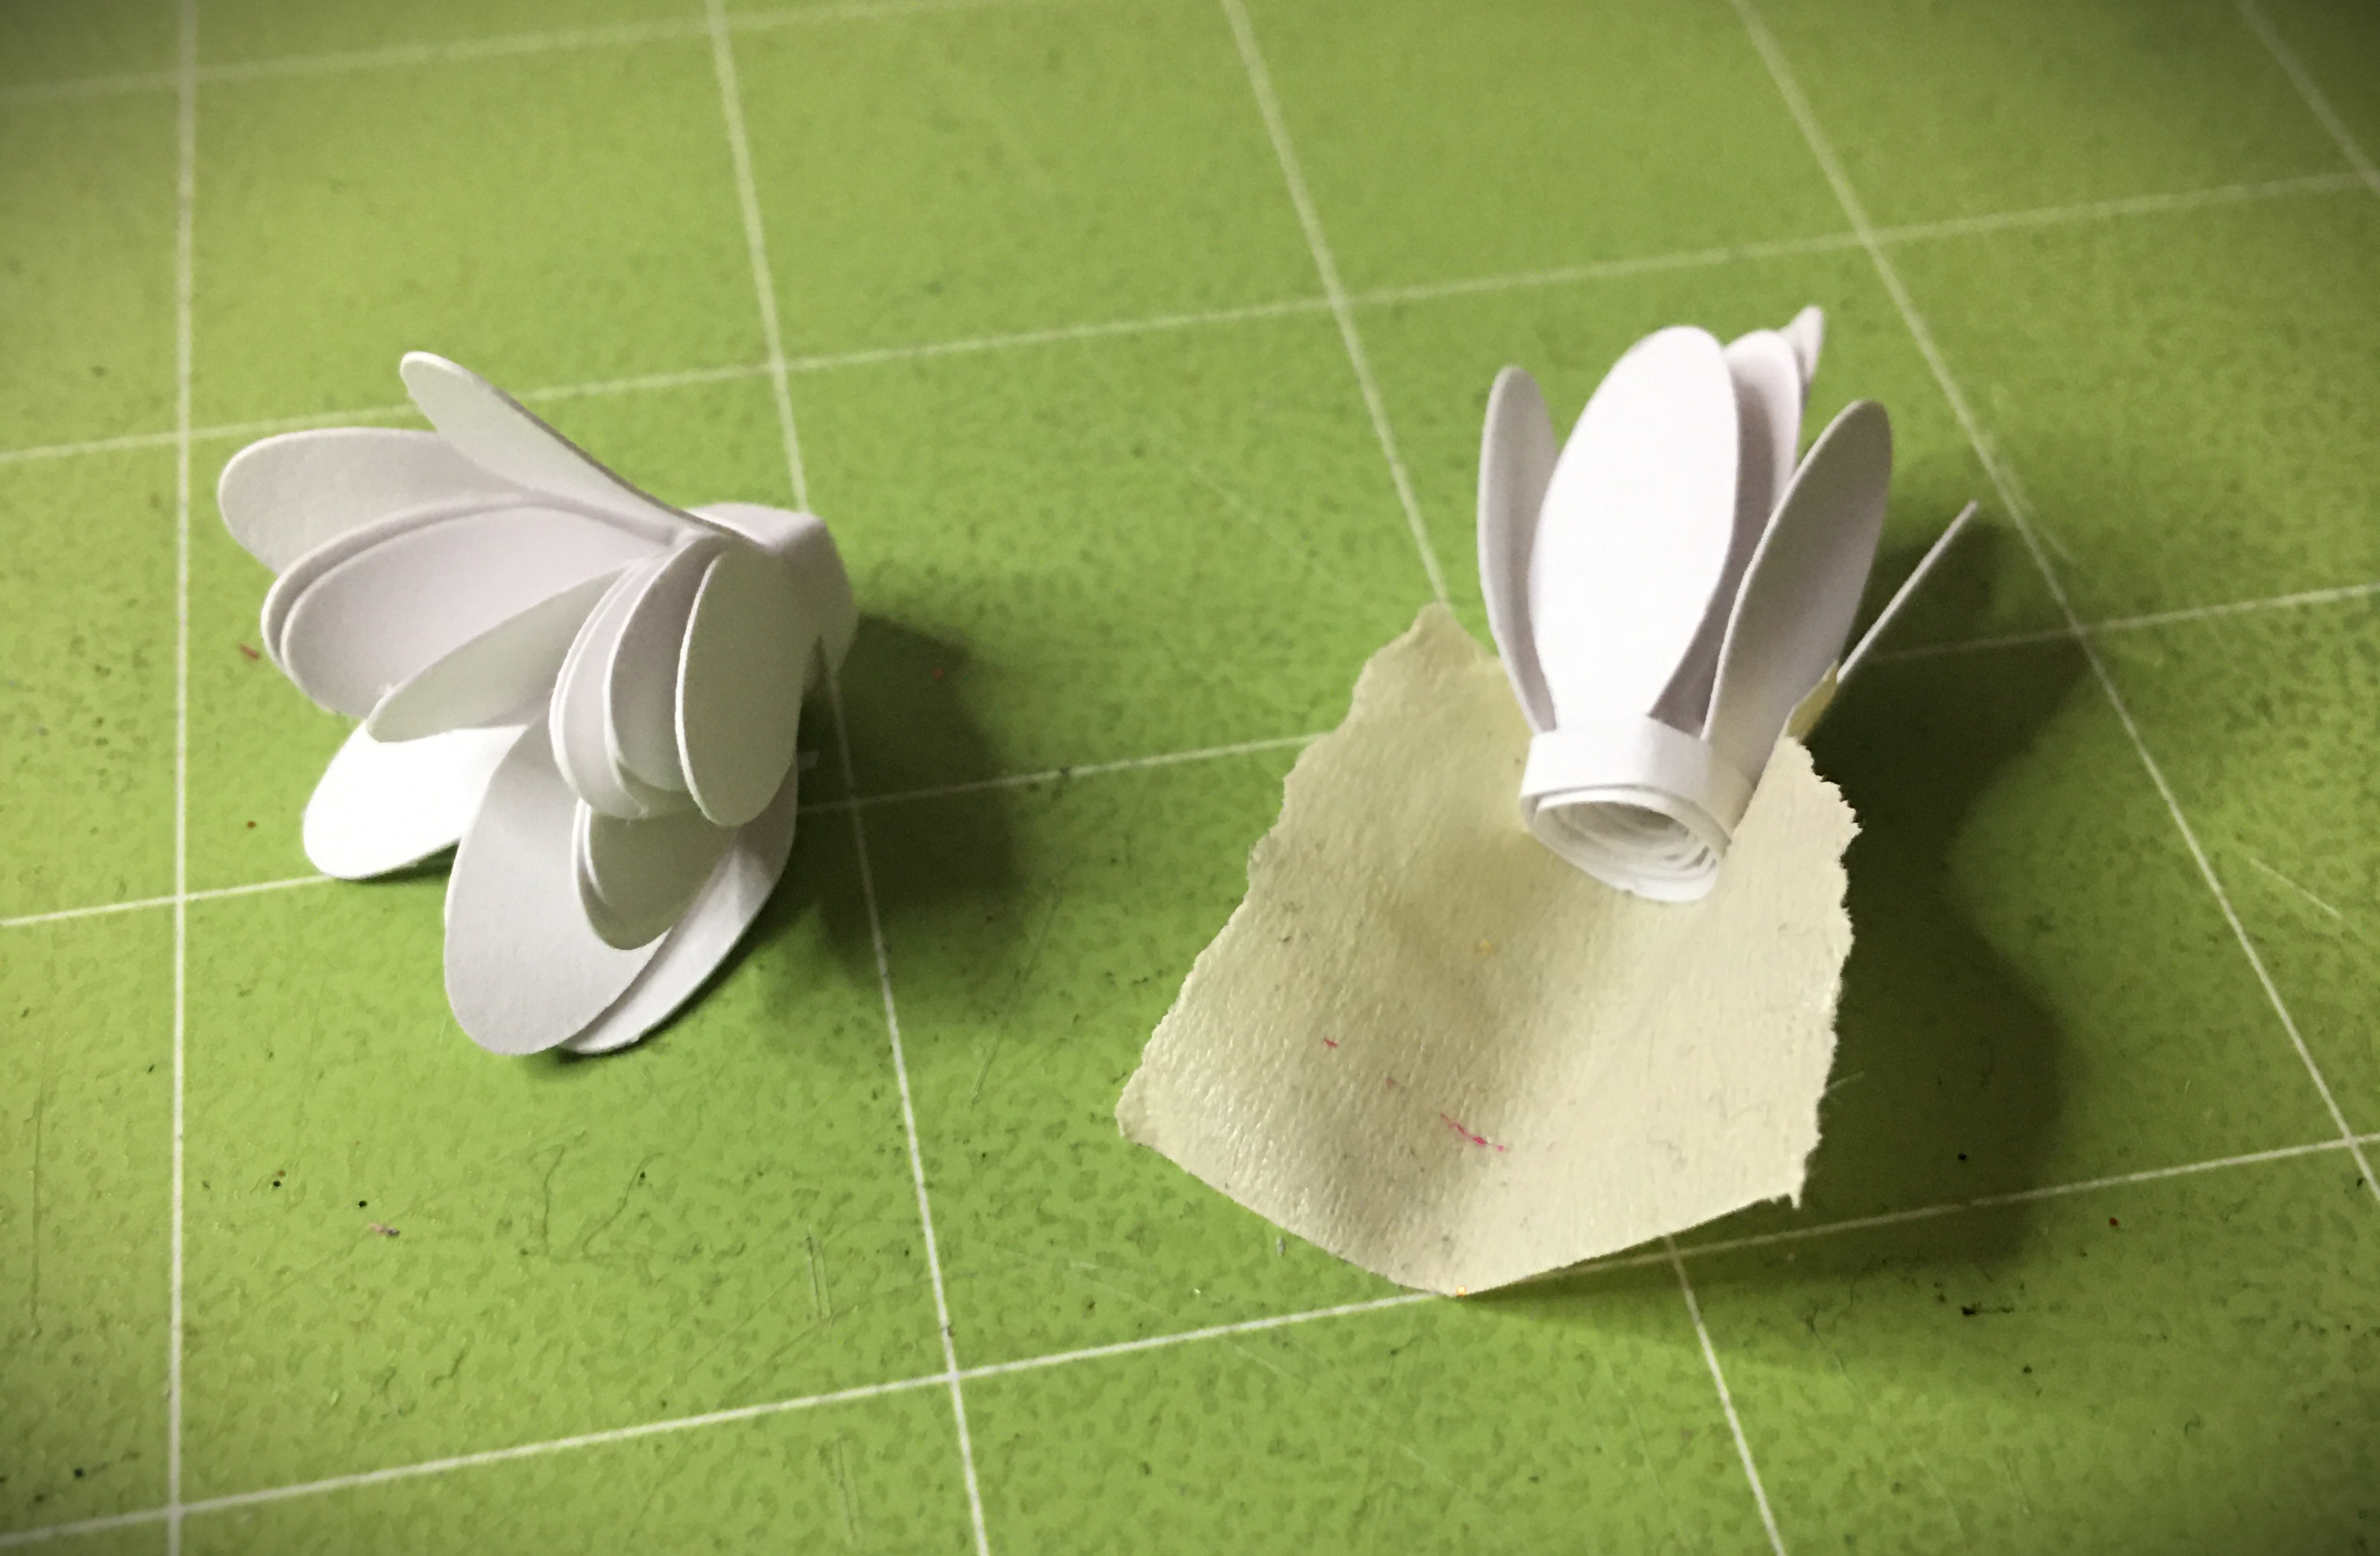
When the glue on the flowers is dry, it’s time to shape the petals. If you keep the petals flat, but spread them downward, you will have a mum looking blossom. I chose to curl the petals downward and then crease the center. If you can keep the edges a little rounded downward, it has a chrysanthemum appearance. Either way, I wanted the white cardstock as an accenting color, and there are so many white flowers that have this shape, that it has a simple generic look that is just pleasing. Especially if you’re new paper flowers, this one is easy to play with and assemble.
Assembly
With hot glue, apply the glue on the bottom of the first blossom and insert the tip of the wire into the bottom center of the blossom. With the second blossom, add glue, and attach it to the side of the stem. The third blossom, add glue, and position it on the other side of the stem a little lower on the second blossom.
There is a little crevice between the second and third blossoms. Add glue to the wire and position the Butterfly. When these components are set, glue dried, position the wire circle base around a light bulb. (This will cause the light to still give an up light effect and not be covered.) Once you have the wire base where you want it positioned, apply a liberal amount of glue on top of the wire. Before you press down, apply more moss on top of the glue. Now when you press down, you will secure the stem and hide the glue at the same time. Near the base of the stem, add a drop of glue and place the leaf.
The fourth flower can be glued anywhere on the moss covered ground.
For further ground embellishments you could add anything you can imagine; a car, Poly Pocket accessory, miniature figurine, rock, sea shell, anything. In the second picture above you will notice what looks like a gold stone. In fact, my husband thought that I had added a gold nugget from of the boys’ games. In truth, this “stone” is the gold glitter stick that I had to clean out of my hot glue gun. I just let that pool on my desktop and dried as a puddle, instead of throwing it out.
This cloche is ready to go as is or you can further embellish it.
Further Embellishments
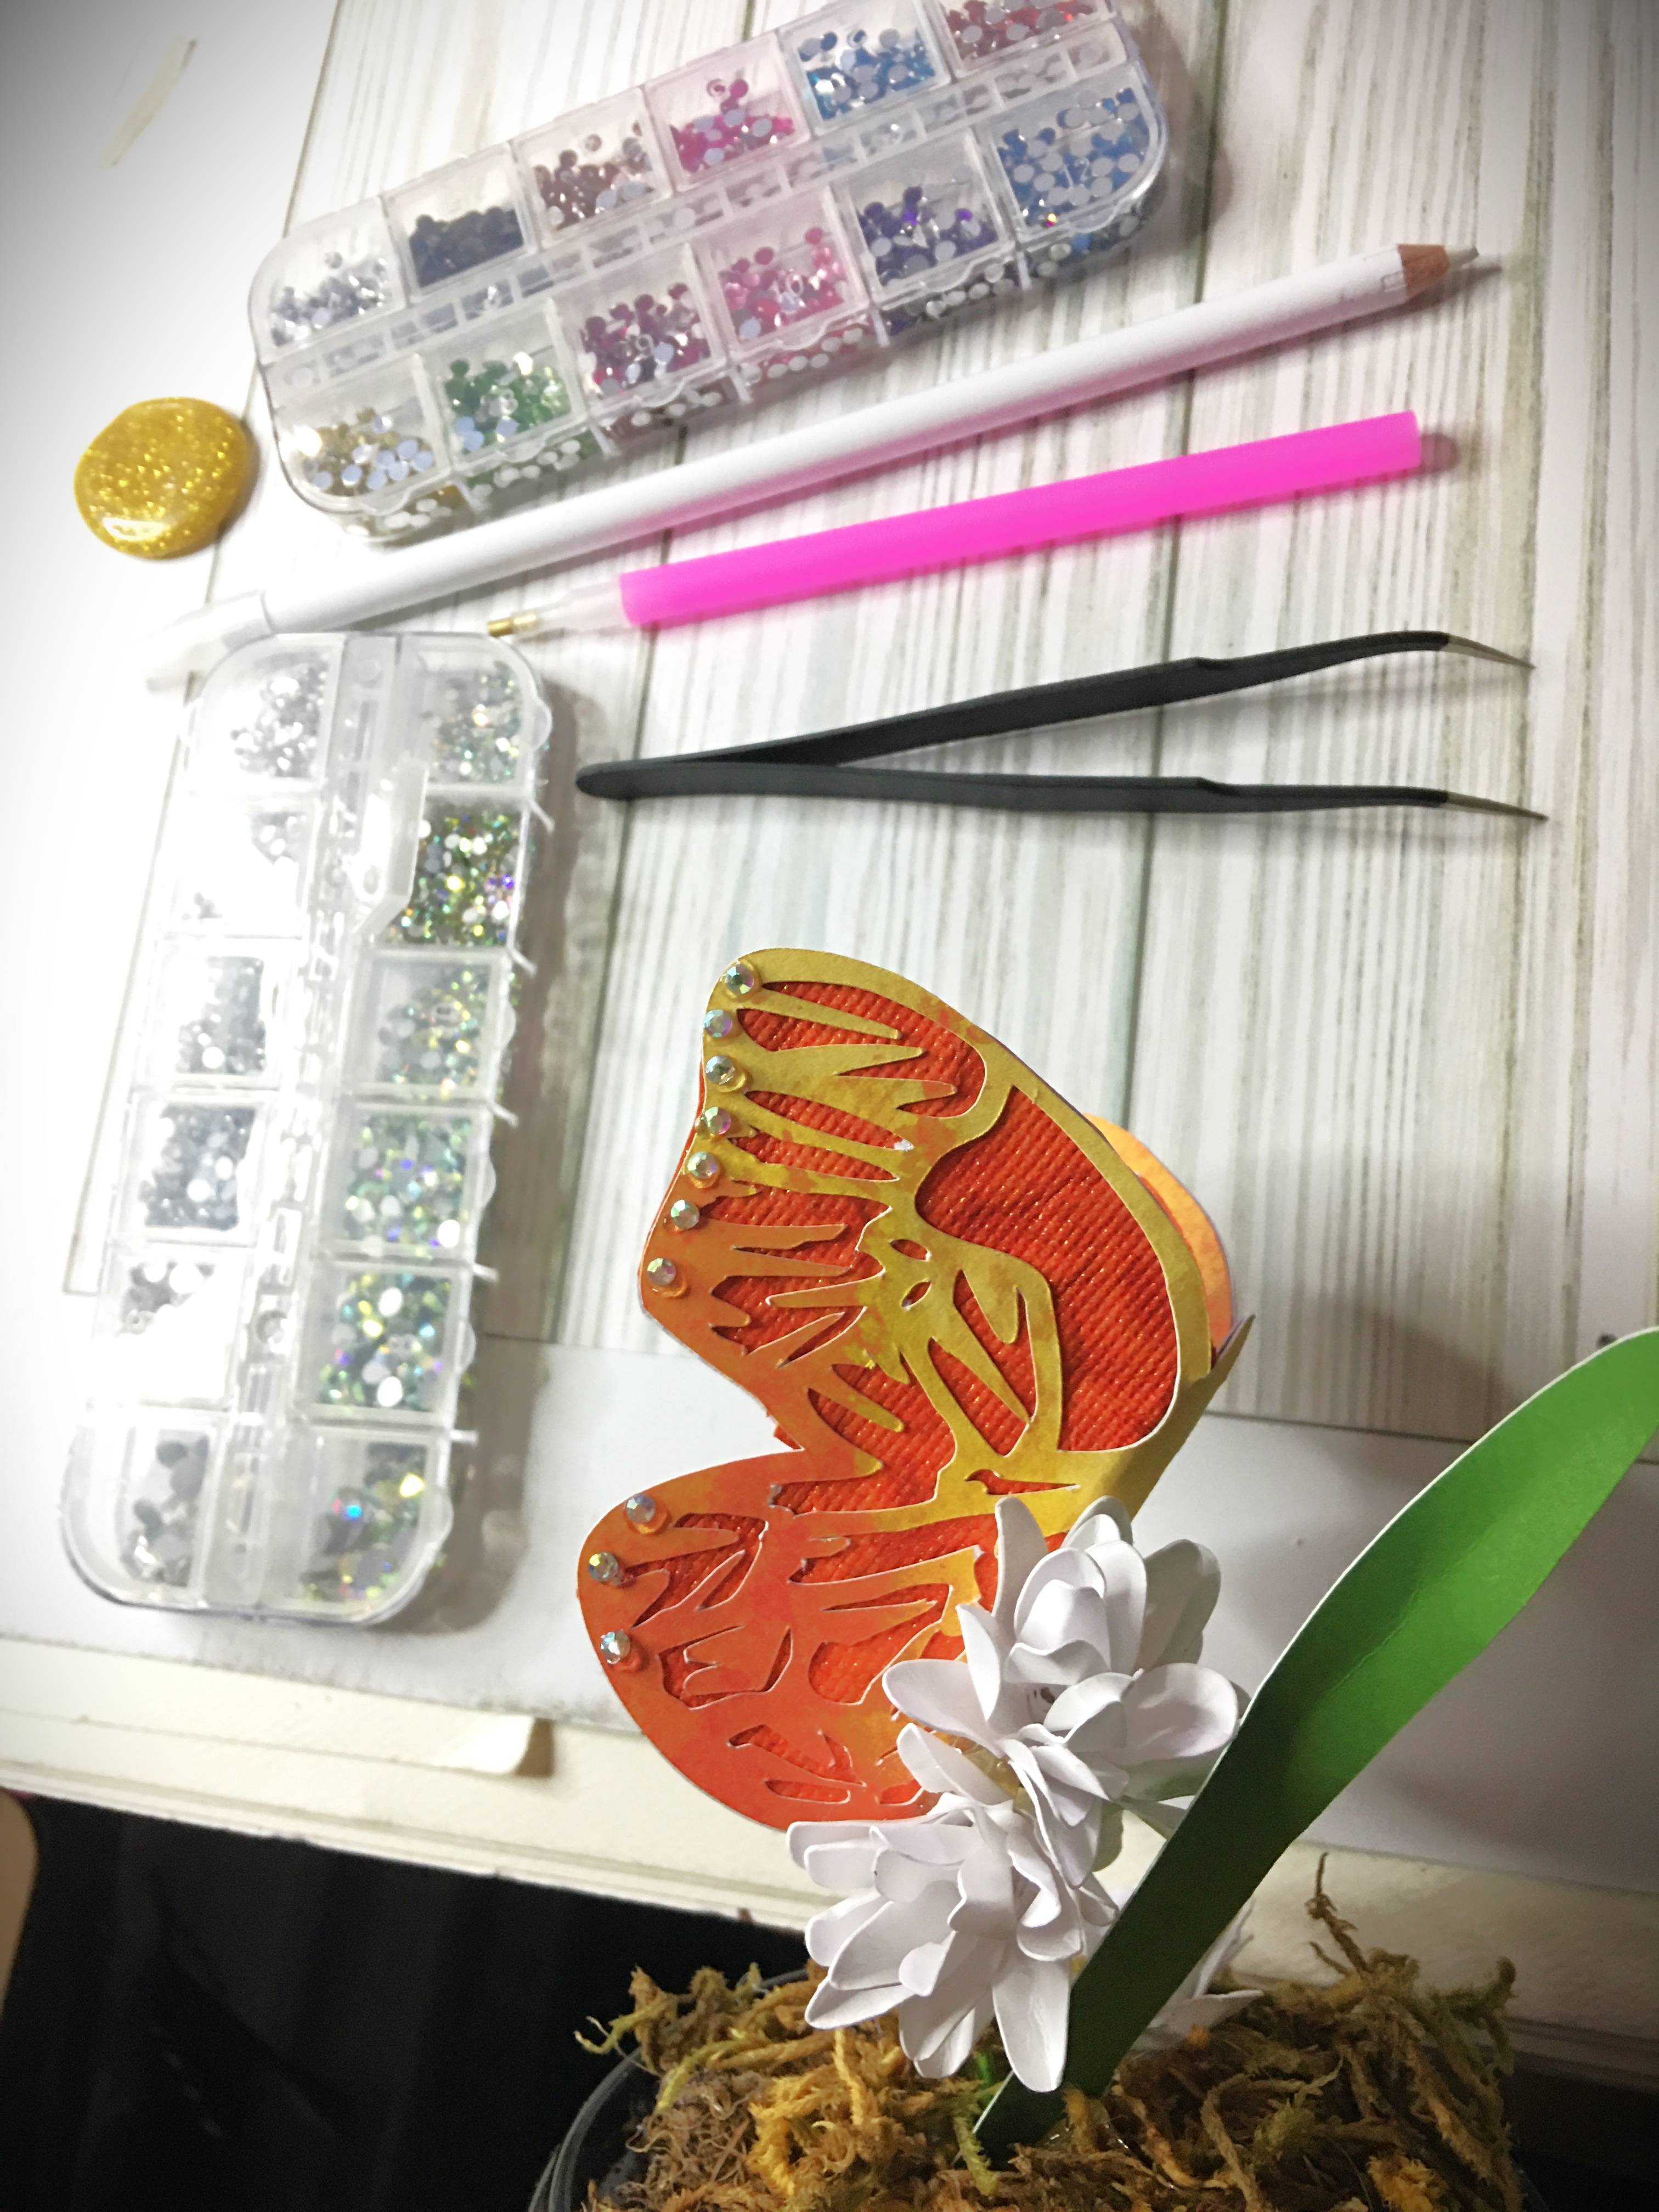
I always love to add more. In fact, this butterfly was really begging to be fully blinged out. However, for this moment I chose to show some restraint so I don’t look like the crazy bling lady.
From here on out the jewelry & metal glue works perfectly. It holds while wet and dries quickly.
Please take note on the first picture above. If you haven’t worked with crystals before, these tools description might help you have fun placing the stones. The two tools that came with the crystals that I bought were the tweezers and the white “pencil”. In my opinion, the tweezers were the most difficult tool. The problem with them is that these tweezers didn’t have grips on the tip. These ones were the smooth tip tweezers. If you think this is going to be slippery work for you, I can promise you it is. I shot a handful of stones across my work space before giving up. The white “pencil” doesn’t feel sticky, but when you press down on the stone with the tip, it grips the stones. Kind of. I couldn’t get the “pencil” to pick up the small stones that I used on the edge of the wing. However it was absolutely perfect for the larger stones that I used near the center of the wings and on the body.
Fortunately for me, I had another tool in my craft room. I do the crystal paintings and had one of those complementary placement tools (the pink tool in the picture). It still had a little residual glue in the gap and it was a dream picking up the smaller stones that I used on the wing edge.
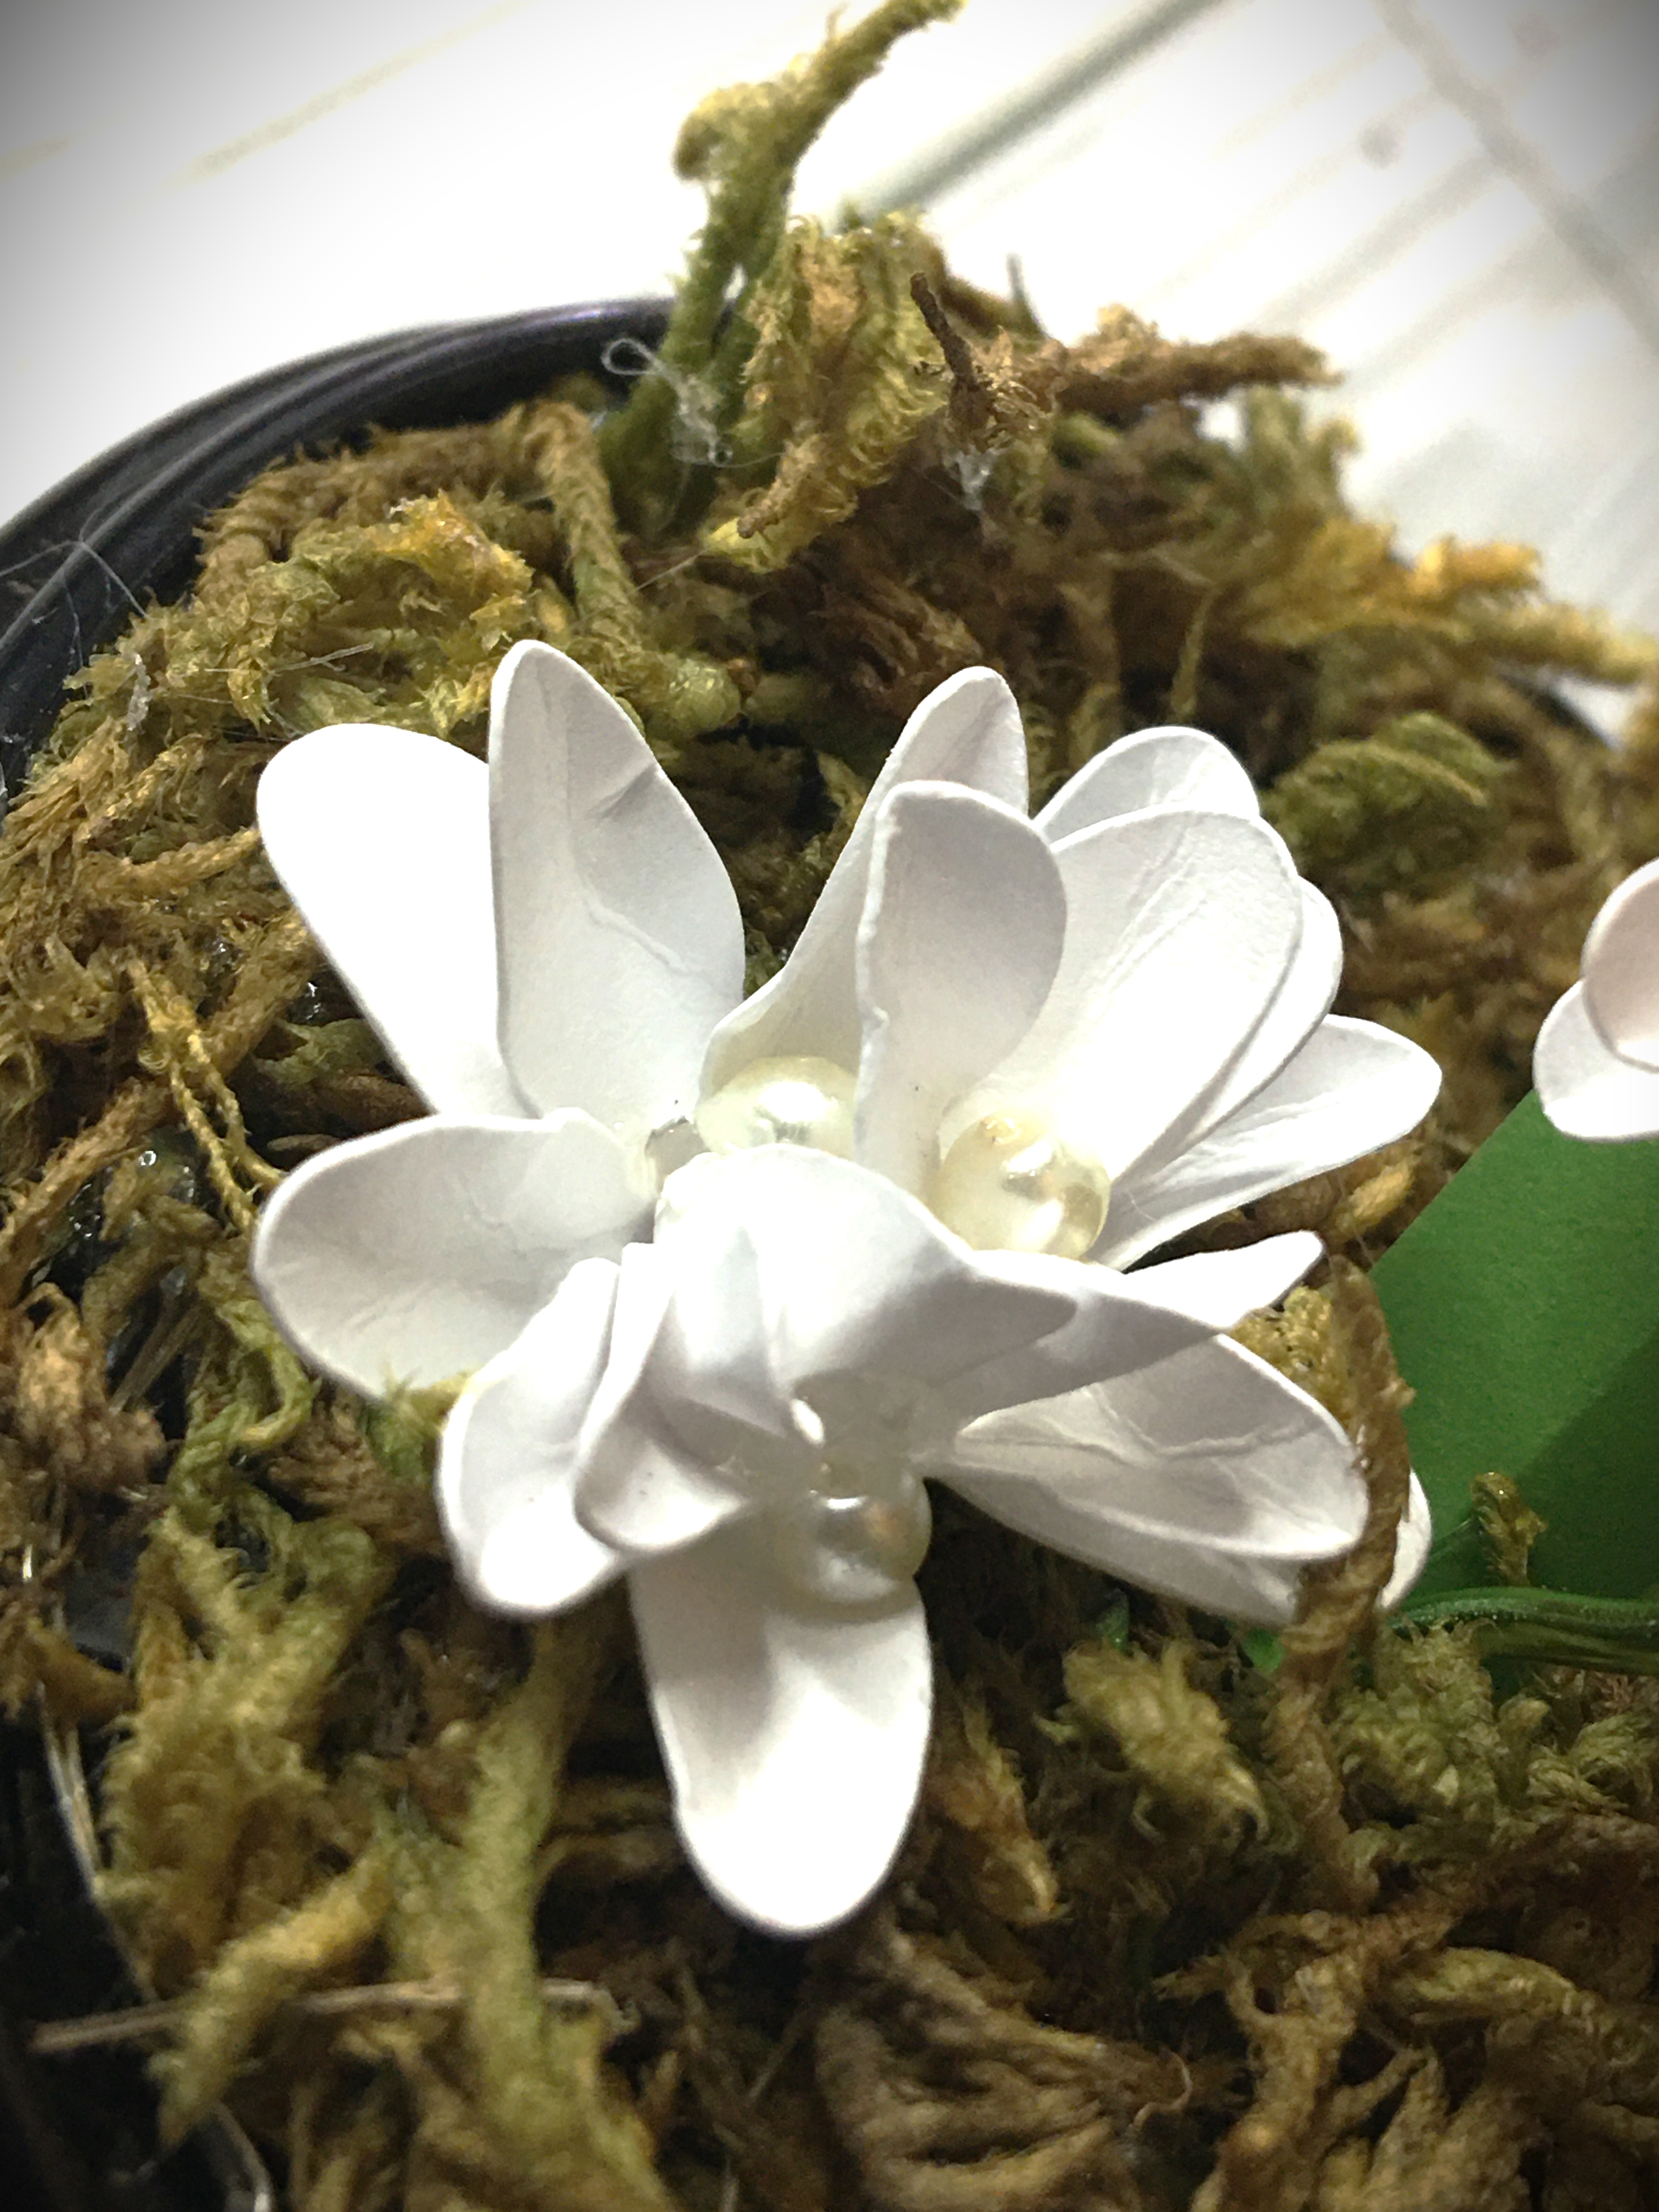
However, the tweezers were the perfect tool for placing the pearls in the center of the flowers.
Tip: If you’re new to paper flowers, and noted to yourself that some of the blossoms look a little wonky, pearl placement is going to be your life saver. In the close up picture, above, you will notice that there were three pearls that I used. Yes, that was a wonky flower. It got away from me. But the great things about flowers are that they can grow in clusters. And so there is no shame in strategically placing flower centers so you can make a misshaped flower into a cluster of two or three flowers.
Now that we’re finished with the assembly, we’re ready to put the dome on.
The only thing left to talk about is the difference between plastic and glass cloches. As you can see here, even though you don’t have to worry about the dome breaking when it’s plastic, you will note that it’s definitely not as clear looking as it would be if it were glass. If you are looking to just do a fun project, a project for a beginner crafter, or need to be particularly frugal, the plastic dome is probably going to be the cloche of choice. If you are looking for a wedding or to have a high impression impact, you most definitely want to opt for the glass cloche. My personal preference is the glass cloches, but realistically I live in a young child home with curious boys.
Everyone’s choices are going to be different. But I cannot stress enough…
IF you are doing a wedding, please do not opt for cheap. The wow factor is going to be from glass or higher quality of plastic than you find at the dollar store. However, if you are on a very tight budget (Absolutely No Shame Here!!!) and the dollar store cloche is the only thing in your budget here are my tips:
Select only the domes that are clear and free of scratches.
Between now and your event, try to not handle the dome.
You will be tempted to try your dome over the decor. Buy one extra cloche and use that dome as your dome tester.
While you are working with glue, keep it away from the dome. Especially the jewelry & metal glue. You may think you didn’t get any glue on the dome. …and then it dries.
In fact, it’s a good practice, whether glass or plastic, to always have one extra dome on hand. Accidents happen, especially on site.
Please email or comment below with pictures of what you create! I want to see what cloche you make.
The one bit of insight you have, when working for someone else, is just how much a business throws out. And the quality of their garbage. And you also gain insight as to what kinds of businesses subsidize other businesses for you marking your product down for their employees.
I personally know of a few companies who have switched to the Lean Operational method of running a business. And even then it still, somehow, manages to amaze me how much gets thrown out.
Maybe it’s the fact that I grew up where we didn’t have as much as other people around us. Maybe it’s the fact that my mom created magic when she made the gifts we were given on less than a shoe string budget. Maybe it’s the fact that I carry on that frugality because our family budget can go farther and do more things when I reallocate and make do with the little I have, so the hard work of my husband can go elsewhere for family provisions.
This craft here is me on a plate, for you. This is me thinking outside of the box. This is me using materials where half of what you see is stuff that most people throw away.
If you are looking for a new infusion to your farm house style or Easter decor, this project is for you!
Advertisements
Materials
8×10 Canvas Frame
Teal and Metallic Gold Acrylic Paint, with paint brush
First you want to remove the canvas from our frame so you can paint the frame for your reverse canvas. (If you’re new to Reverse Canvas, hold on for a moment and I will circle back to help you through this process.) Paint the front and sides of your frame with Teal paint. If you keep the paint very thin, you will notice that the paint is dry to the touch in about three minutes. For this example, I went in a circle around the frame twice with the minimum amount of paint (dry brush method, where it look likes and almost feels like you’re brushing on already dry paint) and ended with full coverage of color with no waiting time to apply the Gold paint. It’s really not in my budget to play with Gold Leaf. I would use it for a client. But for the rustic feel I went for, metallic gold paint was enough to add a smidge of class to an otherwise rustic feeling project. And the gold, I used somewhere around a nickel size drop of paint and hit the corners and some edges. Then I set the frame to the side to dry while I added the HTV to the canvas.
First Time Creating a Reverse Canvas: From the back side of the Canvas remove the staples with a pair of pliers. (There are two different methods of putting the canvas back on the frame, which I’ll cover in steps ahead. I just want to let you know from the beginning, if you remove the staples right from the beginning, it can save you from potential problems in future steps. It’s not mandatory, but definitely one of my highly recommended steps.) If small holes next to the staples happen, don’t be afraid, you will not see them later on. If the staples are stubborn, feel free to cut the canvas next to the staple, with a crafting knife, and release the canvas. Set the canvas to the side and move forward with painting your frame, mentioned above.
TIPS: If you’re keeping with the rustic look, there’s no need to sand your frame. If you want a smooth looking frame, you will definitely want to sand your frame before you paint it. If the frame staples are visually unappealing to you, I highly recommend dry wall spackle. You can find some that is purple when you apply it and turns white when it’s dry. It’s very easy and convenient to use, with next to no guess work. A palate knife or even your finger is all you need to apply the spackle. Once it dries, you’ll quickly run over it with sandpaper a couple times. This will smooth out your edges. And when you paint your frame, no one will know that you used putty to fill in the frame cracks. (This is the same method I use when I want to use a frame that for one reason or another was gouged or dropped.
Applying Vinyl to the Canvas
When you go to cut your HTV (High Temperature Vinyl) from your cutting machine, remember to mirror your image. Once you’ve weeded your vinyl, you will place your frame on top of your canvas, so that you can see exactly where you want to press your carrier sheet down on the canvas. (This step is mostly important if you have a few small holes in the canvas that you’re working around. If you’re canvas came off the frame undamaged, than feel free to skip using the fram as a point of reference.) Follow our vinyl’s directions for heat and pressing time. These settings vary. Once you’re vinyl is attached, proceed to reattaching your canvas to your frame.
What if I choose to use Permanent Vinyl? I have successfully used permanent vinyl on canvas. I prefer HTV over 651 (or permanent) because once I have it adhered I do not have to worry for one moment about humidity causing the vinyl to lift. But please do not be shy with using permanent vinyl. You will still want to use an iron to press your Canvas. If there’s any moisture in the fabric, the iron will get that dried out and prepped for your permanent vinyl. Once you place your vinyl, you will want to make sure to have your project on a hard surface that you can press down with a scraper or squeegee. The more attention that you use with burnishing that vinyl down will pay off in the end with a longer life to your craft. Remove your transfer tape and then move forward with attaching the canvas back onto the frame.
Advertisements
Reapply Canvas to the Frame
There are two ways of doing this; hot glue gun or staples.
Method Hot Glue Gun: Apply a liberal amount of hot glue to the back of your frame. Flip it over and position it over your canvas before pressing down and attaching the two together.
The benefit of this method is that it is so quick! Any skill level of crafter can do this application. The important thing to remember is that you have to move quickly so your glue doesn’t cool down on you. AND you will want to try and manage how much glue you use. Too little and the canvas won’t want to stick to your frame. Too much and you will have guaranteed seepage of glue that you will have to clean up. My recommendation is err on the side of a little too much and keep the glue a little off center. It’s better if it seeps out of the outside edge instead of the inside edge. With an inside edge seep, you will need to try and scrape the glue off the canvas or risk having what looks like slug trail on your canvas.
Method Staples: Flip your frame upside down. Position your canvas on top of the frame. Take your staple gun and staple at the top center of your frame. Gently pull your canvas down and place a staple in the center bottom of the frame. Gently pull the canvas to one side and staple in the center of that side. Gently pull on the other side of the canvas and staple in the center of that side. This is called Stretching Canvas. You will then go through the whole rotation again, moving out from center. On a frame this size, you should have about 5 staples across the top and bottom. And about 7 down the sides.
In my opinion I recommend stretching your canvas with the Staple Method. Anytime you add anything to canvas, if it’s not taunt, the weight of your project will warp the appearance of your canvas.
I’m in a crafting group where many of the crafters there swear by the hot glue gun method. In that group I withhold this information because in that setting it’s more important to have these ladies soak up the success of accomplishing a craft that they might not otherwise have attempted.
Here, I want to give you further information because I want you to make an education decision based off of the goal you are after. If you are making this to sell at a craft fair, or you’re decorating for an event that you want professionalism for, I want to set you up for success in these moments. And I know we are not face to face so I can’t use my tone or non-verbal cues to fill you in on this. I am by no means dogging on the hot glue method. In fact, in this example I’m showing you I couldn’t find my staple gun and so I in fact used a hot glue gun. I know the value of stretching canvas and so even with a hot glue gun, I still stretched my canvas. It took much longer than with a staple gun. And if I were using something of more weight than paper carrots, I can assure you that I would not trust hot glue to keep my standard of professionalism to clients. (I know my limitations with hot glue guns, and I’m woman enough to admit that there are many other crafters out there who are geniuses with hot glue. I have skills, but I am not a hot glue gun goddess.)
I want you to feel comfortable with your skill level and what goals are for this project. If what you have available is a hot glue gun, you’re not at all comfortable with stretching canvas, and you’re new to reverse canvas making–PERFECT! Know that you can make a beautiful and professional looking canvas using this method. If you want the challenge and extra security that staples offer, than stretching your canvas is exactly what you’re looking for.
Once your canvas is attached, you will want to trim off the extra canvas. You can either use a crafting knife and cut away on the outer edge of the frame. Or you can use a pair of scissors, angle you blade into the back of the frame, and trim the canvas back.
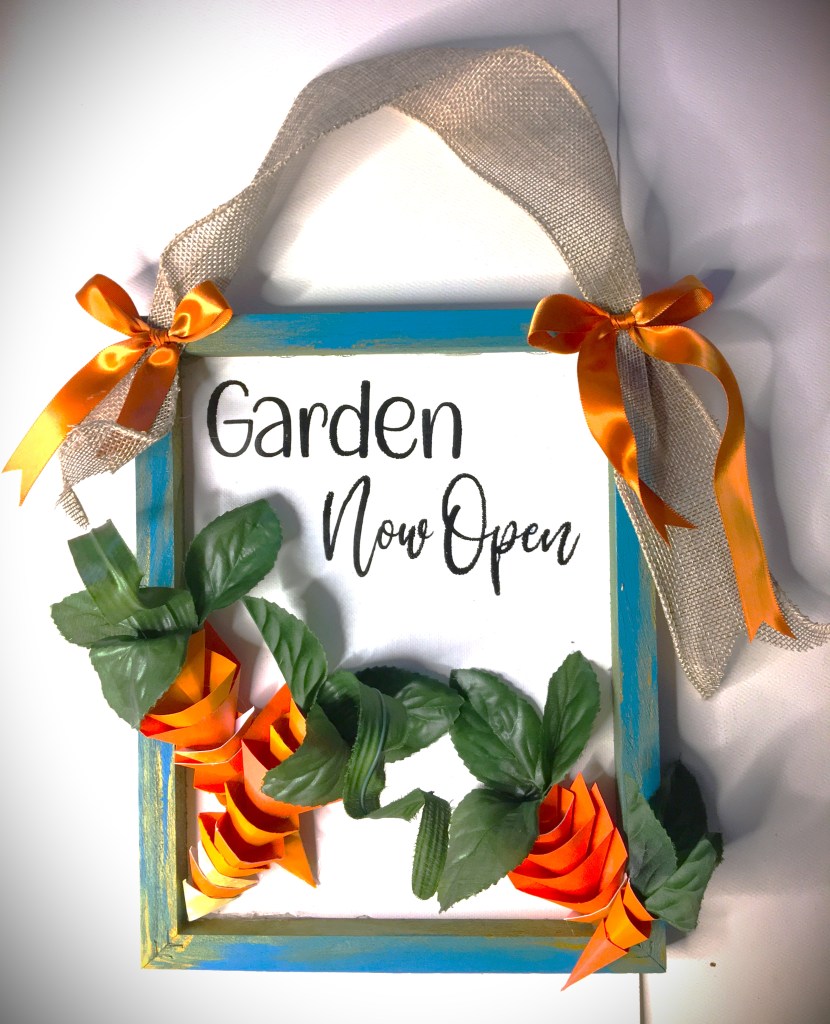
With clean edges, it’s now time to add those carrots!
Carrots
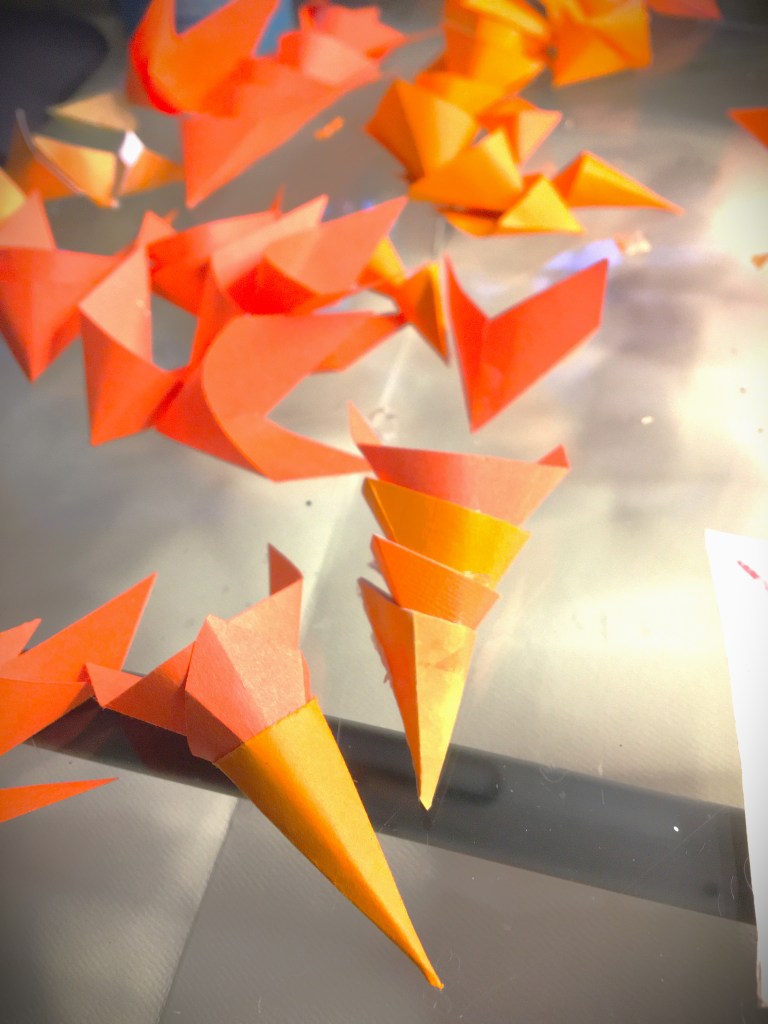
This is the part that I’m most excited about. These carrots are made completely from scraps that most of the times end up in the trash or recycling bins.
Most of these segments are made from triangles and parallelogram scraps about 3″ wide. Some wider, some less. All of these were from scraps from an explosion box I made a few months back. The card stock was 5 different textures and shades of orange. In fact, one of the orange papers was actually faded from being left out in front of a window. The segments you see above were not triangles and so I pre-folded them in triangular forms to make it quicker to shape and hold with a small drop of glue.
These single cones I then stacked with each other. On a few of the carrots I placed the glue on the back of the cone. Most looked better with the attachment point being at the front of the cone.
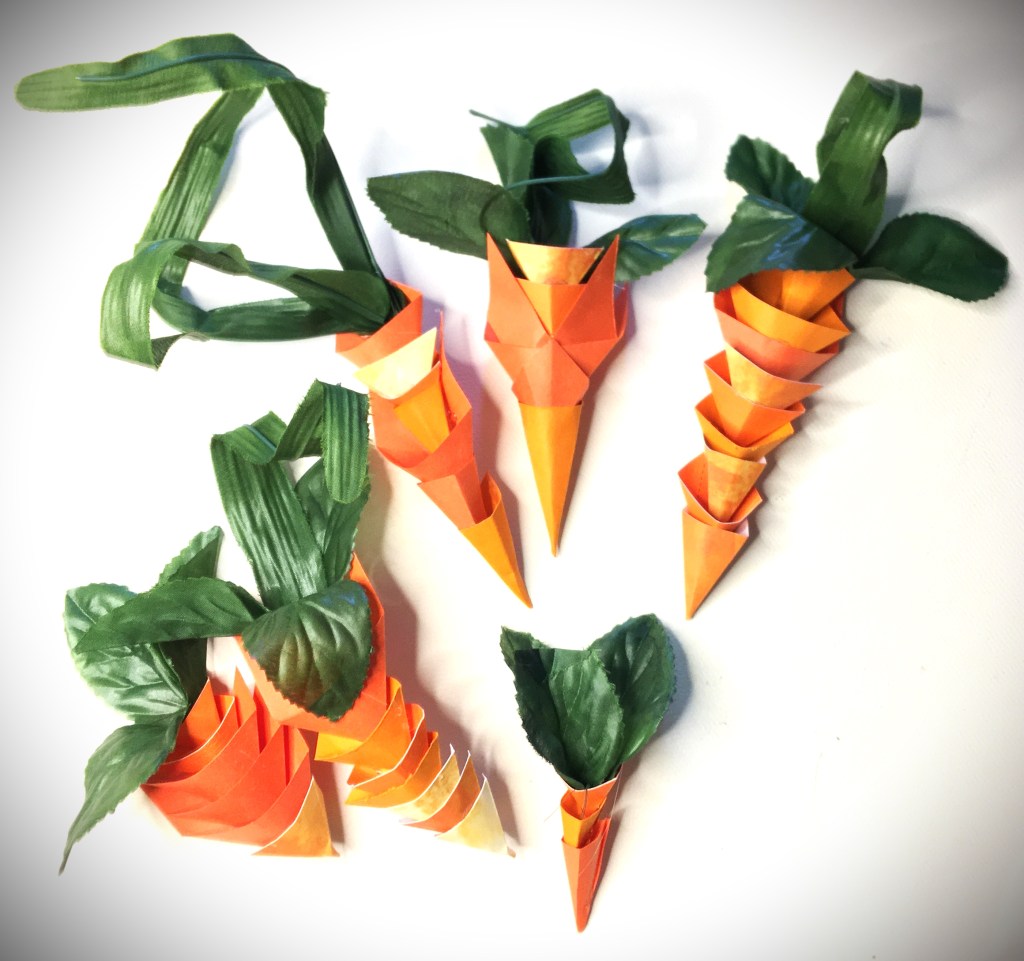
I made a few extra carrots than I had space for on the canvas, because I wanted to have some choices of which ones looked better than others. In fact, one carrot had a herringbone look to it. And since it didn’t have the same feel as the others, that one got set aside for a future project.
Once I got the length of carrots that I was happy with (a few were 4″ long and others were as much as 8″), I went into my bin of silk flowers that have seen better days. In fact, they were part of the flowers that I bought from a wedding planner who was selling all of her inventory. I was after her roses, but she gave me her entire flower collection. These leaves were actually from some geraniums and daffodils. The daffodils were actually really beat up and were just collecting dust, because I couldn’t use them for events. And this was the moment that I could actually give these greens a purpose. Other than purchasing silk ferns, these greens were actually quite perfect.
What makes these carrots so special in the crafting world is that it embraces the cubism element from the art world. I’ve seen a lot of carrots made from yarn and cloth, styrofoam and foam. These paper carrots give talking points and structure. And this structure is what was great for placing in the frame, with the ability to break free from the frame (giving a nod to surrealism).
Finishing Touches
Once I found the placement that I liked for these carrot shapes, I glued them down with hot glue gun.
Due to the light weight nature of this project, attaching the ribbon with hot glue is enough. However, if you’re creating for a professional item, you will want to use a stapler to attach you bottom layer of ribbon to the frame. For the top ribbon attachment, E6000 glue would be better than hot glue. But hot glue does do the job for a non-sellable project.
Please comment below and tell me how this spring time project turned out for you. Pictures are even better. I love seeing what other people make!