Does it really matter???

Before I answer this question, I should put it in a framework. In some instances no, it doesn’t matter if you don’t follow directions on a recipe, or do things out of order. And in other instances, YES it absolutely matters if you do things in the right order AND measurements.

What is the determining factor?

The item you are making.

For example, cooking and baking. I will absolutely advocate experimenting. Yes, even with bread (which we’re always told is a science and should never be deviated from). I’ve gone in left field with bread recipes and have had success.

How can you have success?

Photo by Ron Lach on Pexels.com

Know the science. If the ingredient is not part of the active component, it’s just there for flavor. Experiment away. Yeast (going back to the example of bread) is a living organism and has preferred temperature and environments for optimized leavening activity. This is the science part that you cannot change no matter what you toss in the bowl. Kill your yeast, there’s nothing you can do (even following the recipe perfectly) that will get that bread to rise.

So by all means, if you want some fancy bread with herbs tossed in to complement a meal you’re making, do it! Use a recipe you’re familiar with and add the herbs you want to add. Go ahead and baste the bread with salted garlic butter right before cooking it. Modify to your heart’s content.

Advertisements

When does it really matter?

Soap making is definitely one of those times where you must follow the recipe.

Mind you, I’ve been less than precise where I’ve added a couple of grams more or less of the fat/oil components of the recipe and the bars have turned out fine. Some fat/oil are known for making a softer bar, so be prepared that if you use more of a softening fat/oil, your bar is going to turn out softer than if you were more precise. But the soap is still soap and still becomes firm when you cure the soap.

Just because I brought this subject up, here are fat/oils that affect the hardness of your soap: Sunflower oil will make a softer bar. Harder bars of soap can be obtained by using Cocoa Butter, Lard, Palm Oil, or Tallow.

Take the time to do a quick search and learn what all the different fat/oils do. Many contribute multiple attributes to your soap. Some attributes you can find are lather, shine/conditioning, oil control for acne, helping dry skin, and so many other factors. It really is fascinating to see what can contribute or irritate your skin’s health!

And when you make soap, the ingredient that it absolutely matters how you use it is Lye (sodium hydroxide for bar, potassium hydroxide for liquid)!

Of course there are the standard safety warnings: use in a well ventilated area; wear long sleeves, gloves, and eye protection; and use equipment that are least reactive to this caustic chemical (use glass or plastic).

But this particular ingredient, it absolutely matters how you use it!

Here’s one way that I messed up!

Disclaimer: At no point in time am I ever encouraging you to go against directions with caustic ingredients. At all times use safety equipment and be aware of what you are doing. Understand what you are working with, what reactions are happening, and never leave a project at a volatile moment in the process. Be present. Be aware. And have safety equipment and procedures in place. And always work in an environment free from distraction.

Even know I don’t know why I thought I could make soap during the day when the kiddos were awake. There’s a reason why other women also tell you to focus on soap making after you put the kids to bed for the night. I knew exactly why and I still chose to give into the illusion I could do this and it would turn out all right.

Nope. Even nap time is not a good time to make soap.

Photo by Mikhail Nilov on Pexels.com

After the frazzle of getting the kiddos to go to sleep, I forgot that the recipe I was using did not call for water (to react with the lye). Instead I was using Aloe Vera liquid (which acts like water in this recipe). I put the Aloe Vera in the bowl that I was melting down my solid fats (coconut oil being one). I caught this accident when I grabbed my Olive Oil to measure out.

I so wanted to kick myself!

Instead of wasting all these ingredients, I decided to move forward and see what happens when you make the mistake and proceed with the batch.

The first thing I learned, you can’t sub out a fat/oil for your “water” ingredient.

This comes back to science–which you cannot change no matter how much you wish you could. Olive Oil did not dissolve the lye. The chemical reaction with the lye never took place until I added the fat/oils into the bowl and started mixing. The Aloe Vera finally came in contact with the lye and the reaction could proceed.

And this is why soap recipes are broken up into two components: lye and fat/oils!

When your lye and water start to react it produces heat. If you have your whole recipe in a bowl when this happens, your fat/oils are instantly heated by the reaction. What follows is the accelerated rate of saponification. And if this happens before your fat/oils are emulsified with the lye solution, then you are faced with all the problems of soap making.

In this particular instance, my soap broke. I had an oil slick on my hands. And I know for a fact that my soap wasn’t set up because it hadn’t had the time needed to emulsify everything together.

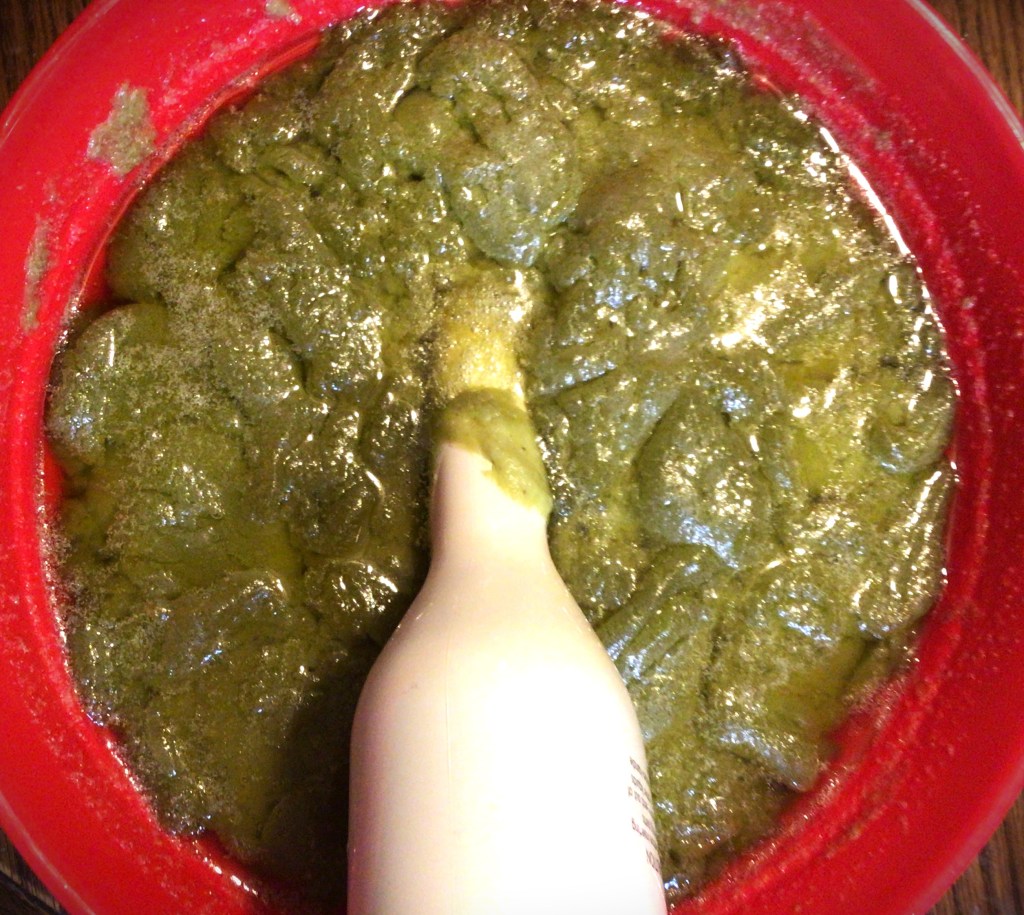
And the more that I blended the soil back into the soap version of cottage cheese, the problems didn’t go away. By the time I got the oil slick to disappear, my soap seized up!

At this point there were only two options. One, I could throw everything away and start again. Or Two, I could see if this would work.

Normally, everyone tells you to take the blending of your cold press soap to a light trace. I’m not like everyone else. I find that a light trace gives me a soft soap (even when following a recipe to utter perfection). So my comfort zone is to take my soap to a medium trace. It gives me a firm soap that doesn’t melt in the shower thanks to young hands who sometimes leave the bar in the water. And it still allows me to make bars without air bubbles. (I’ll come back to that trick in just a moment.)

I kept blending that seized soap past my usual medium trace and prayed to see the final signs of emulsification. This one is hard to describe in words, because this is just where experience comes into practice–you know when you’ve emulsified.

At this point the soap was so thick from seizing and still being worked that I only had a few minutes before complete loss. And I didn’t even have time to stop and put in my scent. So I stopped and immediately transferred into my individual soap molds and my loaf mold.

Tip for Removing Air Bubbles: This one is taken directly from the baking world of cake making. Have you ever seen someone drop a cake or cupcake pan down on the counter several times? They were removing the air bubbles to keep an even crumb. I use this same trick for soap making, especially with the batches of soap with a heavier trace.

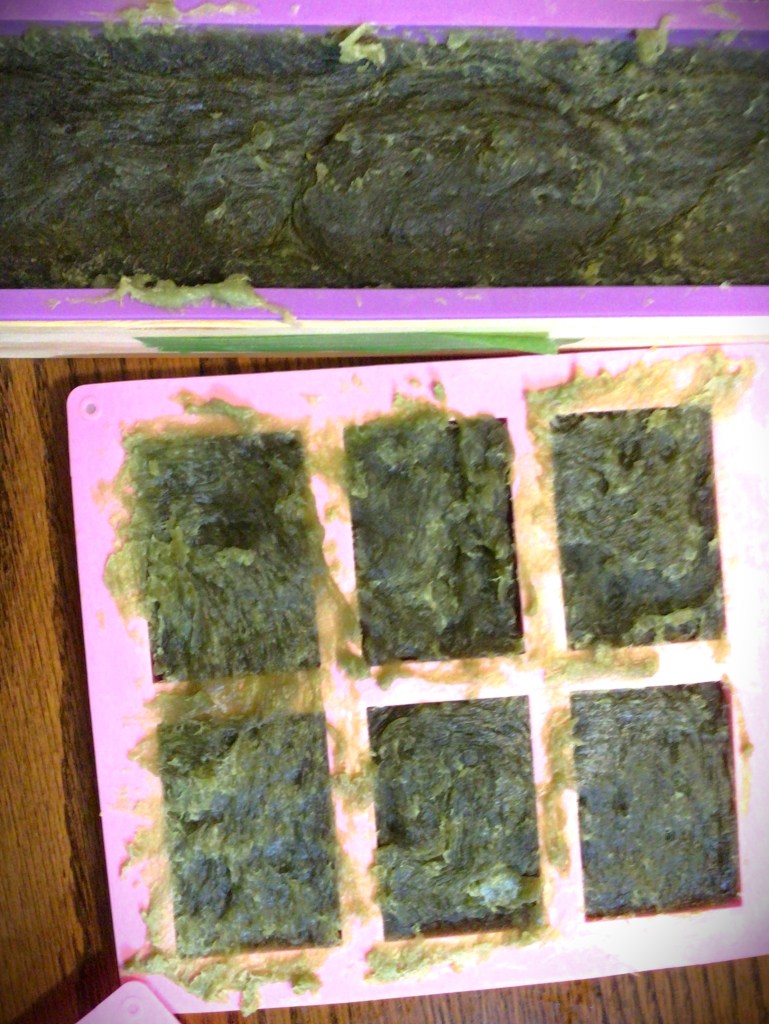
I dropped my molds like there was no tomorrow, to remove the air bubbles. I knew they were there. And because of how I could or could not drop the molds, both types had different outcomes.

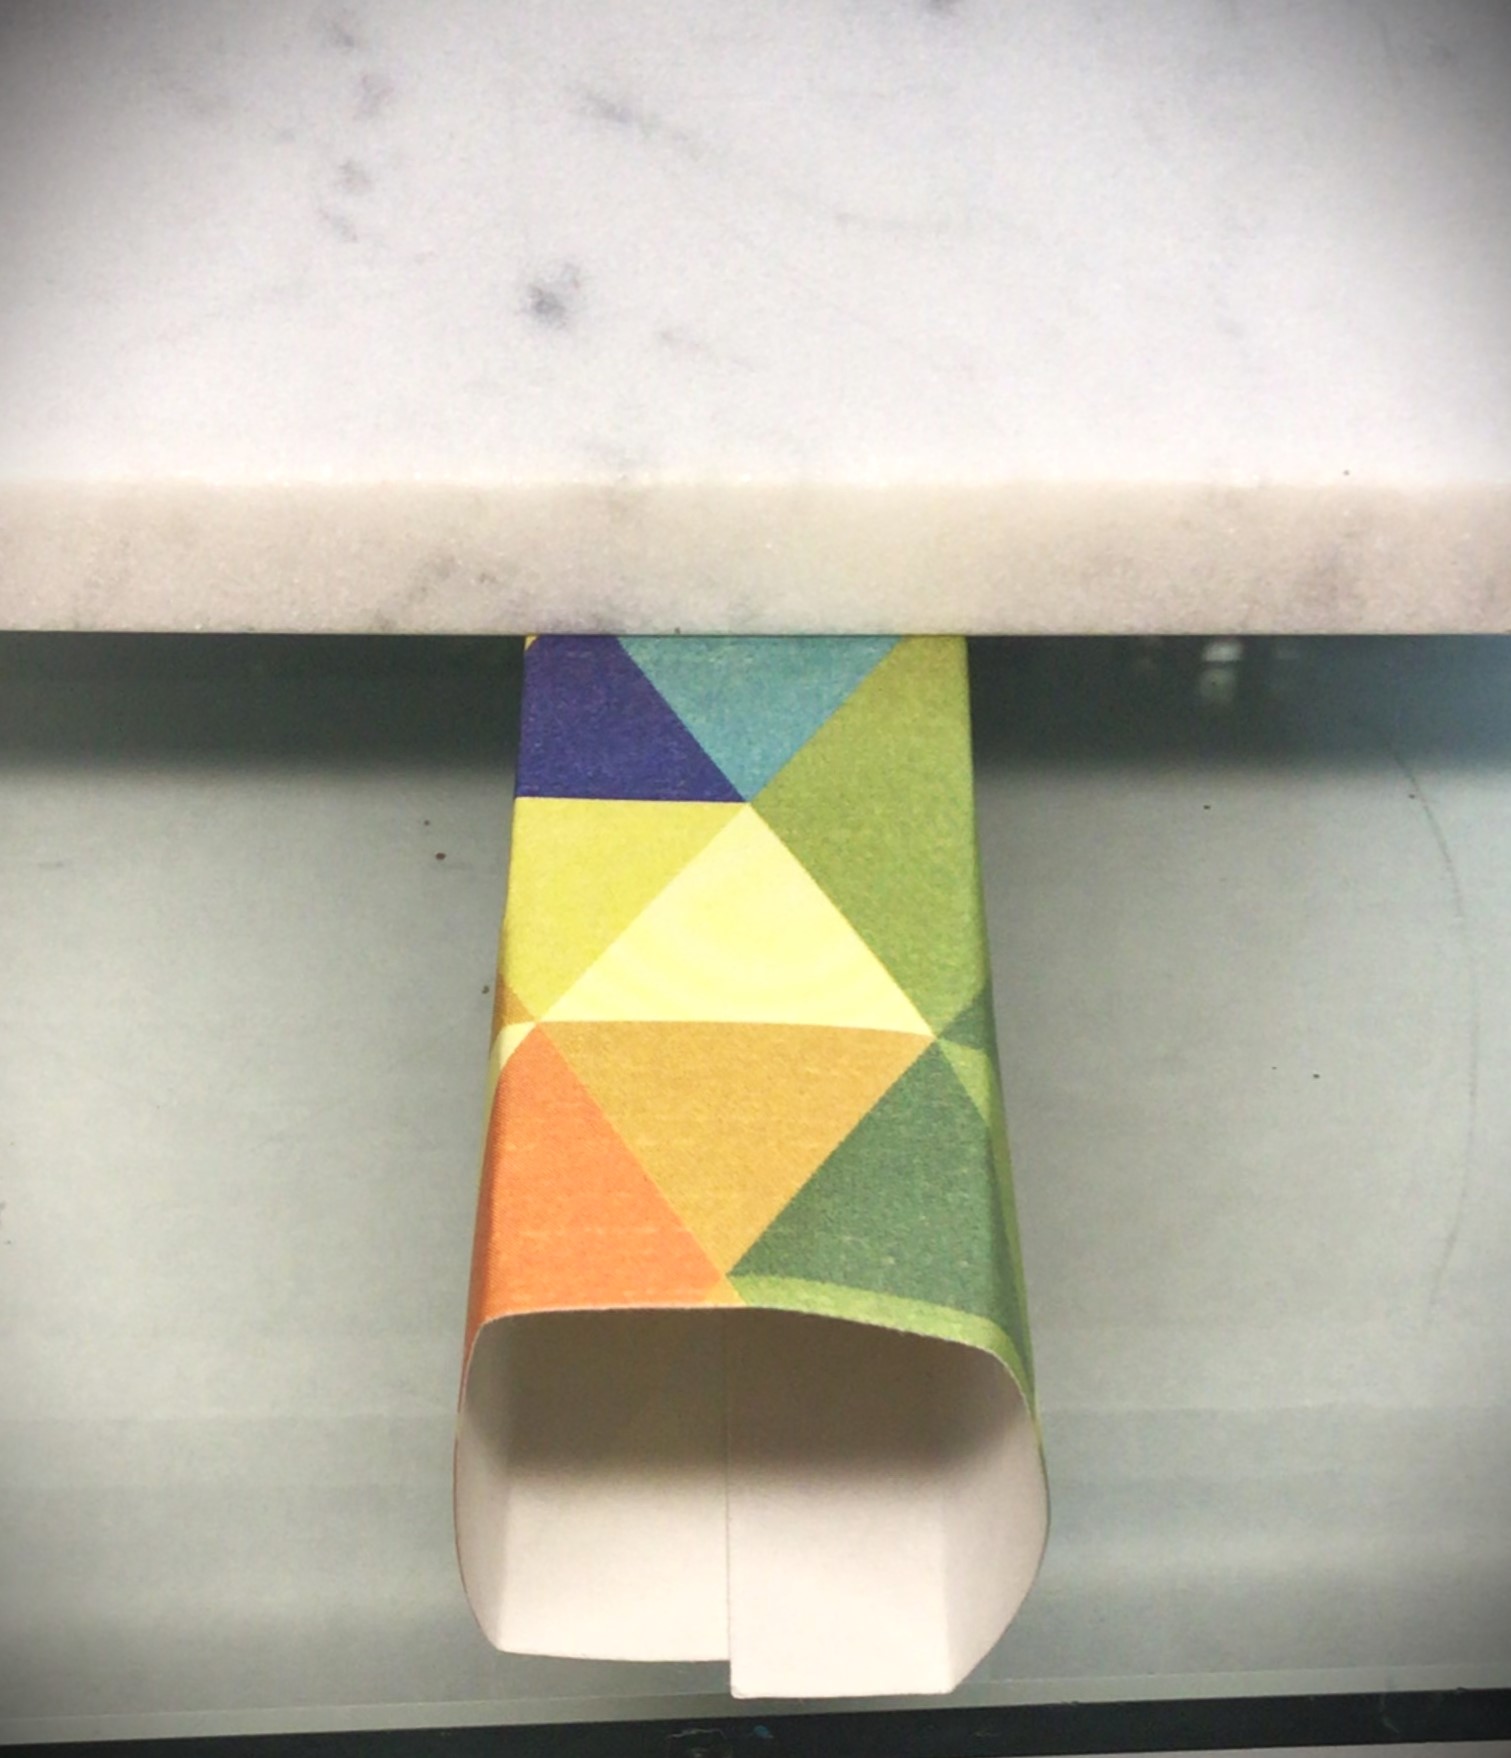
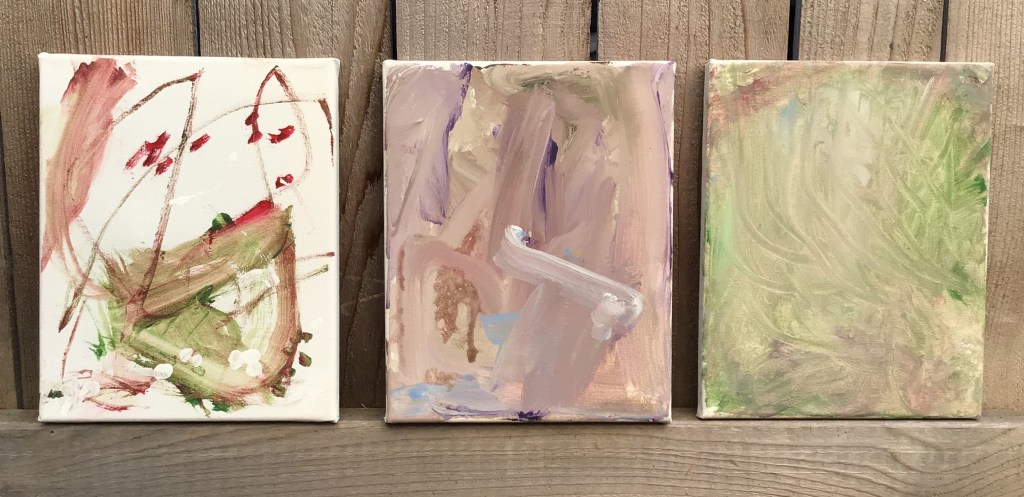
The individual molds were not rigid and could only use a light drop. The silicone wouldn’t hold up to much gravitational help. As a result, you can see here how these soaps turned out to have a cratered texture.

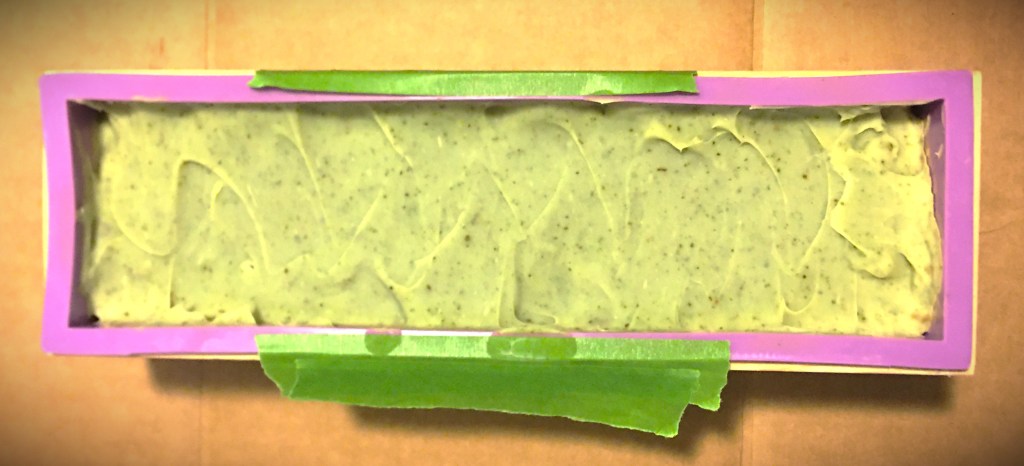
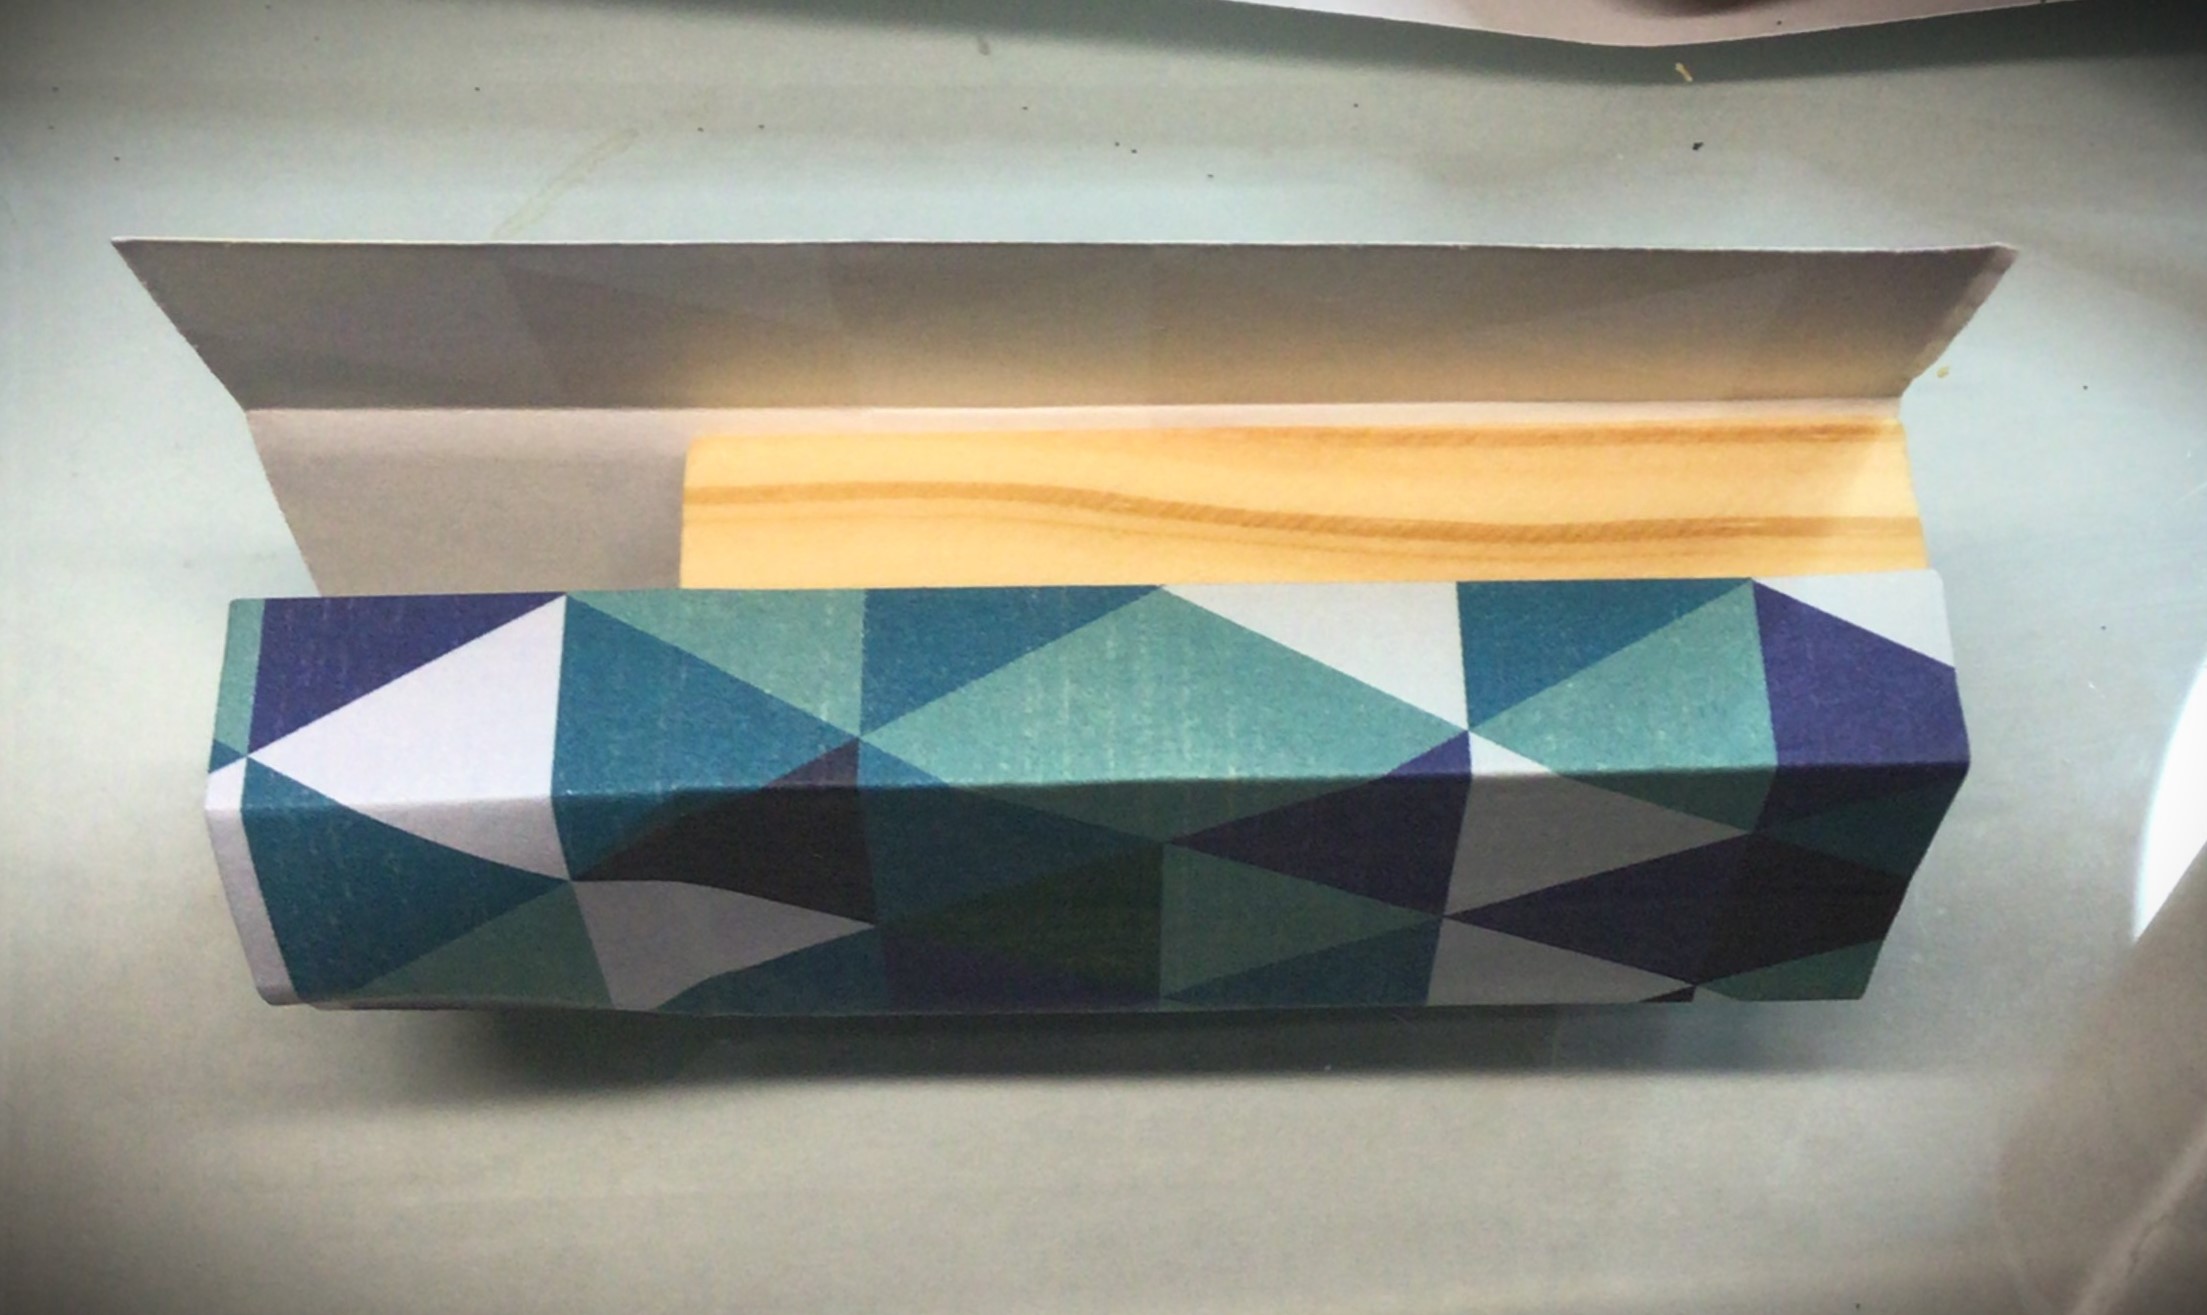
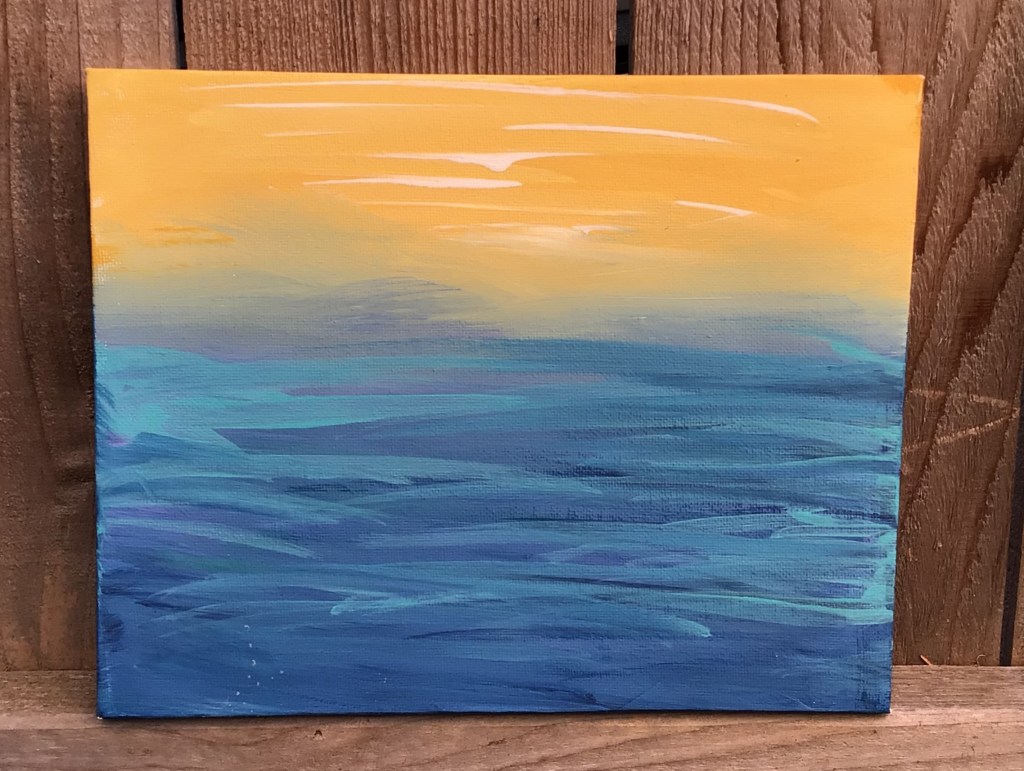
On the other hand, the loaf mold has that beautiful wood frame (thank goodness for jointed corners!) which definitely could withstand a little help from gravity. I dropped that loaf mold several times until the soap started lying flat in the mold and no more air bubbles came to the surface. And as you can see here, no one would ever know that I had trouble with this batch of soap. (These ones again will be for family use because I didn’t include the scent.)

Advertisements

What if recovery is not possible?

This time I was able to pull soap out of that massive mistake. But I already had a backup plan in my back pocket in case I unmolded the soap and there was total devastation.

  • Melt down the soap and mix it with a correctly formed soap mixture. This is what soap makers do all the time when they forget to mix in a scent or even a couple of other errors. Especially when you do a cold process of soap making you have a little more time to decide if you want to fix this mistake by melting down and trying again.
  • Cube or shave the soap down into decorative pieces and add it into a soap batch that worked out better. If you’ve ever seen soap that has another color “floating” in the bar of soap. This is the technique they use. The day that you unmold these soaps and cut them down, they are solid enough to add to a fresh batch of soap. You will just cure the bars on the time scale of this fresher batch of soap. (Tip: make sure that this fresh batch of soap is stopped at a light trace. This will help get around all the corner/curves and get into any craters without the need of dropping the mold to remove air bubbles–which would throw off the suspended look.)
  • Use it for other DIY projects. Make sure that you still cure this soap because you don’t want the lye to cause problems with your other projects. But you can use this soap to grease that sticky glass slider track or any other trick that you’ve seen elsewhere.

Just because this mistake had a “happy” ending…

I want to give this disclaimer one more time.

Disclaimer: At no point in time am I ever encouraging you to go against directions with caustic ingredients. At all times use safety equipment and be aware of what you are doing. Understand what you are working with, what reactions are happening, and never leave a project at a volatile moment in the process. Be present. Be aware. And have safety equipment and procedures in place. And always work in an environment free from distraction.

Sometimes, you just need to know the reason why you’re told “this is the way that you do this”. As I said earlier, in instances where you accidently gravitate away from a recipe, you’re not going to start a fire or blow your house up by adding herbs or seasoning in a recipe that you’re told to stick to. But when you’re working with chemicals, the process that you’re told to follow is there to prevent serious issues from happening. There’s no doubt a long list of possible things that could happen by mixing soap out of order, most of them causing harm to your body.

Advertisements

How can you prevent mistakes from happening?

  • Make sure you’re in the right headspace for your project. (You’re not distracted or sleep deprived as examples.)
  • If you’re rushed, stop and find a different time to do this project. (You are in control.)
  • Rewrite your ingredients in the order that you will use them.
  • Rewrite you steps in precise order (short and easy to read).
  • Before you start your project, organize your materials in groupings of what you’re adding together, in the order that you will add them.
  • Pre-measure out everything into separate containers.
  • Even if you’re used the recipe before, reread through the ingredients and steps and make sure you remember what you’re doing.

Even when you do prepare, mistakes are still going to happen. Know in advance what you’re going to do. Have plan B, C, and D already in your head. This allows for quick thinking and recovery. One of these plans needs to include what you do when you need to dispose of a failed project.


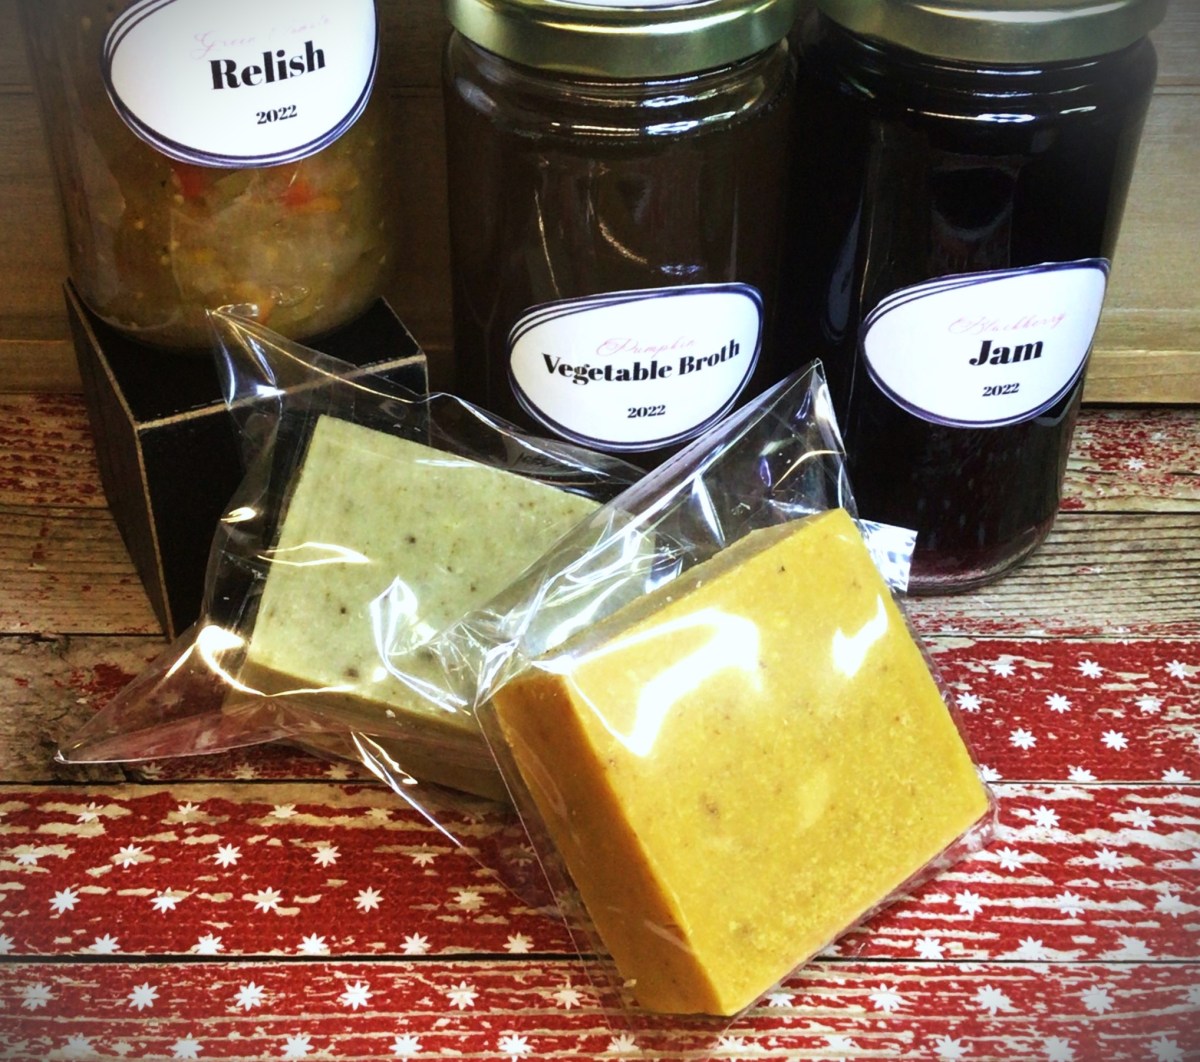
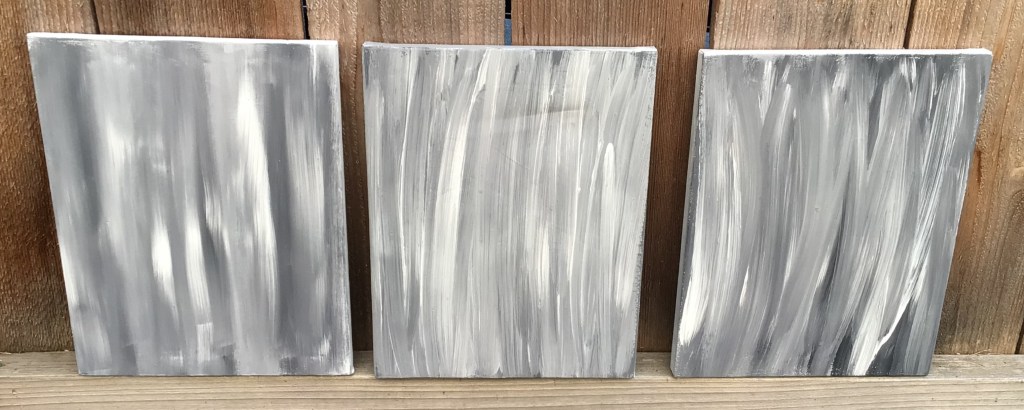
Here’s the final cut

As I walk back through all that happened, I’m actually still surprised by how things worked out in the end, having dealt with broken soap and fixing it until it seized. When you look at these pictures you will see that the bar on the left (the soap I put in individual molds) definitely show the war that took place. However the bar on the right (cut from the loaf mold) looks like the only issue was minor cosmetic issues.

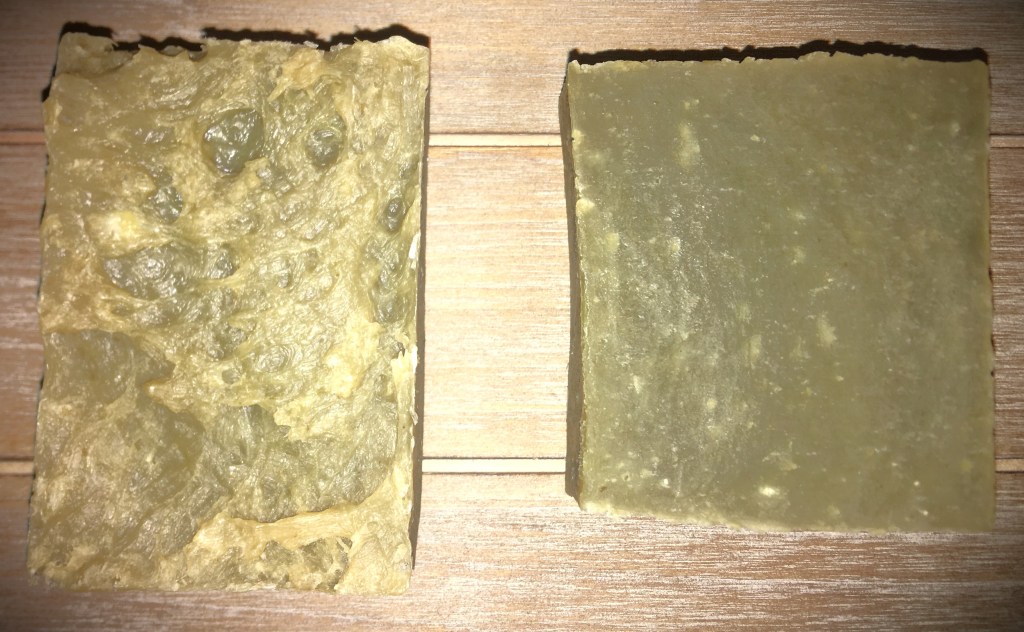
Most of the issues on the loaf mold soap are really seen from the side view. And the worst of the individual mold is seen in the face picture.

As a point of reference, if you ever hear a soap maker describe a problem as looking like brain matter, what they are describing is the face shot of the individual mold. It doesn’t literally look like a brain, but it has webbing and crater like surface.

Hopefully you never have to go through any of this while making soap of your own. But here’s at least some conversational information that you may or may not hear from anyone that you’re learning soap making from or in any of the countless videos on YouTube.

Above all, at least now you have some information and images to go with everything else that you are learning elsewhere.

Processing…
Success! You're on the list.

Leave a comment

Advertisements

On The Court

Winter sports have started and parents everywhere are volunteering for coach their kid’s park and recreation teams. And I am that parent-coach.

After spending quite a few years working with kids, you learn firsthand that not all kids learn the same way. But one learning style that all kids have in common is that they have to have a visual of some kind. And when you’re on a sideline, during a game, and you can’t walk out on the court/field to physically show your team what you want them to do, the next best thing is a whiteboard clipboard of your court/field. (So you don’t have to wait for school athletics for kids to be learn from this court map.)

For whatever reason, if you want to have the benefit of having a court/field dry erase board but don’t want to go through the expense of buying one, I’m going to show you a couple of different ways that you can make one rather inexpensively. (This is a huge perk for summer camps where counselors are coaching and you don’t want to worry about misplacing or breaking a nice board.)

Advertisements

Laminated Court

I went this route because I already had in my craft room a clipboard, laminating machine, laminate, paper, printer, magnets, white board pen, ink pen (you never know when you need an ink pen), and hot glue gun. All in all, for the materials I spent under $4. So this is really inexpensive and gets the job done.

First you either want to make or down load a copy of a basketball court (or any other court or field you’re coaching) and print it off.

Run it through a laminating machine with a laminate cover. And as soon as it’s cooled, this mock white board is ready to write on.

I can’t tell you how many different of these “white boards” I’ve made for homeschooling with worksheets that I want to use over and over again. Yes, some colors like to stain the laminate (red and blue are the two colors that cause problems in my house). BUT they’re super easy to clean up. Take a cotton ball with rubbing alcohol and you’re back to a crystal clear “white board”. And if you’ve ever found out that you grabbed a permanent market instead of a white board pen. Don’t worry! Rubbing alcohol will also take that right off. Or if you ran out… simply take a dry erase pen over the permanent marker and erase. The permanent marker comes right off! (It’s the same trick for with a real white board.)

Now I modified my white board. After my first practice I got tired of fishing my pen out of my pocket. So on the back of my clip board I hot glued a magnet for my dry erase pen and for my ink pen. I hot glued magnets to my pens, in a place where they wouldn’t interfere with how I hold my pens (near center, in the crook between my thumb and first finger).

Advertisements

Depending on your pen, hot glue may not work. Hot glue works like a dream on plastic finishes, but if you grab a metal pen like I did its 50/50 if the glue will hold. My pen popped off with a minimum amount of glue. This second time I used a very generous amount (where I had to wipe off a large glob of left over glue) and the magnet has stayed on the pen. My back up for another glue failure is to switch over to liquid cement glue that is formulated to work on metal and ceramic. I didn’t start with that glue because I didn’t want to rig up something to hold the magnet in place while the glue dried.

As you can see, I don’t have to worry about making sure I have pockets while coaching and my pens are taken care of without having to worry about tying my pen to the clip on the clipboard.

But what if you don’t have a lamination machine that you can use???

Plastic Holder

This one is another one of my homeschooling hacks. And I love it for absolutely everything, including a recipe protector in the kitchen if you have a sauce or frying and you get liquids flying next to your stove.

So far I’ve only seen these plastic holders at the dollar store. If anyone else has found them anywhere else (other than Amazon), please comment below!

But with this option, all you have to do is find a court or field that you want and print it out on a piece of letter sized printer paper and then you just slide it in. White board pens work on this plastic just the same as the laminate option above and white boards! So for under $2 this is really affordable for any scenario where your “basketball clipboard” will go missing. Or even if you have young kids who want to pretend play “coach”!

This option is also good if you want to be hands free coaching, but want your board with you. Connect it to a lanyard or a retractable key set on your belt loop. It’s handy when you need it and the pouch can also hold your pen.


Files Used For This Project

Don’t want to hunt down another basketball court image to print? You can use this PDF file here. Other sports fields and courts will be added to this link. If you don’t see the one you’re looking for, please leave a comment!

Other Items that may interest you

This post contains affiliate links that give us commissions on products purchased at no additional cost to you. These items listed here are from Amazon but may be purchased at local markets.

15 mm disc magnets I know these can be found in your local store. I used magnets, of this size, that I had found at my local dollar store (traditional black refrigerator magnets).

Processing…
Success! You're on the list.

Leave a comment

Advertisements
Advertisements

Lather Up

How was your Christmas? Were you able to spend time with those you love?

In my house the whole month of December is difficult. But that’s the life of having a handful of young children in the house. I use to think that starting to decorate at the beginning of December and putting out presents as soon as they were wrapped was adding to the incessant build up of excitement and driving mom bonkers.

Nope.

We did things differently and things didn’t improve. My gift making still happened at night. Or should I say lasting into the wee hours of the morning. Lets just say that coffee is my friend.

But….

This gift, especially the soap, was probably my favorite gift to give.

I didn’t know how many people were having skin issues this year. And most people don’t talk about what they quietly suffer with. Part of it is the “I’ve tried everything” and no product on the market works.

The truth is that the local grocery stores have aisles dedicated to soap. And when you’re in that aisle you grab what you’ve purchased in the past (which may have been the brand that you grew up using) or it’s a sale based off of the label and its marketing claims. And we think that these area our only options.

Advertisements

You have another option

This is the video (three ingredients) that I watched that set me on the path of making my own soap, almost 3 years ago. It was an empowering feeling for me to make my first soap, Goat Milk Soap (4 ingredients), and stop buying the store bought soaps which have an ingredient list that looks something like this:

The comfrey soap in its mold.

Even though I took many chemistry courses in college, I can only tell you half of what is on product labels like this. If my children can’t sound out what the words on these kinds of labels have, that means that those ingredients are stuff made in the product labels of these soap corporations. Companies do this (take organic or natural items and change one chemical compound in the chain) they have made something they can patent and prevent other people from recreating (by pain of legal actions).

Soaps are made out of three items and three items alone: water, lye, and fats.

Yes, even those soaps that people claim are made without lye are actually made with lye. There’s a product on the market, melt-able soap base, that people claim is lye free but that is not true. This soap base is where the emulsification of the lye and fats has already happened for you. The lye and fats have already gone through the process of combining and so the lye has become safe to touch and no longer corrosive like in its original form (whether you use a crystalline lye or wood ash).

Advertisements

Here’s an example of a soap base. The first 5 ingredients are fats, followed by water, and then lye (sodium hydroxide). The end of the list is all the little extras that they added in to make their soap base unique from the others on the market.

In essence, this is an already made soap that a person at home can reshape and have the option of adding other things into for further personalization.

If you’re nervous about using lye, a soap base is going to be a good option for you. It’s not the best thing for your skin but definitely better than all the major brands on the store shelves.

Note: When making soap from scratch, with lye, you will need to cure your soap. This means that after you remove it from its mold (after it’s solidified for 24-48 hours), it will need to cure. This means that the soap sits for 4-6 weeks to dry out. While the soap dries, this allows the chemical transformation through emulsifying the lye and fats, to finish its work. When completed, they lye is no longer corrosive. The lye and fats molecular structures are completely joined and stable

Advertisements

Ingredient list from the soaps I made for Christmas

The two soaps that I made this year were Pumpkin Oatmeal and Comfrey Tea Tree.

Comfrey Tea Tree: Olive Oil, Aloe Vera, Coconut Oil, Avocado Oil, Lard, Sodium Hydroxide (Lye), Comfrey, Bentonite Clay, Tea Tree Oil

Pumpkin Oatmeal: Coconut Oil, Olive Oil, Distilled Water, Lard, Sodium Hydroxide (Lye), Almond Oil, Pumpkin Pure, Rolled Oats, Honey

Both soaps have only 9 ingredients that anyone can understand, colors of the soap come from the natural ingredients, and I can tell you the purpose of each of these ingredients and why they are good for your skin. You don’t need the lab chemicals to create lather or bar hardness. You don’t need the lab fragrances to give you a pleasant scent to wash with.

Note: “Fragrance” listed on an ingredient list of a mass produced soap, approved by USA FDA regulations, is all that has to be noted on a label even though it can include up to 200 different “fragrances” to make the scent of your soap. This is allowed because it’s modified in the lab and falls under proprietary patent laws.

Some of the comfrey soap after I cut it and before I set it aside to cure.

I know that not everyone approves of lard use in soap, usually for religious beliefs, but this fat can be switched out for tallow (beef, goat, or deer) which can align with religious beliefs. Or these animal fats can be omitted completely for the wide world of plant oils.

The variety of fats, found naturally in the world, each have different properties for your skin health and how it functions in a bar of soap. For example, lard is a single ingredient that adds hardness to the soap bar, creates lather, and adds to the shine and conditioning/softening of skin and hair.

One book that I highly recommend for understanding how fats work in soap making and benefits to your skin and hair is Simple & Natural Soapmaking by Jan Berry

Advertisements

Origin of the fats is also going to play a part in how it reacts with your skin.

Shea Butter is not all the same. In fact, this week I just learned that not only is there a difference in quality of Shea that comes from heat vs. cold pressed processed Shea, but also the region. If I remember the documentary correctly, Uganda Shea butter is absorbed quicker into the skin than the Shea produced from other regions. And I never would have thought it, but the beauty industry is already capitalizing on the difference of absorption rates of the Shea butter produced from eastern and western Africa. It’s not all the same.

So if you by chance tried Shea butter beauty products and felt like the fat just sat on the top of your skin instead of being absorbed as you were promised, the reason isn’t because Shea failed you. It’s because you used a product that had a lesser quality of Shea.

In this instance, if you can afford to purchase a higher quality of Shea butter, all evidence shows that this purchase for a higher quality is most definitely well worth it. I’m all for finding the deal, but moving forward I’m now going to purchase a better quality of Shea.

With animal fats, whether the animal grazed on foods naturally available to the animal vs. grain fed and various injections will all be passed on to you through your skin.

Why what you put on your skin matters

It took me going through my second quarter of Anatomy & Physiology to learn that your skin is your largest organ in your body. Your skin keeps all your insides in, but it also is a filter from the outside world trying to come inside you.

I really don’t know why I was so surprised by all this because growing up we all have the conversations about needing lotion for our skin. We already know that we can correct some conditions by adding lotion or medication, depending on what’s wrong with our skin. But we never think about what we are adding to our skin daily that’s potentially causing the problems to begin with.

An example of a soap label. Notice the difference in readability and ingredients compared to a bar of soap I made (my shampoo bar, currently curing, is the same ingredients that the bar of soaps listed above).

We’re told to wash our hands regularly, especially during cold and flu season (not to mention the marketing for this habit over the last three years). With this increase reminder to wash your hands, how long is that ingredient list? How many of those ingredients do you know how to say, let alone identify what they do in the soap? Is it your hand soap that is adding to your cracked hands during the winter?

For example, my hands crack and bleed every winter. There has never been a lotion that I could find to ease the pain, let alone prevent the cracking in the first place. Christmas was when my Comfrey soap finished curing and I could use this recipe for the first time. Just by the first use alone, the redness of my irritated skin cleared up. The cracks decreased in size by half and by the next day they were all healed. I still have dry knuckles because I stopped using the Comfrey soap (leaving it for my son who has more sensitive skin in need of good soap). The Pumpkin soap isn’t as healing, but it’s still preventing the cracks. The Comfrey soap has aloe vera in it (which the pumpkin does not), so I might have to change that recipe to add some aloe in.

But I think you can start to see just by how your ingredients work, the natural function of things found in your garden, you can easily make a soap for yourself, family or loved ones that meet your skin type needs and not have to spend hundreds or thousands of dollars on store products that just don’t work.

Advertisements

There’s just so much to talk about with soap making. I will have to come back to this subject in upcoming posts. But I wanted to start the thought in your mind that you really can make your own soap. You don’t have to just survive and live with the condition(s) that you currently have. The first step is to start by cutting that ingredient list in half. The fewer the ingredients and shorter the syllables of the words mean that you understand what you are putting on the largest organ of your body. You can pinpoint what irritates your skin and you can pivot by switching out a fat or other ingredient that offers a vitamin or mineral that your skin actually needs.

Leave me a comment below if you’re looking for a solution to an issue.

In 2023 I’m looking forward to talking more about how herbs and garden ingredients can benefit your body. And all you have to do is add them as a seasoning to the foods you already cook, which benefits your body from the inside. And you can already start now with making soap to help your body from the outside. Skip the lab ingredients and start using luxurious soap that uses all natural ingredients which can eliminate all the extras that you need to “fix” what other products are doing to you.

For example, one lifestyle change for my family is that we are switching to homemade shampoo bars. My goal is to find the recipe that makes a shampoo bar where I don’t have to use 3 different conditions to combat the dryness that I’m convinced is caused by the long ingredient list on my shampoo bottles.

Happy New Year!!!


Products that were either mentioned in the post or items that you may find valuable in making your own soap.

This post contains affiliate links that give us commissions on products purchased at no additional cost to you. These items listed here are from Amazon but may be purchased at local markets. These products were paid for by us and are not the only products available.

Simple & Natural Soapmaking by Jan Berry

After watching videos and reading different books, this is my personal favorite resource for recipes, ingredient information, and general soap making information.

Soap Mold Making Kit

I prefer cutting my own bars of soap and this is the set that I wished I would have bought the first time. The cutting block takes the guesswork out of eyeballing a uniform and straight cut.

Silicone Soap Mold

This is great for just getting started and you don’t want to think about portioning out bar sizes. The disadvantage is that the silicone is very flimsy under the weight of the soap. So make sure that you have cardboard or another hard surface to tansfer the molds to a different location while the soap solidifies.

Processing…
Success! You're on the list.

3 responses to “Lather Up”

  1. Cassandra Avatar
    Cassandra

    Valid information worded in layman’s terms. Thank you.

    Liked by 1 person

    1. Jihn baker Avatar
      Jihn baker

      My granny made lye soap, used it all her life, never had skin problems, i make basic lye soap myself, 3 lbs of greese, bacon preferably, but the drainings off cooked meat, 2 gallons of water, and one can lye, , i greate up some for clothes soap, i use it in place of aal types of soap, melt it and mix with water for dish soap, works better than cascade in the dish washer, the only problem is aquiring the lye, it extreamly hard to get in the stores because it is one of the main ingreidants in the manufacture of meth, and everytime i make soap i have to call the police and noify them, so i dont get charged with making meth, it smells the same, making meth or making soap,

      Like

      1. Pacific Northwest Event Design Avatar

        There shouldn’t be any fear in purchasing lye. I’ve been purchasing it for a few years now and have never had to report to a registery. There are certain over the counter medications that I’m aware of that there is a registry because of of it being associated with drug manufacturing. And in the instance of that product registry, there is a notation of who is buying what and at what quantity. For the manufacturing of drugs there is a specific amount that law enforcement starts paying attention to. For the average person, making soap at home, they are not going to come close to hitting that limit. I mention all this to prevent unnecessary fear from being spread.
        Thank you for sharing how you make your soap! And also sharing how you use it to also to clean clothes and dishes.

        Like

Leave a comment

Advertisements

Desk Tree

This year is an interesting year to go into for Christmas. For some families, they are facing a tight budget and want to still have some wow while still meeting other necessities. Other families have taken the last few years to simplify their homes with a minimalistic look. And yet there are other people you will gift this year who are limited by space, be it home or office.

The first gift I want to present to you this year is the Desk Tree.

The beauty of the Desk Tree is that it is minimalistic in design and fits into small spaces at the same time. Not only that, but it is a blank canvas for other ideas that you already have in place for someone on your list. But I’ll come back to all these possibilities in a few moments. As well as the announcement of a special treat!

Let’s Make a Desk Tree

The fundamental components are the base, tree, and present. Everything else is completely customizable and based off of what you can find in your local shops or what you already have in your craft room. This time the only thing I purchased recently was the tree.

Other supplies I had on hand:

  • acrylic paint
  • paintbrushes
  • wood glue
  • Mod Podge
  • hot glue gun
  • clamps
  • craft paper
  • glitter
  • gold embroidery floss
  • styrofoam balls (different sizes)

Prep All Wood Pieces

I didn’t choose to sand the wood, because I wanted to keep rough surfaces for the wood glue to adhere to well. In fact, where I glued two pieces of wood together I roughed it up by scratching into the wood with a wood carving blade.

Option: you can paint the base before or after you glue on your tree. For the example in this set of photos, I glued the tree on first and worked around it. For the other copies I made, I painted the base first and glued on the tree afterward. The disadvantage of adding the tree first is that you have to have a steady hand as you paint around the tree. The disadvantage of adding the tree after the base is completely finished is that you run the risk of scratching the “floor finish” if you rough up the spot where you will add the tree.

Paint the Base

I could have painted the tree base before gluing it on. But let’s be honest, I didn’t think about it until later. So just know that it is easier to paint the tree base before you glue it, but entirely possible to paint it while on the base. Just remember to paint the tree base before you paint the floor. Because I chose to go with gold accent to my teal tree, the gold tree base paint doesn’t ruin or effect the floor at all since it blends in with brown. This is another good reason to paint the tree base first. If your paint brush slips, it’s not going to throw off your paint job. And as you can see here, in the first picture, I cleaned the gold off my brush by just painting it on the “floor” going with the grain of the wood.

When you paint the “floor”, paint in the direction of the wood. This allows you to use thin coats of paint (making it a faster dry time) and if the wood grains show through, it adds to your paint job instead of competing with it.

Picture 2 I took to show you that you have the option of leaving any decorative edges of your wood different if your creativity is taking you in a different direction.

Picture 3 shows you the direction that I went, changing the color of the pine to more of a mahogany wood color.

Option: Perhaps you don’t want to paint the base to another wood color finish, but have a wood stain in your garage. Go ahead and use the stain!

Stylize Your Tree Set

Sometimes you have to pause and put things together to see what direction you want to go with. Originally I had planned on painting my “present” and then add dots of glitter to make my own “wrapping paper”. Let’s just say that my polka dots looked like my preschooler made them. It wasn’t the vibe I was going for so I present to you my second option, glitter “wrapping paper”. For a different project, I might choose this option, but it wasn’t working for me either.

While I was staring at the teal tree with the “ornaments” that I put on it I asked myself what it was that attracted me to this tree. And the answer was the playful was that geometry was used. And then it hit me! I had geometric crafting paper.

As you can see here, the geometric triangles brought symmetry to a very asymmetric and quirky tree. And the crafting paper just made my job of wrapping this “present” so much easier.

Wrap the Present

This is simpler than actually wrapping your Christmas presents because you get to use glue!

Once I trimmed my paper (leaving the bottom exposed, with enough left over to wrap the top), I created the folds in my paper before gluing it down. The one thing I hate about gluing down craft paper is that if you have to lift it to reposition it, the paper doesn’t look as nice. So to avoid this pit fall, I made sure to make all my creases first. This allowed me to put the edge of the wood block in the crease and line up before laying down the Mod Podge.

Plus there is the added bonus of knowing where your finishing end will land. In this case, I started my first crease by thinking of this blind end finish and placing the paper edge on the corner of a short end. By the end of my creasing job, the tail end had the paper over lapping around halfway on that same small end.

Start by gluing the paper down with this small end tail.

Work one end at a time and smooth out the paper as you lay it down. This will prevent the paper from slipping, having bubbles, or making creases as you go around your wood block.

When you come to the end, your last flap will be the section that lines up with the short end of the wood block. Apply glue to both the wood block and on top of the paper that you already glued down. The “present” how has a hidden seam where you don’t have to worry about hiding a back side of the present.

Put this seam side of the “present” table side down and place a weight on top of the block. This frees your hands up to do another step of the project while the glue dries, keeps the paper from lifting or wrinkling.

Once this seam side is dry, you are able to know wrap the top of the wood block. For this step, pre-creasing will also make this step easier.

Fold the seam side of the paper down first. Then fold the other short side of the block down next. Finally fold the long sides down.

Reopen the paper and apply Mod Podge down on the full top of the wood block. Fold down the seam side. Apply Mod Podge to the paper of the other short side and fold it down. Then put Mod Podge on the paper of the long side flaps and press them down in the order that you folded them.

When you “present” top is wrapped, you will want to add a weight to the top until the glue dries. (This once again frees your hands up to work on something else of the project.)

You will probably find that you need to put the “present” in between two items to keep it from falling over. You will see that I put it between a craft bin and one of my bottles of paint

Finishing Touches

In order to tie in the glitter from the teal tree and the pain finish of the craft paper, I decided to add some gold glitter trim to the bottom of the “present”.

TIP: To keep the glitter from shedding, consider applying a top coat of something. It’s whatever you have on hand. If you have some glitter glue, that seals in the glitter you just applied without adding a dull layer over the sparkle.

Once the glitter dried, I opted to add an embroidery floss ribbon. All my ribbons were disproportionate to the present. And I didn’t have any tiny premade bows to stick on top. So if your craft room also is limited in tiny items, consider things like embroider floss, thin hemp twine, baker’s twine, or even sewing thread wrapped around a few times.

Depending on what you use to finish off your present will determine how you attach your present to the wood base. Ideally, you would want to add the present with wood glue. In this instance, wood glue would have created more of a mess to clean up than hot glue. I placed hot glue on either side of the floss so that the glue would balance out the thickness of the floss and make the present secure.

Gifting Options

Desk Tree is perfect as is for gift exchanges and teacher’s gifts. But it’s even better when paired up with the little something extra that just wasn’t enough on its own.

Here are two examples of adding a little something extra to a gift that can still be brought out year after year for holiday decor. Match this up with that perfect scented candle that you found. Or maybe that person you gifting only wanted a gift card. This is a festive way of dressing up a gift card!

No matter how you decide to gift this Desk Tree, you will not go wrong with this project!

SPECIAL ANNOUNCEMENT!!!

Starting with Desk Tree, I’m going to make Limited Editions available of crafts that you see in my blog.

There are many people who would rather “I can make that!” But there are others who are not so crafty inclined. I don’t want you to feel left out on ideas that you love.

For right now, shipping is only going to be made available for the United States. And all purchases are only through my website, Order Here. I will keep you updated on any changes as they become available.

If you have any questions about Limited Editions, please do not hesitate to reach out to me at info@pacificnorthwesteventdesign.com or here:

Go back

Your message has been sent

Warning
Warning
Warning
Warning.

Items used in the making of this project

These links are affiliate links to products used in this project. We may receive a commission for purchases made through these links, but at no extra cost to you.

These are generic Jenga blocks that are great for crafting on a budget when your local dollar store is out of stock.

Last Christmas, my husband put these Dewalt clamps in my stocking for crafting. And they are definitely one of my favorite project tools.

At the time of this posting, this Mod Podge is on sale. There are many varieties and finishes, but I wanted to send you to the sale link.

I originally bought these Marble Tiles for working with HTV. But I’ve found that they have had other uses in my craft room, such as a weight for holding certain projects down.

Processing…
Success! You're on the list.

Leave a comment

Comfort In a Jar

Hello Fall. Hello Soup Season.

I won’t even say what else comes with this season. Let’s just say that as a mom of three young children, I’m fully aware of what the change of season means. And this past week, that came and knocked the energy out of me. Shoot I didn’t know I had any more energy to be knocked out! I thought my kiddos drained it from me to fuel their never ending supply of energy.

And yet, I was so grateful to have this soup already canned up and ready to go in my pantry. The chicken stock I make, I add antiviral herbs to it. Let me just say that Lemon Balm is my new favorite antiviral herb to cook with! (In a few weeks I’ll share more with you everything I put into my Chicken Stock. You’re going to love it!)

I want to share with you this recipe for Chicken Soup that is perfect for those days where you need healing chicken soup but don’t have the time or energy to make it from scratch. You will absolutely love this because it takes only 5 minutes to warm up–the same amount of time it takes to make condensed soup from the grocery store. BUT it has less ingredients and more immune boosting goodness. And even if your sick days are few and far between, this soup is quicker to heat up than going through a fast food drive through. Plus as the added bonus of being that IT item to use up some leftovers you have sitting in your fridge on the day you crack open this jar of soup.

Yields: 7 Quarts of canned soup

  1. Clean your jars and lids.
  2. Prep your ingredients.
  3. Cold pack your chicken, split evenly between all 7 jars.
  4. For each of your ingredients, split evenly between all 7 jars. Start with the larger cut ingredients and end with the smaller peas and lentils.

(It’s easier to shake the smaller ingredients down into the cracks of larger ingredients than to shove the larger ones in on the smaller.)

  • Fill each of the Quart size jars with about 2 cups of chicken stock.
  • If you have Kosher or Sea Salt, you can season your soup now. Otherwise, do not put in your table salt or iodized salt. You will season your soup when you open you jar before serving.
  • Clean the rims of your jars with vinegar and then place lids and rings, finger tight.
  • Prepare your pressure canner.

Follow your canner’s directions for the correct process of canning with your canner.

For example, I am Sea Level – 1,000 foot elevation so I can the Chicken Soup with 10 lbs of pressure for 90 minutes in my weighted canner.

  • Once time is complete, turn off the heat and let your canner naturally release pressure.
  • When you can remove your lid, let the cans sit for an additional 10 minutes before removing them from the canner.
  • Allow your jars to sit 12-24 hours to seal. Then remove the rings and clean your jars before storing.

With new lids preserving your canned goods for up to 18 months, you have plenty of shelf life for this soup.

There are many options you have for this Chicken Soup.

  • You can season it and eat as is.
  • If you have left over rice or noodles in your fridge you can add those ingredients and still have rice and chicken or chicken noodle soup that is ready to eat with a 5 minute warm up on your stove.
  • With adding a thickening agent (slurry or corn starch) you can turn this into chicken and dumplings or a pot pie filling.
  • Maybe you have other small amounts of leftover meat, like Italian Sausage. You can use this meat to bulk up the soup, add some kale and parmesan and have a Tuscan style soup.
  • Or maybe you’re looking for something Latin in flavor. Grab some tortilla strips, grated jack cheese and add in Latin American seasonings and you can have Tortilla soup.

These ideas are a far cry from being authentic cultural cuisines. However I want to give you a few ideas on how you can turn one of your canned soups into a blank slate for some variety.

Advertisements

I know a lot of us really do not have time to prep meals for our families. In fact “meal prep” might have a double four letter word effect in your ears. And that’s okay. For roughly the same time it would take me to cook a soup from scratch for my family, I can make 7 meals that I can crack open and serve dinner in less time than it is for me to go through a drive through. And it’s healthier for us.

To heat up this dinner in 5 minutes, this is all I do:

  1. Grab my jar from the pantry.
  2. Grab my soup pot. And turn my burner on high.
  3. Open the jar and pour the soup into the pot.
  4. Fill the jar with Water and pour into the pot.
  5. Put the jar in the dishwasher and set the table.
  6. Taste the soup to make sure it’s seasoned the way I want it. (Add salt, because I usually only have table salt readily available, so it got canned without salt.)
  7. And it’s dinner time.

If you have a college student who’s coming up on Mid Terms or Finals, this is perfect for them! Often times they’re up late and find themselves hungry after the cafeteria is already closed. This is something they can cook from their dorm room with a microwave or hot plate and have the brain food that they need. Or maybe they’ve caught a cold and need a little mama’s love in the form of soup. This is super convenient and perfect for a care package.

Advertisements

Looking for a gift idea for this Holiday Season?

This is soup is perfect for the new mother getting use to having baby at home, an elderly family member who retired their pots and pans, someone who is an avid camper or loves cooking by camp fire, or anyone else who can benefit from a quick home cooked meal without all the fuss.

Maybe you’re the type of person who loves gifting food to a neighbor, friend, or family when they become ill. Here is a quick way of gifting all that healthy goodness without your schedule batting an eye.

I highly recommend this recipe for everyone!

Do you need another gift idea?

This one is personal and doesn’t require you to have a master’s degree in art to make!

Here are some supplies that you will need:

  • Canvas
  • Paint
  • Paintbrush
  • Clear Acrylic Spray
  • Chalk pen/crayon, Paint pen, Pastel, or like craft item you can write with
  • (Optional) Sponge, Paper towel, Napkin, or Tissue
  • (Optional) Embellishments such as pre-cut vinyl design

Paint a design on your canvas. You can do whatever design you would like. Here are some examples of canvases that I already have on hand. There are the canvases that my boys made 3 years ago.

And these are the ones that I have in the prepped stage for various projects that I have in the works. You can use coordinating colors, monochromatic colors, are shades for an abstract scene.

Let your canvas dry.

Spray your canvas with Clear Acrylic Spray and let dry. This step is important, because accidents happen and sometimes you want to “erase” a mistake. I’m a phonetic speller and sometimes I just get a word wrong. No worries. By having the acrylic spray dried before you start writing with your crafting pen of choice, you have the option of wiping away the mistake with a wet cloth. The only writing medium that gets to be a bit tricky is acrylic pens. That one you may not find having an “erasing” quality. Chalk pens and most pastels will generally work for excessive editing.

With your writing medium of choice write your message, series of quotes, words of encouragement, or whatever you’re inspired to say. When I made these gifts for nieces and nephews, it took about 7 quotes that I pulled from online to fill the 8×10 canvas with medium small print from top to bottom. You can write as large or small as you would like. Just be aware that the writing medium you choose to use will help you decide how small you are able to write. I used a chalk crayon that had a relatively large nib, so I wrote as small as I could and the words were as tall as the width of my pinky.

Advertisements

Decide if you would like to leave your writing clear and readable or if you would like to smudge the words to make an added texture on top of the painted design that you made. This choice is perfect for the people who believe that their handwriting isn’t pretty. By smudging your writing, you remove the uneven, shaky, or other characteristics of your handwriting that you may be self conscious of. If you choose to smudge, I recommend printing out a copy of your message that you can give with your gift, so the recipient has the opportunity to read the love that you wrote for them. For direction of smudging, that is completely up to your eye. I personally like smudging my work from left to right because I love using horizontal strokes when I paint. I do have some pieces that the strokes are vertical and so my esthetic is to smudge vertical with those, so the “text” doesn’t compete with the flow. But you could choose to smudge diagonally, circular, zigzag… each direction you go will give a different feel to your piece.

Once you are done writing and/or smudging spray your canvas with the Clear Acrylic Spray again. This is going to be a critical step for you. If you chose to smudge your “text”, the spray will prevent further smudging. If you want to add vinyl or HTV on top of your art, this spray is going to anchor your vinyl down. I’ve tried applying vinyl and HTV straight on a painted canvas and both have peeled off, taking paint with it. But every time that I’ve used the Acrylic Spray, vinyl and HTV both stay on the canvas perfectly.

Embellish your gift. Your options are endless at this point. You can choose to make something and personal with just adding your recipient’s name. You can add scrapbooking embellishments with hot glue to add some glam or character. You could pray a frame with a metallic paint and make a modern framed art. Or perhaps you want to do four panels and keep them frameless. And then there’s always the option making a 3D piece using other crafting techniques, such as this.

If you find that you are on a budget this Holiday season, this is a perfect gift option for you. We are in a time in history where people need to hear how much they are loved and valued. So when you can poor into another person and share with them a hope of a future with them, it can hold profound meaning in their life right now. I have never before seen so many people facing suicide and thoughts of hopelessness like I’ve seen in the last few years. Sharing with someone how much they mean to you is something that you will never regret. And you never know that it might be the one thing that offers them hope in a time where it seems like everything is so wrong.

What is inspiring you right now? Do you have ideas sparking in your mind?

Right now I’m inspired with many of the changes that come with fall. This is the season that always has inspired me. In fact, my boys found a whole acorn that I so want to use as a piece of 3D art. I’m hoping I can find some more and have more than a single nut to work with!

Please comment below with what you want to make and even send me some pictures. I would love to see what creativity jumps to life in you!


Files used today

Spring Triple Panel comes with all you see here. Or you can select individual elements.

Jelly Fish element from my Jelly Fish Collection

Processing…
Success! You're on the list.

Leave a comment