After spending almost a decade in the event decorating industry I have repetatively heard "I can do that". Instead of being dismissed by creative minded people, I want to show you how I do "that" so you can be sucessful in recreating that inspiration image. I just might have a few tricks that you haven't seen yet!
I love my outdoor plants. And often I’m asked, “Is there anything you don’t grow?” For me, the struggle is real when it comes to indoor plants. I pick up in the language of outdoor plants. I think I get confused when it comes to the dialect of indoor plants. “What are you telling me?!”
It was this past year when I was gifted me a clipping and an indoor propagation unit that I decided to give indoor plants another whirl.
Back in August I was thinking of winter months, being shut in with no fresh air. So I picked out a few end of season clearance plants that are known for being air purifiers in the home.
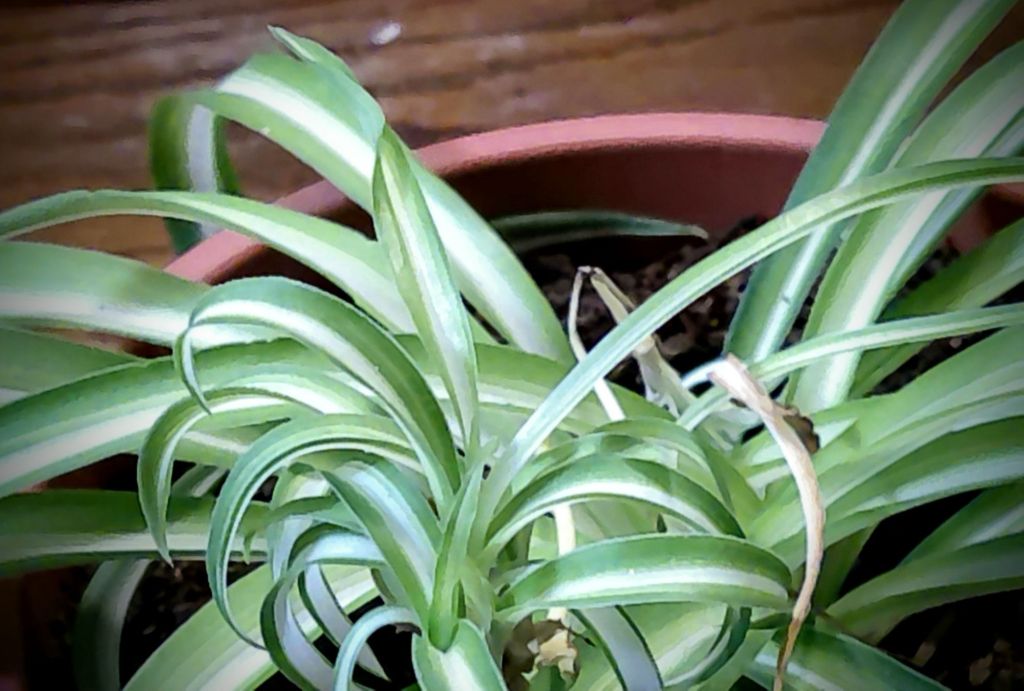
One that I bought was a Spider Plant (Chlorophytum Comosum Vittatum).
This is a great plant for those who struggle to keep indoor plants alive. We were gifted with a spider plant back when I was an event decorator and my hours were horrible. That plant lived for about two months of forgotten watering before it finally gave up on me.
I picked a spider plant this time around because of how hearty this plant is and it deals with neglect better than other types of indoor plants. Plus, with my homeschoolers who love commandeering my indoor plants and calling them theirs, this is a great one for young kids to learn about plant care with. My kids love over watering and this one loved their over attention
In fact, after the fourth or fifth time I had to empty my overflow bowl from a standing puddle, I noticed that this spider plant had started producing baby plants. The day after the first baby showed up, a second formed. And about a week later two more popped up.
I wasn’t counting on this plant living our home so we’ll to put off four babies almost right away. But since I’m now part of a bartering group, I figured that nurturing these babies over winter will give me four plants to barter with come spring. Or seeing how the boys have taken these baby plants over, I’ll let them take them to an event to barter with. (It’s a life skill that they’re starting to become comfortable with.)
Advertisements
How To Propagate the Babies
The first thing you’ll notice growing from your mother plant, when a baby is going to be produced, is a long rigid stem. Have you seen a rigid stem of an orchid? The baby spider stem reminds me a lot of an orchid stem. On this end of the stem, you will see a miniature spider plant start to sprout its leaves.
At this point many people say that you’re supposed to bend that stem over toward a new pit, set the baby in that soil, and stake it down until its root system grows. Then you can cut the stalk.
The reason for not cutting the stem first is because it acts like an umbilical cord and gives the baby spider plant nutrients while it grows its root system.
That way makes sense and I’ve seen it done as a child. But I didn’t go that route with propagation this time. I tried to wait and let the stalks grow so that they were long enough to lean over into a new pot. None of these stems grew longer than 9 inches.
Instead I went with the Water Propagation Method.
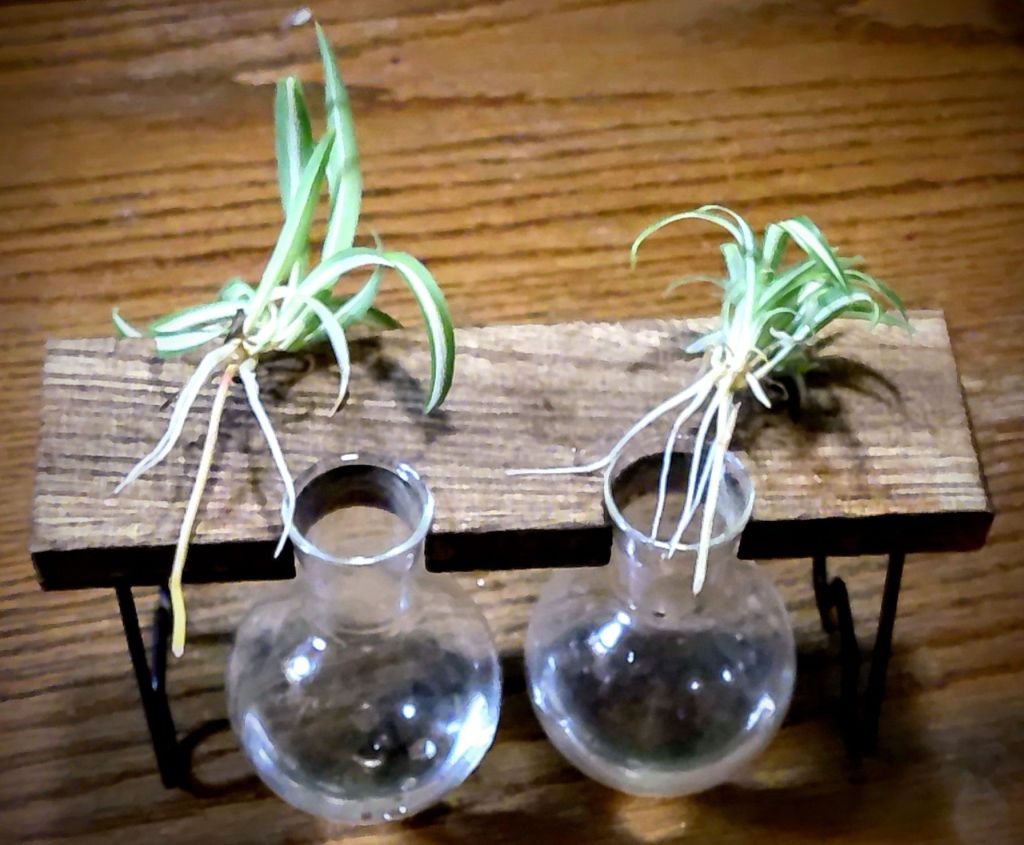
Here you can see the root growth from the Water Propagation Method that I started 4-6 weeks ago. I cut the stem of the baby spider plant a few inches long and then place them in these water propagation tubes.
The trick with this method is keeping the water level up to the base of the leaf cluster. As you can see from the pictures, this is where you see the root growth coming from. By keeping the water level high, it ensures that the emerging roots have contact with water at all times.
From there I simply place the stand in a window so the plants get sunlight. And then I wait for the roots to grow.
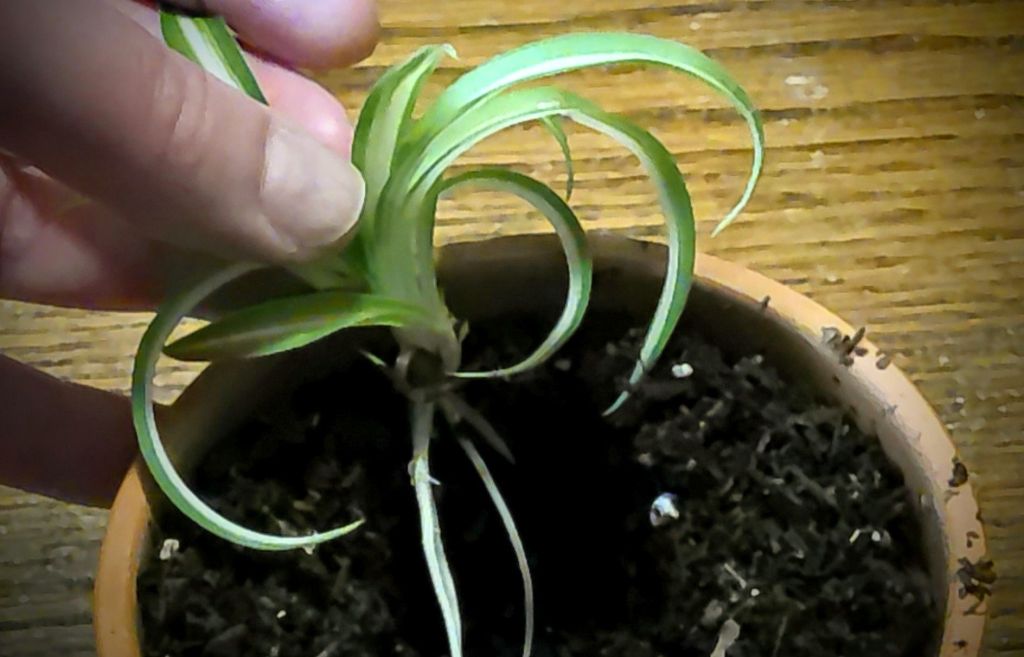
Here you see the far right and far left plants are the babies that I rooted several weeks ago and I’m ready to put them in soil. The center two babies are the ones that I just cut from the mother plant and are now ready to start the rooting process. I wanted to show you these side by side so that you can see the stems (which on my plant are a pale yellow) in comparison to the new roots (which are white).
With these newly rooted baby spider plants, I put some potting soil in a clay pot. I hollowed out the center of the soil, where I want the plant to sit in the soil. (I create the hole for the roots because they are tender and I don’t want to damage these young roots. After a few months, when I’m ready to repot, I’m not as concerned with the roots because they’ve had a chance to establish themselves in the soil. For now they are going to go through a little shock because they are changing from water to soil environment. Their function is going to change in this new medium.
While holding up the leaves of this baby plant I fill in the hole (with the roots held in place below surface level) with more potting soil. Once the hole is filled, I gently pat the soil down to give the plant a little stability. Not much is needed because these roots are around 2 inches long (some a bit longer).
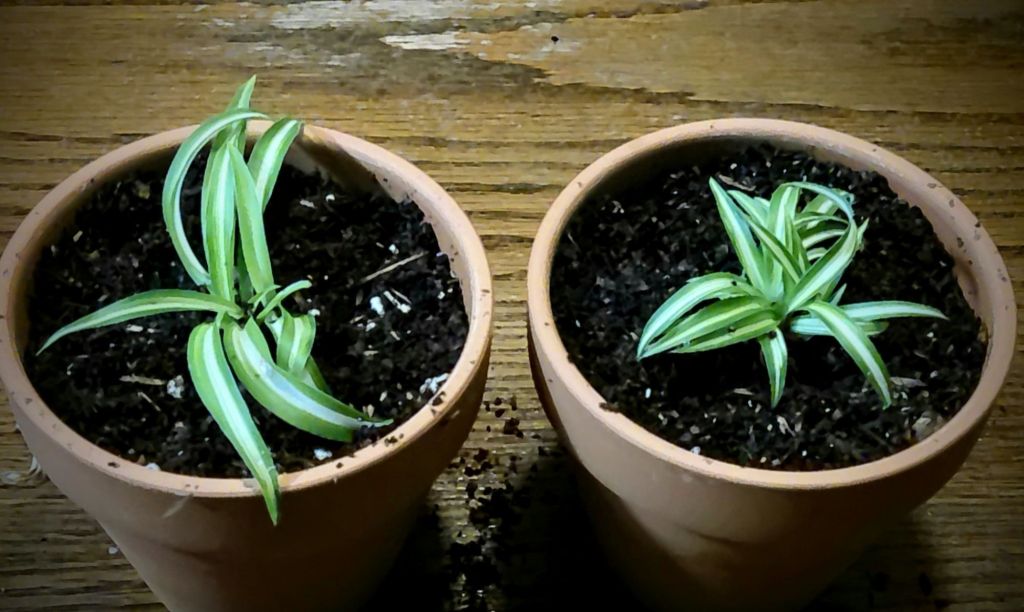
And here are how my new baby spider plants look in their new 4″ terra cotta pots. I gave them a bit of a watering and then set them back in the window.
Other than the time it took to allow the roots to grow, the setting up of this propagation took less than five minutes. And potting the rooted baby spider plants took another 5 minutes. This is something that doesn’t require much of your time, if you have limited time to care for indoor plants. And with spider plants, I water mine once a week. It’s been about 4 months since I first brought the mother plant home, so on my to do list is to give them a good fertilizing on their next watering.
Advertisements
Word of Warning for Propagation Equipment
This water propagation set up was gifted to me from a friend who hated it. It was my “transportation” unit for taking home a clipping of another plant for my drive home. After working with this stand for a year now, I fully understand why she didn’t like it. And yes, I am still that type of person that still uses it even when I hate it myself.
I look at it as a personal challenge to make it work!
If you’re looking to water propagate plant cuttings, let me walk you through this set up so you can have a little walking knowledge for choosing the set up that you end up purchasing or getting from a buy nothing group, or any other opportunity.
The reason why this stand is such a fail is because of the holes that the tubes slide into. In the above left picture you can see that the center of gravity of the holes are way off. They needed to be set back into the center of this board.
You can probably guess that when these tubes are filled to the top with water, they become front heavy and tip forward spilling water and cuttings everywhere.
In fact, in just this short period of time that I took to take all the photos for this post, the filled tubes fell forward not once… but twice!
To make matters even more entertaining, my husband decided to watch the process and freaked out with each of the dumpings. Water spread not just all over the table but also the floor. And that leads to the picture where I put the pot in front of the filled tubes. As much as I enjoy a good challenge, I really didn’t want to clean up a third water mess.
Advertisements
And that leads me to the solution of how I make this failed unit work for me.
When I have a new set of clippings to add to the tubes, I set the rack down in the window with the tube side facing the glass. When the rack leans forward, under the weight of the water, it leans into the window and holds itself up.
There are two other options that I have to fix this unit once these baby spiders are ready to be potted.
I’m going to check to see if I have a drill bit that’s the right size so I can make the hold deeper into the wood so the tubes sit more center in the unit.
If that doesn’t work, I’m going to take some thin crafting dowels and put legs in the front corners.
And in case I need a third option… I’ll drill a hole in the back corners that’s big enough for a long screw that I can add enough nuts to create the correct counter balance to keep the unit upright even under all the water weight.
No matter what the situation, a solution can be found!
Advertisements
Final Task before Putting All the Plants Away
This mother plant has been so amazing to me that I just needed to take a couple of extra minutes and tend to her so that she can keep being a happy plant for me. I trimmed away some of her discolored and battered leaves and cut the remainder of the baby stems down to their base.
Why the trimming?
The stems were no longer supporting baby plants, so they no longer needed the energy being directed to them. The leaves were damaged and there’s no need for plant energy to go to them to see to the trauma. The overall health of the plant is very good and with plenty of healthy leaves, trimming away what I did would not affect the photosynthesis of the plant. But the trimming returns that amount of energy back to the mother plant to go elsewhere: whether new leaf growth, existing overall grown, it’s cellular immune health, or even gearing up for a push of new baby plant growth.
This mother plant is now ready for the next phase of whatever cycle she is on to now. And with the next watering combined with fertilizer, she’ll have all the nutrients she needs to move forward.
Here are some propagation units that I’m eyeballing for my next adventure in rooting plants.
I have not had a chance to see or use these units, but I wanted to share with you what other ones I’m looking that you can have an idea of what is out there.
This post contains affiliate links to products. We may receive a commissions on products purchased through these links, but at no extra cost to you. These items listed here are from Amazon but may be purchased at local markets.
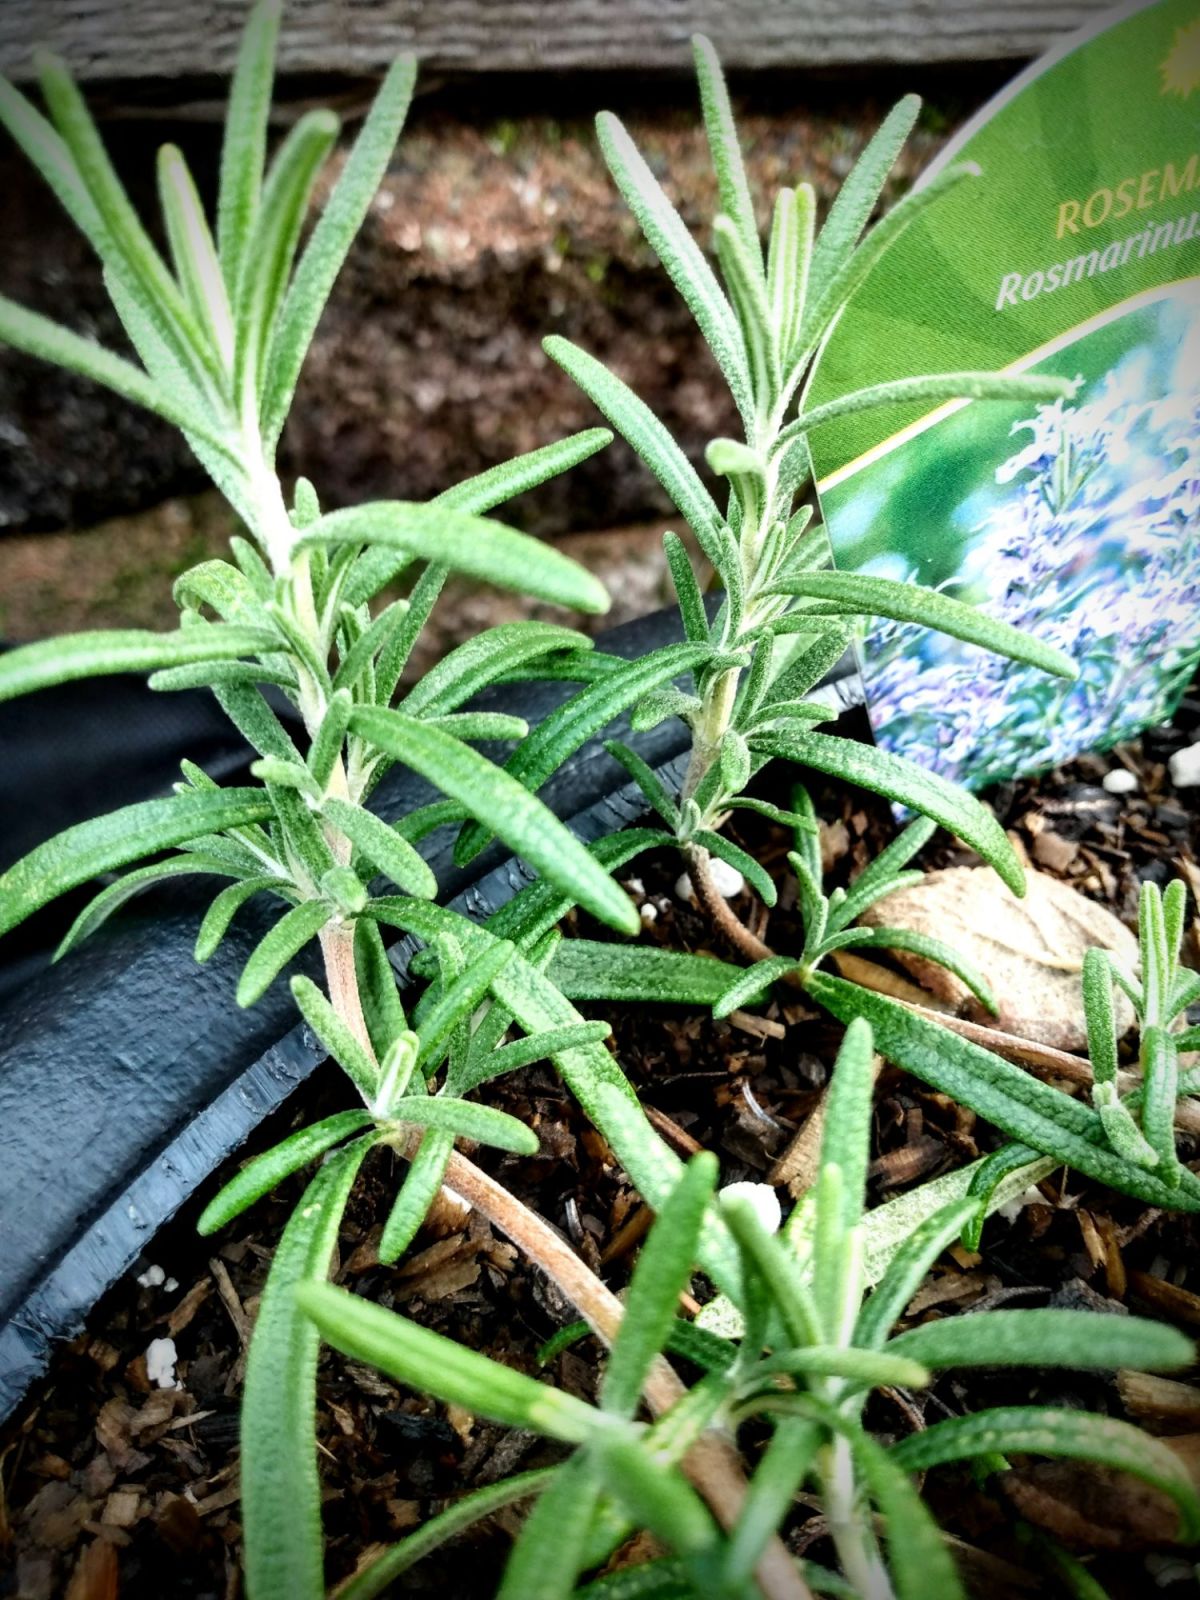
There’s something about the scent of fresh rosemary. I’m not talking about the dried needles that you find in the herb aisle. Those over priced dried herbs have nothing on the fresh branches you can harvest from the bush.
If you haven’t handled fresh rosemary, I encourage your to get you hands on some.
The first thing I noticed was that there was the classic rosemary scent, but there’s also a spruce/pine under note that surprised me.
For many years we’ve sported an artificial tree. That started because there was a season where my husband and I were going through a financially rough. I had an artificial tree that I used in the past for a Christmas tree decorating competition. But we took over into using that tree for our family in order to free up money that would otherwise be spent on a fresh tree. As much as we prefer fresh trees, it’s just made more sense to use the one time fresh tree money and put it toward a fake tree and reallocate that money each year toward some other area in our budget. (This by no means negates how the trees are made and that they just don’t disappear–but this is a whole other conversation for another day.)
I mention this not to enter the tree debate, but to highlight the point that when I first smelt fresh rosemary, it completely brought back all the childhood memories of having fresh Christmas trees in the house. And once I found this out, I’ve started taking some rosemary inside during Christmas time just for that scent during this time of year. And also because of the amazing health benefits that rosemary has for our bodies, especially during known cold and flu season.
Advertisements
Growing Rosemary
The first picture that I started with was taken last year when I attempted to root some rosemary sprigs for some free rosemary plants. I wasn’t successful with those sprigs. But as I look back at this picture I see that 4 of the 5 sprigs are wood growth instead of green growth. And just like lavender, there’s a difference in cloning these plants depending on if you’re using new/green growth or wood/brown growth. Once I’m successful in propagation of rosemary, I’ll make a new post on how to do it and eliminate the guesswork.
Until then…
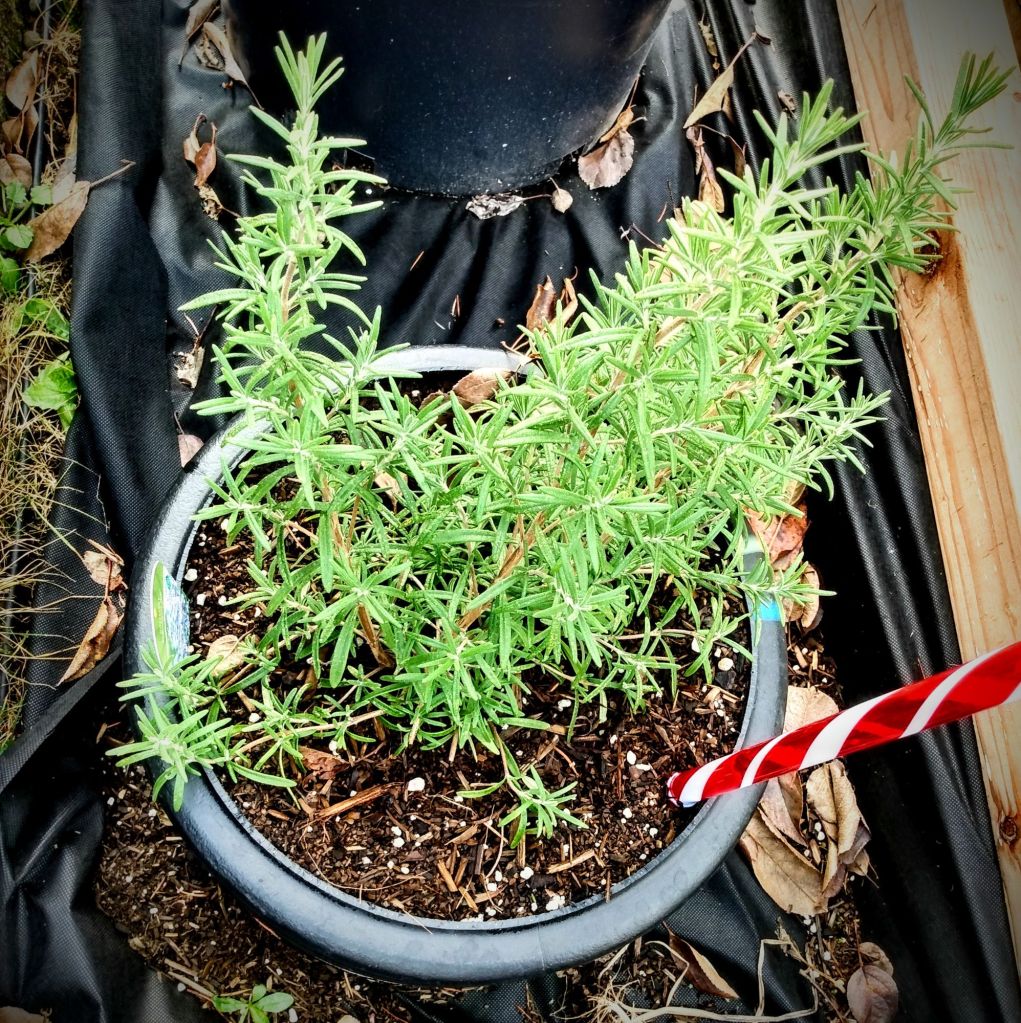
The rosemary on the left is a spraling variety. The plant on the right is an upright bush.
I found two plants at a local produce stand, at an amazing price, over the summer. One rosemary plant is more than enough for a family, with enough left over to share with friends, neighbors, and whoever else you can give it to. If you’ve seen the memes about zucchini season, warning people to lock their car doors before neighbors deposit excess zucchini in your vehicle, then you have an idea of how prolific that rosemary can be. I bought two plants because I’m a sucker for variety (thus the reason why I got a sprawling and an upright bush varieties). But rosemary is one of my favorite ingredients that I love putting into hair and skincare products and soaps that I’ve been making.
As you can see above, I’m in the process of making a new flower/garden bed. It wasn’t ready as all when I got the rosemary so I improvised. And I’m sharing this unfinished project because I want you to know that you don’t have to be finished with a build before you can get a plant “in the ground” and start establishing itself. I’ll come back to this in the future, when I have the build completed.
In the mean time… note that I used cylinder pipes and filled it with soil. When I planted these rosemary, the root ball literally fit in my hand, so the 12″ cylinder, that stand about 10″ tall were more than enough to set up these starts. There’s more than enough room for the root structure to grow over the winter. And in the spring, which I plan on having this bed finished, I can remove these pipes once the soil has been laid. In the mean time I need to lay some woodchips down to help insulate these plants before we get our expected snow in about a month or so. We live in a temperate area, so I’m not concerned about killing off the root system. I would be more concerned if we lived in an area with subzero winter weather.
One thing that I love about rosemary is that it is a drought resistant plant, as it is originally from the Mediterranean area. Once rosemary is established, it’s a plant that all you have to do is keep an eye on it to make sure that is free from pest and disease. One valuable resource for that information can be found here at Farmer’s Almanac. But this plant will be here for you for many years.
Advertisements
Health Benefits
This is absolutely one herb that you want to keep ready in your kitchen for not just maintaining your health, but also for food medicine.
Food medicine is alternative pharmaceuticals. If you are trying to reduce the amounts of chemical medicine (because of side effects or other complications), medicine from herbs and other foods are great for giving your body the building blocks it needs to maintain your health or boost your immune system to do the work it was designed to do.
It was not so long ago that the pharmaceutical industry was created. Before then, families would treat themselves with food and herbs. This is not to say that pharmaceuticals don’t have their place. But what we are not told is that drug companies cannot patent plants, found in nature. So there is a huge industry in modifying plants. If a plant can be modified so that it cannot be grown in nature, then that plant can be patented and then be purchased at a premium price. The same goes with pharmaseudicals. They started out with plants found in nature and then the natural compounds are extracted and manipulated until they are at a point where they cannot be found naturally. These compounds can then be patented and sold at a premium price. These compounds are manipulated to be “fast acting”. So when you see “fast acting” on packaging on over the counter drugs, it is in comparison to natural compounds.
Advertisements
There is a large conversation that can be had on this subject. I bring it up because most people are not aware that the natural compounds are available in common plants and are just as effective if not more effective than some drugs because the natural compounds are not subject to being ineffective (drug resistance) by our immune system, as our body starts to recognize that these “medicines” are not natural/found in nature. So our bodies are not able to break the compounds down and fuel our immune systems to combat the situation we’re dealing with.
Again, this is not to negate or berate necesary pharmaceuticals. I just want to draw awareness of where drugs actually start from and why they might not be effective or stop being effective. And if this happens, it’s not the end all that causes you to stop having hope of being treated for whatever it is that you’re facing. So please do your own research and have conversations with your healthcare provider. There are always scientific studies on natural plants, like rosemary, and big health issues. It’s just that they aren’t publicized in commercials and the media because these natural plants are not and cannot be patented. So there’s not as much money that can be made from treatments from natural plants in comparison to what can be made off of patented medicines.
Identifying Rosemary
This past week I was at a party where the table decor was pine branches and rosemary sprigs were used on one of the appetizers. One of my friends happened to have one of the pine branches shed it’s needles on her plate and she couldn’t identify the rosemary to the pine needles.
If you remember what I mentioned above, about how rosemary smells like Christmas to me, smelling a pine and rosemary needle side by side may not help you decide which needle you want to eat. So I pointed out this one unique identification feature to my friend.
The underside of rosemary leaves have a white stripe down the middle.
In this case the misidentification of a pine or rosemary needle is not going to be a life threatening moment. Pine is known to have Vitamin C. In fact, during the spring I look for the new growth tips (bright yellow/green) of pine and spruce trees. The amount of Vitamin C found in this tips put citrus fruits to shame. So depending on what health needs you have, making tea from the tips of new growth pine and spruce trees, will give you far more vitamin C than eating citrus fruit or taking Vitamin C supplements/chewable.
With that little tid bit of information aside, another feature that you might want to know is the difference between the new growth of rosemary and the woody part.
With new plants, like what I have, it’s a little harder to differentiate between the two parts in comparison to an older plant. But as you see above, the new growth is white and the woody portion is a reddish brown. With a young plant like this, the woody part of the stem is still flexible. But in an older plant, the woody portion is very rigid like a tree branch.
The higher concentration of nutrients, and valuable compounds, are going to be found in these new growth portions of the branch. This is where the plant is sending all of its energy to. So if you’re looking to use your rosemary as a food medicine, this is the part of the plant that you are going to want to harvest and use.
That doesn’t mean that the rest of the leaves, lower on the branch are not useful. They still have the rosemary flavor that you want when you’re cooking with rosemary. They just don’t have as much of the active compounds that are found in the new growth region of the plant.
Advertisements
Useful Preparation of Rosemary
There are two ways that I preserve rosemary the most; dehydrating and infusing in oil.
For dehydration I’ve tried two different ways. I’ve left the leaves on the branch and dehydrated the branch with the leaves. And I’ve also removed the leaves. Dehydration time is the same either way, in my experience. But it’s easier to remove the rosemary from the dehydrator on the branch then collecting the individual leaves. So I’ve just left them on the branch and then when processing is down, I run my fingers down the limb, over a bowl, and quickly strip off the leaves. From there I save some leaves as is, which promotes the longevity of the healing compounds. Then I take some and grind it up into a powder in my herb grinder. In powder form, the compounds start to break down and become weaker around 6 months. So I only grind what I’m going to use in the near future. Otherwise I leave the leaves whole, where they retain their compound integrity for a year, upwards of two years (depending on who you talk to).
But I don’t use rosemary just for when I make my meals. I use them in the lotions and soaps that I make. In fact, the shampoo bar that I make for my hair has increased my hair health so much so that I cannot remember when my hair was this thick and healthy. It’s more healthy then even when I was pregnant with my children (which are one of the things that most pregnant women notice is that their hair health is improved). I use the leaves in the soap, but more importantly I use rosemary infused oil.
I use rosemary infused oil for everything; food and skin/health care products. So I use rosemary oil more than every other preparation. But one thing to note is that if you have more rosemary than you can process (either drying or infusing) rosemary freezes beautifully. Just leave the leaves on the branch, bag it and put it in your freezer. It will stay fresh and will not break down or wilt when you’re ready to use it.
Advertisements
Making Infused Oil
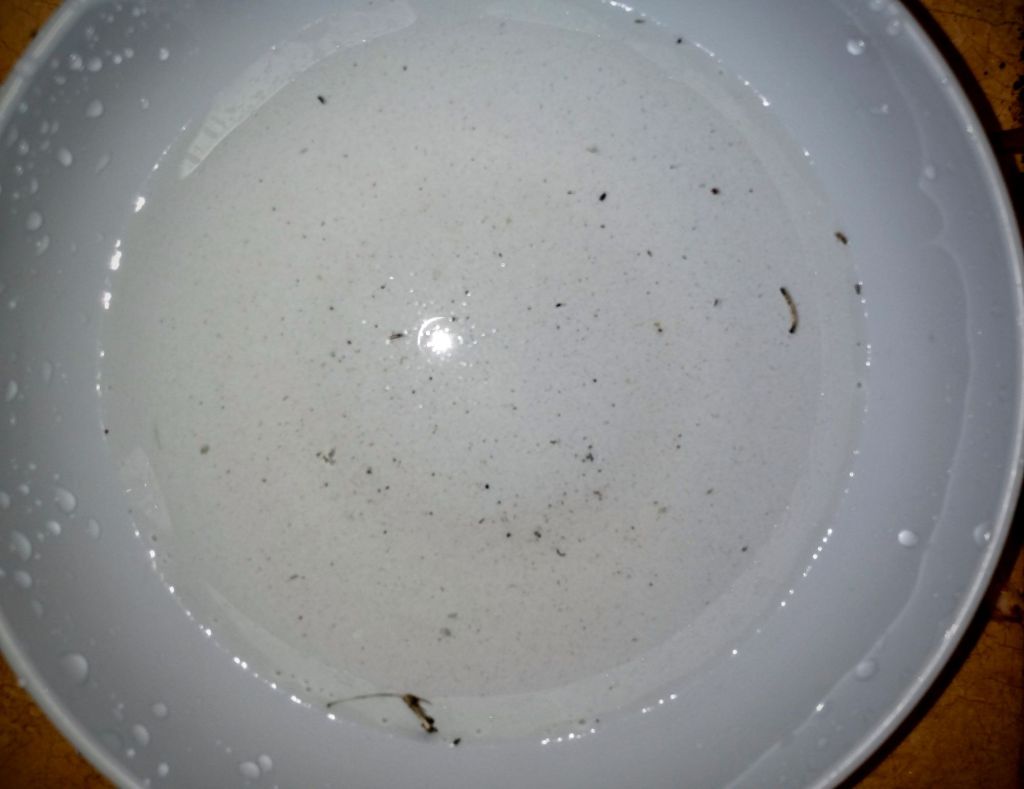
The first thing that you want to do after you cut the rosemary you will use is to rinse the branches off. Even though my plants are only a couple months old and I grow them organically, you can see below how much came off of my branches and they looked clean. All of this debris would have compromised my infusion and caused problems that are common when you read about mold and other issues people have when infusing herbs in oil.
Another problem that people have when infusing is that they put wet herbs into oil. Please remember that oil and water do not mix. What happens with water is that it becomes the medium for mold to grow (which is usually jump started by the debris that’s not washed off).
The three components that cause organic materials to break down and spoil are water, heat, and light. These three things are what feed and promote bacterial and mold growth. So whether you’re preserving food or making infusions, you want to keep these things in mind.
After rinsing off the rosemary, I air dry off the water.
There is a whole other conversation around whether to use fresh or dried herbs for making an infusion. I won’t go into that conversation here, but for delicate leaves I dehydrate them first. Plants like rosemary and lavender I go ahead and infuse fresh because of these are drought resistant plants, have thicker branches and leaves that are designed to not release the water that they have stored up inside of them. That’s not to say that I haven’t had mold grown on an infusion with these hardier plants. The times that I have, it was when the branches were above oil level (access to oxygen) and I didn’t remove the branches 6 months after the infusion was supposed to end. (It took that long for a mold colony to grow where I noticed it.)
There are also two different type of infusion you can do: stovetop or solar. Both use heat as the extraction method of the plant compounds into the oil (which I use olive oil. This is a great universal oil for cooking and soap making.)
For stovetop (or crock pot/slow cooker) the important thing to remember is to keep the temperature on your lowest setting and let it process for a few hours. I don’t do this method, but if I did I would let it run for 6-8 hours.
I prefer using the solar method because I love how it looks. And more importantly I describe myself as a busy mom. Nothing is better, in my opinion, than to spend less than 15 minutes setting something up and letting it do it’s thing over a longer period of time that absolutely does not involve me.
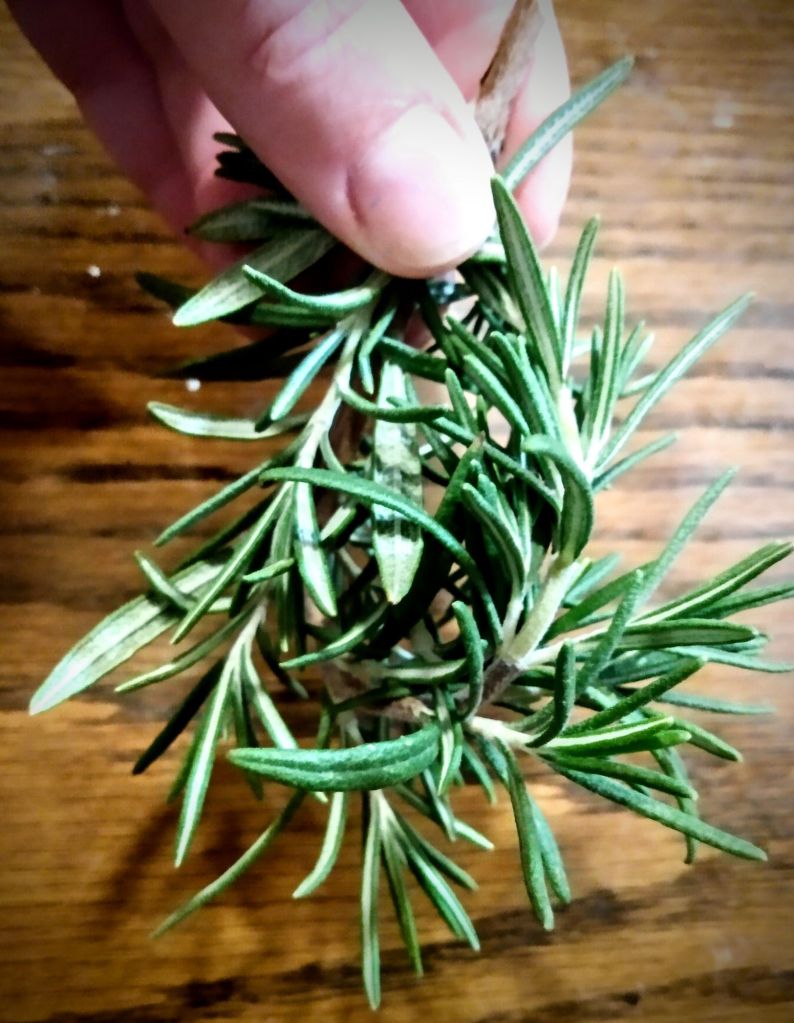
So after my rinsed rosemary is dried, I put the sprigs (stems and leaves) into a jar. Tightly fitting in the plant material is great because it prevents parts from floating to the top, keeping everything fully submerged when you add the oil.
On the subject of oil, not all oils are made alike. And this is another one of those points that people have failed infusions. They chose inferior oils. When you pick your oil, keep in mind what material you are using. Olive oil, grape seed oil, and a few others come from plants that are not known to be modified and with less processing. Vegetable and Canola oils are both produced from crops that are known for being genetically modified and are heavily processed (an indication that their natural plant compounds have been changed and have less natural benefits). But when you also look into the history of their origin, you will realize that they were never created for human consumption. Canola oil was formulated for World War engine lubricant. After the war, the oil was then marketed as a cooking ingredient in order to make a return on investment and because it’s cheap to produce. (For a short history of Canola, and some comparisons to other oils, can be found in the article Rapeseed to Canola: Rags to Riches by R. Keith Downey.)
For today, I used smaller mason jars. And to keep most of the rosemary stems submerged for this solar infusion, I coiled the stems into a ring shape and placed them in the bottom of the jars.
Next I poured my olive oil to the top of the jars. Then I capped them with a lid and ring. (I prefer lids and rings because you can tighten the lids tight enough so that when you shake the jars, there won’t be a leaking of the oil.)
For the next 6-8 weeks I will shake the jars and make sure the rosemary stays submersed in the oil. During the summer, I leave them in a window sill. During winter, I put the jars on my south facing windows during the day and then move them to a warm space during the dark hours. Sunlight is what causes the heat that opens up the leaves to extract the compounds and oils from the leaves.
Solar infusion takes longer than a stove top or slow cooker method because the heat temperatures do not go as high or stay sustained like a controlled heat. But the one thing that I haven’t been able to find is an article that talks about the effect that the sun has on the oil compounds themselves. (For example we know that the sun has a bleaching effect on laundry. So what else is the sun capable of doing when using it a part of the oil infusion process?)
At the end of the infusion process, no matter which method you choose, you will want to strain out the rosemary. Store it in a clean glass jar and lid. And then keep it in a cool dark place.
As with all herbs, medicinal compounds start to break down 6-12 months. This doesn’t mean that they are empty of any good. It means that they lose their effectiveness. The flavor can still be there. So as long as rosemary (and other herbs) is properly stored, they are good to be used.
It never fails that each year something doesn’t go to plan. This past grow season, many growers across the US complained that what came up in their gardens was not the seeds that they bought.
What I found interesting was that it wasn’t one seed supplier that had a seed mishap, but a handful of large seed companies. It wasn’t one seed type, but several.
Across social platforms some growers tried to pacify upset growers by saying that mistakes happen. And the response often was that this doesn’t happen on the large scale that it did happen.
Truly, it was a weird moment, especially when so many people long for a time of no more surprises and life as normal as possible.
The problem is that if you’re not self sufficient in management of your seeds, you are vulnerable to the surprises that happen to other growers that you are dependent on. None of my seeds were packaged wrong. However I did order garlic over the summer. Shortly before delivery time I received an email telling me that one of the varieties that I ordered had a bad grow season so there were heads that were going to be sold this year.
No problem, I shifted my order to another variety. And this inconvenience probably worked out in my favor. My replacement order is a variety that will do much better with the winter that’s projected.
Advertisements
These are just a couple examples of what can happen when our seeds come from other growers. And as much as it feels unfair and out of our control, it serves as a good reminder that there is a skill we can all learn… Seed saving.
There are many benefits for saving your own seeds for next year’s garden. Provided that nothing happens to your crop, you are guaranteed seeds. These seeds have a memory that is specific for your microclimate. And if you have a surplus of seeds, you can trade them with neighbors.
One thing that I love about learning how to seed save is that I learn the whole life cycle of the plants that I grow.
Here are a few seeds that I collected this year.
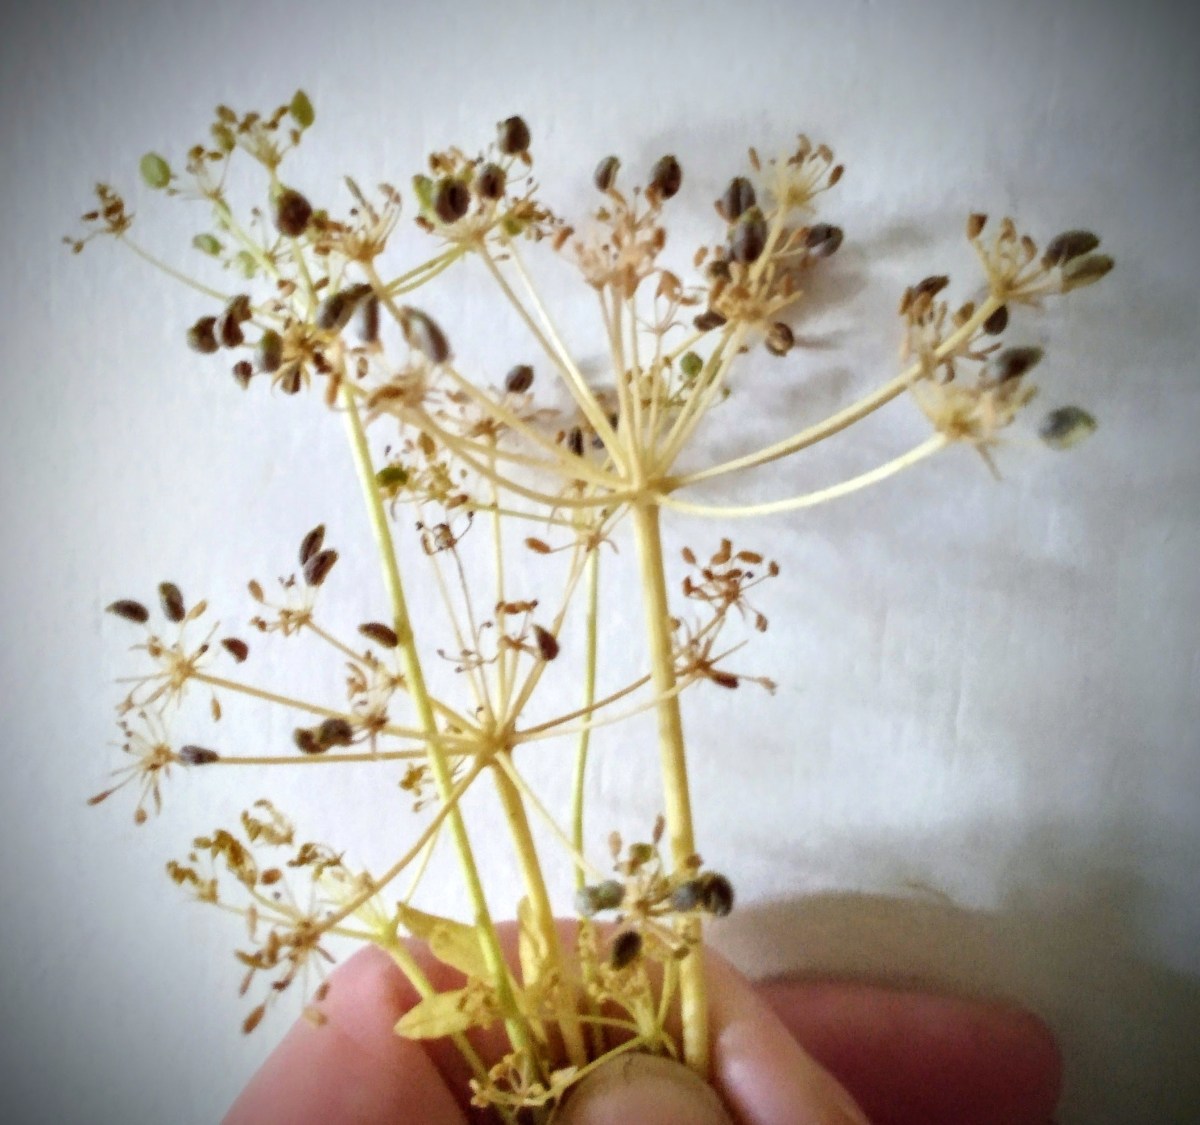
Parsley
I kind of laughed when I saw my Parsley. The weather has been so weird lately that I had three different stages of seed production all at the same time. As you look at the pictures below you’ll see the progression from the tail end of the flower stage, into the green seed stage, and finally the mature seed stage.
Just with these three pictures, it’s easy to see why you have to have patience when you are waiting for your seeds to mature. And this is the reason why I wanted to share this information with you is because schools don’t teach you how to look for mature seeds. In a botany class you’ll see diagrams of the seed stage. But it is experience that shows you when it’s the right time to collect.
If you are unaware of what to look for, you can see seeds and make the mistake of collecting the seeds at that moment in time and you’re completely unaware that you saved seeds that are immature and will more than likely never sprout in the spring when you try to germinate them. Mature seeds are what you want to re-grow plants successfully.
TIP: If you’re unsure if you have mature seeds yet, take a small section of seeds now and leave the majority on the plant. If the seeds are green, the next time you go out and see a change in the seeds you will then know that what you first collected was immature seeds. Discard those seeds. If you think that you now have mature seeds, take a small section and save those seeds and leave a large number on the plant to further mature. If the seeds on the plant change, then you collected immature seeds. Discard those seeds. Once mature seeds have arrived they are only on the plant for a couple of days before they fall to the ground for self seeding.
Another benefit that this parsley gave me is that it gives you a place examination of seeing different stages. When first saving seeds, none of us know what to look for. We learn through trial and error or from someone who knows the life cycle of the plant and tells you specifically what to look for when gathering seeds. Going back to Parsley above, this particular plant shows that the seeds are ready when the seeds have turned black.
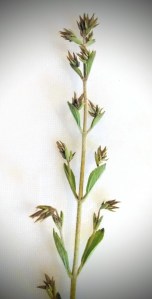
Sometimes flowering seeds are not as easy to recognize.
Advertisements
Catnip
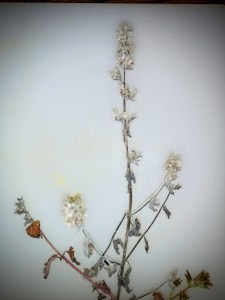
This is my second year with Catnip, even though I sowed seeds for it 3 years ago. This is the first year that the plant actually bloomed for me, and it was only this one stalk of flowers that you see here.
When I look closely at this stalk, it seems like I have captured a few different seed stages as well. There’s an obvious white blossom section still present. There’s one section that looks like it might be green seeds, it looks like a head of wheat berries. And then there is also one section (in the tallest branch) where I see a black seed and what looks like empty pods where seeds have dropped out.
The problem is that I tried looking up seed stages from this plant and I haven’t yet been able to find any source that helps me identify what mature seeds look like.
Because I grew this plant from seed, and I still have seeds left over, I can go back to the original seeds and see what those mature seeds look like.
But if you don’t have the benefit of mature seeds to compare with, there is this process of trial and error that you need to go through to learn the life cycle of seed growth to figure out what it is that you’re looking for. (See the TIP above.)
What I did want to draw your attention to is that even with flowering plants/herbs, the seeds are not all going to present themselves the same. Catnip and Parsley are both herbs. Parsley exposes it seed before it falls. Catnip looks like there is a pod covering, something akin to how seeds are presented in the Brassica vegetable family. The seed is grown inside a pod and once the seeds are mature, the pods open and the seeds drop.
I suspect that Catnip holds seeds in a single pod because when I look closely there is a transparent skin like “flower” that is empty. Now the flowers of catnip are not transparent. They are a very opaque white (at least on my catnip) flower that has shown itself to be hardy. (If you zoom in on the middle two branches you can see the remnants of these flowers on the decline. It’s very different in appearance to what you see in the tallest branch/section.) These transparent skins are mostly in this tallest branch/section. And when you look closely there, you see a single black seed. These black seeds are the mature seeds. (I pulled out my packet of catnip seeds that I had originally purchased. The seeds are black and small. So I can confirm this seed.)
Advertisements
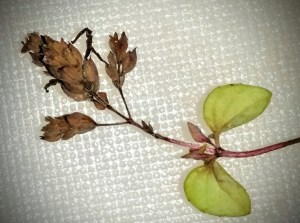
Oregano
Most people never see the seeds from Oregano or other herbs (like Basil) because everyone is warned to prune off the flowers in order to promote a longer leaf grow season. And once the flowers develop, we’re told that the leaf changes its flavor. At the best it’s just a flavor change. At worst, the leaves become unpalatable. Because of this, most growers prune off the flowers as they start to grow at the end of the season.
If you want to have seeds, you have to leave the flowers on the plant and show patients. Pollinators have to go to work on these blossoms. When they are pollinatedyou have to wait even longer for the seeds to develop and grow.
I wasn’t planning on growing seeds on my oregano that I’ve grown in a basket and overwintered in a greenhouse. (I’ve noticed that some growers discourage overwintering oregano because the flavor becomes less desirable when you treat it like a perennial. However I’ve noticed no real change in leaf flavor. This was the first year that it bloomed on me, so I’ll have to wait until next year and try the leaves after being overwintered again.)
What I wanted to show with Oregano is that the seeds grow a little different. It’s similar to what I showed with Parsley, where the seeds are presented in a very obvious way. But instead of being a single seed spaced out in a firework cluster formation, the seeds of Oregano have a gathered cluster head.
The seeds here are a little more obvious to identify. But I wanted to talk about herbs like Oregano because as growers we are so accustomed to prevent seeding in favor of harvesting. I want to suggest that if it’s your desire to save as many seeds from the plants that you grow in the event that you have a surety of preserving what you use for food and medicine, it might be time to make a conscious decision to let the blossoms grow and go to seed so that you can collect. This is particularly a good idea if you haven’t learned how to clone that particular plant and you want to share with loved ones what you have been having success with.
Advertisements
Stevia
Stevia is a new to me plant. This past year I had found this start at a local shop and wanted to give it a go for growing. I’ve never seen what the seeds look like for this plant. And truly I know nothing about this plant other than the leaves are sweet and a viable alternative for sugar, if you’re looking for self sustaining options for providing for your family.
Where I am at now with this plant is not much further than where I was when I started. However, I’ve come to learn that the plant that I purchased grows in stalks instead of bushes. The longest stalk is about 3 feet tall. Currently it’s “dying” off for the season very similar to my Lemon Balm. The leaves became mottled (black and green). Unfortunately the latest wind storm caused my planter to fall and split the main stalk. (I’ll try to triage this stalk and see if I can bring it back. The break looks clean and free from disease. And to give it the best chance to over winter I’ll put it in a flowerbed that’s a bit more protected from the weather.)
I didn’t set out to find how stevia propagated. Originally I thought it might be a perennial bush that spread instead of going to seed. However, one day out taking care of fall tasks, I found that the stevia had gone to seed. And that is what you see above. I have no idea what stage these seeds are at. I did snip this from the top of a stalk and left the other three stalks as they were (also seed bearing). That was two weeks ago and all the seeds are now gone.
The walk away lesson is that seeds take forever to grow. And then they are gone before you think about it.
Advertisements
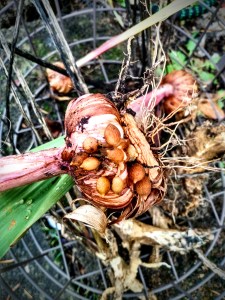
Gladiolus
While talking about flowering seeds, I wanted to show one last example of how flowers can produce seeds. A Gladiola is officially a bulb flower, but it produces seeds.
As you can see here, at the bulb of the gladiola, the seeds form underground.
If you’ve grown gladiolus, you know that they don’t produce seeds from their flowers. But if you’ve also grown bulb flowers you are also aware that bulbs (daffodil, tulip, chrysanthemum to name a few) duplicate themselves with a single additional bulb. So when you look at this picture and see all these seeds, you start to question everything you thought you knew.
The people who owned our home before us grew gladiolus out front. When I was ready to pursue gardening, gladioli were not on my list. For several years I kept pulling the stalks of each new gladiola and wondered what was going on. It didn’t matter if I pulled in the spring or fall, They just kept coming back. And If I left one because life was just too busy, the next season a half dozen would pop up. And that’s the short story about how I learned that gladiolus had seeds.
One year I pulled one up, like you see in the picture, and saw all the seeds forming on the bulb. And everything suddenly made sense. If I pulled the bulb after the seeds had formed (and subsequently stayed in the ground) of course a new garden of gladiolus would spring up next year.
This is one seed that if you do a search, you will find pictures of seeds and even a couple articles that talk about them.
Other seeds you will also find talked about online are seeds that are collected from the petals of flowers (marigolds and bachelor buttons to name a few).
As you can see, just by talking about seeds that come by flowers there is a whole world that opens up. And all of it because not all seeds look the same or are produced the same.
Advertisements
Seed Memory
Each spring packets of seeds are always on sale in brick and mortar stores. Starts are readily available at farmer’s markets, local growing communities, and certain stores. But as we saw with online seed sales, mistakes happen. What you think you purchased can turn out to be something different. It doesn’t matter if it was a true accident or something that was designed to happen. The walking away point that we can all move forward with is that the only seeds that are in your control are the ones that you save yourself.
I started saving seeds from my vegetable garden as a way of saving money when purchasing seeds and starts. “Free” seeds frees up your resources for other areas in your life. And if you know what to look for, you can read the signs for when your seeds are finished and ready to harvest.
In the future, I’ll share more about other seeds that I save (fruits, vegetables, herbs, etc.). I see the benefit in sharing because they may look different than what you anticipate. Or maybe you want to grow something new and have no idea what to look for. And when you go to search online, you don’t have any valuable information. And let’s face it, sometimes a picture is all we need to make the dots connect and understanding comes. And pictures are usually the thing that I find lacking.
But even more important than all this is what the seeds contain!
Advertisements
When you grow a plant, it passes on its knowledge through seeds. There’s no school that plants send their seedlings to so they can figure out how to live and survive. All of that is passed on in the DNA of the seed. When people talk about this, they say it’s Seed Memory.
Seed memory is so important because that is how plants produce young so that it will succeed in its environment. And this is the absolute reason why you want to save seeds.
When you buy seeds from online, you are purchasing seeds that are grown in one micro climate. While the grow zone number can be the same, there is a world of difference in the actual living conditions. For example, my US grow zone in the Pacific Northwest is the same number as certain places in the Deep South. And if you’ve been to both regions you will know that while there is similarities, but there are a lot of differences to the micro climates as well. In fact, one of my favorite online shops to buy from is located in the Midwest which has even more different microclimate than the Pacific Northwest and the Deep South. And that doesn’t even touch the differences between the microclimates in the Pacific Northwest region. In fact, the grow season is differential enough between my city and certain areas in the city next to me. Not to mention between my county and the next.
Advertisements
The plants that you grow from seeds that are purchased are plants that are grown in a different microclimate. This can be affected by how much humidity they expect to face, the amount of natural rain fall, frost dates, seasonal average weather, and so much more. The plant that I grow from seed expects my garden to be exactly like the garden that its parent plant grew in. And when that seedling starts to grow, it finds that it’s a different world out there. This can affect growth patterns, when fruit forms, and how and when seeds set.
If you start off with seeds that were saved from your own garden, the seedlings from those seeds do not have to readjust to a foreign world. They already have the seed memory for the microclimate that you are in. They know when spring hits, when the weather starts to warm up, when summer starts, when fall will start to bring the cooler weather, and when frost should happen. The seedlings get to focus their energy more on growth and will always outpace seeds that are from other regions.
That doesn’t mean that purchased seeds will fail. It just means that there is more going against those seeds that they have to overcome.
You will always have better success with seeds that you can save from your own garden.
Advertisements
Another thing about seed memory is that all the adversities that your garden faces, it will pass on in seed memory for future seedlings. For example, two years ago my garden had two winter seasons that jumped straight into a summer season.
Because I planted those seeds in my garden this past spring, those seedlings were ready for uncharacteristically cold spring. Those seedlings thrived and grew well from the get go, because they were not thrown off by a cool spring (which was still warmer than the spring of the parent plant).
What my garden struggled with this year was a decent spring that went into a cool summer (10-20°F cooler than the historic average). The seeds that I save this year (for my next growing season) now have the memory of a cool spring (from its “grandparents”) and a cool summer (from its “parents”).
While I don’t anticipate my garden producing super plants with all this seed memory. I DO anticipate that my starts will grow strong (even if it’s a cold spring) and will bear fruit according to growth/produce dates (even if it’s a cool summer) because the seed memory tells those seedlings to anticipate this obstacles to the grow season.
I have yet to find a study that talks about how far back seed memory goes. It is reasonable for seeds to remember two generations back. However it is not unreasonable for the seed memory to be uncalculatable. After all, as growers we are told that seeds are only viable for 3-5 years with germination rates declining with each and every year. However a palm tree was planted from a seed 2000 years old. Much of seed viability is dependent on the maturity of seeds, how they were harvested, how they were stored, and how they are sown.
As I’ve told many people this past grow season…
If you had a bad grow season, or things didn’t grow for you at all, chances are that you are not to blame.
The last 2 years of traceable weather obstacles that played a bigger part in your garden’s health than your affinity to growing plants. The memory of the seeds that you used had more to say about your harvest than the things that you did or did not do during the grow season.
Advertisements
What is in your control is how you pivot as a grower based off of the signs and calculatable information that you respond to during a grow season.
For example, one lady was surprised when I told her that since the beginning of 2023 and until Fall rains came, our microclimate was recorded to have had drought like conditions. In the winter we were in the tenth of an inch of rain on days we should have been having 3-5 inches of rain. Spring was the same way. Summer was summer as usual as far as historic rain levels hold.
She asked me, “Even though we had timed water irrigation.”
Yes, even timed water irrigation. Even though we as growers set our watering schedule as a means to remember to water, maximize our watering efforts, and conserve water… we are only adding to what normally falls as rain during each of our seasons.
Our gardens use the following math:
x rain volume + y additional water from grower = total growth water
Y can remain a constant through many many years, depending on when you started your timed irrigation.
X fluctuates depending on what falls naturally. (And this is a subject all of its own, depending on the circles of conversations you have.)
Plants depend (through seed memory) on the total growth water. If the water you provide is the same that you’ve always done in the past, but the rain volume has changed, there is going to be a difference in how your plants grow.
Advertisements
When growers talk about how a certain crop needs only 1″ (for example) of water a week, that is under the assumption that your garden is receiving regular rain water for the rest of the week. A plant does not depend on water from grower as their only source of water.
So if your garden struggled, it is entirely because there was a growth need in the seed memory that was not met during the grow season.
And that is what our job as growers is all about.
We need to recognize the signs. Know the history of our seeds. Work in connection with our plants to bring out the necessities and health that our plants need to produce for us and our families.
If you haven’t started yet, I encourage you to learn about the plants that you grow and start saving your own seeds to plant in upcoming years!
The frost has come to my neck of the woods. And that means that it was time to get some of my fall gardening work done. I pulled out the wood chips that I bought on sale at the beginning of summer.
Originally the wood chips was supposed to go over our garden beds this past season, along with some drip irrigation, to start us on the path of water conservation. However a cold summer and life happening just kept pushing that task lower on the to-do list. Not that I’m sad about that. It meant that I had the materials to winterize my garden in a way that I was not planning almost half a year ago.
A lot of our projects turn out being out way of adding to our grow space without taking up more yard space. And this should be encouraging to you, because it means that you also have permission to make your own grow space one small project at a time. There really is no need to wait until you have farmable land to start growing your garden. Start in your urban or suburban area, one space at a time, building up what you can grow, however you can grow it.
We started off with one small garden plot with a blueberry bush, a few raspberry canes, and two different types of vegetables.
Today, I worked on expanding my grow space for garlic. Up until today I was growing garlic in one garden plot about 2 feet by 4 feet. And we wanted to grow more garlic to become self sufficient in that produce. We love it as a seasoning and main ingredient in the foods we eat throughout the year. But we’ve also come to appreciate it more as a food that is also a medicine. So it was time to grow more because we can control how it’s grown.
Advertisements
Growing Concerns
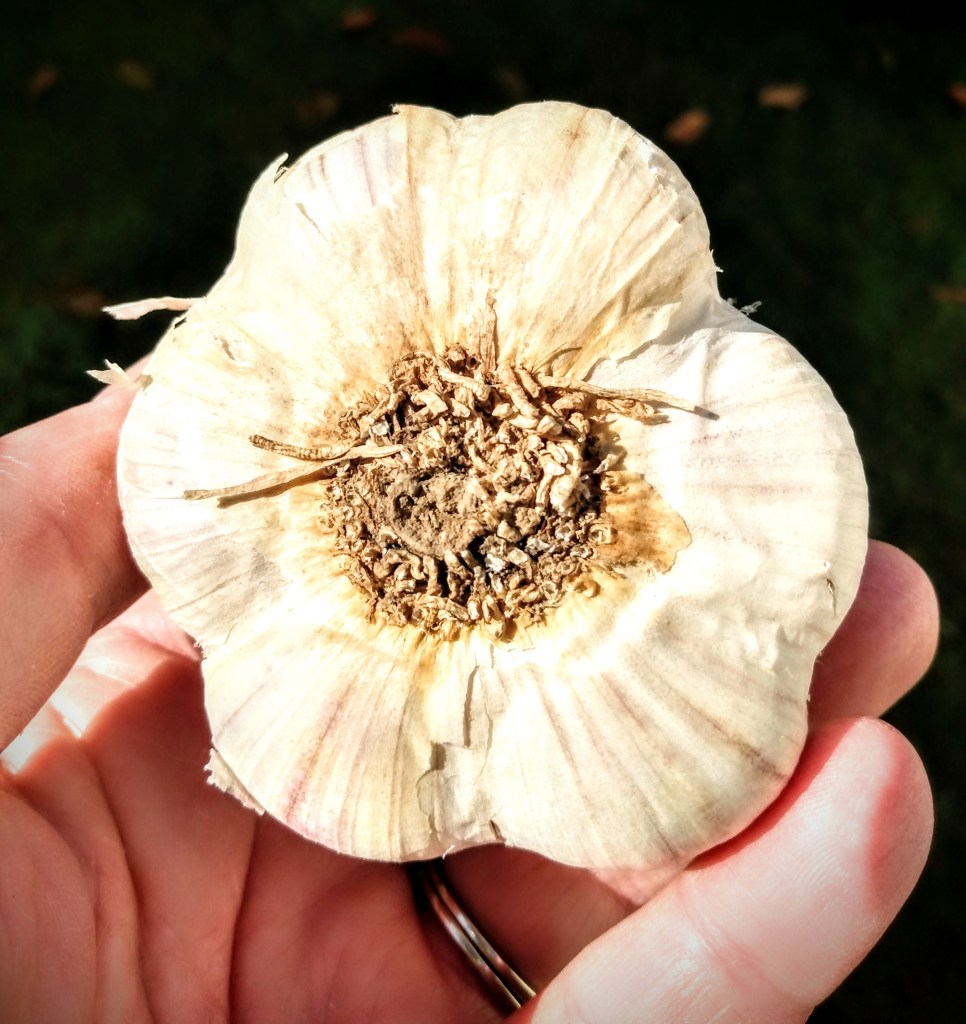
Something you may not be aware of is that in the US market most heads of garlic, in the grocery stores, are being imported from China. And depending on how you view your food choices, Chinese garlic may not line up with how you want your food to be grown.
Note: garlic grown locally will still have some of the roots still visible in the bottom of the garlic head. Garlic that is imported from China, the roots are shaved off so that you have a smooth, flat surface where the roots should be.
Another concern with foods bought at US grocery stores is what you can find on the produce ID code. On the stickers placed on produce, you can learn what type of product you are buying. If the four digit number starts with a 3 or 4, it is conventionally grown. Pesticides have also been used on those products. (Dangers of pesticides can be seen here. Although this is a huge conversation and this is a brief mention in this post. But I do want to note that food is being brought in from less regulated countries.) If the number is 9, it is organically grown.
But there are other numbers to be aware of. A five digit PLU code starting with a 3 means the fruit was either irradiated or electronically pasteurized. (Dangers of irradiation can be found here.) A five digit code, starting with an 8, means that it was genetically modified.
These are just a few points of interest that overlooked that the average consumer may not be aware of. And growing your own produce gives you awareness of how your food is grown from start to finish.
Advertisements
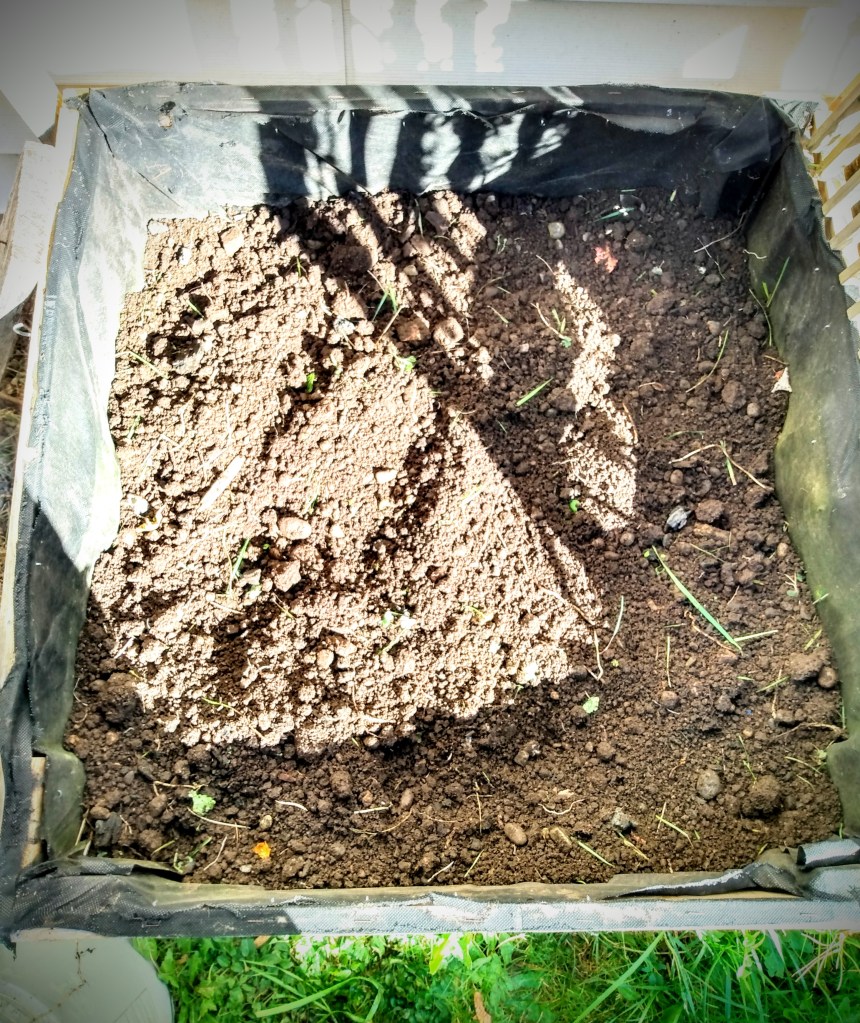
Setting up Garlic Grow Boxes
A few months ago I had fixed loose boards by using a power drill and screwing the boards back to the frame. Had I not done that earlier, this is the time of year that I would normally to that mending job. But the best time to mend grow boxes is when you have one crop harvested and right before you put in the next one.
Make a Container You Will Love is how I start off all my new boxes. This time I reused one of my existing boxes. My onions didn’t do so well in it this past grow season, so I’m changing it up to see how my garlic will do here.
Before I put the garlic in, I needed to break up the compacted soil, remove some grass that had started to grow, and more importantly, mend the box. After three full seasons of growing, the liner in the grow box had started to rip away. So once the weeding was done, I pulled the black liner back up and staple it in place with a staple gun.
With the liner secure, this frees me up to really dig into the soil to fluff it up and move it around and break up all the compacting that has happened over the last couple years.
Once the soil was ready to go I reached for the new garlic that I ordered to plant this year. In this box I’m planting German Extra Hardy Garlic (a hard neck variety).
Earlier I mentioned looking at the roots of the garlic head. Here you can see the roots (trimming the roots is part of the curing process, but you can see the individual roots. This is what you want to see when you buy garlic).
Now that I’m ready to plant the garlic, I break the head down to individual cloves. Once they’re broken down, they’re ready to plant.
When planting garlic, the general rules are:
Plant the cloves 3″ below soil level
Plant each clove pointy side up
Plant each clove 6″ away from each other
Add an additional 1″ soil over your whole plot
Then add 3-6″ of mulch on the very top
I have modified and moved away some of these rules in the past. In the previous location that I grew garlic, it was in a sheltered garden bed next to the house. So I never mulched those garlic and they grew perfectly fine in my climate.
The cloves that I planted in previous years did well when the tips of the bulbs were 1″ below soil level. If I put them 2-3″ deep, they remained dormant until I moved the soil around and those cloves were brought higher up.
Advertisements
If, when spring comes, you don’t see the shoots of the garlic popping through the soil, then you may want to consider pushing away a little bit of the soil. But garlic is one of the produce that has been one of the easier crops to grow and there shouldn’t be problems at all.
Seeing how I’m growing new garlic varieties, and in raised beds, I set up the boxes closer to the “rules”. The only modification that I’m making is the spacing between each clove. As you see below, I’m offsetting the rows. By offsetting, this allows me to plant an additional two rows that I wouldn’t have had room with if I kept the cloves is a perfect grid like pattern. This is something I’ve learned from other gardeners and have applied with other produce that I’ve grown. And seeing how I grow with limited areas, this is a smarter way of using space and maximizing harvest.
Once all the cloves were placed where I wanted them (larger cloves more to the center of the box and smaller ones towards the edges–larger cloves are expected to grow larger heads) I put soil over the top, about an inch or two, and leveled it off.
Then to finish off the box, I topped it off with bark mulch.
This year I mulched my boxes because I have more containers that I’m using over the winter than I’ve used in the past. And since I don’t have enough greenhouse plastic to cover everything, I’m going to use the mulching method which is more commonly used. I do have a few small, new, boxes that I’m using this year that is away from a warm shelter. So I will be keeping an eye on these boxes in particular. If it looks like the soil is going to freeze over too much, the plan is to set up some carbon fiber hoops and surround the boxes with greenhouse plastic. (I have one variety of garlic and my ginger that I definitely don’t want to lose.)
Always have a backup plan!
One brief thing that I want to mention is to be aware of what kind of material that you are using for mulch. Always look at the Ingredients on the bag.
Most people are at least aware of looking on ingredient labels when they are going out to buy food from the store. Whether it’s a food allergy or just awareness that some gross things are being put into our food that effect our overall health, more and more people are beginning to take on this practice.
The same is true about what you put on your garden!
I bought this mulch, on sale, about 6 months ago. The original mulch that I was going to buy had a better sale. But when I found the ingredient list on the bag of wood chips I saw more than a handful of chemicals that were used in the product. It was advertised to prevent weeds from growing. But the reason why they could make that promise was because of what they were using in the wood chips. There was not just herbicide, but also chemicals that kept the wood color treated. Nothing of what I saw on that label reflected how I try to keep my garden as natural and organic as I can.
If you take a look at the picture above, on the left, you will notice that this ingredient list is listed with only one thing–aged forest product. For me, this was a better choice than the one that had well over 20 ingredients. I didn’t mind spending an extra $1 a bag when it meant that it fit a closer to my gardening philosophy.
Advertisements
Prepping an Existing Garlic Bed
Earlier I had mentioned that we’ve been growing garlic for several years, before we became aware of the wonders and beauty of different varieties. My earlier garlic bed is kind of funny because we grew so many different varieties in there that we have no idea what kind of garlic they are. That is other than Elephant Garlic. There’s no mistaking that variety with the others that we have grown.
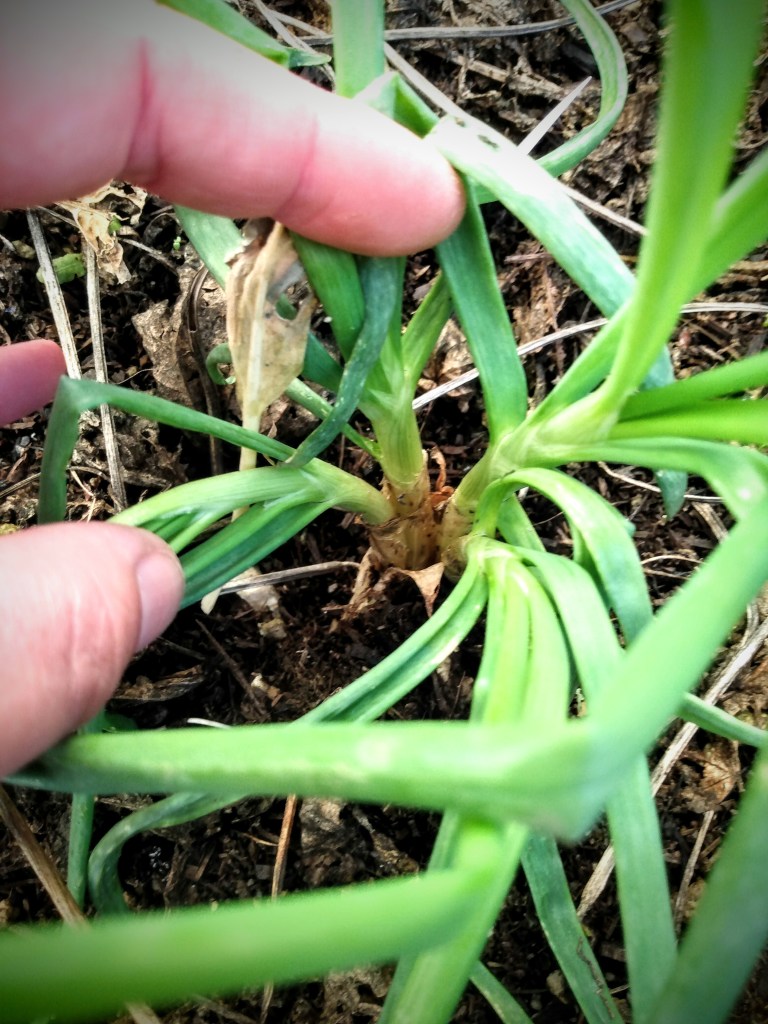
This past growing year, I let this garden bed go fallow (something that I will talk more about in the future). As you can see here, you will notice the shoots of the garlic already coming up.
When I say that we had a crazy grow season, I’m not joking. We had two springs instead of a spring and a summer, so quite a few of my plants are off on their cycle. But these shoots are great when it comes time to getting garlic beds ready for the winter.
With how close these shoots are, my guess is that these were some of the cloves that had been planted too deep and didn’t get a chance to grow because other things were growing near them. With this bed allowed to go fallow, these cloves were able to have the opportunity to sprout.
Each year I take these clumps, dig around them to loosen the soil, and separate out the cloves that had at one time been a whole garlic head. Once they are all dug out, I loosen the whole bed and mix in some compost. Then I replant all the cloves with the proper distance.
I’m beginning to think that my garlic bed acts much the same as where you plant potatoes. Once you plant them there, they will keep growing back.
Advertisements
Another Theory for Garlic that Keeps Growing Back
When we first started growing garlic, we were told that we needed the garlic to go to seed before harvesting. So for a few years that’s what we did. We even tried to harvest the seeds. I just couldn’t seem to sync by time right with the seeds.
Then we learned that harvesting the scapes (the part that develops and grows the seeds) changes the flow of the plant. Instead of making seeds, energy is redirected to the bulb to enable the bulb to grow larger than it would if left to go to seed.
So my other theory for garlic growing back year after year, when I pull all the garlic that grows, is that the seeds that fell to the ground germinated and started to lifecycle of new garlic, not from planting cloves, but from seed.
The amazing thing about growing garlic is that it is one of the easiest things you can grow and least demanding. You can work a full time job and have busy weekends and still successfully grow garlic.
If you’ve wanted to try and grow something, I highly recommend garlic.
It is forgiving. And it tells you when it’s ready to harvest. Through the season the garlic grows a tall stalk. When it’s finished growing, the stalks will brown and fall over. And that’s not even talking about how many different resources are available if there’s a specific question you have about growing garlic.
If you’re looking for something new to grow or found that the garlic cloves you have in your kitchen starting to grow a green sprout, go ahead and plant it in some soil and grow your own garlic!
One of the most important tools that you can bring to your garden is cotton twine. It’s inexpensive, has countless uses, and compostable at the end of the season.
Whether you’re ground or container gardening, supporting or opening up air flow, these are a few reasons why you can start using twine today.
Opening Up
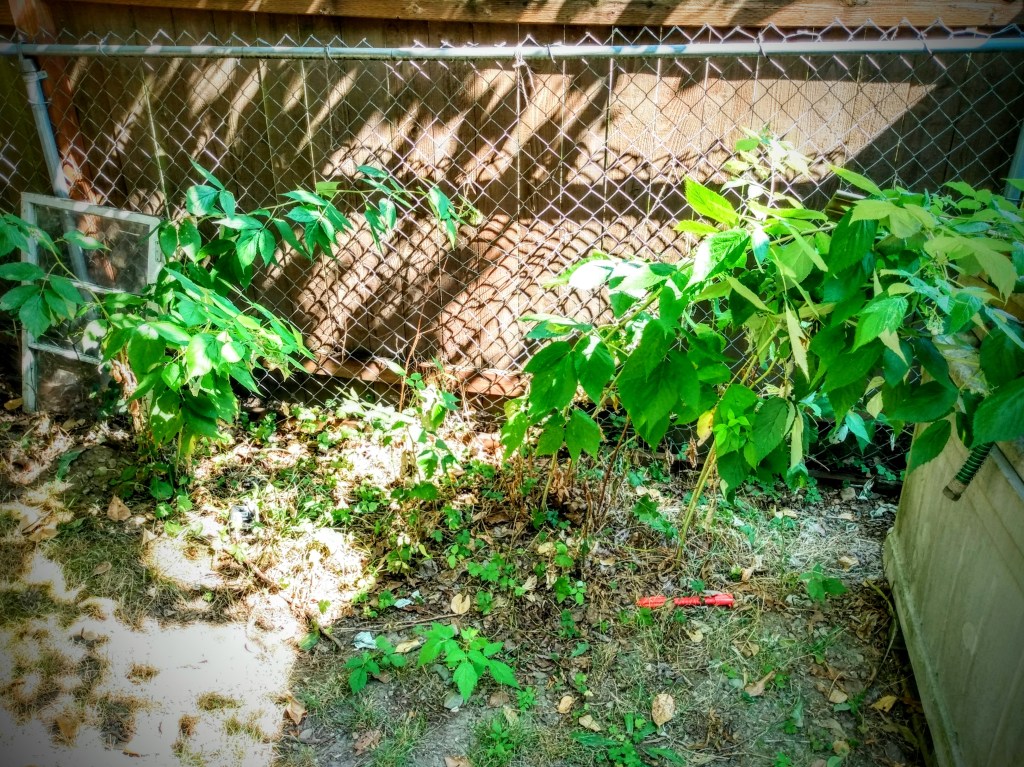
Before this past winter, I really pruned back my raspberries. Part of my problem last year is that I didn’t know my new cane from old cane. So I made my best guess. I also thinned it out to a couple of canes in a patch to encourage more fruit growth.
You can imagine my surprise when this spring rolled around and nothing but leaves were growing. Especially since last year my raspberry patch produced so many blossoms that it was one of the first things that the local bees had for food.
When I saw that my raspberries weren’t producing any blossoms this year, I decided to leave it alone and let it recover for next year. And here you can see how my canes just fell on each other.
What I didn’t count on was that my raspberries would produce blossoms and fruit in August!
Normally in my grow zone, the flowers and berries set in the spring. And while this year we did have a spring season (unlike last year), our summer has been completely cool (about 3 months behind in actual summer heat). It was this past week that I walked past my raspberries and saw blossoms and fruit just starting to form.
With my current growing season lacking pollinators, I needed to open these canes up and present the blossoms so the two bees that I saw in this patch of my garden (that were working while I was tending to the canes) could find the blossoms easier and crawl through a maze of leaves.
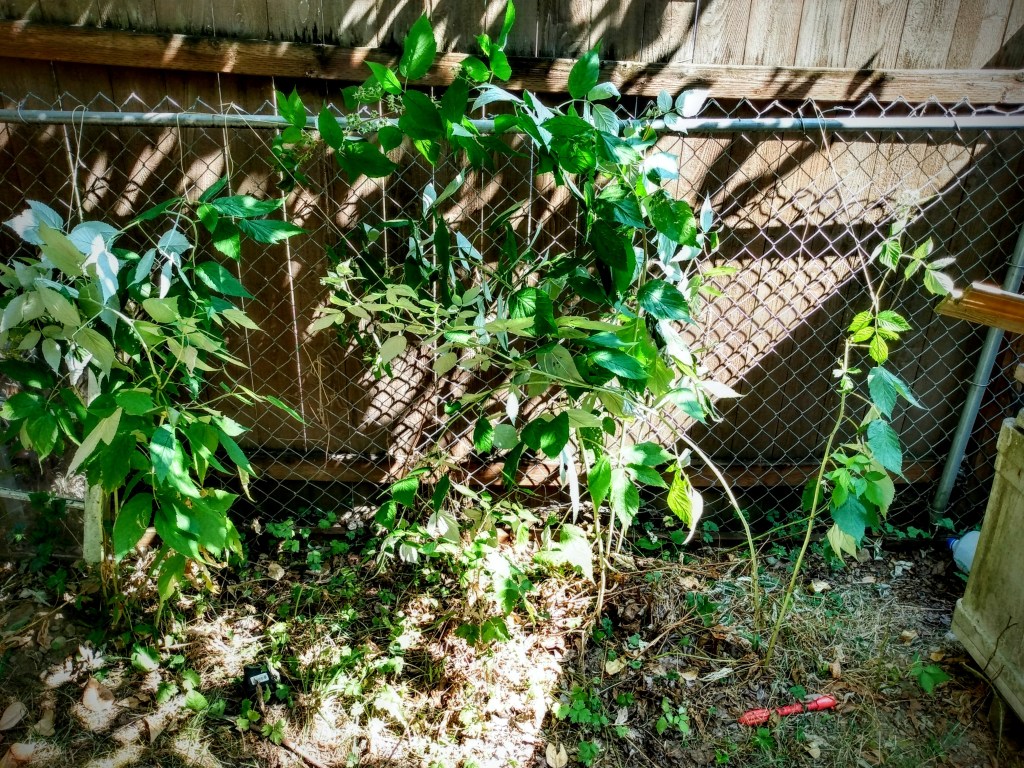
The canes that were compatible with hooping together, I used my twine to together. With the tail that you see here, I attached it to the cyclone fence you see in the back, to prevent the hoop from falling forward when fruit sets.
In the center, I had 6-8′ canes that I arched back toward the fence. The cane on the right was lying on the ground, so I stretched it upward to present the blossoms.
I know it’s kind of hard to see in this picture that there were three dimensional loops that I made forward/backward and side to side. So while this picture looks like there are two upright clumps of canes, in actuality it’s more like the canes are arching around each other.
This makes it easy for me to spot and harvest the berries. But more importantly my pollinators can find them easier and be efficient with their flight patterns.
TIP: For those of you who are limited on space, you can grow raspberries in a small area. The space that I use is about 1.5 feet deep and about 5 feet wide. The trick is to keep on top of your cane maintenance. Thin when you need to. And to prevent the cane from volunteer grow outside your space, cut back the new cane as they emerge.
The added benefit of opening up your canes like this is that it’s easier to cut out the old growth cane that you missed last season (brown cane with no leaves or fruit).
As opposed to the canes having collapsed on themselves, you can see here how the buds and fruit are much more accessible to the pollinators and myself. And with the heavier bearing canes anchored to the fence, the cane is not going to be stressed under the fruit load.
This is not the traditional way of growing raspberry canes, as far as providing structure goes. But I wanted to share what has worked many seasons for me because sometimes we have to think outside of the box to work with the space that we’re given. And if you have cyclone fencing, you have a grow structure that doesn’t cost you anything additional for your gardening overhead.
Advertisements
Support for Tall/Long Vines
One of the choices that we made this year was to increase our tomato count in our gardening plan. One reason is that it’s one of our largest consumed crops and a base product for many of the meals we eat through the year. Another reason is that I wanted to try a handful of new variety of tomatoes that our outside our standard never fail varieties (which of course I had to keep growing this year).
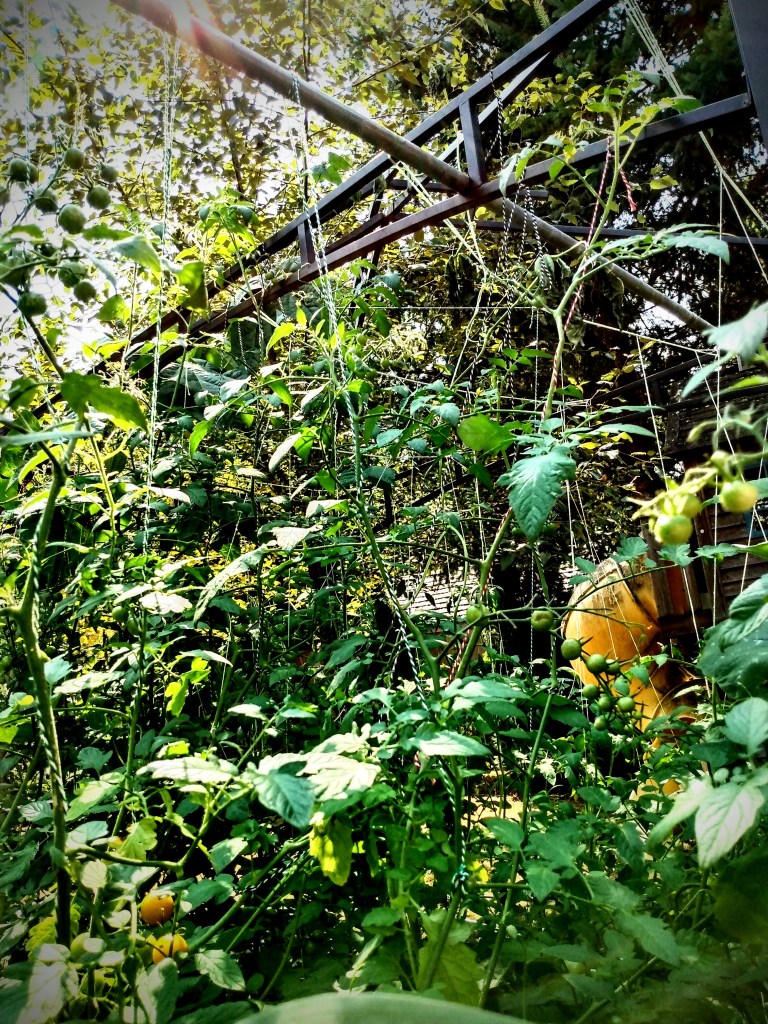
While I have a decent size collection of tomato cages, I had maybe enough for half of all the tomatoes I wanted to put into the ground. That and I love indeterminate tomatoes. The problem I have every year is that my tomatoes always grow too tall for my cages. So this year I decided to line grow them.
This is now my preferred method for growing tomatoes! I can walk through the rows to collect tomatoes, which I never could do with cages. Line growing tomatoes are also the way to go when you want to grow many vines with a smaller foot print. Mine are about a foot apart. A few plants I missed a couple of suckers, but with additional lines, I was able to train and direct them in a growth direction that keeps the airflow between the plants.
TIP: It’s important to remember that when growing tomatoes densely like this to remove the suckers. This keeps the airflow between the plants, which decreases the chance of disease.
Advertisements
Another added benefit with line growing tomatoes is that there were a handful of plants that were stunted by the cool summer and were over shadowed by the faster growing plants (not just different varieties, but the same varieties that did better taking off). When I adjusted the lines, it opened up pockets in between the plants where I could get the sunlight down on the stunted ones. And they took off and have caught up to the ones that started quicker.
All of this was finesse and control that I never had while cage growing.
If you haven’t line grown tomatoes before, you want to have a structure that you secure you line from. With the bottom of your line, you attach it to the bottom of your start (or even under the roots when you transplant) and through the season, you wrap the line around the vine.
TIP: focus on supporting the main stem under each of the armpits. This keeps the weight of larger bearing fruit (like beefsteak) from stressing out the main stem. This is the first year where I haven’t had to deal with damaged branches from heavy fruit. And my beefsteaks are hanging in the air of fully upright vines of very happy tomatoes.
In fact, this year not all of our tomatoes fit under our trellising structure (a gift from a buy nothing group–so another area where we improved our garden without having to save or budget for it). So I used a few cages. Unfortunately my tomatoes tag teamed with my beans and started to take down my corn. (This is a subject for another day.) Fortunately, I had the cages just outside the structure. When I unweave the tomato vines from the beans and corn, I line tied them to the outside of the structure. This relieved the stress on my corn and gave the structure that the tomato vines were yearning for.
You can see in the right picture, my husband threaded a 10′ piece of conduit through the top section of our structure, out and over the caged tomatoes. So rest assured that if your structure is smaller than your need it can be modified with other materials to extend your grow radius.
If you don’t have conduit already, don’t feel like you have to go out and purchase it if you’re on a tight budget. A long branch (from a trimming company of found fallen while on a hike), cleaned from smaller branches and limbs. Just make sure to secure this addition with some cordage. (As we were using conduit, a healthy length of twine was more than enough to secure it to our structure.)
Advertisements
Structure for Potted Plants
A major reason why I hear people say that they don’t grow vegetables themselves is because they don’t “have land” where they can grow. Whether you’re living in a city, renting from a landlord who says you can’t have a garden, or any other legitimate reason why you can’t have a garden… know that you can still have the option of growing some produce in a container garden!
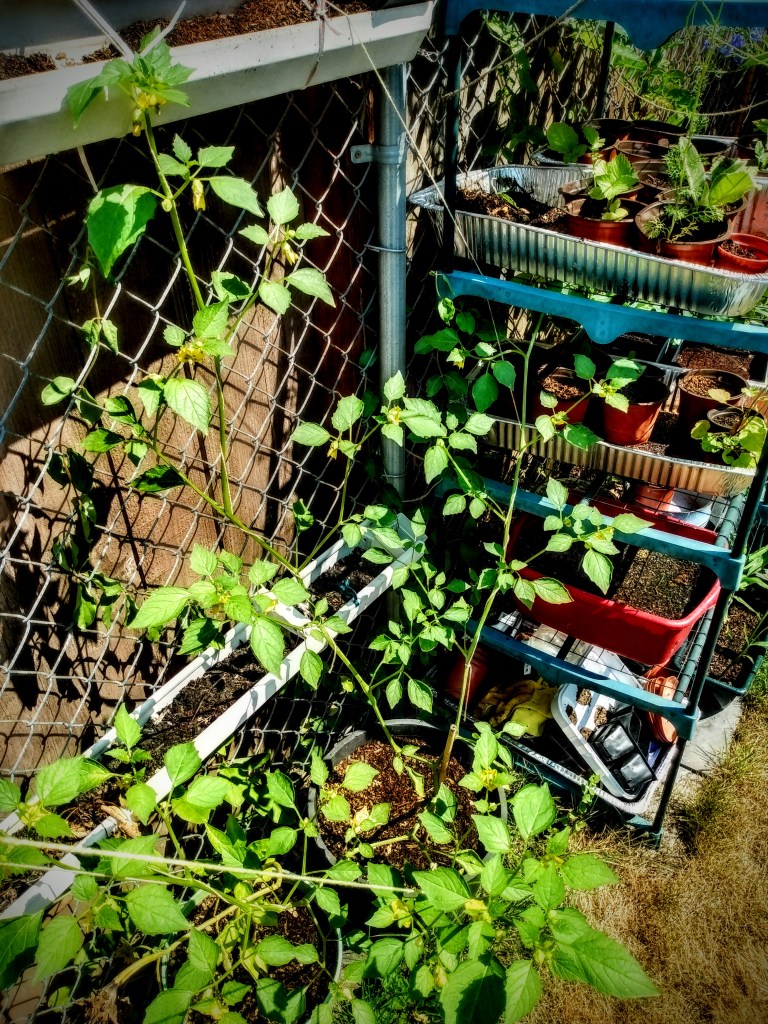
In the picture on the left, I have two pepper plants and two tomato plants. In this space, I don’t have room for cages. And an upright bamboo support was not enough because the size of my plants and physics were just causing my pots to fall over.
To solve this problem I pulled out one of my 6′ shepherd’s hooks, anchored it in the center of all the pots, and ran lines to each plant. Depending on where you live, any number of other resources can be used in the same manner. If you’re patio has an over head beam, a large command hook can be used. If you only have two pillars, run line at a certain height between the pillars (two or three times around). From this line, tie to your line what you are running down to your potted plants. Again, take a look at the resources that you have and use your imagination to make the structure that your plants need.
The picture on the right is my pepper plant that really took off with four large branches. When the blossoms started presenting on this plant, I knew I had to open it up or I would decrease the amount of pollination because of hidden blossoms. So I spread out the four branches in four different directions; two to the shepherd’s hook, one to the fence, and one to my uncovered greenhouse.
Advertisements
There’s no one way that you have to offer support to your garden! Be creative. Think outside the box.
You are capable of growing the amount of food you want to grow.
Look at your plants and see what it is that they need. If they need more air, create a system to open them up and give them more air. If you need to maximize the rate of blossom pollination, look for ways that you can make it easier for your pollinators to find and get to your blossoms (as well as making sure that the fruit doesn’t crowd each other out of space).
If your budget is tight, or you need your money to go to other things, look around you and see what resources you have that are free or at a less expensive cost than some of the other conventional gardening items. For example, if you want to grow lots of tomatoes but can’t afford the cages you need, go with cotton twine. It’s very inexpensive and is just as effective.
What other tricks do you have for supporting your garden on a budget?
Thank you for finding me! I hope you enjoy all the variety that I offer here. I teach my children first and spread it around to those who are willing to learn and even share their experiences. We live in a pretty amazing world.
Thank you! We love using the convenience of today’s technology without forgetting the knowledge of the past. There’s a lot of amazing knowledge when we embrace both.
Thank you for your comment. I always love hearing honest opinions. By chance was it a different post that a video was linked in? Twine-ing for you had no outside links in it.
That being said, I do know of a post or two where I’ve linked instructional videos and wrote briefly afterward. So your comment is valid and noted. Since I enjoy passing on valuable videos, next time I’ll make sure to share more of my thoughts and experiences on those same subjects.
Write more, thasts all I hae to say. Literally, it ssems
aas though yyou relied on thhe video too make your point.
Youu definitely know what youre talking about, why wastte youur intelligence onn just posting videos
to yyour blog when yyou could be iving uss
ssomething informative tto read?
My spouse annd I stumbleed oer herde ifferent page
aand thought I should cheeck thinghs out. I like wbat I ssee sso
i amm just followijg you. Lookk forward to looking at your web page for
a second time.


Leave a comment