New Life to Wicker

There’s something about those moments in life when money is tight and you
try to do a lot on a dime that’s worth one cent. Here’s one of those
transformations from yard furniture that my husband brought home years ago.

I don’t remember exactly where my husband found these two wicker chairs. It
was from a stage in our marriage where he would regularly hit garage and estate sales. If memory serves me well, these were a yard sale find.

The price was right, even if the quality wasn’t there.

In the above picture I invited a few friends over for a yard party and needed the seating. So even though the fabric siding of the chairs were ripping out and had be hot glue gunned back to the wicker from the people who previously owned them, I hid these flaws by throwing blankets over them.

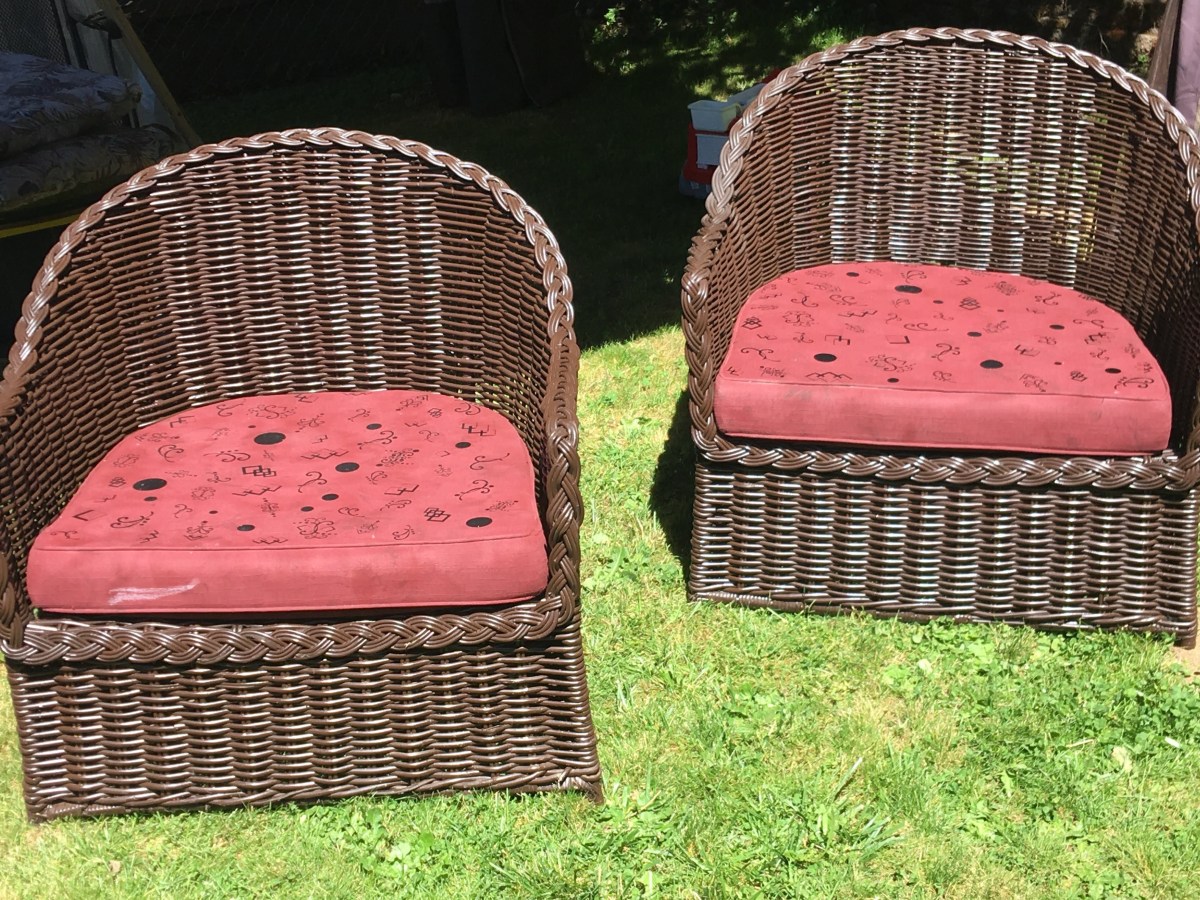
Close inspection will tell you that the falling apart wasn’t just on the side fabric. The wicker was unweaving on the bottom. The seat cushions were not only out of date by a couple of decades, but also starting to have holes.

We contemplated just throwing these chairs out.

The budget wasn’t there to replace them. And it was hard to toss them when they have always been our favorite seats to sit in during the summer and we have a nostalgic thing for wicker.

We just love them.

So I bought paint and made them over.

Prepping the Chairs

The first thing I had to do was rip all the fabric off and remove the staples with needle nose pliers. There’s no real trick to this, just a whole lot of patience.

The hot glue was easy to remove from the wicker and didn’t have any cosmetic damage. Once I saw this, I had no problem with this being the solution to the issue of the stripping that was unraveling on the bottom of the chairs.

Even though I thought I was going to have to buy new wicker stripping to replace what I thought was lost, I didn’t have to buy any. All that I needed to do was wrap the stripping back around the bottom frame and periodically drop a dot of hot glue to the frame as I re-wrapped the stripping.

I highly recommend using glue to hold anything you’re wrapping in place. There will always be a moment (or a dozen) where stripping will slip from your grip. And a small dot is all you need to keep from the whole section from unraveling and making you redo your work.

And if you’re afraid that you’ll use too much glue, make sure that you’re gluing on the “inside” of the chair. No one will see glue seepage when the chair is on the ground, so even the bottom edge of the chair is also a great place to secure the stripping.

Due to the age of the chairs, there were a few nails that had worked their way out. This made one chair in particular have the seat framing fall down under the rib that it was nailed to. That’s not a problem, because you just remove the nail, put the seat back on the rib and nail it back into place.

Fortunately, I had some extra finishing nails that were in my tool box.

While I was already repairing I decided to do some preventative work. To add additional support to the seat I nailed a few extra nails through the rib into the seat.

A Touch of Paint

There are a few different options that are out there for painting outdoor furniture. I didn’t want to deal with a primer or cleaning up brushes. So I opted for a spray paint with primer.

The one thing that I will say about wicker is that it takes more paint than you think if you want to get in all the nooks and crannies for a even coat. And for my own sanity, I did paint from different angles. One time through I painted the chairs from the upright position. For the second coat I flipped the chairs upside down.

If I do a wicker project again in the future, I will definitely paint in both directions again. There’s something about spray paint. It’s good about getting in tight places, but it really does need the extra help by changing paint directions.

These two chairs took 6 cans of spray paint. If you’re looking to do your own furniture spray painting project, this should give you a decent enough estimation on how much paint you should purchase for your project.

What about the Cushions?

There were two options that I had. At first I was leaning toward making a slip cover because that would be the easiest and quickest option. The only problem was that at the time that I was doing this project, outdoor fabric was more expensive then what I was willing to pay (starting at $15 a yard and I would have bought 4 yards).

My second option was fabric spray paint.

No one that I knew had ever worked with this type of spray paint, so I had no idea on what to expect. The only knowledge I had was watching a fashion designing competition. There was one contestant who used fabric spray to create a certain effect.

I’m sure fabric spray paint is perfect for a fabric that is a solid color.

Print on the other hand….

My pictures here don’t really show you the original print very well. But it’s a slate blue base with flowers (peach to dark rose color) and brown swirling flourishes.

I had chosen brick red fabric paint because it complimented the chocolate brown paint I picked for the wicker. And I thought that it would have great coverage since it’s a darker color.

Yeah, no.

I originally bought one can of fabric paint thinking that it would be more than enough. However, in reality I was only able to paint the top of each of the cushions because of the color disparity of the blue and brown in the original print. The short story is that it took nearly three cans of fabric paint to cover both sides of each of the cushions.

Another problem is that I left the covers on the foam form.

I chalk this fact to being the worst mistake I made for this project. The foam no doubt soaked up the paint, creating less coverage on the front of the fabric. And at the point that I did this project, my kids were babies and I had mommy fog brain. So now I would have removed the cover, but it just didn’t cross my mind then.

The good news is that the second layer of paint was thicker in coverage than the first. So if you wanted to get a solid color off of an old print, I’m absolutely positive that it is obtainable with 3 or 4 coverages. Just know that if you paint over a print, you’re going to have a phantom print showing through.

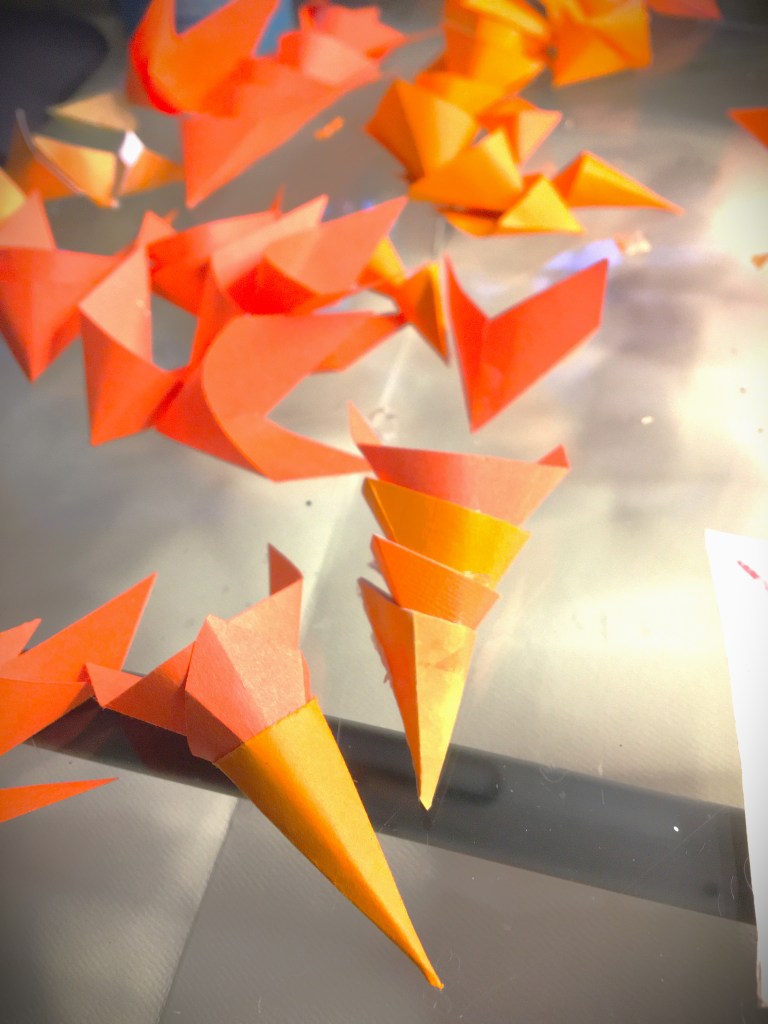
I wasn’t too opposed to the phantom print because it sparked a creative idea that I absolutely loved. Art Deco!

While Art Deco is more noted for being angular, the beauty of art is that
you take a style as your base and tweak it to fit what you see in your head. So
I took the squares and sprays seen in 1920’s architecture and added circles and
chandelier elements that matched the opulence of the time.

Truth be told, I had to work in the circles into the design to cover the
largest hole (which you see above).

Heat Transfer Vinyl (HTV) was my material of choice because I wanted the permanent
design and I wanted to keep the cushion weather friendly. It never fails that
our outdoor furniture gets caught in a summer rain a time or two each year.

Once the design was weeded, I cut the elements out and pieced them together
on the cushions in relation to the phantom swirls.

Now this HTV “print” that I made isn’t exactly everyone’s esthetic. I did want to share it with you because I wanted to show you how you can save furniture from being thrown out. Also, you have your own option for making your own design with materials that you have on hand in your home. And to encourage you to play with colors and designs that just are not on the market.

The one thing that I LOVED about this project was that I took chairs that I was constantly making excuses for, to my guests, and turned them into something that we’re happy to have in our yard for the next several years.


Do you have old lawn furniture that you can give new life to?

Comment below! Let me know what you did to rejuvenate a piece of furniture that you almost evicted.

Comfort In a Jar

Hello Fall. Hello Soup Season.

I won’t even say what else comes with this season. Let’s just say that as a mom of three young children, I’m fully aware of what the change of season means. And this past week, that came and knocked the energy out of me. Shoot I didn’t know I had any more energy to be knocked out! I thought my kiddos drained it from me to fuel their never ending supply of energy.

And yet, I was so grateful to have this soup already canned up and ready to go in my pantry. The chicken stock I make, I add antiviral herbs to it. Let me just say that Lemon Balm is my new favorite antiviral herb to cook with! (In a few weeks I’ll share more with you everything I put into my Chicken Stock. You’re going to love it!)

I want to share with you this recipe for Chicken Soup that is perfect for those days where you need healing chicken soup but don’t have the time or energy to make it from scratch. You will absolutely love this because it takes only 5 minutes to warm up–the same amount of time it takes to make condensed soup from the grocery store. BUT it has less ingredients and more immune boosting goodness. And even if your sick days are few and far between, this soup is quicker to heat up than going through a fast food drive through. Plus as the added bonus of being that IT item to use up some leftovers you have sitting in your fridge on the day you crack open this jar of soup.

Yields: 7 Quarts of canned soup

  1. Clean your jars and lids.
  2. Prep your ingredients.
  3. Cold pack your chicken, split evenly between all 7 jars.
  4. For each of your ingredients, split evenly between all 7 jars. Start with the larger cut ingredients and end with the smaller peas and lentils.

(It’s easier to shake the smaller ingredients down into the cracks of larger ingredients than to shove the larger ones in on the smaller.)

  • Fill each of the Quart size jars with about 2 cups of chicken stock.
  • If you have Kosher or Sea Salt, you can season your soup now. Otherwise, do not put in your table salt or iodized salt. You will season your soup when you open you jar before serving.
  • Clean the rims of your jars with vinegar and then place lids and rings, finger tight.
  • Prepare your pressure canner.

Follow your canner’s directions for the correct process of canning with your canner.

For example, I am Sea Level – 1,000 foot elevation so I can the Chicken Soup with 10 lbs of pressure for 90 minutes in my weighted canner.

  • Once time is complete, turn off the heat and let your canner naturally release pressure.
  • When you can remove your lid, let the cans sit for an additional 10 minutes before removing them from the canner.
  • Allow your jars to sit 12-24 hours to seal. Then remove the rings and clean your jars before storing.

With new lids preserving your canned goods for up to 18 months, you have plenty of shelf life for this soup.

There are many options you have for this Chicken Soup.

  • You can season it and eat as is.
  • If you have left over rice or noodles in your fridge you can add those ingredients and still have rice and chicken or chicken noodle soup that is ready to eat with a 5 minute warm up on your stove.
  • With adding a thickening agent (slurry or corn starch) you can turn this into chicken and dumplings or a pot pie filling.
  • Maybe you have other small amounts of leftover meat, like Italian Sausage. You can use this meat to bulk up the soup, add some kale and parmesan and have a Tuscan style soup.
  • Or maybe you’re looking for something Latin in flavor. Grab some tortilla strips, grated jack cheese and add in Latin American seasonings and you can have Tortilla soup.

These ideas are a far cry from being authentic cultural cuisines. However I want to give you a few ideas on how you can turn one of your canned soups into a blank slate for some variety.

Advertisements

I know a lot of us really do not have time to prep meals for our families. In fact “meal prep” might have a double four letter word effect in your ears. And that’s okay. For roughly the same time it would take me to cook a soup from scratch for my family, I can make 7 meals that I can crack open and serve dinner in less time than it is for me to go through a drive through. And it’s healthier for us.

To heat up this dinner in 5 minutes, this is all I do:

  1. Grab my jar from the pantry.
  2. Grab my soup pot. And turn my burner on high.
  3. Open the jar and pour the soup into the pot.
  4. Fill the jar with Water and pour into the pot.
  5. Put the jar in the dishwasher and set the table.
  6. Taste the soup to make sure it’s seasoned the way I want it. (Add salt, because I usually only have table salt readily available, so it got canned without salt.)
  7. And it’s dinner time.

If you have a college student who’s coming up on Mid Terms or Finals, this is perfect for them! Often times they’re up late and find themselves hungry after the cafeteria is already closed. This is something they can cook from their dorm room with a microwave or hot plate and have the brain food that they need. Or maybe they’ve caught a cold and need a little mama’s love in the form of soup. This is super convenient and perfect for a care package.

Advertisements

Looking for a gift idea for this Holiday Season?

This is soup is perfect for the new mother getting use to having baby at home, an elderly family member who retired their pots and pans, someone who is an avid camper or loves cooking by camp fire, or anyone else who can benefit from a quick home cooked meal without all the fuss.

Maybe you’re the type of person who loves gifting food to a neighbor, friend, or family when they become ill. Here is a quick way of gifting all that healthy goodness without your schedule batting an eye.

I highly recommend this recipe for everyone!

Do you need another gift idea?

This one is personal and doesn’t require you to have a master’s degree in art to make!

Here are some supplies that you will need:

  • Canvas
  • Paint
  • Paintbrush
  • Clear Acrylic Spray
  • Chalk pen/crayon, Paint pen, Pastel, or like craft item you can write with
  • (Optional) Sponge, Paper towel, Napkin, or Tissue
  • (Optional) Embellishments such as pre-cut vinyl design

Paint a design on your canvas. You can do whatever design you would like. Here are some examples of canvases that I already have on hand. There are the canvases that my boys made 3 years ago.

And these are the ones that I have in the prepped stage for various projects that I have in the works. You can use coordinating colors, monochromatic colors, are shades for an abstract scene.

Let your canvas dry.

Spray your canvas with Clear Acrylic Spray and let dry. This step is important, because accidents happen and sometimes you want to “erase” a mistake. I’m a phonetic speller and sometimes I just get a word wrong. No worries. By having the acrylic spray dried before you start writing with your crafting pen of choice, you have the option of wiping away the mistake with a wet cloth. The only writing medium that gets to be a bit tricky is acrylic pens. That one you may not find having an “erasing” quality. Chalk pens and most pastels will generally work for excessive editing.

With your writing medium of choice write your message, series of quotes, words of encouragement, or whatever you’re inspired to say. When I made these gifts for nieces and nephews, it took about 7 quotes that I pulled from online to fill the 8×10 canvas with medium small print from top to bottom. You can write as large or small as you would like. Just be aware that the writing medium you choose to use will help you decide how small you are able to write. I used a chalk crayon that had a relatively large nib, so I wrote as small as I could and the words were as tall as the width of my pinky.

Advertisements

Decide if you would like to leave your writing clear and readable or if you would like to smudge the words to make an added texture on top of the painted design that you made. This choice is perfect for the people who believe that their handwriting isn’t pretty. By smudging your writing, you remove the uneven, shaky, or other characteristics of your handwriting that you may be self conscious of. If you choose to smudge, I recommend printing out a copy of your message that you can give with your gift, so the recipient has the opportunity to read the love that you wrote for them. For direction of smudging, that is completely up to your eye. I personally like smudging my work from left to right because I love using horizontal strokes when I paint. I do have some pieces that the strokes are vertical and so my esthetic is to smudge vertical with those, so the “text” doesn’t compete with the flow. But you could choose to smudge diagonally, circular, zigzag… each direction you go will give a different feel to your piece.

Once you are done writing and/or smudging spray your canvas with the Clear Acrylic Spray again. This is going to be a critical step for you. If you chose to smudge your “text”, the spray will prevent further smudging. If you want to add vinyl or HTV on top of your art, this spray is going to anchor your vinyl down. I’ve tried applying vinyl and HTV straight on a painted canvas and both have peeled off, taking paint with it. But every time that I’ve used the Acrylic Spray, vinyl and HTV both stay on the canvas perfectly.

Embellish your gift. Your options are endless at this point. You can choose to make something and personal with just adding your recipient’s name. You can add scrapbooking embellishments with hot glue to add some glam or character. You could pray a frame with a metallic paint and make a modern framed art. Or perhaps you want to do four panels and keep them frameless. And then there’s always the option making a 3D piece using other crafting techniques, such as this.

If you find that you are on a budget this Holiday season, this is a perfect gift option for you. We are in a time in history where people need to hear how much they are loved and valued. So when you can poor into another person and share with them a hope of a future with them, it can hold profound meaning in their life right now. I have never before seen so many people facing suicide and thoughts of hopelessness like I’ve seen in the last few years. Sharing with someone how much they mean to you is something that you will never regret. And you never know that it might be the one thing that offers them hope in a time where it seems like everything is so wrong.

What is inspiring you right now? Do you have ideas sparking in your mind?

Right now I’m inspired with many of the changes that come with fall. This is the season that always has inspired me. In fact, my boys found a whole acorn that I so want to use as a piece of 3D art. I’m hoping I can find some more and have more than a single nut to work with!

Please comment below with what you want to make and even send me some pictures. I would love to see what creativity jumps to life in you!


Files used today

Spring Triple Panel comes with all you see here. Or you can select individual elements.

Jelly Fish element from my Jelly Fish Collection

Processing…
Success! You're on the list.

Leave a comment

Personalizing the Difficult

Whether you’re trying to prevent mix ups from lookalike items at work, on sports teams, or family members, there are just certain things that are flat out difficult to personalize.

For example, my mother in law gifted my boys duffle bags for soccer. Having triplicates of the same nylon bag is great for making sure that no one got a “better” bag. But without some identifier, it makes it difficult for the kiddos to figure out whose bag belongs to whom.

In this same situation, growing up my mom took a sharpie and wrote our names on the straps of our bags.

Fortunately there’s a way of personalizing without going full on retro.

Most people shy away from using iron on (or HTV) decals because the nylon bags melt so easy.

The simple tips with these kinds of bags are that you want to minimize the exposure of high heat that you can.

One you have selected your decal or made your own with your favorite sports font (and cut your HTV with your cutting machine), you want to grab a couple extra items. You want a pressing pillow or a folded up towel that you can place inside your bag and prevent an accidental melting of the two sides of your bag together.

Note: a pressing pillow is going to be a better option because it’s a smooth surface. Even when the nylon starts to get warm from the pressing, it’s a smooth surface that will keep your bag’s fabric smooth where you press. With a towel, especially terry cloth or a towel with some nap to it, the nylon will form against the nap and leave a texture behind when it cools down. So if at all possible, try to keep your barrier something with a smooth surface just to take you that one extra step closer to a perfect final product.

With your barrier inside your bag, you can then place your decal wherever you want on the bag. Just make sure that the pressing pillow or towel is directly under where your decal is going to be placed.

Advertisements

Depending on who you talk to, some crafters are going to tell you it’s okay to use parchment paper or wax paper over your decal. I’m going to steer you away from this advice. The nylon bags melt so easily (especially seeing that your decal is going to need some heat exposure to adhere properly). What is going to eliminate the potential for bag melt is to use a teflon sheet.

Teflon is going to distribute heat better than the other options. The heat bleeds out and so there’s not that clear demarcation that this was where your head source was applied. (This is especially important with an iron or a mini press, where you have a bit more precision with where you are pressing your heat.

Parchment paper will only keep is an okay alternative. I recommend making sure that your press is on a lower temperature, because parchment paper will not prevent discoloration from high heat on a delicate material.

If I can talk you out of one option, it would be the wax paper (or the press and seal that I’ve heard some crafters use as a vinyl carrier). You don’t want the wax (or the press and seal) side to be in contact with your heat source. There will be a residue transfer that is just going to give you some problems you definitely don’t want to deal with. And there are some materials, like nylon, that will absorb in anything that’s an oil based material. It is possible for the wax paper (or press and seal) to leave a halo effect on your nylon where you pressed. And it will be most noticeable if you’re like me and point your iron or press in any and every direction. Instead of having crisp lines, the halo could appear like a faint comic speech balloon.

For the bags that I personalized for my boys, I used a teflon pressing pillow and covered the HTV with a teflon sheet.

Even though the job would have been quicker with my heat press, I opted for my mini press. It was easier for when a couple of the corners of a few letters didn’t want to adhere like the rest. I could pinpoint directly to the spot.

Note: Nylon doesn’t require as long of a press as cotton or canvas. So be sure to either drop your temperature a little or cut your pressing time. It’s easier to press a little longer than to scorch the nylon.

What’s great about knowing how to apply decals onto thin nylon bags is that now I know how I want to commemorate my kiddo’s sports teams through the years. I’ve designed some team logos that I will add on from previous sports seasons. And if I can’t come up with a design for some of the crazy young kiddo team names out there (like Tiger Squirrels) I can pick and font and just add the name.


I hope these tips will help take away the fear factor of personalizing items that we tend to stay far away from. By taking proper precautions and knowing how a material will react to something (like heat), you can most certainly make adjustments to make it a usable material for your creativity!


If you haven’t heard or seen Teflon sheets or pressing pillows here are a couple of links to familiarize yourself with the products. These are affiliate links. I may receive a commission for purchases made through these links, but at no extra cost to you.

Processing…
Success! You're on the list.

Leave a comment

Advertisements

New Twist on Carrots

Making a new style out of throw away materials

The one bit of insight you have, when working for someone else, is just how much a business throws out. And the quality of their garbage. And you also gain insight as to what kinds of businesses subsidize other businesses for you marking your product down for their employees.

I personally know of a few companies who have switched to the Lean Operational method of running a business. And even then it still, somehow, manages to amaze me how much gets thrown out.

Maybe it’s the fact that I grew up where we didn’t have as much as other people around us. Maybe it’s the fact that my mom created magic when she made the gifts we were given on less than a shoe string budget. Maybe it’s the fact that I carry on that frugality because our family budget can go farther and do more things when I reallocate and make do with the little I have, so the hard work of my husband can go elsewhere for family provisions.

This craft here is me on a plate, for you. This is me thinking outside of the box. This is me using materials where half of what you see is stuff that most people throw away.

If you are looking for a new infusion to your farm house style or Easter decor, this project is for you!

Advertisements

Materials

  • 8×10 Canvas Frame
  • Teal and Metallic Gold Acrylic Paint, with paint brush
  • 2 Complimentary Ribbons
  • HTV Vinyl (Permanent Vinyl is another option)
  • Garden Now Open SVG
  • Leaves from Silk Flowers
  • Hot Glue Gun with Glue Sticks
  • Pliers
  • Crafting Knife or Scissors
  • Staples (optional)
  • Sandpaper (optional)

Prepping the Frame

First you want to remove the canvas from our frame so you can paint the frame for your reverse canvas. (If you’re new to Reverse Canvas, hold on for a moment and I will circle back to help you through this process.) Paint the front and sides of your frame with Teal paint. If you keep the paint very thin, you will notice that the paint is dry to the touch in about three minutes. For this example, I went in a circle around the frame twice with the minimum amount of paint (dry brush method, where it look likes and almost feels like you’re brushing on already dry paint) and ended with full coverage of color with no waiting time to apply the Gold paint. It’s really not in my budget to play with Gold Leaf. I would use it for a client. But for the rustic feel I went for, metallic gold paint was enough to add a smidge of class to an otherwise rustic feeling project. And the gold, I used somewhere around a nickel size drop of paint and hit the corners and some edges. Then I set the frame to the side to dry while I added the HTV to the canvas.

First Time Creating a Reverse Canvas: From the back side of the Canvas remove the staples with a pair of pliers. (There are two different methods of putting the canvas back on the frame, which I’ll cover in steps ahead. I just want to let you know from the beginning, if you remove the staples right from the beginning, it can save you from potential problems in future steps. It’s not mandatory, but definitely one of my highly recommended steps.) If small holes next to the staples happen, don’t be afraid, you will not see them later on. If the staples are stubborn, feel free to cut the canvas next to the staple, with a crafting knife, and release the canvas. Set the canvas to the side and move forward with painting your frame, mentioned above.

TIPS: If you’re keeping with the rustic look, there’s no need to sand your frame. If you want a smooth looking frame, you will definitely want to sand your frame before you paint it. If the frame staples are visually unappealing to you, I highly recommend dry wall spackle. You can find some that is purple when you apply it and turns white when it’s dry. It’s very easy and convenient to use, with next to no guess work. A palate knife or even your finger is all you need to apply the spackle. Once it dries, you’ll quickly run over it with sandpaper a couple times. This will smooth out your edges. And when you paint your frame, no one will know that you used putty to fill in the frame cracks. (This is the same method I use when I want to use a frame that for one reason or another was gouged or dropped.

Applying Vinyl to the Canvas

When you go to cut your HTV (High Temperature Vinyl) from your cutting machine, remember to mirror your image. Once you’ve weeded your vinyl, you will place your frame on top of your canvas, so that you can see exactly where you want to press your carrier sheet down on the canvas. (This step is mostly important if you have a few small holes in the canvas that you’re working around. If you’re canvas came off the frame undamaged, than feel free to skip using the fram as a point of reference.) Follow our vinyl’s directions for heat and pressing time. These settings vary. Once you’re vinyl is attached, proceed to reattaching your canvas to your frame.

What if I choose to use Permanent Vinyl? I have successfully used permanent vinyl on canvas. I prefer HTV over 651 (or permanent) because once I have it adhered I do not have to worry for one moment about humidity causing the vinyl to lift. But please do not be shy with using permanent vinyl. You will still want to use an iron to press your Canvas. If there’s any moisture in the fabric, the iron will get that dried out and prepped for your permanent vinyl. Once you place your vinyl, you will want to make sure to have your project on a hard surface that you can press down with a scraper or squeegee. The more attention that you use with burnishing that vinyl down will pay off in the end with a longer life to your craft. Remove your transfer tape and then move forward with attaching the canvas back onto the frame.

Advertisements

Reapply Canvas to the Frame

There are two ways of doing this; hot glue gun or staples.

Method Hot Glue Gun: Apply a liberal amount of hot glue to the back of your frame. Flip it over and position it over your canvas before pressing down and attaching the two together.

The benefit of this method is that it is so quick! Any skill level of crafter can do this application. The important thing to remember is that you have to move quickly so your glue doesn’t cool down on you. AND you will want to try and manage how much glue you use. Too little and the canvas won’t want to stick to your frame. Too much and you will have guaranteed seepage of glue that you will have to clean up. My recommendation is err on the side of a little too much and keep the glue a little off center. It’s better if it seeps out of the outside edge instead of the inside edge. With an inside edge seep, you will need to try and scrape the glue off the canvas or risk having what looks like slug trail on your canvas.

Method Staples: Flip your frame upside down. Position your canvas on top of the frame. Take your staple gun and staple at the top center of your frame. Gently pull your canvas down and place a staple in the center bottom of the frame. Gently pull the canvas to one side and staple in the center of that side. Gently pull on the other side of the canvas and staple in the center of that side. This is called Stretching Canvas. You will then go through the whole rotation again, moving out from center. On a frame this size, you should have about 5 staples across the top and bottom. And about 7 down the sides.

In my opinion I recommend stretching your canvas with the Staple Method. Anytime you add anything to canvas, if it’s not taunt, the weight of your project will warp the appearance of your canvas.

I’m in a crafting group where many of the crafters there swear by the hot glue gun method. In that group I withhold this information because in that setting it’s more important to have these ladies soak up the success of accomplishing a craft that they might not otherwise have attempted.

Here, I want to give you further information because I want you to make an education decision based off of the goal you are after. If you are making this to sell at a craft fair, or you’re decorating for an event that you want professionalism for, I want to set you up for success in these moments. And I know we are not face to face so I can’t use my tone or non-verbal cues to fill you in on this. I am by no means dogging on the hot glue method. In fact, in this example I’m showing you I couldn’t find my staple gun and so I in fact used a hot glue gun. I know the value of stretching canvas and so even with a hot glue gun, I still stretched my canvas. It took much longer than with a staple gun. And if I were using something of more weight than paper carrots, I can assure you that I would not trust hot glue to keep my standard of professionalism to clients. (I know my limitations with hot glue guns, and I’m woman enough to admit that there are many other crafters out there who are geniuses with hot glue. I have skills, but I am not a hot glue gun goddess.)

I want you to feel comfortable with your skill level and what goals are for this project. If what you have available is a hot glue gun, you’re not at all comfortable with stretching canvas, and you’re new to reverse canvas making–PERFECT! Know that you can make a beautiful and professional looking canvas using this method. If you want the challenge and extra security that staples offer, than stretching your canvas is exactly what you’re looking for.

Once your canvas is attached, you will want to trim off the extra canvas. You can either use a crafting knife and cut away on the outer edge of the frame. Or you can use a pair of scissors, angle you blade into the back of the frame, and trim the canvas back.

With clean edges, it’s now time to add those carrots!

Carrots

This is the part that I’m most excited about. These carrots are made completely from scraps that most of the times end up in the trash or recycling bins.

Most of these segments are made from triangles and parallelogram scraps about 3″ wide. Some wider, some less. All of these were from scraps from an explosion box I made a few months back. The card stock was 5 different textures and shades of orange. In fact, one of the orange papers was actually faded from being left out in front of a window. The segments you see above were not triangles and so I pre-folded them in triangular forms to make it quicker to shape and hold with a small drop of glue.

These single cones I then stacked with each other. On a few of the carrots I placed the glue on the back of the cone. Most looked better with the attachment point being at the front of the cone.

I made a few extra carrots than I had space for on the canvas, because I wanted to have some choices of which ones looked better than others. In fact, one carrot had a herringbone look to it. And since it didn’t have the same feel as the others, that one got set aside for a future project.

Once I got the length of carrots that I was happy with (a few were 4″ long and others were as much as 8″), I went into my bin of silk flowers that have seen better days. In fact, they were part of the flowers that I bought from a wedding planner who was selling all of her inventory. I was after her roses, but she gave me her entire flower collection. These leaves were actually from some geraniums and daffodils. The daffodils were actually really beat up and were just collecting dust, because I couldn’t use them for events. And this was the moment that I could actually give these greens a purpose. Other than purchasing silk ferns, these greens were actually quite perfect.

What makes these carrots so special in the crafting world is that it embraces the cubism element from the art world. I’ve seen a lot of carrots made from yarn and cloth, styrofoam and foam. These paper carrots give talking points and structure. And this structure is what was great for placing in the frame, with the ability to break free from the frame (giving a nod to surrealism).

Finishing Touches

Once I found the placement that I liked for these carrot shapes, I glued them down with hot glue gun.

Due to the light weight nature of this project, attaching the ribbon with hot glue is enough. However, if you’re creating for a professional item, you will want to use a stapler to attach you bottom layer of ribbon to the frame. For the top ribbon attachment, E6000 glue would be better than hot glue. But hot glue does do the job for a non-sellable project.

Please comment below and tell me how this spring time project turned out for you. Pictures are even better. I love seeing what other people make!

The SVG used in this post can be found here

Processing…
Success! You're on the list.
Advertisements

Don’t Throw That Out Yet!

It doesn’t matter if you’re an Artist, DIY Bride, Crafter, or a Just Because-er, you will create something and there’s just nothing you can do to save that project from the junk heap. Sometimes we get wrapped up in our own emotions of wasted time, wasted materials, dashed dreams of overextended ambitions, and everything else, that we forget even the Master Artists had unsuccessful projects.

If you’ve spent anytime in art history classes, or been around artists long enough, you probably already heard about this. All the Greats recycled their canvas. That’s right! Da Vinci, Rembrandt, Picasso, I could go on and on… they all painted over something they created before. The lesson that we can take from this is that we can create over something that we tried to create before.

This was a wood block that I had to give up on after running through Plan A to Plan F. That’s right, I tried to correct and original problem five other times! Am I stubborn? Yes. Am I determined? You better believe it. Do I succeed at everything? No. But, I give myself permission to set aside what is clearly not working. For this particular project, I discarded about 16 hours of trying to make it work and grabbed a new blank. In less than an hour, I executed my main vision without having to go through another plan letter. Sometimes scrapping a project to start over on the same vision is completely necessary. And that is when your success comes.

Here is where things get good for this block of wood. Even though I had painted it on all sides (in a color I don’t usually work with) there are ways of recovering materials and reusing it in something completely different. I had fully intended on sanding the glitter and acrylic paint off, but inspiration hit and I really didn’t want to waste the time of stripping the wood for a clean base. Instead I challenged myself with this cotton candy pink by adding black, blues and purple to the pink and creating a base that gave off a vibe of sunrise or sunset. And that in turn inspired the three variations of Darkness To Light. (Click here to see all three!)

What is amazing about blending colors and adding textures into your paint is that you can cover over even the raised text from stencil painting and the glitter. Acrylic paint doesn’t cover glitter at all. It always manages to shine through. So if you decide to not go with glitter ontop of a project you previously used glitter on, I recommend taking the time to sand the glitter off. I’m sorry I could not get a picture of the glitter coming through (I gave up after 30 attempts), but my oldest son kept playing with my lights to get the glitter to sparkle. So if you know kids, when they play with lights you know the glitter is still there. However after much finagling, I was able to get one angle where my camera did finally pick up on the raised lettering. But unless I point out stuff like, most people I know pretty much never pick up on the fact that I reused this wood block.

The raised letters are right here on the bottom just above this cloud line.

Normally at this point in a project I spray a couple of coats of clear acrylic spray over the top. It seals in the paint to it doesn’t transfer paint when you knock it against something. And I love using HTV over paint. I get a better end product with it and the vinyl stays on without lifting. (Permanent vinyl tends to lift when you have higher humidity levels.) The clear acrylic spray also smooths out your surface, making it more flat when you adhere your vinyl. Coming up the next few shots, you will see what the raised textured acrylic paint did to the vinyl. But this is something that spray acrylic and HTV really does overcome.

Instead of my usual route, I went with the unsealed acrylic paint and permanent vinyl. Going into this, I knew that there were a few obstacles that I was going to have to overcome; transfer tape stripping the paint off the wood block and the vinyl not adhering to the uneven surface.

Transfer Tape Stripping of the Paint

This is the #1 problem most crafters complain about when they work with paint and vinyl! You will find it everywhere, on every forum where people are asking for help. You will get the standard answers of use a transfer tape with less tack, use transfer paper, use press and seal…. I’m telling you that you don’t need to do any of this! The reason is that the problem isn’t the level of stickiness. The problem is that you’re pressing your transfer material onto your paint with the same force that you’re using to adhere your vinyl. Both have tack. They’re both going to stick. So please don’t spend more money chasing a solution that is still going to be part of the problem. I know because I’ve tried all the different tack and I still pulled up paint before I learned this.

Solution: DO NOT burnish your transfer tape with your vinyl.

Instead: gently lay your transfer tape in position and very lightly press it to your surface. The goal here is keep your vinyl in position while you use another tool to press down ONLY on the vinyl. With Darkness and Light being larger letters, using my fingers was enough to transfer the vinyl. For my thin letters here, I used my cutting machine’s scoring tool. This gives the ability to press down as hard as you like. You will not adhere your transfer tape to your paint. And you’re not going to scratch your unprotected paint either. Absolutely none of my paint peeled or flaked off. You can zoom in on the following pictures and see for yourself. All of my built up layers of acrylic stayed the same as they were before I applied my vinyl.

Vinyl Adhering to an Uneven Surface

There’s generally two problems under this category. One actually getting your vinyl to adhere and not lift (you’re not going to get a complete seal). The other problem is purely cosmetic, you’re not going to have that glossy (or matte) smooth finish.

For the cosmetic, unsealed raised paint is never going to give you a flat smooth vinyl esthetic.

As I stated earlier, there are ways around this. But the way that I painted and left it unsealed…this is what it looks like. If you choose to work with vinyl on an uneven surface and want to try for the perfect finish, I recommend finding an appropriate sealer to help minimize the highs and lows of your surface and then aim for placement to go where there is the least amount of height disparity. Chances are that you’ll probably still won’t get that flawless look, but you’ll get close. Just remember that the more layers of sealer you put on top you will have to allow more than enough time for it to fully dry or cure before applying the vinyl. Vinyl needs to have a dry surface to adhere to because your sealer has to breathe to dry/cure. (This is most definitely not the project you want to use the wet method of applying vinyl. Save that for a glass or plastic surface that don’t need to breathe.)

That being said, there is a solution to maximizing the potential of your vinyl adhering properly.

Once you’ve removed your transfer tape, go back through and reburnish your vinyl. Transfer tape hides alot. You never see what is not fully burnished until you remove the transfer tape. As you can see here, there was plenty of places where I didn’t press down on the vinyl enough the first time, or because the text is so thin the transfer tape pulled some of it up. In reality, for this project it was both of those things.

With nothing protecting my vinyl, I didn’t want to scratch or crease it with my scoring tool. So I flipped my tool over and used the other side. It is wider than my thin text, but it also didn’t have a plastic seam running down the middle. So I had a smooth surface to go back over my vinyl and burnish it again without fear of scratching my vinyl or my paint for that matter.

Here is the final project!

I’m sure that the question will be asked, “Did your vinyl lift?”

At the time of writing this blog, my vinyl has sat untouched for over 48 hours and looks the exact same as the finished project picture above. I have every reason to believe that I’m in the clear and the vinyl will stay as is. You are more than welcome to ask in the comments below for a future check in. I’m more than glad to fill you in on the status.

I am going to add one observation I’ve had with vinyl though. Where you put your project is totally going to effect the longevity of what you made. For example, I have bathroom art which has vinyl on top of acrylic and were sealed. the two pieces that I have in there, the vinyl on the piece nearest the shower lifted after 6 months. So much so that I had to apply some glue underneath to keep the vinyl on. The glue solved the problem and I haven’t had lifting since. The piece that is about two feet further away had one small piece lift, but not enough for me to get glue in there to reattach it. Since the same vinyl was used on both pieces, I know it wasn’t the vinyl itself. It was the humidity from being close to the shower. Vinyl does not like humity. So be aware of where your final placement is going to be. And let that information help you make decisions on which materials you are going to use for your project. Again, there are always solutions on how to fix things. But being aware is so very important for the longevity of your creations.

This was important to point out, because I will never put this Darkness to Light project in my bathroom or near my stove in my kitchen (where it would become exposed to steam). The uneven surface creates little pockets where steam/humidity can come in and loosen the adhesive bond.

Now that all is said and done, I am so happy with the outcome of this recycled project!

The scrapped project brought me so much tears and frustration. I actually hid it in my craftroom because of how many emotions is evoked in me. But it’s transformation brings me so much joy! Sometimes it’s hard for me to wrap my mind around the fact that there is ugliness and frustration under the new design. It makes me wonder if all the Great Artists felt like this when they painted over something previously made.

Thank you for walking through this transformation project with me. I hope it inspires you not to give up on something that you’ve made that just doesn’t hit the mark on any level. These projects can see new life in a new direction.

Please comment below, sharing with my any transformation projects you’ve made. Or if you’re stuck on something and would like some perspective to help get unstuck. I’m here for you.

See you next week!

Processing…
Success! You're on the list.