After spending almost a decade in the event decorating industry I have repetatively heard "I can do that". Instead of being dismissed by creative minded people, I want to show you how I do "that" so you can be sucessful in recreating that inspiration image. I just might have a few tricks that you haven't seen yet!
Whether you’re trying to prevent mix ups from lookalike items at work, on sports teams, or family members, there are just certain things that are flat out difficult to personalize.
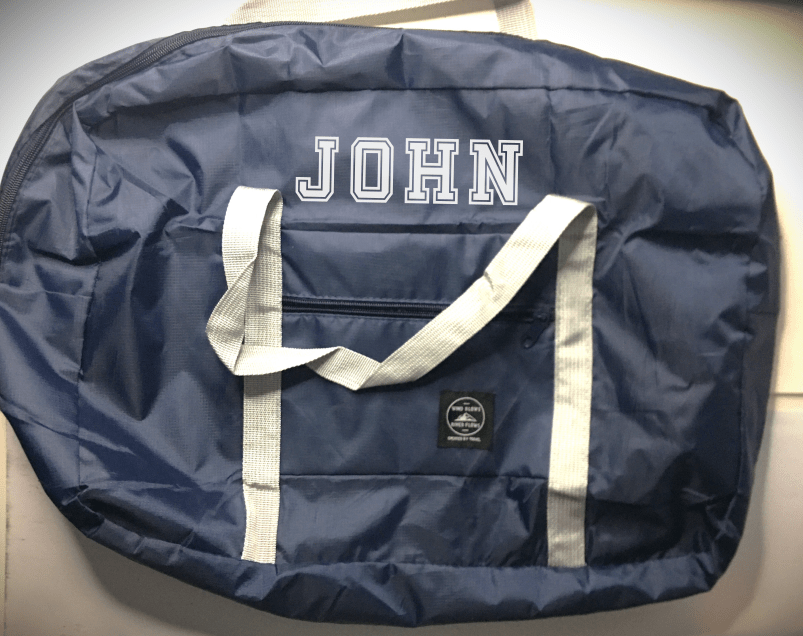
For example, my mother in law gifted my boys duffle bags for soccer. Having triplicates of the same nylon bag is great for making sure that no one got a “better” bag. But without some identifier, it makes it difficult for the kiddos to figure out whose bag belongs to whom.
In this same situation, growing up my mom took a sharpie and wrote our names on the straps of our bags.
Fortunately there’s a way of personalizing without going full on retro.
Most people shy away from using iron on (or HTV) decals because the nylon bags melt so easy.
The simple tips with these kinds of bags are that you want to minimize the exposure of high heat that you can.
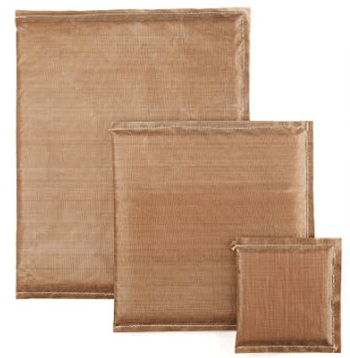
One you have selected your decal or made your own with your favorite sports font (and cut your HTV with your cutting machine), you want to grab a couple extra items. You want a pressing pillow or a folded up towel that you can place inside your bag and prevent an accidental melting of the two sides of your bag together.
Note: a pressing pillow is going to be a better option because it’s a smooth surface. Even when the nylon starts to get warm from the pressing, it’s a smooth surface that will keep your bag’s fabric smooth where you press. With a towel, especially terry cloth or a towel with some nap to it, the nylon will form against the nap and leave a texture behind when it cools down. So if at all possible, try to keep your barrier something with a smooth surface just to take you that one extra step closer to a perfect final product.
With your barrier inside your bag, you can then place your decal wherever you want on the bag. Just make sure that the pressing pillow or towel is directly under where your decal is going to be placed.
Advertisements
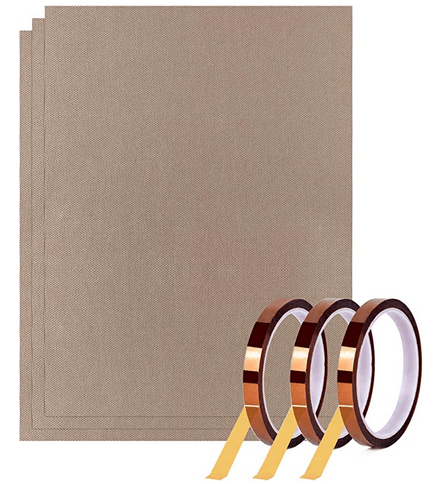
Depending on who you talk to, some crafters are going to tell you it’s okay to use parchment paper or wax paper over your decal. I’m going to steer you away from this advice. The nylon bags melt so easily (especially seeing that your decal is going to need some heat exposure to adhere properly). What is going to eliminate the potential for bag melt is to use a teflon sheet.
Teflon is going to distribute heat better than the other options. The heat bleeds out and so there’s not that clear demarcation that this was where your head source was applied. (This is especially important with an iron or a mini press, where you have a bit more precision with where you are pressing your heat.
Parchment paper will only keep is an okay alternative. I recommend making sure that your press is on a lower temperature, because parchment paper will not prevent discoloration from high heat on a delicate material.
If I can talk you out of one option, it would be the wax paper (or the press and seal that I’ve heard some crafters use as a vinyl carrier). You don’t want the wax (or the press and seal) side to be in contact with your heat source. There will be a residue transfer that is just going to give you some problems you definitely don’t want to deal with. And there are some materials, like nylon, that will absorb in anything that’s an oil based material. It is possible for the wax paper (or press and seal) to leave a halo effect on your nylon where you pressed. And it will be most noticeable if you’re like me and point your iron or press in any and every direction. Instead of having crisp lines, the halo could appear like a faint comic speech balloon.
For the bags that I personalized for my boys, I used a teflon pressing pillow and covered the HTV with a teflon sheet.
Even though the job would have been quicker with my heat press, I opted for my mini press. It was easier for when a couple of the corners of a few letters didn’t want to adhere like the rest. I could pinpoint directly to the spot.
Note: Nylon doesn’t require as long of a press as cotton or canvas. So be sure to either drop your temperature a little or cut your pressing time. It’s easier to press a little longer than to scorch the nylon.
What’s great about knowing how to apply decals onto thin nylon bags is that now I know how I want to commemorate my kiddo’s sports teams through the years. I’ve designed some team logos that I will add on from previous sports seasons. And if I can’t come up with a design for some of the crazy young kiddo team names out there (like Tiger Squirrels) I can pick and font and just add the name.
I hope these tips will help take away the fear factor of personalizing items that we tend to stay far away from. By taking proper precautions and knowing how a material will react to something (like heat), you can most certainly make adjustments to make it a usable material for your creativity!
If you haven’t heard or seen Teflon sheets or pressing pillows here are a couple of links to familiarize yourself with the products. These are affiliate links. I may receive a commission for purchases made through these links, but at no extra cost to you.
There are times in life where you always ask yourself, “What can I get them?” We’ve all been there, especially if you’re the primary gift giver in your family. There are always a few different ideas that come to mind. But then the question becomes, “Will they like it? Or do I just like it?”
When I graduated High School, the one gift that I didn’t appreciate at the time was from my maternal grandfather. Granted it was probably the first time that he gifted a gift alone without my grandma’s thoughts. And I can actually smile at the memory now, because I understand his thinking. But it wasn’t the best graduation gift. I was gifted a set of pink towels.
Yes, you read that right.
I can smile now because from the perspective of a well over retirement age widowed man, I’m sure that towels were a practical gift that he thought he nailed. Everyone needs towels. It’s a necessity. And with college coming up, a graduate is going to need towels. And now that I think about it, maybe my grandma would have approved of the gift.This set of grandparents was very practical at gift giving. There had been a childhood Christmas where I was gifted underclothes. That was definitely NOT what a child expects or wants to open up on Christmas, but it was definitely practical and a necessity at that Christmas.
Please don’t misunderstand me. I’m not mentioning these gifts to say that they were horrible. Neither am I saying, if anyone is thinking of gifting a graduate towels, that you should reconsider. I am mentioning this because what may seem logical, well thought out, and well meaning in your intentions and thoughts, it might just be seen in a different light by the recipient.
It’s this kind of disappointment, written all over the face of the recipient, that prompted and bolstered sales of gift cards for somewhere around two decades now. Also, there’s the fact that some people are just difficult to buy for. Thus the thought of, it’s just better to give a gift card or cash (or some generations prefer gifting checks). You express your desire to love on someone and they get to pick out exactly what is going to make them happy.
Or let’s be honest. There are also times that life happens and you didn’t make it out to the store or missed buying with enough shipping times (or as we’re seeing unusual delays in shipments). What do you do now?
How do you gift cards or cash???
That is the number one reason why I drag my feet so much in gifting by cash or gift card. I love giving meaningful gifts. I love finding a gift that represents a small part of me, but screams that other person’s name. What am I going to do with cash or gift card, slap it in a card and call it day? That’s just not me.
So, here are two ideas that I’ve used.
Explosion Box
This one is actually my favorite right now. Growing up I was always taking pictures. I still have those pictures. I have inherited pictures. And I bless the day that digital cameras were created, because I could take pictures to my heart’s content, see the shots without having to wait for film to be developed and printed, and capture moments that I can relive forever.
If you are like me, love pictures, or you are a memorabilia collector this option is absolutely perfect for you!
There are many options to choose from. You can have many box arms that unfurl for you. You can have a single layer or many layers of box within boxes. There are many “accessories” you can find that comes with different boxes.
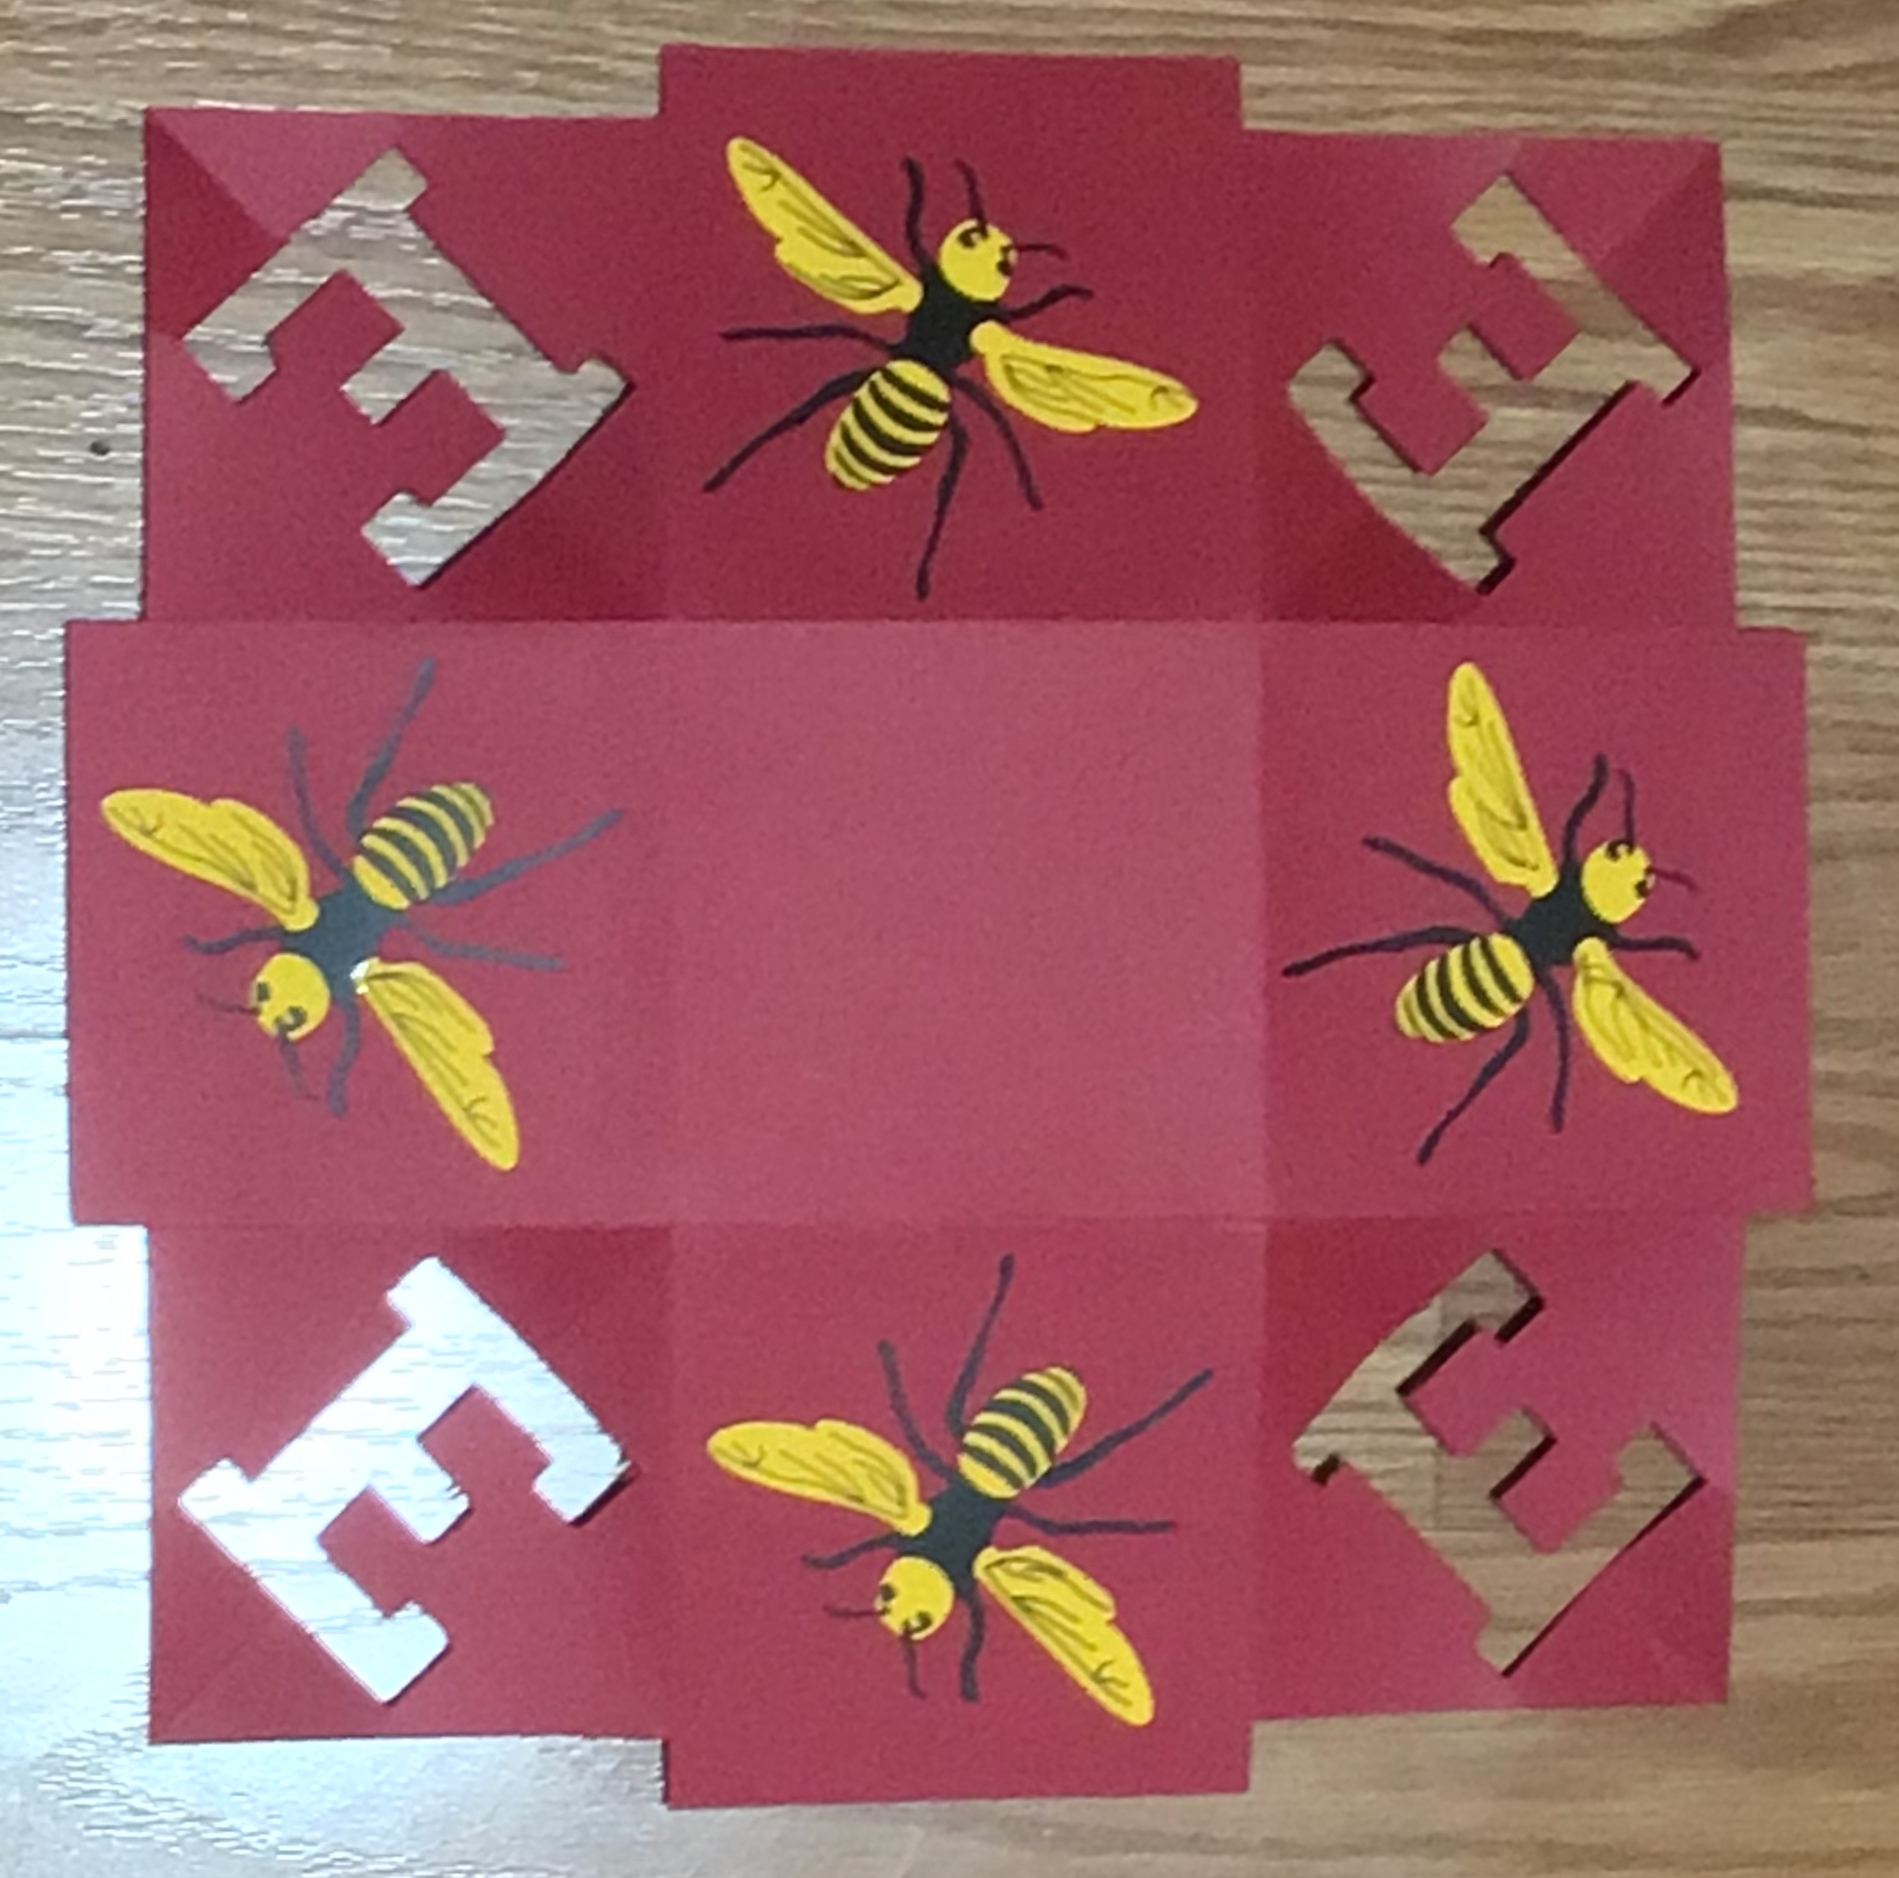
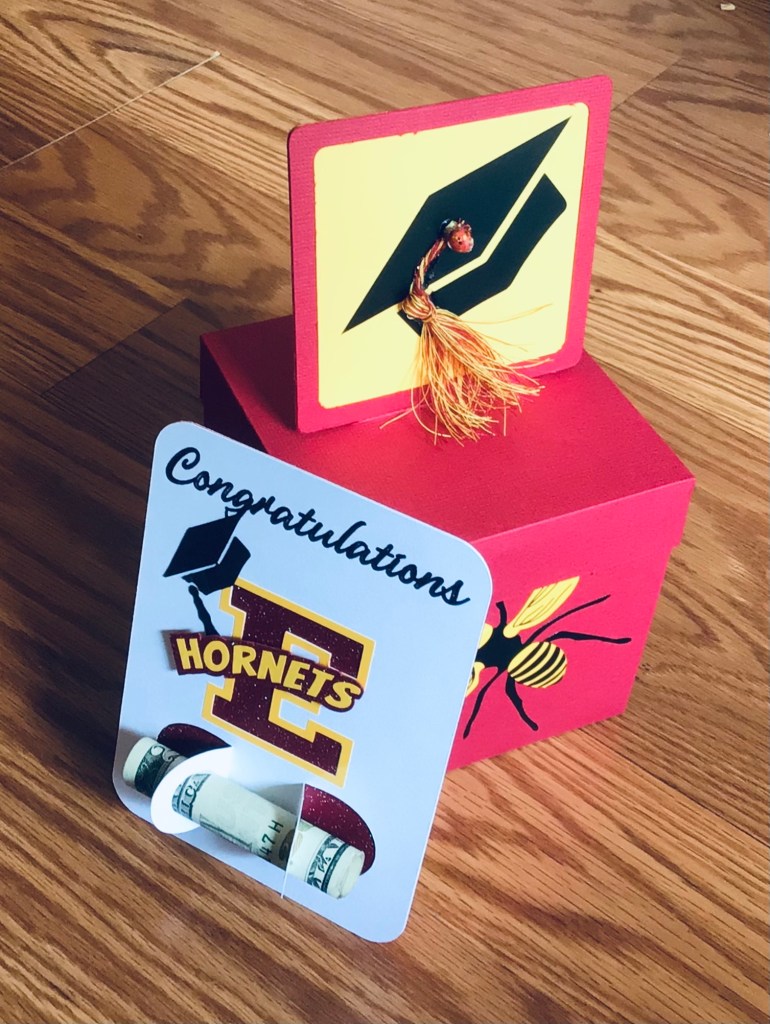
By accessories, I mean what is included in the base design of the box. This year, my graduation boxes feature Polaroid picture frames. Last year my graduation boxes were on the life stages of butterflies. (The first layer was designed with caterpillar shapes. The second layer was all about the chrysalises. The third layer was designed after the butterfly.) Also, this year I’ve focused on the school monogram, school colors, and mascot. You can have just picture frames in the boxes. Or you can have holders that you can store ticket stubs, gift cards, and folded notes. Think memory box and different organizational devices to keep these memories organized.
That is an explosion Box. It is completely customizable. And even when boxes are cut from the same file, the variety of materials available makes them all unique. Even if a few people bought the same explosion box for a person, it’s not like you bought them the same card. The uniqueness of the box is what you put in it. Your shared memories with the recipient are going to be different than the shared memories of the recipient with a different gifter of the same gift. And then the fun begins, because you can compare all the different things that you’ve shared with the same person!
Money Card
This item is the newest fad in giving of cash. I’ve only recently become introduced with them, but I’m sure that they’ve been made for a year or two.
At least, this is the newest rendition of this form of giving money. I’ve seen enough chatter in the crafting groups that money cards are not readily available in certain global regions. And in those areas, which do not have designs reflecting their cultures, they will use a beautified envelope.
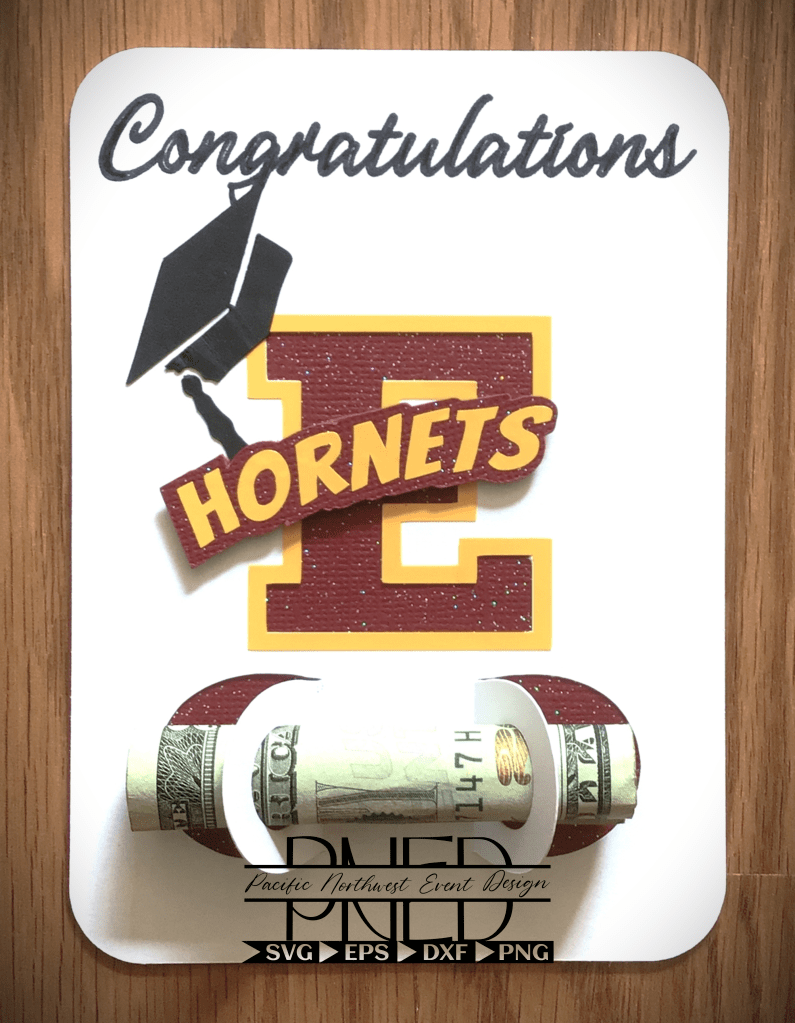
There are two different versions of the Money Card that I see right now. One is using a plastic shell inside a card stock holder. Imagine the plastic shell used on your favorite tube of of Chap Stick that’s sealed in between two thin pieces of card board. That is one version of the Money Card. This one is great, because if you want to secure the cash, so it doesn’t slip out in your purse when you pull the cash card out, this is what you’re looking for.
Another version of the Money Card is where there are two tabs with circles. You roll up the cash that you are given and you slide it through the holes in the tabs of the Cash Card. This version is great, and my preferred one, because once the cash is given, the card can then be used again. For example, the Money card can have the tabs flattened and then be used as a book mark.
I love books, so yes I went for second use as a book mark.
This second version is not destroyed to remove the plastic shell holding the money. So it also makes it have the added bonus of being saved as a memory. It’s not that often that people receive notes or letters from loved ones. So here’s one option where a grandparent, aunt or uncle can leave a hand written note for their graduate. And having lost several noteworthy people in my life I can finally tell you from experience that having a hand written letter telling you that your loved one is proud of you and that they love you is something that will NEVER go out of style. It’s something that you pull out and relive the love of that person.
So please don’t underestimate the power of a cash gift that carries your handwriting and love with congratulations. You may think that you will be around forever. But there really is a day that someone will miss you. And with the increase of stories of students dying to suicide or from accidents caused by other, maybe your note of love is something they can tangibly hold. Maybe a note from you keeps your loved one from escaping to drugs or running away and living on the street. Never ever ever underestimate the moments in life where you can lift someone up and tell them just how proud you are of them.
I wish you could see me right now, while I’m typing. If you are crying you’re in good company. I can’t keep the tears out of my eyes. I know my graduates are in secure families, but my heart is breaking in this moment for those graduates that are going through a rough moment that no one knows about. Yes, I have a mama’s heart and I wish I could give those graduates a great big hug, look them in the eyes, and tell them that they matter. They have purpose. The world needs them. And they can make it past this moment.
Please forgive that rabbit trail. I try not to pass up moments that matter. And I never know who reads this blog. But if you needed that last paragraph, know that it was meant just for you.
Money Leis
This was a thing that started back when I graduated High School, at least in my area. I first noticed it was with the year that graduated with me. And I’ll be honest, I so wanted one of those. So thank you Pacific Islander families who introduced this graduation gift to me all those years ago.
This is not my image. Nor do I own the rights to it. This is an image from Pinterest.ca that was found in a google search that was free to share and use. If you own this picture, please reach out to me and I will give you proper credit here.
I’m sorry that I’m not able to instruct you how to make this item. But there are plenty of videos on YouTube that can walk you through those steps. And know that one of these days, I will learn how to make them myself. In fact, I’ll go ahead and put it on my to-learn list for this year. That way I can come back for 2023 Graduation season and have some input on tips and what steps to avoid.
Money Arrangements
Very similar to the Money Lei is the Money Arrangements. I’ve seen many crafters fold money, like the Money Lei, to make flowers and topiaries. I’ve also seen people roll up bills. These rolled bills are then arranged into different shapes. You could use the rolls to make a graduation cap, graduation cake, or just about anything you have the imagination for.
If you’re interested in making making money topiaries, I did find a pictorial tutorial that looks very user friendly for those who might describe themselves as craft challenged. Here is a link to Sugar Bee Crafts. As of the writing of this post, I have not had contact with this craft blogger. Nor do I receive any compensation for this mention. I bring this to you, to be of service and help you come up with new ideas for your gift giving.
Now that I’ve given you some ideas on meaningful ways of gifting cash to your graduate, here is a little tutorial on how to make a quick tassel to dress up any graduation craft.
How To Make A Tassel
My collection of Embroidery Floss was not locatable when I was making my nephew’s graduation box. So I did the next best thing. I used my sewing thread that was in his school colors. And this was absolutely perfect, because I needed a small tassel and sewing thread gave a more sleek appearance that was proportional to the final product.
What I used:
Two different colored spools of thread
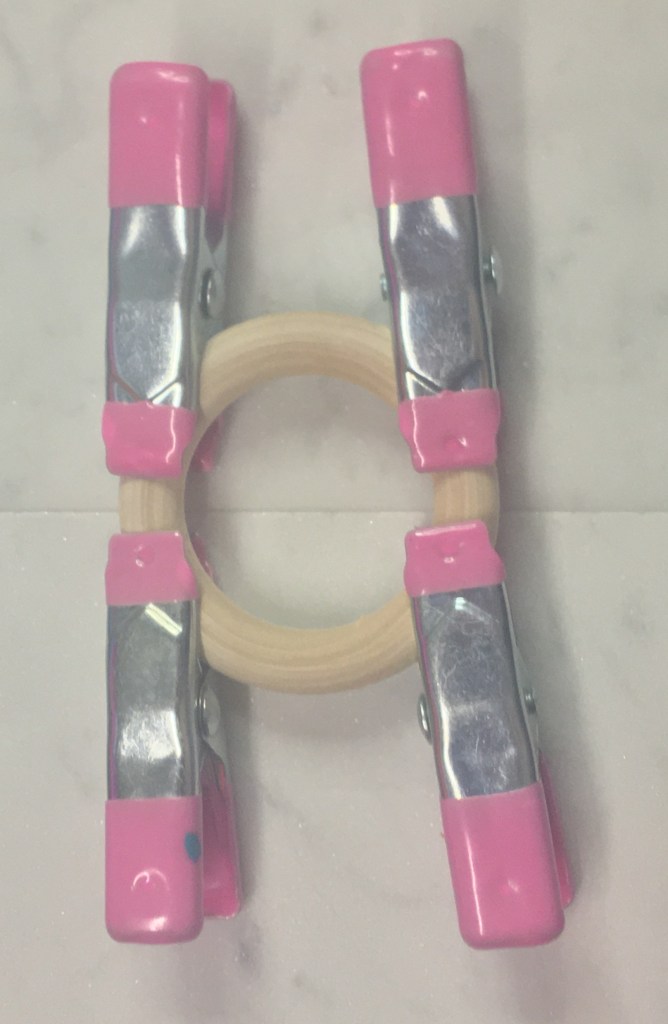
(1) 2 inch wooden ring
(4) crafting clamps
Scissors
Hot glue gun and glue for application
Place the clamps on your ring so that you can keep your thread centrally located.
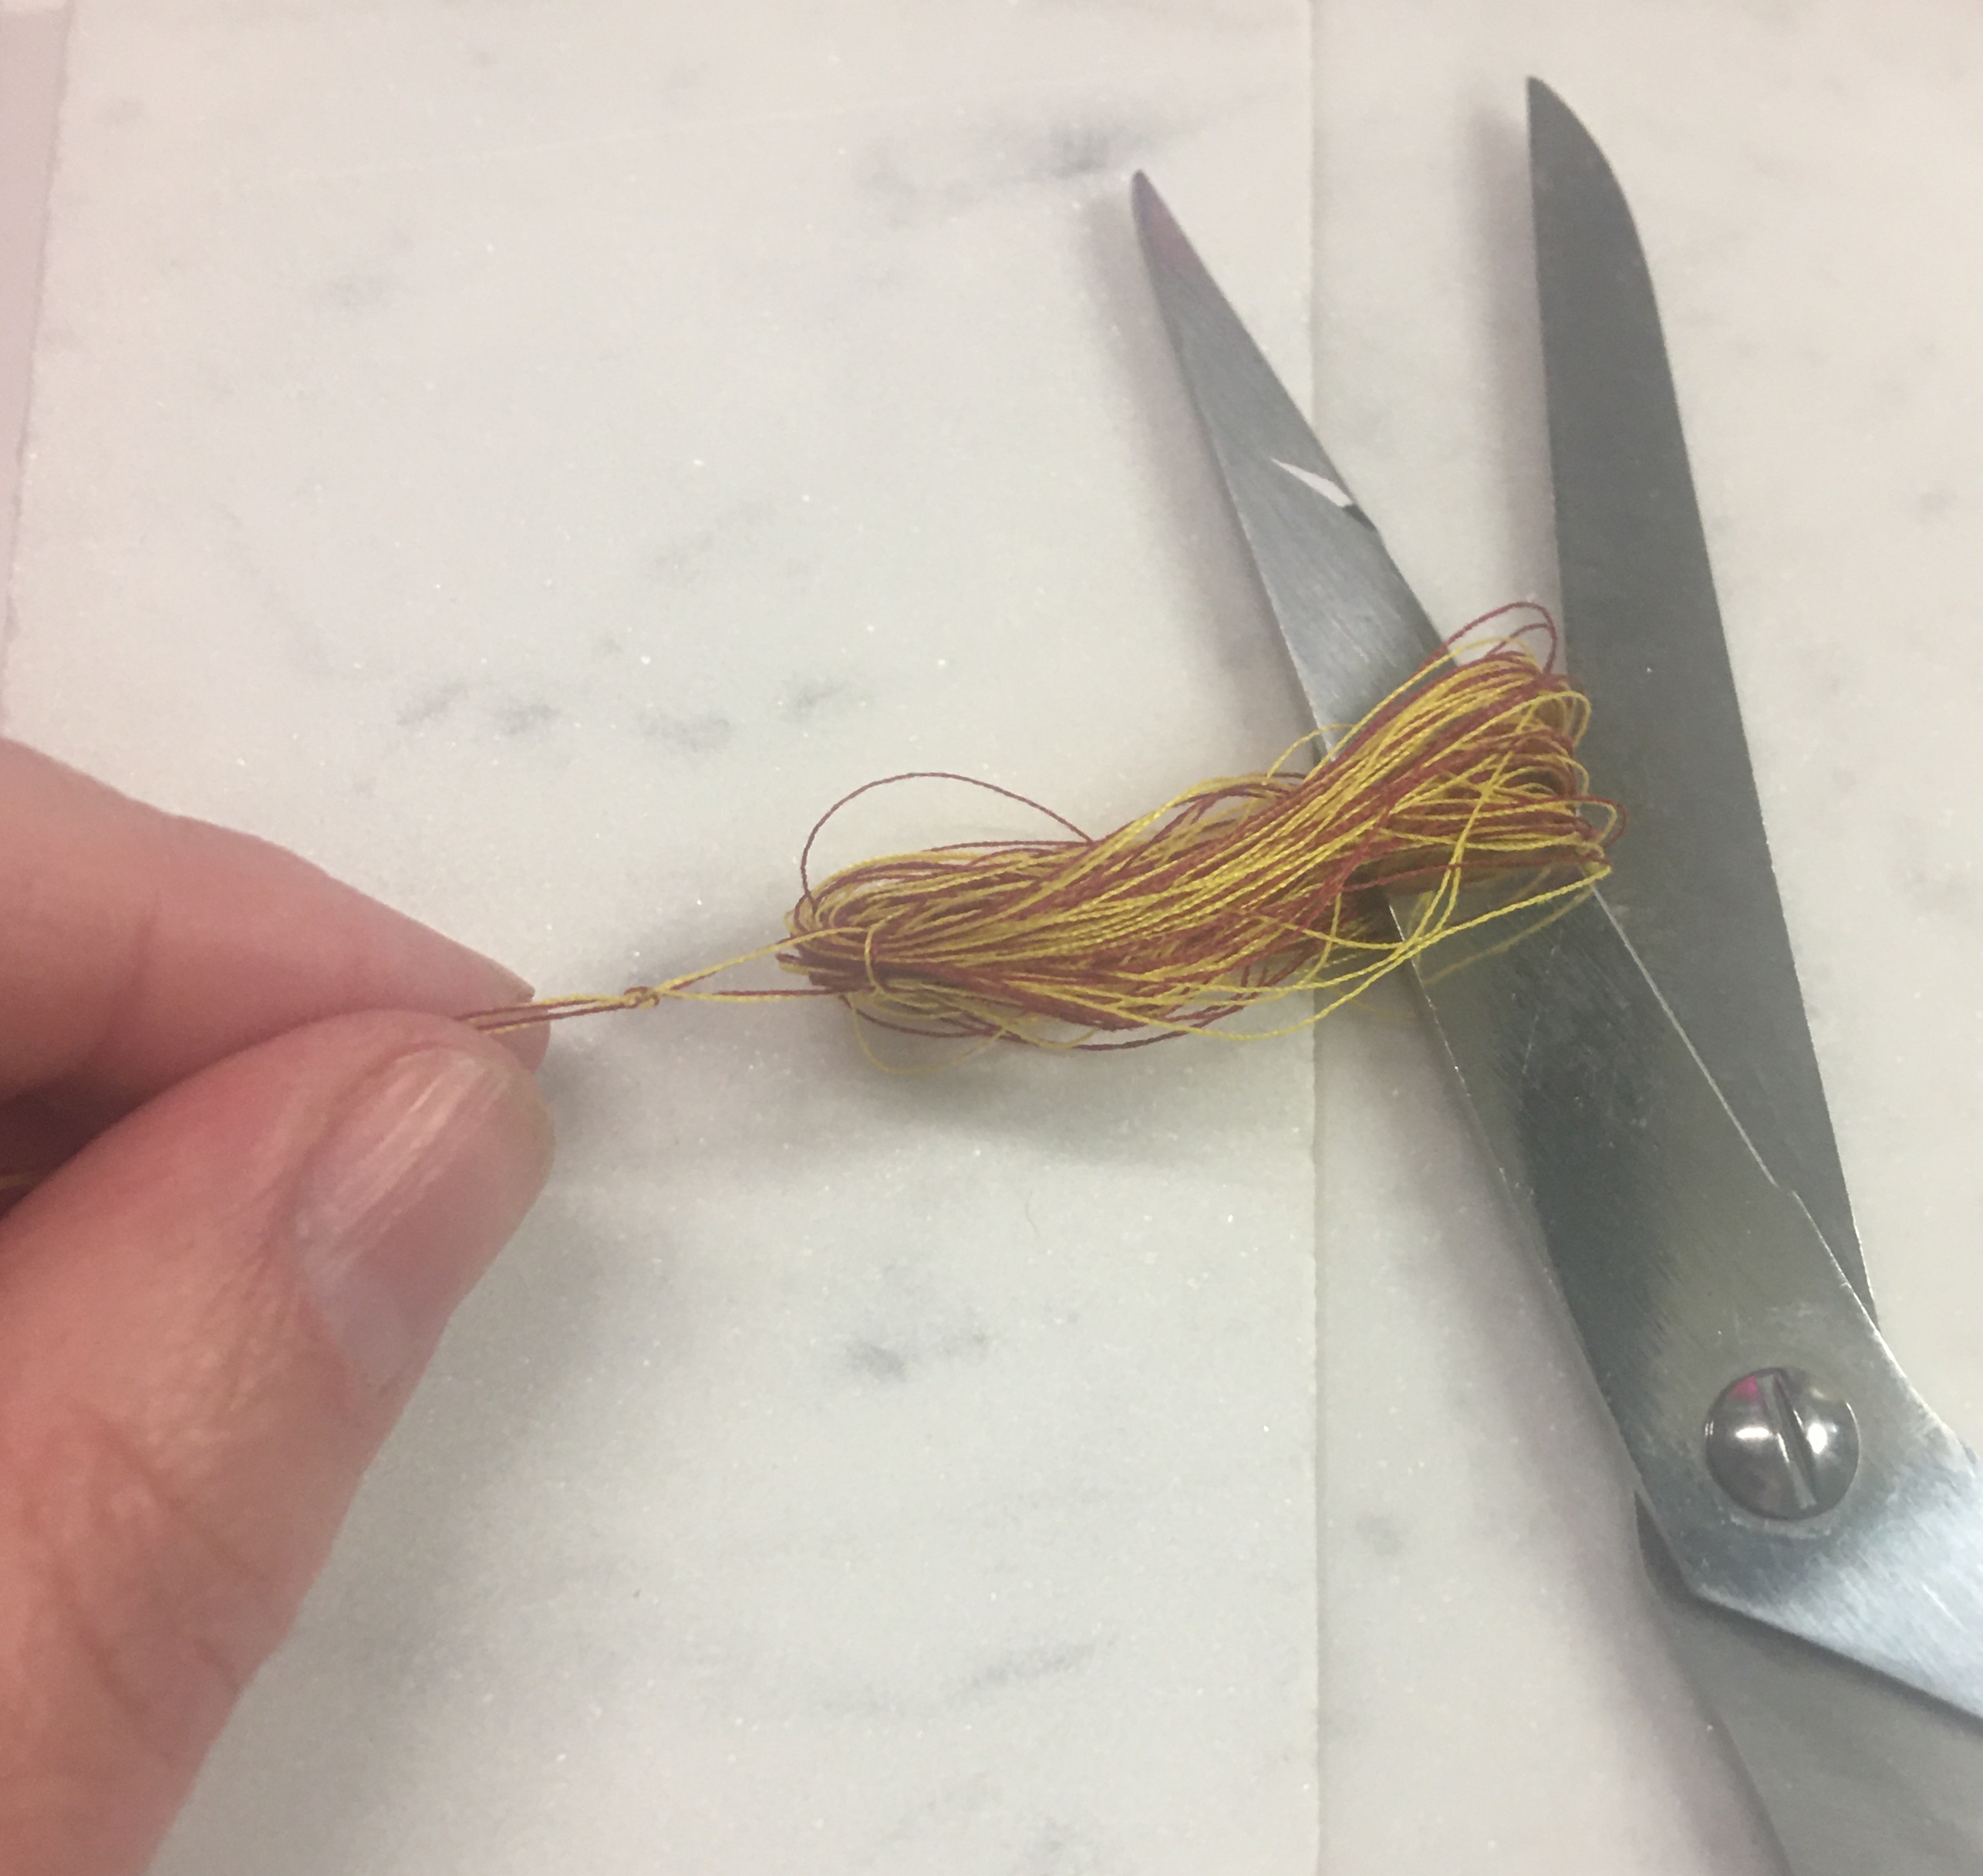
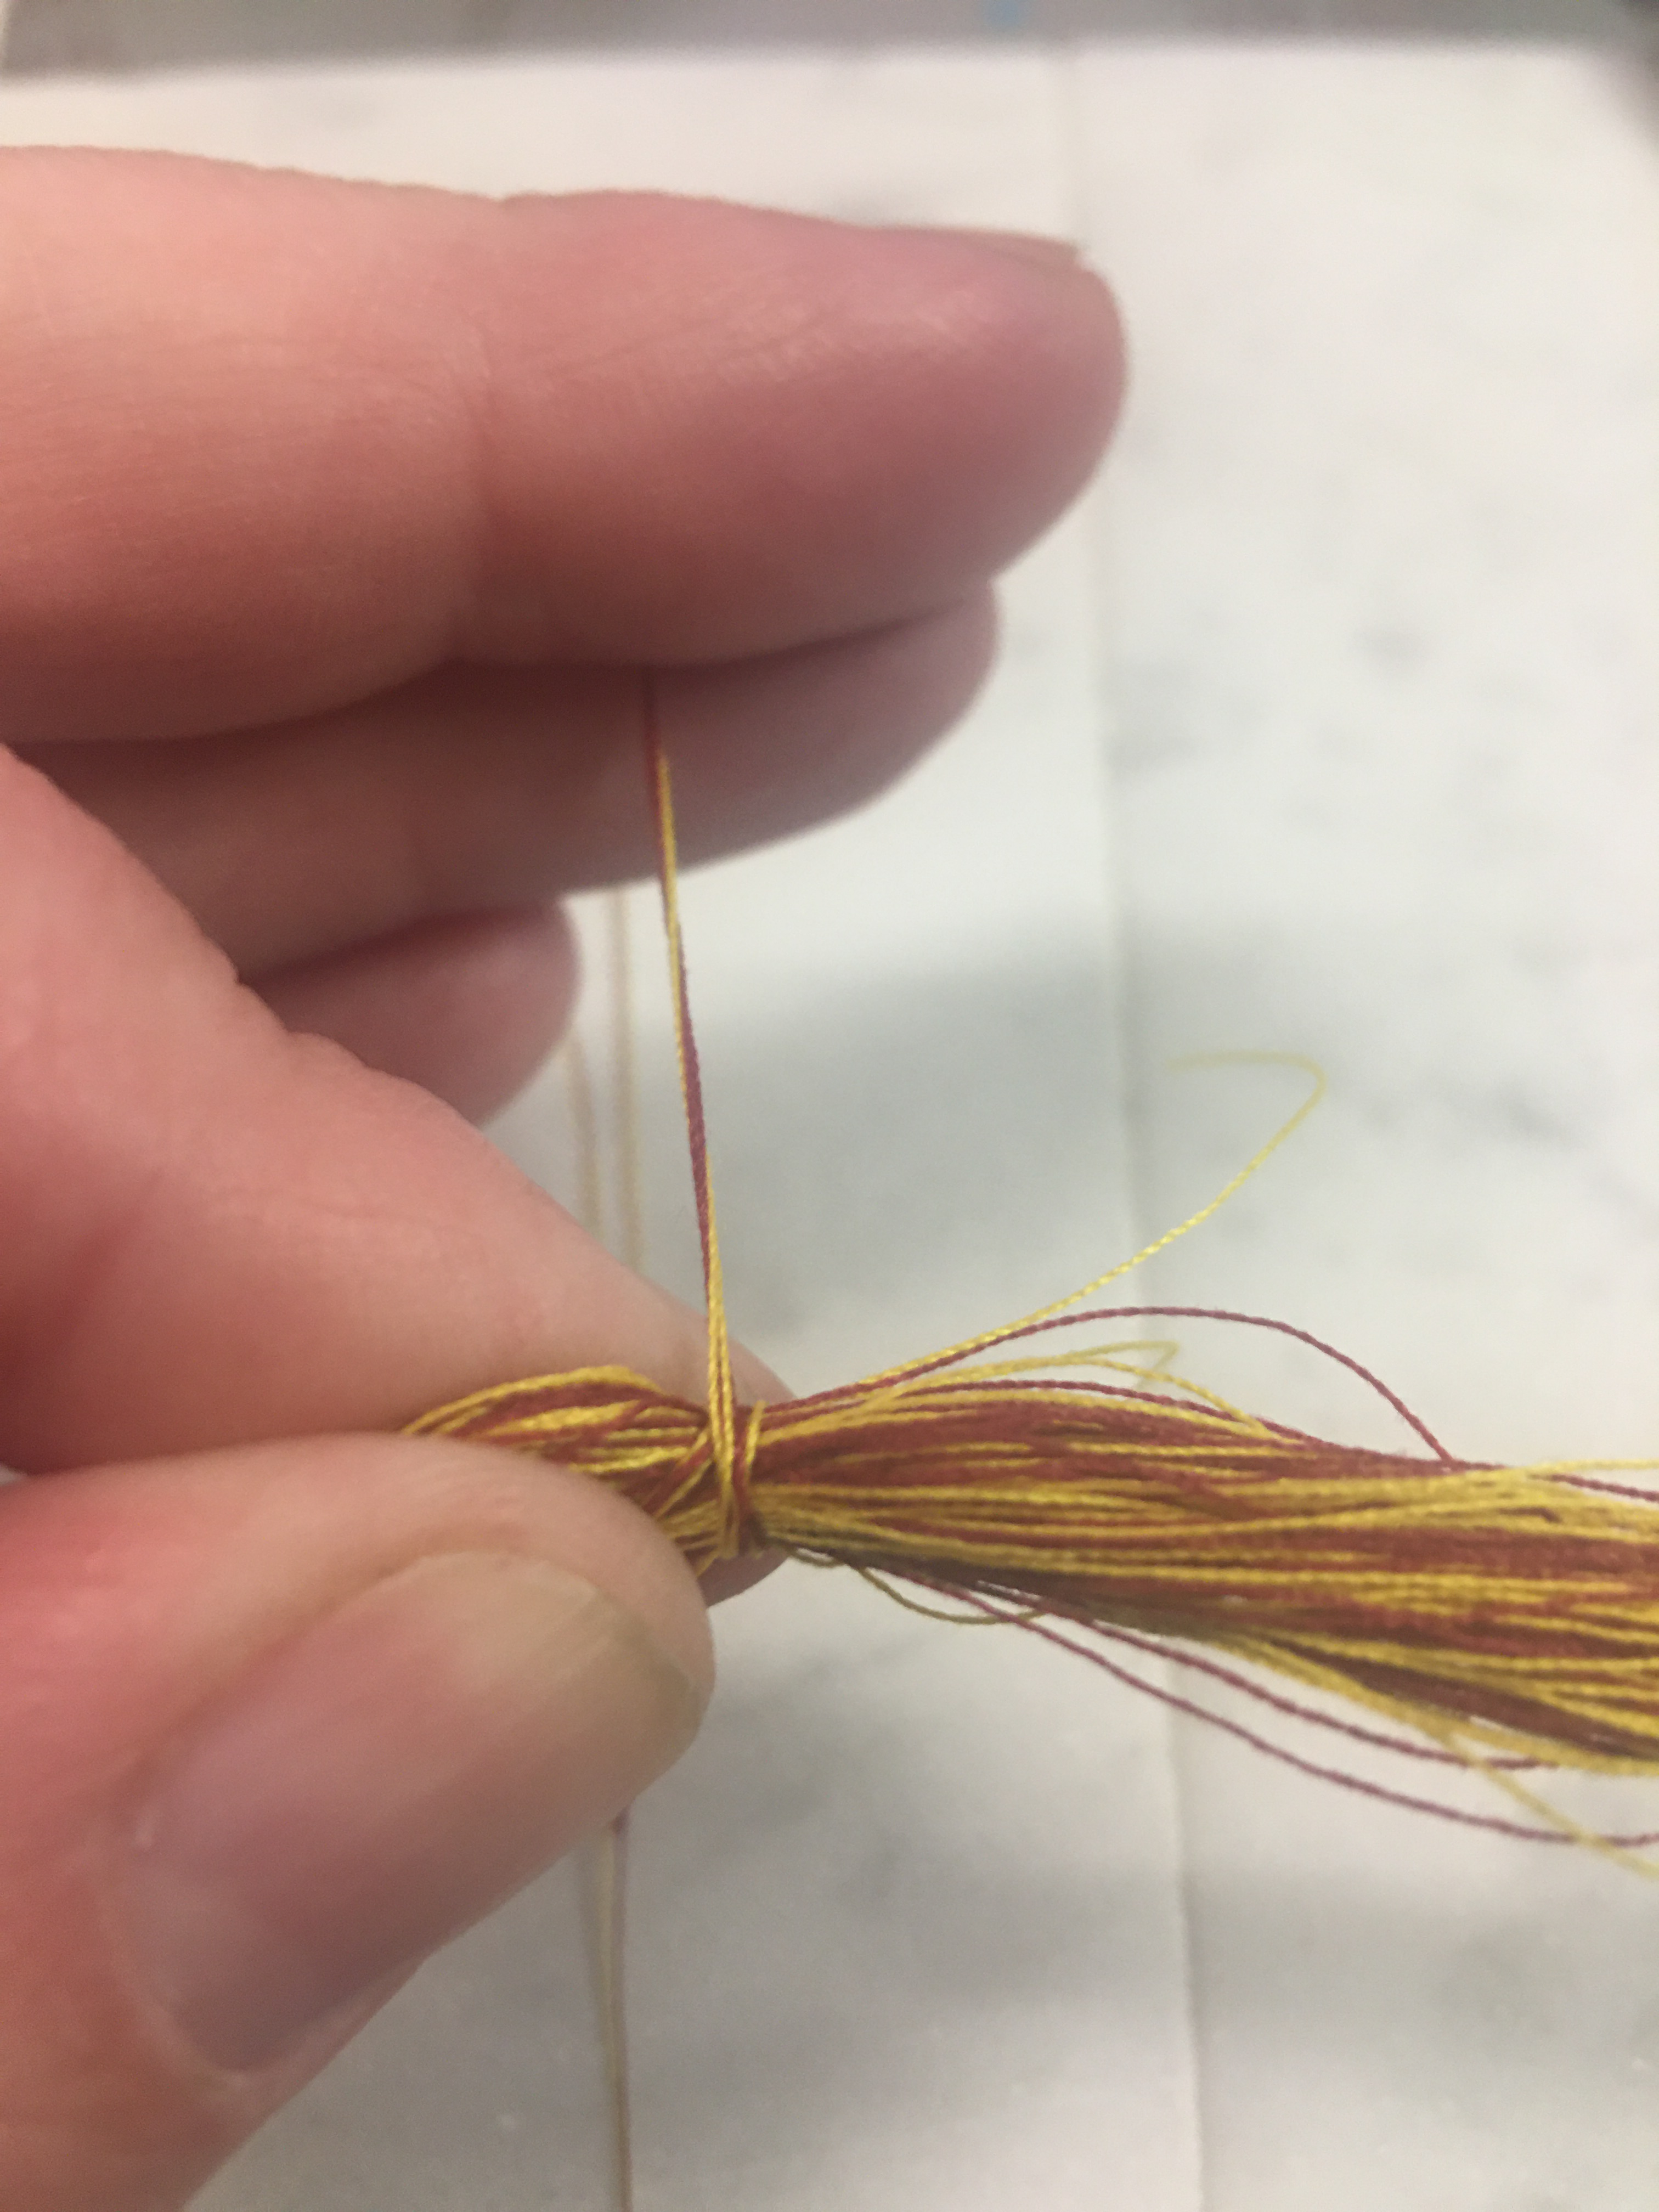
Take the ends of your two threads, leave a tail at the top of the ring, and start wrapping your thread around the ring.
Once you’ve reached your desired thickness, cut your finishing tail on the same side of the ring.
(Left Top) Remove the clamps, slide the thread off the ring, and hold one side of the loop. Make sure to keep the other side open.
(Left Middle) Wrap your tails around the open end of the loop and carefully tie your tails in a knot. If you pull too tight, you will distort the lengths of the thread. When this happens, keep calm and finish the knot. We can fix this when we trim the bottom of the tassel.
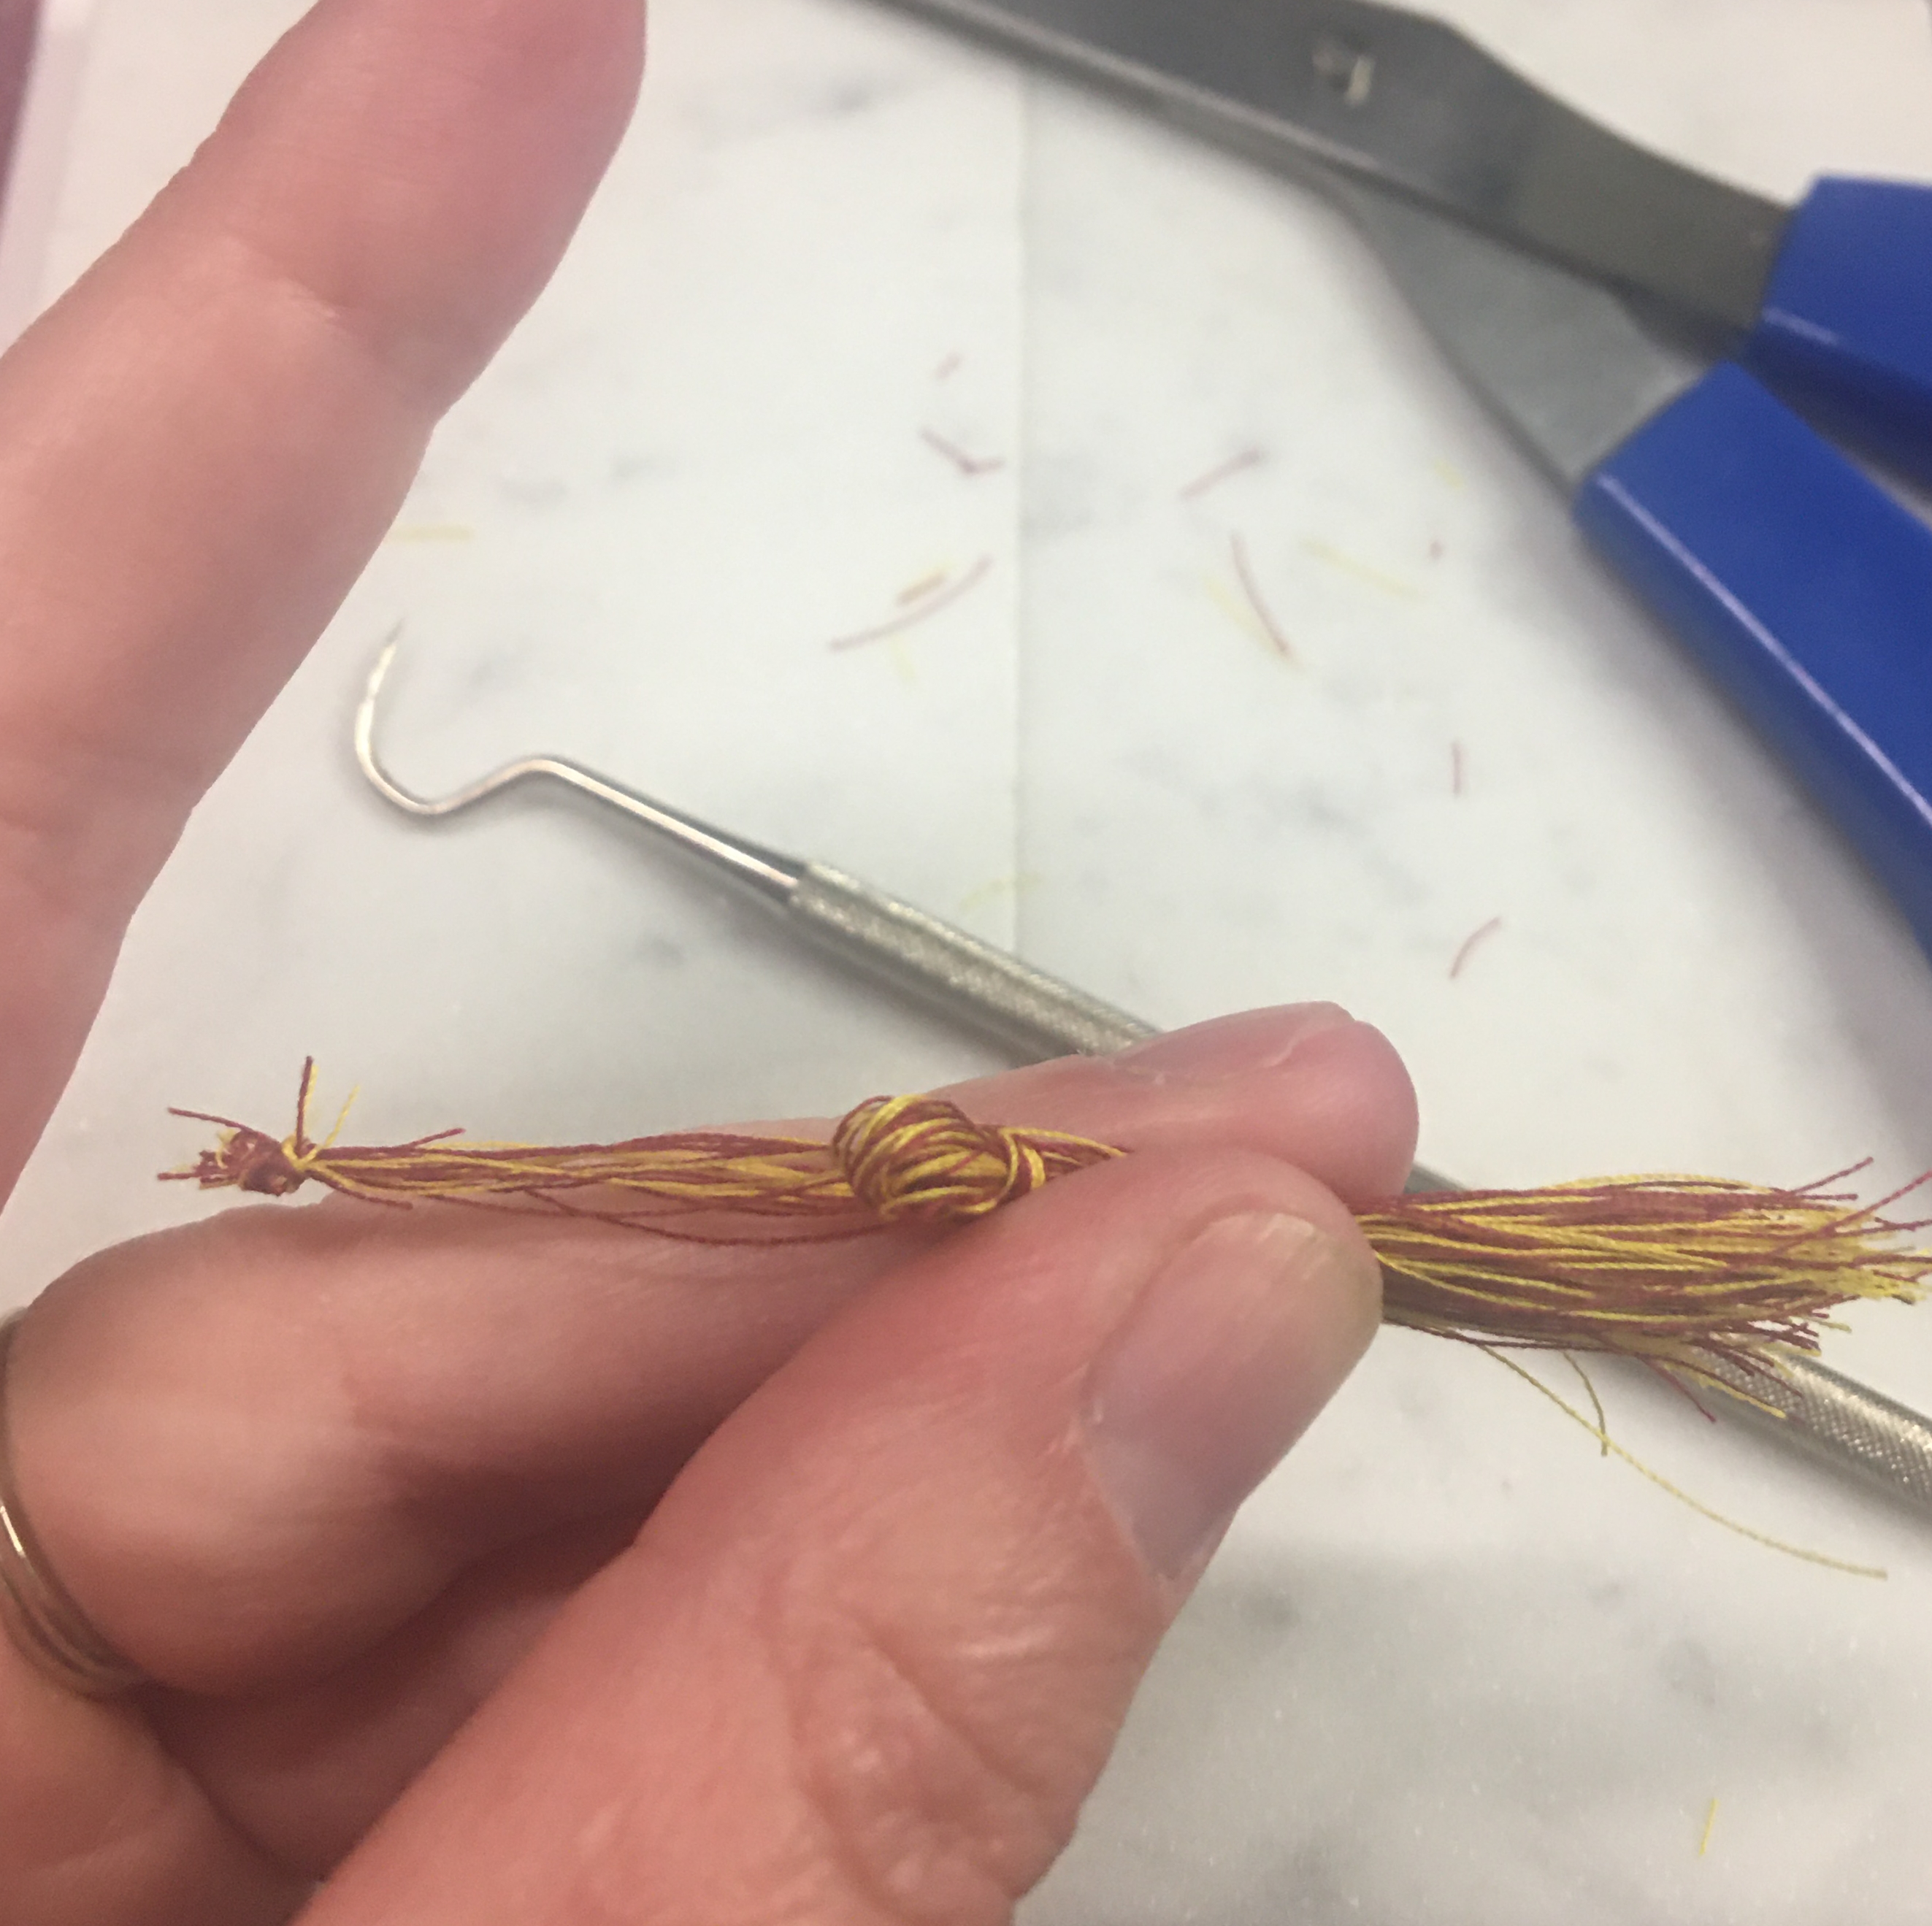
(Left Lower) Place your scissors in the center of the loop and pull them to the opposite side, away from the knotted end.
(Right) Take both tails and wrap them around the tassel head, to desired band thickness.
(Bottom Left) Tie the tails with a couple of the tassel strands. This will become the back of your tassel that you will glue to your project.
The tassel strands that you tied to the tails (and the tails) will all be pulled up to the top of the tassel to form the cord. You can choose to braid these. I opted to coil the threads by twisting them. (I knotted the end to just maintain order, especially for gluing.)
Trim the bottom of the tassel to make all ends even.
(Bottom Right) Glue your tassel to your project.
Further description of how I applied the tassel on my project:
On my nephew’s explosion box, I marked with a pen where I wanted to add my thread tassel. I started by hot gluing the tassel body in position. With the body in position I twisted the tails/cord, applied a thin row of glue on the pen line and laid the cord. Once the glue cooled, I trimmed off the knot and too long bits of thread. These ends I then hid under a colored foam ball that I stole from a silk flower arrangement.
Tip: The thinner you can keep your glue, the more it will hide. So try to be stingy on the glue. There will be more than enough glue to hold the tassel in place.
Tip 2: If you have a small crochet or tatting hook, you can make a seamless tassel by pulling the tails down into the center of the tassel and trimming off any length longer than the rest of the tassel.
I hope that you enjoyed these ideas and you find that you have a couple more options for gift giving this graduation season!
Files that were used for this post
My 2022 Graduation Collection has options for a general Explosion Box and Money Card. These include the monograms where you can custom make your graduation items with the same letters that I use.
I also have options for premade school boxes and cards for my local schools.
If you would like a specialized design for your school and mascot, feel free to email me to receive a time estimate of when that file goes live. You can reach me at info@pacificnorthwesteventdesign.com
Processing…
Success! You're on the list.
Whoops! There was an error and we couldn't process your subscription. Please reload the page and try again.


Leave a comment