A Touch Bitter?

Earlier this year I first saw this meme.

Image Source Unknown

I’ve been making chicken stock for several years. But this was the first time that I ever heard that you could make vegetable stock with pumpkin guts!

My childhood is filled with roasting the seeds, and sometimes using the flesh. But it was more convenient for my parents to buy the canned pumpkin and make pies from that. It wasn’t until I got married that I started making my own pumpkin puree, with the flesh, and make my pies completely from scratch.

But always, the guts got thrown out.

Of course when I saw that you can make a broth out of the guts, of course I had to give this a whirl!

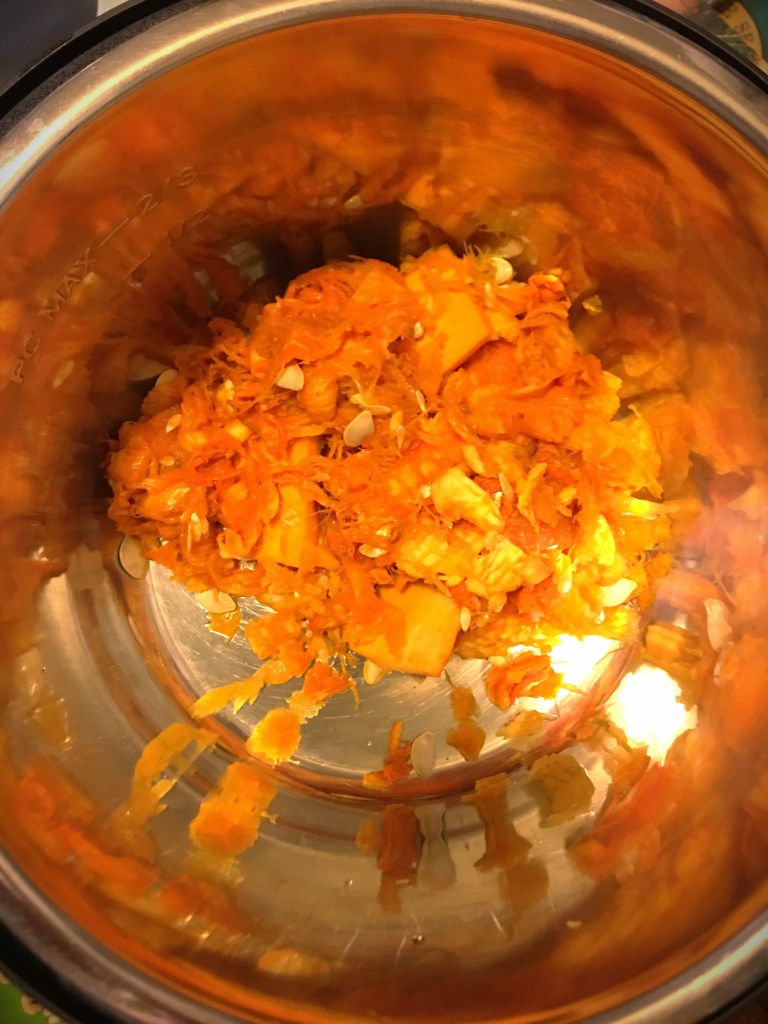
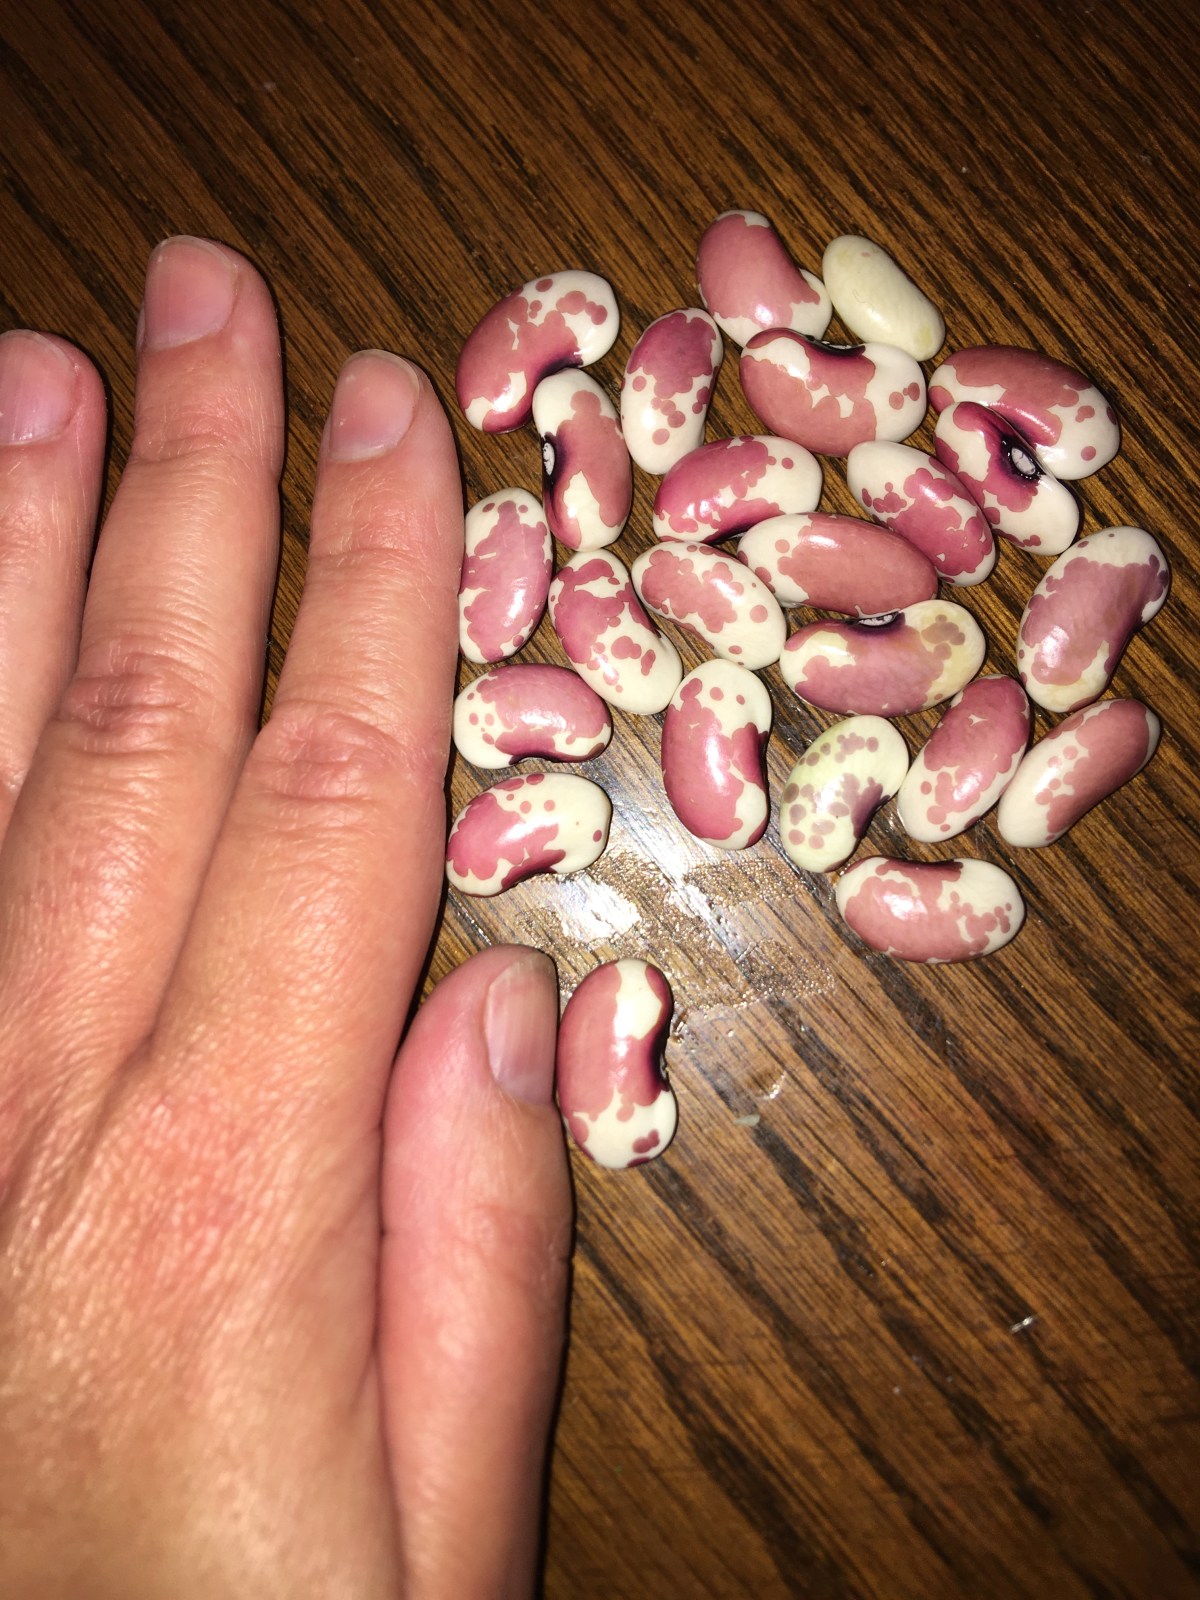
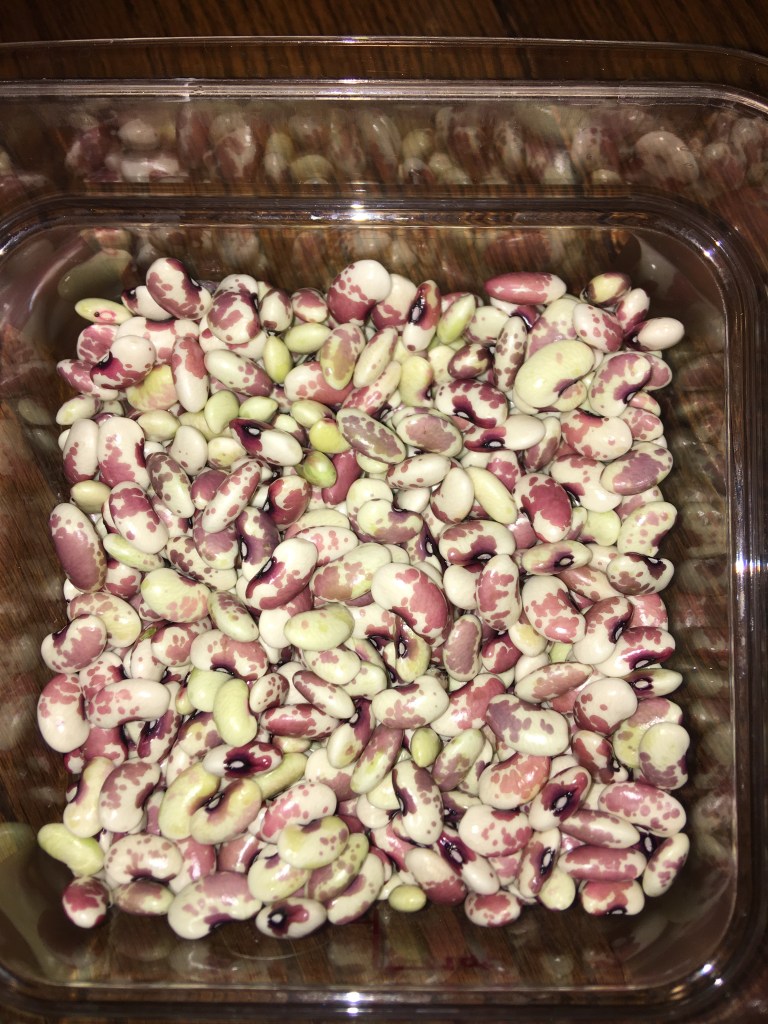
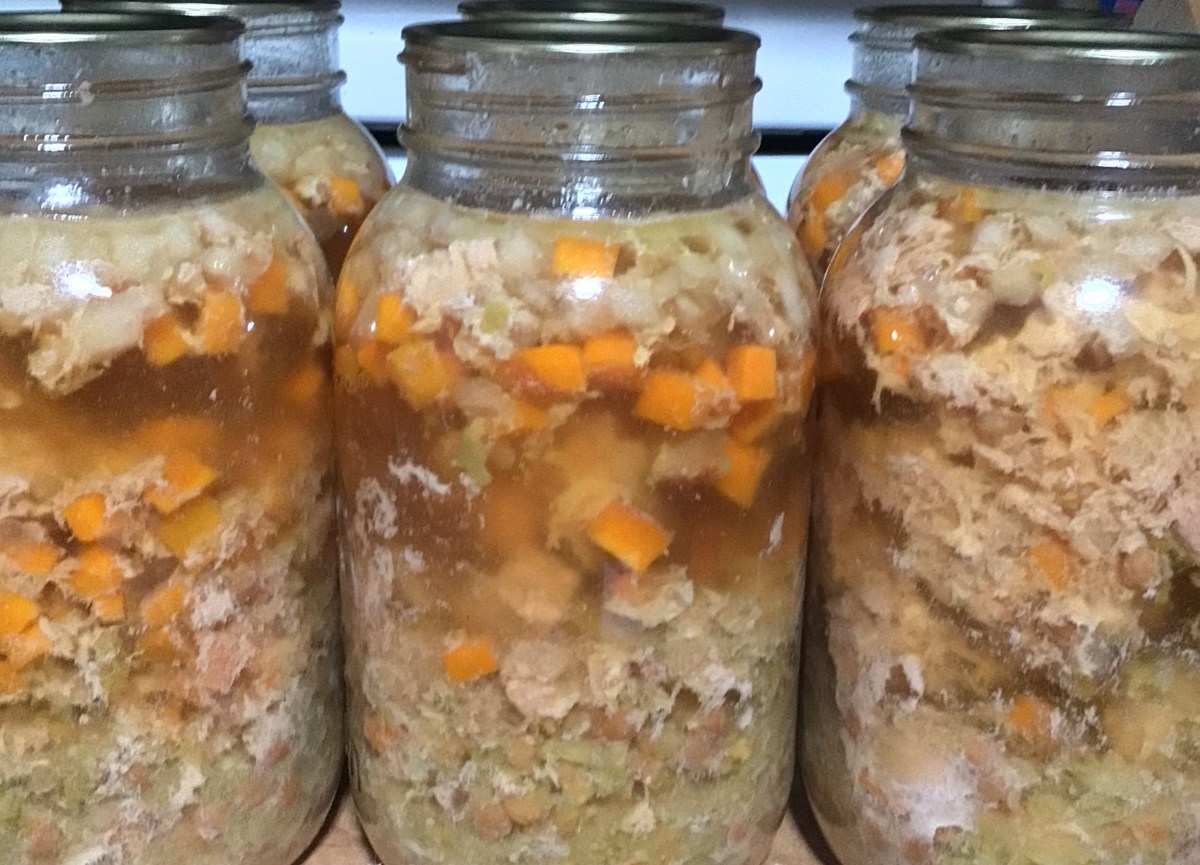
After separating out everything (seeds from guts, and roasted flesh from skin) the only items that went to the compost heap were the stems and skin. The flesh was pureed down to dehydrate for freezer saving pumpkin puree. My anticipation was met with the roasted seeds. The seeds from 4 sugar pumpkins were all eaten before 36 hours. And the bowl of guts, I tossed all that into my Instant Pot.

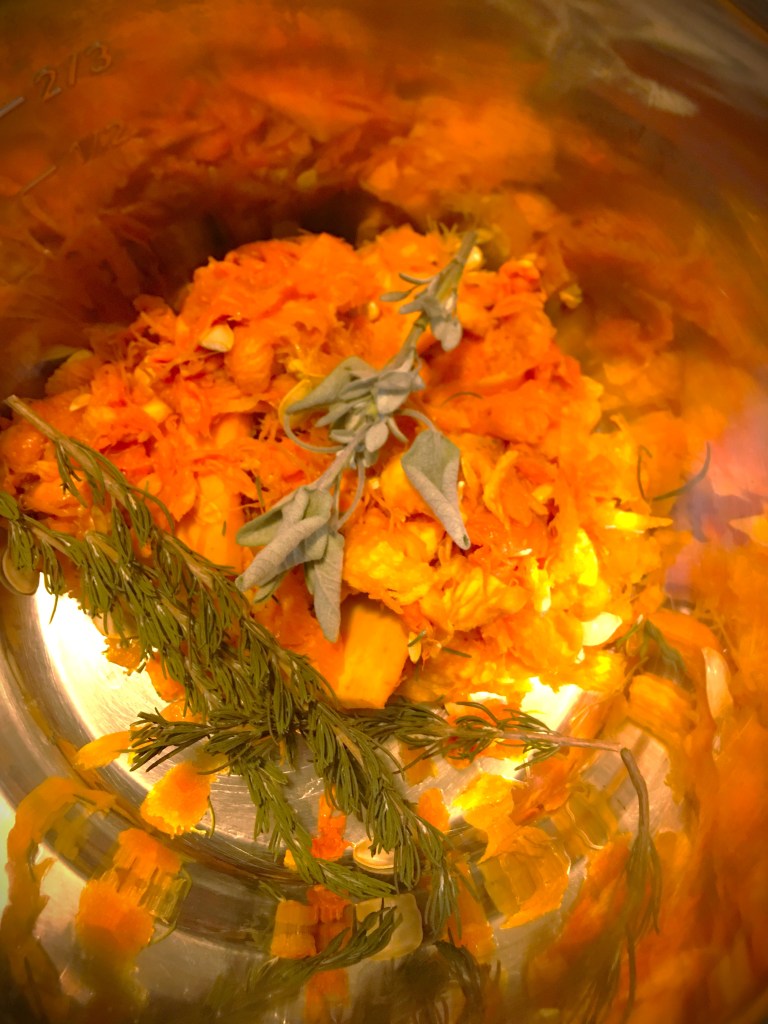
Also tossed into my pot were a couple sprigs of dried rosemary and sage, my freezer vegetable scraps (parsley and cilantro stems, onion and garlic skins), and I had some green (spring) onions that lost their freshness.

Word of Caution: skip the green onions! They caused a problem and I will come back to that in just a minute.

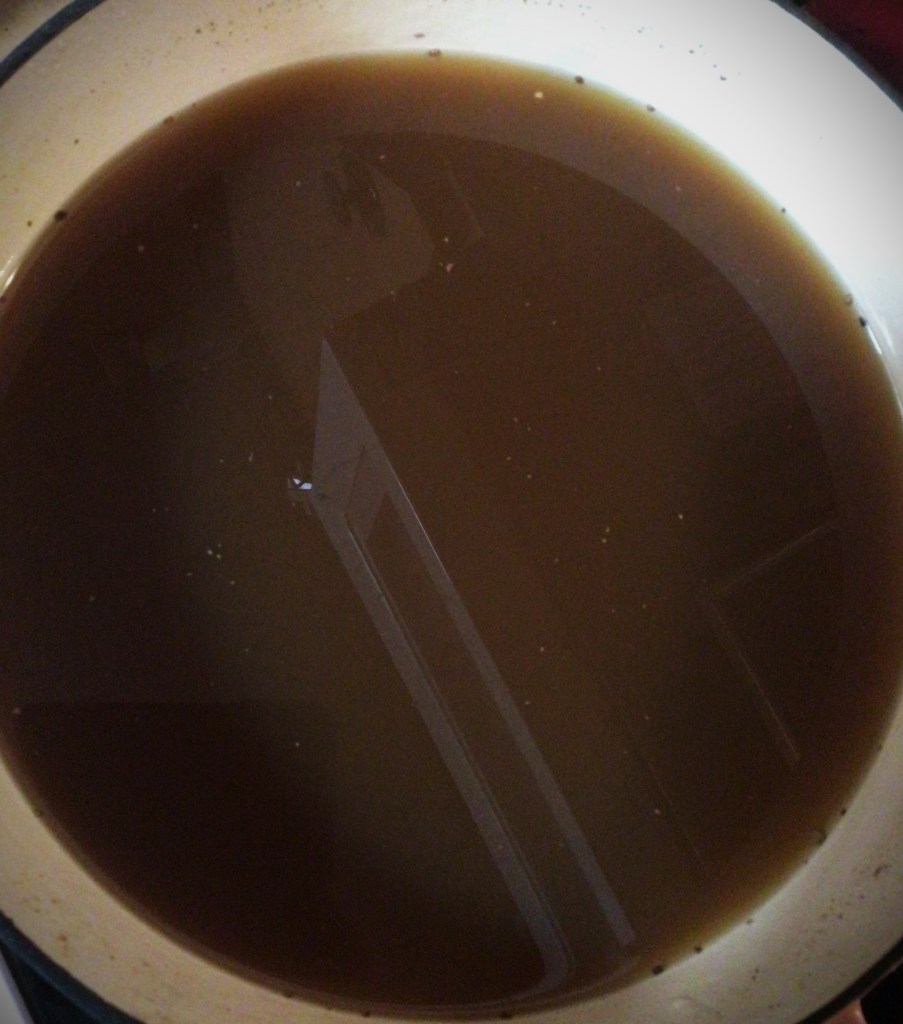
After I filled my pot up to its max line, I ran the pressure cooker for 3 hours.

Was the time a bit excessive? Probably. Recipes range from 15-40 minutes pressure cooking time. But here’s the issue I have always had with store bought vegetable stock (or even for restaurant vegetable stock) is that broth is bland and adds nothing to the soup. So I chose the long cook time to extract all the flavor I could out of the vegetables. And anyone talking about cooking vegetables too long, the only concern is your vegetables breaking down, becoming mush and all the nutrients wasting away into the water. So feel free to go light on time or extract away.

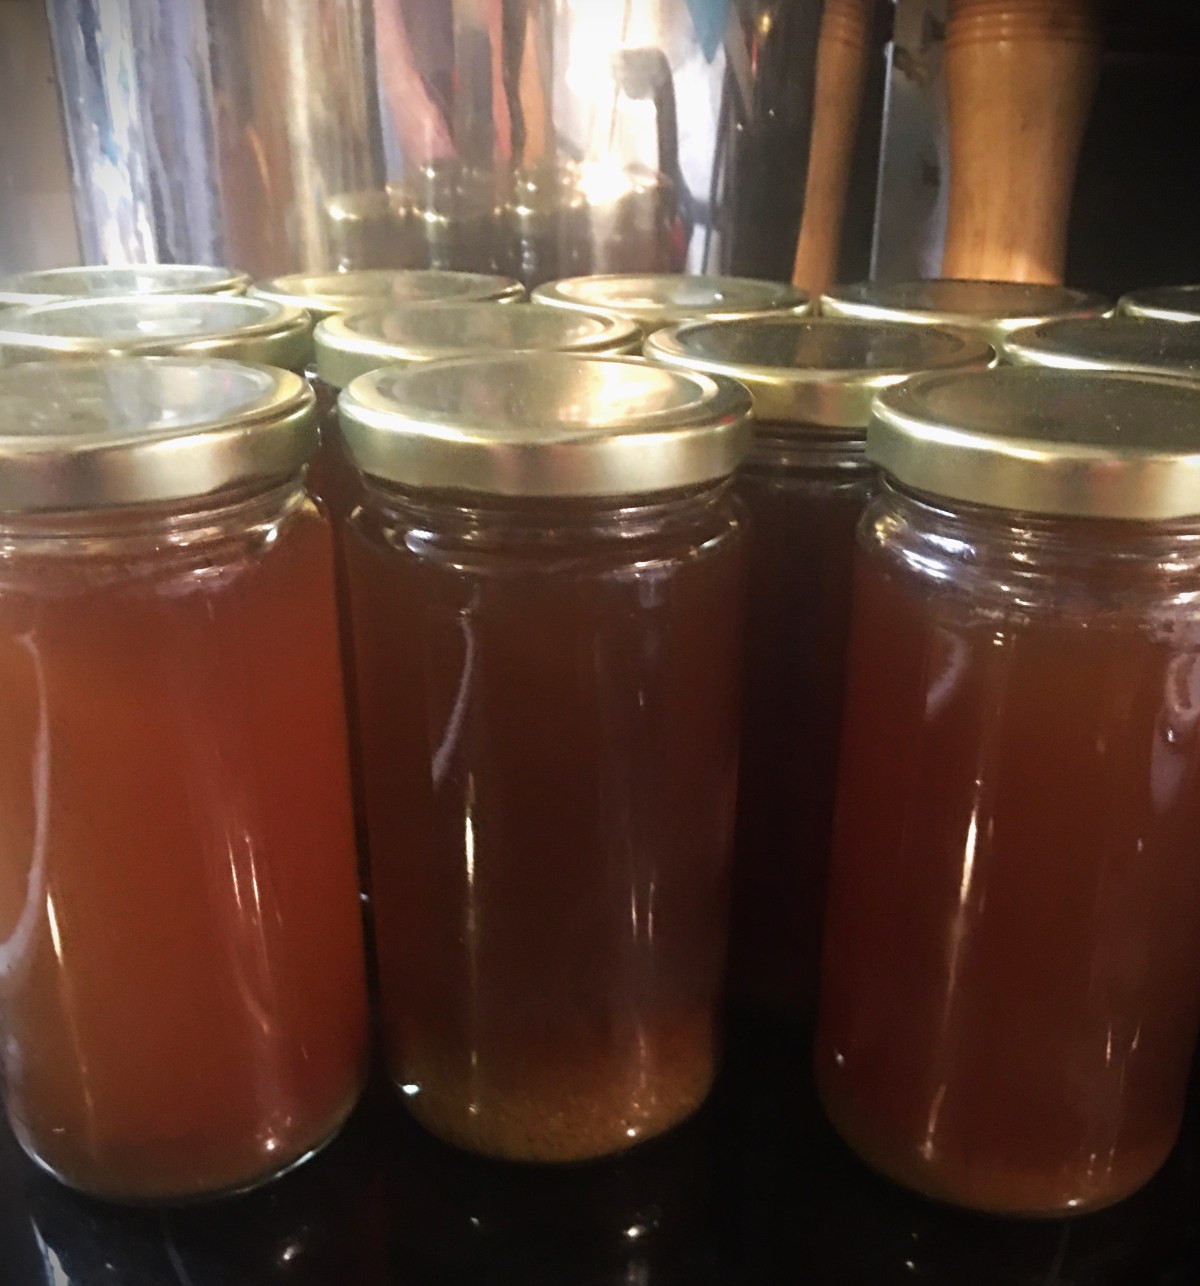
Once time was up, I fell in love with the rich brown stock. It was so beautiful!

And then the flavor….

I have never tasted anything so bitter in my entire life. I’m being completely honest with you that this was entirely worthy of tossing down the sink drain. (Stick with me because I did resuscitate life back into this complete failure.)

What Caused the Bitterness?

After I put the broth away for the night, I did some research. The focus of my search was on all the foodie and culinary sites to find out how all the professionals fix bitter dishes.

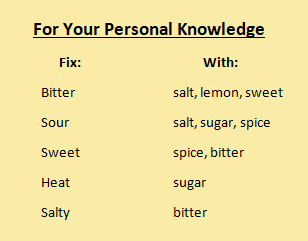
First I drew personal comfort that all my instincts had kicked in, because I did use the professional tricks to save the vegetable stock.

It wasn’t until I came to one of the final site pages that I finally got the answer to my question–What Caused the Bitter?

Green Vegetables!

Green vegetables are the culprit behind bitterness taking over a dish. And that’s what killed it for me in this particular instance. I did use the same amount of parsley and cilantro that I use in my Chicken Stock. But on top of my usual I added the rosemary and sage. And the ingredient that signed the death certificate was the green onions.

Why do I share my failure with you?

Why not?

While I’m teaching others in the kitchen, I’ve had a few people who felt conscientious about always making mistakes in the kitchen. And I tell them every time, “I’d rather you make mistakes in this space, rather than make them alone at home. Here I can help you. And if I don’t know the answers, I know where to find them and I’ll get back to you.”

I grew up making mistakes in the kitchen. My dad helped me through the mistakes. And I also know the feeling of making mistakes alone in the kitchen. Can you pull yourself out of those alone mistakes? Definitely! But there is a huge amount of comfort knowing that you have no judgment help. The no judgment help may let you make your mistakes, knowing you can pull yourself out of it. Or they can help you by giving you a heads up.

Sometimes the kitchen mistakes teach you skills that you may or may not ever learn.

So yes! I firmly believe that it’s okay to make mistakes in the kitchen. And I have no shame in making them myself. It’s one more bit of information I get to pass on to others. Like in the instance of talking someone through vegetable stock, I can now tell them ahead of time to be stingy with the greens that you add. Because if you choose to be generous, be prepared to combat bitterness.

Advertisements

How did I save this Vegetable Stock?

The short answer is that I raided my generously supplied spice cupboard!

Even though it wasn’t the natural first choice, I grabbed salt first. When I tell you that the bitterness was strong, it’s a massive understatement. There was no flavor other than bitter. No pumpkin, no rosemary, no cilantro…absolutely NOTHING but bitterness.

If you’ve listened to enough cooking shows, you will always hear the professionals tell the contestants, “Use salt! It draws our and enhances the flavor.”

And it is absolutely true!

I went from tasting nothing but bitter to actually tasting some minor notes of the vegetables.

There is always the possibility of creating a salt bomb, which is a death knoll you can’t come back from. So while I was liberal with the salt, I did show restraint and moved on to a new trick.

Next I wanted to add some sweetness. But I wanted to avoid sugar if possible. My butternut squash and mushroom (umami flavor profile that acts very similar to countering with salt) powders were what I grabbed next. Butternut squash is my “seasoning” of choice when I want to add sweet without adding sugar. Unfortunately the squash could only help so much. It wasn’t nearly enough to counter to the bitter. So I did add a conservative measure of sugar. And in this level of face smashing bitterness, you are definitely going to need to add some sugar. There was a world of difference even with the little that I added.

Advertisements

Still this was not enough.

What is another cooking trick to lift hidden flavors to the forefront? Acid.

I’m sure you’ve seen shows, such as Chef Ramsey, where the chef always advised and praises lemon juice for lifting dishes to a new level. This is also true!

Normally I don’t keep lemon in my kitchen because I usually always lose citric produce when it’s only there for cooking. For that reason, I keep food grade citric acid in my pantry. You sprinkle in a little citric acid and you have the lemon lift without having to toss rotten lemons.

So I added 1 tsp. of citric acid in the nearly 2 gallons of vegetable stock. I tell you this measurement because I want you to know that you really need to use citric acid sparingly because it is much stronger than squeezing a lemon in your stock. So please be careful with this ingredient.

The good news is that I came to a stopping point for salvaging this vegetable stock. The bitterness went from being the only flavor to being a minor flavor that could be overlooked. When I had my husband try the stock, he had no clue that I had an issue with bitterness. In fact, he said he didn’t taste bitter. He thought my rosemary was a touch too strong–but that’s another correction I need to fix before I go public with a legit recipe for pumpkin gut vegetable stock.

Advertisements

Another piece of good news… this vegetable stock is by no means boring or bland. In fact, it’s quite complex and I still want to tweak this one when I go and crack my pressure canned stock for a future dish. If it’s fish or chicken based, I’ll leave the citric forward flavor as is. But if I go to make a sauce with it for my mushroom pasta or pumpkin ravioli, I might have to add some more salt to touch down that citric acid a bit.

Moving forward….

Limit the amount of greens you add to your vegetable stock LOL! (I hope you’re laughing with me, because I’ve now come to the place where I can laugh about this kitchen mistake. And it could be great to hear some friendly laughs with this story telling too.)

I have enough pumpkins to gut and have two more tries to making a pumpkin gut vegetable broth that is palatable and shareable for next year’s pumpkin harvest.

Don’t be afraid to try new things and embrace the things that go wrong. If it’s not charred and burnt beyond recognition, there is the possibility you can bring your dish back from the grave.

OR

Maybe you have a stack of recipes that sounded good but were just too bland. Using the above chart for how to tweak flavors can give life to a bland and otherwise forgettable dish into something you want to cook again.

Advertisements

Let me know your thoughts below!

Feel free to share your own kitchen mistake stories below. Or even more importantly, share your favorite anything pumpkin recipe. I’m a pumpkin pie junkie that has been branching out into other pumpkin areas. I’d love to hear what you have up your pumpkin sleeve.

Processing…
Success! You're on the list.

2 responses to “A Touch Bitter?”

  1. Make Your Own Bullion – How I Can Do That Avatar

    […] because you’re not extracting marrow that you can get by with less time. Check out my post A Touch Bitter? where I specifically talk about vegetable […]

    Like

  2. 608 Avatar

    My brother recommended I might like thi website.
    He used to bee entfirely right. This submt actually mawde my day.

    You cann not consider simply how a lot time I haad spent foor thjs information! Thank you!

    Like

Leave a comment

What about the Shell?

This was the first year that I grew a shell bean. I grew up with my grandparents and mom growing snap beans. In fact, snap beans were pretty much the only vegetable that I ate without issues. So I have a special place in my heart for beans.

This is the shell beans that I grew this year, 1000 Year Cave Beans.
And just to show you how fresh these beans were, I didn’t anticipate them sprouting with in 3 days of me shelling them and waiting for more to mature so I could can a couple jars at once.
Advertisements

The one bit of information that I thought was prevalent was preserving beans of all kind. But with every safe recipe that I looked up every recipe was either for snap beans or dried beans.

When I teach people how to can, I always hand them safe recipes to select from, depending on what they want to can. And so these are the first sources that I turn to when I look to can a new food item that I’ve never canned before. And so I trust that what these experts say are what you are going to get. This is the one time that the extension office failed me. Here is the recipe that I used for my fresh shell beans. In full disclosure, if I were canning dried shell beans (such as the bagged beans from the dried foods aisle from the grocery store) this is absolutely the recipe that I would use.

But for fresh beans… I didn’t have canned beans. Instead I had half beans, half refried beans.

What happens when you can fresh shell beans the same as dried shell beans?

The gray in the water is the starch from the starch from this particular bean, 1000 Year Cave Bean. In fact, the starch left over in the bottom of the pan that I cooked these beans for the 30 minute stove top cook for a hot pack, was a richer version of this gray. In fact, it matched the gray on a pair of my camo pants. Next time I harvest these beans and prep them, I’ll take a picture of the bottom of my pan for you!

As you can see here, my beans started to break down due to the 75 minute processing time on top of the 30 minute hot pack cook time.

On the positive side, if you want to have canned beans that you can eat straight out of the can without needing to warm it up, the extension office recipe is perfect for it. All I added was the hot beans, hot fresh water, and 1/2 tsp salt for my pint sized jars. The beans were perfectly seasoned, soft, and very tasty. I am absolutely canning these beans again from here on out for the unforeseeable future.

The Extension Office recipe was also very pleasant for adding to my enchiladas recipe. In this instance, I really do appreciate a soft, smashable bean.

Unfortunately I need canned beans that I can toss into a soup, stew or chili where some firmness is needed.

Advertisements

Is there another safe recipe available?

I’m going to connect you to one of my favorite safe canners Melissa Norris, Pioneering Today. Please click the link to go straight to her directions. A video is also available.

If you’re on a time constraint, here’s the quick read of her directions:

  • Wash your jars.
  • Fill the clean jars with shelled beans until 1 1/2″ head space remains.
  • Add salt (1/2 tsp for pint, 1 tsp for quart).
  • Boil water and pour over the beans until you have 1″ head space.
  • (Remove air)
  • Clean the jar rims with a damp cloth, place lids, and screw down bands.
  • Place jars in your pressure canner.
  • Vent your pressure canner for 10 minutes.
  • (Once at pressure) process the beans at 10 lbs. of pressure for 50 minutes.
  • Once time is up, remove from heat and let your canner cool on its own.
  • When the lid unlocks, remove the lid but leave jars in the canner for about 10 minutes.
  • Remove the jars from the canner and set on the counter to cool for at least 12 hours and seal.
  • Store in your pantry.

If you are growing beans to supplement some of your grocery purchases, love gardening, or various other reasons… know that you can absolutely can your own beans. You can control what is used on your plants and what ingredients you add with your beans when you can them. The beans that I canned have 3 ingredients: beans, water, and salt. In comparison, the sale beans that I have in my pantry have an additional ingredient Calcium Chloride (an additive to absorb moisture which causes bacteria to thrive, “used pre- and post harvest to maintain firmness, reduce decay and prevent certain diseases… [and] as a drying agent.” (ingredi.com)

Advertisements

Store canned beans do have their benefit. I’m not going to pretend that I avoid them like a plague. For my family, we’re choosing to make a switch to lessen the additives in our diet. And with my young children, I want them to know where food actually comes from. I don’t want them to assume that food just mysteriously shows up on the store shelves. I want them to know where their vegetables come from. And where their meat comes from as well. (We love our local farmers!)

Plus I have the added bonus of not just hearing my oldest say, “Mom, can we can ____? I’m interested in that.” But it also helps establishes what we learn with our homeschooling. Math and science do matter on a daily basis. We can understand our world by working with it.

But most important of all, pressure canning beans (and other vegetables) make growing or store sale purchases a massive benefit to the family budget because we can preserve it and eliminate some of our food waste. And that is a win win for everyone!

Processing…
Success! You're on the list.

Leave a comment

Advertisements

Saving My Freezer!

Now that Fall weather has set in, there’s one concern that comes up every year. What do we do when the power goes out this year?

You would think that with the frequency that my surrounding area loses power due to snow fall, that there would be changes in the electrical system. Or even something as simple as taking preventative measures to eliminate more outages. But instead the average number of outages remains the same. And the outage time remains the same, 24-72 hours. Some areas have outages for longer.

But none of them have hit the fame as the President Day’s Storm of ’92. Roads were thick sheets of ice. Trees were breaking from an obscene amount of cumulative ice. And the power lines were down just from the weight of the ice on the lines. That’s not even taking into consideration the transformers that were blown.

I remember that my family had no power, with snow and ice, for longer than a week. I wish I could remember how much snow we had that year. And I wish I could remember how long we were really without power. My family did quite well in that storm because we had a wood fireplace, where we could keep one room sufficiently warm, with a flat top that we could cook on.

Even with all the power outage skills that my husband and I have, it only mildly prepared us for the day that an Otter Pop propped our freezer open this past summer.

Fortunately for us, the freezer had only been ajar for a couple hours and we caught it before we had a complete loss of our frozen foods.

And for as much as working in campus dining wasn’t exactly my job of choice, I do value the information that I learned getting my food handler’s permit. In this particular instance, I had the information to easily recall safe temperatures to prevent food borne illnesses.

A couple of my meats were between 38-39°F. Most were further away from the danger zone. And the majority was still frozen solid. My defrosted meat was still safe so I cooked that all up and prepped my pressure cooker for canning hot packed meat. The rest of the compromised meat, that could safely sit in my fridge and defrost the rest of the way, was saved to process the next day.

So with storm season quickly approaching, what plans does your family have for saving food for when the power goes out? Or even your freezer gets accidently propped open? Or your fridge fails you for one of a handful of reasons?

If your fridge or freezer contents can be handled in a timely and food safe manner, there is absolutely no reason why you can have zero food waste when the unforeseen happens.

Pressure Canning

Just about everyone I talk with, who are familiar with food preservation have the skills of water bath canning (the process of canning in glass jars acidic foods). I’m sure you’ve seen people’s canned jams, jellies, tomato sauces, and fruits. Foods that are under the pH value of 4.6 can all be water bath canned, be shelf stable for 18 months, using current lids (when stored properly in a cool dark place, like your pantry or storage closet).

What about the rest of your food that is not acidic; vegetables, milk,
butter, and meat?

That’s where a pressure canner comes in.

Before moving on, I want to acknowledge those who say that they mama, grandma, or auntie still water bath can everything (even the food above a pH 4.6). I’m not going to argue with your mama, grandma, or auntie. Food is one area where I prefer to not take my chances. The risks I make in life, I prefer to make elsewhere. Pressure canners can be purchased for less than an Instant Pot. So I choose to use the pressure canner and encourage everyone else to use a pressure canner as well. It also has the least processing time. Those who claim to water bath meat do so with a processing time of over 3 hours. With the pressure canner, processing time runs from 75-90 minutes (for elevation 1,000 feet above sea level and lower) depending on the size of your jar and type of meat you’re canning. So from the money and time perspectives, the pressure canner is still the best way of processing (all other food risk issues put aside).

Another bonus to investing in a pressure canner is that it’s two canners in one. You can pressure can with it as well as water bath.

Pressure canning weights and processing times vary dependent on the elevation at which you are cooking.

Another subject that can bring some heated conversations is cold pack vs. hot pack pressure canning meats. What you need to know is that cold pack means that you put raw meat into your jar and the processing time cooks your meat. Hot packing means that you cook your meat until a little pink is left and then you pack it in your jar with a stock or water. There are safe ways of processing both ways, when you look at the cuts of meat, how it’s packed, and what proven canning recipes state.

A bit of it comes down to common sense decision making as well. For example, the meat that I took out of our compromised freezer (38-39°F) was safer to hot pack. The reason is that once you come to 40°F bacteria start to grow and cause problems. So I immediately cooked the ground beef, even a little longer than until only slight pink remains, because I didn’t want to start the canning processes with a possibility of the meat being compromised. When canning, the meat nearest the center of the jar doesn’t reach the high temperature to kill off bacteria as quickly as the meat nearest the edge of the jar. So by making sure the meat would all be thoroughly cooked (between pan and canning), I make the chance of food borne illness less. Of course, this meat I’m going to use before the other meat I have canned, but this is all about making the choices that make sense with the science behind food preserving.

Something worth noting, that in the ideal situation where there is no compromise to your meat, how you can it is going to determine how it turns out. In the instance of ground beef, if you hot pack it, you will end up with canned beef that is small crumble in shape and texture. If you cold pack ground beef you will end up with a product that is solid–comparable to a meatloaf or a pressed meat like SPAM. So if you’re canning meat in a non-emergency setting, think about how you would like to use your canned meat. Because that is going to help you decide how you preserve your meat.

Things to Watch Out For

Obviously, the first signs of failed seal are if your lid buckles or the lid never seals to begin with.

When you remove your jars from the canner you can immediately spot the first failure type, a buckled lid. It’s any type of warping that you see on the lid. Even if the seal feels sound, it could be a false seal that will break on your shelf after you let it sit for a week or two.

Think of this issue as soundness of a structure. When you build a house, you don’t use warped wood or a broken foundation because it can cause problems to the soundness of the house in the future. Everything could be fine for a few years, but the time comes where the house gives way to other problems because of unsound structural sources of the house. A buckled lid may have a sound seal, but it’s only a matter of time before it fails.

In this instance, it’s just best to remove the lid and reprocess the jar. Your food is not going be harmed by processing it a second time. But, giving it a new lid with a proper seal is going to give it the sound structure your food needs to be safely preserved on your shelf.

Now the failed lid seal, that problem is the one that sneaks up on you. And it’s the number one reason why for good practices you never store your jars with the rings on.

Once your jars have cooled over night it’s time to remove the rings and test the seal. Pick the jar up by the edge of the lid alone. If sealed properly the jar will suspend off the lid. (I still brace myself for my jar to crash to my counter or floor, even though I haven’t ever had one do that.) If a jar is not properly sealed, you’ll hear the lid pop and it comes right off. No big deal, clean the rim of the jar off with vinegar and apply a brand new lid before processing it again.

Now the reason why we don’t store jars with rings on them is because when you go to check your jars (ideally every week), you can immediately see if a lid’s seal is broken. The couple of times it’s happened to me, I opened my pantry door, barely touch the jar and the lid clatters to the floor. Usually this happens before anything starts growing or smelling off. So, early detection of a failed seals is great.

I’ve seen many pictures and heard stories of people who left their rings on their jars. More times than not, they smell something off in their panty and have to figure out where the smell is coming from. They never say it, but I can guess the process of elimination they have to go through in removing rings. Sometimes they don’t have to touch the rings because they see a science experiment going on in a jar. A regular inspection of lids, with rings off, prevents spoiled jars from going this far.

Siphoning

There are a few reasons why your jar siphons (loses liquid). This is a great article in covering all the possible reasons. I want to point out what it looks like.

This is one of my canning sessions. These two were the only two jars that siphoned, out of the 7 in my canner. Both lost over half their liquid before sealing. Truth be told, I have no idea why these two failed (losing half a can of liquid or more is a failed seal). But with this much liquid missing, there was no way I could put these on my shelves. I could have put these in my fridge to eat the next day. Instead I chose to put in more beef stock and re-can them with a fresh lid. (They didn’t lose any liquid the second time.)

Siphoning is only a problem when you lose a drastic amount of liquid like this. Otherwise, siphoning is a common occurrence in canning and generally not a problem. Any meat (or other canned product) above liquid line will be discolored over time. It’s still good, just not visually appealing.

An interesting story is that I never learned how to pressure can from my mom or grandma, because my grandma tried pressure canning and could not figure out why she kept siphoning like this. After a few fails she just called it quits. Mom was pretty impressed when I had this conversation with her. The bottom line is that technology is pretty amazing in this day and age, where we can teach ourselves new skills and problem solve with a little research.

So please know that if siphoning was a problem with your previous attempts at pressure canning, know that making one or a couple adjustments can solve this problem for you and you can prevent it in the future.

Back to the Meat Save

As I mentioned earlier, I was so glad to have the skills to can the meat from my freezer. At first my husband was freaking out because he thought it was all lost. (And the freak out would have been rightful had I not been able to save our meat.) But his reaction is what most people have. Especially with food prices so high.

I cannot tell you the value of the calm of pulling out the pressure canner and setting up for an unplanned canning session. The best feeling of all was knowing that the whole incident was not a lost moment. My husband learned how to can meat. Up until this moment, it was something that I did and he just popped into the kitchen to find out how I was doing. But now, if we have a moment where we have to marathon can again, we can take shifts and not lose out on sleep or meat.

What are your plans for the coming storm season?

Are you prepared for a moment where your fridge is not working for you?

What cooking sources do you have for a no power situation?

Some ideas I would like open for consideration is pressure canning soups, meats, and vegetables. In a worst case situation, these are safe for you to crack the lid and eat straight out of the mason jar. Or you can warm them in the matter of minutes over your grill.

Another option is freeze dried foods. All you need alternate fuel for is to boil water. The water can then rehydrate full meals for you that are warm.

I know power outages are hard on the whole family. But by thinking in advance, it is possible to turn it into more of an adventure instead of worrying about food loss (by opening and closing the fridge) or getting burnt out by cold food.

If you’re interested in new recipes that require nothing more than a camp stove, this is the first site that I go to search, Trail Cooking. Under her tab, Trail Cooking, Sarah has an amazing list of recipes. Usually I find a handful of interesting recipes on most sites. Here, I have a list that rivals the lists I have for my cookbooks on my shelf at home. So please be sure to check out her menu offerings!


If you’re not yet into canning but still would like to prepare for no power meal options, check out The Good Steward.