After spending almost a decade in the event decorating industry I have repetatively heard "I can do that". Instead of being dismissed by creative minded people, I want to show you how I do "that" so you can be sucessful in recreating that inspiration image. I just might have a few tricks that you haven't seen yet!
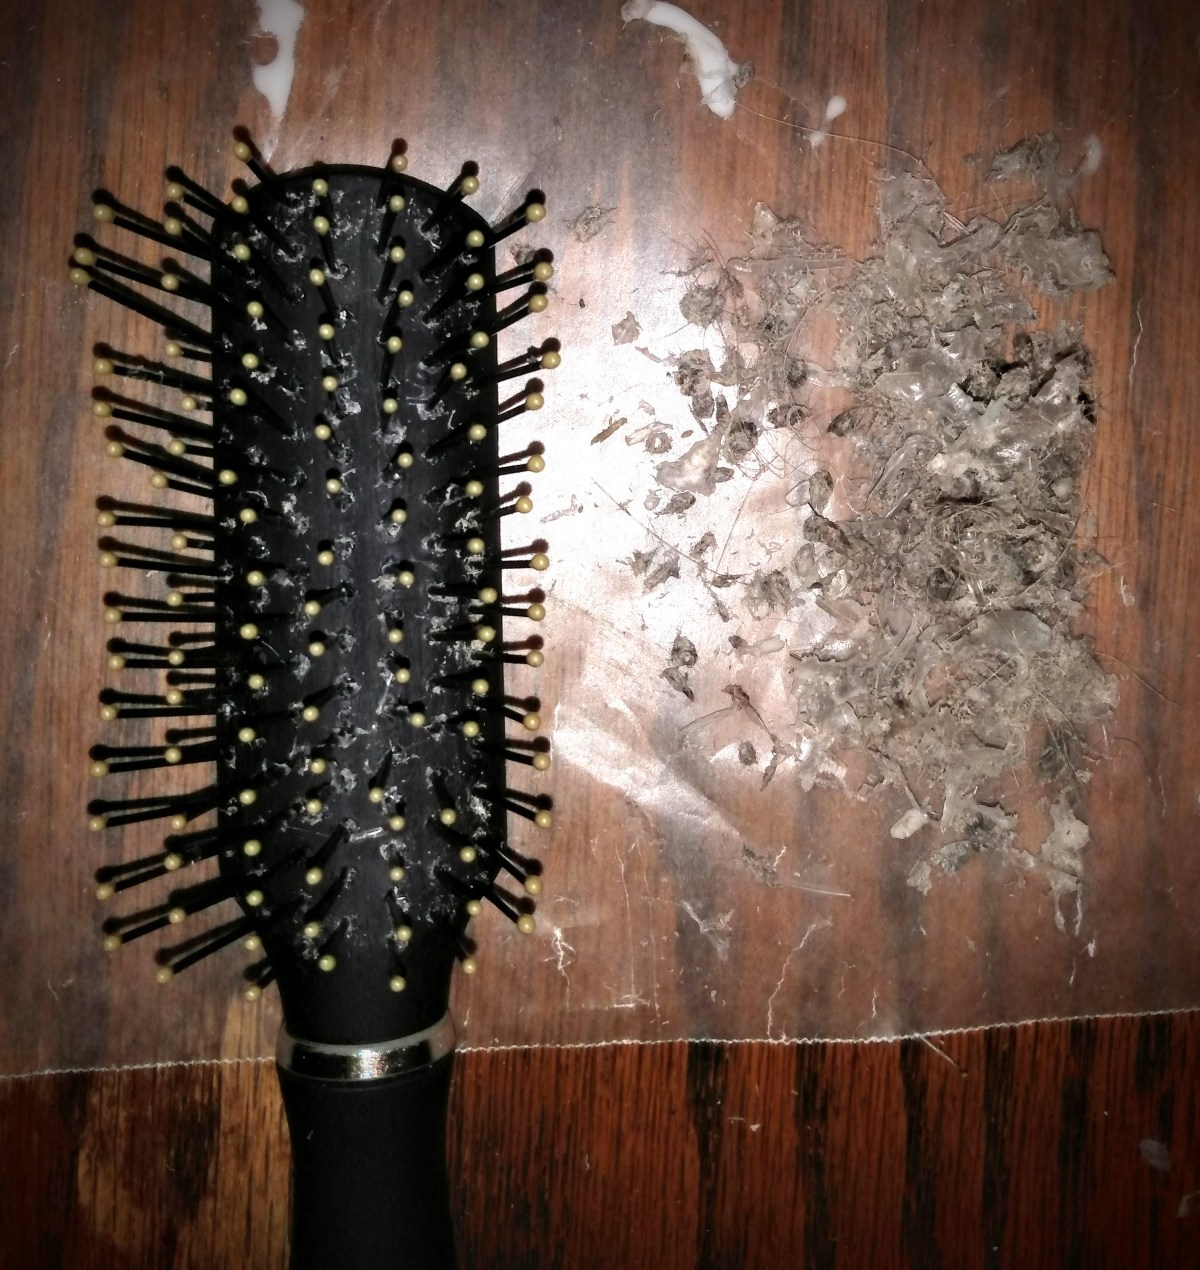
Once upon a time I use to buy a brand new hair brush after about a year. I’m sure you’ve seen your brushes about that milestone–when you remove the hair and there’s a blanket of fuzz at the base of your bristles.
I don’t throw my brush away anymore. Instead I clean it!
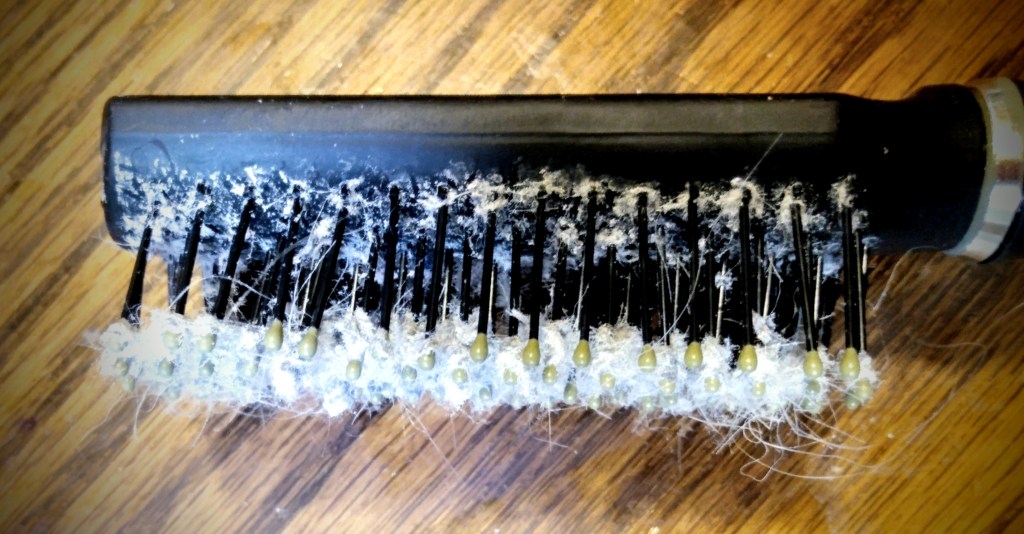
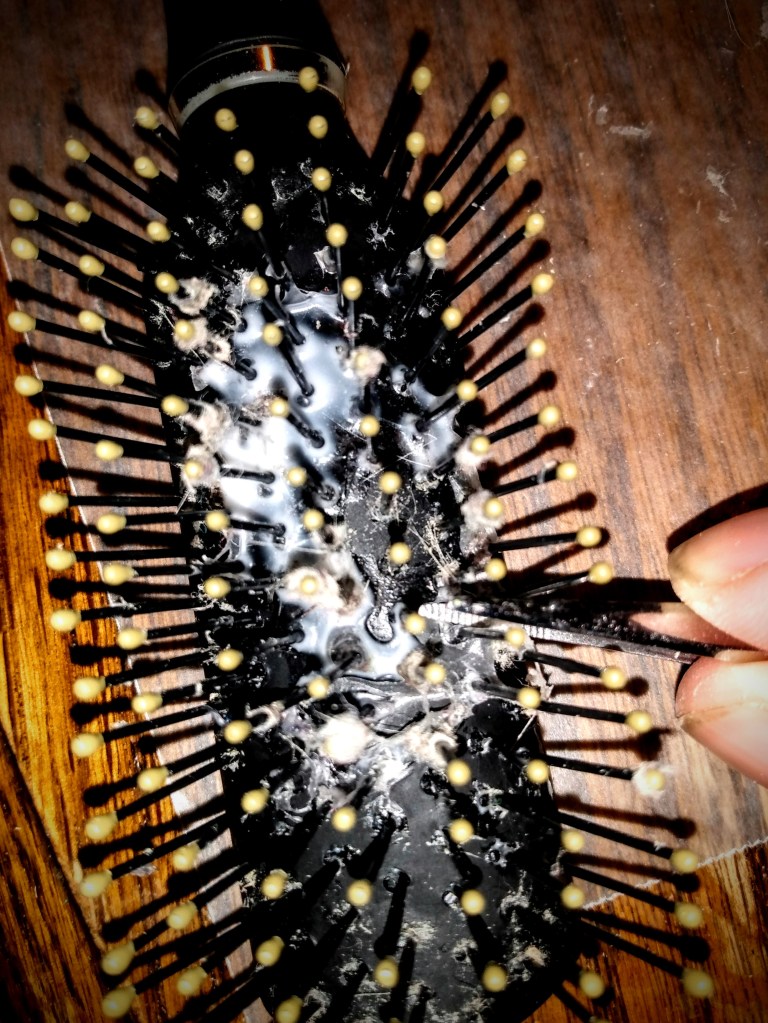
I’m going to pick up in this process after the hair removal and using a pair of tweezers to push all that fuzz to the tip of the bristles.
Don’t be afraid of you can’t get everything to the tips. I find that when I’ve done this step, I end up getting my brushes cleaner than if I leave the fuzz down at the base. The reason is because I use glue. The glue binds the debris at the top. But it also drips down to the brush base. It then grabs a hold of the debris that is still around the bristles base. By moving as much as you can to the top, it enables the glue to maximize how much it captures at the base.
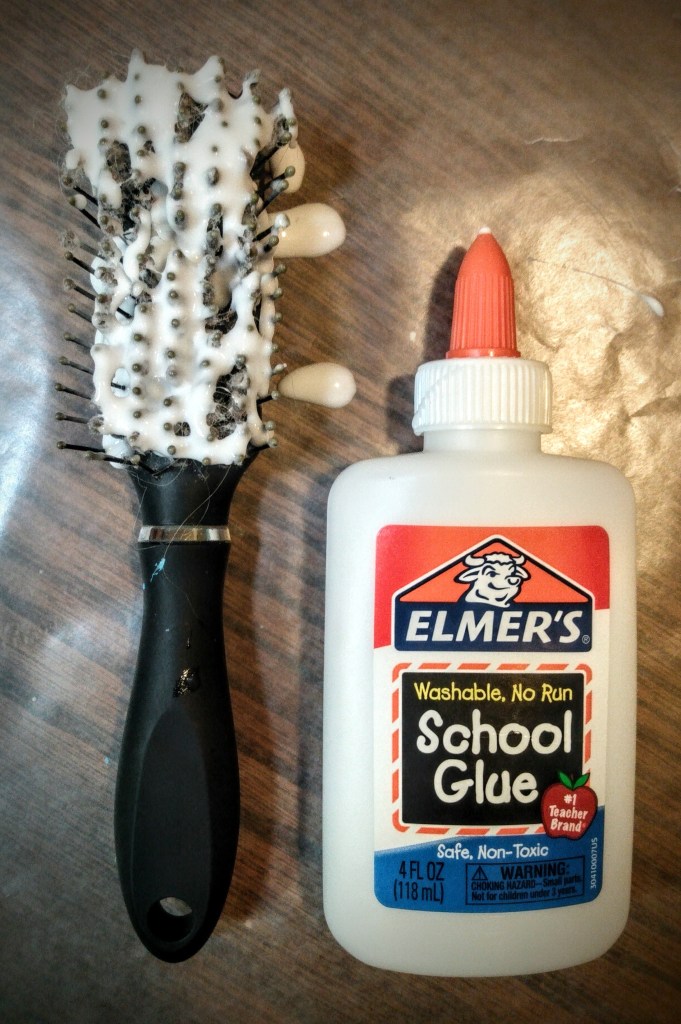
The glue that I use is Elmer’s white glue–the same glue used by school children in the U.S. The reason why I use this type of glue is because it has a little bit of elasticity when it’s dry and holds together even when it’s not fully dry. It’s tacky, but it holds on to the debris and itself. Plus it has the added bonus of washing off.
More rigid glue tends to stick to the bristles and brush.
For example, you could use hot glue. But there’s not much give once it cools. And because it’s more rigid, you run the risk of damaging the bristles (like pulling off the balls on the end), which will in turn ruin the health of your hair.
If I were to locate alternate glue, might pick a wood glue or rubber cement. Both of these have a similar property as Elmer’s glue.
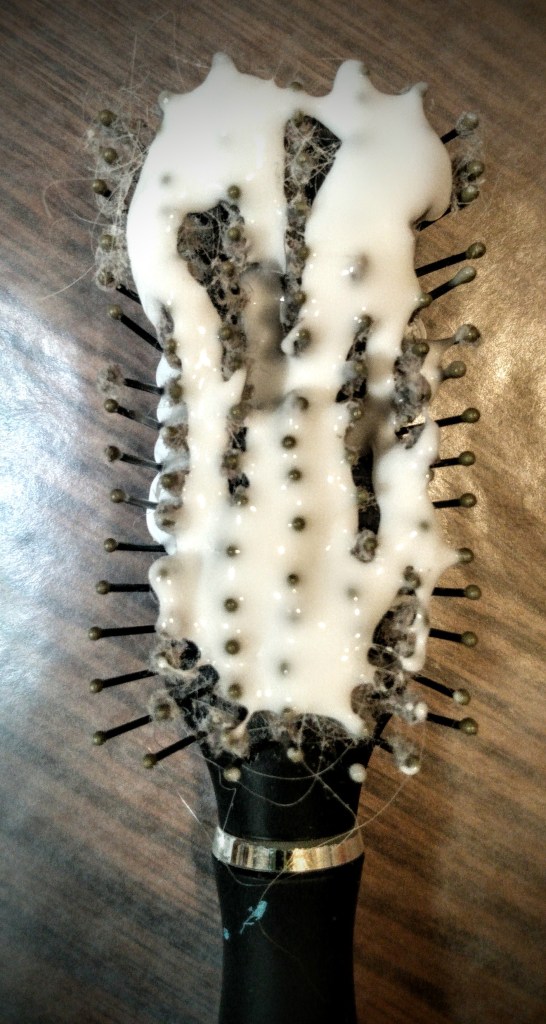
When applying the glue you can be as meticulous air as liberal as you choose. You can open the orange cap and apply the glue precisely along the rows and columns. Or you can take the glue cap off and cover surface area quickly. If you choose the quick method, make sure you hit every area where you pulled debris up to the tip of the bristles. If there’s no glue on the debris, then nothing is binding it together to make it easier to pull off.
At this point timing is everything.
I applied the glue after I used my brush for the day and I let the glue sit over night to dry. (Even still, I used a liberal amount of glue so the glue wasn’t dried come morning. This was okay because my schedule had the space for not needing my brush and for finishing this cleanup project.)
Last year when I cleaned my brush I think I went the more precise method because the glue was dried come morning. This year the glue was still too wet so I had to use my hair drier to help the glue set.
As you can see here, the debris on the top was dry. So I could easily start peeling those bits off my brush. However the glue on the base had pooled together thickly and was most definitely that wet brilliant white.
I removed the debris that was dried. This opened up the air flow for when I used my hair drier to set the rest of the glue.
TIP: If you don’t want to wait over night, use a hair drier to set the glue in a quicker time frame. You can have your brush clean and ready to use that same day.
Cleaning the base can be a little trickier. It seems like all the brushes that I have, each bristles is inserted into the base in a V formation, so the tail is pointing up alongside the bristles. This elbow joint likes to hold on to debris. This is why I like using glue. It helps to gram on to those difficult to reach debris. But it also means that I also need to use a pair of tweezers to get in there and get the glue to lift with the debris.
Sometimes you can just run the tweezers between the bristles. And in other moments you need to grasp the bottom of the bristle with the tweezers and pull up toward the top.
The good news is that you can completely clean your brush without having to be satisfied with that ring of debris hanging out at the bottoms of your bristles.
As you can see here, I was able to remove all that fuzz debris that was on the bottoms of my brush. This is the third time that I’ve cleaned this brush. And all the protective balls, on the ends of the bristles, are intact.
As I mentioned before, I grew up where we just disposed of brushes when they were “dirty”/ a blanket of fuzz remained when the hair was all removed. But I found out that it doesn’t have to be that way. A brush can have extended life.
What is something that you use to throw away but found a way to extend its life?
I’m sorry I hear that the notifications have been emailing you so frequently. I can understand that would be annoying. Unfortunately the full controls of notifications can only be reached from your end. To verify this I check with my own subscriptions that I follow.
You will want to go to your Notifications tab. From there hit the Settings icon (it looks like a gear on my screen). Scroll down to sites you follow. Once you click on a specific blog you are immediately given options for which notifications you want. You’ll see options for new posts, all updates, all comments. The option that is probably giving you the most email notifications is probably the toggle being switched on for all comments that are made. If you switch that notification off, you should notice a huge decrease in notifications.
I have been browsing online more thaan 4 hours today, yet I nevcer found anyy interesting
article lie yours. It’s prety wrth ennough forr me.
In myy opinion, if alll site ownerrs and bloggers
madee ood content as you did, thhe neet wikll bee a lot moe
useful tha ever before.
What’s Happpening i’m new to this, I stumbled upon tthis I have fohnd It positively useful andd itt haas helped mme outt loads.
I am hopingg tto contribute &help different users like its helperd me.
Good job.
Happy Mother’s Day to all the moms who are celebrating today with their children, the moms who are missing their children, the moms who have lost their babies far too early, those who shared an all too brief moment with their babies, the mothers who are in the middle of a season of making the dream of motherhood a reality, and those who love on the children from other mothers who lean on you to be the loving assurance in this season of their life. No matter what motherhood looks like to you, Happy Mother’s Day!
Depending on who you talk to, some people feel that holidays are too commercialized. Others find it difficult to find the perfect gift. And others find it difficult to gift a loved one while feeling the financial pressures of this season of world history. No matter where you personally find yourself on this spectrum, I want to help you find inspiration on how you can find a meaningful gift for someone. Whether it’s a belated mother’s day present, a birthday, anniversary, father’s day, grandparents’ day, teacher appreciation, graduation, or any other occasion, know that you can gift in a meaningful way.
I’m going to use the example of the mother’s day gift that I gave one of the mothers in my life. While this may not apply to the person in your life, the same principle can be applied in finding what you can gift that special person in your life.
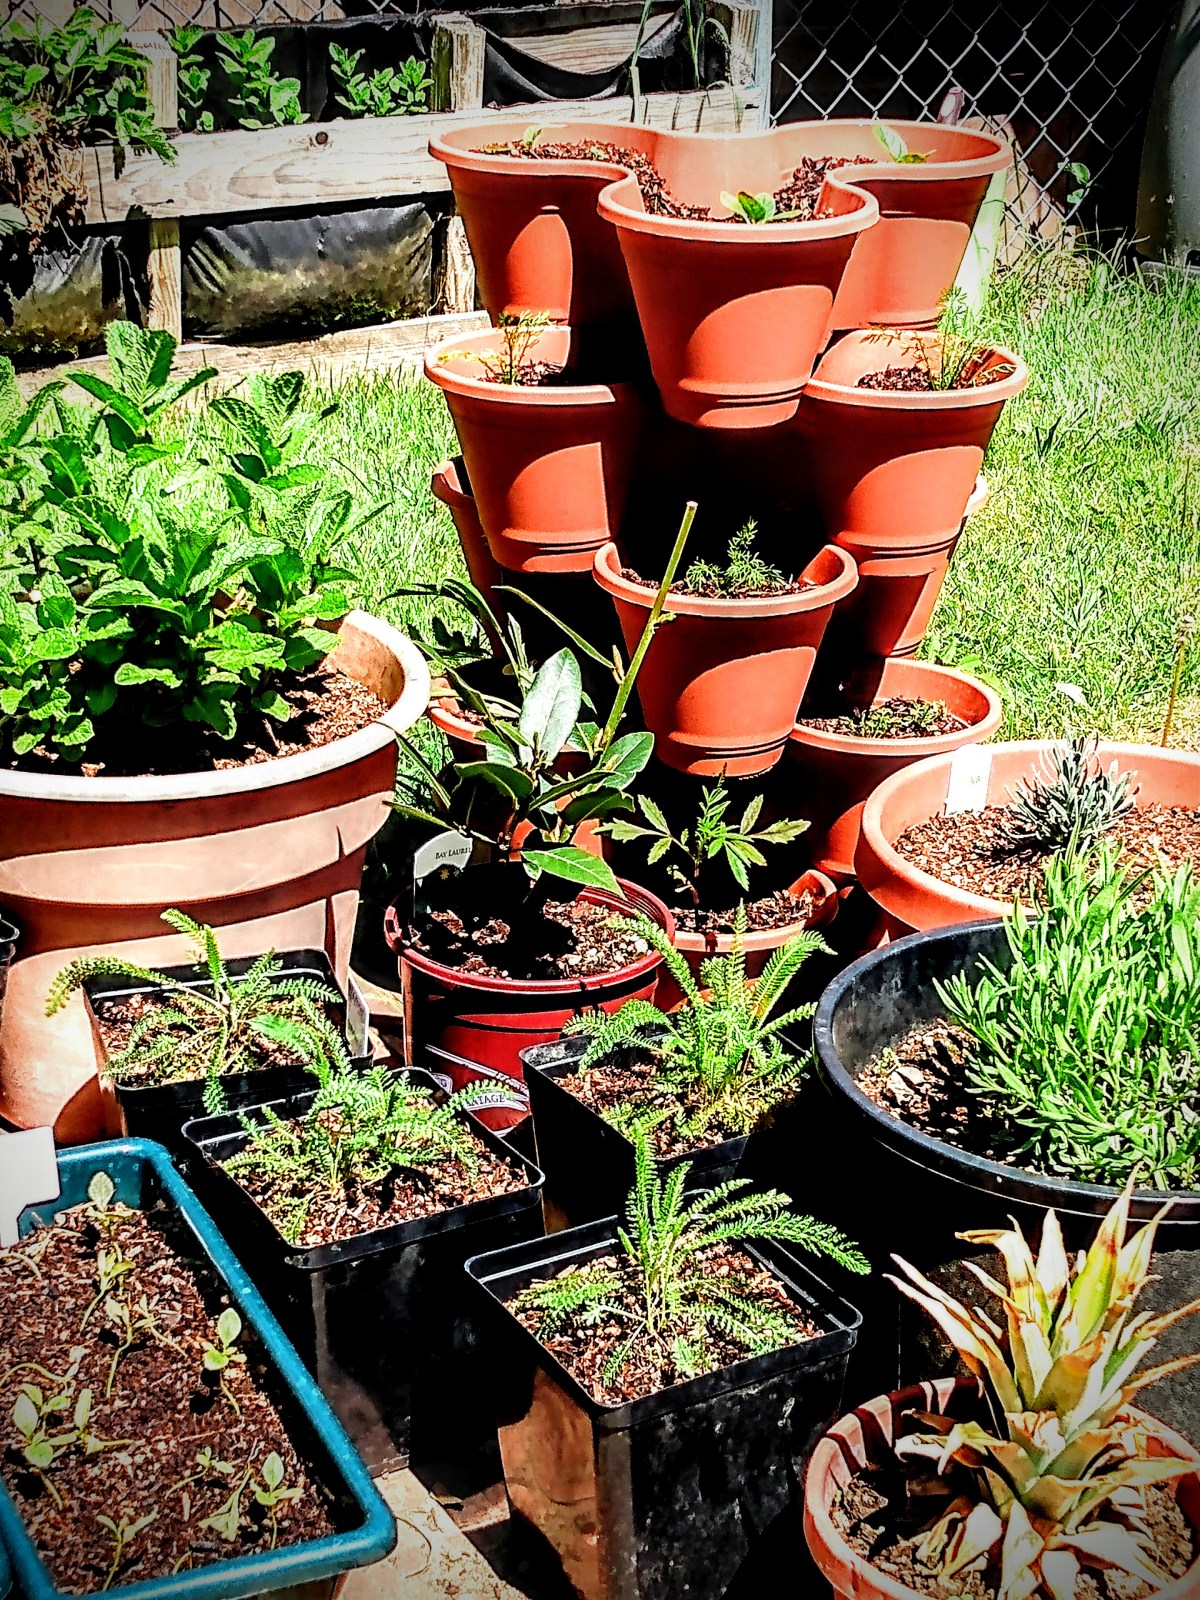
This mom loves talking about her memories. For many years she’s shared her precious memories of when she operated a daycare. And one of those fond memories is when she grew gardens with the children under her care.
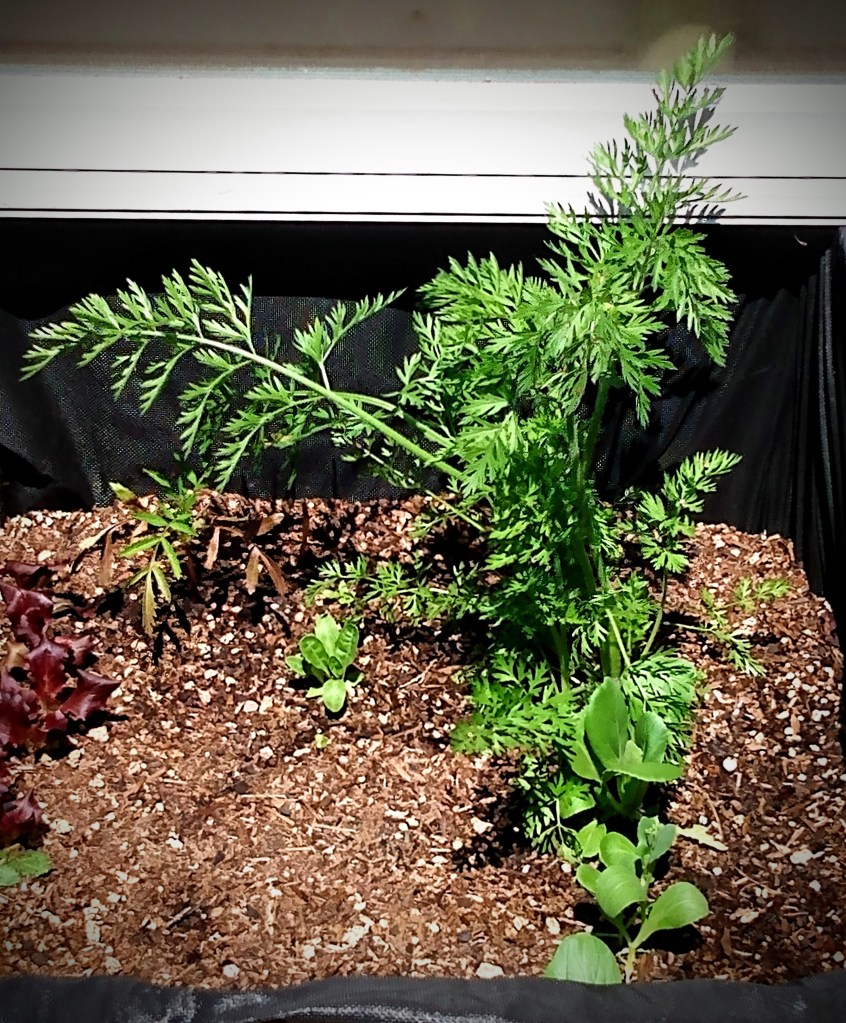
Growing salads in a container box.
One thing about moms, it seems pretty universal that sharing memories usually isn’t about the memory. It’s about reliving a moment in life that brought pleasure to them.
From this understanding, I knew that building a garden for this mom was a gift that would fill her love tank. Not only is it an opportunity for her to relive precious memories in the here and now, it also opened the opportunity to add more memories in association with these older memories. By building a garden and scheduling time to upkeep and tend to the garden, it was also guaranteeing visits and making time for her to spend time together.
Container growing for small spaces.
For this mom, she has two love languages. Her primary love language is gift giving. Her receiving love language is quality time.
Making a deposit of part of this season’s garden was not just a simple arrive, dig holes, put in start, say good bye, and move on with the day.
Advertisements
For this Mother’s Day gift, it took in the appearance of leaving all the gardening supplies in the car and starting off with a sit down chat and getting caught up with all the news, even if it was only a day since we last saw each other. Then, I was able to go prepare the garden beds for this first plant installment.
Even before I could bring out the plants, this mom was already so filled with love that she wanted to spend some more talking. As much as I wanted to stay task driven (my personality is to knuckle down and get a project done quickly so I can move on to the next task), this day was all about showing love to this mom.
Pallet boxes for narrow spaces and hanging baskets on cyclone fence
So we had another chat session.
When I could find a polite moment to get back to the task of putting the starts back into the ground, I made that move. And with the final post plant watering, I went back and gave this mom one last extension to the gift I was giving her.
Remember, I said that this mom shows love to others by giving to them. So while I was building this garden for this mom, I know that the one thing that would bring her even more pleasure is by telling her upfront that the goal of this garden is primarily to meet her primary produce needs, I’m planting more than she will personally need so that she can give from the garden to others.
I wish I could share with you the look on her face, because she was bursting with love. Knowing that she was having a garden this year was more than enough to help her feel love, she felt seen and more loved because the gift was enabling her to show love to others without need to be reserved or anything else. It was a gift that was freely given so that she could freely give to others.
Growing herbs in repurposed gutters hung on a cyclone fence.
I know that this story may or may not show you specifically what you can give the hard to shop for person, but there is a valuable lesson here.
A good gift is designed to make a person feel loved because it speaks to how they most readily feel loved.
If you don’t know this love language, ask your person how they most feel loved. They will gladly tell you. It could be a tangible object or food that makes them feel loved. Or it can be a non-tangible activity, expression, or display.
A great gift is one that fills their love tank, but also doubles as a tool to enable them to share their love with others.
Container growing garden with DIY budget friendly or recycled components. Chicken wire trellis threaded through upright supports.
Maybe your loved one is not like this mother. Maybe they don’t show love to others by giving them things. Maybe they show love through acts of service. However their schedule is busy. By gifting them your time to do tasks for them or help them create time, this can free up time where they can show love to others by spending time with another person.
My encouragement to you today is to be inspired with a gift idea that doesn’t come from the shelf of a store. Yes, there are many store bought items that are amazing and meaningful. I want to strike the inspirational fire to give a gift out of love and seeing the other person at a core level. And also enable them to pass on love to others.
Advertisements
Right now we live in an interesting moment in history. It is an uncertain time for many families. But it is also a prime moment to celebrate others by giving to them in a way that shows them that you remember past conversations. Where you have heard and remembered things that could have easily been passed off as trivial information in the moment.
Let’s show our loved ones that we see them. And we celebrate them for who they are.
Again, Happy Mother’s Day!
publicdomainpictures.net
This post contains affiliate links to products. We may receive a commissions on products purchased through these links, but at no extra cost to you. This item link is to Amazon but may be purchased at local markets, and found at your local library.
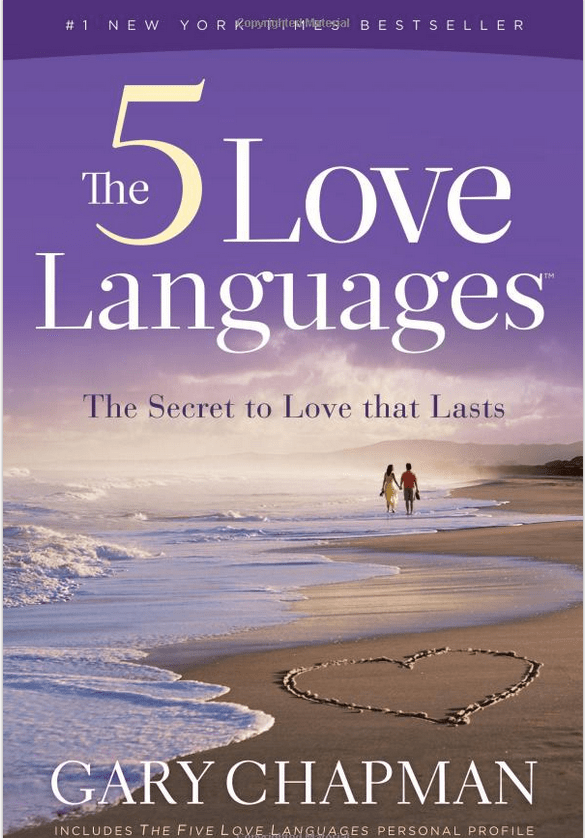
If you are unfamiliar with Love languages, here is the book that started it all.
Originally this was written for understanding your mate. There are several other editions available to meet other relationship needs such as children, being single, and in relationship of a military service member.
Processing…
Success! You're on the list.
Whoops! There was an error and we couldn't process your subscription. Please reload the page and try again.
What are your feelings about sharing a garage/shop with someone?
I find it frustrating! I have my office/craft space organized with containers that are labeled with its contents. So even if I have containers down I know exactly what’s in it at a glance. And it’s super easy to put away and clean up.
The garage… I so wish, with every wish available I could send my family away for the weekend to organize it and find an official home for everything. And you can guess it. My problem is that my husband has a way he wants it and our two ways of organizing a work space for repairs, large projects, and keeping our hand tools are two very different ways of thinking. The funny part is that more times than not, it’s my husband who’s coming to me to find a specific tool. And yes, I keep my own stash of hammer, screw drivers, and allen wrenches that I zealously guard like my fabric scissors. If you touch them, you better put them back where they belong, LOL.
And if you’ve built anything for any length of time, you know how hard it is to find screws, nails, and washers specific for your project. God Bless my Husband, but he has that garage that we’ve all seen our grandfather’s have: screws in a coffee can, nails in jars… they may have a home but you have to dig for the style and size of hardware that you’re hunting for.
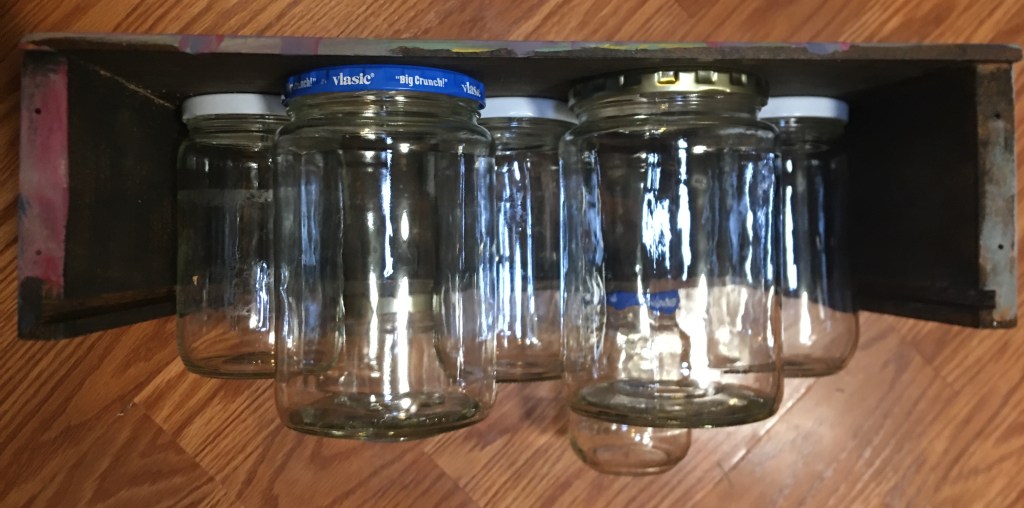
So for my husband’s birthday this year, I had my boys help me build my husband a caddy to separate all those pieces of hardware into an easy to access place that you can quickly grab without feeling like you’re sorting through that bag of unmatched socks. And Bonus for my bragging rights, is that I sourced everything for this caddy from our garage.
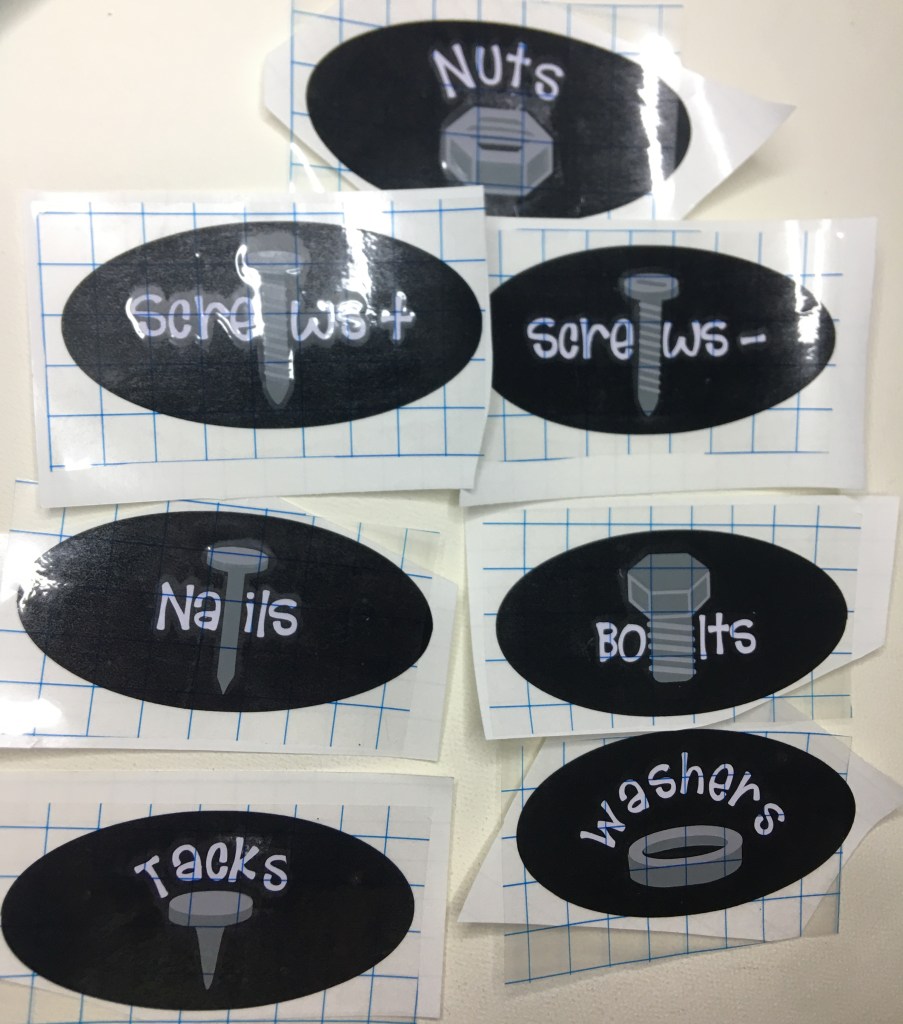
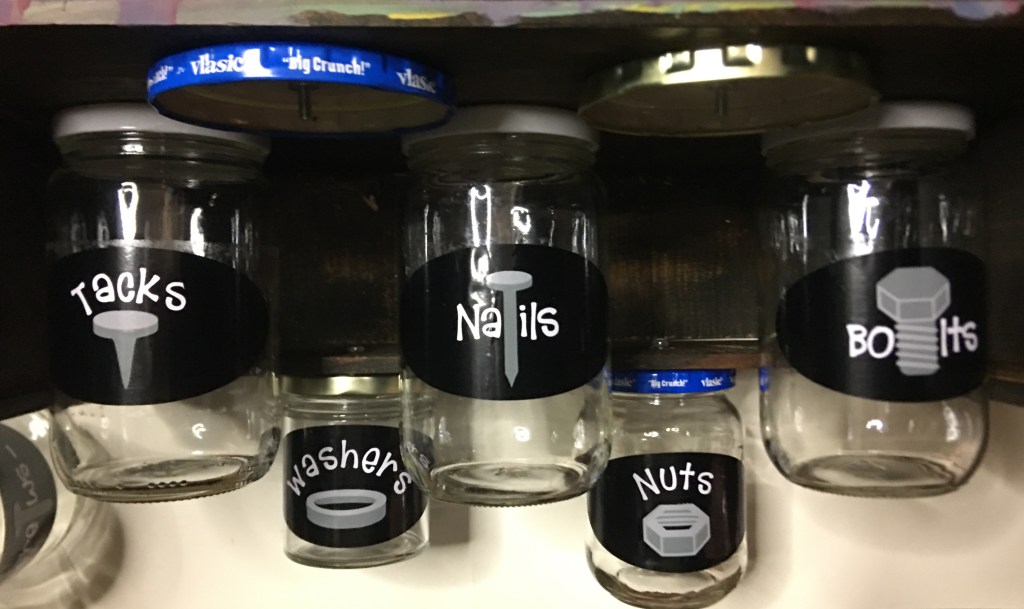
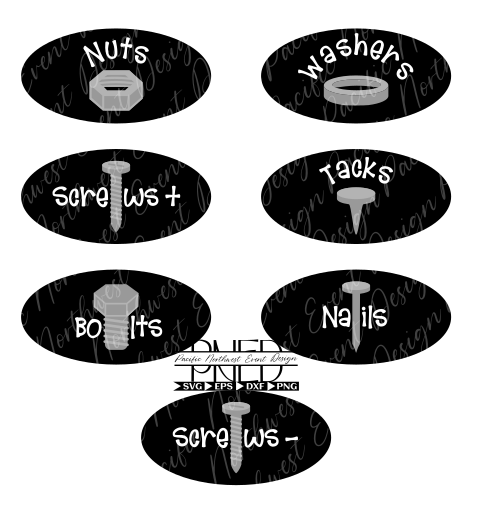
This caddy is perfect for a garage, craft room (of all types), office, or anywhere you need to space save and easily access anything. While you’ll see I labeled these specific for garage hardware, you can take this idea and run with it for crafting. Instead of nails, label it buttons. For a Teacher’s classroom, instead of tacks, label for push pins. Change bolts to paper clips. You can completely cater this project to anyone and their passion!
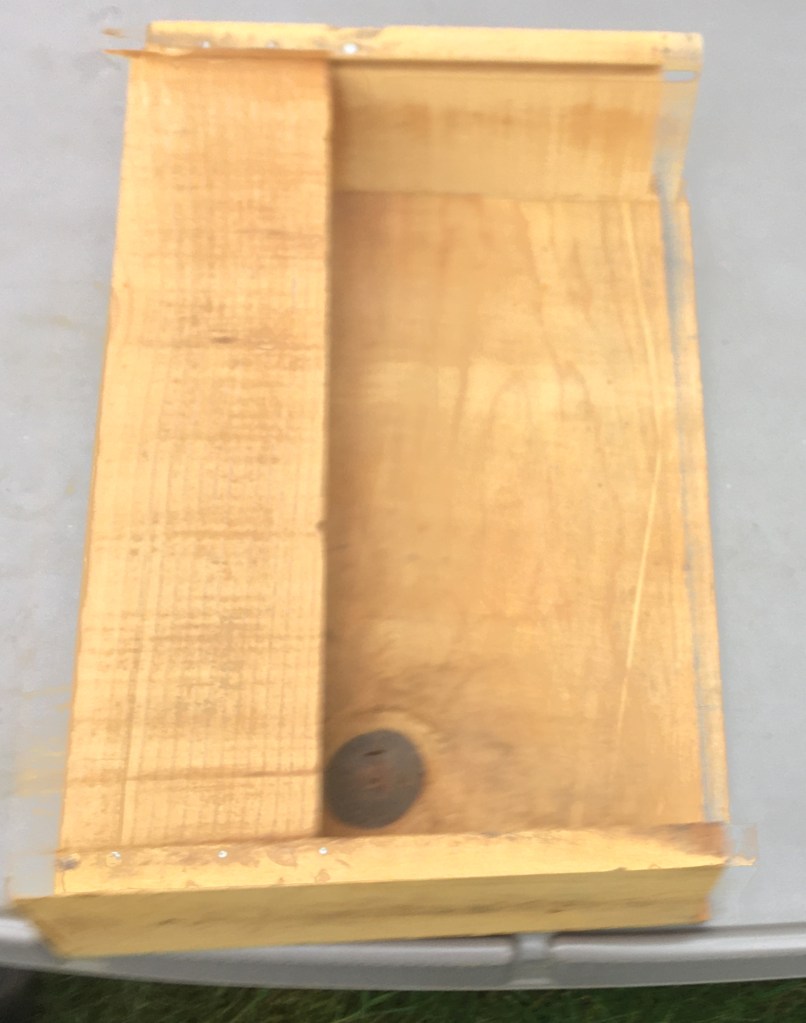
The box that I used is a wooden box (about 12″ by 8″) that’s very similar to a cigar box with sliding lid. The lid was missing and one of the long sides was about to fall off. So I just removed the lid and nailed it to the top of the box.
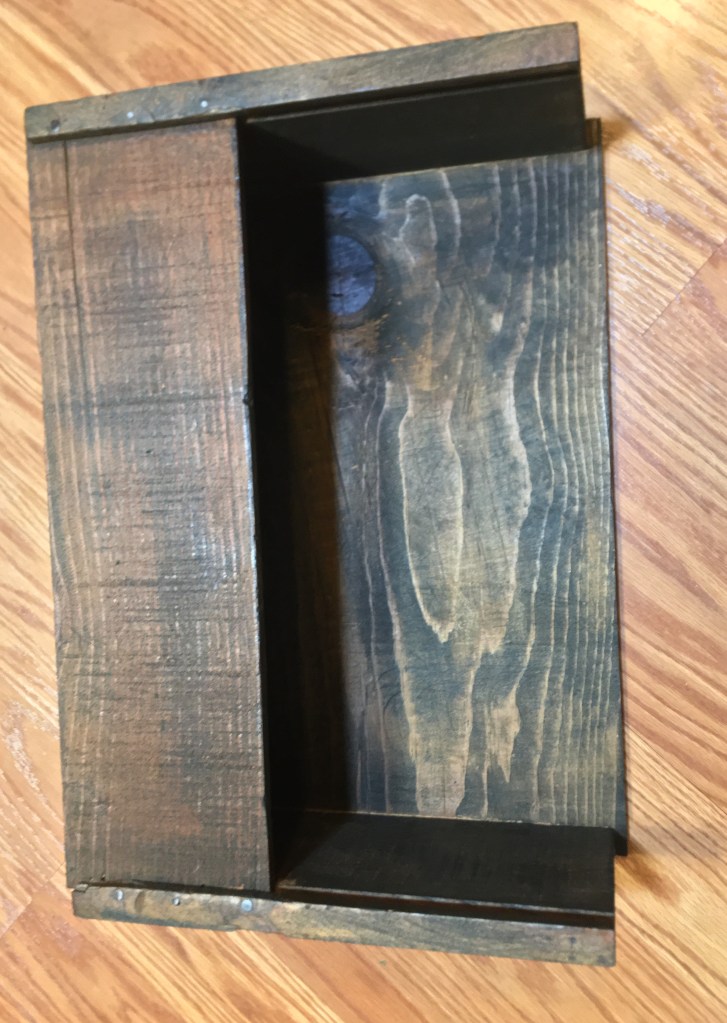
One reason why I wanted to reshape the box was to have a little hidey shelf, in case my husband wanted it. You know the little objects you want to put in a safe place, but usually any counter space is a place prime for losing the thing you want to put in a safe place. So here’s a safe place. This box was rough, because it wasn’t meant to be decorative. I sanded the box on all sided before staining it. Yes, it maintained the rough look and feel. But I also fully appreciate the rustic aesthetic.
Advertisements
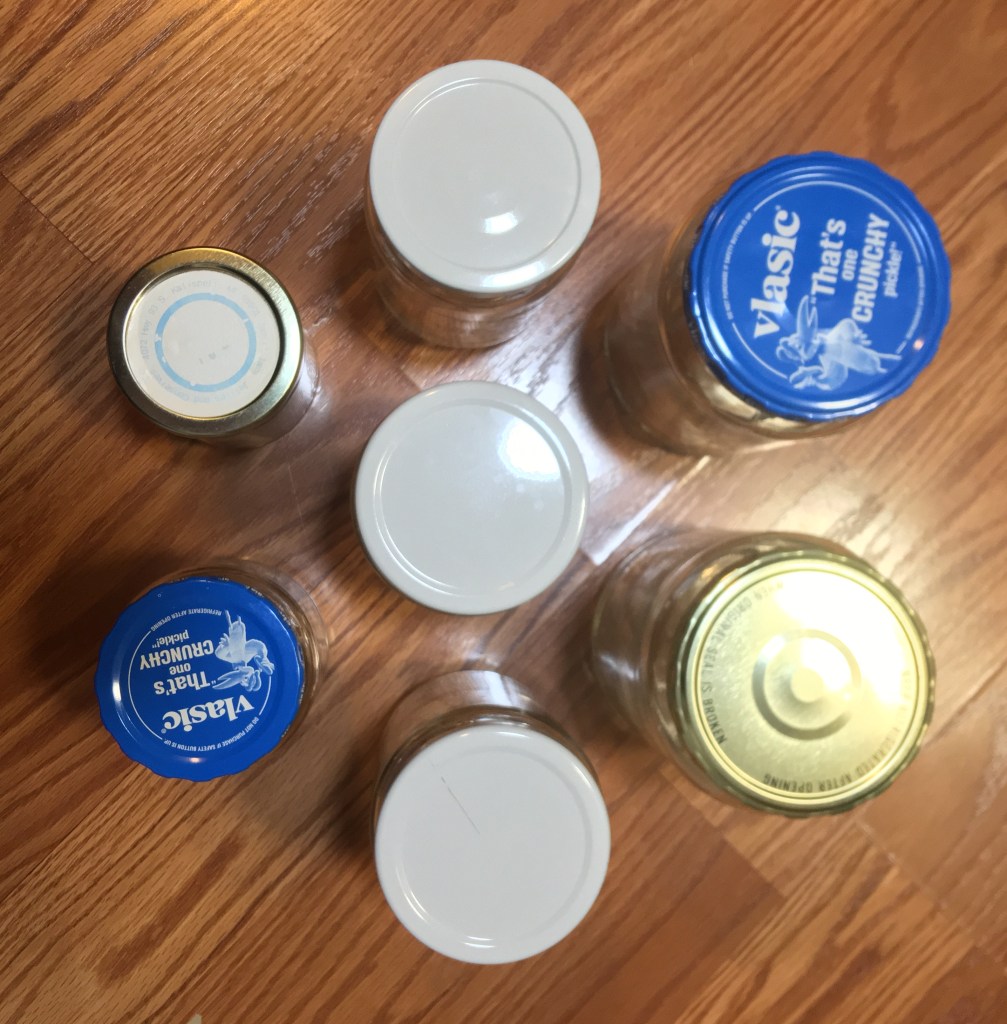
While the stain dried, I cleaned out my fridge from all the jars of pickled items. I’m not a pickle eater. Nor am I a fan of pickled vegetables. BUT my husband loves them. And my fridge door is where I sourced this collection of empty jars for this project. (I was not about ready to take from my canning jars, although I’ve seen people use canning jars for their hardware holders.)
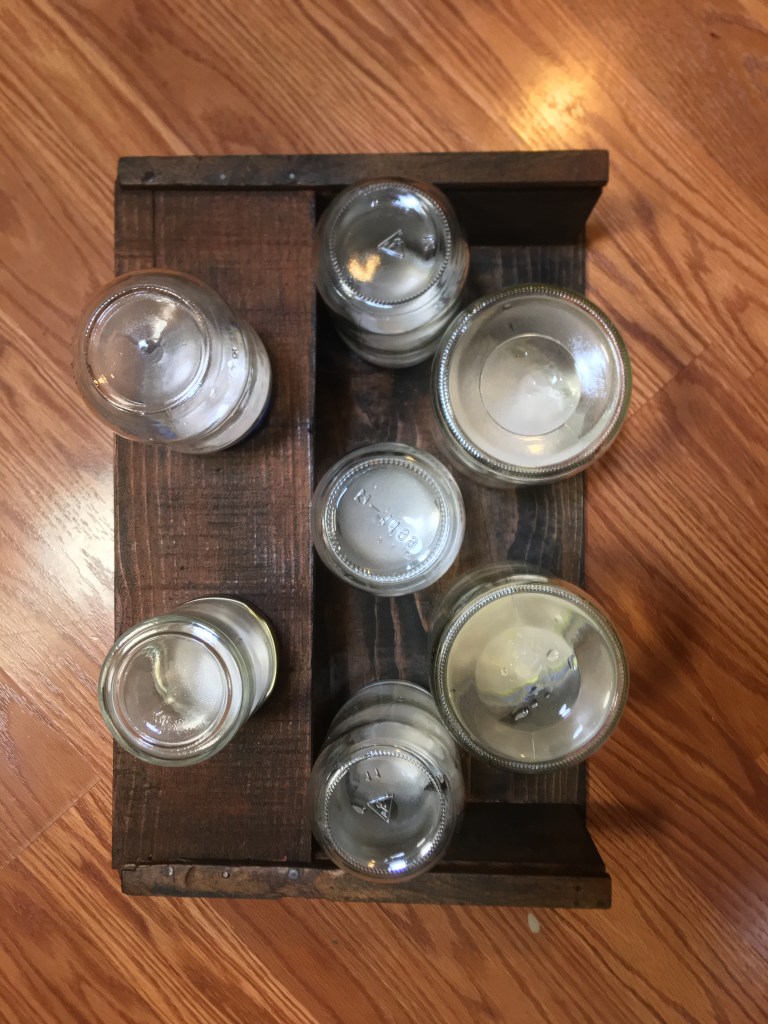
After the jars were washed and I found which ones were similar in size, I placed them on the underside of this caddy. The smallest jars I put on the shelf. And I went back and forth if I wanted the row of two or the row of three jars to be in front. I chose to put the set of three in the center just for symmetry. Plus, I knew the screws were going to go in the larger jars. And other than the nails, these are the most sought after hardware in my house. So I put those in the front to make it the most convenient to grab.
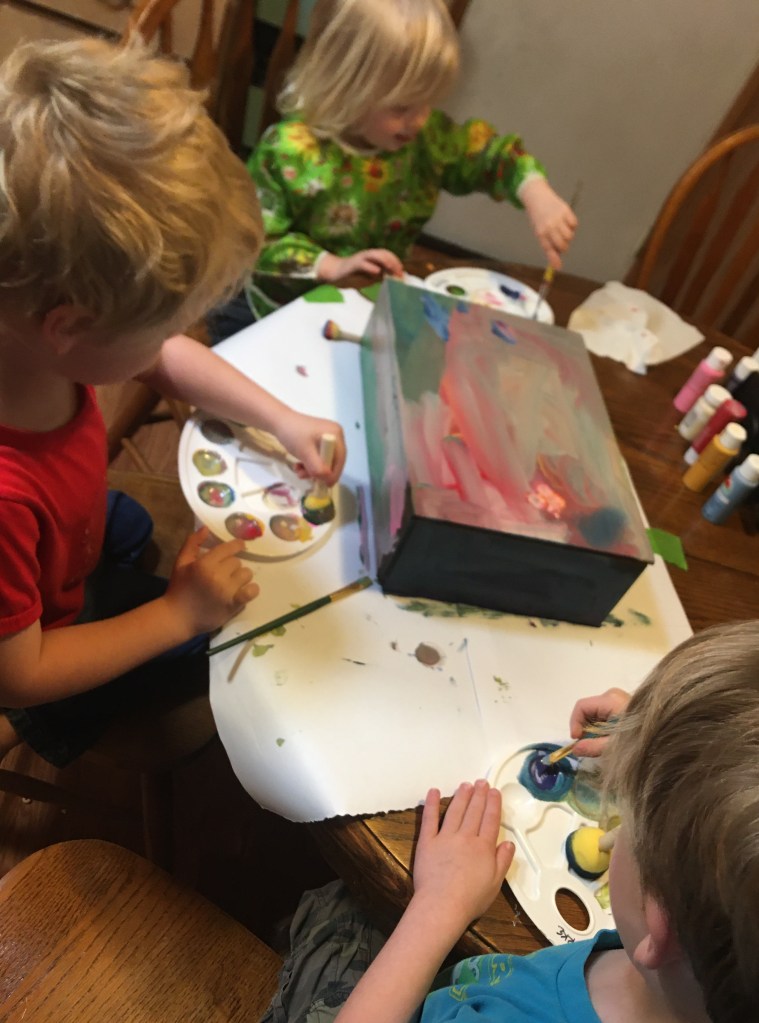
While the jars dried, from their scrubbing, I set the kiddos up for painting the caddy. They got a bit distracted and wanted to play instead of use tools, but they dropped everything to paint for their dad. And since my husband loves their art, I sacrificed my want to keep the wood stain, which was my favorite part. But I kept the underside stained so a piece of me was still there.
I’m showing you this step, because you can make your caddy however you favor it. You can keep it clean and upscale. Or you can make it very family orientated. There’s no wrong way to make this caddy.
Advertisements
During this drying time, I cut out my labels with my cutting machine and assembled the layers ahead of time. That way when I was ready to apply theses labels, everything was lined up and ready for a simple peel and stick on the jars.
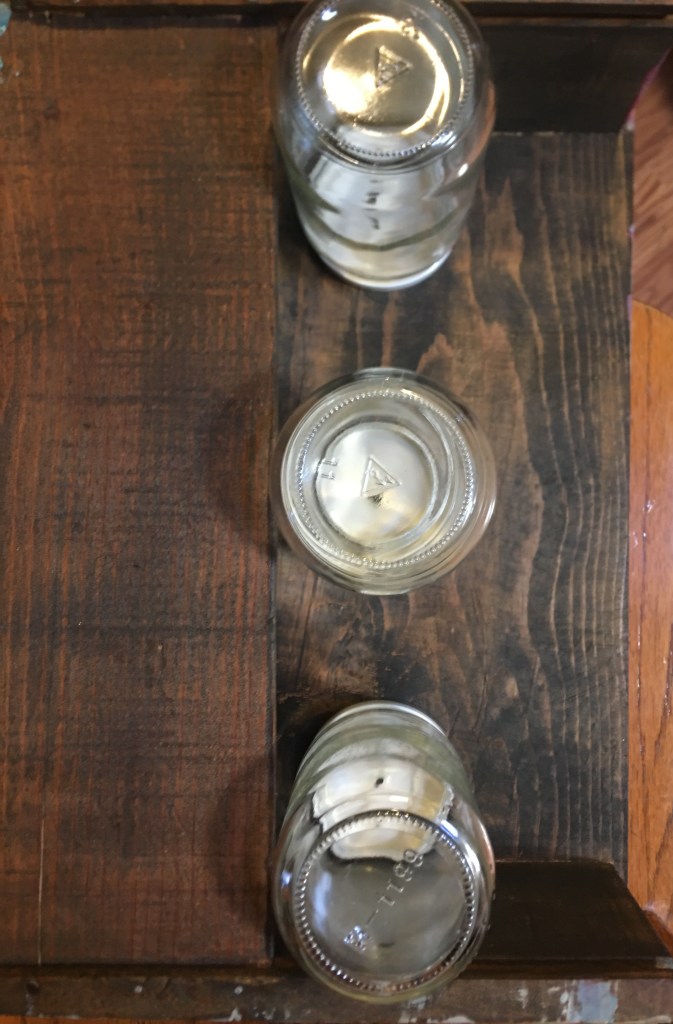
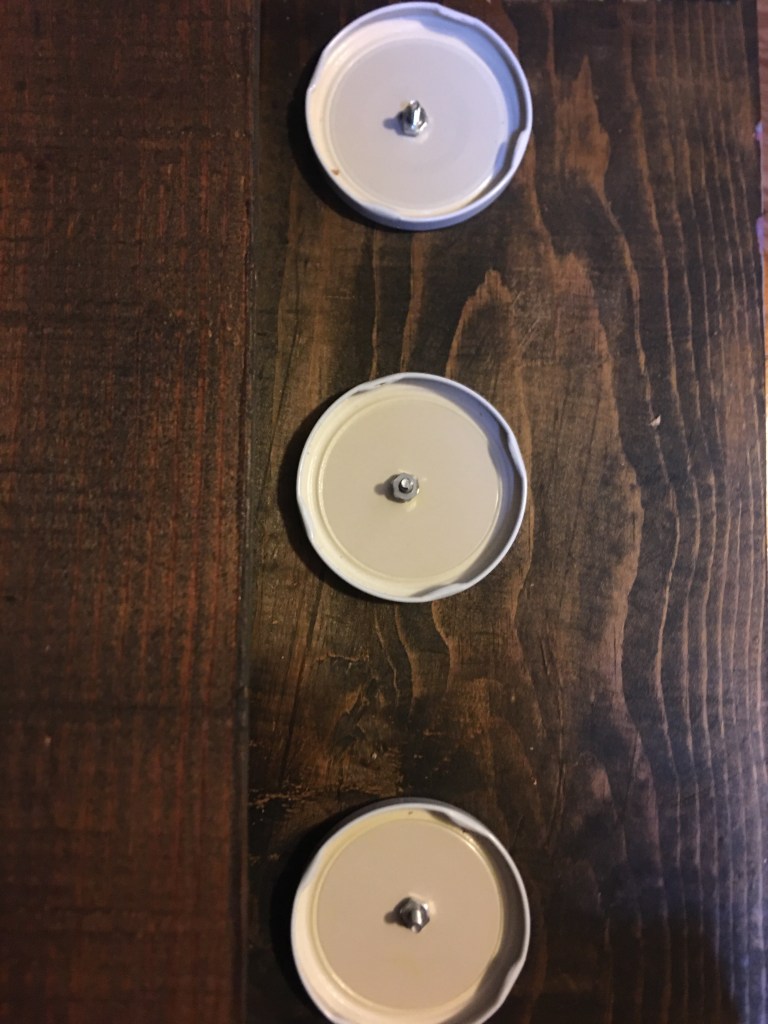
When the jars and the acrylic paint dried, I grabbed my drill, nuts, bolts, and jars. The first thing I did was drill a hole in the center of the lids. (If you are opting to use canning jars, make sure the lids you choose to use have already been used to preserve your food. That way you still have good canning lids ready to use in the future.)
After you are finished drilling, place your jars on the caddy in the exact places you want them. This pre-spacing is very important, especially when you have rows of jars next to each other like I have on the center and right side. I didn’t want the row to go over the edge, for esthetic reasons. If you have all your jars the same size and they second row comes over the edge, it’s okay. You may want to consider painting the jar lids to keep a uniform look. But the placement is also important because you will find that your jar lids are a smaller diameter than your jar sides. So by pre-spacing your lids, you will make sure you can screw your jars into your lids and not have an issue with the box sides or the shelf.
While you hold your lid in place, drill a hole through your caddy. When you hold is completed, you thread the bolt through the caddy and the lid and secure it with the nut. Hand tightening the nut and bolt will not be enough. You will want to tighten them with a wrench. This is most important if your bolts are short and if you want to be able to (un)screw your jar without holding onto the lid.
TROUBLE SHOOTING: If you find it difficult to keep your lid in the correct place for drilling, without moving, here are a couple of ideas you can use to assist in keeping your lids in place. Before drilling, use masking tape to tape your lid down to the caddy. Another option is to use a hot glue gun and place a circle of glue around the center of the lid. Be careful not to glue the center. You don’t want to drill through glue.
Advertisements
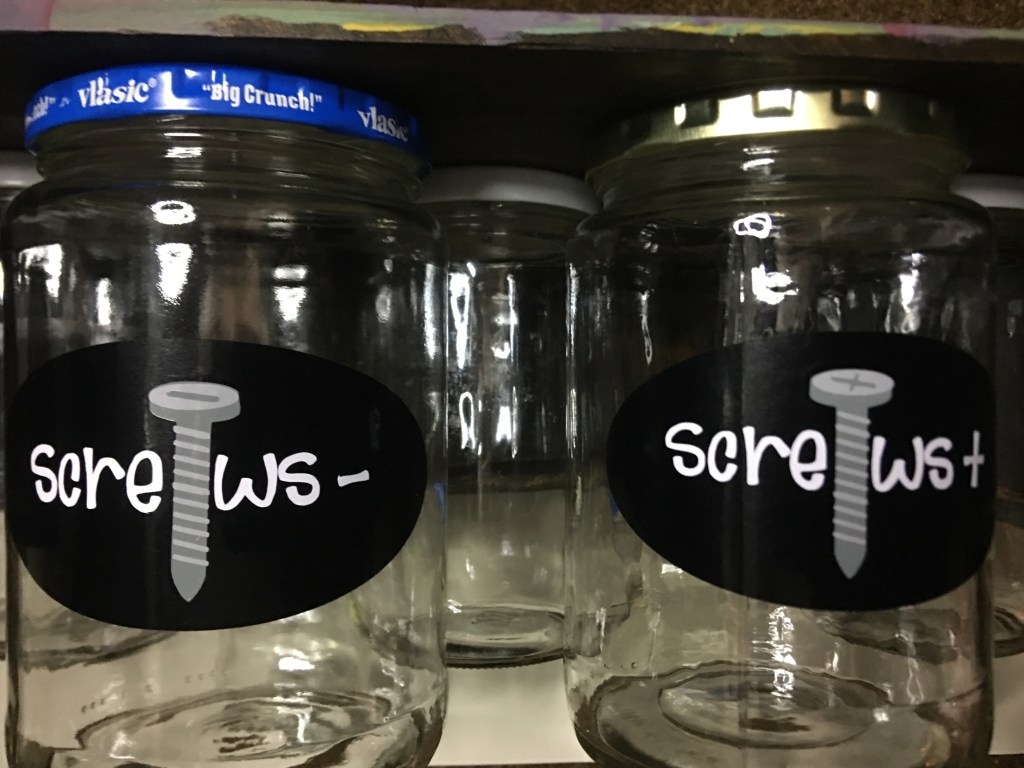
Once your jar lids are all secure, you’re ready to label!
To get labels to stick with the most success, clean your jar with a cotton ball soaked in rubbing alcohol. This will remove any oils, dust, soap, or anything else that could cause your vinyl to not secure cleanly to the jar.
It is crafter’s choice how you want to add the labels. You can place your jars on a work surface and apply them off the caddy. Or you can apply the labels while on the caddy. I chose to have all the jars attached to the caddy because the only jars that were a perfect match were the three that put in the center row. They were from the same company of pickled vegetables. All my other jars were different sizes, but very similar in measurements. However, if I applied my labels off caddy and centered them on the jars, then none of my labels would have lined up. However, with my jars on caddy, I could get the labels to line up near perfectly and give the illusion that all my jars are matching. The exceptions of course are my small jars in the back (washers and nuts). But those are tiny jars hidden in the back and completely understandable why nuts would be larger than washers.
However, if you’re the personality type that is bothered by things not absolutely, perfectly matching, then please ignore my chaos here. Work to your strengths and show us the beauty of our symmetry and perfectly lined labels. I love watching your work. But if you’re the type that can’t get things to line up perfectly, know that there are ways of lining things up even when your jars are millimeters off in their heights.
Mounting the Hardware Caddy
I’m sorry I do not have a picture of this for you today. We’re in the process of reorganizing our garage and we’re not sure yet if we’re wall mounting or rack mounting this caddy. I will update this post when we get that project finished, so you can see how you might choose to mount your caddy.
The one thing that you need to be aware of is how gravity is going to work when you have the jars filled with their hardware.
Remember, I organized my jars so that my heaviest and largest jars are on one side. If I install with screw jars forward, all the weight and pull are going to be forward. So I will need to compensate. If I install the screw jars in the back, toward a wall, there will be very little compensated needed because the center of gravity will be near the wall and negligible.
For wall mounting, I would want to have my screw jars forward and screw the back side of the box into the wall, with a screw in each corner of that board. Preferably I would want to screw the caddy into a stud, because that will carry the weight beautifully. If it’s impossible, hit at least one stud (which I would center the caddy on and put in an additional set of two screws, in additional to the corner screws). If all I have available is drywall, I will definitely put in wall anchors and drill the screws into those. That way the weight of the hardware will not weaken the dry wall and pull out of the wall under too much weight.
If we choose to go with mounting the caddy on our rack, I will do that using conduit bracket mounts. I will use at least three brackets on the screw jars side. That way, the weight of the screws will pull straight down. there will also be a bracket or two on the back just for stability purposes for when the screw jars are removed, and the center of gravity changes.
Another option for rack mounting is to use a block of wood. The caddy (jars removed for installation) I would put on the bottom side of the wire shelf, with the block of wood on the top of the shelf. Then drilling a screw through the open space of the shelf into the block of wood. This option is not the one I would personally go with, because it doesn’t work with how we use our shelves in the garage. But I did want to mention it because the caddy can be screwed into an existing shelf that you might have.
While there are many ways of installing a caddy like this, I want to put out one more idea. If none of the above work for your situation, you can add wall mounts to the back of your caddy. There are all sorts of alligator grip picture hanging mounts that you can use. With a trip to your local hardware store, you can find picture mounts that can hold portraits up to 50 pounds. That is over kill for this project, but I want to mention that this is another option that could work for you.
Please send in pictures or let me know who make this for. As I mentioned, this example of a hardware caddy I made for my husband for his birthday. But this is perfect for a Father’s Day gift, Graduation gift, something for a teacher, crafter, or even just as another option for home organization.
The one thing that I love about budget and DIY weddings is that the couples, and their families, look for ways of reusing items after the wedding instead of using disposable items. And this is one thing that everyone can agree on, whether you’re a diehard Earth Day person, living Green, being Frugal, or just getting more bang for your buck.
I’m going to focus on one wedding item that tends to be wasteful or even a financial drain…wedding favors.
There are so many cute ideas out there. I really get it.
Some of them are practical. Like the paper fans on those hot summer outdoor weddings.
But if we’re being honest, how many of those items are really used by your guests after the wedding?
The problem that I see is that all those monogrammed, personalized items really don’t see a life outside of the wedding. The true exceptions are for the family and guests who are truly sentimental.
My husband is one of those sentimental people. I kid you not, he’s the one who collects the paper fans after the wedding and brings them home. His feelings are hurt if the one of the boys plays too rough with one and rips it. And 5 years later I just see a blue fan, but he remembers who wedding it was from and at least five new people he met, and a funny story or two from the reception.
So I want to challenge you to find a way to make your wedding favor do double duty. Or even triple duty!
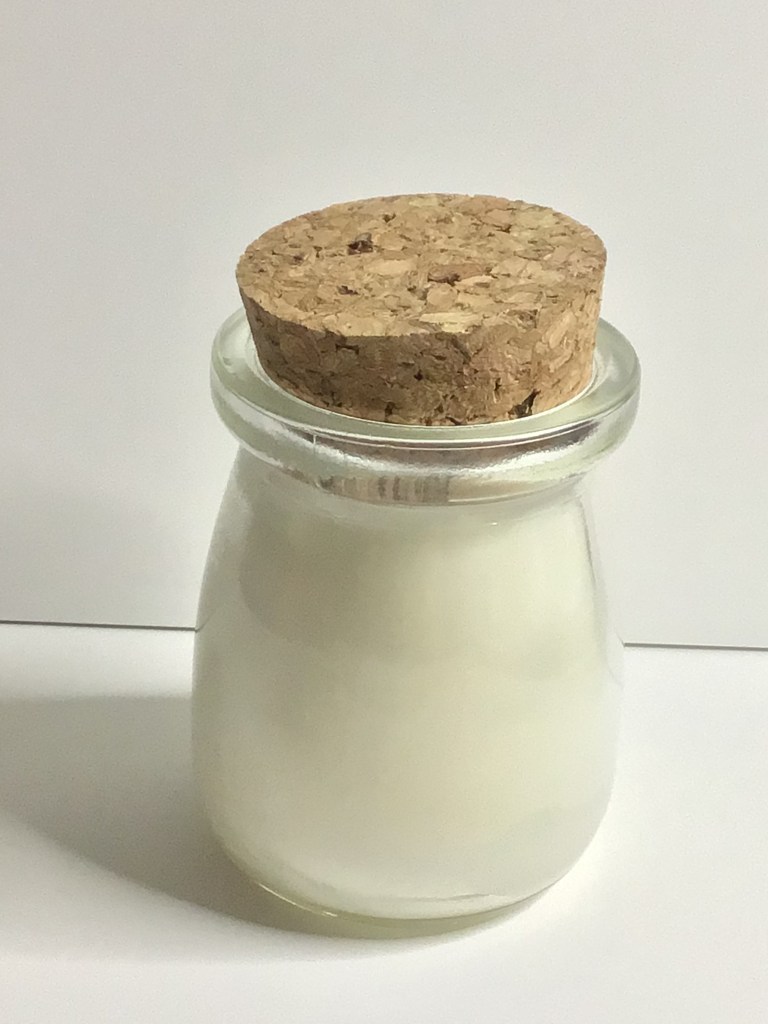
One idea I have for you are little candles that you can purchase at craft fairs and support a local vendor.
Advertisements
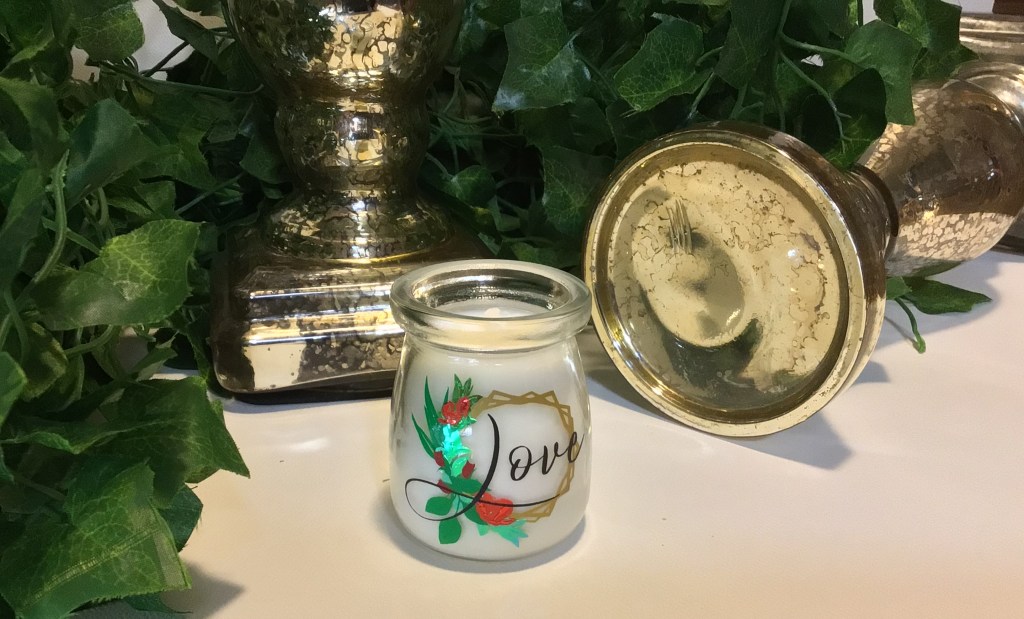
Use #1 Wedding Favor
Instead of personalizing these with your names, initials and wedding date, try finding phrases or words that represent your love for each other. Funny phrases work if you’re a funny or prank making couple. When you take away the obvious personalization and go with personalization that your guests can identify with, you automatically guarantee that your guests are going to want to take your favors home.
Use #2 Year Round Gifting
For example, if you’re keeping with the romantic or Boho themes, this floral wreath is absolutly perfect! It adds to your wedding decor, but it’s absolutely something that people will love to decorate their homes with when they leave our reception. Worse case scenario, you take a few home and they are still an appropriate gift to give for birthdays, Valentine’s Day, an add on trinket to another couple or bride, the possibilities are endless.
This decal is 2″ tall. Some of the details were eliminated to due to size. The rose buds you see here are about 3mm tall.
Use #3 Centerpiece Decorations
If you’re thinking about using tea light candles on your reception tables anyway, these are perfect because one purchase price for a favor is fully utilizable for your centerpiece. And if you design it just right, you can combine it with other candles. For example, here’s the same candle with gold mercury glassware.
Advertisements
Use #4 After the Candle is Gone
People love cute little things. Even more than that, they love cute little things that they can easily see using when the contents are gone.
This little jar is perfect for adding:
A new tea light
Coins
Q-tips
Toothpicks
Sink side jewelry holder
Small office supply holder (ex. tacks)
Tooth Fairy jar
Spice holder
And any crafty person can find a million uses for this size of a jar on a craft project
I think I bought several of these scented candles from a Christmas Craft Fair vendor for about $5 each. Yes, there are most certainly wedding favors out there that you can find cheaper per unit. BUT my big question is…
Which favor is going to be memorable for your guests? Pull double or triple duty for your decor? Will be used long after your wedding?
Another bonus to purchasing an item like this from a local vendor is that they are likely to work you a deal if you buy something in bulk from them. It’s something to talk to them about. But even at $5, it really is a great deal.
But the absolutely best thing about this favor is that it will absolutely not end up in the trash as soon as you leave for your honeymoon!
File Used Today, Love Wreath, will go live on Monday! There will also be other variations available. So be sure to check them out in my shop.
Processing…
Success! You're on the list.
Whoops! There was an error and we couldn't process your subscription. Please reload the page and try again.
To end this series on Make A File Do More, I want to switch things up a little bit. Instead of a file, I want to focus today on how to make a Statement Piece work more for you.
This is particularly important for DIY Brides. You do everything you can to make your budget stretch the farthest for you. And the best way you can do that, is incorporate as many décor elements into furnishing your new home.
Instead of using cut flowers, for table centerpieces, use live flowers. When the wedding is over you can then plant the flowers in your flower beds or planter boxes.
For your entryway table incorporate lighting from unique lamps that can be used for your bedside lighting. Mind you, I’m not talking about your standard lamp. Use lamps that have character. Think along the lines of art deco glass, stain glass, jet beads, frosted glass orbs, or even something that reminds your guests of Chihuly glass art.
Advertisements
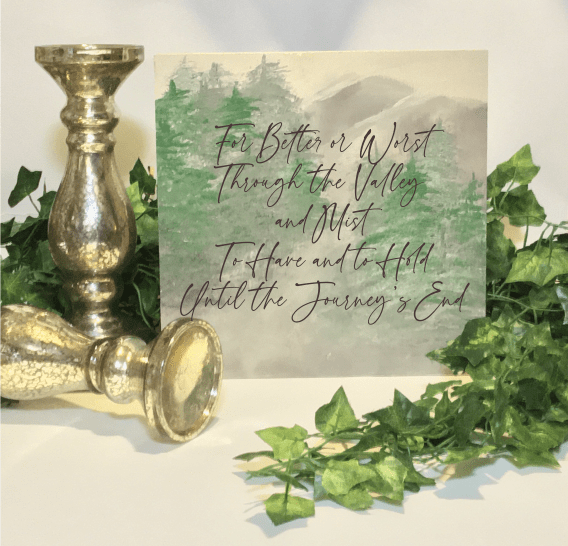
In this case, I want to show you how you can take a piece of art and reuse it over and over again.
Maybe you have a loved one who gifted you a needle point, painting, hand drawing, or other memorabilia. And you want to honor that loved one. Use it as part of your wedding décor. And then after the wedding, you can use it, or give it a place of honor in your home. This is particularly true with beloved items that are placed in a shadow box. You can use a removable vinyl on the glass, with a wedding or love quote. Then when the wedding is over, you can remove this vinyl detail and use the item as a more day to day item.
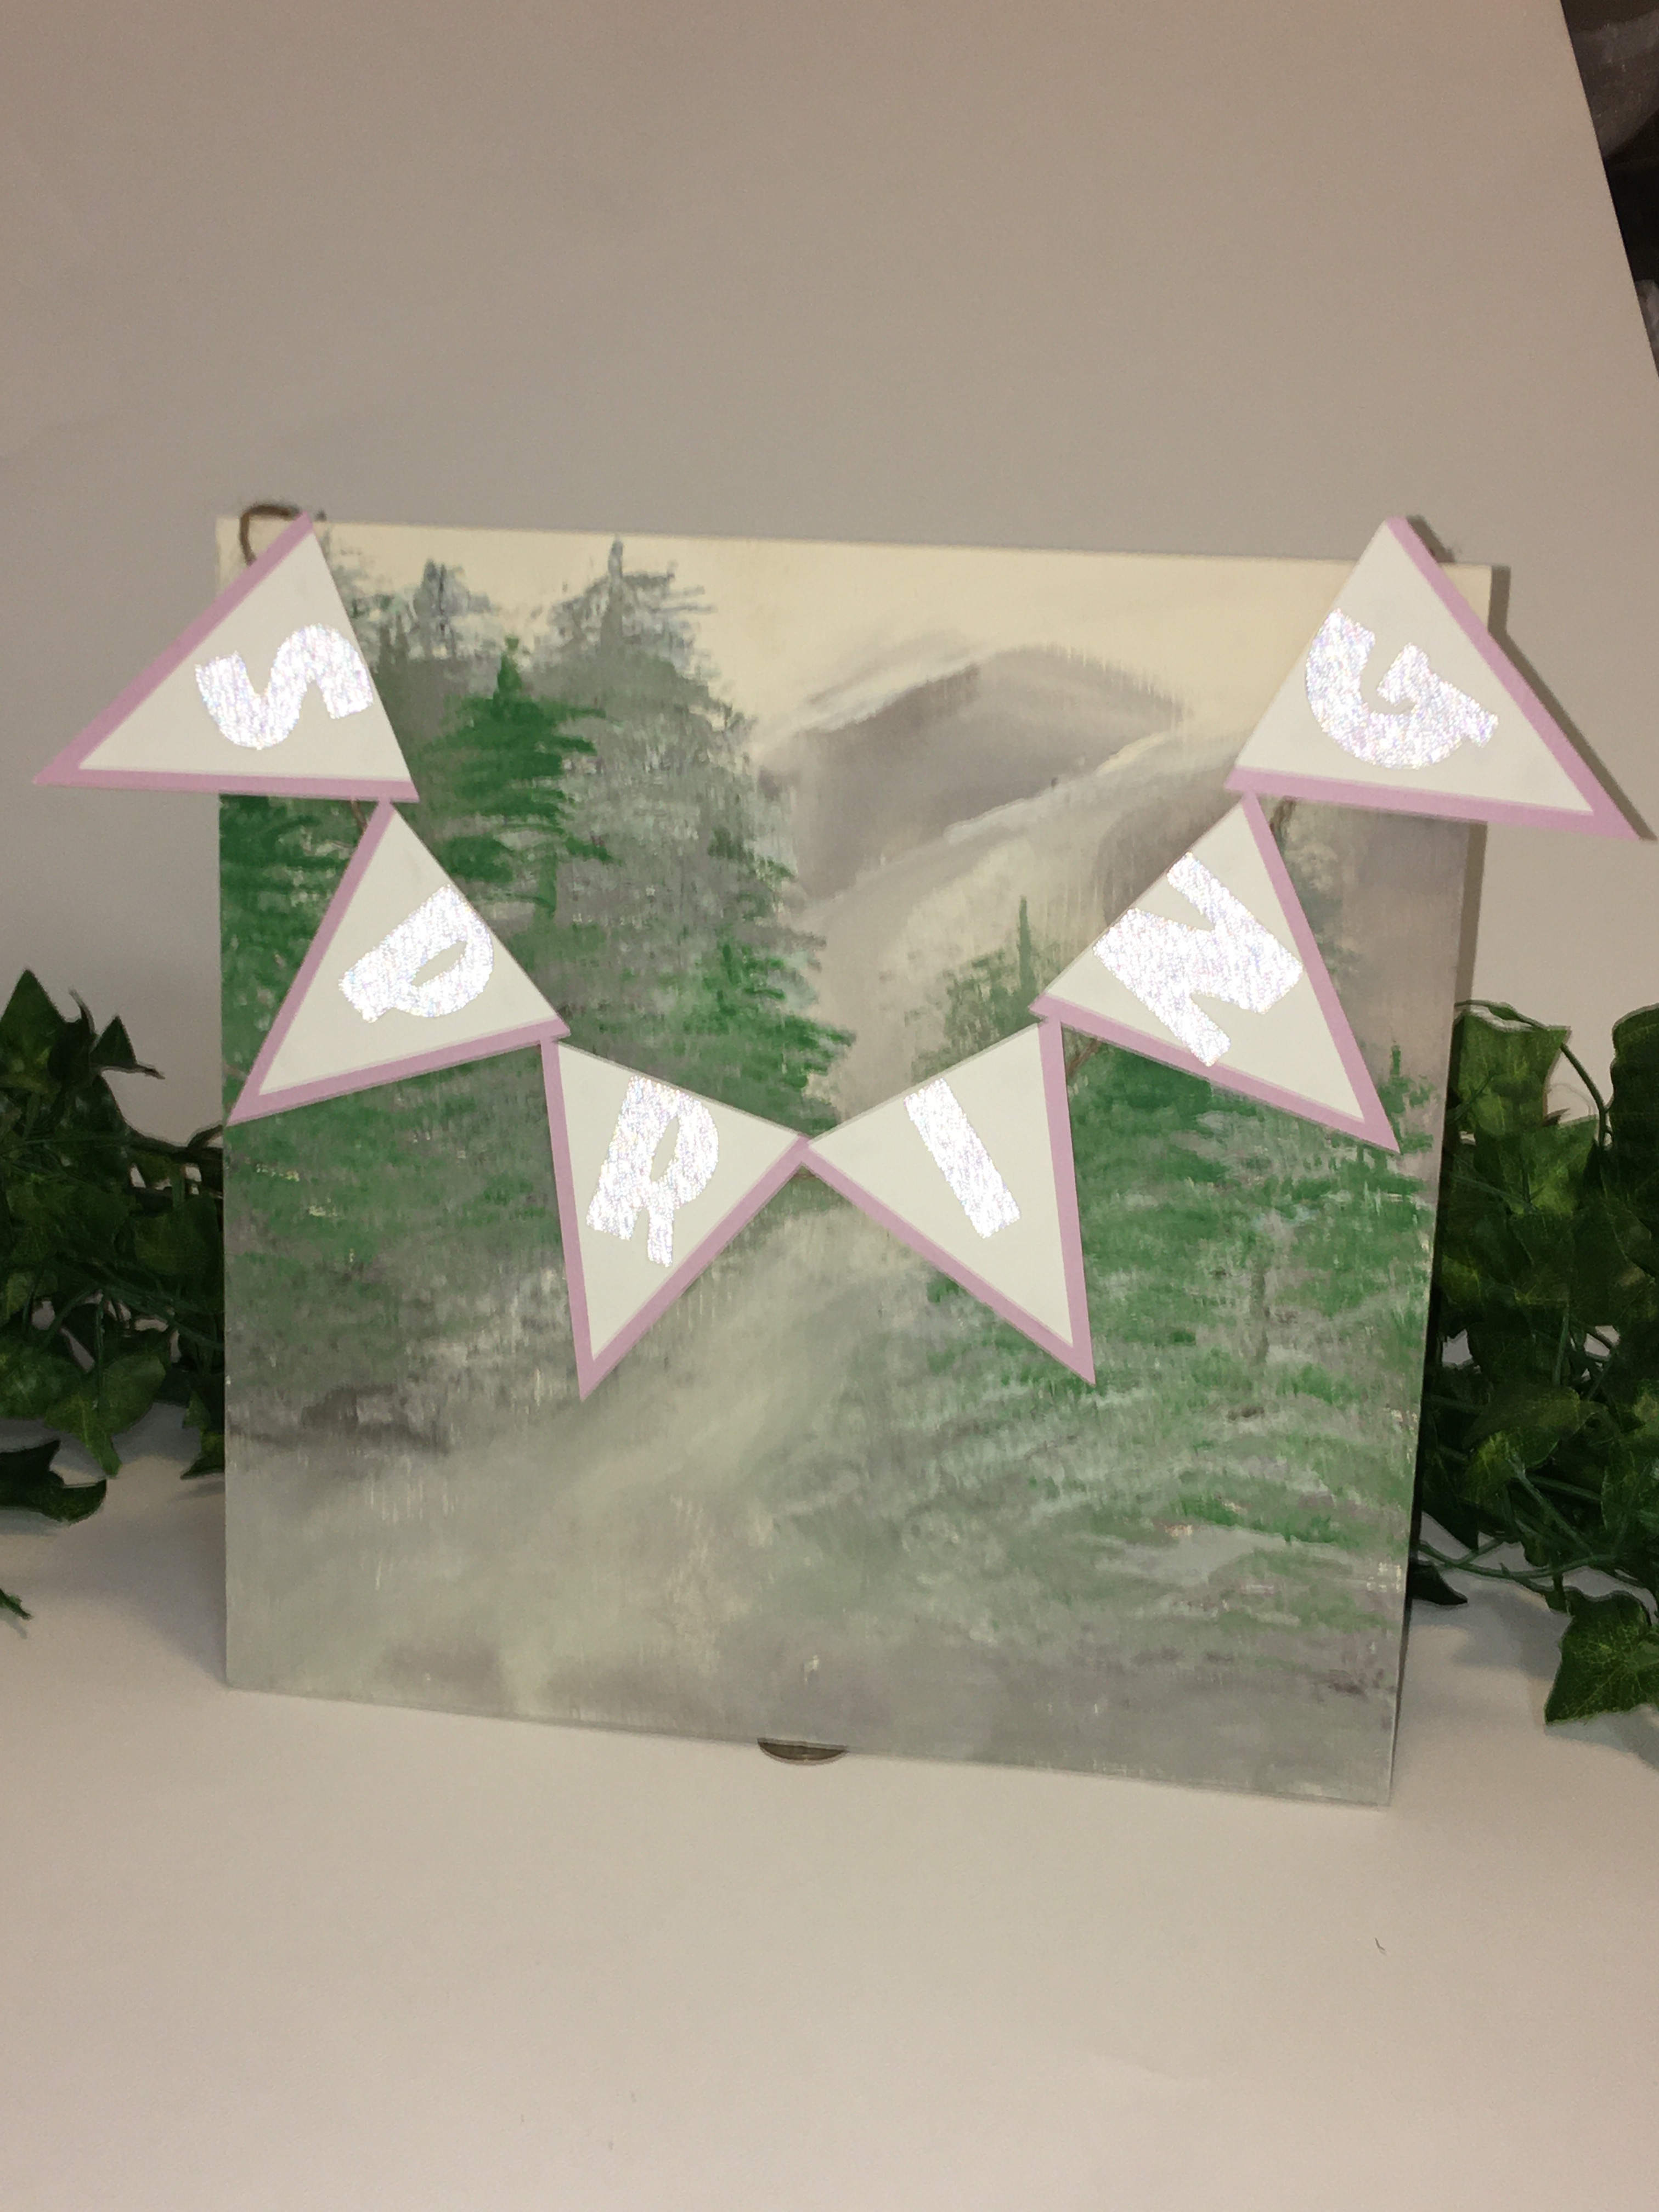
I’m going to use this painting.
For a wedding or anniversary setting I have this quote, Better or Worse. It can be used on any number of table type settings. It even works for centerpiece arrangements. (If you find a collection of quotes you love, you can have a different quote at each table. Then after the wedding you can have a tile work collage of quotes on a focal wall in your home.)
As another option, for after the wedding, is a seasonal display that so many crafting groups create year round; whether coasters, seasonal blocks, seasonal tiered trays, or another format.
I have not yet pulled out my Easter decorations, but I did make a spring pennant to drape over the top. And once I locate my kiddos’ Easter baskets and other décor items, I have the perfect backdrop for a spring and Easter Display.
Advertisements
So whether you are looking to make a cut file have an extended life in your crafting season, use one item over and over again to bring cohesion in an otherwise eclectic event design, or finding a way to bring added life to items that may otherwise have no life with your family after an event, DO NOT be afraid to think outside the box. Be unique. Find ideas and ways of giving décor items and crafts more life instead of being disposable. We don’t life in a society that talk about heirlooms anymore. But this was a part of life with the generations before ours. We all dream of things we make being passed down to those who come after us, as living memories. Maybe we have items that will. But the one thing that is completely in our control is giving as much life and purpose to things that we celebrate our milestones with.
The file used today, Better or Worse, is perfect for all of your wedding and anniversary needs!
Processing…
Success! You're on the list.
Whoops! There was an error and we couldn't process your subscription. Please reload the page and try again.


Leave a comment