On The Court

Winter sports have started and parents everywhere are volunteering for coach their kid’s park and recreation teams. And I am that parent-coach.

After spending quite a few years working with kids, you learn firsthand that not all kids learn the same way. But one learning style that all kids have in common is that they have to have a visual of some kind. And when you’re on a sideline, during a game, and you can’t walk out on the court/field to physically show your team what you want them to do, the next best thing is a whiteboard clipboard of your court/field. (So you don’t have to wait for school athletics for kids to be learn from this court map.)

For whatever reason, if you want to have the benefit of having a court/field dry erase board but don’t want to go through the expense of buying one, I’m going to show you a couple of different ways that you can make one rather inexpensively. (This is a huge perk for summer camps where counselors are coaching and you don’t want to worry about misplacing or breaking a nice board.)

Advertisements

Laminated Court

I went this route because I already had in my craft room a clipboard, laminating machine, laminate, paper, printer, magnets, white board pen, ink pen (you never know when you need an ink pen), and hot glue gun. All in all, for the materials I spent under $4. So this is really inexpensive and gets the job done.

First you either want to make or down load a copy of a basketball court (or any other court or field you’re coaching) and print it off.

Run it through a laminating machine with a laminate cover. And as soon as it’s cooled, this mock white board is ready to write on.

I can’t tell you how many different of these “white boards” I’ve made for homeschooling with worksheets that I want to use over and over again. Yes, some colors like to stain the laminate (red and blue are the two colors that cause problems in my house). BUT they’re super easy to clean up. Take a cotton ball with rubbing alcohol and you’re back to a crystal clear “white board”. And if you’ve ever found out that you grabbed a permanent market instead of a white board pen. Don’t worry! Rubbing alcohol will also take that right off. Or if you ran out… simply take a dry erase pen over the permanent marker and erase. The permanent marker comes right off! (It’s the same trick for with a real white board.)

Now I modified my white board. After my first practice I got tired of fishing my pen out of my pocket. So on the back of my clip board I hot glued a magnet for my dry erase pen and for my ink pen. I hot glued magnets to my pens, in a place where they wouldn’t interfere with how I hold my pens (near center, in the crook between my thumb and first finger).

Advertisements

Depending on your pen, hot glue may not work. Hot glue works like a dream on plastic finishes, but if you grab a metal pen like I did its 50/50 if the glue will hold. My pen popped off with a minimum amount of glue. This second time I used a very generous amount (where I had to wipe off a large glob of left over glue) and the magnet has stayed on the pen. My back up for another glue failure is to switch over to liquid cement glue that is formulated to work on metal and ceramic. I didn’t start with that glue because I didn’t want to rig up something to hold the magnet in place while the glue dried.

As you can see, I don’t have to worry about making sure I have pockets while coaching and my pens are taken care of without having to worry about tying my pen to the clip on the clipboard.

But what if you don’t have a lamination machine that you can use???
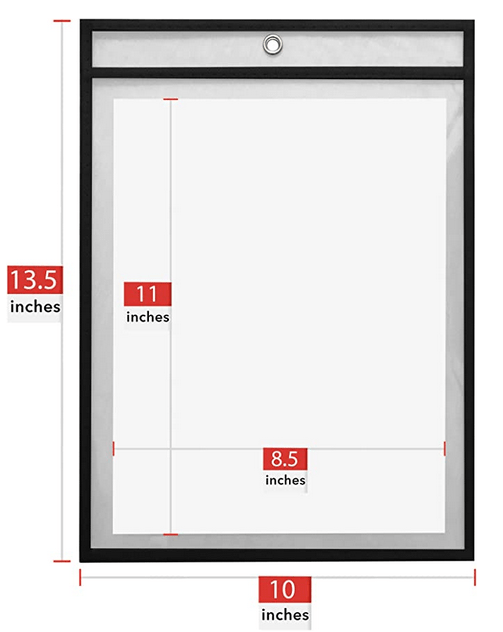
Plastic Holder

This one is another one of my homeschooling hacks. And I love it for absolutely everything, including a recipe protector in the kitchen if you have a sauce or frying and you get liquids flying next to your stove.

So far I’ve only seen these plastic holders at the dollar store. If anyone else has found them anywhere else (other than Amazon), please comment below!

But with this option, all you have to do is find a court or field that you want and print it out on a piece of letter sized printer paper and then you just slide it in. White board pens work on this plastic just the same as the laminate option above and white boards! So for under $2 this is really affordable for any scenario where your “basketball clipboard” will go missing. Or even if you have young kids who want to pretend play “coach”!

This option is also good if you want to be hands free coaching, but want your board with you. Connect it to a lanyard or a retractable key set on your belt loop. It’s handy when you need it and the pouch can also hold your pen.


Files Used For This Project

Don’t want to hunt down another basketball court image to print? You can use this PDF file here. Other sports fields and courts will be added to this link. If you don’t see the one you’re looking for, please leave a comment!

Other Items that may interest you

This post contains affiliate links that give us commissions on products purchased at no additional cost to you. These items listed here are from Amazon but may be purchased at local markets.

15 mm disc magnets I know these can be found in your local store. I used magnets, of this size, that I had found at my local dollar store (traditional black refrigerator magnets).

Processing…
Success! You're on the list.

Leave a comment

Advertisements
Advertisements

Personalizing the Difficult

Whether you’re trying to prevent mix ups from lookalike items at work, on sports teams, or family members, there are just certain things that are flat out difficult to personalize.

For example, my mother in law gifted my boys duffle bags for soccer. Having triplicates of the same nylon bag is great for making sure that no one got a “better” bag. But without some identifier, it makes it difficult for the kiddos to figure out whose bag belongs to whom.

In this same situation, growing up my mom took a sharpie and wrote our names on the straps of our bags.

Fortunately there’s a way of personalizing without going full on retro.

Most people shy away from using iron on (or HTV) decals because the nylon bags melt so easy.

The simple tips with these kinds of bags are that you want to minimize the exposure of high heat that you can.

One you have selected your decal or made your own with your favorite sports font (and cut your HTV with your cutting machine), you want to grab a couple extra items. You want a pressing pillow or a folded up towel that you can place inside your bag and prevent an accidental melting of the two sides of your bag together.

Note: a pressing pillow is going to be a better option because it’s a smooth surface. Even when the nylon starts to get warm from the pressing, it’s a smooth surface that will keep your bag’s fabric smooth where you press. With a towel, especially terry cloth or a towel with some nap to it, the nylon will form against the nap and leave a texture behind when it cools down. So if at all possible, try to keep your barrier something with a smooth surface just to take you that one extra step closer to a perfect final product.

With your barrier inside your bag, you can then place your decal wherever you want on the bag. Just make sure that the pressing pillow or towel is directly under where your decal is going to be placed.

Advertisements

Depending on who you talk to, some crafters are going to tell you it’s okay to use parchment paper or wax paper over your decal. I’m going to steer you away from this advice. The nylon bags melt so easily (especially seeing that your decal is going to need some heat exposure to adhere properly). What is going to eliminate the potential for bag melt is to use a teflon sheet.

Teflon is going to distribute heat better than the other options. The heat bleeds out and so there’s not that clear demarcation that this was where your head source was applied. (This is especially important with an iron or a mini press, where you have a bit more precision with where you are pressing your heat.

Parchment paper will only keep is an okay alternative. I recommend making sure that your press is on a lower temperature, because parchment paper will not prevent discoloration from high heat on a delicate material.

If I can talk you out of one option, it would be the wax paper (or the press and seal that I’ve heard some crafters use as a vinyl carrier). You don’t want the wax (or the press and seal) side to be in contact with your heat source. There will be a residue transfer that is just going to give you some problems you definitely don’t want to deal with. And there are some materials, like nylon, that will absorb in anything that’s an oil based material. It is possible for the wax paper (or press and seal) to leave a halo effect on your nylon where you pressed. And it will be most noticeable if you’re like me and point your iron or press in any and every direction. Instead of having crisp lines, the halo could appear like a faint comic speech balloon.

For the bags that I personalized for my boys, I used a teflon pressing pillow and covered the HTV with a teflon sheet.

Even though the job would have been quicker with my heat press, I opted for my mini press. It was easier for when a couple of the corners of a few letters didn’t want to adhere like the rest. I could pinpoint directly to the spot.

Note: Nylon doesn’t require as long of a press as cotton or canvas. So be sure to either drop your temperature a little or cut your pressing time. It’s easier to press a little longer than to scorch the nylon.

What’s great about knowing how to apply decals onto thin nylon bags is that now I know how I want to commemorate my kiddo’s sports teams through the years. I’ve designed some team logos that I will add on from previous sports seasons. And if I can’t come up with a design for some of the crazy young kiddo team names out there (like Tiger Squirrels) I can pick and font and just add the name.


I hope these tips will help take away the fear factor of personalizing items that we tend to stay far away from. By taking proper precautions and knowing how a material will react to something (like heat), you can most certainly make adjustments to make it a usable material for your creativity!


If you haven’t heard or seen Teflon sheets or pressing pillows here are a couple of links to familiarize yourself with the products. These are affiliate links. I may receive a commission for purchases made through these links, but at no extra cost to you.

Processing…
Success! You're on the list.

Leave a comment

Advertisements