After spending almost a decade in the event decorating industry I have repetatively heard "I can do that". Instead of being dismissed by creative minded people, I want to show you how I do "that" so you can be sucessful in recreating that inspiration image. I just might have a few tricks that you haven't seen yet!
With the growing list of food ingredients that people become sensitive to, it’s easy for families to kind of go numb reading ingredient lists. Not only is it difficult to read the chemical name of some of the ingredients (let alone answer the questions, “Why is this in here?”), but some families are now asking, “What isn’t listed?”
For example, natural flavoring is listed as a single ingredient but can actually incorporate up to 200 different ingredients. It’s a shady practice, because it could be something as simple as a proprietary blend of herbs. Although it’s more likely the summation of chemicals used for extractions of certain elements for flavoring. But how is a family to know what chemicals or processes were used and make the educated decision if this is something that is harming the health of a loved one?
So whether you’re looking to cut some corners in your grocery budget, trying to eliminate ingredients in your diet, or simply wanting to eat more simply (knowing exactly what you’re cooking with, able to say the ingredients, and other reasons) you can make basic kitchen ingredients from scratch. Bullion is one of those ingredients that you can make in advance and have it in your pantry waiting for you to use!
Advertisements
First Make Your Stock
I’m going to move forward here with making chicken stock and turning it into chicken bouillon. However you can do this by making your own beef stock or vegetable stock. (And I just want to say that when you make your own vegetable stock, it actually has more flavor and tastes a thousand times better than what you will buy in your local grocery store!)
There are also a few different ways that you can cook your stock. You can make stock on stovetop, in a slow cooker in your oven, in a crock pot, or a pressure cooker. The only difference is going to be the amount of time you commit to. With the exception of the pressure cooker, you will want to cook low and slow to release all the nutritional benefits of your ingredients. A lot of influencers, bloggers and You Tubers will encourage you to make a stock in a short amount of time. Of course it is possible, but I want to encourage you to take the time and cook your stock ingredients out.
If you’re making a bone broth, cook it so that you extract the marrow from the bones. If you’re cooking vegetables, don’t assume that because you’re not extracting marrow that you can get by with less time. Check out my post A Touch Bitter? where I specifically talk about vegetable stock.
You know that you have a good and flavorful stock when it has rich and dark colors. The color comes from all the nutrients that you cook out from your original ingredients.
Advertisements
My Chicken Stock
I’m going to be honest with you here, daddy taught me how to cook by following a recipe. But I inherited a wild cooking hair from mom, where we improvise. I cook by smell, then by flavor, all over what a recipe says. I’m working hard to make notes on my recipes to find a strong base that is pretty average for how my recipes go. Just know that when I have chicken bones to use, I literally use the ingredients that I have on hand. And just like your kitchen, there are ingredients that I run out of. I don’t go to the store for missing ingredients. I run with what I have.
Here’s what I have standard in my kitchen:
onion skins (kept in a vegetable food scrap bag in the freezer)
garlic skins (vegetable food scrap bag)
stems of herbs that dehydrate to make my own dried herbs (vegetable food scrap bag)
dehydrated herbs from my garden (oregano, basil, lemon balm, sage, parsley, chives and others)
dehydrated herbs that I have yet to successfully produce in my garden (ginger, tumeric and others)
General Recipe
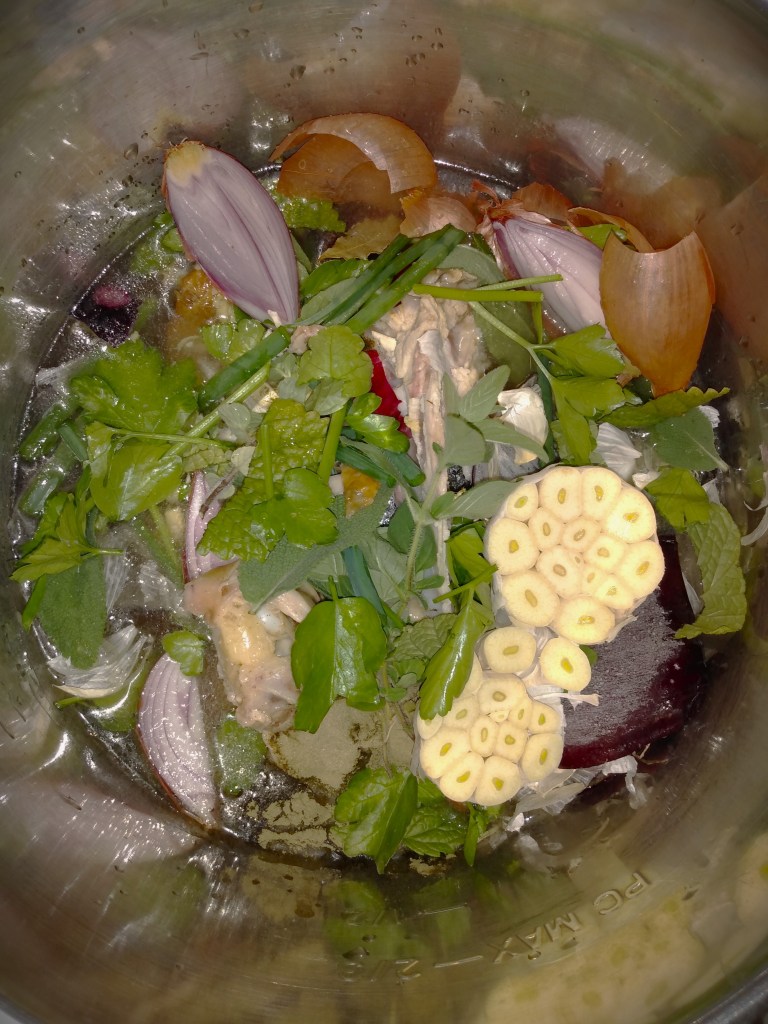
In my 8 quart instant pot I add:
the bones of one whole chicken fryer
if the chicken came with gizzards, I cook the gizzards here in my stock.
the vegetable food scraps from my freezer (ideally I aim for the skins of about 4 onions, the skins of 2-4 garlic heads, half a bunch of leafy herbs)
herbs from my seasoning shelves (including salt and pepper)
filtered water that fills my pot up to it’s Max line.
The herbs are generally where I run out of supply and have to improvise. If I have everything the herbs that I like to add are:
Ginger
Bay leaves
Lemon balm (fresh will give you more of a lemon flavor, dehydrated will have more of a green tea lemon flavor, use according to which type you’re using. I like going heavier on the fresh lemon balm)
Rosemary
Oregano
These herbs I go heavy on. If I’m out of any of these, I improvise using other herbs. Sage I use sparingly because it’s such a potent herb. Cilantro I use sparingly because I have family members who dislike the flavor of this herb. So I keep this one low in quantity to still get the nutritional value, but the flavor is not prominent at all. Fresh cracked pepper I use in varying levels depending on what my stock is currently at. Salt, I try to remember to add, but half the time I forget. Because the flavor of salt is not extracted, like herbs, I have no problem seasoning with salt once my pressure cooking is done.
I set my instant pot to pressure cooking, on high, for 3 hours. (No matter which stock type I’m making, I don’t ever go less than 3 hours.) This is what gives you full extraction.
Making Bullion
Once your broth has finished processing, you strain out all the ingredients. With a vegetable stock, I go ahead and compost the vegetable bits that I strain out. With bone stock I strain out all the bones and vegetables and they are thrown out.
If you’re making vegetable bullion, you can cool your stock down to room temperature and then move forward with the next step. If you make a bone broth (chick, beef, venison, goat, sheep, etc.) you will need to cool your broth off over night in your refrigerator. The exception is if you have a fat skimmer that can separate the fat out from hot broth. I do not. So I refrigerate my stock over night.
Once the fat layer has formed on your chilled broth, you skim the fat off of the broth.
You have to skim off of the fat, because when you make bullion you want to have a long shelf life. Fat is the limiting factor in shelf stable food. It will go rancid before anything else goes bad. So by removing the fat, you ensure that you have a long shelf life for your bullion.
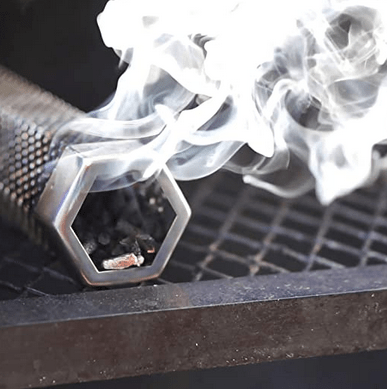
When my chicken broth is been skimmed from fat, I grab my jelly roll trays for my dehydrator and set my dehydrator up where it’s going to process the broth. The reason why I set my dehydrator up in location and fill the jelly roll trays on the stacked racks is because the broth is going to run to lowest point. There is not going to be an even layer of broth. So I fill in place and pour the stock until I reach the lip at one point on my tray. This will maximize the amount of broth I can process at a single time.
Dehydrating liquid hack: before placing your liquid on the jelly roll trays put it in a sauce pan and reduce the stock. By evaporating the liquid down, you will cut down on your dehydrating time and save space in your dehydrator.
I run my dehydration temperature at 140-145°F until the broth is crispy like this. Dehydration time is going to vary depending on if you reduced your broth first, the temperature you dehydrate out, and most importantly the thickness of where your broth pools. The thicker sections will be gummy to touch until it’s properly dehydrated. The thinner bits you can leave as is. Or when you check on your progress, you can used a silicone spatula to push the thinner bits in closer to the thicker bits (this makes it easier to remove the thinner sections when you’re finished dehydrating).
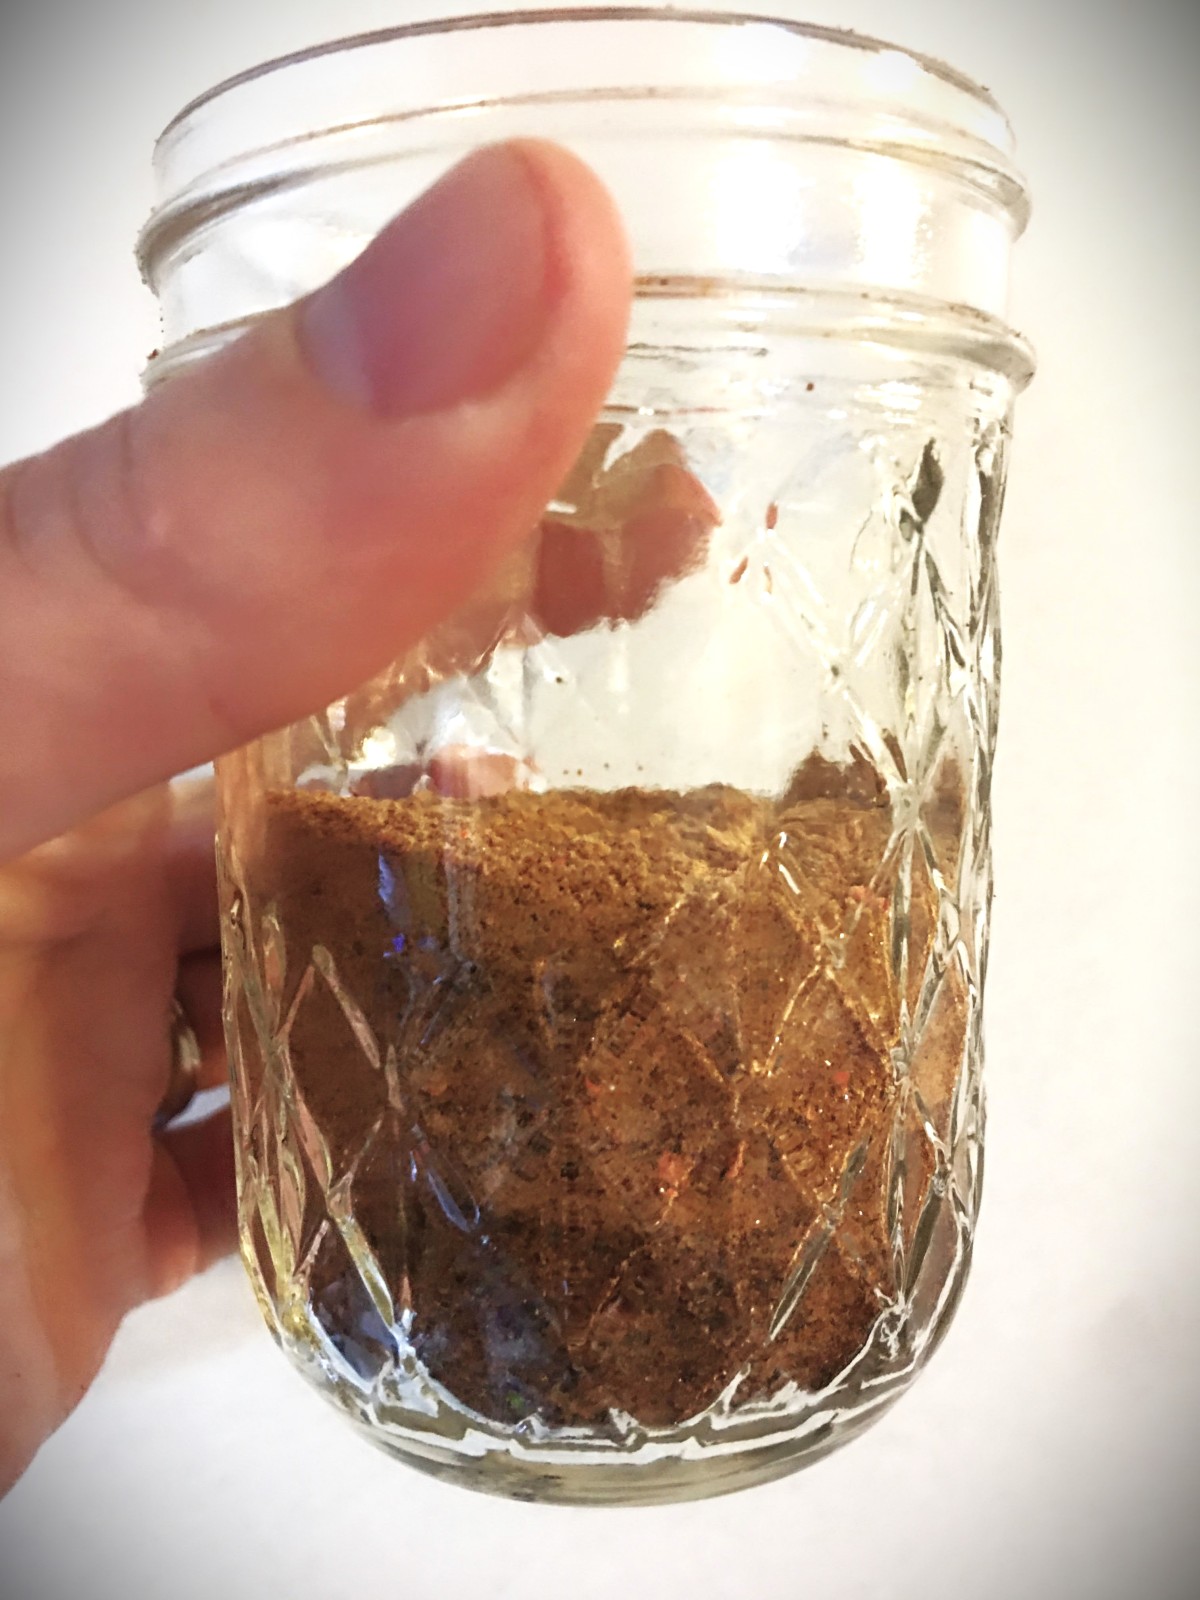
In the center of my jelly roll try, you’ll see that I put my coffee/herb grinder in the center. It makes it easy to brush the chunks and bullion dust into the grinder. When the container reaches its limit I remove the tray, cap the grinder and run it for about 10 seconds. Just long enough for the broth to turn into a powder. The bullion powder I put directly into my mason jar that I’m going to store it in.
Just so you won’t be alarmed, what you see in this 1/2 pint size jar is what my 8 quart size instant pot produces. My first time making my own bullion, I was disappointed that it didn’t make more. But that disappointment disappeared when I tasted the bullion. You will not be disappointed with the intense flavor!
This is perfectly save to keep in your pantry or in your spice cupboard.
Personally I have a tiny kitchen, so I keep my bullion on the top shelf of my fridge. The bullion usually doesn’t last my family a year. Although there was a time where I needed to free up some jars and use my canned chicken stock, so I had one batch of bullion powder in my fridge for about 2 years. It was still fresh and flavorful when I went back to finish this bullion off.
Comment below and tell me how you like this space saving flavorful bullion.
How does it compare to what you’ve previous bought from the store?
This post contains affiliate links to products. We may receive a commissions on products purchased through these links, but at no extra cost to you. These items listed here are from Amazon but may be purchased at local markets.
If you don’t have a current dehydrator and are looking for one, I have been very pleased with this dehydrator. This was an upgrade from my very first dehydrator, but still on a budget. If you’re in a tight financial place, with today’s economy, this is the one that I highly recommend. Not only was it a great price, but it also included jelly roll trays for each rack (something that can’t be said with other budget units)
I considered waiting to share this post until the fall, but then I thought why not now. This is the perfect idea to share now while you’re still deciding what you are putting into the ground or containers for this growing season.
If you have some tomatoes planted and wondering if you should plant more, the answer is a resounding yes!
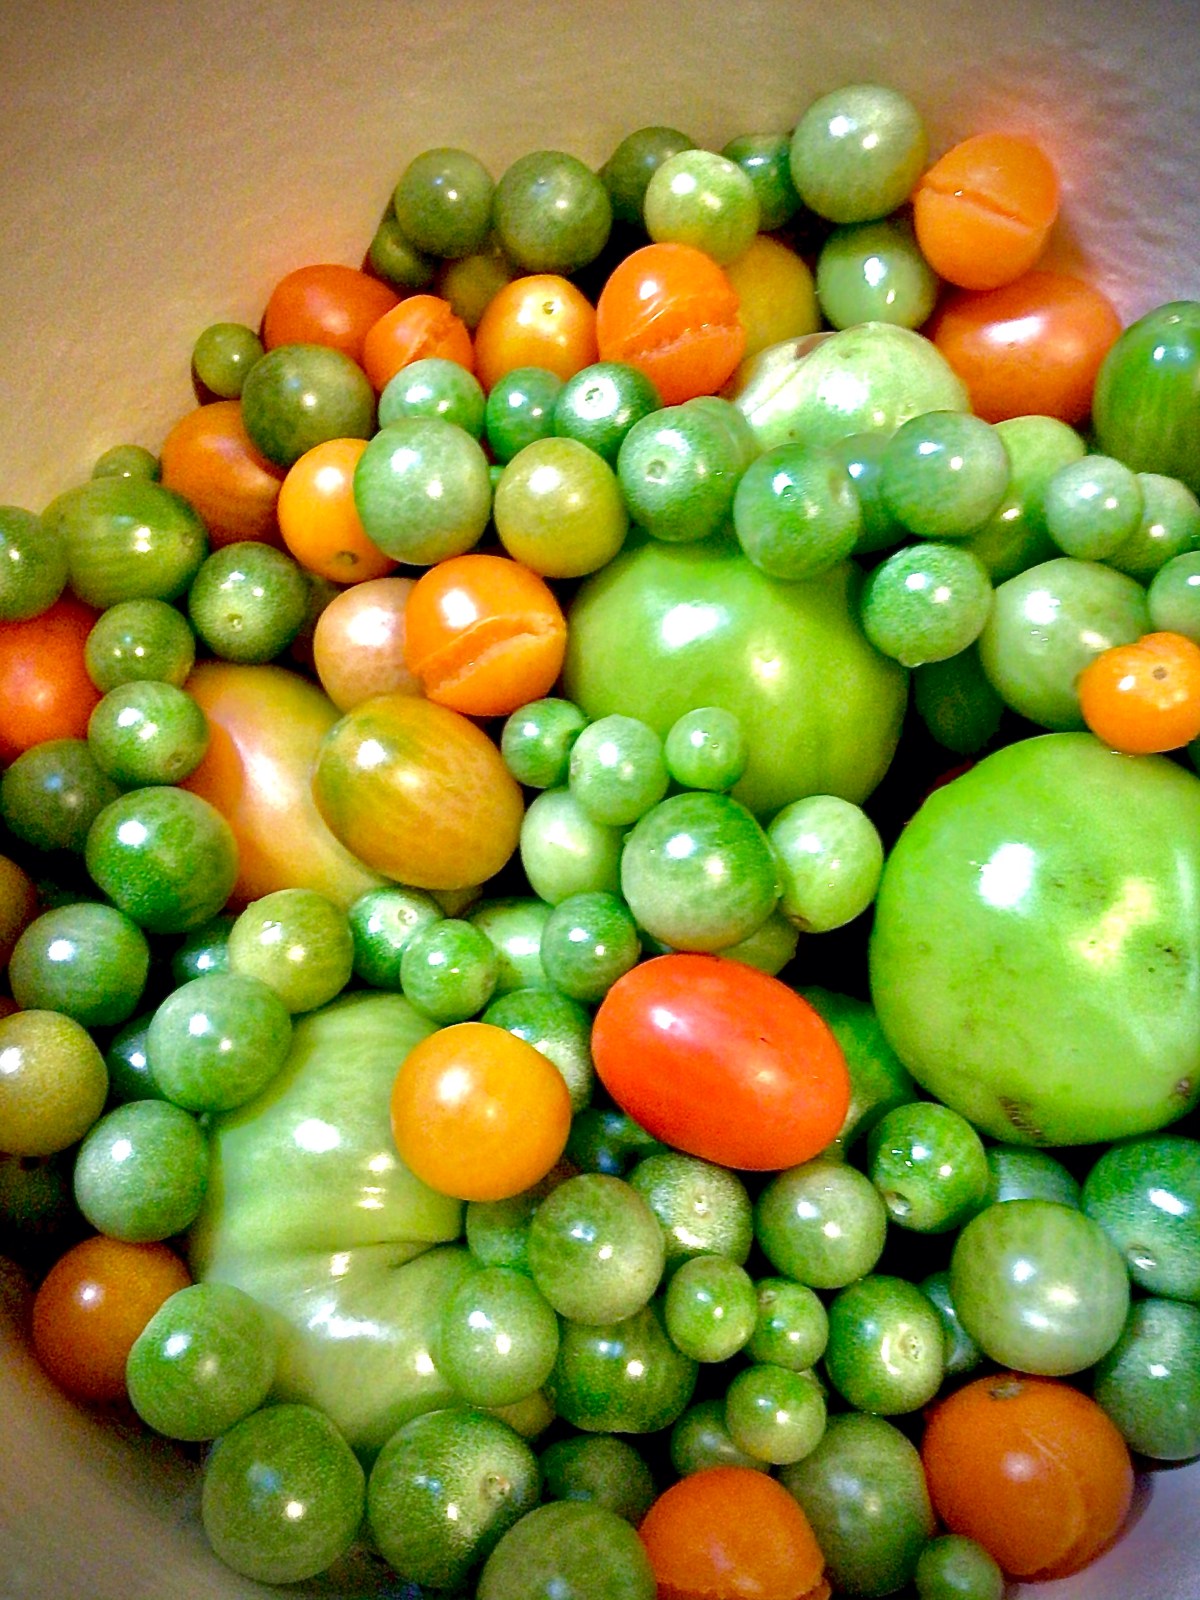
I’ve mentioned before that last year, the growing season here in the Pacific Northwest was horrible. Nothing really took off until the end of June and the beginning of July. And I was concerned with my tomatoes. If fact, the above picture was the last of the tomatoes that I took off the vine at the beginning of October!
As you can see, there were so many green tomatoes that I still had, but my plants were dying off. So instead of all these beauties, I brought them inside and found a recipe that has now entered my MUST make every year when I bring the tomatoes in.
But I wanted to share this recipe with you now, because this is worth planting the extra tomato plants that you’re debating about adding to your garden.
If you’re like our families, you grow enough tomatoes to make your tomato sauce, pizza sauce, tomato soup, salsa or other tomato product you store for the winter. (This year I’m going to add making our out ketchup and tomato paste.) You definitely want to add Green Tomato Relish to your list!
I tried this last year not just because I had a plethora of green tomatoes, but also because my husband loves relish and I hate pickles. So I gave this a test drive to see if I could make something that is on his list of condiments and yet is something that I will eat as well. And I tell you that this hit the spot for everyone!
Advertisements
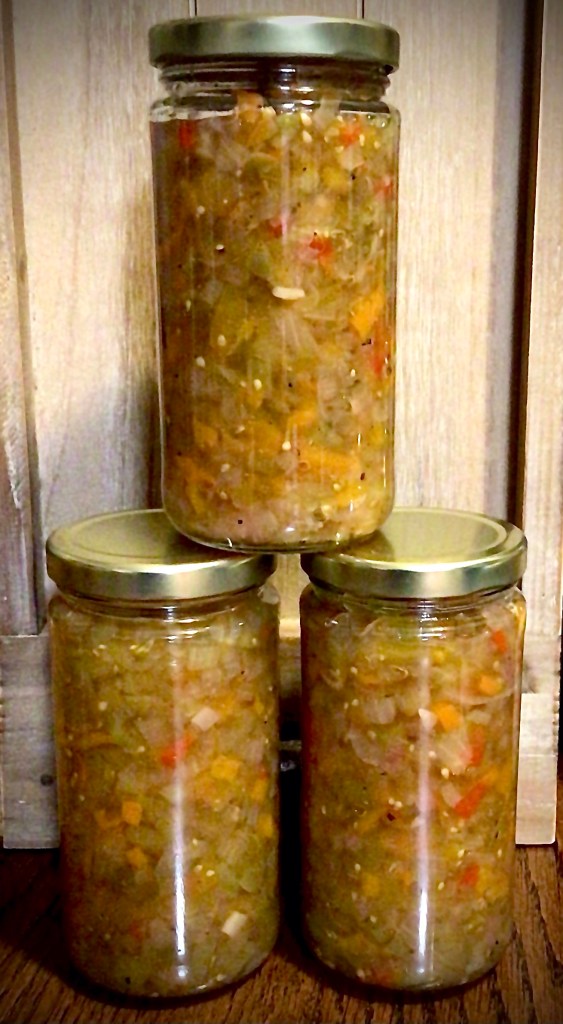
OurHalfAcreHomestead Green Tomato Relish
Mrs. Volfie posted her Green Tomato Relish here, but for your convenience I’m leaving the directions she walks through below. Please note, that if for your first time you don’t have the celery seed in your cupboard you are still going to have an amazing relish without it. I now have celery seed in my kitchen so I can’t wait to see how much better it turns out.
This is the vegetable ratio that Mrs. Volfie talks about in her recipe. You can mutiply it according to how many green tomatoes that you have.
2 C Green Tomatoes, minced
2 C Onions, minced
1 C Sweet Peppers, minced
The Base for this recipe is 5 Cups of produce.
As you can see here, I used red onions instead of the yellow onions that Mrs. Volfie used. They are just my personal favorite onion, but please feel free to use the onions that you have on hand. I also want to mention that I was about a half cup short of the minced peppers and I still instantly fell in love with this recipe. Just remember that if you’re light in one vegetable, you should try to make up for it with one of the other vegetables.
I didn’t and I ended up with a slightly wetter finished product than I would have liked. But that is okay. Having run this recipe and knowing what the outcome is and what my personal expectations were, I know that this next batch that I make, I’ll make sure to keep that 5 Cups Base ratio and I’ll go a little lighter on the liquid, but I’m ahead of myself.
Let’s move forward.
This is a 2 day project. On first day, you’re going to mince your vegetables and let it sit over night. The next day you’re going to cook and bottle or jar your relish. And as a busy mom, I sure do love recipes that I can break up into steps like this and not have to take an entire day to run a canner.
Advertisements
Day One
Mince your vegetables to make up your Base Unit. (In the video Mrs. Volfie made a triple batch, which is a total of 15 Cups of produce.) I didn’t have the chopping tool that Mrs. Volfie used, so I minced by hand.
Combine your vegetables and add 2 Tbsp of Pickling Salt. If you are running less or more of a Base Batch, you may need to adjust the amount of salt used accordingly. (The purpose of the salt is to soften the vegetables but also reduce some of the water content.)
Put the raw relish in your refrigerator overnight.
Day Two
Strain and rinse off your relish.
Put back into the pot and add the following. (This is for a triple batch, so please adjust these ingredients according to the Base Batch of recipe that you’re running.)
2 C Sugar (Mrs. Volfie mentions that she prefers brown sugar. I just used cane so can’t comment on the difference in flavors.)
2 C Organic Apple Cider Vinegar
2 tsp. Salt
1 tsp. Celery Seed
Fresh Cracked Black Pepper
Bring to a boil on your stovetop.
Fill hot jars or bottles with the relish with 1″ headspace and de-bubble.
Hot Water Bath the relish for 15-20 minutes.
For Christmas, my husband and I gifted this relish to friends and loved ones. And everyone came back raving about it. Not only that, but have talked with their loved ones who are also interested in this relish.
You won’t hear this in the video, but I would be remiss if I didn’t tell you that this relish makes the BEST tartar sauce just by mixing in your favorite mayonnaise. Everyone I’ve told that to in person just gave me the humored head nod that said, “so you say. I might give it a try.” Everyone did try and they came back with fireworks in their eyes.
Living in the Pacific Northwest, we are spoiled with fresh seafood. So of course when anyone talks about tartar sauce, people get a little snobby. But please, please, please, give this a try. Because I have yet to have someone come back to me and tell me that it did not hit the spot.
And if you are planning a special event, are a caterer, and seafood is on the menu I am telling you that this one condiment is the way to wow your customers and come back with glowing revues!
Advertisements
Other recipes that may interest you…
I have not yet tried these recipes, but these are on the top of my to try list.
Ketchup
The ingredients on this recipe from Self Sufficient Me sounds about right for what I look for in a ketchup. The written recipe is found here.
There is one glaring issue that I have with this recipe by watching the video is that it is too thin and liquid based for the type of ketchup my family likes. The culprit for this being so runny is that he runs his tomatoes through a food processor at the very beginning.
I was teaching a small class on how to make tomato sauce and we found out the hard way that when you process tomatoes like this you just can’t ever get that sauce to thicken up! The reason for this is because there is a chemical in the skin of tomatoes that when you release (by blitzing the tomatoes) it counteracts the pectin that is naturally in the tomatoes. You end up with tomato juice.
So to prevent the thinning of your tomato product, you really do not want to cut the tomato more than you have to. Small tomatoes cut in half. Large tomatoes cut into quarters. The pectin inside the tomatoes will thicken your sauce and minimize your time in front of a hot stove.
Advertisements
Tomato Paste
While I do have a few Italian Nona’s that I love watching on YouTube for inspiration, I want to try this Turkish recipe for making a tomato paste. With Turkish Food Travel, you can watch her video here or written recipe here.
A quick walking away point from this is that you notice that the pectin inside the tomatoes are at work in making this a thick sauce to start with. Then you keep the pan on the heat much longer than you would for a chunky tomato/pasta sauce. So if you’re making your own pasta sauce already, to make a paste you keep cooking the sauce down until you cook the vast majority of the liquid out.
I like how this recipe uses salt to reduce the tomato liquid even before you start cooking. This has inspired me to prep the tomatoes the night before I want to cook the paste, so the salt can maximize its extraction time.
At the end of the video you will hear about the method of making tomato paste by cooking it in the sun. Even though there was not enough description here, it sounds very similar to what I’ve heard is done in Italy. There are wooden tables that are used to make the paste. From what I understand, the sauce is first made and then spread across the wooden table. The sun dehydrates the tomatoes for you to make the paste. The only thing you do during this process is to use a scraper or a bench knife and mix the sauce/paste so that everything dehydrates/dries in the sun at an even rate.
If you are Italian, Turkish, or any nationality that makes a tomato paste using the sun, please comment below on the process that you use. Because I want to know how you do it. Making tomato paste by sun is on my cooking bucket list (I want to try this at least one time during my life).
Advertisements
Too Busy? Here’s some quick condiments that can fit in your busy life.
I just came across Becoming A Farm Girl and I’m excited to see what she has in store to share with the world. Here is her video on 7 Quick Condements. I love listening to Cassandra. Her approach for making mayonnaise is the easiest method that I’ve seen to date. And she’s made me super excited to make this the next time I run out of mayo. We’ve been meaning to make our own because of a couple of ingredients that have made their way onto the ingredient labels of commercial mayo.
To get her print out recipes you will need to sign up to Cassandra’s email list. The link to that is in the details of the video linked above. I did sign up to get this recipe book and it is beyond what I’ve received from others. So, if you’re picky about who you sign up for, I absolutely did not regret signing up for this one.
Looking for a tool to make your food prep easier?
This is an affiliate link to mentioned product. We may receive a commission on this product, purchased through this link, but at no extra cost to you. This item is from Amazon but may be purchased at local markets.
A few years ago, my oldest came home from school saying that he and one of his friends were BFFs. I asked him if he knew what that meant. He said, “Yes, mom, Bacon Friends Forever!”
I tried so hard not to laugh. He was serious. And it got me thinking about how no matter the culture people have always bonded together over food.
Today I want to talk about curing meat. If you are a non-pork eater (whether for religious or personal reasons) please stay with me here, because the curing of bacon is the same process as curing other meats. For example, Pastrami is made with beef using the same method (even with a different seasoning recipe). And you can even make Bacon using Beef as a substitute (there’s a recipe for this at the very end of the post).
The process of curing meat use to be common knowledge for all families before refrigerators were invented. In fact there are still many cultures around the world that still cure meat in their traditional ways. If you are interested in learning other methods 2 Guys & A Cooler is one channel that I follow. And what surprises me is just how similar all these other meat preserving methods are to making bacon.
Curing meats, in short, is the process of removing water from meat to make it shelf stable without refrigeration. This is done by using high amounts of salt.
The reason why salt works in preserving meat is because salt draws water out of the meat and creates a saline environment that makes the meat inhospitable to the growth of colonies of bacteria and mold.
Specific salamis are cured for a specific flavor brought from the controlled growth of certain mold. So, in this instance salt is the controlling agent to that mold growth.
I mention this before starting to show you how easy it is to cure meat because there are certain diets where it can be tempting to alter meat curing recipes. You need to keep the high salt content on order to not grow bacteria or mold on your meat, and making it dangerous to eat. There are methods to alter the saltiness of the meat later on in the curing process. So give me a moment, and I will come full circle back to salt levels.
Advertisements
Let’s Make Bacon!
There’s many bacon recipes found all over the internet. My husband and I have tried at least half a dozen. And that doesn’t include the experiments we made in trying to make our own. None of them compare to the recipe made by Jess Pryles, which is our go to recipe. The easiest way of describing it is to think of your favorite grocery store brand and multiplying your love for it a hundred times. Or think of the best bacon you had in a restaurant, and this bacon turns out better than even the finest restaurant. That’s how much we love this recipe. So this is the one I’m going to share with you because it’s not too sweet, not too spicy, smokes without burning or sticking to your smoker/grill, and the level of saltiness is easy to manage for your preference–both at the beginning of the curing process and at the end.
This recipe can be multiplied in direct relation to the weight of the pork belly you are working with. See “Managing Saltiness” to see how you want to treat this ingredient as well as the pink curing salt.
Managing Saltiness
Before I move on to the process I want to briefly walk you through your first option of managing the saltiness of your bacon–or any cured meat for that matter. You have two options of salt to use: fine grain salt or rock salt.
Fine grain salt is your table salt, kosher salt, or any other salt that has been milled down to a fine powder. Because of how small the salt has been broken down into, the salt easily penetrates deep into the muscle tissue of the meat. This will give you a punch in the face saltiness level that you can further modify at the end of the curing process.
Rock salt is the crystal salt that you usually see in the store for sea salt or Himalayan salt. There’s a couple of other salt options out there that uses the crystals or rocks to put in your own spice grinder or mill. Because the rocks are obviously larger than the salt grains, it takes it longer for the saltiness to enter into the meat tissue. This process speeds up as the water is extracted from the meat and “melts” the salt crystal/rock. If you prefer cooking on the less salt is more spectrum if cooking, this is the salt you want to use. (I’m in this spectrum, so I always use this salt for curing meat.)
One more thing I want to address, before moving on to the process, is the pink salt ingredient. If you are nitrite or nitrate sensitive, you definitely want to leave out this ingredient. Pink curing salt is included in many recipes because it is preserving agent. Depending on how quickly you move (or don’t move) through a pork belly depends on if this is a necessary ingredient for you.
Without the pink curing salt, your bacon can be kept in your fridge for a couple weeks before spoiling. So if you go through a lot of bacon, that the pink curing salt really isn’t necessary. But if it will take you months to eat through pounds (however big your pork belly is) you will need to think of an alternative long term storage option, such as bagging up the bacon in your family’s serving sizes and storing in the freezer.
As a comparison note, we cured whole bellies with the pink curing salt, and life happened. We were unable to cook with the bacon like we thought we would and it took us almost three months to finish that batch. It’s instances like this where families might choose to use a pink curing salt. But making bacon has happened long before the manufacture and sales of pink curing salt.
Advertisements
Curing Container
There are a couple of different options you can go with when it comes to what you will contain your bacon in while curing. You can choose to use zip lock bags, closed container, or open container.
The open container is easy because everyone has one. There are a handful of drawbacks though. First, you keep the curing bacon in your fridge, so an open container leaves your meat vulnerable to flavor exchange with other foods. The bacon is also vulnerable to other contaminates, such as someone sneezing while looking in the fridge. And the water extracted from the meat gums up in the bottom of the container through the curing process.
A closed container is by far better in regards that it prevents all the draw backs of the open container. Plus, if you are a family that eliminates or minimizes the amounts of plastics in your house, this fits in your lifestyle. But the drawback for the average home kitchen, is that you might not have a large enough reusable container for your meat to lie flat. I do have a Pyrex casserole dish (which has a lid) that’s the perfect size for a 5lb pork belly. However it comes out of meal cooking circulation for a week.
Both of these options are great for their own reasons. However it’s important to note that these two containing methods will require that you handle the curing meat by hand or other kitchen utensil such as thongs. So if you have any food handling aversions, this might be your determining factor.
The other option is using plastic zip lock bags. You will have to cut the meat down to fit in a one gallon size bag. Or you can leave it whole if you have 2.5 gallon bags. This option gives you an automatic barrier for when it’s time to flip the meat and contain all the extracted water. It is also the most space saving method in the fridge, if space is the limiting factor. The drawback to this option is the dreaded bag failure. If the seal is not secure, you will have the extracted water leaking in your fridge.
If you are using a 3 lb pork belly, the 1 Gallon Zip Lock Bag will be large enough. We generally use a 6-9lb belly and need the 2.5 Gallon Bag.
This bag method has been my method of choice with littles in the house. It just minimizes the other potential could-go-wrongs that happen in a very active house where the kids love to help and be part of the cooking process.
The pictures you see throughout this post are from the bag method and closed container, but we have done all three. They all work. But the open container method also dries out the meat, so it definitely does not come out as tender as the other two methods.
The Process
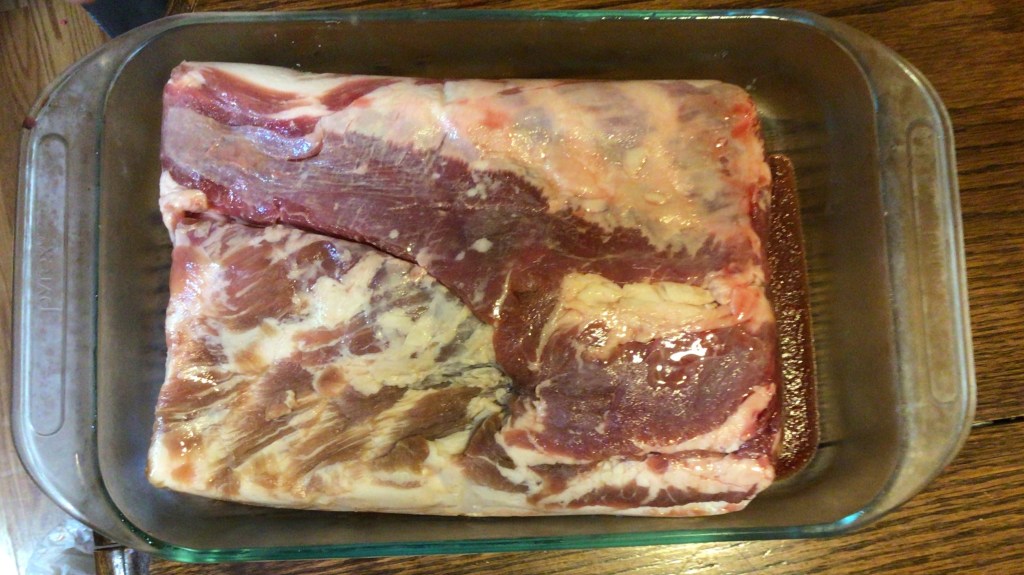
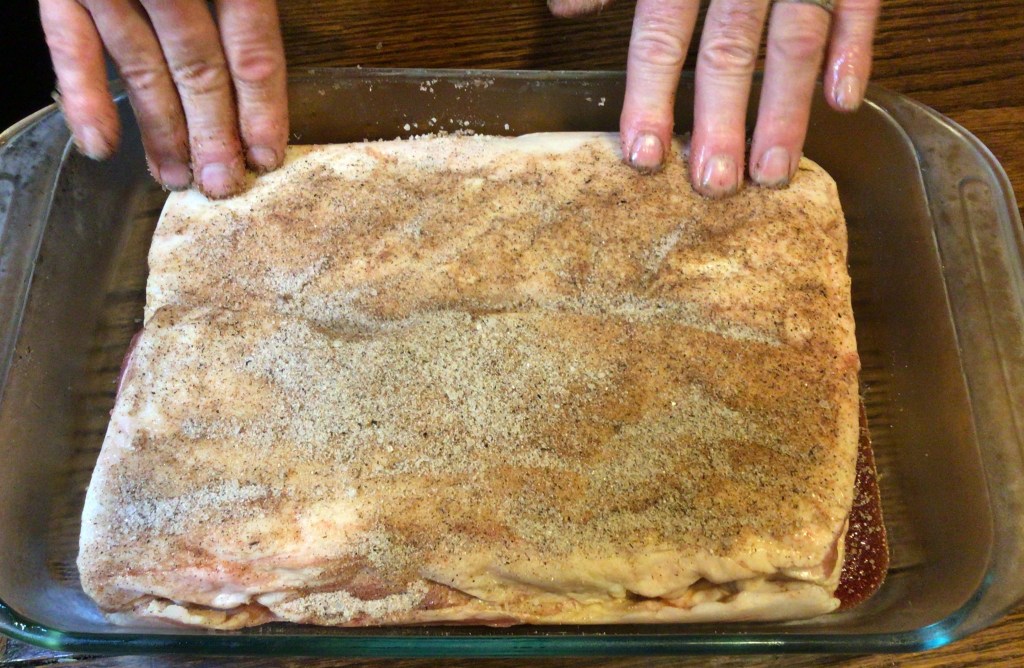
Measure out your seasoning ingredients (in direct relation to the weight of your pork) and set aside.
Remove your Pork Belly from it’s wrappings (whether direct from a butcher or from a wholesale meat provider) and rinse it off to remove any juices that it may have had in its packaging.
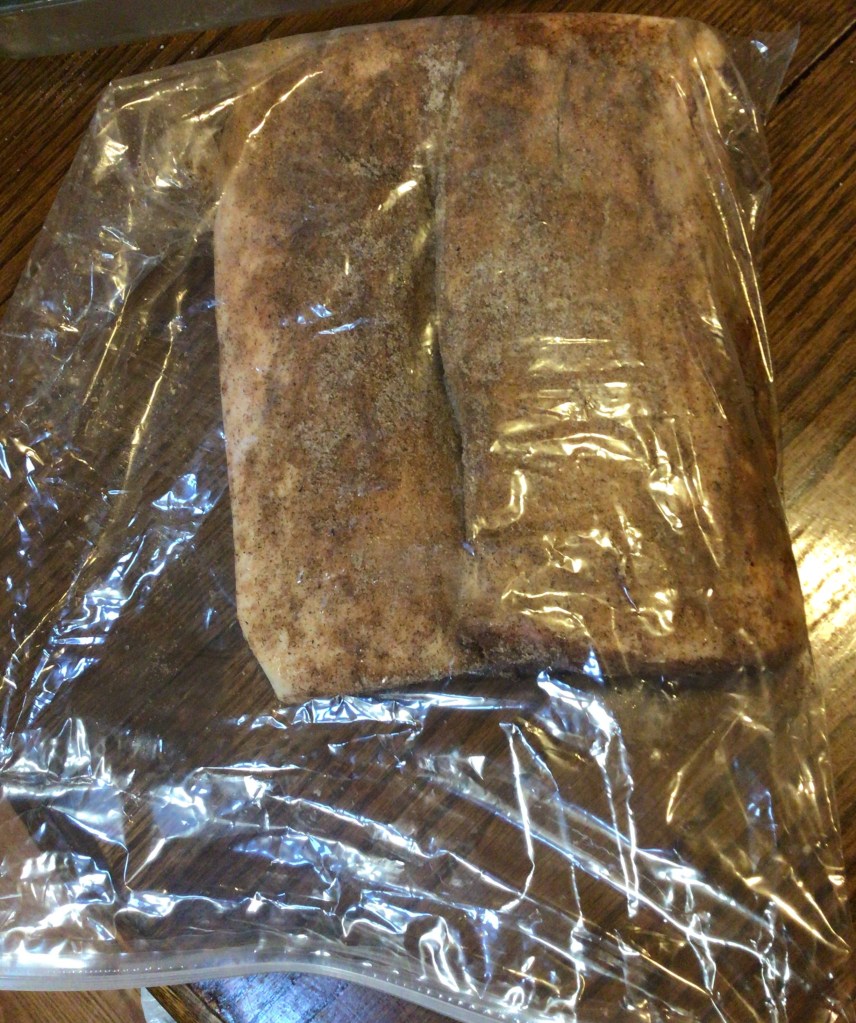
Season your meat with the seasoning ingredients, making sure that you have equal amounts on front and back, and all the ends. Be aware of all the creases in the meat and get the seasoning in there–the salt needs to be in here to make sure that all surface areas are covered in adequate salt. (If you are using the bag method, it’s easiest and cleanest to put the pork belly in the bag and season it in the bag. Seal up the bag once you’re finished.)
Close your bag/container and place the pork belly in the fridge.
For 7 whole days, flip the bacon over once in the morning and once in the evening.
Once the 7 days are up, can remove the cured bacon from the fridge or let it continue curing for a few additional days.
Remove the bacon from the bag/container and rinse off your pork belly. (See below for “Rinsing Advice”.)
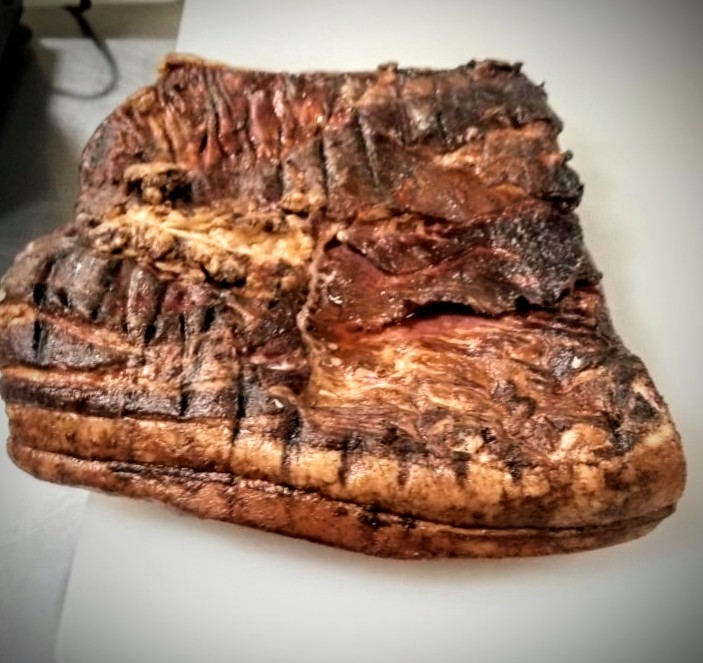
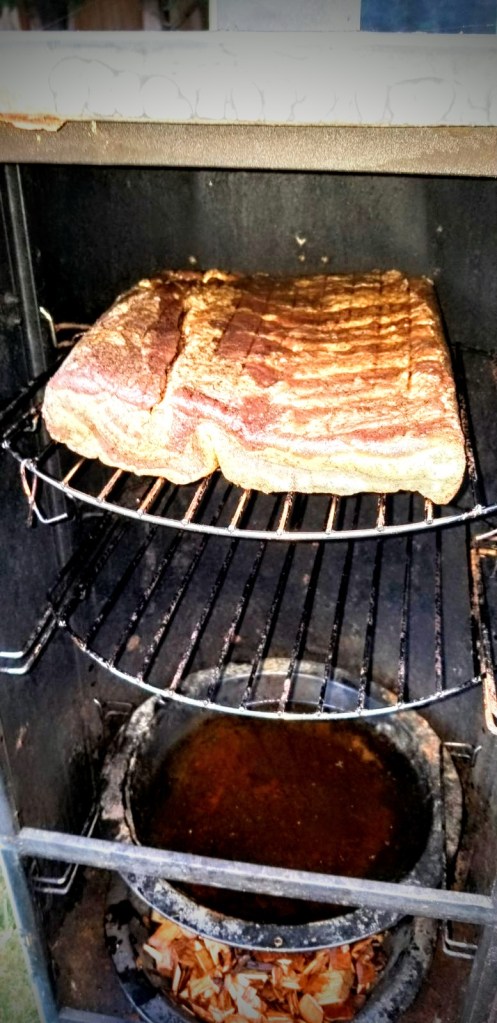
Now you will low and slow cook or smoke the pork belly, depending on what equipment you have available at your home. If all you have is your oven, set your oven on the lowest possible setting and cook the pork belly until you reach the internal temperature of 165°F. (See Below for “Cooking Options” to hear about the other ways you can cook/smoke the bacon.)
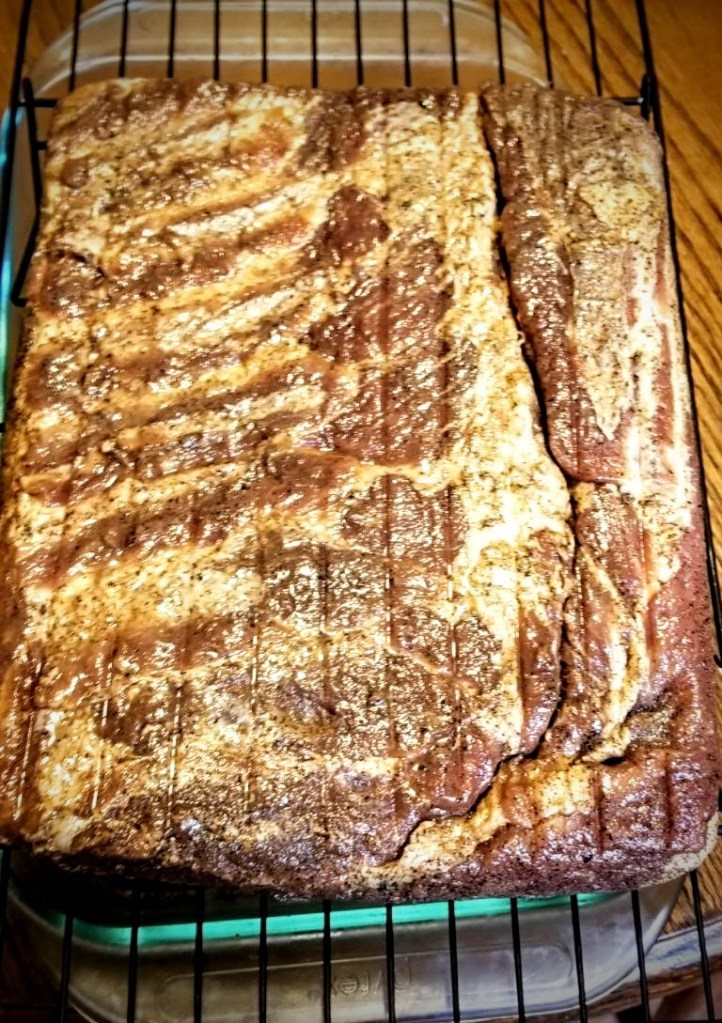
Once you’ve reached the correct internal temperature, you will remove it from the heat source and put it on a plate/tray and cover it with foil and let the pork belly come to room temperature. (See “Tenting Options” below.)
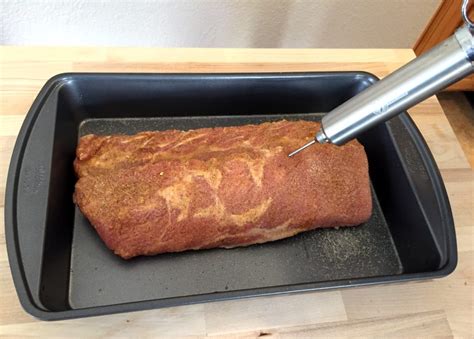
The room temperature pork belly can now be put in the fridge overnight. (See “Cutting Options” below)
Slice the pork belly into the thickness of bacon you prefer, whether thick or thin.
You now have bacon!!!
Use this bacon just as you would with the bacon you’ve previously purchased from the butcher or local grocery store. If you are anything like my family, you will turn into a bacon snob and prefer the slices that you made over the store bought ones.
Rinsing Advice
This rinsing stage is going to look a little different for you depending on what type of salt that you chose to use.
As I mentioned above, my family likes the rock salt because we lean to the savory side of the food world, instead of the salty side. A generous rinsing off of the curing seasoning will leave a mild saltiness to it. A quicker rinse off is the maximum limit of our salt preference, but the starting off point for some of our family members.
If you choose to use a fine salt, a quick rinse is going to leave you with a salt bomb. (I did this once and that bacon was quickly reserved for soups and stews, and I don’t add any of the recipe’s called for salt. This bacon took care of the salt seasoning for the entire dish.) A generous rinse is what I consider a salt lover would prefer. But if you’re like our family of salt-less-is-more camp, but only have fine salt, I recommend filling a large bowl with clean water and letting the pork belly sit it for about a half hour or so. This is not going to undo the curing at all, but it will keep you from puckering from too-salty.
This is one ingredient that no one can tell you how to handle it, because everyone’s preferences are going to be all over the spectrum. So hopefully this section helps assists you in making salt choices that reflect your personal seasoning preference.
Advertisements
Cooking Options
We have cooked our pork bellies on our Traeger Grill and in a proper smoker. Both of these other cooking sources are great options, but our personal favorite is the smoker.
When it comes to grills, whether charcoal or propane, you want to use indirect heat. Even on the lowest setting/heat, it’s going to cook your bacon. This step should take no less than 3 hours. We are talking low and slow. And if you want to add that element of smoke flavor to your bacon, you can use a smoking chamber on your grill, like the one I have a link to below.
If you have a Traeger, or other grill that is a combo smoker, you want to keep your grill on the smoke setting and let the smoke cook your pork belly. It’s been a while since my husband smoked bacon on our Traeger, but he remembers it taking about 3-4 hours. Remember, this isn’t about time as much as it is about reaching that temperature of 165°F using just the heat from the smoke.
My husband loves the smoker that he found on a community “Free” page. This one allows you to customize your meat smoking experience better than a smoker/grill combo unit. His advice for using this cooking option is to soak your wood chips. At a bare minimum you soak them for 30 minutes, but 30-60 minutes is good. And in my ear, my husband is saying, “Do not soak grill pellets!” You definitely want the wood chips. And even with soaked chips, you still want to keep a tray of water in your smoker with your chips and meat. It keeps the humidity just right to keep the juices in your bacon.
The other advice that my husband popped in to give, is that if for whatever reason your pork belly just won’t come to temperature don’t worry. All you have to do is put it in your oven (lowest setting) and finish cooking it to 165°F.
Tenting Options
While this step can be omitted, you might consider to keeping it in your procedure. The tenting helps keep the steam in, instead of evaporating away while it cools down. My husband advocates that this is the secret that keeps his bacon from drying out.
If you want to tent your bacon but don’t want to use foil, you can use your lidded container (just don’t seal it).
Cutting Options
Here is where my husband and I have a slight difference of opinion. I have absolutely no problem slicing my bacon by hand. I’ve been slicing sandwich bread for over 3 years now, so I have a steady hand for this sort of thing. My husband prefers a meat slicer. Knife or machine, I’m an advocate for using what you have on hand.
We both do agree that letting the pork belly rest over night in the fridge is a huge step in your favor. If you slice your bacon at room temperature, you will more than likely find that it shifts on you and your blade slides out of place. By cooling the pork belly over night in the refrigerator, it firms the meat up and makes the slicing that much easier.
Why is it important to cure the pork belly for 7 days?
Depending on who you talk to, or where you look up information, you’re going to find a wide spectrum of curing time as an answer. But before I answer this question I want to make sure we’re on the same page about why we cure meat, in this case bacon.
All throughout history meat has been cured to preserve meat in a time before refrigeration was invented. In fact, many countries today still depend on curing to preserve meat. The enemy of meat (and food in general) is exposure to water, light, and heat. These three things degrade food, promote bacterial growth, and increase the chances of food borne illnesses. Salt is an amazing ingredient, because it changes (in this case) meat in such a way that water is removed and it creates an environment that bacteria does not like or live in.
In fact, in another scenario, I have the perfect example. The yeast that I use to make my bread, when I neglect it, starts to grow bacteria. The whole yeast culture is thrown off and smells horrible. However, this is the culture of wild yeast starter. You have a community here. When the community gets out of balance you have to make changes to bring it back into balance and make the community happy again. Salt does this. I toss in 2 tsp of salt into my out of balance starter, give it a good stir, and by the next day all is right in the world of my wild yeast starter. What happened? The salt changed the environment of the starter. The bacteria became unhappy and quit reproducing. Mean while, the yeast became happy and began to populate again or recovered from its illness (or however you want to look at it.)
Now a pork belly is so much larger than my quart size mason jar of yeast starter. It’s a thriving metropolis in comparison. It takes much longer for salt to infiltrate that pork belly and withdraw the water content of the belly. It takes time for the meat to cure and stabilize itself to withstand the threats to food preservation.
I saw one site say that it takes up to 24 hours to cure bacon using their method. The difference is that they have to inject the salt in deep throughout the pork belly. This method is not using an injection method. It is the meat bringing in the salt, and the salt working its way into the center of the belly. This takes time.
any2ndnow.com
There was another site that I saw claim that it only took 3 days to reach a “mild” cure. Food science being science, either it’s cured or it’s not cured. Cured meat is a process. It is a method. And the proof is behind the results on how the meat holds up over time. There’s nothing wrong with making salted pork. It doesn’t make it cured. It just means that it has a higher salt content that the meat that you pull out of your fridge or freezer. Please, let’s just call salted pork by its rightful name.
Can bacon be cured longer than 7 days? Absolutely! It’s not going to dry your pork belly out unless you’re using an open container. But that only happens because your fridge naturally evaporates water out of food that is left in there without being covered.
And let’s just be clear that evaporation or dehydration is not curing. Dehydration/evaporation is one method of preserving that is purely unique. Curing is an entirely different method of preservation, unique to itself. Every method has its own rules. Anything that doesn’t follow the rules is a different method for a different purpose.
I wanted to mention all of this because there were some friends of ours that we walked through the steps of how we cure our bacon. They stopped the curing step at three days and didn’t find the results that we said they should expect. There’s a couple of reasons why their first attempt of curing bacon didn’t turn out, so I can’t write definitively here what went wrong. I do know that we had shared from the same pork belly and the bacon had turned out with the above method. The two biggest suspicions I have is that not all the cuts and groves in the pork belly so the majority of the belly was working on becoming cured, but there were spots where bacteria had the opportunity to grow because the salt wasn’t there to make the meat an uninhabitable environment.
The other big potential of what went wrong is that the salt did not make it into the center of the meat. This is an important issue because remember, we are cooking low and slow. And since the center of meat is the last place to “cook”, this becomes a prime breeding ground for all sorts of potential food problems because salt wasn’t there to keep in check bad cultures. This then comes into realm of poor food handling.
I know that it’s tempting to take short cuts or speed things along quicker than described. We’ve all been there, especially when we’re excited to try a new skill and have great expectations. Please know that no matter how tempting it is, curing meats does take time. It can’t be rushed. And if you don’t believe me, you have to check out the link I have below for 2 Guys & A Cooler. They have amazing methods for making so many different cured meats that I can’t wait to get cracking to try. And what you see there just confirms what I’m saying that great meats take time.
Advertisements
Here are other recipes you may be interested in.
If you’re looking for a Beef Bacon (bypassing the pork all together), this is the recipe that I recommend. Disclosure, I have not tried this recipe yet. But this is the one that I have on hold for when I make that plunge.
If you’re interested in a Pastrami Recipe, this is the one that I have bookmarked.
2 Guys & A Cooler is definitely worth subscribing to if you’re looking at many other ways of curing meat. This link takes you to their video on making Biltong. I like their presentation because it all makes sense after making our own bacon for several years now.
This post contains affiliate links to products. We may receive a commissions on products purchased through these links, but at no extra cost to you. These items listed here are from Amazon but may be purchased at local markets.
If a smoker is not in your budget, this might be the tool to meet your needs.
Happy Mother’s Day to all the moms who are celebrating today with their children, the moms who are missing their children, the moms who have lost their babies far too early, those who shared an all too brief moment with their babies, the mothers who are in the middle of a season of making the dream of motherhood a reality, and those who love on the children from other mothers who lean on you to be the loving assurance in this season of their life. No matter what motherhood looks like to you, Happy Mother’s Day!
Depending on who you talk to, some people feel that holidays are too commercialized. Others find it difficult to find the perfect gift. And others find it difficult to gift a loved one while feeling the financial pressures of this season of world history. No matter where you personally find yourself on this spectrum, I want to help you find inspiration on how you can find a meaningful gift for someone. Whether it’s a belated mother’s day present, a birthday, anniversary, father’s day, grandparents’ day, teacher appreciation, graduation, or any other occasion, know that you can gift in a meaningful way.
I’m going to use the example of the mother’s day gift that I gave one of the mothers in my life. While this may not apply to the person in your life, the same principle can be applied in finding what you can gift that special person in your life.
This mom loves talking about her memories. For many years she’s shared her precious memories of when she operated a daycare. And one of those fond memories is when she grew gardens with the children under her care.
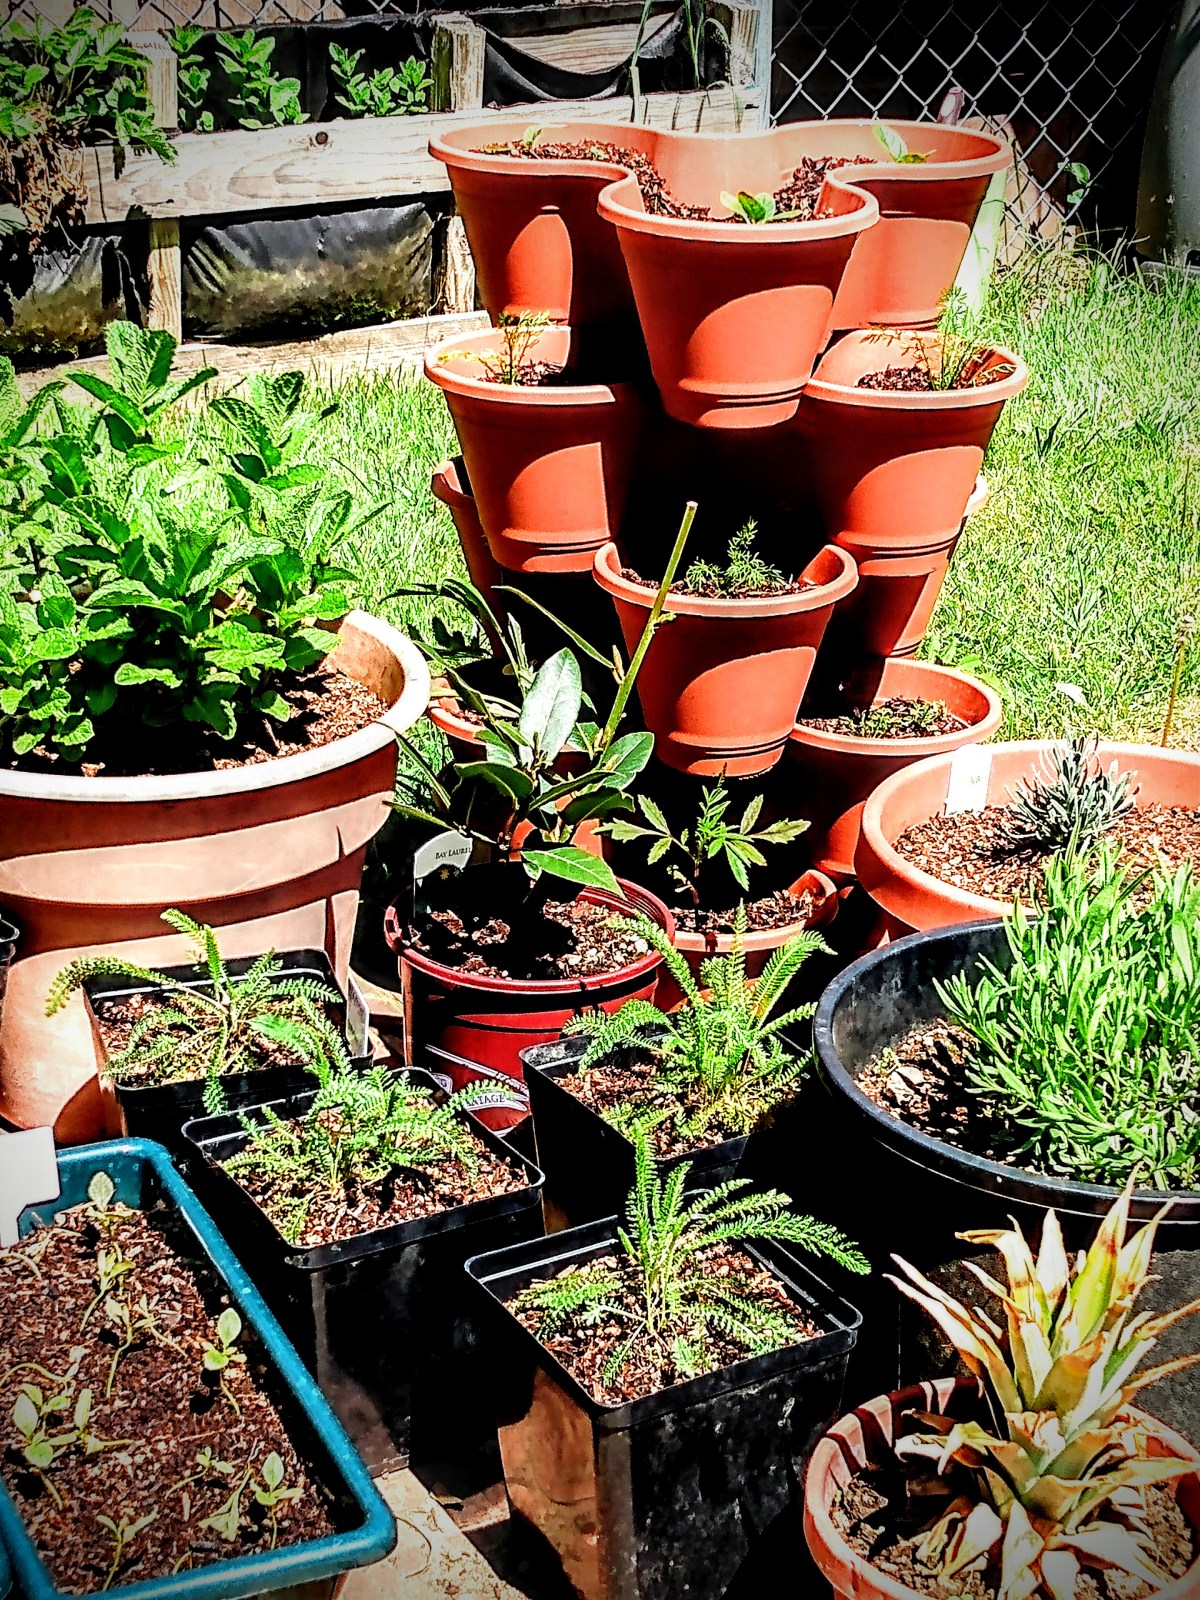
Growing salads in a container box.
One thing about moms, it seems pretty universal that sharing memories usually isn’t about the memory. It’s about reliving a moment in life that brought pleasure to them.
From this understanding, I knew that building a garden for this mom was a gift that would fill her love tank. Not only is it an opportunity for her to relive precious memories in the here and now, it also opened the opportunity to add more memories in association with these older memories. By building a garden and scheduling time to upkeep and tend to the garden, it was also guaranteeing visits and making time for her to spend time together.
Container growing for small spaces.
For this mom, she has two love languages. Her primary love language is gift giving. Her receiving love language is quality time.
Making a deposit of part of this season’s garden was not just a simple arrive, dig holes, put in start, say good bye, and move on with the day.
Advertisements
For this Mother’s Day gift, it took in the appearance of leaving all the gardening supplies in the car and starting off with a sit down chat and getting caught up with all the news, even if it was only a day since we last saw each other. Then, I was able to go prepare the garden beds for this first plant installment.
Even before I could bring out the plants, this mom was already so filled with love that she wanted to spend some more talking. As much as I wanted to stay task driven (my personality is to knuckle down and get a project done quickly so I can move on to the next task), this day was all about showing love to this mom.
Pallet boxes for narrow spaces and hanging baskets on cyclone fence
So we had another chat session.
When I could find a polite moment to get back to the task of putting the starts back into the ground, I made that move. And with the final post plant watering, I went back and gave this mom one last extension to the gift I was giving her.
Remember, I said that this mom shows love to others by giving to them. So while I was building this garden for this mom, I know that the one thing that would bring her even more pleasure is by telling her upfront that the goal of this garden is primarily to meet her primary produce needs, I’m planting more than she will personally need so that she can give from the garden to others.
I wish I could share with you the look on her face, because she was bursting with love. Knowing that she was having a garden this year was more than enough to help her feel love, she felt seen and more loved because the gift was enabling her to show love to others without need to be reserved or anything else. It was a gift that was freely given so that she could freely give to others.
Growing herbs in repurposed gutters hung on a cyclone fence.
I know that this story may or may not show you specifically what you can give the hard to shop for person, but there is a valuable lesson here.
A good gift is designed to make a person feel loved because it speaks to how they most readily feel loved.
If you don’t know this love language, ask your person how they most feel loved. They will gladly tell you. It could be a tangible object or food that makes them feel loved. Or it can be a non-tangible activity, expression, or display.
A great gift is one that fills their love tank, but also doubles as a tool to enable them to share their love with others.
Container growing garden with DIY budget friendly or recycled components. Chicken wire trellis threaded through upright supports.
Maybe your loved one is not like this mother. Maybe they don’t show love to others by giving them things. Maybe they show love through acts of service. However their schedule is busy. By gifting them your time to do tasks for them or help them create time, this can free up time where they can show love to others by spending time with another person.
My encouragement to you today is to be inspired with a gift idea that doesn’t come from the shelf of a store. Yes, there are many store bought items that are amazing and meaningful. I want to strike the inspirational fire to give a gift out of love and seeing the other person at a core level. And also enable them to pass on love to others.
Advertisements
Right now we live in an interesting moment in history. It is an uncertain time for many families. But it is also a prime moment to celebrate others by giving to them in a way that shows them that you remember past conversations. Where you have heard and remembered things that could have easily been passed off as trivial information in the moment.
Let’s show our loved ones that we see them. And we celebrate them for who they are.
Again, Happy Mother’s Day!
publicdomainpictures.net
This post contains affiliate links to products. We may receive a commissions on products purchased through these links, but at no extra cost to you. This item link is to Amazon but may be purchased at local markets, and found at your local library.
If you are unfamiliar with Love languages, here is the book that started it all.
Originally this was written for understanding your mate. There are several other editions available to meet other relationship needs such as children, being single, and in relationship of a military service member.
Processing…
Success! You're on the list.
Whoops! There was an error and we couldn't process your subscription. Please reload the page and try again.
There’s just something about having real vanilla extract in your pantry. It’s so tempting to reach for that imitation vanilla extract on the grocery shelf when you see that price tag on the real extract. But there is such a huge difference in flavor when you use the real stuff.
I’m not going to go into the problems and scary information that will want you stay away from the imitation extract. There’s not need to create fear or disgust. So I’m just going to focus on the good and benefits of the real vanilla and add value to making the purchase of the real vanilla beans to make your own extract and other products.
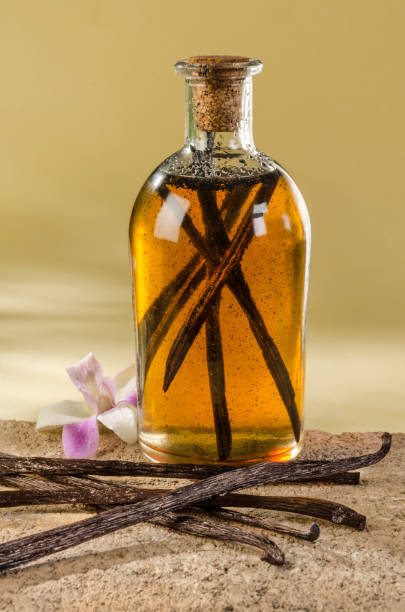
How to make a Vanilla Extract
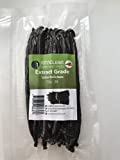
All you need to make your own extract is vanilla beans, 70-proof alcohol (or higher), and a glass jar (with a sealing lid) to extract. The three most common alcohols used are bourbon, rum, and vodka. (My preference is vodka because it has the least amount of alcohol flavor.) A general rule of thumb is to use 4-6 vanilla beans for each 8 oz of alcohol.
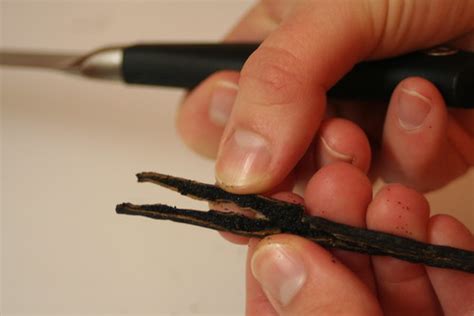
Slice the vanilla beans down the length of the bean. This opens the bean up to create the most surface area for extraction. It also releases the bean, which heightens the flavor of the extraction.
flicker.com
Put the cut beans into your jar and fill the jar up to the brim with your alcohol of choice. Tighten the lid and give the ingredients a good shake. Place in a cool dark place for a minimum of two months. (For a rich potent extract, let it sit for 6-12 months.) Shake the jar daily for the first two weeks.
The draw backs of making your own extract
What everyone tells you is that as you use your extract, you need to keep topping off your jar.
My big problem is that I use vanilla extract a lot and I quickly found that my extract quickly became diluted! I didn’t do anything wrong. It’s just that the non-vanilla alcohol quickly overtook the extract. And so my vodka quit tasting like a vanilla extract and began tasting more like vanilla infused vodka. That’s not so much of a problem if you’re after flavored liquor. But it’s a huge problem if you’re using the extract for baking.
flicker.com
My solution is making a few jars of vanilla extract at the same time. Yes it is a little overkill at first glance, but bear with me. Once your jar starts giving you a less potent extract, it’s time to shelve it and let the vanilla beans go to work and extract more. By giving this first jar a little vacation, and grabbing a second jar, you get the benefit of having vanilla potency as well as keeping the extract cycle going.
Some people say that your beans will last for 5 years. My mom had gifted me a bean from Hawaii where it was marketed to last up to 25 years. I’m not going to put an expiration date on your beans. My Hawaiian bean and the second one that I added to it, are still in their jar maybe 18 years after I first received it. I just recently fished this jar back out from the back of my cupboard because I finally had beans and alcohol to start back up on my real extract. The older beans are only giving off a diluted vanilla extract now. So I added 2 new beans in to jump start my extraction and get real vanilla back in my life. And I have a larger bottle started, which I should get to the longer extracted window before I need to use it and give my smaller bottle a break and refortify itself.
Benefits of Vanilla
If you grew up like I did, the only thing you were exposed to was imitation vanilla extract. If you were fortunate enough to have a family member go to Mexico, they might have brought back a real vanilla extract. But all you knew was that it was a luxury and yes it tastes amazing.
What you May not know
Vanilla beans contain B Vitamins (niacin, thiamin, B6, Pantothenic acid), potassium, riboflavin, copper, magnesium, and iron. They also have these properties; antioxidant, anticancer, anti-inflammatory, and are neuroprotective.
Depending on if you want to just make your own real vanilla extract, or would like to use vanilla to help meet your other health needs, the above information is a great starting point to talking with a naturopath or herbalist to see how vanilla can find a new course for healing your body.
I started looking a little deeper into what other benefits I could gain from vanilla (aside from incomparable baking goodness) when I got into soap and lotion making. It’s probably well thought about how vanilla is great as a comforting aroma therapy to soothe anxiety and calming the stomach. After all vanilla bean ice cream is pretty much a comfort food.
What was new information to me is that there have been studies that show there is the potential of vanilla having the benefits of increasing hearth health by helping to reduce LDL cholesterol, it’s antibacterial properties help treat acne, the antioxidants have healing properties to boost your immune system, help heal split ends and strengthen hair, and slow down the aging process (age spots and wrinkles).
Advertisements
All of these benefits were what has been found in the studies that have researched the compound Vanillin. These studies have done work in vanilla extracts and the seeds. And if this interests you, these studies are well worth reading up on.
Even if you don’t want to pursue vanilla for health reasons, it is worth knowing that vanilla beans contain over 200 compounds. And their concentrations are dependent on the region from where the beans are harvested. Again, this is another area of diving into that is well worth the look. I wanted to mention this (as well as point you back up to the vitamins and minerals mentioned in the beginning) to point you toward the benefit of using real vanilla extract over imitation vanilla extract (which has absolutely none of these components).
Extract is not the only thing you can make from Vanilla
Vanilla beans can also infuse oil.
In the infusion that I made, I used 4 vanilla beans, a quart sized mason jar, and olive oil. (You can choose your own carrier oil, like jojoba oil, or any other that is better absorbed into your skin. Each oil has its own benefits that it offers the infusion.)
Follow the same steps as above, with the vanilla extract. The only difference in the method is that the vanilla beans are scraped from the bean pod. The pods are what I put into the oil. (The beans I put into a lotion–this will be its own post in the future.)
Instead of keeping my oil in a cool dark place, I left mine in a westward facing window and used solar heat to help the infusion for 2 months. Even using winter sun, the finished oil has a warm vanilla scent.
This oil can be used for so many different needs.
Use the oil on your skin for massage or relieve dry skin
Use to improve sleep whether you put a drops of oil in a warm bath or smell the oil before going to bed
Improve your skin health by adding a couple drops into your face wash or lotion
It is reported to soothe minor burns when you add 2-3 drops to effected area
Use in desserts (for whatever recipe calls for oil and you chose a cooking oil like avocado or olive)
I also use infused oil in products I made for sale.
Advertisements
If you are interested in using vanilla beans for cooking only, you can put a bean in with some sugar in your food processor and blend together. This will give you a fancy sugar that you can dust on top of desserts or use as a sugar rim on a drink of choice. The same can be done with salt (even though savory herbs are usually matched with salt).
The most important thing to keep in mind when using vanilla beans, whether in extract or infusions, make sure that your beans have an oily sheen to them. Many compounds are found in the oil of the bean and speak to the overall health and quality of the bean.
There is so much goodness found in vanilla beans. Hopefully, you have learned something new about vanilla. That it has so much more to offer than just being the flavor of a beloved ice cream or just a simple ingredient that you add to your cakes and cookies.
What have you used Vanilla for?
This post contains affiliate links to products. We may receive a commissions on products purchased through these links, but at no extra cost to you. These items listed here are from Amazon but may be purchased at local markets.
Are you looking for a new place to buy vanilla beans? I am very pleased with this vendor.
Processing…
Success! You're on the list.
Whoops! There was an error and we couldn't process your subscription. Please reload the page and try again.
I really like what you have acquired here, certainly like what you’re stating and the way in which you say it. You make it entertaining and you still take care of to keep it wise. I can not wait to read far more from this site.
Thank you for commenting! I appreciate what you’ve shared. My goal is to take a new skill and make it approachable for someone who might question if they can do it. Being entertaining is an amazing bonus. Thank you for reading, and I hope you enjoy future posts.


Leave a comment