“Someone ate Pac Man!”

We all have our favorite places to source decoration items for parties. And it becomes a challenge when we need to find things that just can’t be on the shelves anywhere.

Last week I shared some ideas on decoration ideas for retro 8-bit arcade games.

This week I want to share with you, keeping with the same theme, my hacks for ordering a cake and a fresh idea for dressing up a snack can.

How to order a cake from a bakery that doesn’t decorate with licensed characters.

We decided that we were going to get the cake from Costco this time. (I’ve used this same ordering technique with my local grocery store bakery department.)

Before going in person or ordering online, you want to sit down and think of how you want to decorate your cake. Previously one kiddo wanted a train birthday and so I had to come up with a steam train engine cake. This time, how was I going to make a Pac Man cake?

First I made my Pac Man. He was cut out of yellow cardstock and laminated so that I wouldn’t have to worry with paper dye bleeding into the frosting.

The Cardstock Train sits ontop of the cake with a cluster of white balloons behind the smoke stack.

The time that I made my train, I attached wooden dowels. This kept everything directionally proportional with the 3D focal point.

This time I needed to get Pac Man to stand up. So dowels were not going to work for me. This time I hot glued a plastic fork on the back. The fork thongs give the ability to stand Pac Man fully upright or reclined back at a 45 degree angle. I needed this flexibility because I had absolutely no idea how the bakery was going to follow my directions or what their placement was going to look like.

The reverse side of Pac-Man has a clear plastic fork attached in the middle. The bowl of the fork and tines are below the body of Pac-Man.

The one thing I can tell you with absolute certainty is that bakery staff looks forward to doing something different as long as it’s not making more work for them. So if you leave your note with your best manners and let them know what you’re going to do, they get excited about being part of something different.

For the train I had asked them to cluster the balloons together, with no strings, to make a cloud cluster for a train that I would place on the cake. I kid you not, I went to pick up this cake and heard all the bakery employees complain about this insane request that they got from someone. Instead of quickly decorating a cake, they were going to spend additional time and drag their day out.

Of course I thought they were complaining about my simple request and so I was bracing myself for some attitude. Instead, I got the complete opposite. One of the employees came to the counter to help me, went back for the cake, and all the employees came to the counter grinning ear to ear because they wanted to see the train.

The success to the train was that I didn’t ask for more “balloons” then they would normally give. I didn’t tell them specifically where I wanted them or how to position them. I didn’t demand a certain color. I left it simply with no strings, white cluster. My request saved them maybe a few seconds from what they normally would do. But that was a few seconds in their favor.

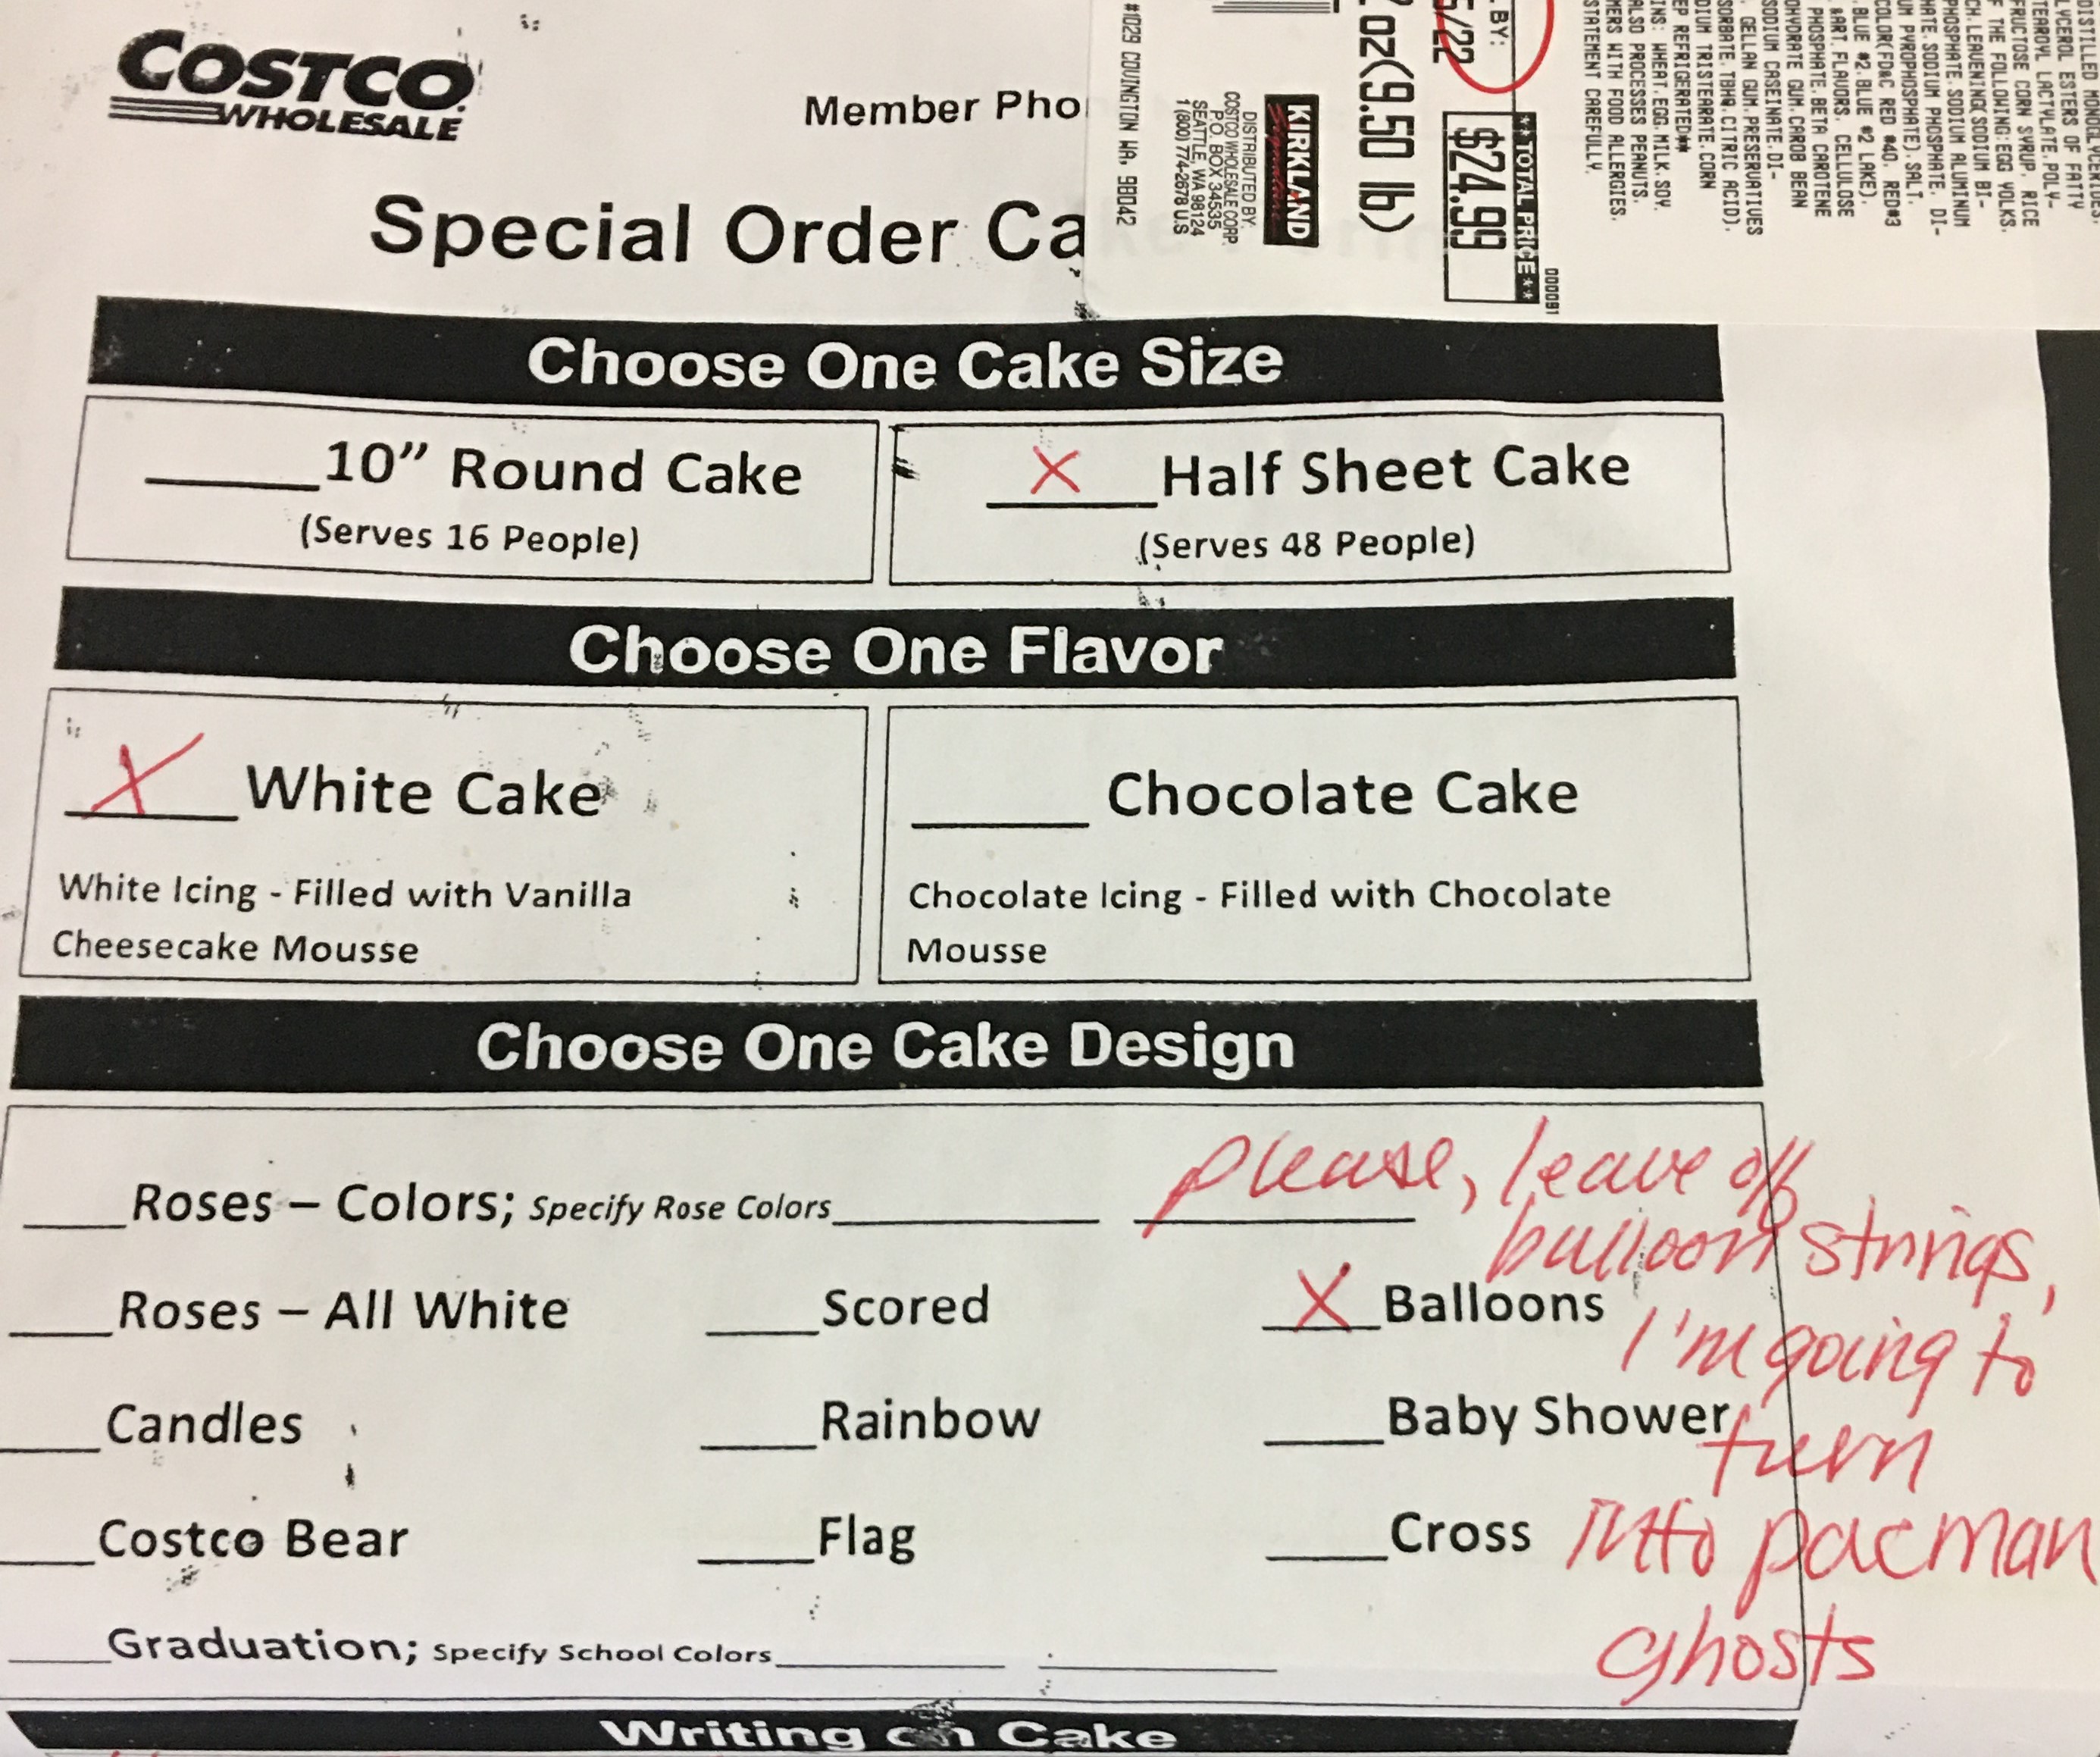
As you can see with my Costco order form, I asked for something simple. I don’t remember if these are their standard balloon colors or sizes. But they were great in giving me large balloons, the exact number I needed, and their colors!

I don’t know what this bakery’s response was, because my husband picked the cake up.

But I do have a story for this one, on the day that I placed the order.

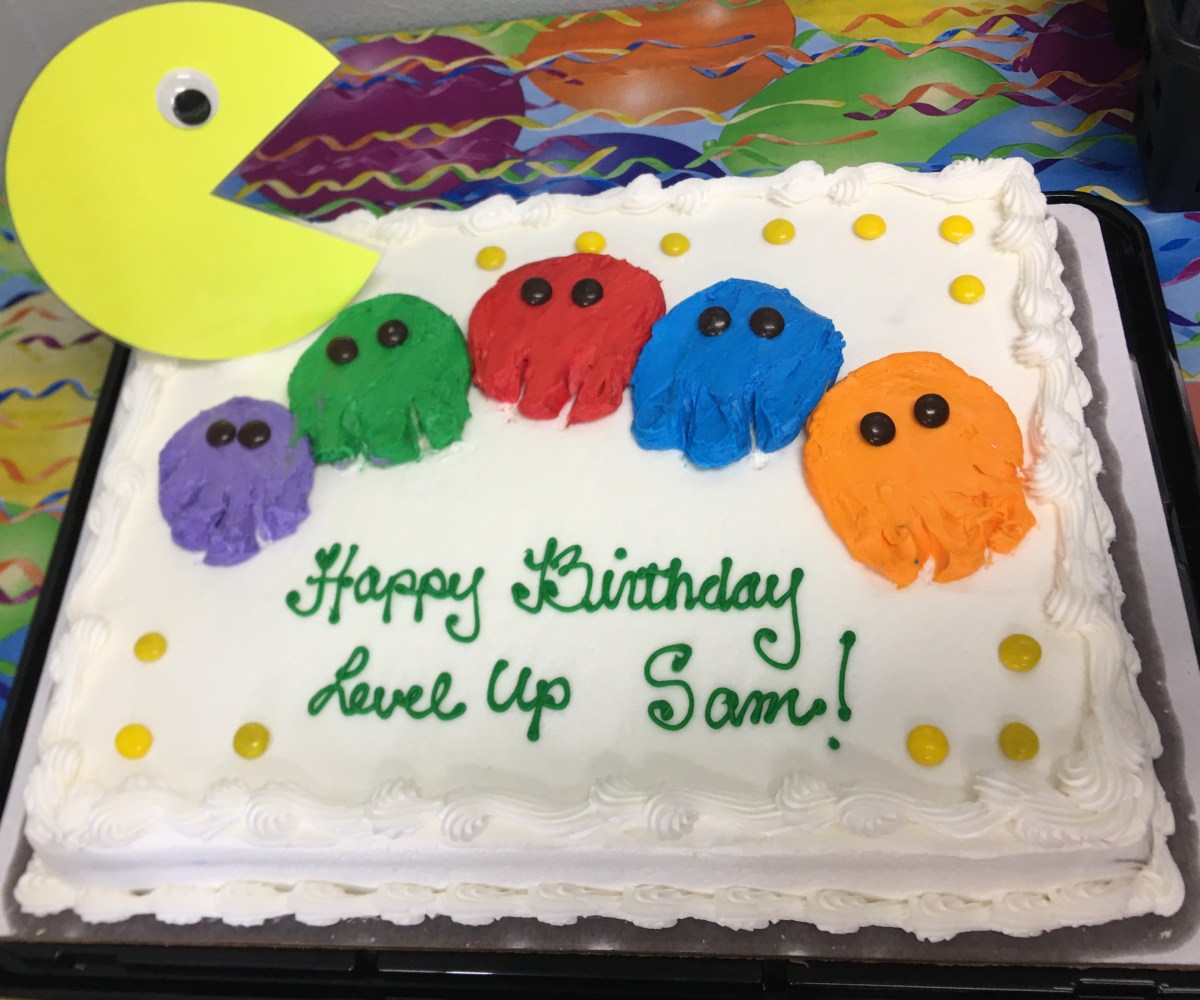
My son was so excited to have a Pac Man cake that as we were leaving the bakery section, after filling the order form, he flagged down the nearest employee and blurted in a loud excited voice that he was getting a Pac Man cake. You should have seen the employees face when he had to tell my son that they don’t do licensed characters. My son cut him off and told him, “No! I’m getting a Pac Man cake!” I had to step in here and explain to the employee that I requested that the balloon strings be left off so I could turn them into ghosts and I would add a Pac Man at the party. The employee chatted for a few more minutes and kept repeating himself that this was a brilliant idea.

If a non-bakery employee was excited about my idea, you can just imagine how the bakery employees reacted when they saw the order form. If nothing else, it turned a typical boring day into something to talk about. Again, this wasn’t a request that added to their work time. It may have saved them seconds. But I’m assuming it was something fun that broke up the monotony.

While on the subject of cakes…..

I don’t know about your family, but I kid you not growing up and even with my own kids, we have at least one cake story that will live as a memory for a lifetime!

Advertisements

What is your cake of a lifetime story???

When we were kids, my mom locked my sister’s birthday cake in the car, at the lake, with the keys in the car.

I tried my hand at making a sculpted cake for my son’s birthday. He wanted a bubble birthday. So I attempted to make a bubble container cake. That cake makes me cry in the fetal position to this day, because the sponge was so dry that the dang cake kept crumbling and falling apart. It didn’t matter how many dowels I added to maintain the structure, that I used fondant for a little holding power, or that the cake was frozen… it was a nightmare!

And that photo I keep buried away in a digital file folder where I can cry as my son laughs as an adult and I have to recount that story. Because even though I hate it, I have to admit that it’s a story that deserves to live on.

So Yes! This Pac Man cake will live on for the ages. Not for the same reason as the Bubble Birthday Cake. But for this reason….

Pac-Man cake has Pac-Man in the upper left corner. Five ghosts are in the center of the cake. The peremeter of the cake is lined with yellow M&Ms like the arcade game's power pellets. All but five of the M&Ms are missing. The M&M eyes of the far right ghost are missing. That ghost's frosting is smudged.

After I finished assembling the cake, I left the party room to go talk with the other moms while the kiddos played. After a time, my birthday boy walks up to me with his hands on his cheeks, devastated face, and trying hard not to cry as he exclaimed, “Someone ate Pac Man!”

I had zero idea what he was talking about, but seeing his reaction was enough that I got up and walked back to the party room to investigate.

Here my son is about to cry. As soon as I saw the cake I busted out laughing almost to the point of cry laughing, because that is absolutely hilarious!!!! This was no typical finger swipe of the frosting. Someone ate as many of the M&Ms as they could reach and took out a ghost in the process. And no, my laughter didn’t help my son. I looked down at him and told him it was going to be okay. I had already taken pictures of the cake. And then I asked him if he wanted to see what his cake looked like before this happened.

We went back to where everyone was at. As I picked up my phone to pull up the pictures I let the moms know that someone had ate the candy decorations off of the cake. They all were mortified, as any mother would be. I showed my son the picture. I fawned over it with him and once he was happy to at least to have seen his finished pre-eaten cake, he went back off to play. Then I showed the moms the picture and filled them in on what happened.

Advertisements

I don’t think they knew how to respond with how I was responding. As a mom, we’re all use to the finger swipes. But to see the cake pillaged! LOL Honestly, my whole thinking was that it could have been a whole lot worse. Someone could have taken a fist full of cake out of the cake. Being angry or interrogating the kids to find out who did it would not have restored the cake. It would have made the party uncomfortable for everyone.

What surprised me was that because I was okay with not knowing who did it, the moms began one by one asking their kids if they took the candy off the cake. None of the kids did. And it became a great mystery. It wasn’t until I mentioned this story in my newsletter that I realized that I never asked any of my three kids. Obviously birthday boy didn’t. His feelings were genuinely hurt in that moment. I assumed my oldest wouldn’t do it. Even though he’s a first grader, it’s just not his style. Now my youngest! That boy has the sweet tooth that the other two have never had. And he’s also in the food swiping stage. I did ask him the other day and he told me that he didn’t. But I also know that he’s at the stage of not telling the truth to see if he can get away with things.

To this very day, I’m going to error on the side that it was my youngest that plundered the cake, but I have absolutely no proof that he did. So officially the case is closed as a cold case. But secretly I still think it’s him.

A New Take on Snack Wrappers

I know I’ve seen the crafty labels that people put on Hershey bars or bags of chips. The one thing that I haven’t seen is a label for Pringles. And snack chips were one of my party purchases from Costco.

When trying to make a theme happen from scratch I really did one more item to pull it all together and finish it off. And what’s better than something you can put jokes on, for kids at an age who adore any joke you throw at them!

A stack of flat snack can wrappers are splayed on the desk. In the center of each label is a Pac-Man with power pellets on either side of him.  On the left portion of the labels are hand written jokes. On the right are chip flavor indicators; cheese bonus, original bonus, sour cream bonus.

My first thought was to create a PDF that I could print off from my printer. However my color ink cartridge was empty and it was just easier to keep material cohesion by using black cardstock and vinyl. Plus I have acrylic pens and have hardly touched my white pen. So I cut from vinyl all that I could. And I wrote out the jokes.

Let me just say that I did not think I would find any Pac Man jokes. I was surprised when I did. There are kid friendly ones and there are adult friendly ones. So you kind of have to pick and choose which jokes you use for your party. But here is the site I used for one reference joke page. I didn’t save the sites and can’t find the second one that I pulled from. But it was a simple Google search and you don’t have to go far before you start seeing repeats. So it is a small joke world for this game. All in all I used 8 jokes that I recycled over the 36 mini tins that I dressed.

Before I show you how I attached these labels I want to point out a troubleshooting tip. I had a lot of weeding and transferring to do. And I’m not ashamed to say that I worked quickly because I had a lot of items to go through. I did lose some letter details, as you can see with this B.

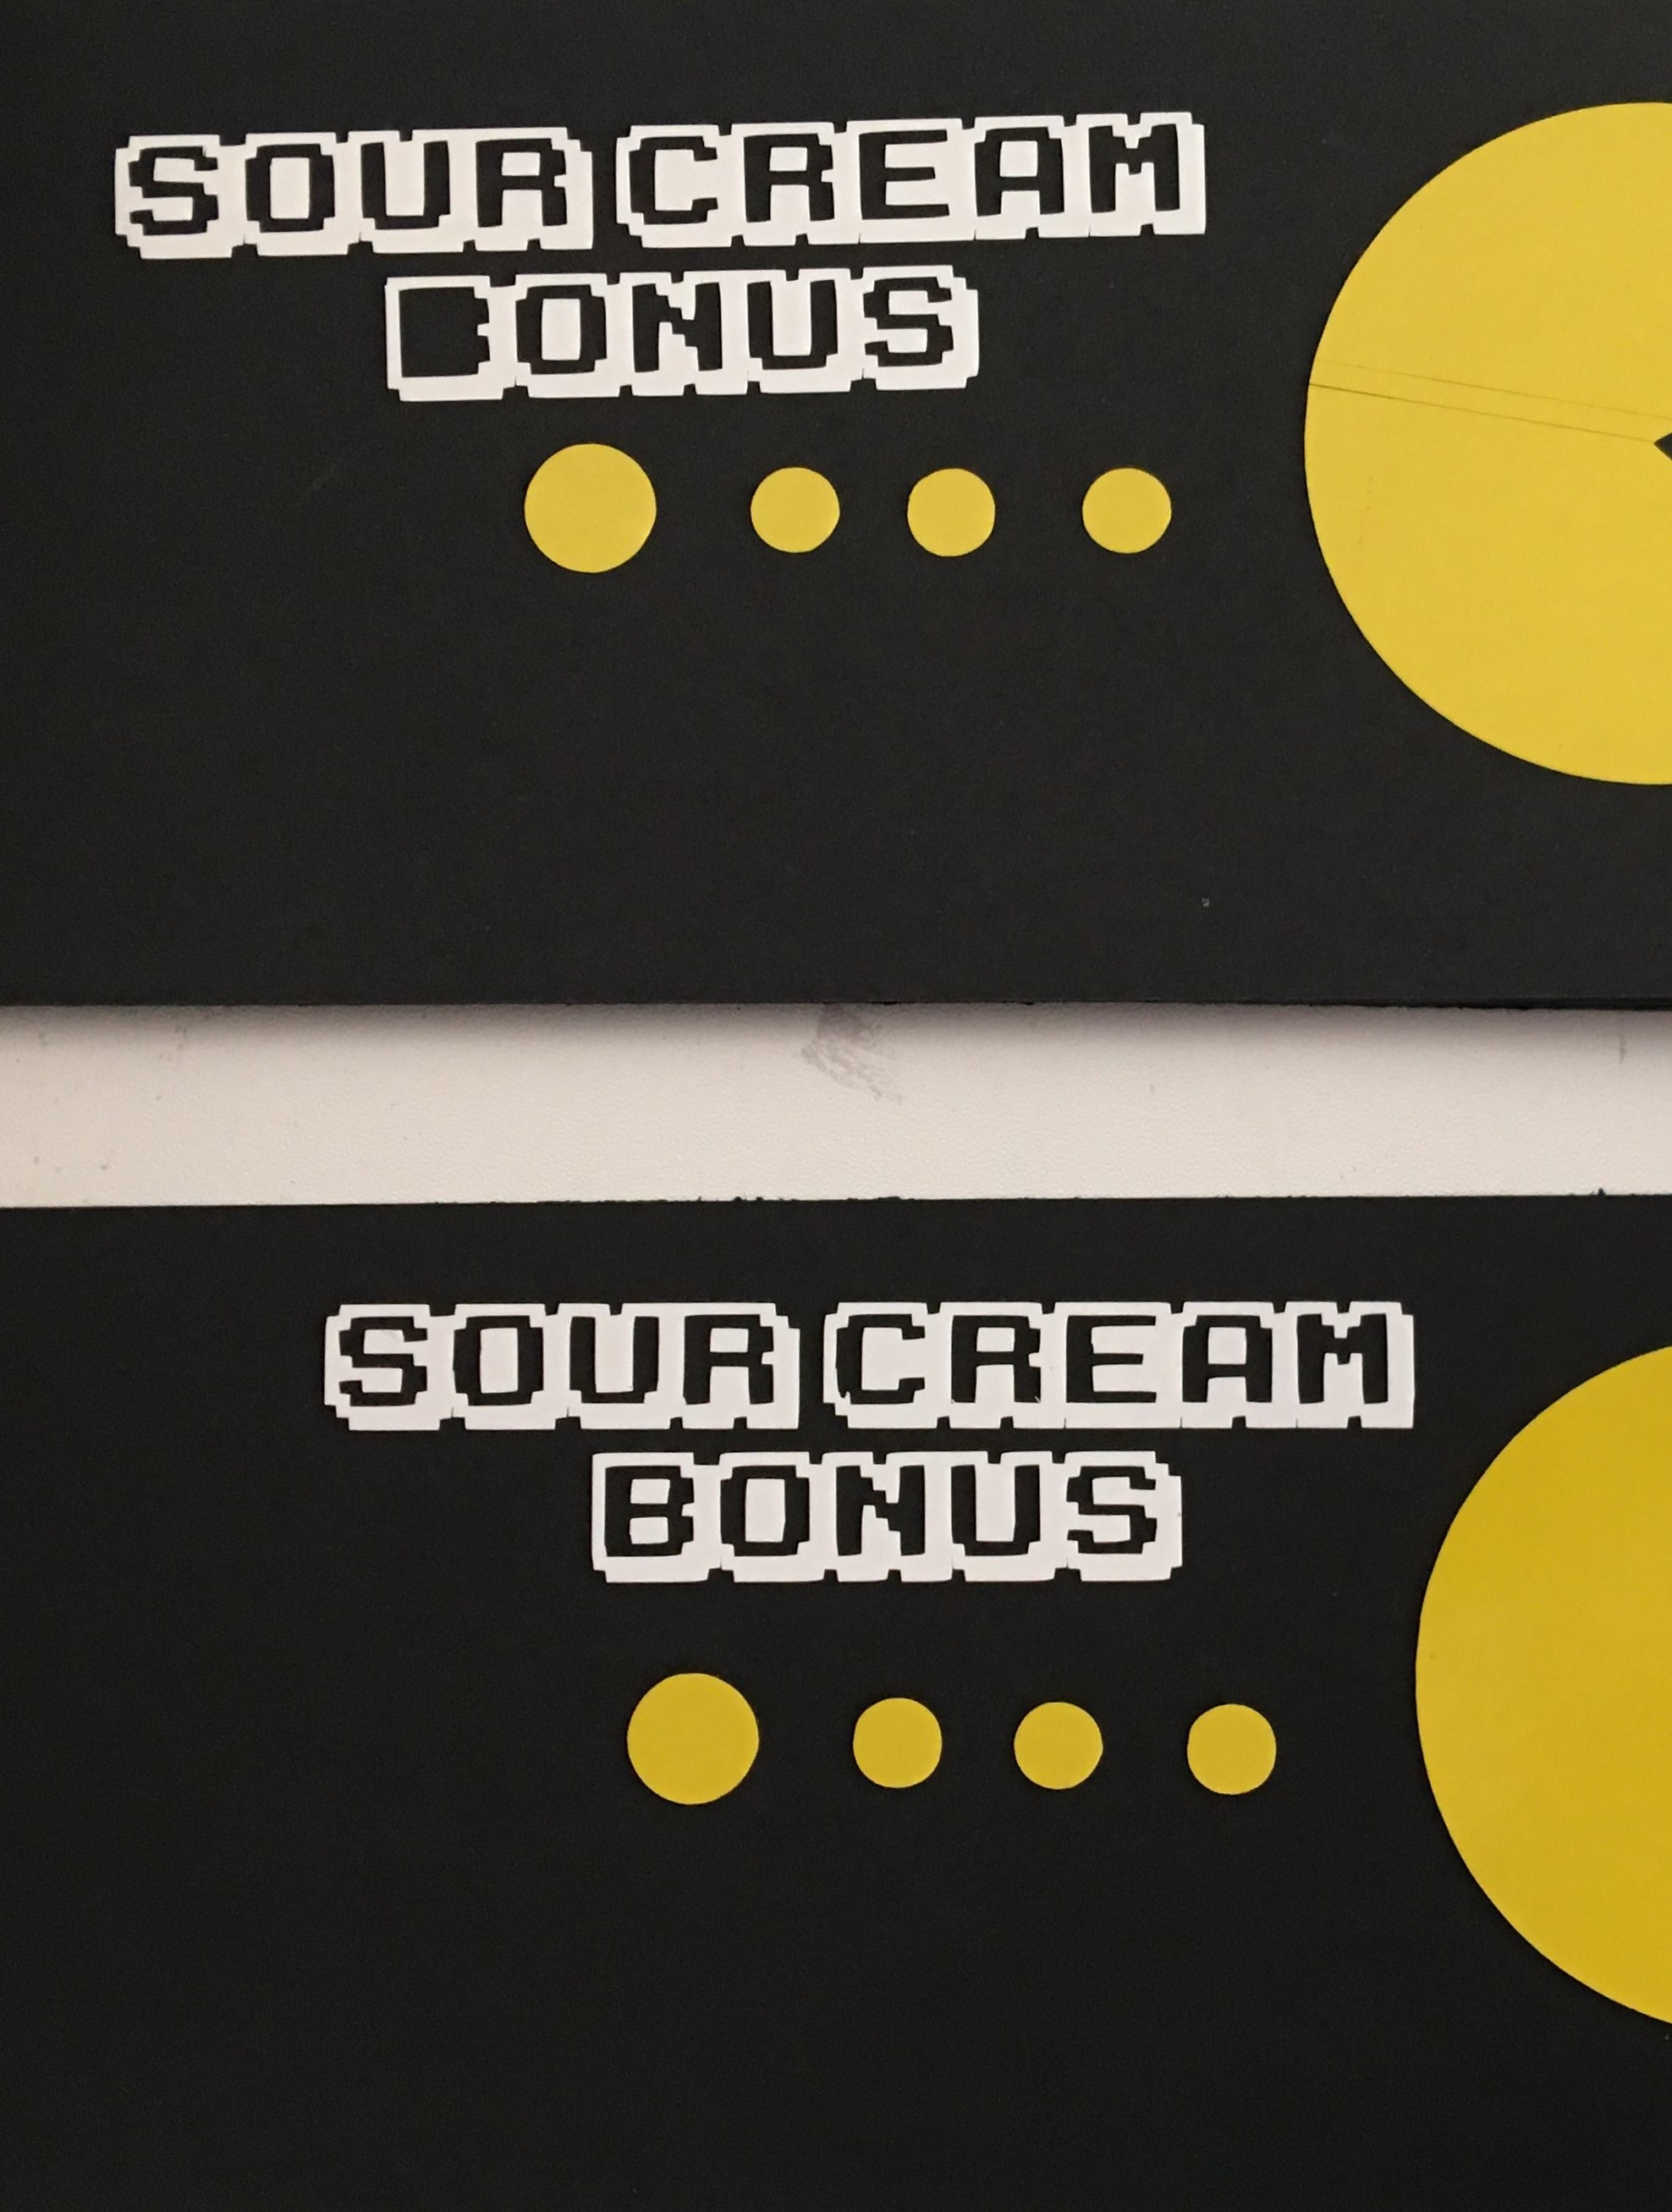
Tip: If you lose details, use a white acrylic pen and draw it back in.

That is the one thing that I love about 8-bit fonts, if you lose a letter detail, all you need to know is how to draw a line or rectangle. I had a few cans that I had to correct. But I didn’t even tell my husband or kids and none of them noticed. And my detail orientated boys are quick to point something out to me that’s missing, wrong, or whatever corrections they want me to make because I didn’t do it just so. ….kids!

The assembly on these is super quick. If you’re using copy paper glue dots are all you need. For cardstock I needed hot glue.

The wrap is slightly longer then the circumference of the can because I didn’t want to have to deal with a hairline crack of color because it wasn’t cut precisely to precise measurement. Because there was overlap, I used two small dots of glue to anchor the edge down to the can. After wrapping the label around, I finished it off with a line of hot glue. There was no puckering or edge lifts. I advise against using glue like Elmer’s where you have to hold and wait dry. Hot glue was perfect because it dried by the time I had aligned and pressed everything into place.

Tip: The tab of the container seal is something that you want to pay attention to, so that no one struggles to open the can. A tried folding the tab up and press it back down after the label was attached. This took too long. So I went with option 2.

Tip 2: Slide the label up under the tab. Apply your anchor glue and then finish off the attachment. Having the tab on top of the label helped to align the label quicker. So it was a time saver guide.

Three fully labeled snack cans are lined up side by side, showing different parts of the label. From left to right; Pac-Man, "Original Bonus", jokes.

An additional option that you can add to these cans is to apply a Pac Man sticker/vinyl on top to cover the Pringles man’s face. I chose not to do this because I wanted to not over complicate all that I had to arrange for the party.

Instead I opted to turn these cans into small coin banks for the boys as an after the party trinket. To make this modification, all you need to do is take a box cutter or exacto knife and slice a single cut through the clear lid. The best way of doing this is to cut with the lid on top of an empty can. The snack was not damaged and you have a proper safe way of making cuts without the lid slipping on you.

Tip: One cut is perfect if you want your coins to remain in the can and still allow a child to shake it and use it as an instrument. If you make a wider slot, you will allow the opportunity for coins to fall out.


I hope these cake stories made you laugh as much as I did. And that you enjoyed all the decorations and new ideas from this week and last. They were fun and well worth making.

If you have any cake stories, please share them in the comments below!
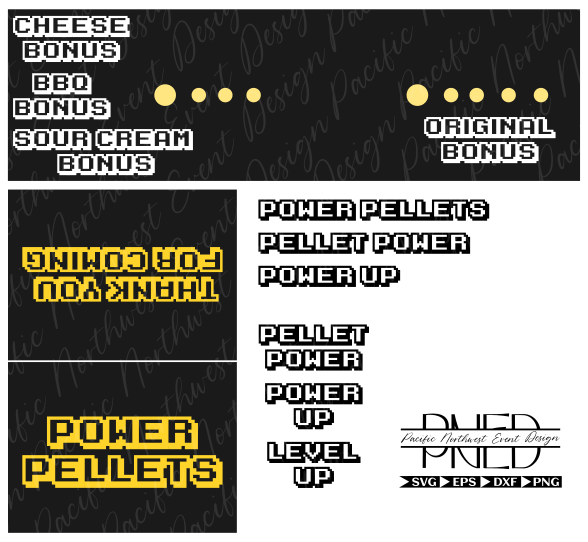
Files used Today:

The file for the Snack Can Label is found in this Archade Label set.

Processing…
Success! You're on the list.

Leave a comment

Advertisements

Fresh From The Garden

(This post contains affiliate links to products. We may receive a commission for purchases made through these links, but at no extra cost to you.)

I am so happy that the recent sun and high heats have hit my garden the last couple of weeks. The spring here has been cold and wet and I second guessed, third guessed, and fourth guessed whether my spring plantings were going to be viable in making produce.

The great news is that my leafy greens are all doing well and have come to maturity for harvesting. My tomatoes are finally putting forth fruit. Truth be told, I keep looking for more blossoms and hunting for more new fruit. I really want to put away more pasta sauce and try my hand at tomato paste. Usually we just go through so much sauce that I really don’t get the opportunity to make anything else. So fingers crossed, I am so hoping to make other tomato products.

My corn is finally starting to outgrow my oldest child. Fortunately I drive past farms that grow fields of corn, so I compare my humble hobby garden to the professionals. And I’m glad that my few rows of corn are keeping pace with the large farms. So there’s hope. And particularly since I grew popping corn last year, for the first time, my boys are hooked with “our” popcorn. And I planted more corn than I’ve ever done before in hopes of making a year’s worth of popping corn. When the ears have matured, I’ll make a post on this so you can know which types of corn to grow to make your own popping corn. Also, you can see just how easy it is to make pop corn. Other than the wait, making pop corn is super easy!

I won’t go into all the details of everything that I’ve grown this year, but I will end here by stating that my fall seeds have already sprouted and are doing so much better than my spring planting. And even today, I’ve come across so many videos on YouTube talking about what crops you can plant in August and still harvest in the remaining time for this growing season. So if you are curious to try your hand at growing something before fall hits, there is definitely still time!

Fresh is what’s for dinner!

Out of the five items I harvested from my garden this morning, I used three of them for dinner tonight; Cabbage, Bok Choy, and Mizuna.

If you’re asking, “what is mizuna?” believe me, so did I. This past fall I bought seeds from Baker Creek. (Not an affiliate link, just a great product.) When I got that delivery I found out that the gift packet of seeds I got from them was mizuna. I had never heard of this green before. So I took a chance and grew it on the blind. And tonight I found out that it is a type of bitter green. Some of the bitter greens are quite bitter and I have to douse restaurant salads that come with them, because they’re so bitter. However the mizuna is not so strong. It has a mild bitter flavor, but is not bad at all if you’re sensitive to the bitter profiles, like I am.

Advertisements

Knowing that I have so many green to bring in starting tomorrow and for the next week or so, I had to come up with a new idea on how to use them. Other than dehydrating my greens and turning it into a powder to use in countless recipes, I can’t think of a way (other than freeze drying, but I don’t have that machine yet) of preserving them without becoming a wilty mess. Granted Cabbage is good for kraut and ferments–which I will be doing when I get a few more heads ready for harvest. Once my green cabbage comes in I’ll post an amazing Italian ferment that I found. And with the red cabbage I’ll post on making a red kraut. So there are a few things to keep an eye out for.

Back to dinner, I needed to find a use for these three greens to make dinner. Cabbage and Bok Choy can both handle some cooking. But one look at Mizuna and I knew I couldn’t do a stir fry with it. It’s definitely a salad green.

But Asian sounded so good!

And that’s when inspiration hit. Two of the three greens could handle the heat, so I cooked my rice and chicken in a marinade (Mr. Yoshida’s Original Gourmet).

While everything cooked, I prepped the greens.

For a single plate I used (from top to bottom) 4 stalks of Bok Choy, a few leaves of Cabbage (the head was small, so I used about 5 leaves), and 4 stalks of Mizuna.

The Bok Choy and Mizuna I chopped. Because the cabbage is raw, I rolled the leaves together and julienne cut the leaves. Once these are cut, they just mix together easily like this.

I usually dread buying mixed salads at the store because either their mixes don’t taste good to me, are old, don’t keep long in the fridge, or all the various recalls over the last few years. Now that I have these greens ready to pull from my garden (plus spinach once it reaches maturity), I can put together a salad mix that is far superior than what’s found in the stores AND it takes less time than driving to my local store (about 4 minutes away).

The great thing about this mix combo is that I can place hot rice right on top of the salad and it retains its crisp texture. Cabbage isn’t phased by the heat. Bok Choy naturally can be cooked for a couple of minutes and keep firm texture in the stalk with mild wilt in the leaf, but retain full pleasurable taste. Mizuna, I fully expected to not hold up to the heat, just because it did wilt in the time between me rinsing the greens off and making dinner.

All in all Mizuna acted much like Bok Choy. The greens did wilt. BUT the beautiful purple stalks remained crunchy just like the Bok Choy stalk.

Top off the salad greens with rice, and then marinated chicken. And as a side note, left over chicken is just as perfect as having warm chicken. I ate this both ways.

You can see here that the rice I had on hand in my kitchen is basmati rice. I couldn’t have picked a better rice for this dish. White (short or long grain) rice tends to be sticky and would just be globular bunches of rice on this dish. Brown rice could be used. But if given the choice between basmati and brown rice, I would pick basmati for textual reasons. But know that you can choose your favorite rice.

Alternate Ingredients

I don’t have much experience with grain alternates to rice. I wouldn’t recommend quinoa (too nutty for this flavor profile), potato, or riced cauliflower(too gummy of a texture). Couscous could work, especially if you use a different marinade for the chicken.

If you didn’t want to use Mr. Yoshida’s Original Gourmet, Teriyaki would be just as perfect for this rice on salad. Sweet and Sour would be a fun alternate. I’m leaning toward trying the next time I make this, using a honey ginger sauce. And maybe you’re not into a sauce at all, for any dietary reason, but prefer vinaigrettes. You are most certainly not limited in how you dress your chicken or rice.

And once you opt for a different dressing, you can make any of your other alternate grains work in the place of rice.

You’ve also then opened up the window for other additional ingredients. Have garbanzo beans that you’ve been looking for something new to make with it? What about dehydrated fruits or vegetable chips? Pomegranates, fruit slices (fruit or canned)… as you can now see, you can really turn your salad on its head with adding a heated element on top of something traditionally thought of as being a cold entre. You can use dehydrated or preserved ingredients–especially if you need to use up some of your previously shelved preserves to make room for what is coming up in your current garden.

I can’t even begin to share with you just how excited I am about this! With all the recent hot weather and the lack of desire to cook dinners, I am actually looking forward to making this a meal a couple of times a week, different meats, different dressings, different additions. Plus it’s the bonus of eating all the leafy greens that don’t normally keep well, like some of the other produce I grow to preserve. And that’s not even taking into consideration all the edible flowers that abound this time of year (such as culinary lavender and dandelions)!

As you can see here, with how beautifully this all mixed together I’m positive your imagination has already added in additional ingredients to make this meal individually you!!!

Here’s the cut files that were newly released this past week. New files are released every Monday!

Processing…
Success! You're on the list.
Advertisements

Just A Touch of Spice

Long before I met my husband, his father had made and gifted him (and his siblings) a handmade spice rack. For well over a decade, we had intentions of displaying this gift and filling it with spices. However, the convenience of buying spices really took away the need of using the tins.

A few years ago I played around with my dehydrating skills and found new seasonings to cook with that I never thought of making.

I love mushrooms. There’s a gentle earthiness that comes with using them in a recipe. And when your family doesn’t go out of their way to eat mushrooms, I sneak them into sauces by dehydrating the mushroom and then grinding them down to a powder with a spice blender. Now I can have the benefit of having the flavor profile without my family seeing it and making their picky faces.

My absolutely favorite “spice” to cook with is actually butternut squash. I roast the squash in my oven. When it’s finished cooking I remove the flesh from the skin and mash it. From there, I take the mash and spread it across the fruit roll up tray of my dehydrator. Once the mash dries out, I also put that in my spice grinder and turn it into powder.

Here’s the absolutely most beautiful thing about turning your vegetables into powder! If you have a child or family member who turns their nose up at even the mention of vegetables, you turn it into a powder and season your food with it and your family has absolutely no idea that they are eating vegetables!

Not only this, but if you’ve made sauces before you are fully aware of how the traditional flour and corn starch have no benefit of flavor. You have to remember to cook down your flour. And if you use too much corn starch, and have sensitive taste buds, you can actually taste it. So there’s the issue of the texture; corn starch has a different texture and appearance than flour. But…instead of using these two traditional thickeners you can use dehydrated vegetables.

I prefer using potato flakes over flour and corn starch hands down. You can use potato flakes minutes from finishing your cook time. So if you forgot to cook flour to make rue, you have potato flakes. If you hate making slurry with corn starch and then wait for it to set, use potato flakes. I’ve had slurry take anywhere up to 10 minutes to take effect. But with potato flakes, it’s generally set in about two minutes.

That is my #1 mom hack of thickening a sauce, stew, or soup.

My #2 mom hack is using butternut squash instead of sugar!

If you’ve made your own tomato sauce before, you know the debate among the community: use sugar or not. Sometimes you need that sweetness to balance out that flavor profile. However, if you’re trying to eliminate sugar, or keep it to a minimum, what do you do?

You add butternut squash powder!

It’s sweet. You have an added vegetable in your meal. Plus, you have the added bonus of having yet another thickening agent that is healthy for you.

Advertisements

You would think, for as much as I make seasoning and thickening agents from vegetables, why haven’t I grown my own herbs yet?

It wasn’t until this year that I set out, with intention, growing herbs. And it was a great thing that I focused on herbs this year.

A family member tested positive this year with the strain of covid with assaults the gastro-intestinal track. But I had fresh herbs on hand that are anti-viral in nature, giving your body the building blocks to strengthen your immune system to do its job that it was designed to do.

Bay leaves are anti-viral, good for your body no matter which virus your body is fighting.

Lemon balm is also an anti-viral, but its properties are good for the whole coronal family of viruses. So it’s good if you test positive or if you’re fighting off the common cold (it’s from the same family).

So with these two herbs, and my homemade chicken stock, I had the building blocks to make a broth for this family member. Because their GI was being affected, of course food is sounding pretty horrible compared to other strains. To this broth, I added other herbs that I knew were beneficial for delicate GI and combating nausea; ginger, mint….

I’m still working on the recipe to making it recreatable. But I know I’m on the right track because this family member asked me to make a second batch of broth, because it tasted good AND it soothed their stomach so they could get some nutrients into their body.

The whole point of the broth was not to cure them from the virus. The whole goal was to get the nutrients into their body for them to get their body everything they need to fight the virus. Our bodies are amazing things. They’re meant to fight off disease. We just need to give them the building blocks to do their job.

And that is what is amazing about growing a garden. Whether you’re growing food to put on the table or growing herbs to make food taste better without all the extra ingredients in the now $6-10 bottles of seasoning at the store (sometimes more, and if they’re on the shelf).

Consider what it is that you can grow for your family. You may not have the yard to grow a garden. But with a sunny window, you can grow a few easy low maintenance herbs that are good for fighting colds and viruses. I buy bay leaves, because I don’t have the space for a bay tree. But Lemon Balm can be grown in a pot in a sunny window. And the mint family (which lemon balm comes from) is prolific and among the easies things you can grow. Plus it’s something that you plant once and it will keep coming back and grow.

Please comment below with the herbs you grow or with any hacks you have for using vegetables in a new way!

The file, Seasoning Labels, I used for these herb layers are now live in my shop here. The file comes with the labels oval in shape. To create these in the round, I just resized the oval into a circle. This font is amazing for retaining its shape!

Processing…
Success! You're on the list.

Leave a comment

Would You Like a Cuppa?

It’s funny how beverages of choice are so regional. For example in the United States, there has historically been a continental divide between coffee drinkers and tea drinkers. Tea has been pretty regional for the East Coast and Coffee the West.

The history of this divide started around the foundation of this country. We all know about the Boston Tea Party and how they threw tea over the sides of the ships, all over a 3 cent rise in taxes. (I find this historical fact both interesting and funny in the context on how there has been upwards of 14% inflation on so many products across the grocery shelves.)

Coffee started making its footprint in the United States with the colonization (and yes, even subjugation) of the Caribbean Islands and South America. But it found its biggest consumers with the people who moved west, not just the Mid-West but also the West Coast and upwards into Alaska.

In fact, before Starbucks became established and took over every major street corner, I grew up where you could tell whether your family was West Coasters or from back East. If your family had spent a few generations on the West Coast, you had a coffee pot in your kitchen. I grew up with many people whose grandparents drank tea, but their parents, coffee. Those were my New England transplant friends. And then in High School I made friends with a transfer student, who came from Virginia. She hated coffee and only drank tea.

What is funny is what the transition from tea drinking family to coffee drinking family looks like.

A set of grandparents came up from the Texas area. One was Texan, coffee drinker, and the other was from the Deep South. The only tea that was in this grandparents’ house was sun tea. And there was only ONE way to make it–so obviously a tea drinker. Every summer there was sun tea that was made, that beautiful dark golden brew. There is really nothing like it. Mind you, this isn’t the sweet tea that you will find in the Deep South, where verbal wars can be started on the proper summer time tea. Just good strong, dark, rich sun tea.

Now my parents were both coffee drinkers. And yet almost each summer growing up, my mom would brew at least one sun tea.

This dedicated coffee drinker, I’m a very picky tea drinker and it was only this summer, when the sun finally came out that I caught myself thinking “I need to make some sun tea”. You can imagine the “What the– where did that come from?” moment I had because I don’t make sun tea. And yet this summer was it.

So that prompted me to ask on my social media for recommendations and recipes from my tea loving friends who have the tea that even a coffee lover would love. Obviously the majority of my friends and acquaintances are coffee drinkers because I only had a few responses. But the responses that I received shocked me because I never knew about these teas and they never crossed my mind.

The following yellow product buttons are affiliate links. I earn a commission off of these products at no additional cost to you.

Mint Sun Tea

One recommendation sent to me was:

  • 1-2 Regular Tea Bags
  • 3-5 Bags of Mint Tea OR Fresh Mint Leaves

Add the above tea bags into a glass gallon jug of water (which you use to brew your sun tea). Brew for 2-3 hours, in the sun, or longer if you want your tea stronger or you’re sun is hiding behind clouds.

When finished brewing refrigerate.

This friend also said that she adds honey into the tea before refrigerating.

I was excited about this recipe because my absolute favorite tea is Stash’s Moroccan Mint Green Tea. If I’m craving tea, this is the one I hunt for because it has the world’s best flavor. I’ve tried to get into the Green Tea fad, but I find the vast majority of green tea either tastes like grass or soap. (I’ve recently learned that the majority of people who don’t like cilantro is because of it tasting like soap. There is actually a chemical compound in these green that to certain taste buds taste like soap. So this is real and there’s a reason!)

If you’re like me, and not a green tea person, seriously try this one. It’s not just me. I have a friend who use to be a Japanese tea distributor, says that she’s extremely picky, and assures me that this tea is one of the greatest to make a sun tea with!

This friend is currently cooked with brewing Chai with Hojicha, Green Tea with Self Healing and fresh mint from her garden.

Strawberry Tea

This one surprised me when a friend suggested this. I don’t know why I never thought of fruit sun teas. Fruit just makes sense because of summer. Strawberries are appealing because I’m growing them and I love strawberries. And the recipe passed on is super simple.

  • 6-8 Strawberry Tea Bags
  • Strawberry Puree

In your glass gallon jug of water (which you use to brew your sun tea) add the Strawberry Tea Bags. Brew for 2-3 hours, in the sun, or longer if you want your tea stronger or you’re sun is hiding behind clouds.

Once your tea is done brewing, remove your tea bags and chill your tea. If you can’t wait, pour your tea over a glass filled with ice. Mix in strawberry puree for a stronger strawberry flavor. If you like sweet tea, add sugar to your liking.

Sweet & Spicy

This one was recommended by two different friends, one from Tennessee and one from Texas.

This tea I found intriguing because the ingredient list reminds me of staple recipes from Asia. In fact, reading the ingredients made me start craving Thai!

I’ve been assured that these tea bags alone are all you need for some of the best sun tea you’ve ever had. And since I grew up on sun tea made from plain Lipton tea, I can see how this is going to be amazing!

Along this line of tea, I was also introduced to the idea of Cinnamon Tea. This blew my mind!

I’ve never heard of Cinnamon Tea before. And I learned that 2 cinnamon sticks in about 4 cups of boiling water will give you a nice tea.

This is definitely on my list to make once fall comes. I love cinnamon, but I’m on a kick with my mint right now. However, my Chocolate Mint might need the cinnamon to bring it to the next level. It’s still missing something for me, and this might be it!

Natural Sweetener Alternatives

There are various reasons why people choose an alternate to sugar for sweetening foods and beverages. I’m personally leery about many sweeteners because the last thing I want to do is add more chemicals into my diet. So when it was brought to my attention that Stevia is a plant based sweetener, this product had my attention.

I’m hooked on the idea now that I have located stevia plants to add to my garden. So I will soon be growing this and learning how to make sweetener.

My mom has cooked with stevia and says it does well with baking. She also used it with alternate flour sources.

I’ve used the packets of stevia and sprinkled in my large water cup and 4 leaves of mint. So with nothing to hide, I was able to taste the stevia. I didn’t notice any off flavors that I’ve noticed with other sugar alternatives. The flavor is slightly different than sugar, but not enough of a difference for me to say it’s “different”. The huge bonus I can say about it is that I like how stevia melts into the water. If you’ve added sugar in cold water you know how much of a gritty feeling there is until the sugar has been well stirred and sat for a while. That’s not the same experience I had with stevia. I only had to give a good stir and I was good to go. No textural difference.

When my mom gifted me stevia, I seriously wondered what I was going to do with it. Other than just keep it in my cupboard for when my mom visits. Now I know what I’m going to do with this natural sugar.

I recommend giving this sugar alternate a chance.

Here is the packets:

And the bag:

Looking for an alternative to tea?

I know that there are still some people who just do not lean towards tea drinking at all. Or maybe you’re looking for a tea that is kid friendly. There is one more option I have for you.

Infused Water

While waiting for some good leads for sun tea, I instantly ran across a post from on of my favorite bloggers. She just got me hooked on putting fresh mint leaves in my chilled water!

I have a 36 oz. water “cup” that I use to make sure I get my daily water in. The only thing I add to my water is 4-6 leaves from my mint plant of choice. Before you put the leaves in your cup, stack and roll them up, crush the leaves in your fingers, and then add them to your water. By crushing the leaves, you break open the cell walls of the leaves and release the oils within.

The best part about using fresh leaves from your garden (or produce stand if you haven’t yet planted fresh herbs at your home) is that you are not only drinking something tasty, you’re giving natural medicine that give your body the building blocks to bring you back into or keep you in health.

What I recently learned is that by putting mint leaves in your water, it can help combat ailments such as GERD (Gastro-esophageal Reflux Disease). I personally am not afflicted with GERD, but summer heat does a number on my body. Not only is my appetite affected, but I’m more prone to upset stomach. In fact, my stomach was upset when I first put mint in my water cup. By the time I finished drinking that cup, my stomach was back to normal. And since I’ve been using the mint daily, it hasn’t returned.

Anyone who works with herbs will tell you that the mint family does have properties that benefit your gastrointestinal system. I love learning about these things, because I try to keep off of as much over other the counter or prescribed medication as I can.

Here are some ideas of what mints you can use:

  • Mint
  • Chocolate Mint
  • Pineapple Mint
  • Orange Mint
  • Lemon Balm
  • Spearmint
  • Peppermint

And there are other types of mint that you can find at your local nursery for produce stand that sells starts. Better yet, maybe your neighbor has a mint they are growing. For example, I have Chocolate Mint and Spearmint. I had Orange Mint, but this crazy spring may have killed it. (I thought it died on me, but I recently saw a new sprig come up from the soil. I’m waiting for it to grow a bit bigger before seeing if it’s Orange or Chocolate.) One neighbor has Lemon Balm. Another neighbor has Pineapple Mint. And I only found out what my neighbors were growing by telling them about what I’m growing and what new projects I’m working on with my herbs.

Here are the flavors of the mints that I’ve tasted.

Chocolate mint just tastes like mint to me. The reason why it got its name is because when you crush the leaves, it stains your fingers brown like milk chocolate. I mentioned before that I’m very particular about my tea. I found my pickiness kicking in on putting this mint in my water. A tiny sprinkling of Stevia was just enough to pull this infused water around to allow me to drink this. Even though I found I could drink this, none of my kiddos liked this flavor. Instead, two of my boys leave my water alone if it has mint, because of this one. So mamas, if you want your water left alone, this one may do it for you!

Pineapple mint really does smell like pineapple. I can’t wait to get this in my water, because it smells like a Piña Colada. My neighbor just gave me a few sprigs this evening so I’m excited to try them tomorrow!

Lemon Balm, I swear it tastes like lemon! I usually don’t keep lemons in my house because they turn on me before I use them. However, I’ve used lemon balm in my chicken broth and it tastes just like I squeezed in some fresh lemon. You better believe that I have a new friend in my kitchen. I’m so using this herb instead of lemon or lemon zest.

Spearmint brings back so many fond childhood memories of incessantly chewing Wrigley’s spearmint gum. And yes, I’ve almost picked my spearmint plant bald for my water. And this is the infused water that my youngest will still steal my water. So this mint gets my recommendation if you’re looking for an herb infused water that is kid friendly.

I so hope you’ll join me in dressing up your water this summer!

What’s your favorite water infusion or Sun Tea?

I’m still looking for new ideas on sun teas in particular. But I want to hear what everyone is drinking right now to stay hydrated. Please comment below!

Processing…
Success! You're on the list.

Leave a comment

Easy Cheesy

Since last week I continued my experimenting with whey and I wanted to do a follow up post on what I learned. And this information is important because of the inflation, the items that are starting to not be stocked in the grocery stores, and supply chain issues.

So whether you are trying to be more efficient with how you spend your grocery budget, or if you’re trying to find a replacement for the things you cannot find on the shelves here are some ideas for you.

First, for those of you who are dependent on keeping some probiotics in your diet for your guy health, know that whey gives you a better option for probiotics. Check the label on your yogurt with probiotics. It’s been brought to my attention that those yogurts often have higher sugar content than other yogurts. If you’re not up to making your own yogurt, you can buy greek yogurt, stir in whey and you have a probiotics yogurt, at a better price, and lower sugar content.

If you make a dressing at home (for example we make Ranch) from a packet/scratch, switch out the milk content for whey. If your dressing calls for water instead of milk, still use whey instead of water. This simple switch automatically adds gut healthy probiotics and gives you the same dressing. The whey will impart a hint of lemon to the final product, but that gives new life to a favorite condiment that you take for granted or no longer excited about.

Whey also solved a problem that we had with the Ranch dressing we’ve experienced for the last 6 months or so. For whatever reason, the dressing (same recipe we’ve been using for years) always separated after a week. I was tired of this waste, and got excited when I came across an article that talked about how homemade mayonnaise normally lasts a week. However if you add whey into your homemade mayo, the shelf life increased for one week to a month. That was what caused me to substitute out milk for whey in our Ranch dressing mix. We are approaching two weeks and my dressing no longer separates. It hasn’t turned bad yet either.

So if you’re looking to extend your shelf life on a mix, look to whey.

Do you remember the list, I posted last week, about uses for whey?

I’ve been working my way through that list.

Here is everything that I got out of that first gallon of milk:

  • 1.5 pounds of Mozzarella Cheese
  • 4 loaves of Bread
  • 1 jar of Ranch dressing
  • 1 batch of homemade Doughnuts (which my boys and husband’s coworkers couldn’t eat enough of)
  • Pizza dough (enough for 2 large pizzas)
  • 66g of Ricotta Cheese
  • And I froze the whey left over whey before it went bad for 5 more loaves of bread.

I couldn’t believe how much I got out of 1 gallon of milk! If I had used milk for all of that, instead of whey, I would have used at least 2.5 gallons of milk.

How great is that?!!!!

Advertisements

More Cheese

I know that even with my first time experience, there’s a chance that someone might still be uncertain of making cheese. So I wanted to make Ricotta from the mozzarella whey. And Ricotta is the absolute easiest cheese to make.

If you were leery trying to make Mozzarella for the first time, try Ricotta!

Now above I already stated that I was able to recapture 66g more cheese by making Ricotta from the Mozzarella cheese. This was not enough Ricotta to make a lasagna dinner with for my family. So that same day I grabbed a gallon of milk from my fridge and made Ricotta from a second method.

Get ready to make the easiest cheese from one of these two methods!

Advertisements

Traditional Method From Whey

Before I made this first batch of Ricotta, I had already used about half of my whey from making Mozzarella. (I share this with you in case you’re reading these two methods to see which is going to yield you the most cheese–yes, I see you!)

With the traditional method, you put your whey into a stainless steel pot and turn on the heat to medium low.

That is it. You let it warm up to 200°F. There are small bubbles that start to form around the edge of the pot. Don’t be afraid if you don’t see Ricotta forming until the whey reaches in the neighborhood of 140°F. That was about the temperature that I started to see some action take place.

Once you reach 200°F, turn off the heat and remove the pot from the burner.

The instructions, that I followed, said to immediately remove the cheese and drain it.

Now Ricotta has smaller curds of cheese than mozzarella, so this time I used a cheese cloth to strain the curds from whey.

The instructions said to let the cheese drip dry for 2-8 hours depending on how dry you want your Ricotta. I had very gently squeezed the whey out and hung it to dry for an hour and a half before I taste tested it. It was already too dry for my liking and tasted like chalk. The instructions never told me to salt the Ricotta. So I’m going to tell you, salt the Ricotta.

Tip: Salting Ricotta is easier when it is warm instead of cooled from the drying process.

This is the left over whey that I put in the freezer to make 5 more additional loaves of bread. I pre-portioned the whey out into baggies so that all I have to do is defrost the whey in the fridge, the day before bread making day, and I don’t have to measure it out again.

The great news about this method, of Ricotta making, is that even though I didn’t stir the whey during this cooking process, my pot was clean on the bottom.

This traditional method is right in the skill level of my 6 year old’s cooking level. So if you were nervous or afraid of making Mozzarella, rest easy and KNOW that YOU CAN DO THIS! I have every confidence in you.

Advertisements

Ricotta From Milk Instead of Whey

As I already mentioned, 66g of Ricotta is not enough for a lasagna dinner. It is enough to make a spread out of and eat it on top of a toasted bagel.

I grabbed a fresh gallon of milk, the Ricotta recipe from the beginner cheese maker kit (that I shared last week) and tried a different method of making Ricotta. The Recipe I used called for whole milk and a couple of cups of heavy whipping cream. All that I had in my fridge was a gallon of 2%. So that is all that I used. From just 2% milk, I yielded 630g (1.4 lb) of Ricotta.

Into my stainless steel pot I added the milk, 1 tsp. Citric Acid, and 2 tsp. Non-iodinated salt. Turn the burner to low-medium heat. Leave the milk alone until it reaches 140°F. Then you scrape the bottom of the pan with a rubber/silicone spatula. Do not touch it again until you see the cheese layer, on top, crack and the whey start to boil up through that crack(s). Turn the burner off and put the pot on a cool part of the stove. Cover the pot and let it sit for 20-30 minutes.

Strain the Ricotta through a cheese cloth, inside a fine mesh strainer.

In this method, instead of air drying I used my spoon (or you can use your silicone spatula from earlier) and pushed the Ricotta around in the cheese cloth. The whey naturally separates without the gentle squeeze or drip drying. And while you push the Ricotta, take a pinch of salt at a time and season the Ricotta to taste.

You are in control of how salty your Ricotta tastes. And you are in control of the sodium content, for those who are on a low sodium diet.

I stopped pushing my Ricotta when I got to the creamy texture that I prefer. If you prefer your Ricotta to be drier and you’re not able to get it from just pushing the cheese in the cheese cloth, go ahead and hang it up to air dry in the cheese cloth. I recommend checking on your cheese every half hour just to make sure that you do not get too dry.

Tip: If your Ricotta gets too dry and you just can’t eat it like that, don’t worry. Mix in a little whey at a time to re-wet your cheese. If it becomes too wet, hang it up to dry again.

The only problem that I had with this method of making Ricotta is that the heat was a little higher than I did with the first method. The bottom of my pan did start to scorch, as you see here.

Even with this level of scorch, the flavor of the cheese was not harmed. But it was a close call. Moving forward, I know that my stove needs to remain at a medium Low temperature.

The next time that I make Ricotta from this method, I’m going to drop my heat a little BECAUSE I know that my stove runs HOT. I am forever reminding my husband to drop the heat when he cooks because it slips his mind that our stove does this and he has burning issues. He’s a good cook, he just expects our hot stove to behave like a normal stove and it just doesn’t.

Tip: Know your stove. If your stove runs hot, drop the heat a little lower. If your stove runs cooler, add a little more heat.

Advertisements

Differences in Whey

There is a difference in the appearance of the whey from Ricotta compared to the whey from Mozzarella. The Ricotta whey was not as clarified.

Independence Day weekend is very busy with my family, so I have yet to put the Ricotta whey into the pot and run a second batch. But as you see here, there is a lot of material left in this whey that I anticipate a greater return in additional Ricotta (vs. what I pulled out of the Mozzarella whey). I have time to food prep coming up early this next week. So be sure to sign up for my newsletter below and I’ll email you the results of this second run in my 7 July 2022 email. (If you are reading this past the email date, please comment below and I’ll respond with the results that I found).

Over all…

I’m excited to have cheese in the house that only has 3 ingredients: milk, citric acid, and salt. In a day and age where the ingredient lists grows longer and longer, this makes me feel good about the food I cook my family. Even more so, I learned new skills that I can teach my boys that I don’t have to wait until they’re older for them to make.

I am also happy that I have healthy probiotics on hand that I can add to as a seasoning and milk alternative to other recipes.

Please walk away from today with ideas on how to stretch your milk ingredients and add more nutrients into your other foods.

An idea that just popped into my head, how whey would work with making risotto. I know that I’ve made it with wine and also with chicken broth. So it makes me curious. I may have to try this out for dinner later on this week!


If you’re interested in making a Ricotta spread (which I use for my bagels), cut up some fresh herbs and mix it in with your cheese. I used the leaves from two sprigs of Italian Oregeno, from my garden, and used enough Ricotta for two bagels.

Use your imagination with the herbs that you have on hand.

Processing…
Success! You're on the list.

Leave a comment

Advertisements