Fresh From The Garden

(This post contains affiliate links to products. We may receive a commission for purchases made through these links, but at no extra cost to you.)

I am so happy that the recent sun and high heats have hit my garden the last couple of weeks. The spring here has been cold and wet and I second guessed, third guessed, and fourth guessed whether my spring plantings were going to be viable in making produce.

The great news is that my leafy greens are all doing well and have come to maturity for harvesting. My tomatoes are finally putting forth fruit. Truth be told, I keep looking for more blossoms and hunting for more new fruit. I really want to put away more pasta sauce and try my hand at tomato paste. Usually we just go through so much sauce that I really don’t get the opportunity to make anything else. So fingers crossed, I am so hoping to make other tomato products.

My corn is finally starting to outgrow my oldest child. Fortunately I drive past farms that grow fields of corn, so I compare my humble hobby garden to the professionals. And I’m glad that my few rows of corn are keeping pace with the large farms. So there’s hope. And particularly since I grew popping corn last year, for the first time, my boys are hooked with “our” popcorn. And I planted more corn than I’ve ever done before in hopes of making a year’s worth of popping corn. When the ears have matured, I’ll make a post on this so you can know which types of corn to grow to make your own popping corn. Also, you can see just how easy it is to make pop corn. Other than the wait, making pop corn is super easy!

I won’t go into all the details of everything that I’ve grown this year, but I will end here by stating that my fall seeds have already sprouted and are doing so much better than my spring planting. And even today, I’ve come across so many videos on YouTube talking about what crops you can plant in August and still harvest in the remaining time for this growing season. So if you are curious to try your hand at growing something before fall hits, there is definitely still time!

Fresh is what’s for dinner!

Out of the five items I harvested from my garden this morning, I used three of them for dinner tonight; Cabbage, Bok Choy, and Mizuna.

If you’re asking, “what is mizuna?” believe me, so did I. This past fall I bought seeds from Baker Creek. (Not an affiliate link, just a great product.) When I got that delivery I found out that the gift packet of seeds I got from them was mizuna. I had never heard of this green before. So I took a chance and grew it on the blind. And tonight I found out that it is a type of bitter green. Some of the bitter greens are quite bitter and I have to douse restaurant salads that come with them, because they’re so bitter. However the mizuna is not so strong. It has a mild bitter flavor, but is not bad at all if you’re sensitive to the bitter profiles, like I am.

Advertisements

Knowing that I have so many green to bring in starting tomorrow and for the next week or so, I had to come up with a new idea on how to use them. Other than dehydrating my greens and turning it into a powder to use in countless recipes, I can’t think of a way (other than freeze drying, but I don’t have that machine yet) of preserving them without becoming a wilty mess. Granted Cabbage is good for kraut and ferments–which I will be doing when I get a few more heads ready for harvest. Once my green cabbage comes in I’ll post an amazing Italian ferment that I found. And with the red cabbage I’ll post on making a red kraut. So there are a few things to keep an eye out for.

Back to dinner, I needed to find a use for these three greens to make dinner. Cabbage and Bok Choy can both handle some cooking. But one look at Mizuna and I knew I couldn’t do a stir fry with it. It’s definitely a salad green.

But Asian sounded so good!

And that’s when inspiration hit. Two of the three greens could handle the heat, so I cooked my rice and chicken in a marinade (Mr. Yoshida’s Original Gourmet).

While everything cooked, I prepped the greens.

For a single plate I used (from top to bottom) 4 stalks of Bok Choy, a few leaves of Cabbage (the head was small, so I used about 5 leaves), and 4 stalks of Mizuna.

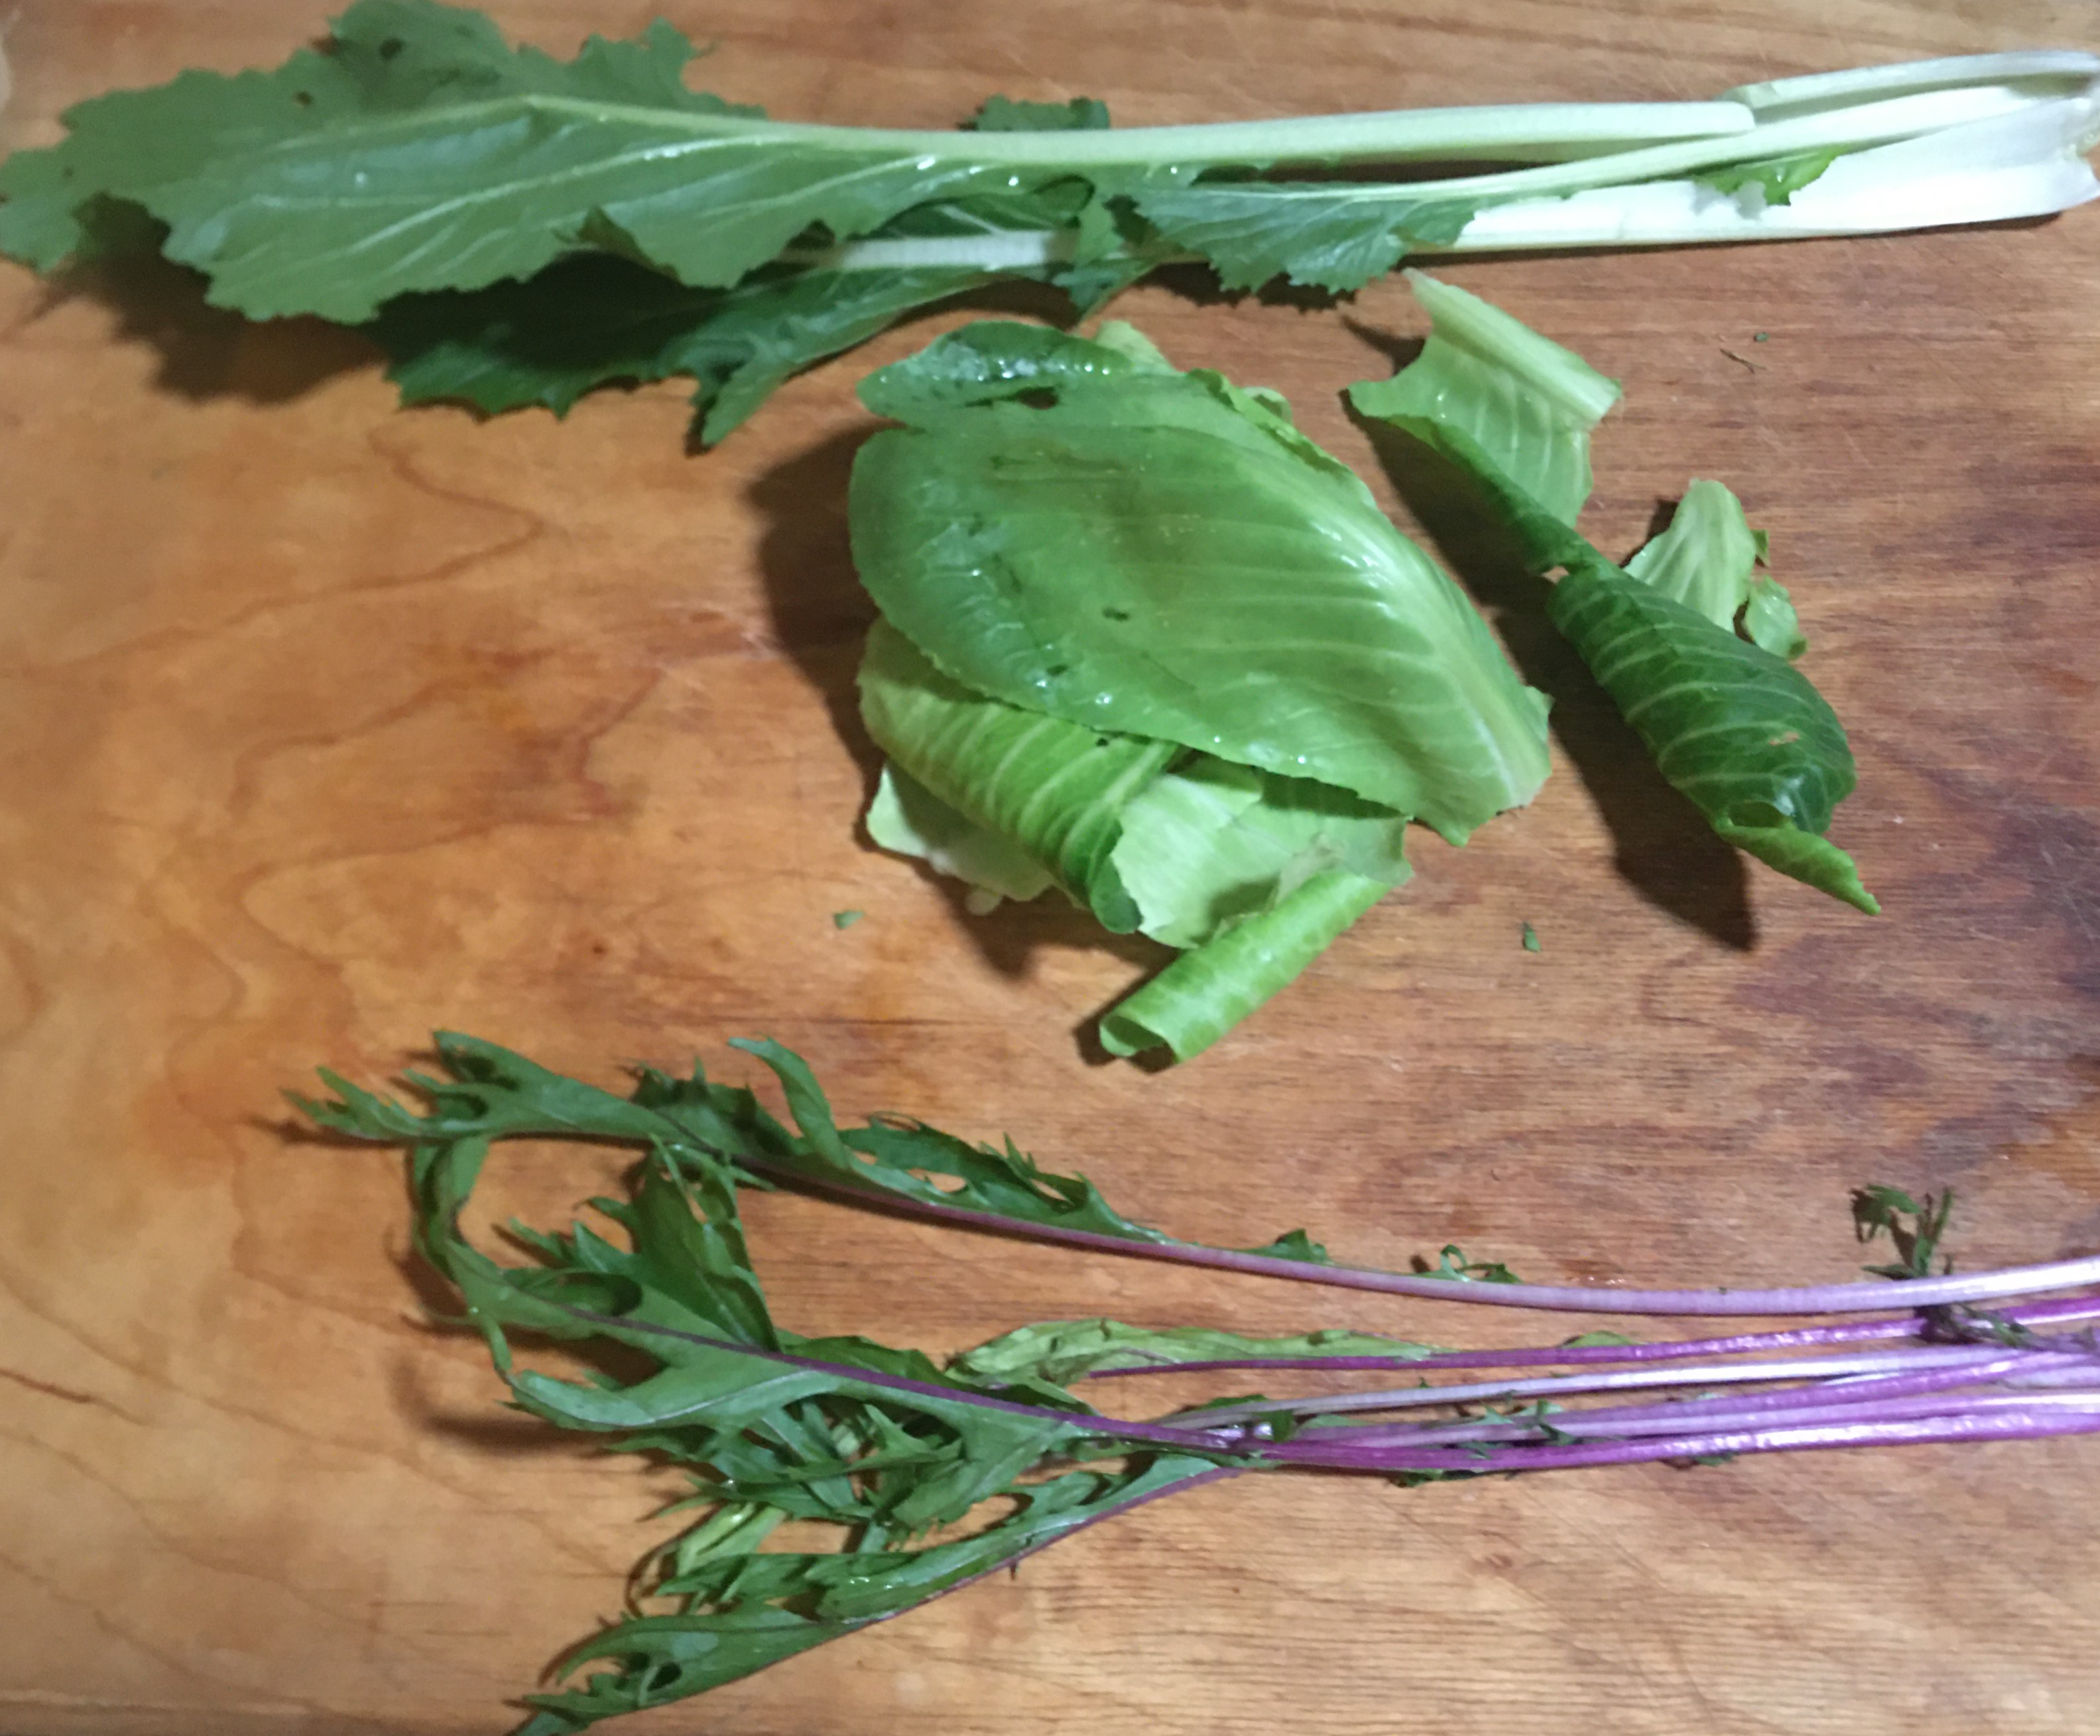
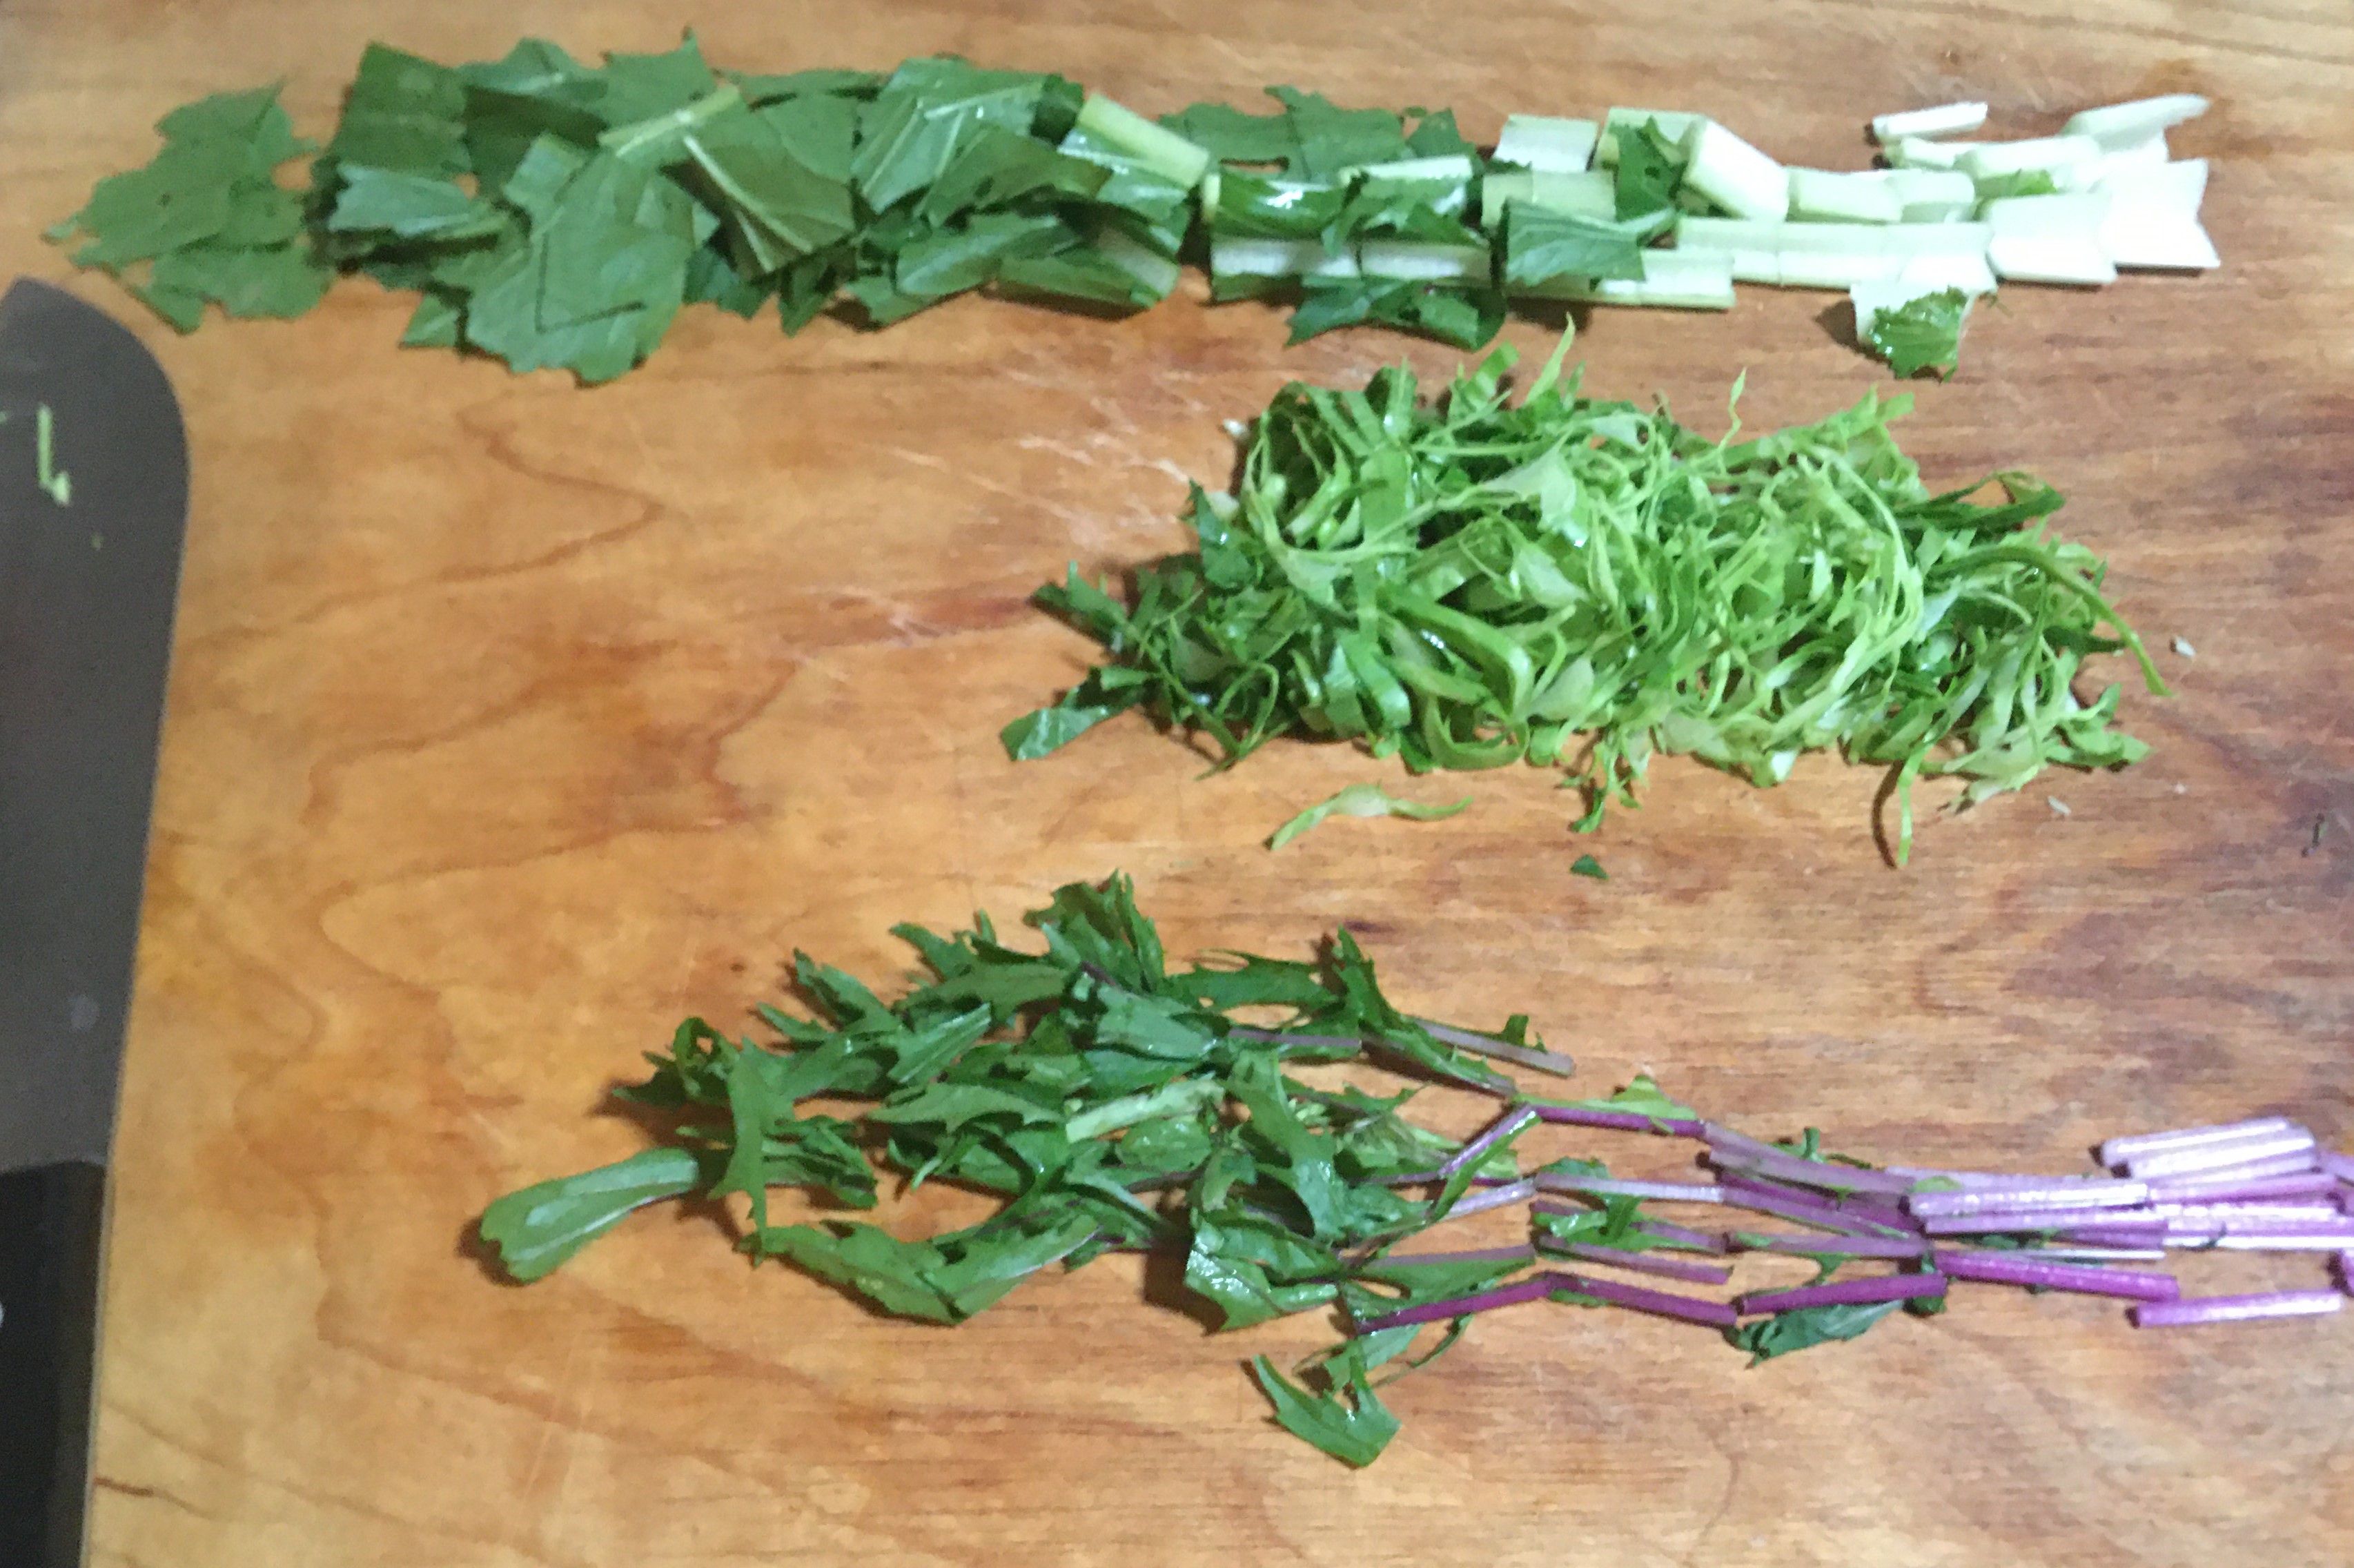
The Bok Choy and Mizuna I chopped. Because the cabbage is raw, I rolled the leaves together and julienne cut the leaves. Once these are cut, they just mix together easily like this.

I usually dread buying mixed salads at the store because either their mixes don’t taste good to me, are old, don’t keep long in the fridge, or all the various recalls over the last few years. Now that I have these greens ready to pull from my garden (plus spinach once it reaches maturity), I can put together a salad mix that is far superior than what’s found in the stores AND it takes less time than driving to my local store (about 4 minutes away).

The great thing about this mix combo is that I can place hot rice right on top of the salad and it retains its crisp texture. Cabbage isn’t phased by the heat. Bok Choy naturally can be cooked for a couple of minutes and keep firm texture in the stalk with mild wilt in the leaf, but retain full pleasurable taste. Mizuna, I fully expected to not hold up to the heat, just because it did wilt in the time between me rinsing the greens off and making dinner.

All in all Mizuna acted much like Bok Choy. The greens did wilt. BUT the beautiful purple stalks remained crunchy just like the Bok Choy stalk.

Top off the salad greens with rice, and then marinated chicken. And as a side note, left over chicken is just as perfect as having warm chicken. I ate this both ways.

You can see here that the rice I had on hand in my kitchen is basmati rice. I couldn’t have picked a better rice for this dish. White (short or long grain) rice tends to be sticky and would just be globular bunches of rice on this dish. Brown rice could be used. But if given the choice between basmati and brown rice, I would pick basmati for textual reasons. But know that you can choose your favorite rice.

Alternate Ingredients

I don’t have much experience with grain alternates to rice. I wouldn’t recommend quinoa (too nutty for this flavor profile), potato, or riced cauliflower(too gummy of a texture). Couscous could work, especially if you use a different marinade for the chicken.

If you didn’t want to use Mr. Yoshida’s Original Gourmet, Teriyaki would be just as perfect for this rice on salad. Sweet and Sour would be a fun alternate. I’m leaning toward trying the next time I make this, using a honey ginger sauce. And maybe you’re not into a sauce at all, for any dietary reason, but prefer vinaigrettes. You are most certainly not limited in how you dress your chicken or rice.

And once you opt for a different dressing, you can make any of your other alternate grains work in the place of rice.

You’ve also then opened up the window for other additional ingredients. Have garbanzo beans that you’ve been looking for something new to make with it? What about dehydrated fruits or vegetable chips? Pomegranates, fruit slices (fruit or canned)… as you can now see, you can really turn your salad on its head with adding a heated element on top of something traditionally thought of as being a cold entre. You can use dehydrated or preserved ingredients–especially if you need to use up some of your previously shelved preserves to make room for what is coming up in your current garden.

I can’t even begin to share with you just how excited I am about this! With all the recent hot weather and the lack of desire to cook dinners, I am actually looking forward to making this a meal a couple of times a week, different meats, different dressings, different additions. Plus it’s the bonus of eating all the leafy greens that don’t normally keep well, like some of the other produce I grow to preserve. And that’s not even taking into consideration all the edible flowers that abound this time of year (such as culinary lavender and dandelions)!

As you can see here, with how beautifully this all mixed together I’m positive your imagination has already added in additional ingredients to make this meal individually you!!!

Here’s the cut files that were newly released this past week. New files are released every Monday!

Processing…
Success! You're on the list.
Advertisements

Just A Touch of Spice

Long before I met my husband, his father had made and gifted him (and his siblings) a handmade spice rack. For well over a decade, we had intentions of displaying this gift and filling it with spices. However, the convenience of buying spices really took away the need of using the tins.

A few years ago I played around with my dehydrating skills and found new seasonings to cook with that I never thought of making.

I love mushrooms. There’s a gentle earthiness that comes with using them in a recipe. And when your family doesn’t go out of their way to eat mushrooms, I sneak them into sauces by dehydrating the mushroom and then grinding them down to a powder with a spice blender. Now I can have the benefit of having the flavor profile without my family seeing it and making their picky faces.

My absolutely favorite “spice” to cook with is actually butternut squash. I roast the squash in my oven. When it’s finished cooking I remove the flesh from the skin and mash it. From there, I take the mash and spread it across the fruit roll up tray of my dehydrator. Once the mash dries out, I also put that in my spice grinder and turn it into powder.

Here’s the absolutely most beautiful thing about turning your vegetables into powder! If you have a child or family member who turns their nose up at even the mention of vegetables, you turn it into a powder and season your food with it and your family has absolutely no idea that they are eating vegetables!

Not only this, but if you’ve made sauces before you are fully aware of how the traditional flour and corn starch have no benefit of flavor. You have to remember to cook down your flour. And if you use too much corn starch, and have sensitive taste buds, you can actually taste it. So there’s the issue of the texture; corn starch has a different texture and appearance than flour. But…instead of using these two traditional thickeners you can use dehydrated vegetables.

I prefer using potato flakes over flour and corn starch hands down. You can use potato flakes minutes from finishing your cook time. So if you forgot to cook flour to make rue, you have potato flakes. If you hate making slurry with corn starch and then wait for it to set, use potato flakes. I’ve had slurry take anywhere up to 10 minutes to take effect. But with potato flakes, it’s generally set in about two minutes.

That is my #1 mom hack of thickening a sauce, stew, or soup.

My #2 mom hack is using butternut squash instead of sugar!

If you’ve made your own tomato sauce before, you know the debate among the community: use sugar or not. Sometimes you need that sweetness to balance out that flavor profile. However, if you’re trying to eliminate sugar, or keep it to a minimum, what do you do?

You add butternut squash powder!

It’s sweet. You have an added vegetable in your meal. Plus, you have the added bonus of having yet another thickening agent that is healthy for you.

Advertisements

You would think, for as much as I make seasoning and thickening agents from vegetables, why haven’t I grown my own herbs yet?

It wasn’t until this year that I set out, with intention, growing herbs. And it was a great thing that I focused on herbs this year.

A family member tested positive this year with the strain of covid with assaults the gastro-intestinal track. But I had fresh herbs on hand that are anti-viral in nature, giving your body the building blocks to strengthen your immune system to do its job that it was designed to do.

Bay leaves are anti-viral, good for your body no matter which virus your body is fighting.

Lemon balm is also an anti-viral, but its properties are good for the whole coronal family of viruses. So it’s good if you test positive or if you’re fighting off the common cold (it’s from the same family).

So with these two herbs, and my homemade chicken stock, I had the building blocks to make a broth for this family member. Because their GI was being affected, of course food is sounding pretty horrible compared to other strains. To this broth, I added other herbs that I knew were beneficial for delicate GI and combating nausea; ginger, mint….

I’m still working on the recipe to making it recreatable. But I know I’m on the right track because this family member asked me to make a second batch of broth, because it tasted good AND it soothed their stomach so they could get some nutrients into their body.

The whole point of the broth was not to cure them from the virus. The whole goal was to get the nutrients into their body for them to get their body everything they need to fight the virus. Our bodies are amazing things. They’re meant to fight off disease. We just need to give them the building blocks to do their job.

And that is what is amazing about growing a garden. Whether you’re growing food to put on the table or growing herbs to make food taste better without all the extra ingredients in the now $6-10 bottles of seasoning at the store (sometimes more, and if they’re on the shelf).

Consider what it is that you can grow for your family. You may not have the yard to grow a garden. But with a sunny window, you can grow a few easy low maintenance herbs that are good for fighting colds and viruses. I buy bay leaves, because I don’t have the space for a bay tree. But Lemon Balm can be grown in a pot in a sunny window. And the mint family (which lemon balm comes from) is prolific and among the easies things you can grow. Plus it’s something that you plant once and it will keep coming back and grow.

Please comment below with the herbs you grow or with any hacks you have for using vegetables in a new way!

The file, Seasoning Labels, I used for these herb layers are now live in my shop here. The file comes with the labels oval in shape. To create these in the round, I just resized the oval into a circle. This font is amazing for retaining its shape!

Processing…
Success! You're on the list.

Leave a comment

Would You Like a Cuppa?

It’s funny how beverages of choice are so regional. For example in the United States, there has historically been a continental divide between coffee drinkers and tea drinkers. Tea has been pretty regional for the East Coast and Coffee the West.

The history of this divide started around the foundation of this country. We all know about the Boston Tea Party and how they threw tea over the sides of the ships, all over a 3 cent rise in taxes. (I find this historical fact both interesting and funny in the context on how there has been upwards of 14% inflation on so many products across the grocery shelves.)

Coffee started making its footprint in the United States with the colonization (and yes, even subjugation) of the Caribbean Islands and South America. But it found its biggest consumers with the people who moved west, not just the Mid-West but also the West Coast and upwards into Alaska.

In fact, before Starbucks became established and took over every major street corner, I grew up where you could tell whether your family was West Coasters or from back East. If your family had spent a few generations on the West Coast, you had a coffee pot in your kitchen. I grew up with many people whose grandparents drank tea, but their parents, coffee. Those were my New England transplant friends. And then in High School I made friends with a transfer student, who came from Virginia. She hated coffee and only drank tea.

What is funny is what the transition from tea drinking family to coffee drinking family looks like.

A set of grandparents came up from the Texas area. One was Texan, coffee drinker, and the other was from the Deep South. The only tea that was in this grandparents’ house was sun tea. And there was only ONE way to make it–so obviously a tea drinker. Every summer there was sun tea that was made, that beautiful dark golden brew. There is really nothing like it. Mind you, this isn’t the sweet tea that you will find in the Deep South, where verbal wars can be started on the proper summer time tea. Just good strong, dark, rich sun tea.

Now my parents were both coffee drinkers. And yet almost each summer growing up, my mom would brew at least one sun tea.

This dedicated coffee drinker, I’m a very picky tea drinker and it was only this summer, when the sun finally came out that I caught myself thinking “I need to make some sun tea”. You can imagine the “What the– where did that come from?” moment I had because I don’t make sun tea. And yet this summer was it.

So that prompted me to ask on my social media for recommendations and recipes from my tea loving friends who have the tea that even a coffee lover would love. Obviously the majority of my friends and acquaintances are coffee drinkers because I only had a few responses. But the responses that I received shocked me because I never knew about these teas and they never crossed my mind.

The following yellow product buttons are affiliate links. I earn a commission off of these products at no additional cost to you.

Mint Sun Tea

One recommendation sent to me was:

  • 1-2 Regular Tea Bags
  • 3-5 Bags of Mint Tea OR Fresh Mint Leaves

Add the above tea bags into a glass gallon jug of water (which you use to brew your sun tea). Brew for 2-3 hours, in the sun, or longer if you want your tea stronger or you’re sun is hiding behind clouds.

When finished brewing refrigerate.

This friend also said that she adds honey into the tea before refrigerating.

I was excited about this recipe because my absolute favorite tea is Stash’s Moroccan Mint Green Tea. If I’m craving tea, this is the one I hunt for because it has the world’s best flavor. I’ve tried to get into the Green Tea fad, but I find the vast majority of green tea either tastes like grass or soap. (I’ve recently learned that the majority of people who don’t like cilantro is because of it tasting like soap. There is actually a chemical compound in these green that to certain taste buds taste like soap. So this is real and there’s a reason!)

If you’re like me, and not a green tea person, seriously try this one. It’s not just me. I have a friend who use to be a Japanese tea distributor, says that she’s extremely picky, and assures me that this tea is one of the greatest to make a sun tea with!

This friend is currently cooked with brewing Chai with Hojicha, Green Tea with Self Healing and fresh mint from her garden.

Strawberry Tea

This one surprised me when a friend suggested this. I don’t know why I never thought of fruit sun teas. Fruit just makes sense because of summer. Strawberries are appealing because I’m growing them and I love strawberries. And the recipe passed on is super simple.

  • 6-8 Strawberry Tea Bags
  • Strawberry Puree

In your glass gallon jug of water (which you use to brew your sun tea) add the Strawberry Tea Bags. Brew for 2-3 hours, in the sun, or longer if you want your tea stronger or you’re sun is hiding behind clouds.

Once your tea is done brewing, remove your tea bags and chill your tea. If you can’t wait, pour your tea over a glass filled with ice. Mix in strawberry puree for a stronger strawberry flavor. If you like sweet tea, add sugar to your liking.

Sweet & Spicy

This one was recommended by two different friends, one from Tennessee and one from Texas.

This tea I found intriguing because the ingredient list reminds me of staple recipes from Asia. In fact, reading the ingredients made me start craving Thai!

I’ve been assured that these tea bags alone are all you need for some of the best sun tea you’ve ever had. And since I grew up on sun tea made from plain Lipton tea, I can see how this is going to be amazing!

Along this line of tea, I was also introduced to the idea of Cinnamon Tea. This blew my mind!

I’ve never heard of Cinnamon Tea before. And I learned that 2 cinnamon sticks in about 4 cups of boiling water will give you a nice tea.

This is definitely on my list to make once fall comes. I love cinnamon, but I’m on a kick with my mint right now. However, my Chocolate Mint might need the cinnamon to bring it to the next level. It’s still missing something for me, and this might be it!

Natural Sweetener Alternatives

There are various reasons why people choose an alternate to sugar for sweetening foods and beverages. I’m personally leery about many sweeteners because the last thing I want to do is add more chemicals into my diet. So when it was brought to my attention that Stevia is a plant based sweetener, this product had my attention.

I’m hooked on the idea now that I have located stevia plants to add to my garden. So I will soon be growing this and learning how to make sweetener.

My mom has cooked with stevia and says it does well with baking. She also used it with alternate flour sources.

I’ve used the packets of stevia and sprinkled in my large water cup and 4 leaves of mint. So with nothing to hide, I was able to taste the stevia. I didn’t notice any off flavors that I’ve noticed with other sugar alternatives. The flavor is slightly different than sugar, but not enough of a difference for me to say it’s “different”. The huge bonus I can say about it is that I like how stevia melts into the water. If you’ve added sugar in cold water you know how much of a gritty feeling there is until the sugar has been well stirred and sat for a while. That’s not the same experience I had with stevia. I only had to give a good stir and I was good to go. No textural difference.

When my mom gifted me stevia, I seriously wondered what I was going to do with it. Other than just keep it in my cupboard for when my mom visits. Now I know what I’m going to do with this natural sugar.

I recommend giving this sugar alternate a chance.

Here is the packets:

And the bag:

Looking for an alternative to tea?

I know that there are still some people who just do not lean towards tea drinking at all. Or maybe you’re looking for a tea that is kid friendly. There is one more option I have for you.

Infused Water

While waiting for some good leads for sun tea, I instantly ran across a post from on of my favorite bloggers. She just got me hooked on putting fresh mint leaves in my chilled water!

I have a 36 oz. water “cup” that I use to make sure I get my daily water in. The only thing I add to my water is 4-6 leaves from my mint plant of choice. Before you put the leaves in your cup, stack and roll them up, crush the leaves in your fingers, and then add them to your water. By crushing the leaves, you break open the cell walls of the leaves and release the oils within.

The best part about using fresh leaves from your garden (or produce stand if you haven’t yet planted fresh herbs at your home) is that you are not only drinking something tasty, you’re giving natural medicine that give your body the building blocks to bring you back into or keep you in health.

What I recently learned is that by putting mint leaves in your water, it can help combat ailments such as GERD (Gastro-esophageal Reflux Disease). I personally am not afflicted with GERD, but summer heat does a number on my body. Not only is my appetite affected, but I’m more prone to upset stomach. In fact, my stomach was upset when I first put mint in my water cup. By the time I finished drinking that cup, my stomach was back to normal. And since I’ve been using the mint daily, it hasn’t returned.

Anyone who works with herbs will tell you that the mint family does have properties that benefit your gastrointestinal system. I love learning about these things, because I try to keep off of as much over other the counter or prescribed medication as I can.

Here are some ideas of what mints you can use:

  • Mint
  • Chocolate Mint
  • Pineapple Mint
  • Orange Mint
  • Lemon Balm
  • Spearmint
  • Peppermint

And there are other types of mint that you can find at your local nursery for produce stand that sells starts. Better yet, maybe your neighbor has a mint they are growing. For example, I have Chocolate Mint and Spearmint. I had Orange Mint, but this crazy spring may have killed it. (I thought it died on me, but I recently saw a new sprig come up from the soil. I’m waiting for it to grow a bit bigger before seeing if it’s Orange or Chocolate.) One neighbor has Lemon Balm. Another neighbor has Pineapple Mint. And I only found out what my neighbors were growing by telling them about what I’m growing and what new projects I’m working on with my herbs.

Here are the flavors of the mints that I’ve tasted.

Chocolate mint just tastes like mint to me. The reason why it got its name is because when you crush the leaves, it stains your fingers brown like milk chocolate. I mentioned before that I’m very particular about my tea. I found my pickiness kicking in on putting this mint in my water. A tiny sprinkling of Stevia was just enough to pull this infused water around to allow me to drink this. Even though I found I could drink this, none of my kiddos liked this flavor. Instead, two of my boys leave my water alone if it has mint, because of this one. So mamas, if you want your water left alone, this one may do it for you!

Pineapple mint really does smell like pineapple. I can’t wait to get this in my water, because it smells like a Piña Colada. My neighbor just gave me a few sprigs this evening so I’m excited to try them tomorrow!

Lemon Balm, I swear it tastes like lemon! I usually don’t keep lemons in my house because they turn on me before I use them. However, I’ve used lemon balm in my chicken broth and it tastes just like I squeezed in some fresh lemon. You better believe that I have a new friend in my kitchen. I’m so using this herb instead of lemon or lemon zest.

Spearmint brings back so many fond childhood memories of incessantly chewing Wrigley’s spearmint gum. And yes, I’ve almost picked my spearmint plant bald for my water. And this is the infused water that my youngest will still steal my water. So this mint gets my recommendation if you’re looking for an herb infused water that is kid friendly.

I so hope you’ll join me in dressing up your water this summer!

What’s your favorite water infusion or Sun Tea?

I’m still looking for new ideas on sun teas in particular. But I want to hear what everyone is drinking right now to stay hydrated. Please comment below!

Processing…
Success! You're on the list.

Leave a comment

Shake That Card

Maybe it’s because of my inner child. Maybe it’s because I have a house full of small children. But the one thing I can say with all certainty is that I absolutely love things that glitter and things that move.

So of course, I’m going to love shaker cards.

Have you seen them before? The few that I’ve seen in the market place have chunky glitter or confetti. Well, I’m going to show you how you can make these for yourself.

But first I want to show you how I make my own confetti. After all, why would I buy confetti when I have some absolutely beautiful scraps that I really can’t bring myself to throw out? There’s textured prints that I love and color schemes too. They make me smile. But there’s the glitter card stock. In the paper world, glitter card stock is my crack. When I have sheets in my craft room, I save it for my favorite people and special projects. So of course I want to use every splinter of that beautiful goodness.

Confetti is super simple! You just your paper scraps and cut them down to this:

Really I do NOT have that much spare time that I buckets and buckets of homemade confetti. If I have a lot of a color or paper, I do recycle those. But there’s something about mixing all your favorite textures and prints and mixing a mosaic in a bag. And this is a confetti blend that you will never find in the store.

For the shaker card I’m going to use my yellow blend. For the shaker gift tag I’m going to use glitter. Feel free to customize any of your shakers with plastic pellets, wax pellets, beads, baking sprinkles, or anything else that your imagination brings to mind.

Assembling Shakers

The possibilities for this style are endless. All you need is to build up a frame, a solid back layer, a transparent front layer, and a decorative face to sandwich in that transparent layer.

For my transparent layer, I usually lean toward laminator sheets. This is what I used for the gift tag. But this time I’m using a plastic packaging for the card. It doesn’t give the crisp window pane effect. However, I know most people don’t have laminator sheets readily on hand, and I don’t want anyone to think that you absolutely have to use that one product. If you’re a green person, this makes one less bit of unrecyclable plastic going in the garbage. So there’s that. Also, another idea is taking the thick plastic “glass” that’s found in a very cheap picture frame. You’ll need to use a blade to cut that down to shape. And you might need to score and take several passes to get a clean line. But definitely use whatever you have on hand!

Cut everything with your cutting machine.

Once everything is cut (and weeded if you’re using vinyl) go ahead and seperate everything out; card, frames, and bees (or other accessories).

The cutting files for this card and gift tag can be found here.

Assemble each group separately and set aside.

This is one time where an organized work station is going to be in your best interest. If you use my Bee Card and Gift Tag, you can understand how things can get a little intimidating. (For projects like this I always include assembly directions. I’ve chosen to work through this project here, because visuals are amazing, especially for people who need to see something instead of being talked through it.) But once you have everything broken down into the three groupings for this project, it has a very easy feel to it.

For the Card, you fold it with the cut out window on the front cover. Apply the honey accent around the window. I used vinyl here, but I probably would have had more fun with card stock. After all I have some fun geometric paper. I stuck with solid colors to keep a cleaner and more streamlined piece.

TIP: If your work surface is white and your cardstock is white, try putting a contrasting color inside the card. I used a mini mat inside the card. This made it so easy to find the white edge of my cardstock and line up the vinyl.

TIP 2: With longer cuts of vinyl, application becomes easier when you use the hinge method and prevent the tails from sticking to other parts of the card. Sometimes it takes a little patience to line up all corner and lines to get a straight application.

The best advice I have for the bees is to leave the black silhouette on its backing and build up the layers one at a time. And if you have a straight tip needle, it is your best friend for when your layers shift on you and you need to adjust them. Just put the needle tip underneath, lift the vinyl and reposition it. If you leave the image of the bees up on your computer screen, it’s a great reference point for making sure everything goes in the right place.

There’s a trick when it comes to building up your frame. The glue that you choose really does matter. Usually I like using a spray adhesive (drawing lines with the straw inside the bottle), but I’ve had more glitter failure with that glue on frames than others. Hot glue gun is great for quick setting. But it tends to be thick and make your overall card weight heavier. So the best glue for this project is wood glue. It give you the light weight benefit while maintaining some flexibility in adjusting your frame so all the layers are square. The disadvantage to this glue is that you have to allow for dry time.

Make sure that when you add your glue, that there is a steady line. If there are any gaps, there will be a way for your confetti or glitter to escape. And when all your layers are in place, adding a weight will make sure that you have the best press and prevent your paper from curling while it dries.

Final Assembly

I waited overnight for the glue to dry (but that’s also because I’m a late night crafter. It’s the one time of day where I can get things done without interruption.)

With the shaker card, I used painter’s tape to hold the frame in place. The back of the card is also the back of the shaker portion. By placing the frame through the cut out of the card, when I open the card to fill the frame with confetti, it will stay in position.

I placed the front decal bumble bees on at this point just because it was convenient. With the shaker gift tag, I wanted to put the bumble bee on the bee outline without having to think of messing up a glue job. As you can see with the first picture, I didn’t quite make it square, so I needed to readjust.

If you find that you need to adjust vinyl decals, the best tool you have is a straight tip weeding tool or a sewing straight pin. The sharp point is convenient for wiggling in under the vinyl and lifting a corner. From there you can lift the vinyl. And if you keep it on the needle tip, you can back you fingers out of the way and have a cleaner sight for lining things up.

Turn your shaker tag upside down and open the card. With the frames open you can place your confetti or glitter with ease.

Shaker Gift Tag: I was originally going to use just fine glitter. But when I saw how much yellow I had going on, I needed to have another color in to break up the monotone. The paper choice I made was my black glitter cardstock. I love the color choice. What I would have done differently is add two more layers of frame in there, for a total of five layers. This cardstock is extremely thick and doesn’t move freely around in the shaker. But over all I was pleased with the fill and would not suggest using more fill than what you see here. I would call this tag filled at 50% capacity.

Shaker Card: As you noticed in my bag of confetti, my yellow was not varied at all. And I also wanted to avoid the monotone in this item also. So I grabbed some of my left over card stock from the honeycomb (not yet cut into confetti), added a pinch of my red, and finished it with some texture of the black and silver glitter card stocks. I would have tossed glitter in this one too, but I wanted to show you what it looks like with just confetti. The fill capacity of the card is about 25%. I could have added more, but again I wanted to have a visual reference for you to see what level of fullness you might prefer.

Watching people’s reaction is the true test of how successful something is made. I showed this card to my sister and after initially looking at all the detail, she instantly started shaking the card and smiled as she heard the confetti rattle around!

Want to dress up the card more?

Please do! You paper, vinyl, and other choices are going to make your card and shaker look completely different. You could use crafting foam sheets for the frame. You can use all paper. In fact, I know ladies who have such an amazing stash of paper, that makes my selection look like a kindergarten class project. But I try to be kind to my husband and not keep insane amount of supplies, like I would truly love to hold.

Now for dressing up on this particular card, I’m a bit limited. I went crazy with the confetti and that’s where the focal point went. Since I don’t want to compete with the confetti, I had to keep the honey accent pretty simple. I chose two different shades of fine glitter and used a glitter Elmer’s glue of a contrasting color (which adds a touch of depth to an otherwise flat glitter). To make fine accent lines, I used a tooth pick dipped in the glue to draw my lines. And as you already know, once you add glitter, your lines instantly grow thicker. So don’t be afraid of having a toothpick thin line. The glitter helps you out.

This particular design would also look amazing adding flowers, grass, or any other embellishment. So please don’t be shy to add what your project needs.

I hope you have as much fun making this card and gift tag as much as I do. Please leave a comment below and email me pictures of how yours turn out!

Here are the files for the Bumble Bee Shaker Card and Tag.

Please sign up for my newsletter for when my christmas and wedding editions of this style are released.

Processing…
Success! You're on the list.

Leave a comment